Prettiest Pies |
After spending hours scouring the magazines at Borders and every food blog I could think of trying to find something to top those awesome lollipop pies I showed you this summer, it hit me… we need a food writer here at INPT.
Why? Because when it comes to food, most people care more about taste than the look, which might not make me the best source of info.
My goal for this post was to provide you with an awesome Thanksgiving dessert recipe (preferably a pie) that would just knock the socks of those in-laws who think you don’t know your way around a kitchen.
Problem is I kept getting distracted by all these pictures of really gorgeous pies that I forgot about recipes. I mean look at some of these…

I found this one on flickr.

These three are from Gemma Comas, the Baking Obsession and I Heart Cakes.

I think I’ve lived in Canada long enough to get an idea what is considered to be a truly Canadian dessert. I won’t be exploring this subject now. It’s all covered here, if you are interested. There are no doubts regarding the butter tarts heritage. But I chose them as my entry for Sugar High Friday-Mmm…Canada not because they are qualified by their origin. I picked them because they are delicious.
The recipe below is my version of the traditional butter tarts. Don’t get me wrong, not that they are needed any improvements (they are good as they are), I made some changes to suit my own taste preferences. And you will see they’ve become even more Canadian after these adjustments. I added maple syrup to the filling and soaked the raisins in Canadian Whisky. Another thing I changed was the crust. I replaced the pie dough crust with the buttery tart crust. And since I love my crust “well-done”, nicely browned and flavorful, I prebaked the crusts before filling them. I hope I’m not going to be blamed for ruining the authentic character of those. They’ve turned out better than store-bought variety.
Makes 6 3-inch tarts and plenty of cookies from the leftover dough
For the crust:
For the filling:
Prepare the crust:
Sift the flour, icing sugar and salt, put them in a food processor. Scatter the pieces of butter over the flour mixture and pulse until the butter is coarsely cut in. Stir the egg yolks and add them a little at a time, pulsing after each addition. When the yolks are in, process in long pulses until the dough forms clumps. Turn the dough out onto a work surface and knead very lightly just to incorporate any dry ingredients that have escaped mixing. Refrigerate the dough for 1 hour.
Butter 6 3-inch tart pans with removable bottom. On lightly floured surface or on parchment paper, roll the dough into 1/8-inch thickness. Cut the dough into circles a couple inches larger than the tart pans. Carefully transfer the rolled dough into the prepared pans and press the dough onto the bottoms and up the sides of the pans. Cut the excess of the dough. Dock the bottoms of the crusts with a fork and freeze for at least 30 minutes. If you are not planning to bake right away, wrap the crusts tightly and keep in the freezer until needed. Do not defrost before baking!
Preheat the oven to 350 F. Butter the shiny side of foil and fit it, buttered side down, tightly against the crusts. Fill with dry beans or pie weights and bake for about 15 minutes, until set. Carefully remove the foil and bake the crusts for another 8-10 minutes until light golden. Transfer the crusts in its pans to a cooling rack and cool to room temperature. Maintain the oven temperature.
Make the filling, bake the tarts:
A day before baking, put the raisins in a small saucepan, cover with water and bring just to a boiling point. Drain the raisins, place them in a small bowl, add the whisky, cover and refrigerate overnight. When ready to bake, drain and pat dry the raisins. Divide them among the prebaked tart crusts.
In a small bowl, using a wooden spoon, mix the butter and sugar together until combined. Add the remaining ingredients and mix to incorporate. Don’t whip the mixture, just stir. Divide the filling between the tart shells and bake at 350F on the center rack for about 18-20 minutes, until the filling is puffed and bubbly, and golden brown.
Cool the tarts on the rack for 5 minutes, then unmold. Cool completely on the rack.
If desired, before serving, top each tart with a cookie baked from the leftover dough.


I’v never made a pear pie before. Actually, have I ever made anything of pears before? Didn’t think so. How strange is that? I mean, how many apple pies and cakes haven’t I made throughout the years? Not once did I think of doing that to pears. That’s unfair. I’ve totally neglected them, it didn’t even occur to me to involve pears in baking until now. And why now, you might ask? Well, I normally don’t eat pears either, because they soften too easily and I like them real hard and crunchy. But a few weeks ago, I was given a really good pear, and I remembered how tasteful it can be. Since then I’ve bought more and more, as they seem to be in season somewhere in the world. But I don’t have practice in storing them, (in the fridge, maybe?) so some of them turned soft and mellow, and that seemed like an invitation for me to finally let the pears enter baking. So after some surfing on the net I came across a cute blog called milkeggsandchocolate with a nice pear pie recipe I wanted to try. It was even sugar free!
Ingredients: (serves 4 pie lovers)
2 cups all purpose flour
1 teaspoon salt
100 g butter
8 tablespoons (or more) ice water
1 1/2 teaspoons apple cider vinegar – or plain apple juice
3 pears
1/3 cup of agave nectar (or apple/pear juice)
1/4 cup all purpose flour
1/2 tsp vanilla extract
1/8 tsp cardamom
1 vanilla bean, split lengthwise
Preheat the oven to 200 degrees Celsius. Blend the flour, salt and butter until coarse meal forms. Add the water and vinegar/juice, until the dough moistens and you can shape it. Add more if it seems too dry. Gather it together and refrigerate for at least 1 hour. When the dough has chilled, roll out the crust on lightly floured surface and transfer to 25 cm/9-inch-diameter pie dish. Combine 1 soft pear, cardamom, agave nectar/apple juice, vanilla seeds, vanilla extract and flour in large bowl. Blend well in a food processor, and pour into the pie crust. Slice the rest of the pears thinly and lay them prettily onto the vanilla-cardamom filling. And if you feel the urge – sprinkle with just a little sugar… Bake at 200 degrees C, for 40 minutes. And it turns out something like this.

I made some adjustments to the original recipe: I tried to make the recipe smaller, since there are only two of us, and without the top crust. I also substituted the vinegar with apple juice, the same with agave nectar. I don’t even know what that is! And I mashed one of the pears into the filling, and sliced the rest thinly and laid them on top. And ok. I added sugar. What can I say, I have a sweet tooth! But only a couple of teaspoons. So I still consider this to be quite healthy. And quite yummy too, it turned out! The flavours of cardamom, vanilla and pear blended together so wonderfully, nothing else was needed. I was a little afraid it wasn’t going to be sweet enough, but it was plenty sweet. I could easily have left out the sugar, but it looks cute with a drizzle of sugar on top anyway. I’ll definetely start experimenting more with pears. Let this be a lesson kids! Don’t forget the pears!
These three are from Gemma Comas, the Baking Obsession and I Heart Cakes.
Then I got caught up in some of the more creative ones, like these cherry pocket pies, so cute, almost too adorable to eat.

And look at this “I love you” one. How cute is this? I love her little label too. It reminds me of me and my sister.


And look at this “I love you” one. How cute is this? I love her little label too. It reminds me of me and my sister.

Taking a bit of a break from stressful things this weekend and making a lovely pie...

... that is a little bit, well, - look away now if you would rather not view overtly love-y things.


I used my lovely I love you cookie cutters to make the letters. And of course Tom was very impressed and loved it, although he wasn't so impressed that I made pie. He thinks I am trying to fatten him up to make myself look better for the wedding!
As if?!
But I have to say, it did taste pretty good - I think it was the cinnamon.
And I remembered that I haven't shown anyone the poster I was working on a couple of weeks ago...

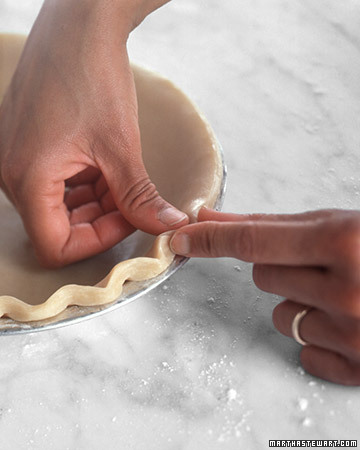
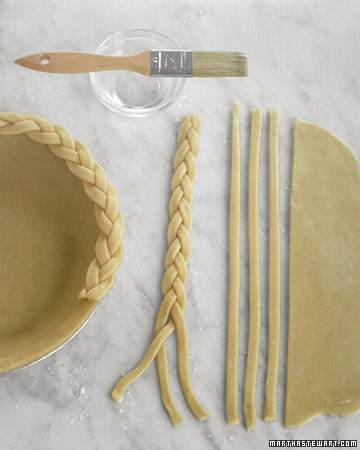
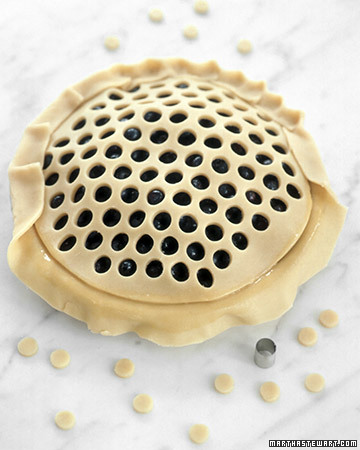
Then, of course I had to find out how one creates such gorgeous crusts, and before I knew it, Thanksgiving week was here and I have yet to test any recipes. I figure the least I can do is point you in the direction of some directions. Here goes:

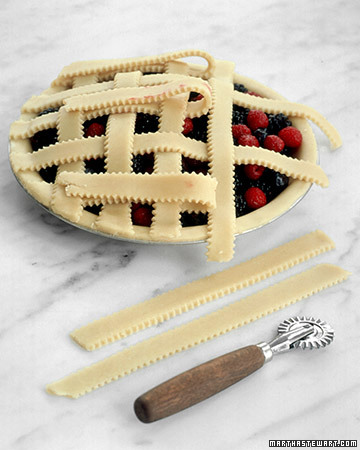
For detailed directions on how to create lattice and spiral tops, click here.
|
||||||||||||||||||||||||||||||||||||||||||||||||||
|
||||||||||||||||||||||||||||||||||||||||||||||||||
|
||||||||||||||||||||||||||||||||||||||||||||||||||


 Deb
Deb
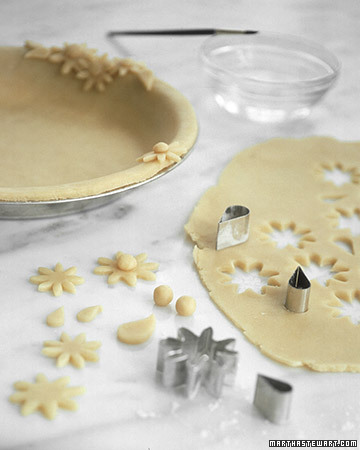
For using pie dough cut-outs to top pies (pictured above), head here.

For extra special occasions, make the top crust of your double-crust pie really spectacular with pretty pie crust cutouts.
 Cut out decorative designs with a paring knife. |
 Place shapes on pie. |
Meringue pie is a favorite of many. Find tips for making meringue in the next section.
Not what you're looking for? Try these:
For detailed instructions on how to make pie crust cutouts (with a pairing knife), go here.

For more general pie crust instruction and inspiration, head over to marthastewart.com

At the very least, I hope I’ve inspired you. Good Luck and if you do have a great tried and true pie recipe share below.
Until next time,
Trendspotter
http://www.ineedprettythings.com/prettiest-pies-on-the-web/
| Рубрики: | Тесто /Из ПЕСОЧНОГО теста ЯГОДЫ и Фрукты |
| Комментировать | « Пред. запись — К дневнику — След. запись » | Страницы: [1] [Новые] |


