-Рубрики
- Hand Made (1426)
- Фетр (308)
- К Новому году (182)
- Деревья, букеты, веночки (112)
- Разные поделки вдохнавлялки (109)
- Декор горшков и баночек (108)
- Пластиковые бутылки (99)
- Переделки одежды, обуви и сумок (98)
- Плетение из газет (94)
- Коробочки для подарков (92)
- Декупаж (64)
- Игольницы (59)
- Рамочки (46)
- Скрапбукинг (42)
- Детские поделки (35)
- Органайзеры из подручного материала (30)
- Подарки для новорожденных (21)
- Люстры, абажуры (10)
- папье маше (2)
- Из трубочек для коктейля (2)
- Развитие детей (678)
- Картинки, карточки, лото (178)
- Рисуем, расскрашиваем, клеим (123)
- игрушки (88)
- Учимся считать (53)
- школа семи гномов (36)
- Развитие речи (35)
- Учимся читать (31)
- Геометрические фигуры и цвета (28)
- Полезные ссылки (26)
- Сказки (23)
- Время и времена года (18)
- География и путешествия (16)
- Воздушные шары (12)
- Дни рождения (11)
- Загадки (11)
- Настольный театр (11)
- Методика Зайцева (11)
- Музыка и о музыке (10)
- Иностранные языки (9)
- Физвоспитание (8)
- Живопись (6)
- Программы обучения, что должен уметь ребенок (4)
- Вязание (586)
- Шапки (152)
- Шарфы, снуды, шали, манишки (107)
- Схемы (88)
- Детское (79)
- Пинетки, носки (56)
- Для девушек (47)
- Сумки (30)
- Варежки, перчатки (25)
- Вышивка (11)
- Игрушки (8)
- Игрушки (2)
- Из старой одежды (2)
- Цветы из бумаги и ткани (496)
- Тканевые (109)
- Из лент и тесьмы (108)
- Из бумаги (84)
- Фетр (54)
- Прочие цветочки (49)
- Канзаши (25)
- Капрон (21)
- Вышивка лентами (15)
- Квиллинг (10)
- Кожа (10)
- из меха (6)
- Фоамиран (1)
- Шитье (469)
- Сумки, сумочки, органайзеры (140)
- Платья, юбки (71)
- Прочее (62)
- Из старого-новое (53)
- Для принцесс (51)
- Подушки, кресла, сидушки (48)
- Игрушки (28)
- Обувочка (17)
- Карновал (14)
- Кулинария (363)
- Тортики, печенье (91)
- Оформление блюд (59)
- Не сладкая выпечка (59)
- Творожная выпечка (51)
- мясные блюда (43)
- Салаты (34)
- Напитки (30)
- Овощи (21)
- Завтрак (21)
- Без выпекания (19)
- Чебуреки (18)
- Рулеты из лаваша и блинчиков (10)
- Печенье (9)
- Ягоды и фрукты (7)
- Манты, пельмени (4)
- Супы (2)
- Засолка, маринад (1)
- Интерьер (185)
- Красивые идеи (71)
- Шторы (38)
- Для детской (33)
- Украшения для стен (30)
- Для красоты (157)
- Маски для лица и тела (49)
- Фитнес (19)
- Здоровые сосуды (14)
- Волосы (9)
- Фитнес для лица (7)
- Для ножек маски (5)
- Прически (3)
- Макияж (3)
- Кремы домашние (2)
- Цветотип и одежда (2)
- Полезные советы (154)
- Фотошоп (112)
- Клиппарт (35)
- Фоны (15)
- О компе, прогах и прочее (57)
- Книги, энциклопедии, ссылки (43)
- Ссылки (25)
- Энциклопедии (11)
- Картонная мебель (27)
- Знаменитые места, конструкции, чудеса природы и пр (22)
- Видео, ссылки, интересные факты (22)
- Обучающее видео (10)
- Музыка (2)
- О лире (20)
- Стихи (18)
- Астрономия, эзотерика, мистика (8)
-Музыка
- Владимир Кузьмин - Сказка в моей жизни
- Слушали: 1503 Комментарии: 0
- Lauren Christy - The Color Of The Night!
- Слушали: 46085 Комментарии: 0
-Поиск по дневнику
-Подписка по e-mail
-Постоянные читатели
-Сообщества
-Статистика
Болеро |
Выкройка болеро
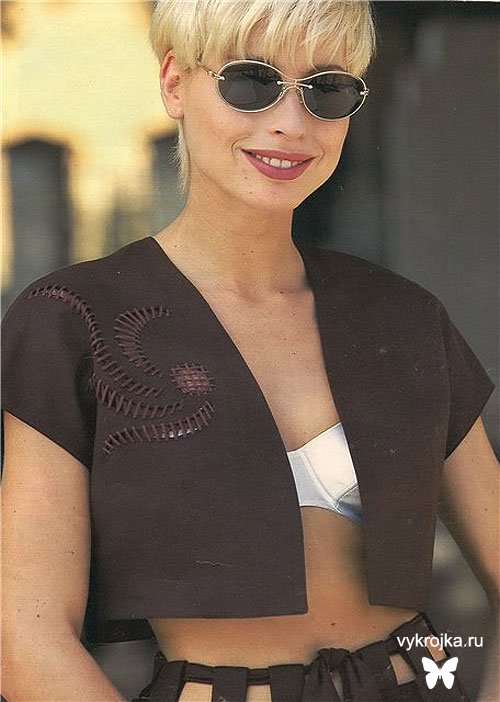
Болеро
Простое болеро украшает мотив, вышитый тесемочками. Для вышивки мотива лучше взять блестящие нитки предназначенные для машинной вышивки.
Размеры 36, 38, 40, 42, 44, 46
Понадобится: Смесовая ткань (хлопок со льном) шириной 150 см и длиной 0,90 – 0,90 – 0,90 – 0,90 – 1,00 – 1,00 м; клеевая прокладка; нитки и тесьма для вышивки.
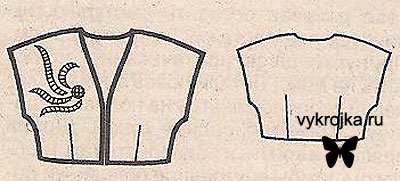
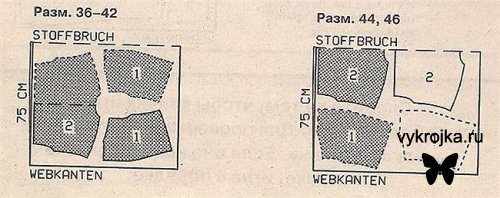
Схема выкройки
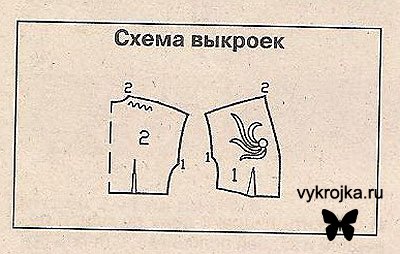
Схема выкройки
Припуски:
На швы 1,5 см, по остальным срезам 1 см.
Раскрой выкройки:
1 перед - 4 детали
2 спинка - 2 детали со сгибом
Болеро сшито из двух слоев ткани. Две детали переда и одну деталь спинки использовать в качестве внутренних деталей.
Перед копированием линий и разметки на внешние детали болеро приутюжить клеевую прокладку. Места приутюживания отмечены на плане раскладки более темным цветом.
Пошив болеро по выкройке:
1. Перед в области мотива с изнаночной стороны укрепить клеевой прокладкой. Стежки зигзага (шириной 2,5 мм и длиной 0,5 мм) должны быть очень плотными.
2. На внешней и внутренней частях болеро стачать плечевые швы, при этом плечевые срезы спинки припосадить между метками.
3. На переде и спинке стачать вытачки. Глубины вытачек заутюжить к середине.
4. Соединить внутреннюю и внешнюю части болеро: внутренние детали болеро наколоть лицом к лицу на внешние детали. Плечевые швы и вытачки точно совмещаются. Стачать вдоль нижних срезов, передних срезов, срезов горловины и нижних срезов рукавов. Строчка кончается точно на разметке боковых швов. Припуски обрезать до ширины 0,5 см. на закруглениях многократно рассечь до линии строчки, на передних углах обрезать наискось. Болеро через открытый боковой шов вывернуть на лицевую сторону, края выметать.
5. На внешней части болеро стачать боковые швы. Припуски разутюжить. На внутренней части болеро припуски бокового шва завернуть на изнаночную сторону, края сшить вручную.
6. Машинная вышивка: мотив скопировать на кальку или папиросную бумагу. Скопированный мотив с лицевой стороны наколоть на перед, прострочить вдоль линий мотива (длина стежка 2 мм). Удалить бумагу. Линии мотива с лицевой стороны отстрочить плотной зигзагообразной строчкой (ширина 2,5 мм, длина 0,5 мм). Внутри линий мотива вырезать ткань, при этом не повредить стежков. С изнаночной стороны осторожно удалить клеевую прокладку. Мотив вышить тесьмой для вышивки.
7. Нижние края, передние края, края горловины и нижние края рукавов отстрочить в край с лицевой стороны.
Скачать выкройку болеро бесплатно с выкройка.ру:
vykrojka-bolero.rar [8,12 Mb] (cкачиваний: 3287)
|
Процитировано 1 раз
Летний сарафан |
Выкройка летнего сарафана

Летний сарафан
Лето в своем разгаре и такой сарафан вам пригодится для любых походов и он всегда по рукой так как очень удобен, у него нет застежек. Его весьма просто одеть, достаточно запахнуть его сзади и завязать спереди бант из пояса и на спинке застегнуть бретели.Косой бейкой окантовать кокетку и проймы. Ткань подойдет любая для летних нарядов это в первую очередь хлопок, но можно лен и креп или любой шелк. При ширине ткани 80см. необходимо 3,5 м. Выкройка на размер 46-48. Перед — 1 деталь. Кокетка — 1 деталь. Боковая часть переда — 2 детали. Спинка — 2 детали.Бретель — 4 детали.
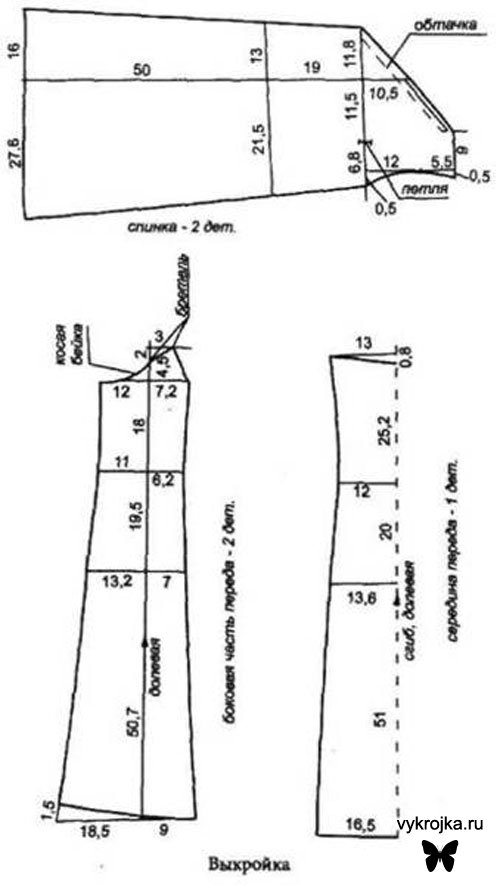
Выкройка летнего сарафана -1
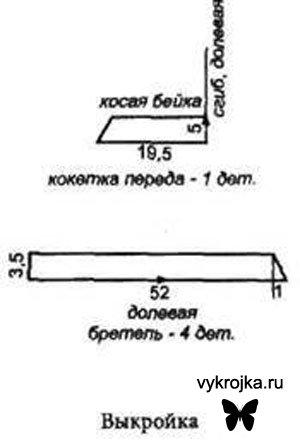
Выкройка летнего сарафана - 2
На правой стороне детали спинки выполнить петлю для пояса, а сами концы вшить в в борт. Бретели выполнить таким образом, что бы на самих бретелях были пришиты пуговицы а на спинке петли и застегивать их сзади на крест.
Для нарядности рукодельницы могут украсить свой сарафан бисером, сделать любую вышивку или украсит кружевом.
Скачать выкройку летнего сарафана бесплатно с выкройка.ру:
letnij-sarafan.rar [87,84 Kb] (cкачиваний: 5495)
|
Пляжное платье на завязках |
Выкройка пляжного платья на завязке

Платье пляжное на завязке
Для изготовления такого платья понадобится по выкройке:
- Ткань (две желаемые длинны платья)
- Лента или тесьма
- Швейная машина
Выкройка платья:
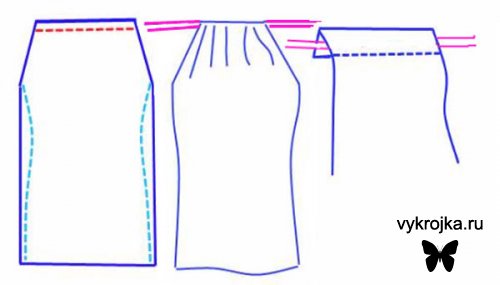
Из ткани выкраиваем два прямоугольника (длинна – длинна платья, а ширина – ширина платья).
Верх подворачиваем и прострачиваем как показывает выкройка. Затем сшиваем боковые швы до проймы, обрабатываем низ и вставляем ленту.
Чтоб сшить приталенное платье, то при раскрое начертите изогнутую линию, указанную на выкройке голубым цветом. И когда будете сострачивать боковые швы, изогните строчку по начерченной линии.
Скачать выкройку пляжного платья на завязке бесплатно с выкройка.ру:
plyazhnoe-platie-na-zavyazke.rar [57,36 Kb] (cкачиваний: 7022)
|
трикотажное платье вечернее |
Красное вечернее платье.

Красное вечернее платье.
Вечернее платье — это одна из самых привлекательных частей женского гардероба. Выбирая наряд для очередного праздника, мы предлагаем вам выкройку элегантного платья с открытой спиной и очаровательным декольте. Выбирая эту модель, вы становитесь центром любой вечеринки. А если этот наряд дополнить соответствующими аксессуарами, например браслетом, серьгами, широким поясом, то это придаст вам еще большего очарования.
Для пошива по выкройке платья вам необходимо: тонкая эластичная ткань, например крепдешин, ширина которого должна быть 1,5 м и длиной от 3 до 3,15 м и застежка-молния.
Основные детали выкройки:
1 — Спинка ( 2 детали );
2 — Полочка с бретелью цельнокроеная ( 2 детали );
3 — Косая бейка для окантовки ( спинки, проймы, бретели ).
Припуски: по всем срезам - 1,5 см, а на подгиб низа — 3 см.
Раскрой: все детали выкройки разложить по косой ( под 45 градусов ) на материале в один слой лицевой стороной вверх. Косую бейку выкраивать из выпадов.
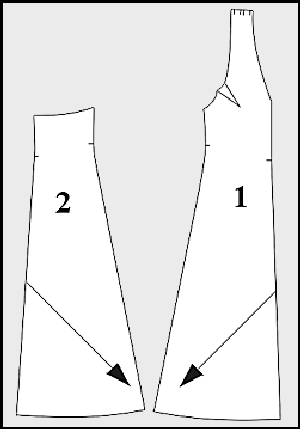
Выкройка 1 красного вечернего платья.
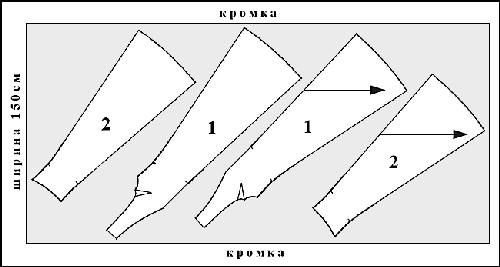
Выкройка 2 красного вечернего платья.
Скачать бесплатно выкройку красного вечернего платья с vyrkojka.ru:
krasnoe-vechernee-platie.rar [42 Kb] (cкачиваний: 4356)
|
трикотажное платье с запахом |
Выкройка Трикотажного пляжного платья с запахом

Платье с запахом.
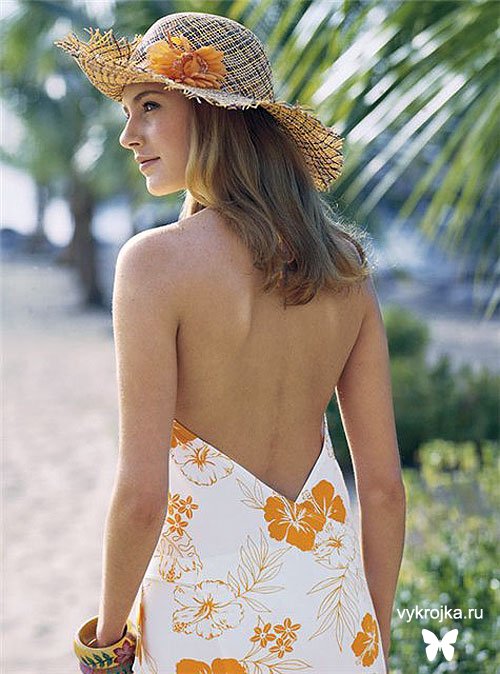
Платье с запахом. Вид сзади.
Выкройка «Трикотажное пляжное платье с запахом», размер 42-44.
Окружность груди 90 сантиметров;
Окружность талии 74 сантиметра;
Окружность бедер 90 сантиметров.
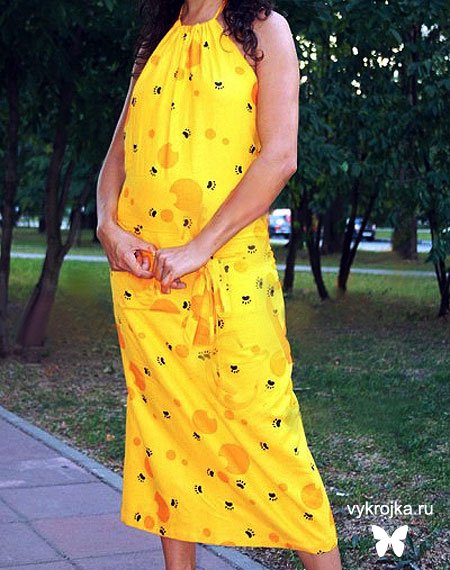
Желтое платье с запахом. Вид спереди.
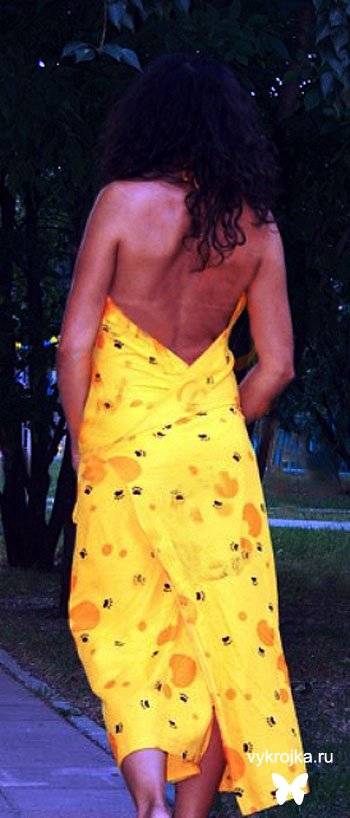
Желтое платье с запахом. Вид сзади.
Для пошива платья по нашей выкройке:
1)Использовать различной расцветки трикотажные полотна, желательно биэластичные.
2) в выкройке, данной для распечатки уже учтен припуск на подгибку низа - он составляет 4 см.
3) нитки в тон,
4) флизелин.
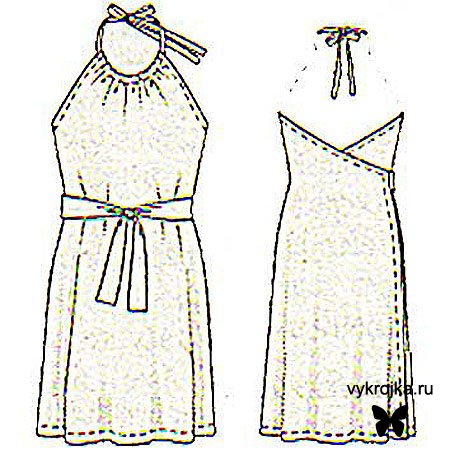
Технический рисунок платья
Раскраиваем ткань:
1) Полочка со сгибом- 1 деталь
2) Спинка - 2 детали
3) Пояс со сгибом - 2 детали
4) завязка для кулиски платья: 140 сантиметров длиной на 4 сантиметра шириной, включая припуски, в готовом виде ширина 2 сантиметра.
Флизелин выкраивается полосками и приутюживается вдоль верхнего среза спинки и срезов пройм полочки платья.
Пошаговый пошив:
1) Сшиваем боковые срезы пляжного платья. В левом боковом шве, по метке на выкройке - оставляем открытым небольшой участок для вшивания правого пояса
2) Припуск на подгибку низа, уже данный на выкройке и на деталях платья, заутюжить на сторону изнанки платья и настрочить на расстоянии 3-х сантиметров.
3) Каждую завязку пояса сложить вдоль лицевой стороной вовнутрь. Стачать продольные срезы и узкие короткие срезы. Пояс вывернуть и проутюжить. Открытые короткие срезы поясов наложить на срезы спинки по метке "ПОЯС" (смотрите лекала платья) и приметать на припуск. Вдоль линии шва спинки проложить поперечную отделочную строчку поверх поясов.
4) Припуски по продольному и верхнему срезам частей спинки и по срезам пройм заутюжить на изнаночную сторону и настрочить.
5) Припуски по срезу проймы переда отвернуть на изнанку на 1.5 см. и настрочить по разметке для кулиски.
6) На завязке для кулиски подвернуть короткие срезы. Завязку сложить вдоль лицевой стороной вовнутрь. Срезы стачать, завязку вывернуть и проутюжить. Концы зашить. Завязку вдеть в кулиску.
Ваше пляжное платье с запахом готово!
Скачать выкройку трикотажного платья с запахом бесплатно с выкройка.ру:
trikotazhnoe-platie-s-zapahom.rar [937,26 Kb] (cкачиваний: 3788)
|
Процитировано 1 раз
Юбка солнце |
Юбка-солнце для лета
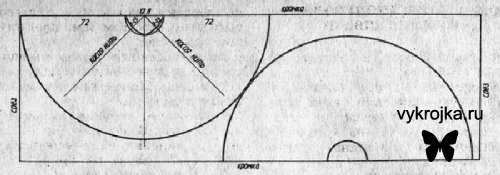
Наступают теплые денечки и самое время подумать о своем летнем гардеробе. И весьма простая и практичная, легкая и удобная для любого ношения в летнее время юбка-солнце. Да и сшить ее можно практически из любой ткани которая подойдет для лета. Выбор ткани конкретно, подскажет ваша фантазия.
Кроить такую юбку очень просто и по этому ее можно сшить без особых навыков в шитье. Расчет дан на длину юбки 77см. и окружность талии 70см. Просто две мерки нужно снять. Ткань для раскроя нужно брать с шириной более 1 м. Радиус выемки для талии считается как 1/6 мерки окружности талии. Просто построить два сектора на полотнище материала, дать припуск на швы по 2 см. Вырезать, сшить и юбка готова
Скачать выкройку юбки - солнце бесплатно с vykojka.ru: ubka-solnce.rar [87,96 Kb] (cкачиваний: 1687)
|
Юбка ступенями |
Выкройка юбки со «ступенями»
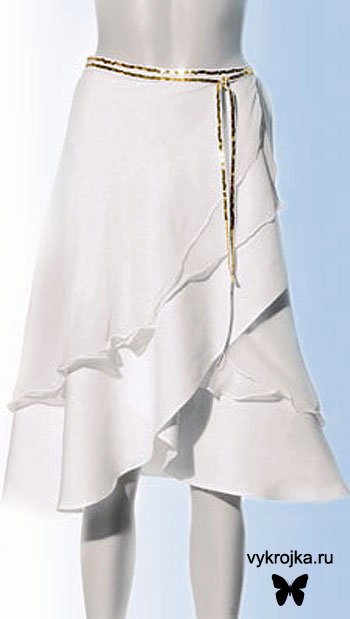
Простая юбка со ступенями
Эта изысканная юбка с запахом пошита из благородного льна и воздушного шифона. Украшением служит тесьма с пайетками, как говорится скромно, но со вкусом. При большом желании, если подобрать к юбке подходящую блузку, то можно создать восхитительный вечерний наряд.
Размеры: 36/38, 40/42
Длина юбки по линии середины заднего полотнища 65 см.
Необходимые материалы:
Льняная ткань шириной 150 см и длиной 1 м; шифон шириной 150 см и длиной 1,7 м; готовая косая бейка шириной 2 см и длиной 3-3,15 м; тесьма с пайетками шириной 5 мм и длиной 3-3,15 м.
При желании можно пошить юбку из других тканей. Для пошива такой юбки лучше отдать предпочтение легким, мягко ниспадающим юбочным тканям.
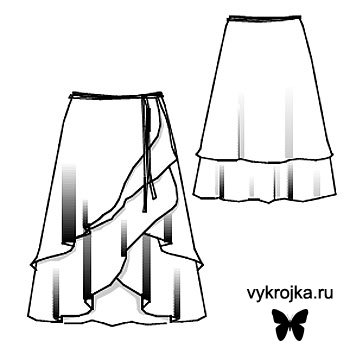
Схема юбки
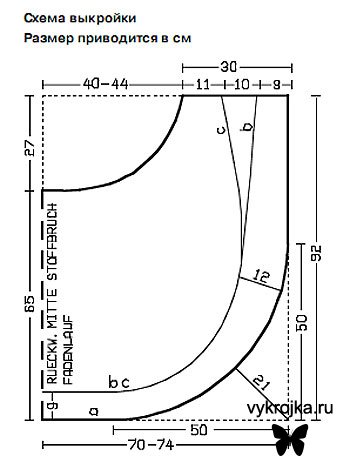
Схема выкройки юбки
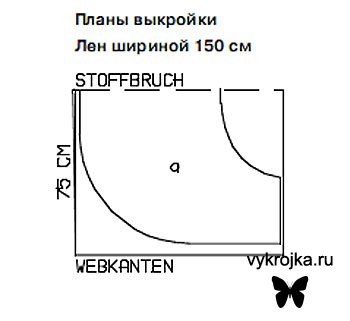
Схема выкройки для нижнего полотнища юбки (a)
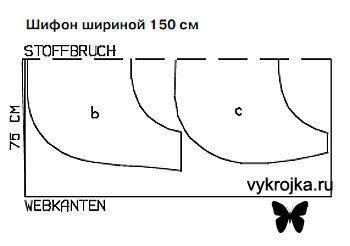
Схема выкройки для среднего(b) и верхнего(c) полотнищ юбки
Схема выкройки юбки:
Размеры на схеме приводятся в сантиметрах. По приведенной схеме изготовьте выкройку в натуральную величину для нижнего полотнища юбки (а). Затем выкроите среднее полотнище юбки (b) короче нижнего на 9-12 см. А верхнее полотнище юбки (с) выкроите на 10 см короче среднего по направлению к переднему краю. По всем срезам дать припуски 1 см на швы и подгибку.
Раскрой:
При раскрое ткань должна быть сложена пополам лицевой стороной внутрь. На плане выкройки сгиб ткани обозначается пунктирной линией.
а) нижнее полотнище юбки со сгибом – 1 деталь
b) среднее полотнище юбки со сгибом – 1 деталь
с) верхнее полотнище юбки со сгибом – 1 деталь
Пошив:
1) Углы подгибки на верхнем и нижнем полотнищах юбки слегка закруглить. Припуски на подгибку низа и припуски вдоль переднего края срезать на всех полотнищах до ширины 5 мм. Затем обметать их и заутюжить на изнаночную сторону. Подготовленные таким образом края отстрочить на расст. 3 мм.
2) Взять верхнее и среднее полотнища юбки, сложенные соответственно изнаночной (верхнего) на лицевую (среднего), и наложить на нижнее полотнище. Верхние срезы сметать.
3) По верхнему краю юбки уложить косую бейку и приколоть. Оставить выступающими концы бейки одинаковой длины в качестве завязок. Затем пристрочить в край косую бейку и стачать завязки. Сверху косой бейки нашить тесьму с пайетками.
Скачать выкройку юбки со ступенями бесплатно с выкройка.ру:
vykrojka-ubki-so-stupenyami.rar [87,03 Kb] (cкачиваний: 1958)
|
Процитировано 1 раз
Понравилось: 1 пользователю
Треугольные подушки-сидушки |
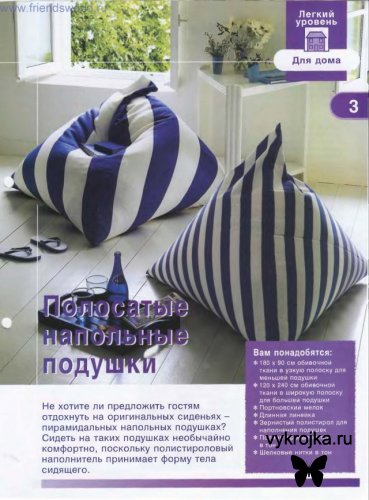
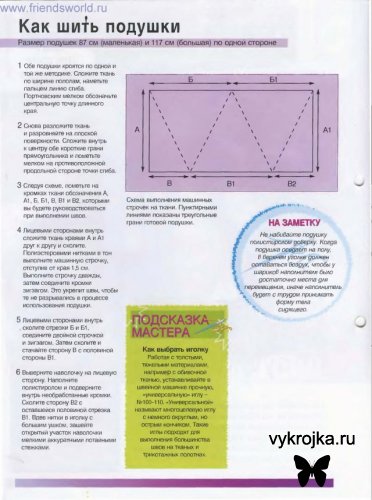
Предлагаю вам сшить такие полосатые подушки.
Я давно мечтала о такой, но купить не получалось. Такая мебель удобна как в детской , так и в гостиной.Сидя на ней очень удобно смотреть телевизор, или читать газету, или просто бездельничать. Вам понадобится плотная ткань, можно кожзам или плащевка. Ткань для подкладки. Пластиковые гранулы.Как шить, подробно написано на рисунке. Буду рада если и у вас дома появятся такие удобные напольные подушки.
Скачать картинки с описанием пошива подушек:
napolnie-podushki.rar [230,22 Kb] (cкачиваний: 1968)
Серия сообщений "Подушки, кресла, сидушки":
Часть 1 - шьем гамак
Часть 2 - Мастер-класс Очаровательные подушки-тыквочки
Часть 3 - Манекены-игольницы. Идеи и мастер-класс
Часть 4 - Прихваточки
Часть 5 - Треугольные подушки-сидушки
Часть 6 - Как сделать кресло мешок своими руками?
Часть 7 - Своими руками сшить мягкую игрушку
...
Часть 46 - Подушка-игрушка "Котёнок"
Часть 47 - Самая красивая подушка РОЗА. Мастер-класс
Часть 48 - Как сшить кресло-трансформер своими руками!
|
|
Креативненько |

|
Опять сланцы обновляем |
So today, I made some frilly little T-strap sandals.
They would look great in any color. And any sized ruffle.
And they just happened to fit perfectly on my little 15 year old niece.
(Such a perk to have family nearby. They may tire of me soon, though. Ha.)
The breathable cotton makes these super comfy and light for the warmer weather. Just slip right in to them……and you’re ready to go.
Great with jeans. Cute with a skirt. Fun for a day out shopping. Or kicking it at home.
Thanks for letting me use your feet Camille. You sweet little thing.
Ready to make your own?
Before you begin, check out the post here, to see how to take apart an old pair of flip flops.
**Also, The fabric I used for these T-straps, was a really sturdy cotton. Somewhere between quilting cotton (really light) and upholstery fabric (really thick). It wasn’t super stiff but it wasn’t too flimsy either. It worked great and gave the straps some good shape to them. Check out your fabric store for different cotton thicknesses.**
For this t-strap style, you’ll need 2 long strips of fabric and some circles. (I made 10 circles the size of one end of a can of vegetables…..but you can make them bigger or smaller. Go for it.)
For the strips, I cut a 2 inch wide strips of fabric that were long enough to go across the top of the foot and then one down the center. I added several inches to the total length so that I would have plenty to tie knots with on the bottom side of the shoe. I created the 2 long strips by folding them in half lengthwise (with right sides together) and then sewed the 2 edges together with a 1/4 inch seam allowance. Then I turned them right side out and ironed them flat. (Need help turning right side out? Click here.)
After the strips were turned and ironed, I cut each strip into 2 pieces. One piece bigger than the other. The longer one is for the top of the foot, the other is the strap that goes between the toe. Everyone’s feet is a different size, so there is no exact measurement, but just be sure to leave plenty of extra length to tie the knots on the bottom of the sandal.
Now, grab the shorter straps and on one of the ends of each strap, fold over the end a 1/4 inch and then about one inch……then sew down in place. This creates a little hole to slide the long straps through.
Slide the longer straps through this casing you just made on the shorter straps……..and this creates the ‘T’ of your sandal.
Now, for the ruffle. It’s not a standard ruffle……just some textured looking fabric. But all it is, is circles. And because it’s cut into a circle, it’s mostly cut on the bias. And that helps keeping it from fraying. It may fray just a bit but that will only add to the fluffiness of the look. If you’re concerned, apply some ‘fray check’ to the edges.
So start with one circle and fold it in half.
Then fold into thirds…..giving you a pie slice shape, with lots of fullness at the wide end.
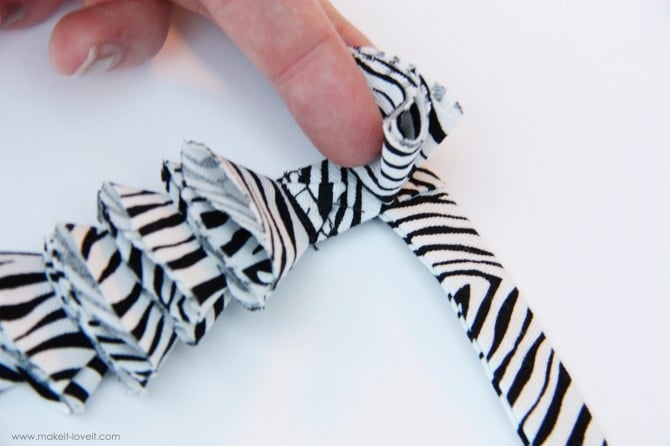
Now, stitch the pointy end down to the top of the T-strap shape……making sure the fulness of the pie shape is facing downward. Make another seam close to the top as well, securing this first circle in place.
Then lift up that piece and attach another circle piece the same way……until all of your 5 pieces (or more or less) are sewn in place. (I recommend holding this on your foot as you go, to see how much ruffle you want and if your circles are big or small enough for your liking.)
See how each circle was sewn on individually with a couple rows of stitches?
Then poke your straps through the holes of the flip-flops, just like shown here. Slip your foot in, adjust the straps to your liking……
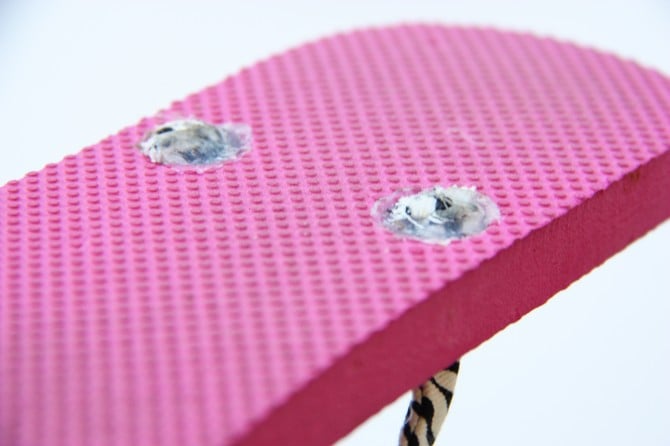
……..then tie the knots underneath and add a little glue for added strength. Done.
(By the way, I didn’t cut any of the foam flip flop away on the bottom of these shoes, like I did here. This fabric wasn’t too thick and didn’t make too big of a knot……..so it fit perfectly into the indent that was already there.)
And that’s it. Your new little Ruffled T-Strap sandals are all done.
One more way to create your own little custom pair of flip-flops…….from an old pair in the closet, or a cheapy pair at the store.
|
Деревянные прищепки |
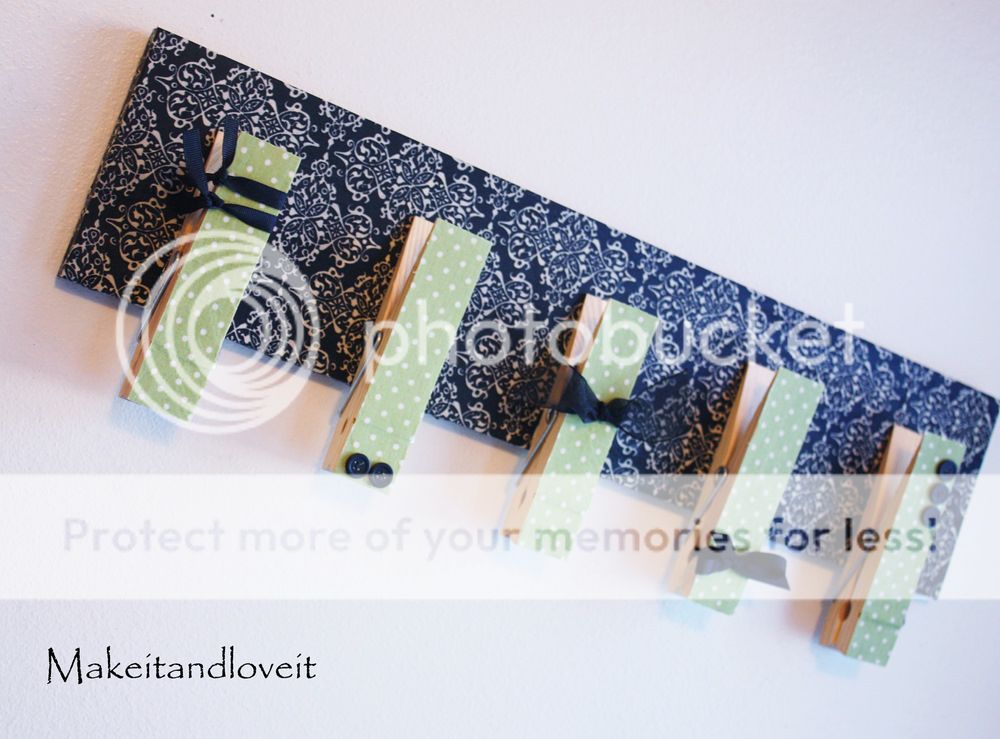
I just needed a solution for wet art that was making a mess touching other things in my home.
Solved that problem.
All I did was cover a board with a layer of Mod Podge and then layed a piece of fabric on top of that. (and I used this tutorial to fold down around the corners/edges of the board.)
And then I covered the front and sides with a nice layer of Mod Podge.
Then I covered some jumbo wooden clothes pins the same way. But only the front of the pins.
Next, I let everything dry completely and the hot glued the jumbo pins to the board. Lastly, I added ribbons and buttons….but that’s completely optional.
|
Для юного мастера |
Now they can get to work.
And have all their tools, right at their fingertips.

**The directions are sized to fit on my 20 month old. Adjust if necessary.**
Do you have a handyman in your house? Does he need a simple tool belt?
Here’s how I made mine:
Cut 2 pieces of fabric, one that is 13 x 11 inches and another that is 10 x 11 inches. Fold each piece in half along the 13 and 10 inch side….so that the pieces are still 11 inches wide. Iron flat.
Then cut a piece of coordinating fabric that is 1.5 x 11 inches, to create a piece of binding. Fold in half length wise and iron flat. Then fold the raw edges in one more time towards the fold and iron flat again.
Place this binding along the top fold of the shorter piece, making sure that one fold of the binding is behind the piece and the other is in front. Sew along the bottom edge.
Then cut another piece of your coordinating fabric that is 3 wide and 5 inches long. Fold in half lengthwise with wrong sides together. Then sew the edges together along the long side, using a 1/2 inch seam allowance. Turn right side out and iron flat.
Fold the loop in half and pin to the edge of that binded piece, about a half inch below the binding. Make sure that your loop is facing inward.
Then sew in place, just to keep it in place while finishing the tool belt.
Then open up the larger piece and line up the smaller piece along the bottom edge of the larger piece. Divide this section into three sections and place pins to mark the division.
Make a straight seam from the bottom, on up to the top of the binding. This will give you your three pockets.
Then fold the top of that larger piece on down over the top of the smaller piece and line up the bottom edge and sides.
Sew along the side with the hammer loop, the entire bottom, and then part of the other side. (Use a 1/2 inch seam allowance.) Make sure to sew along that bottom corner on the second side, to ensure a nice crisp corner after turning it right side out.
And then turn right side out, poking out the corners, nice and crisp.
Iron flat and then sew all the way around the sides and bottom, pretty close to the edge.
Then cut another piece of the coordinating fabric that is 1.5 x 45 inches. (Keep in mind that you can piece two pieces together to make a piece that is 45 inches long, in case you are using smaller pieces of scrap material.) Fold it the same way that you did the binding up above…..and then center it over the top of the tool belt. Make sure that the back fold is behind the tool belt and the front fold is on top.
Sew all the way along this top binding, close to the bottom fold, to attach it to the tool belt. And then continue on to the end of the piece of binding, to secure the folded edges together, making ties with the ends of the binding.
Knot the ends of the ties……and you’re done.
|
Хозяйственная сумка |
.
.
And the tote is great as is……..but I just had to throw a few flowers (from this tutorial) on the front.
But, of course, they’re optional.
.
.
And added a printed fabric for the lining.
.
.
.
The bottom corners are squared, proving more room in the tote.
.
.
And that’s that. They’re quick to make, easy to carry, and big enough to stuff full.
.
.
.
Would you like to make your own rounded opening tote?
.
First of all, my outer fabric is called Duck Cloth. It’s super thick and sturdy canvas-y material that gives totes a great shape. The inner fabric is just a woven cotton. (Bought them at Joann’s)
.
To begin cut out two 19 x 19 inch squares out of your outer fabric and two 19 x 19 inch squares out of your lining fabric.
.
Then, find the center along one edge of your outer fabric and mark it. Then measure out 3.5 inches in both directions and mark it with a pen. (I measured out and marked 3 inches in both directions in the image below but then changed it. Do 3.5 inches.)
.
Now grab a bowl with about a 7 inch diameter (or cut out your own circle) and place the curve of the bowl between the 2 outer marks.
.
I didn’t wanted the circle quite so rounded (a bigger bowl would have fixed this problem) so I left some room between the bowl and the outer marks………
.
……..and then traced around the bowl, stopping about an inch before the edge of the fabric.
.
I then curved the line more outward to give that section of the fabric a bit of a straighter line, rather than continuing with the curve of the bowl. Like I said above, a larger bowl would have helped. Darn afterthought. :)
.
Now, cut out the circle shape…..
.
…….and then place this main piece (not the cut out piece, in case you don’t center it just right) on top of the other square pieces and cut out the same shape.
.
Now, place the outer pieces together with right sides together and sew them together along the sides and bottom (1/2 inch seam allowance). Then zig-zag (or serge) the raw edges and trim if necessary. Do the same with the lining pieces.
..
Now, to create the bottom squared-off shape…….grab one of your bottom corners.
.
And pull the front of the fabric away from the back of the fabric like shown……
.
Then turn the fabric over on it’s side and make the tip nice and pointy while lining up the seam that’s now running along the top, even with the seam that’s running along the bottom. Just feel it with your fingers and line both of those seams up.
.
Now, measure down from the point, 2 inches and mark it with a pin.
.
Then sew a straight line right across……..making sure it hits 2 inches down from the point.
**Do the same with the other bottom corner and then the two bottom corners of the lining.
.
Next, cut out 2 long strips of fabric that are 22 x 3 inches. Fold them in half lengthwise, with right sides together, and sew along the long side using a 1/4 inch seam allowance. Turn then right side out and iron flat.
.
Next, turn your outer fabric for your tote right side out and pin a strip to the curve of the front side of the tote and one to the curve of the back side. Measure down 1.5 inches from the top edge and pin your strip with the raw end facing up. (Make sure that the strip isn’t twisted at all.) And pin the strip ends in place about 3/4 of an inch past the edge of the curve of the tote. You’ll see why later. (And use two pins for each end, to keep the strips from moving before you sew them in place.)
.
Now, with your lining fabric still inside out, slide it over your outer fabric (that’s now right side out)…….
.
…….and keep pulling it up until the top edges are even. Make sure the handles are tucked down inside and then pin all along the upper edge.
Now sew all along the top, using a 1/2 inch seam allowance……….leaving about 5-6 inch gap along one side (near the side seam of the tote).
.
Now trim the corners off at the top of each curve……
.
……..and clip each curve. (Read here for more info on trimming and clipping.)
.
Now stick your hand down in the opening and pull out the outer fabric and shove the lining back down to the inside of the tote.
.
Now, iron the upper edge nice and flat. Be sure to tuck the edges of the opening down towards the inside a 1/2 inch and iron flat. Then top-stitch all along the upper edge about a 1/4 inch away from the edge.
.
Then, create little squares with ‘X’s’ through them right below the edge where the straps were attached. This will help make those strap more sturdy, especially if you’re going to put heavy things in your tote.
Now, fold your straps in half, towards the inside of the bag and sew right along the edge. Start and stop about 1 3/4 inches from the end of each handle.
.
This just gives the handle a better shape and make them easier to grab and hold.
Now, if you want to add flowers to your tote, make them just like the tutorial here. However, I made these flowers using fabric circles that were 2.5 inches in diameter. And I also didn’t hand sew the few extra scrunched circle pieces to the top, like shown in the tutorial mentioned. I wanted the top of the flower to be flat…..so I left them off.
.
And then machine sewed each flower right to the front, sewing through the center section of the flower. You can also hand stitch them in place, if desired.
.
And that’s it.
.
Your tote is done.
.
And ready to be filled.
|
Процитировано 1 раз
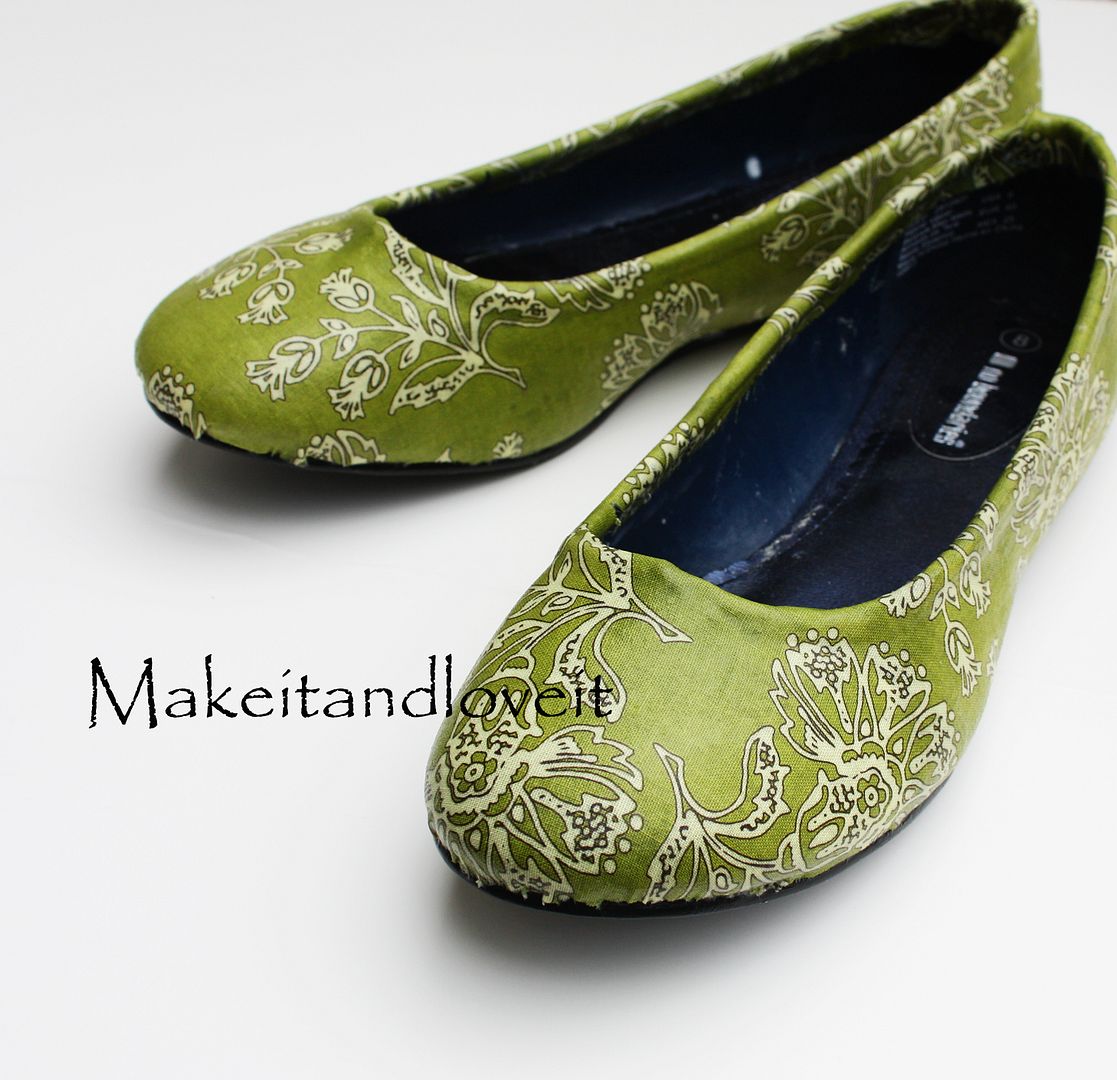
Обновляем балетки |
Just lay a piece of fabric over the shoe, big enough to cover the entire thing.
Trim around the edges, just so there’s not tons hanging over the edge.
Then make a slit up the back, almost to the top of the scoop in your shoe.
Apply some Mod Podge to the toe of the shoe. Use plenty of it.
Lay your fabric on top of your shoe and stretch it to the contours of the shoe. You want as little puckering as possible along the sole.
And remember, it’s okay if there is fabric hanging over the edge. We’ll take care of that later.
Continue on down the shoe, applying plenty of Mod Podge and pulling the fabric tight as you smooth it down.
As you get to the heel of the shoe, lay one side flat and cut straight up the back. Apply your Mod Podge and smooth out your fabric.
Then fold over the other piece but make sure there’s enough extra to fold over the end and then smooth down, keeping the raw end tucked under.
Then trim the fabric along the curve of the shoe, leaving about a 1/2 inch of fabric.
Then make some slits along the curve of the shoe to make it easier to tuck under the fabric.
Apply Mod Podge to the under side and tuck the fabric under nice and tight.
And then continue tucking along the sides and heel of the shoe.
Now, using an Exacto Knife/Utility Knife (with a really sharp blade), trim off the excess fabric……right next to the sole.
And then cover the entire shoe with a nice thick coat of Mod Podge.
Allow to dry completely.
|
Процитировано 1 раз
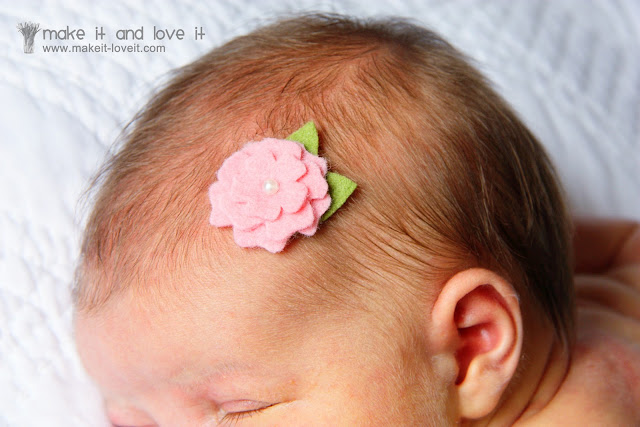
Заколки для малюсеньких принцесс |
.
.
.
.
**Update: I was informed that the shop where I purchased the elastic has sold out of what she had listed. I imagine she will add more soon…….but until then, go check out the comment section of this post. A link to another shop was shared where you can purchase similar elastic.
I first folded the longer strip into a flat cirlce and then placed another strip (with pointy ends) behind it. Then I hand-stitched those layers together.
|
Процитировано 2 раз
Сумка для молодой мамы |
Made it nice and easy for me.
|
Органайзер в сумочку |
The insert can be taken out, in case you want your regular old purse back. But mine is staying put.
Now I don’t have to worry about my poor camera/lenses getting thrown around.
And what’s cool, is that there are little velcro inserts that divide your camera and supplies. And are adjustable so that you can create the right sized compartments for all of your stuff. (This concept is not my own. Many camera bags are made this way.)
And I can move the insert out of the way and still have access to all of the regular pockets for my keys/phone/etc.
Oh, and maybe you’d like to have a camera bag/diaper bag/purse combo?? This bag works for that too. You can change up your dividers and put all of your regular purse items in one section……but then leave enough room for a padded camera section. Just change it up how you need it.
Yeah, sometimes I can’t stomach a hefty price-tag.
So I love when it’s something that I can figure out and make work for me.
Do you have a purse you’d like to turn into a camera bag?
SUPPLIES:
**The quantity of your supplies will vary, depending on the size of purse you’re converting.
- A purse
- 1/2 inch wide foam (I bought mine at Hancock Fabric. It cost me $8 for a huge piece. Probably enough for 3 purses.)
- Fabric of choice (I used about 1 yard…..and I think I found it at Joann’s)
- 1 1/2 inch wide industrial velcro (or any width……just make it work)
- hand sewing needle and thread
- sewing machine/scissors/thread/etc……..of course.
First, you’ll need a purse. Use one of your old ones or buy a new one. You’ll need one that has one large compartment and is a larger in size, if you want to be able to section it off with the dividers. Or you could use a smaller purse if you just want to add padding to it and forget the dividers. It’s up to you.
To begin, you need a piece of foam for the bottom of your purse. Turn your purse over and check out the shape of the bottom of the purse. Then cut out a piece of 1/4 inch foam (I found mine at Hancock Fabric for about $8 for enough for about 3 purses) that is the same size as the very bottom of your purse.
Then place your foam down inside to make sure it fits. Adjust if necessary. Then measure from where the foam is at the bottom of the purse, up to how high you’d like the foam sides to be. If your purse is nice and tall (like mine is), you may not need the whole height of the purse. You may just be wasting foam. All you need is for it to be high enough to protect your camera and lenses.
I decided I wanted my foam to be about 8 inches tall.
So I cut a strip of foam that was 8 inches tall and was long enough to go around the piece that fits in the bottom of the purse. Measure around the top of the piece of foam…….not around the sides of it.
Then you’ll have a nice strip of foam that will make the walls of the foam insert. However, cut about an inch off of one end because after you add the fabric, you’ll be sewing those two ends together with their extra fabric ends. And you don’t want to have to sew through foam. (This will make more sense in later steps.)
Next, time to cut the fabric.
**You will need to add extra fabric along all the edges to account for the thickness of the foam……so be sure to add a little extra to your seam allowances.
For the bottom piece of foam, you will need 2 layers of fabric that are a 1/2 inch wider than the foam piece, around all edges. (A 1/4 inch is for the seam allowance and another 1/4 inch is for the foam thickness.) Just lay the foam down and cut around it. For the long strip of foam, you can either cut 2 pieces of fabric and sew them together into a strip (but then you’ll have 2 seams) or you can cut one strip of fabric and fold it over into a tube of fabric and sew it, resulting in only one seam. I only wanted one seam, so since my foam is 8 inches tall and is 1/2 inch thick, I needed my fabric to be 18 inches tall to wrap around the foam. (8 inches tall on the front + 8 inches tall on the back + 1/2 inch foam thickness at the top + 1/2 inch foam thickness at the bottom + 1/2 inch seam allowance + 1/2 inch seam allowance). My foam strip was about 37 inches long but I added another 2 inches at each end, so that I could later tuck the ends in and sew the foam into a tube. So cut my large fabric strip 41 inches wide by 18 inches tall. (Below it is folded in half under the foam.)
Next, place the two bottom pieces together (with right sides together) and sew all the way around with your 1/2 inch seam allowance, leaving a few inch opening on one side.
Turn it right side out and put your foam inside. You’ll have to fold it in half to wriggle it in there…..but it will get in there eventually. Promise. :)
Then tuck the raw edges inside and hand-stitch the opening closed. (Need help with hand-stitching? Click here.)
Next, open up your strip of fabric and sew some strips of velcro to one half of the strip. Be sure that you aren’t going down too far to be caught in the seam allowances…….and leave 2 inches free on each end to stay out of the way of each end seam too. I used 1 1/2 wide industrial strength velcro (I found it at Hancock Fabric) which worked great for this. I only needed 2 strips to cover a good majority of this half of the fabric. (If you can’t locate any really wide fabric, sew several narrow strips of velcro to this section of the fabric.) You just want enough velcro here to keep your dividers nice and secure. **Make sure and use the SOFT side of the veclro here so that the velcro not in use will not scratch your camera.
Then fold this fabric in half length-wise (with right sides together) and sew into a tube (using your 1/2 inch seam allowance). Then turn it right side out and maneuver your foam inside. Like I mentioned before, folding the foam in half and then sliding it in there works best. But then wriggle it around in there until it’s nice and flat and the side seam is along the bottom of the foam.
Then, tuck each end under about a 1/2 inch and then sew each end closed, then sew another seam, nice and close to your foam, creating a little flap on the end. Do the same thing to the other end.
Next, fold your fabric covered foam strip into a circle, overlap the ends, then sew them together.
Then, place the bottom together with the circle and pin them in place. Then hand stitch the bottom right to the sides……to keep the pieces together. (Need help with hand-stitching? Click here.)
Next, you need little inserts. I didn’t want mine quite as tall as the foam sides…..only 7 inches instead of 8. And as far as how wide…….you may want them wider than the base of your purse like I did. Once you put your foam base down into your purse, the sides kind of open up with the shape of the purse. If I wanted my foam walls to be rigid and just go straight up, I probably would have only cut my little inserts 5.5 inches wide. But I wanted this foam section to open up a bit, giving me more room inside of it, so I cut them 7.5 inches wide. So each of my little inserts were 7 x 7.5 inches.
I cut 2 pieces of fabric for each insert that were 1/2 inch taller on the top and the bottom and 2 inches wider at each side. So I cut 2 pieces of fabric for each of my 2 inserts that were 8 inches tall and 12.5 inches wide. I sewed 2 of the fabric pieces together, with right sides together, along the top and the bottom. Then I turned it right side out and placed my foam inside.
Next, I turned the ends in a 1/2 inch and sewed them closed with 2 seams, just like I did above with the bigger foam strip. Then I cut some of the other half of the 1.5 inch wide velcro strips, into more narrow strips to fit the flaps on each end (about 3/4 inch for me). Then I sewed the velcro right onto each end flap of the foam insert. Both on the same side of the insert. Do the same thing with your other foam insert (or more if you decide you want more inserts).
And that, my friends, is all you need to do.
Just place your foam inserts into your purse and load it up with all your gear. And you’re all set!
|
Процитировано 5 раз
Понравилось: 1 пользователю
Платье из футболки и отреза ткани |
(Riley Blake Designs Umbrella Tops in White here.)
Perfect for this time of year.
Lastly, I folded the bottom edge under a 1/2 inch and then another inch, sewed it in place, then ironed it flat. (But make sure to try it on your little girl to see how long you’d like it…..then hem the dress.)
|
Процитировано 1 раз
Понравилось: 1 пользователю
Заколочки |
Lovely, right?
Would you like to make your own simple little hair bows……with a no-slip grip to keep them in place??
First of all, everyone has their own technique. And there are probably a variety of no-slip grip solutions out there. This is just what I did and what I used. All worked really well for me.
When I was first trying to make a bow that would stay in baby fine hair, I remember seeing bows online that had a no-slip grippy on it. Some of it looked like velvet, other stuff looked sticky. Some people used velcro and others used magnet material. We didn’t have a lot of money and so I was trying to figure out a cheap solution. I remember walking around Wal-Mart one day, trying to decide what I could use to re-create that no slip grip, and I walked by rows of this shelf liner stuff and had an “ah-ha” moment. This liner material keeps things from slipping in cupboards and on shelves…….why not baby hair. So I started using it on my hair clips, and it worked like a charm.
And just when you think you have the best idea ever……..you realize other people have it too. Ha! Because I have seen other people use this stuff to make their own bows since I thought it up for myself that one day. How funny! I swear, we should all participate in a huge think-tank and share all sorts of tricks and secrets. It would save us all a lot of grief.
Anyway, to make these hair bows (without actually tying a bow), I used 3/8 inch ribbon. (Grosgrain works best in my opinion.) I cut 3 pieces that are 4 inches long. I also use a double prong hair clip that I always buy at Sally Beauty Supply….and they’re about 1 3/4 inches long. (I found similar ones online here, in case you don’t have a Sally’s.) Then I cut a piece of the shelf liner that is the same size as the prong section……so about 1 and a 1/4 inch by 1/3 of an inch. And a piece of felt that is about the same size.
To begin, grab your roll of ribbon and heat seal the end (I use a lighter).
Then hot glue about a 1/2 inch of the end of the ribbon to the very bottom of the clip with the right side of the ribbon facing out (if you have a right and wrong side).
Then add a strip of hot glue to the next section of ribbon…
…..and then fold it around the contours of the pinch part of the clip. (Don’t worry, the clip will still pinch and the glue won’t affect the spring at all.)
Then measure how much more ribbon you’ll need by stretching it to the tip of the clip, then fold it back up the length of the prongs. Cut the ribbon off.
Heat seal this end of the ribbon now too.
Now add a long strip of hot glue down the back side of the rest of the ribbon. Then lay it flat across the top of the top prong, then fold it under towards the bottom of that top prong…..to completely conceal that top prong. Press the ribbon together to seal the glue together, and keep the ribbon in place.
Now, grab your 3 pieces of 4 inch long ribbon. Tie a single knot in the center of one of the pieces of ribbon. Try to make it a neat little knot and keep the two ends flat and laying in the same direction. Heat seal the ends of the 2 un-tied pieces.
Then grab one of the plain pieces and bend it into a circle. Overlap the ends by about a 1/3 of an inch and then hot glue them together (image on left). Then pinch the circle right in the center, creating half of your bow shape, and add a little dot of hot glue to the inside center to keep it pinched together (image on right).
Do the same thing with the other piece of ribbon. Then cross the two pieces together……not into an actual “X”, more like a squashed one. Add a dot of glue between the two, to keep them together.
Then place the piece of ribbon with the knot in the middle, right in the center of the squashed “X” (image on the left). Place a dot of hot glue right under the knot, so it doesn’t move around. Turn the bow over and cut off the long ends just a bit and glue them down on the back side (image on the right).
Now, glue the piece of shelf liner to the piece of felt. Press the two layers together.
CAUTION: this can get hot. Test it with your fingers and wait until the glue has cooled from hot to warm and then squish the 2 layers together. Glue will most likely ooze out. Just peel it off your fingers and continue on!!
Trim off the excess along each edge, making a nice clean line around all sides.
Then hot glue the felt side to the top prong.
Then glue the bow to the very top of the clip…..right to the ribbon.
Why I do the bows this way:
- I make the bows in parts so that the bow looks very clean and even. You can always tie some ribbon into a bow and then glue it onto a clip……but it’s hard to get a nice even bow that way. It’s totally just preference though.
- I don’t wrap ribbon around the bottom prong because it’s hard to slide it through hair (like for older girls pony tails and such) if there is ribbon on the bottom. If you leave it bare, it can slide into hair much easier.
- I don’t put the shelf liner on both sides of the prongs because of the reason mentioned above…..I want to keep the bottom prong bare.
And that’s it.
Now make more…….you may need some for every single outfit your child (or friend/granddaughter) has.
(And while you’re at it, make doubles of every color. They look so darn cute when their hair is long enough for pig tails.)
Enjoy.
|
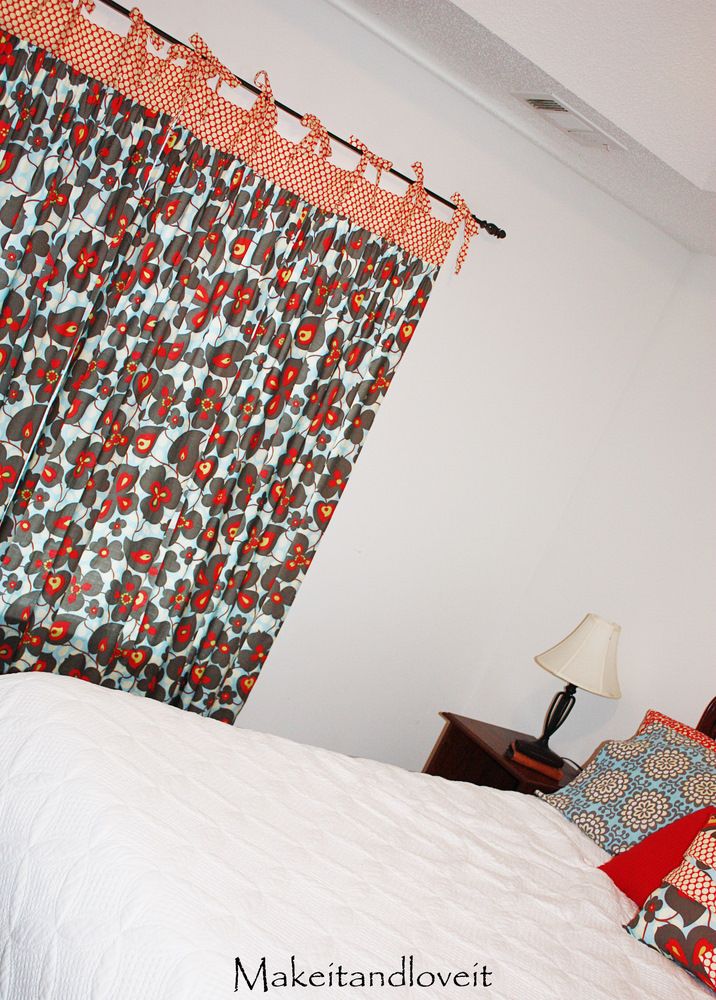
Дачные шторы |
All neatly gathered below a panel of floppy ties at the top.
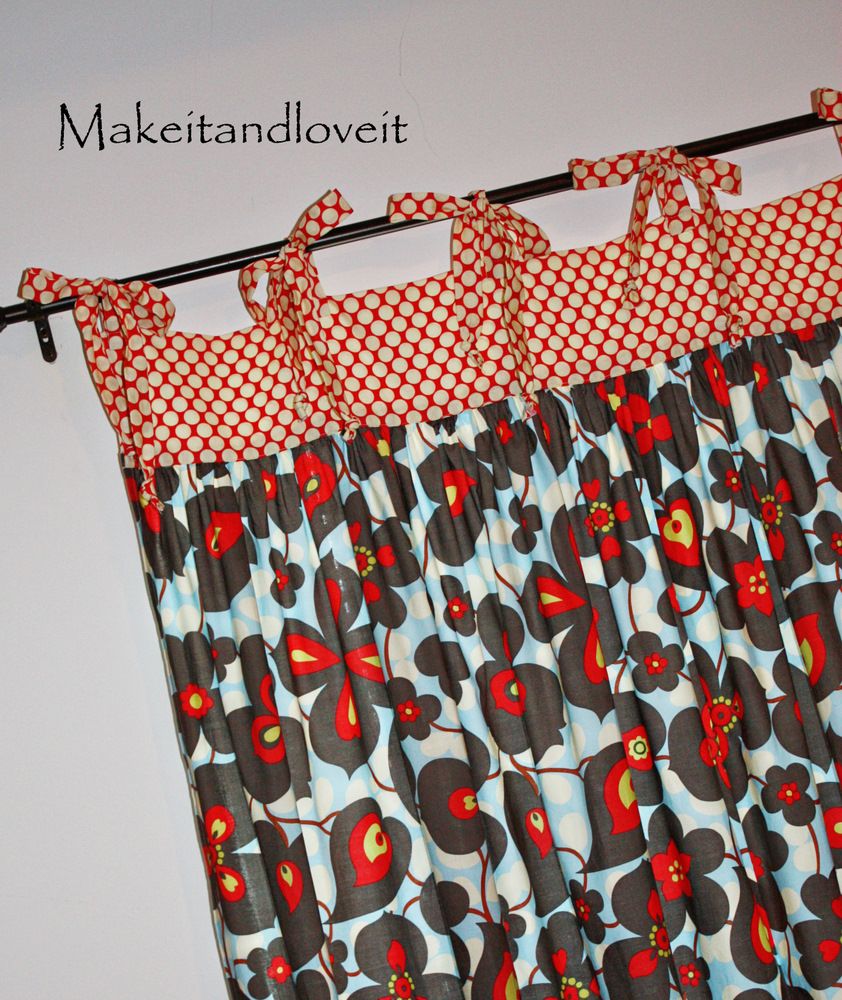
I’m in love with this fabric…..but you probably already knew that.
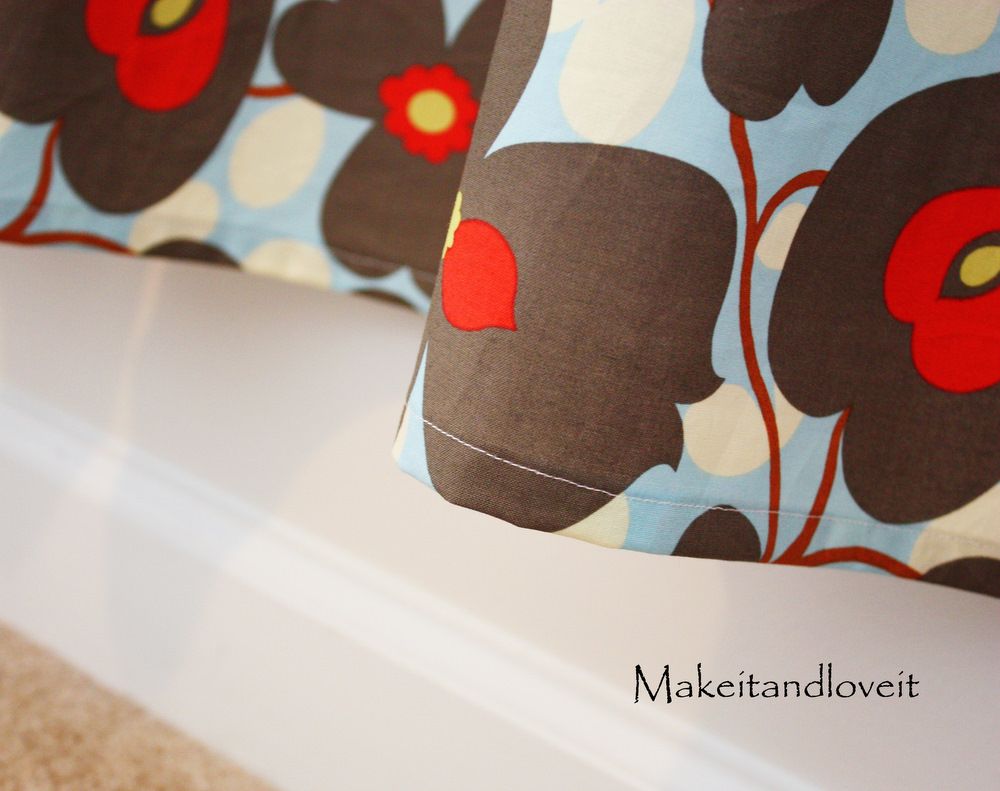
Want to make some of your own?
I made 2 hanging panels to cover our bedroom window, but I will give you the directions to make one panel. (my window measures 70 inches wide by 52 inches tall.
First, I cut a panel for the top of the curtains that was 38 x 11 inches. I ironed the very ends towards the inside of the fabric, 1/2 an inch.
Then I used 4 yards of fabric, that was 45 inches wide, and cut it into two 2 yard pieces……so 2 pieces that were 45 x 72 inches. Then I sewed the two pieces together (with right sides together) along their long side (72 inch side). So I had a great big piece that was 90 x 72 inches.
I then hemmed the sides of this great big piece by folding the edge over a 1/4 inch and then another 1/4 inch and then sewed it into place. (You are sewing the 72 inch sides.)
Then, I made a basting stitch 1/2 inch from the edge along the width of the fabric (the 90 inch side) and gathered the fabric all along the top. Then I pinned it to the long edge of the top panel, with right sides together. Make sure to evenly space all of your gathers.
Sew the 2 pieces together, right along that original seam line. (make sure the folds that you ironed on the ends of your top panel, are still folded towards the wrong side of the fabric as you sew.)
Then fold the other edge of your top panel towards the inside a 1/2 inch and iron in place.
Then fold down and line up that edge with the seam you just made while attaching the gathered piece to the panel. Pin into place.
Then carefully sew from the other side and remove your pins as you go. (If it seems a little too tricky to lift up the panel to remove a pin each time you reach one, put the pins on the front of the panel instead, to secure the back of the panel in place.) This step will help the front lay flat and finished while securing the other edge of the panel down to the back. And you want to sew from the front so that you can watch as you’re sewing and make an even stitch across the front.
Now, sew the entire panel flat. Then sew the ends of the panel closed, making a seam really close to the edge.
Then I cut 6 strips of fabric that were 40 x 3 inches. (there are 12 in this picture because they are for both of my panels.)
Then I folded them in half lengthwise and sewed them along the long side, with a 1/2 inch seam allowance. Then I turned them right side out and ironed them flat. (click here if you need help turning them right side out.)
Then place 6 pins evenly spaced along the top of your panel. Now fold each tie in half to find the middle……..
…….and fold them over the top of the panel, where your pin was marking its spot.
Then make a seam an inch away from the edge, securing the tie in place.
And then flip both ends out, and make another seam 1/4 inch away from the edge. Make sure you have sewn the through both ties and the panel.
Repeat with the other ties and you should have 6 ties evenly spaced along the top of the panel.
**Then you can either hem the end of each tie, or tie them in a knot like I did. Easy and quick…..and pretty cute.
Lastly you’ll hem the bottom of the curtain by folding it under a 1/4 inch and then another 1/4 inch and then sewing it in place.
(remember to make 2 and buy twice the amount of fabric if you’re wanting 2 panels…)
And that’s it.
A completely unique ruffled curtain
………adorned with some floppy ties at the top.
Серия сообщений "Шторы":
Часть 1 - Красивые шторы на кухню
Часть 2 - Декорируем шторы
...
Часть 5 - Идеи декорирования кухонных окон!
Часть 6 - ШТОРЫ ДЛЯ КУХНИ
Часть 7 - Дачные шторы
Часть 8 - Шторы-5
Часть 9 - Римские и японские шторы - жалюзи своими руками
...
Часть 36 - Шторы
Часть 37 - Шьём занавески для кухни. Просто и красиво!
Часть 38 - Как сшить стильные шторы для лоджии
|
|


