Шкатулка для швейных принадлежностей |
|
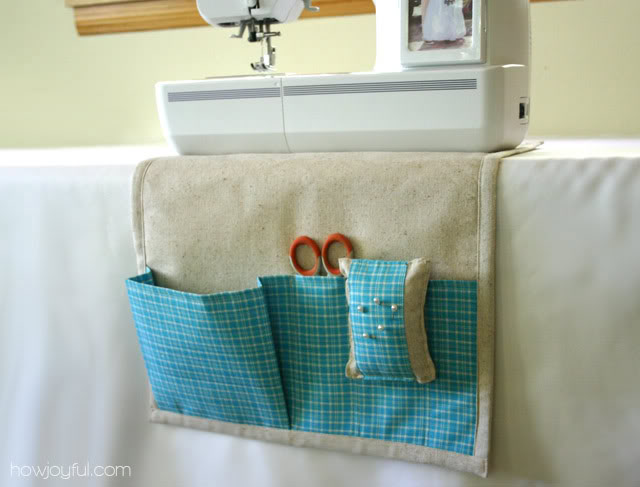
Шьем подложку под швейную машинку с кармашками |
Шьем подложку под швейную машинку с кармашками


|
Что можно сотворить из старых футболок? Множество идей. |
Что можно сотворить из старых футболок? Множество идей.
ЧТО МОЖНО СДЕЛАТЬ ИЗ ФУТБОЛОК? Вот несколько идей….
|
Органайзер для рукоделия. |
Органайзер для рукоделия.
Когда занимаешься шитьем или рукоделием удобно,когда все нужное находиться под рукой. Особенно если рабочее место не очень большое. У меня на столе размером 80х60 где я шью стоят коверлок и швейная машинка вообще развернуться негде. Поэтому с целью экономии свободного места придумался вот такой органайзер или корзиночка для мелочей, которыми я часто пользуюсь при шитье.

|
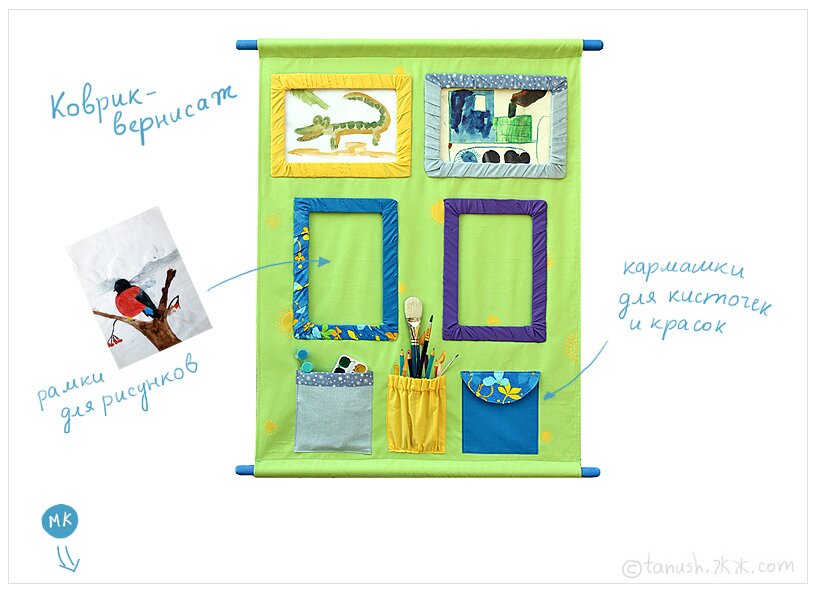
Коврик-вернисаж для детской комнаты |
Коврик-вернисаж для детской комнаты
Коврик-вернисаж - это первая выставка для маленького художника. Коврик вешается на стену, рамочки для размещения детских рисунков, кармашки - для кисточек, красок и прочей канцелярии. Экспозицию картинок можно менять.
|
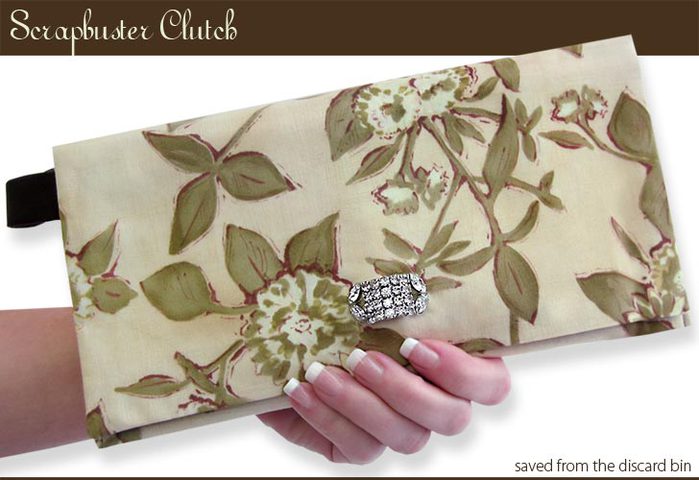
Как сшить сумочку - клатч. Мастер-класс |
Как сшить сумочку - клатч. Мастер-класс
Предлагаю вам несколько выкроек клатча. Клатч произошло от английского слова, что означает "хватать", поэтому он и обходится без ручек и ремешков. Сшить такую стильную сумочку вы можете легко своими руками и украсить ее по своему вкусу. Кстати, о руках..., о красоте которых никак нельзя забывать. Если вы хотите узнать, как укрепить ногти в домашних условиях,при помощи солевых и масляных ванночек, предлагаю заглянуть на сайт женских секретов "Между нами девочками". Здесь же вы узнаете все о здоровье, моде, методах похудения, о правильном питании и многое другое, нужное и полезное для женщин.


|
Пенал |
Дневник |

|
Сумка МК |
Сумка - пакет, легко и просто.
Мастер-класс в картинках.
Что такое эко-сумка? Это не обязательно сумка из экологически чистых материалов, даже лучше, если при ее изготовлении использовать вторичное сырье, например, старую одежду, покрывала и прочее, а форму нам подскажет обыкновенный пакет-маечка.
|
Для юных художников |
Дневник |

But she hasn’t had clothing protection until now.
Her own little art smock.
And just the perfect size.

Keep in mind that you can create whatever size you’d like. Even one for you. However, the dimensions given were created for an almost 3 year old.
You’ll need:

Find the center of the fabric by measuring and then trace a large circle right into the center. I used the mouth of a large cup and then added about 1/4 inch to that all the way around.

Cut the circle out and then cut a line down one end of the fabric…..starting at the center of the circle and then cutting down the center of the fabric all the way to the end.

Then, sew that opening closed again, starting at the bottom…….and then stopping about 8 inches from the circle. Use a 1/2 inch seam allowance.

Then roll under those raw edges a 1/4 inch fold and then andother 1/4 inch fold. Then sew into place.

Then make another seam along that first seam towards the bottom, just to reinforce it.

Now, turn over the fabric and make a few stitches and backstitches right under the end of the opening. Just to keep it strong and from ripping open from beiing pulled on by a toddler.

Now cut your 8 x 15 inch rectangle……

…….and your 3 x 35 inch strip. Fold the strip in half lengthwise and iron flat. (If you’re making this for a boy, or prefer to leave off the ruffle……go ahead and do so.)

Then sew a basting stitch (really long stitch) along the raw edges, really close to the edge….making sure to never go off the edge of the fabric. And make sure to leave long thread tails.

Then pull one of the top threads and start gathering your fabric.

Then pin it along one of the 15 inch sides of your rectangle.

And then place the fold of the bias tap over both layers and sew into place. (This is where I should have used the wider bias tape to make it easier to fit around all of that bulk.)

Then lay it on top of the front side of the art smock, matching up the bottom corners and sides.

Then sew the bias tape along the bottom front and back….and then along the sides.


Now, attach some bias tape around the neck, sewing slowly as you curve it around the circle. Then sew a seam right down the center of the pocket…..turning that one big pocket into two. Make sure to backstitch several times at the top and the bottom of that seam.

Now, using your wide piece of ribbon and your velcro…..attach it to the back of the kneck to create a closure.


And finally, attach your thin ribbon pieces (about 13 inches each) to the waist area of the smock. I placed mine about 9 inches down from the center of the kneck hole.

And that’s it. You’re ready to give your little one freedom to express their creativity.

|
Органайзер в сумочку |
Дневник |

The insert can be taken out, in case you want your regular old purse back. But mine is staying put.

Now I don’t have to worry about my poor camera/lenses getting thrown around.

And what’s cool, is that there are little velcro inserts that divide your camera and supplies. And are adjustable so that you can create the right sized compartments for all of your stuff. (This concept is not my own. Many camera bags are made this way.)

And I can move the insert out of the way and still have access to all of the regular pockets for my keys/phone/etc.

Oh, and maybe you’d like to have a camera bag/diaper bag/purse combo?? This bag works for that too. You can change up your dividers and put all of your regular purse items in one section……but then leave enough room for a padded camera section. Just change it up how you need it.

Yeah, sometimes I can’t stomach a hefty price-tag.

So I love when it’s something that I can figure out and make work for me.

Do you have a purse you’d like to turn into a camera bag?
SUPPLIES:
**The quantity of your supplies will vary, depending on the size of purse you’re converting.
First, you’ll need a purse. Use one of your old ones or buy a new one. You’ll need one that has one large compartment and is a larger in size, if you want to be able to section it off with the dividers. Or you could use a smaller purse if you just want to add padding to it and forget the dividers. It’s up to you.
To begin, you need a piece of foam for the bottom of your purse. Turn your purse over and check out the shape of the bottom of the purse. Then cut out a piece of 1/4 inch foam (I found mine at Hancock Fabric for about $8 for enough for about 3 purses) that is the same size as the very bottom of your purse.

Then place your foam down inside to make sure it fits. Adjust if necessary. Then measure from where the foam is at the bottom of the purse, up to how high you’d like the foam sides to be. If your purse is nice and tall (like mine is), you may not need the whole height of the purse. You may just be wasting foam. All you need is for it to be high enough to protect your camera and lenses.
I decided I wanted my foam to be about 8 inches tall.

So I cut a strip of foam that was 8 inches tall and was long enough to go around the piece that fits in the bottom of the purse. Measure around the top of the piece of foam…….not around the sides of it.

Then you’ll have a nice strip of foam that will make the walls of the foam insert. However, cut about an inch off of one end because after you add the fabric, you’ll be sewing those two ends together with their extra fabric ends. And you don’t want to have to sew through foam. (This will make more sense in later steps.)

Next, time to cut the fabric.
**You will need to add extra fabric along all the edges to account for the thickness of the foam……so be sure to add a little extra to your seam allowances.
For the bottom piece of foam, you will need 2 layers of fabric that are a 1/2 inch wider than the foam piece, around all edges. (A 1/4 inch is for the seam allowance and another 1/4 inch is for the foam thickness.) Just lay the foam down and cut around it. For the long strip of foam, you can either cut 2 pieces of fabric and sew them together into a strip (but then you’ll have 2 seams) or you can cut one strip of fabric and fold it over into a tube of fabric and sew it, resulting in only one seam. I only wanted one seam, so since my foam is 8 inches tall and is 1/2 inch thick, I needed my fabric to be 18 inches tall to wrap around the foam. (8 inches tall on the front + 8 inches tall on the back + 1/2 inch foam thickness at the top + 1/2 inch foam thickness at the bottom + 1/2 inch seam allowance + 1/2 inch seam allowance). My foam strip was about 37 inches long but I added another 2 inches at each end, so that I could later tuck the ends in and sew the foam into a tube. So cut my large fabric strip 41 inches wide by 18 inches tall. (Below it is folded in half under the foam.)

Next, place the two bottom pieces together (with right sides together) and sew all the way around with your 1/2 inch seam allowance, leaving a few inch opening on one side.

Turn it right side out and put your foam inside. You’ll have to fold it in half to wriggle it in there…..but it will get in there eventually. Promise. :)

Then tuck the raw edges inside and hand-stitch the opening closed. (Need help with hand-stitching? Click here.)

Next, open up your strip of fabric and sew some strips of velcro to one half of the strip. Be sure that you aren’t going down too far to be caught in the seam allowances…….and leave 2 inches free on each end to stay out of the way of each end seam too. I used 1 1/2 wide industrial strength velcro (I found it at Hancock Fabric) which worked great for this. I only needed 2 strips to cover a good majority of this half of the fabric. (If you can’t locate any really wide fabric, sew several narrow strips of velcro to this section of the fabric.) You just want enough velcro here to keep your dividers nice and secure. **Make sure and use the SOFT side of the veclro here so that the velcro not in use will not scratch your camera.

Then fold this fabric in half length-wise (with right sides together) and sew into a tube (using your 1/2 inch seam allowance). Then turn it right side out and maneuver your foam inside. Like I mentioned before, folding the foam in half and then sliding it in there works best. But then wriggle it around in there until it’s nice and flat and the side seam is along the bottom of the foam.

Then, tuck each end under about a 1/2 inch and then sew each end closed, then sew another seam, nice and close to your foam, creating a little flap on the end. Do the same thing to the other end.

Next, fold your fabric covered foam strip into a circle, overlap the ends, then sew them together.

Then, place the bottom together with the circle and pin them in place. Then hand stitch the bottom right to the sides……to keep the pieces together. (Need help with hand-stitching? Click here.)


Next, you need little inserts. I didn’t want mine quite as tall as the foam sides…..only 7 inches instead of 8. And as far as how wide…….you may want them wider than the base of your purse like I did. Once you put your foam base down into your purse, the sides kind of open up with the shape of the purse. If I wanted my foam walls to be rigid and just go straight up, I probably would have only cut my little inserts 5.5 inches wide. But I wanted this foam section to open up a bit, giving me more room inside of it, so I cut them 7.5 inches wide. So each of my little inserts were 7 x 7.5 inches.
I cut 2 pieces of fabric for each insert that were 1/2 inch taller on the top and the bottom and 2 inches wider at each side. So I cut 2 pieces of fabric for each of my 2 inserts that were 8 inches tall and 12.5 inches wide. I sewed 2 of the fabric pieces together, with right sides together, along the top and the bottom. Then I turned it right side out and placed my foam inside.

Next, I turned the ends in a 1/2 inch and sewed them closed with 2 seams, just like I did above with the bigger foam strip. Then I cut some of the other half of the 1.5 inch wide velcro strips, into more narrow strips to fit the flaps on each end (about 3/4 inch for me). Then I sewed the velcro right onto each end flap of the foam insert. Both on the same side of the insert. Do the same thing with your other foam insert (or more if you decide you want more inserts).

And that, my friends, is all you need to do.
Just place your foam inserts into your purse and load it up with all your gear. And you’re all set!
|
Сумка для молодой мамы |
Дневник |


|
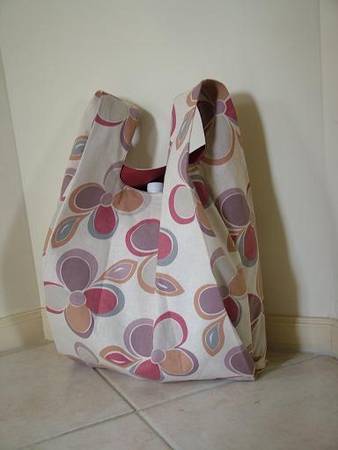
Хозяйственная сумка |
Дневник |

.
.
And the tote is great as is……..but I just had to throw a few flowers (from this tutorial) on the front.
But, of course, they’re optional.

.
.
And added a printed fabric for the lining.

.
 .
.
.
.
The bottom corners are squared, proving more room in the tote.

.
.
And that’s that. They’re quick to make, easy to carry, and big enough to stuff full.

.

.
.
Would you like to make your own rounded opening tote?
.
First of all, my outer fabric is called Duck Cloth. It’s super thick and sturdy canvas-y material that gives totes a great shape. The inner fabric is just a woven cotton. (Bought them at Joann’s)
.
To begin cut out two 19 x 19 inch squares out of your outer fabric and two 19 x 19 inch squares out of your lining fabric.

.
Then, find the center along one edge of your outer fabric and mark it. Then measure out 3.5 inches in both directions and mark it with a pen. (I measured out and marked 3 inches in both directions in the image below but then changed it. Do 3.5 inches.)

.
Now grab a bowl with about a 7 inch diameter (or cut out your own circle) and place the curve of the bowl between the 2 outer marks.

.
I didn’t wanted the circle quite so rounded (a bigger bowl would have fixed this problem) so I left some room between the bowl and the outer marks………

.
……..and then traced around the bowl, stopping about an inch before the edge of the fabric.

.
I then curved the line more outward to give that section of the fabric a bit of a straighter line, rather than continuing with the curve of the bowl. Like I said above, a larger bowl would have helped. Darn afterthought. :)

.
Now, cut out the circle shape…..

.
…….and then place this main piece (not the cut out piece, in case you don’t center it just right) on top of the other square pieces and cut out the same shape.

.
Now, place the outer pieces together with right sides together and sew them together along the sides and bottom (1/2 inch seam allowance). Then zig-zag (or serge) the raw edges and trim if necessary. Do the same with the lining pieces.

..
Now, to create the bottom squared-off shape…….grab one of your bottom corners.

.
And pull the front of the fabric away from the back of the fabric like shown……

.
Then turn the fabric over on it’s side and make the tip nice and pointy while lining up the seam that’s now running along the top, even with the seam that’s running along the bottom. Just feel it with your fingers and line both of those seams up.

.
Now, measure down from the point, 2 inches and mark it with a pin.

.
Then sew a straight line right across……..making sure it hits 2 inches down from the point.

**Do the same with the other bottom corner and then the two bottom corners of the lining.
.
Next, cut out 2 long strips of fabric that are 22 x 3 inches. Fold them in half lengthwise, with right sides together, and sew along the long side using a 1/4 inch seam allowance. Turn then right side out and iron flat.

.
Next, turn your outer fabric for your tote right side out and pin a strip to the curve of the front side of the tote and one to the curve of the back side. Measure down 1.5 inches from the top edge and pin your strip with the raw end facing up. (Make sure that the strip isn’t twisted at all.) And pin the strip ends in place about 3/4 of an inch past the edge of the curve of the tote. You’ll see why later. (And use two pins for each end, to keep the strips from moving before you sew them in place.)

.
Now, with your lining fabric still inside out, slide it over your outer fabric (that’s now right side out)…….

.
…….and keep pulling it up until the top edges are even. Make sure the handles are tucked down inside and then pin all along the upper edge.

Now sew all along the top, using a 1/2 inch seam allowance……….leaving about 5-6 inch gap along one side (near the side seam of the tote).


.
Now trim the corners off at the top of each curve……

.
……..and clip each curve. (Read here for more info on trimming and clipping.)

.
Now stick your hand down in the opening and pull out the outer fabric and shove the lining back down to the inside of the tote.

.
Now, iron the upper edge nice and flat. Be sure to tuck the edges of the opening down towards the inside a 1/2 inch and iron flat. Then top-stitch all along the upper edge about a 1/4 inch away from the edge.

.
Then, create little squares with ‘X’s’ through them right below the edge where the straps were attached. This will help make those strap more sturdy, especially if you’re going to put heavy things in your tote.

Now, fold your straps in half, towards the inside of the bag and sew right along the edge. Start and stop about 1 3/4 inches from the end of each handle.

.
This just gives the handle a better shape and make them easier to grab and hold.

Now, if you want to add flowers to your tote, make them just like the tutorial here. However, I made these flowers using fabric circles that were 2.5 inches in diameter. And I also didn’t hand sew the few extra scrunched circle pieces to the top, like shown in the tutorial mentioned. I wanted the top of the flower to be flat…..so I left them off.

.
And then machine sewed each flower right to the front, sewing through the center section of the flower. You can also hand stitch them in place, if desired.

.
And that’s it.
.
Your tote is done.
.
And ready to be filled.

|
Для юного мастера |
Дневник |

Now they can get to work.
And have all their tools, right at their fingertips.

**The directions are sized to fit on my 20 month old. Adjust if necessary.**
Do you have a handyman in your house? Does he need a simple tool belt?
Here’s how I made mine:
Cut 2 pieces of fabric, one that is 13 x 11 inches and another that is 10 x 11 inches. Fold each piece in half along the 13 and 10 inch side….so that the pieces are still 11 inches wide. Iron flat.

Then cut a piece of coordinating fabric that is 1.5 x 11 inches, to create a piece of binding. Fold in half length wise and iron flat. Then fold the raw edges in one more time towards the fold and iron flat again.

Place this binding along the top fold of the shorter piece, making sure that one fold of the binding is behind the piece and the other is in front. Sew along the bottom edge.


Then cut another piece of your coordinating fabric that is 3 wide and 5 inches long. Fold in half lengthwise with wrong sides together. Then sew the edges together along the long side, using a 1/2 inch seam allowance. Turn right side out and iron flat.

Fold the loop in half and pin to the edge of that binded piece, about a half inch below the binding. Make sure that your loop is facing inward.

Then sew in place, just to keep it in place while finishing the tool belt.

Then open up the larger piece and line up the smaller piece along the bottom edge of the larger piece. Divide this section into three sections and place pins to mark the division.

Make a straight seam from the bottom, on up to the top of the binding. This will give you your three pockets.

Then fold the top of that larger piece on down over the top of the smaller piece and line up the bottom edge and sides.

Sew along the side with the hammer loop, the entire bottom, and then part of the other side. (Use a 1/2 inch seam allowance.) Make sure to sew along that bottom corner on the second side, to ensure a nice crisp corner after turning it right side out.


Clip the two bottom corners.

And then turn right side out, poking out the corners, nice and crisp.

Iron flat and then sew all the way around the sides and bottom, pretty close to the edge.

Then cut another piece of the coordinating fabric that is 1.5 x 45 inches. (Keep in mind that you can piece two pieces together to make a piece that is 45 inches long, in case you are using smaller pieces of scrap material.) Fold it the same way that you did the binding up above…..and then center it over the top of the tool belt. Make sure that the back fold is behind the tool belt and the front fold is on top.

Sew all the way along this top binding, close to the bottom fold, to attach it to the tool belt. And then continue on to the end of the piece of binding, to secure the folded edges together, making ties with the ends of the binding.

Knot the ends of the ties……and you’re done.
So perfect for the man on the job.

|
НЕОБЫЧНАЯ СУМКА ИЗ СТАРЫХ ДЖИНС+ВЫКРОЙКА |
СТАРЫМ ВЕЩАМ-НОВУЮ ЖИЗНЬ! НЕОБЫЧНАЯ СУМКА ИЗ СТАРЫХ ДЖИНС+ВЫКРОЙКА
Автор: И-Ва
"Были старые джинсы весёленького цвета (возраст их лет 10...) и желание испробовать выкройку популярной в сети сумки. В планах перешить такую из кожаной старой юбки, а пока вот что получилось:"
|
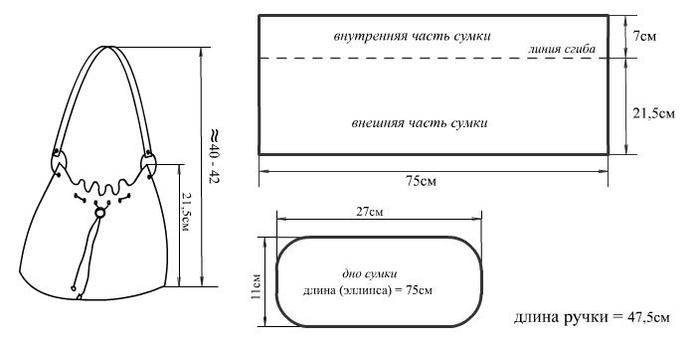
Шьем двухстороннюю сумочку с Мартой Стюарт. Видео + выкройка |
Шьем двухстороннюю сумочку с Мартой Стюарт. Видео + выкройка

Выкройка. При увеличении Вы получите ее в натуральную величину.

|
Чехол для крючков. Мастер-класс + выкройка |
Чехол для крючков. Мастер-класс + выкройка
Автор: Романа
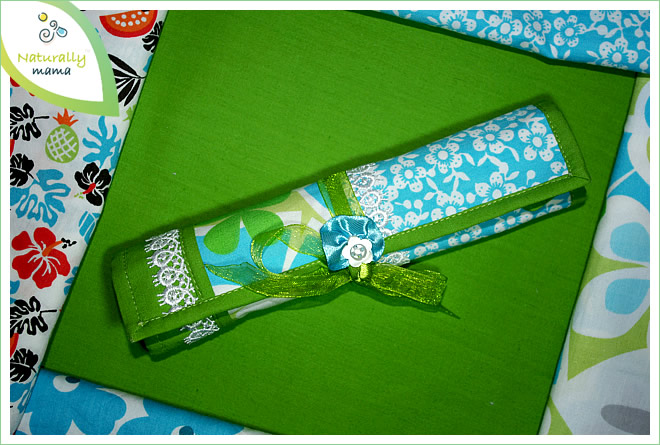
Мастер-класс здесь: http://www.nmcrafts.in/2012/03/blog-post_17.html
|
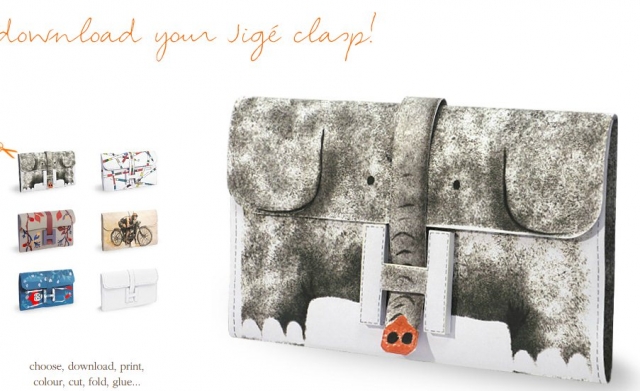
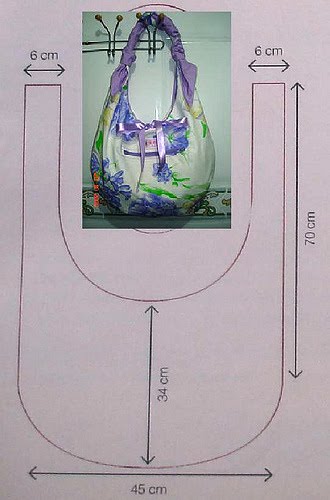
Выкройка клатча HERMES |
Выкройка клатча HERMES
http://secondstreet.ru/blog/prostie_vikroiki/vykrojka-klatcha-hermes.html#cut
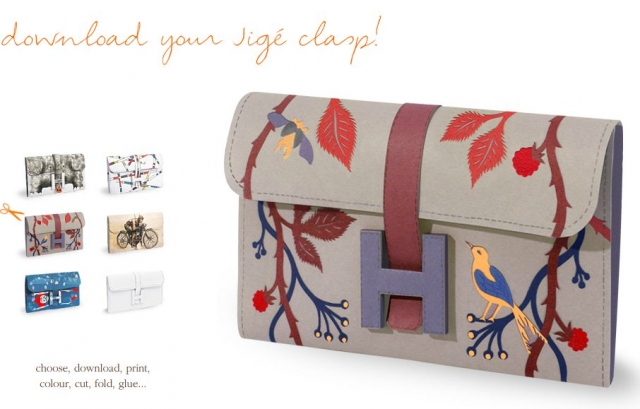
Культовый модный дом HERMES опять выложил в открытый доступ выкройку своего аксессуара. В прошлый раз это была выкройка легендарной сумки KELLY, в этот раз — клатча JIGE.
На этот раз выкройки уже с рисунком, поэтому их аж 6 штук — на любой вкус. В том числе белая, чтобы можно было изобразить на ней что хочешь.
|
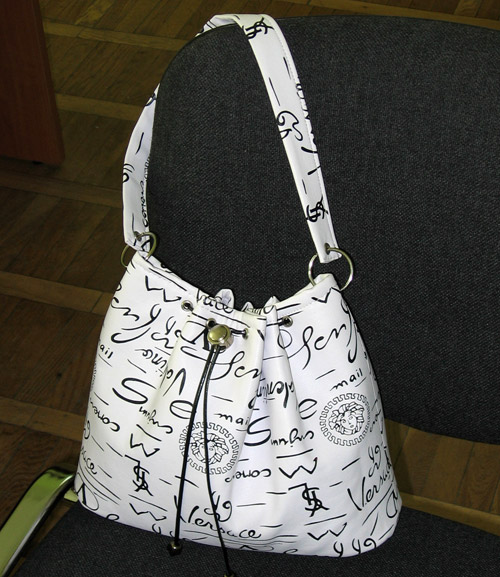
Сумочка |
Сумка
Автор этой замечательной сумки ![]() katarina_sweet !!!
katarina_sweet !!!
|
Много простых и симпатичных сумок |
|
Шьем сумку из старых вещей |
Шьем сумку из старых вещей

|


![[2-774726.jpg]](http://1.bp.blogspot.com/_qgukoTt2wXw/SXSuUAx-RfI/AAAAAAAAA0w/W43YIPXqQmU/s1600/2-774726.jpg)
![[1-773777.jpg]](http://2.bp.blogspot.com/_qgukoTt2wXw/SXSuUAYDvDI/AAAAAAAAA0o/HimRPqkGS30/s1600/1-773777.jpg)
![[3575094077_c2fea29187.jpg]](http://3.bp.blogspot.com/_qgukoTt2wXw/Std0IlbjiJI/AAAAAAAACFo/8-5ycJ6bYjI/s1600/3575094077_c2fea29187.jpg)
![[3575902070_b3da83f1fc.jpg]](http://1.bp.blogspot.com/_qgukoTt2wXw/Std0Iyd0QrI/AAAAAAAACFw/KM5cp9U6YCU/s1600/3575902070_b3da83f1fc.jpg)
![[3362118151_4039bf72cc.jpg]](http://3.bp.blogspot.com/_qgukoTt2wXw/StdzI5WqXiI/AAAAAAAACFA/3yjYAjEYTnY/s1600/3362118151_4039bf72cc.jpg)
![[3202369330_183b265b9e.jpg]](http://3.bp.blogspot.com/_qgukoTt2wXw/StdzIIRJacI/AAAAAAAACE4/64UWkqR2rvY/s1600/3202369330_183b265b9e.jpg)