(� ��� 173534 ������� �� ����� ������������ ����� �����)
������ ����� ������������ ↓
������ ����� �� ������ ���� ���� ������ ������ ������� ���������� ������� ����� ����� ������ ������ ������������� ������ ������ ���� ���������� ����� �������� ����� ������� ���������� ���� ���������� ������ ��������� ������ ����� ������-����� ������ �� ������ ������ ������ ������ ������ ����������� ��������� ��������� �������� ����� ��� ������� ������� �������� ���� ������� ���������� �������� ������ ���� ������� �� ����� ��������� ������ ������ ����� ������� ����� ������ ���� ����� ��������� �� ���� �������� ���� ��������� ���������� ����� ���� ���� � ���������
������ ������ � ���������� ��� |
������� |
��� ������ ��� ����������� ��������� ���������:
- ���������� ����� � �����������;
- ������� ��� ������������;
- ����;
- ���������;
- ������;
- ������;
- ���������;
- ��������;
- ����������.
�����: ���������� ����� ��������� �� ������ ����� ���� ��������� ������ ������ ���� ��������� � ���������� ��������� � ������� ����������� ��������� ������ ������ ������� |
����� ��� ����� ������ ������. ����� 2 |
������� |
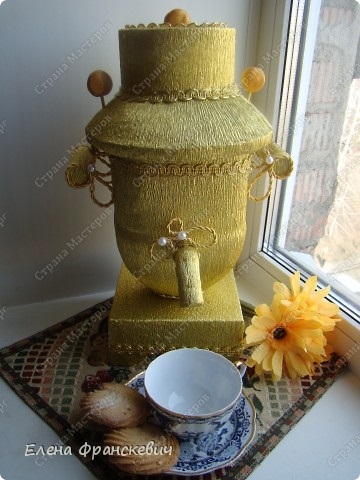
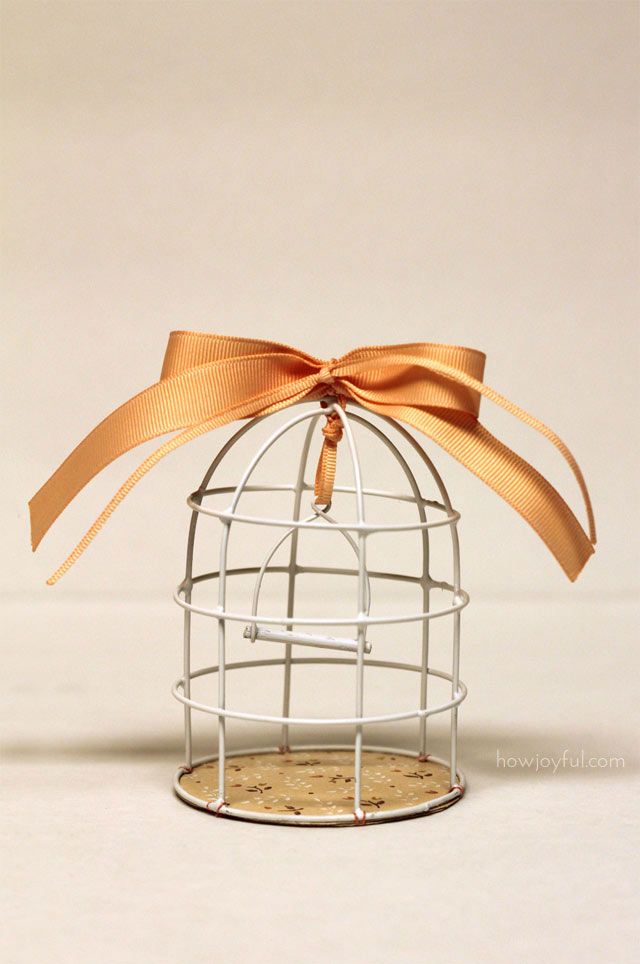
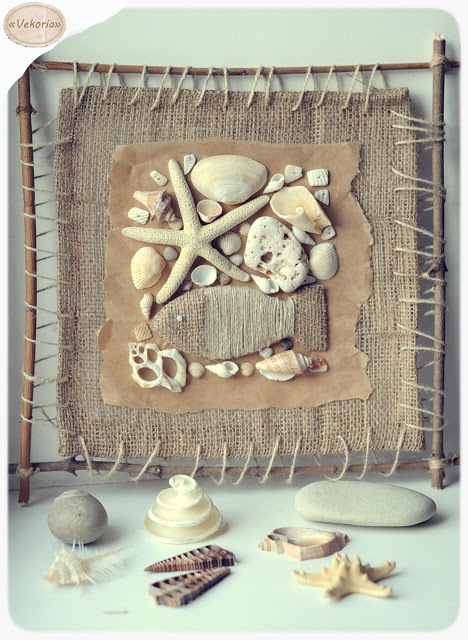
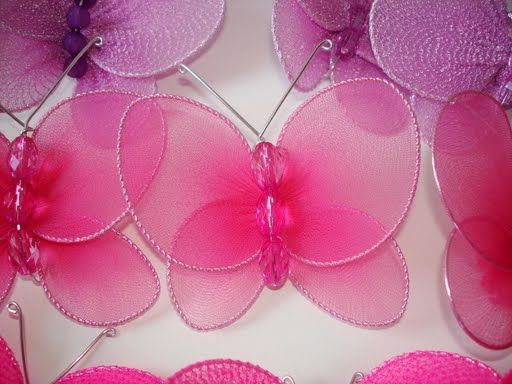
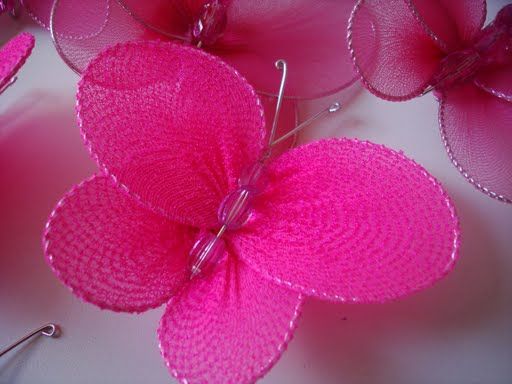
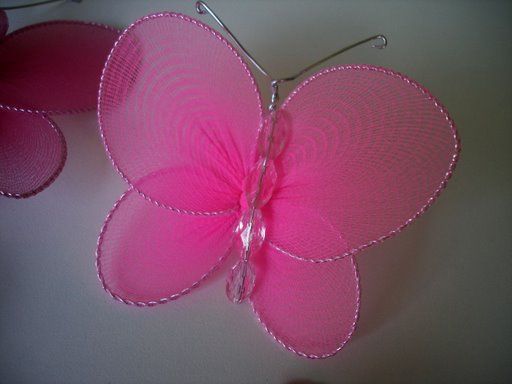
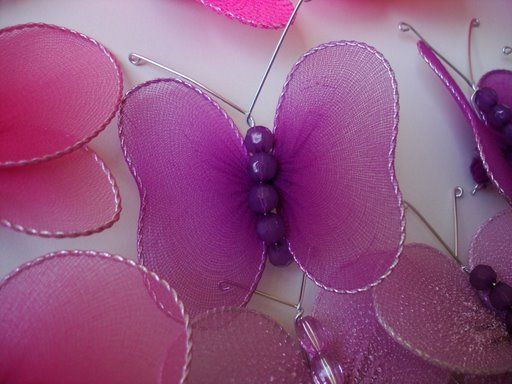
����� ��������� ������ ������ ������� � ���������� �������� ����� ������� — ������� ������.

������������ ������ �� �������� � ��������� ��� ������ ��������� ��������� (������ �� ��������� ����� �������� �� 1 �� � ������ �������).
�����: �������� ��� ����� ����� ��� ����� ������ ����� ����� ��� ����� �� |
������������ ������ ������ ������ ������ |
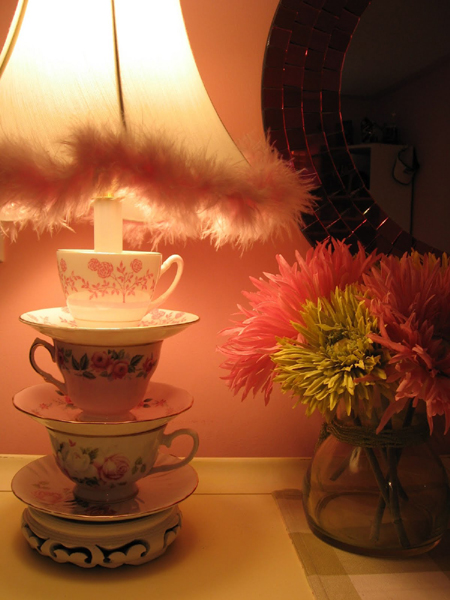
������� ��������, ��� �������� ��� ���������� ������������� ������ �� �������� ������������ ������ ������ � �������� � ���� ��������� ������-������� �� �� �������� :)
�����: ������������ ������ ������ ������ ������ ��� ������ ������ ������ ������� ������ ����� ������ ������ |
������� ������ ������ |
������ �����������, ���� ������ �� ��������� � ����� ������� ��� ������� ����� ������� ������ ������ �� ��������� ���������! ������������� ������ - �����-����� �� ��������� ����
��� ������ �������� �� ���� � ������... �������?

�����: ������� ������ ������ ������ ����� ����� ������ ������ |
�������-������� �� �����-������ |

����� ������ ������� ��� ������ ������ ������ �� ���������� ����� ������������ ������� ������ � ������� ���� ������� ��������� � ���� �����������. ������� ��� ����������� ����� � �� �������, ��� ������ ������ ��������� ��������� �������� ������. ������, ����� ����� ���������������� ��������� ����� ��������� ������� – ������� ����� ������������ ������� �������������, � ������� �������� ����������� ��������� ���� ��������, ������� ��-�������� ������� ������������� ������ �������.

����� ��������� "������ ������ ������":
����� 1 - ��� � �����: ������ � ������� ��� ������
����� 2 - ��� ���������
����� 3 - ��������� ���������
����� 4 - ������� �� ����������� �������
����� 5 - �������-������� �� �����-������
����� 6 - ������� ������ �� ������, �����, ������� � �����!
����� 7 - ������� �������� �� ����
...
����� 31 - ���������� �� ���������� ���������
����� 32 - ����� ��� �����
����� 33 - ����������� ���������� ������
�����: �������-������� ������ ����� |
"������������ � ����" �� �������� ����� |
�����: ������ ����� |
������ �� ��������: ��������� ������ |

��������� �������, ��������� ������, ����������� ��������-��������� ��������...
�����: ��������� ������� ������ ����� |
����������������� ������������ ������� ���� |

���������, ���������, �� ����� ������� ����! �������, �������� � ��� �����.. �� �� ������ �������� �������� ������� ����� �� ��������. � ������ ����� ��� � ������, ���� ������� �������� ����)) ��������!
������������ ������-����� � ���������� ������������ �����������. ������, �� �� �����, �� ���� - ����� 50 ����!))
����, ������
�����: ���� ����� ���� � ������� ������ ����� |
��������, ������ ���� |
��������, ������ ����
�������� ����� ���, �������� ����. ��������� ��� ������ ��������, ������� �� ������ ����������� ����. ������� ����� ����� �������� �����, �� ����� ��� ����� ���� ������� �����, ��������. ��������� �������������!

�����: �������� ������ ���� ������ ����� ��������� ���������� ��� ����� |
���������� ��������� �� ����������� �������. |


�����: ������ ����� ����� ��� ������� |
��: ��������� ���� ��� ����������� ����� |
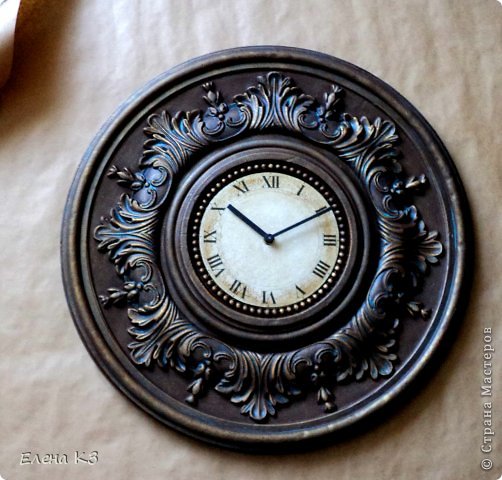
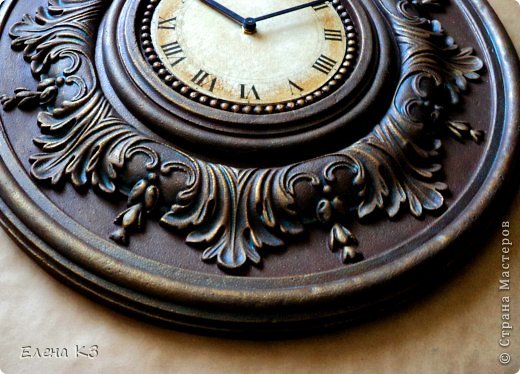
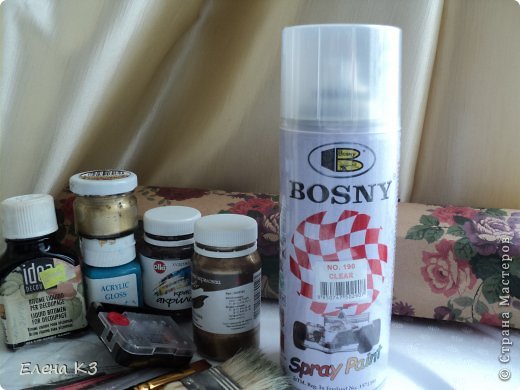
����������� ��� ��� ����� ������ "��������� ���� ��� ����������� �����" � ��������� �� �� ��������� ����������� ��������� �������.
��� ������ �����������: ��������� ������ (���������, ����������, ������, ������), �������� ���, ������� ����, ��������� ���, ����� (��������� � ������), ���������, ������� �������� �� ���������, ����� �� ����� ������, ���������� �������.
�����: ������ ����� ���� ���� �� ������� |
������� �������� |
���� ������!
������, ����� ���������� ���������� �������� �������� ���������, ������������� ����������� ������ � ����������? ��� ��������� ����� ����� 800 ���������������� ����������� ���� ������� ������. � ����������, ��� ����������� ������� ��������� (���� �� ������� ���������� ��������� ������� � ����������� ������) �� �����, �����������, 29%! ��� 34% ��������� � ������������ ������ �����-������ ���� � ���! ��������� �������� ���������, ������� ����� �� ���������, ��������� ��������� 21%, ������ ����� 35% ����������. � ������ 9% ������ ���������� � �������� ��������� ��������. ���������, � ����� ����������� ������ �� ���������, ���� �� ��� ��������� ����� ����� ������-�����������, ��� �������? �� �, �������, ���������� ��������������� ��� ���������� � ���������, ���� ��� ������������ ��������� �������� �� ��������� ���������� ������, ������? ��������, ��������� ���������� �������� ����������� � ������� ���������� �������������, ���� �� ������ � ����� ����� ����� ������� ��������������� - �� ����� �����������, �� �, �������, �� ����� ����! � ������ �� � ���� � ������������� �������������� ���������, ����, �����, � ��� ��� �� ����� ���������, � ����� ������ �������� ��� ����� ��������, ���� ���������-�����������. � ���� �������� ��� ��������� �������� ���� ���������� ������������ ��������� �� ��������� ��������, ������ �������, ���� ������ ��������� �� �������, � ������ �� ��� ��������� �������� ��� ����������� ��� �� ������������! ��������� ���������!


�������� � ���������� ����������� � ��������������� ���� ��������������� ��������� � ���� � ����� �������� - 7ly.ru, ��� ��� ���� ���� ���������� ��� ���� �� �����. ���, ��������, ���� �� ��������� ����������, ���������� ���� ����������� ������� ������������ � ������ ��������� ����� ���������, ����. �������� ��������� ������ - http://7ly.ru/2012/08/23/krasivye-mramornye-peshhery/. ��� �����, ���������� �����������! �� ������� ����� �������� �������� � ����� �� ��������� ������� �������� �� ���� �������� ���� ������ � ����� �������� ��������� ���������. ����������� � �������������!
�����: ������� �������� ������ ����� ������ ������ |
����-����� |
������� ������
����� ������ ��� ������� ��������,������� ���� -�����

��� ������������� ����� ��� �������� �����������:
������� ������� ��� ������ �����(���������,����, �����,����� �������) � ���
��� ��������� ������� ����� ����������� �� �����,��� ���� � ������������.
��� ����� ���� ����� ������(����,������������ ����,�����,� �.�,)���������� ����,�������,������,��������...
�����: ������ ����-����� ������� ���������� ������ ����� ����� |
������� � ��������� |
�����: ������ ����� ����� �� ������ |
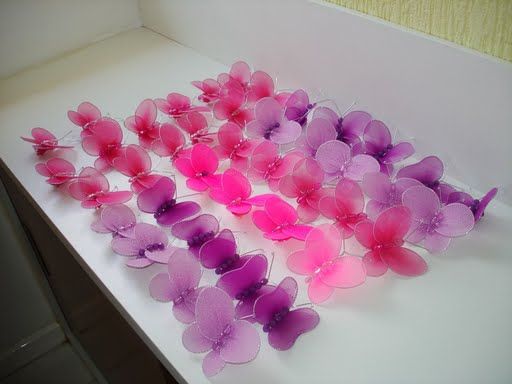
���� �� ������������ ������� |
������� |
�������������� ���� �� ��� ������� ��� �����, ��������� �������� ������� ����� ����� ��������� �������� ����� ����� ������ ���� � ���������


�����: ���� �� ������� ���� ������ ����� ������ ������ |
������ �� ������� |
������� |
������ ������ ����� �������� ���� � ���������. ..����� ��� ������ ������������ �������� ��� � � ������ ��� � � ������� ��� ���������� �� ��� ������ �����,��� �� ����� �� �������� ������ �������� ��� ������� ������� ������� �� ������, ��� ������������ �������.


�����: ������ ������ ������ ����� ������ ����� ������ |
����� ������ �������� |
������� |


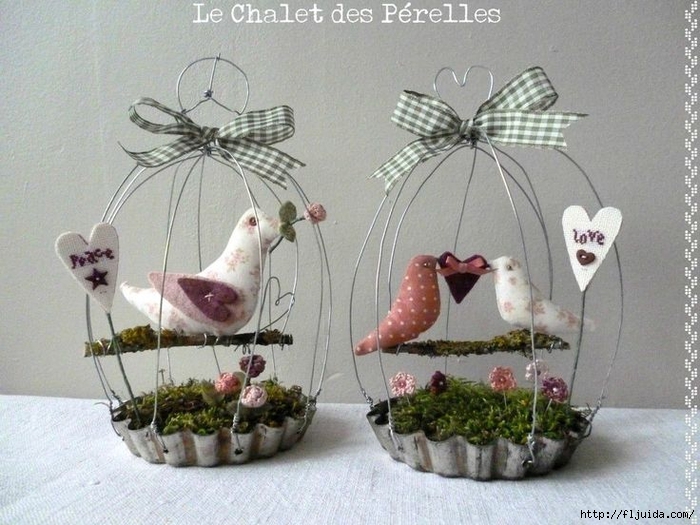
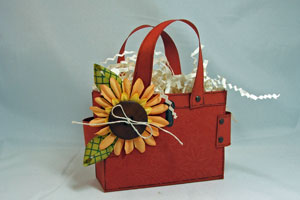
4. Add on some flowers – I just love these!


���� �� ������ ��������� ���������� �� http://niknikann.wix.com/spasibo � ���������� � ���. �����. ��� �� �������.�������
�����: �������� ������ ������ ����� ����� �������� ������ ����� |
����� �� ������ � ������ |
������� |
������������� ,� ������� ����� ������� ������ ����� � ���������.


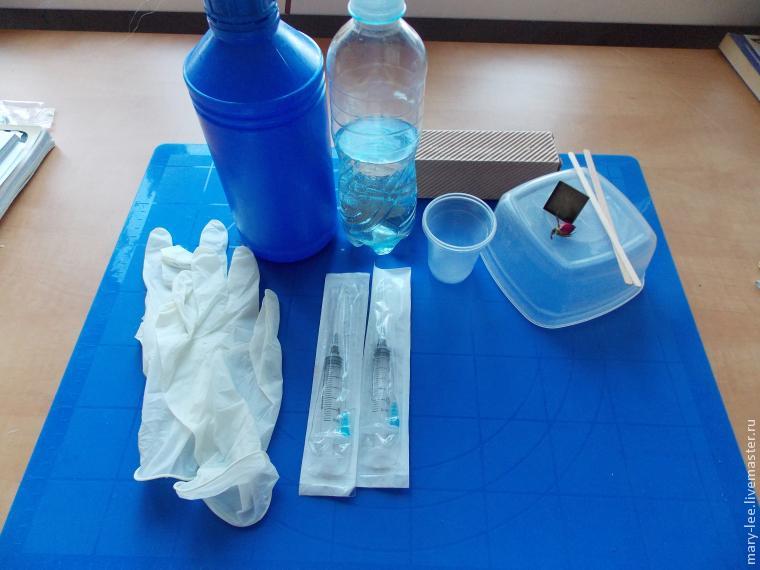
Instruction:
![]()
Step 1:
- Pour the chocolate is submerged 2 / 3 bottles (you remember that on the heart rate turned out).
![]()
Step 2:
- Cut the floral foam so that its larger size glass bottle and soak it in water.
- Wrap the bottom half of the sponge with plastic bags, and A flooded into the glass.
![]()
Step 3:
- Cut two 12 cm long bamboo stick, forcing close to the body to keep the bears.
- Attach the bear into a corner of the piece of foam.

![]()
Step 4:
- Tie red ribbons and wires attached to the corner next to the bear to build buzz.
![]()
Step 5:
- Plug the laurel cord around the sponge to form a circle (about 5 wires laurel is just).
- Small Tip: Do you remember how to plug the laurel branches covered a body sponge.


![]()
Step 6:
- Cut the rose stems to about 5-6cm.
- Plug the three flowers in front of the bear.
![]()
![]()
Step 7:
- Forced to add a red ribbon at the bottom of laurel branches as picture
Finished it!

���� �� ������ ��������� ���������� �� http://niknikann.wix.com/spasibo � ���������� � ���. �����. ��� �� �������.�������
�����: ������ ����� ����� �� ������ |
����� ������� |
������� |
����� ����� ��������� � �������� ���� �� �������� ��� ����� �������, ������� ��� �������� �� ���������� �� �������� ,�� � ��� �� ����� �� ����. �������!!!
���� �� ������ ��������� ���������� �� http://niknikann.wix.com/spasibo � ���������� � ���. �����. ��� �� �������.�������
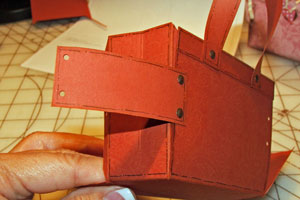
Download pdf template file. Print directly ontocardstock or print on white paper and photocopy onto cardstock. (Template will print in a very light gray color and lines will not be seen on your finished project.)
Totally Totebag Template
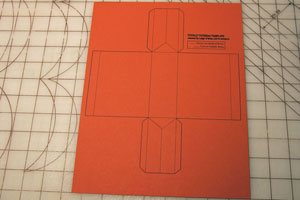
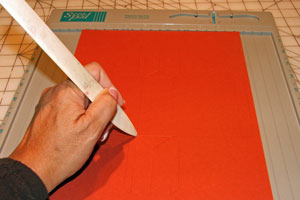
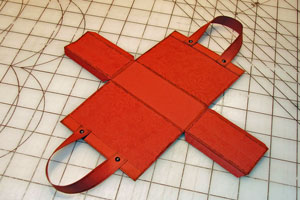
Score template on all dotted lines.
Cut out pattern on solid lines. Save scraps to use for bag handles and side straps.
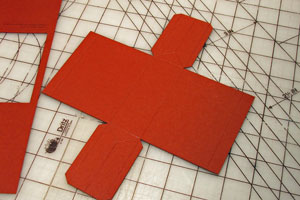
Turn pattern face down and stampbackground on front and back sides as well as thinner side pieces.
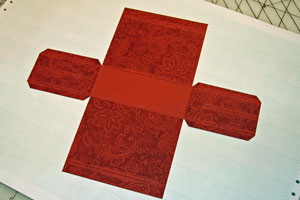
Fold down top 1/2" on both front and back of totebag towards stamped side of bag. Adhere with red line tape and crease fold with bone folder.
You now have a contrasting top edge since it's plain and not stamped.
Optional:
Add stitch lines to edges as shown in the sample. Use contrasting ink to sponge edges of all sides. Set aside.

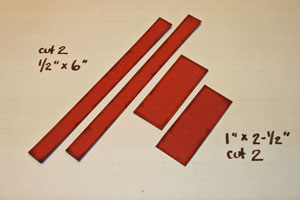
From cardstock scraps, cut side straps - 2 pieces (1" x 2.5") and handles - 2 pieces (1/2" x 6").
Optional:
Add stitch lines to edges as shown in the sample. Use contrasting ink to sponge edges of all sides.
Measure 3/4" from left edge of top front of bag and adhere one end of handle.
Measure 3/4" from right edge of top front of bag and adhere other end of handle as shown in photo.
Punch 1/16" hole and insert brad to decorate and reinforce handle. Repeat for the back to the bag.
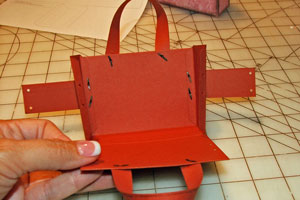
Measure 3/4" down from top edge of front of bag and put right end of side strap approx. 3/8" overlapping left edge of the front of the totebag.
Punch 1/16" holes in corners of side strap and totebag front at the same time. Do not adhere at this time.
Repeat this step for each side of both the front and back of totebag and for each end of the side strap.
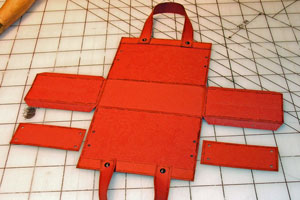
Fold small flaps on sides of totebag inwards as if your were now making the bag. Use punched holes to mark where holes need to be punched on those small inside flaps. Make sure to mark all four flaps. Punch 1/16" holes.
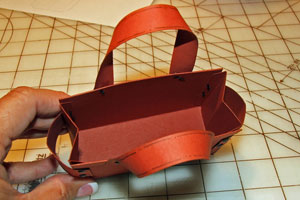
Hold one end of side strap over edge of front side of totebag - lining up holes in side strap, front of bag, and inside flap. Insert brads.
Repeat with other side of bag front.
Wrap side straps around to back of bag, again lining up all punched holes - and insert brads.
Note:
It will help if you crease the small inward "v" on the sides of the bag when inserting brads on the back side.
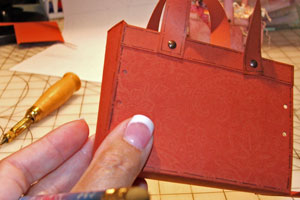
Adhere photo turn, button, or buckle to top fold of front of bag as a clasp.

Decorate straps of the bag with ribbon or add a big flower to the front. The decorating portion is up to you! Fill with raffia or goodies and have fun!
|
�����: ����� ����� ������� �� ������ �������� ������ ������ ������ ����� |
��������� ��� ������������� ������ |
�����: ��������� ��� ������������� ������ ������ ����� ����� ������ |
�������� �� ������� |
�� ��������
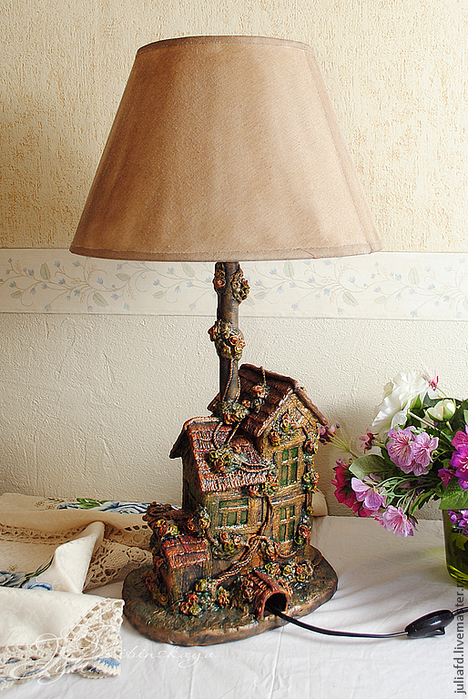
��������-������� ��� ������ ��������� ����������� ������ ����� ������� ������.

��� �����������: ������, ���� ���, �������� � ������� ����� � ��������� ������ ��� ������-�����.
������, �� �������� ������� ��� ��� ��������� ����� ������ 8 ��, ������ – 6 ��, ����� ��������� �� ������ ������� – ������ �������������.


�����: �������� �� ������� ������ ����� ������ ������ �� ������� |
�� �� ������������� ���� |
������� |
����� ������ http://len4ikcom.blog.ru/93493683.html
���� �� ������ ��������� ���������� �� http://niknikann.wix.com/spasibo � ���������� � ���. �����. ��� �� �������.�������
�����: ���� ������ ������ ���� ������ ����� |
���������� �����-�������� |
�����: ���������� �����-�������� ����� ������ ����� |
�� �� ������������� �������� |
�����: ���������� ���� ������ ����� ������������� |
��������� ���������� ������� ����� |
�����: ������ ����� �� ����� |
������� ������ ������ |
������� ������ ������ � ������� ���������� �������:) ������-�����
������� ������� �����!
������ ������� ������� ��� ����������� �������� �������������� - � �������� �������� ����� � � ����������� ��� ��� ����������? ����������� ��������� �������� � ��������, ������, ��������, ��������� ����� � ����� �������!


�����: ������� ������� ������ ������ ������ ����� |
������� �� �������� |
20
����� ��, ��� � �������� ����, ������ ��� ����� �������, � ��� ����������� ��� �����, ������������ ������ �����...
�����: ������� �� �������� ������� �� ������� ������ ����� |
��������, ��������� ��������� |
��������, ��������� ��������� -����, ��������
������ ��� ������� ���� ��������� �����, � ����� ����� ������������� ����������� ����, �� �������������, ��������, ����������,������������. ������ ����� � ��������� �� ���� ����������� �� ����� ���������� � ����� ��������, �������, ���������, ��������, �������. ����� � � �������� �� ���!
�����: �������� ����� ������ ����� �������� ����� �������� |
���� � ����� ������-��� |
���� � ����� «�����-���».��
���� � ����� «�����-���»
��� � � ������� ��� ������ ������� ������-������. ��� ����� �������� ����������� �������� ��������� �, ��������, � ����� «�����-���», ������� � ���� �� ���������������.
")
![]()

���� �� ������ ��������� ���������� �� http://niknikann.wix.com/spasibo � ���������� � ���. �����. ��� �� �������.�������
�����: ���� �����-��� ������ ����� ������� ��������� |
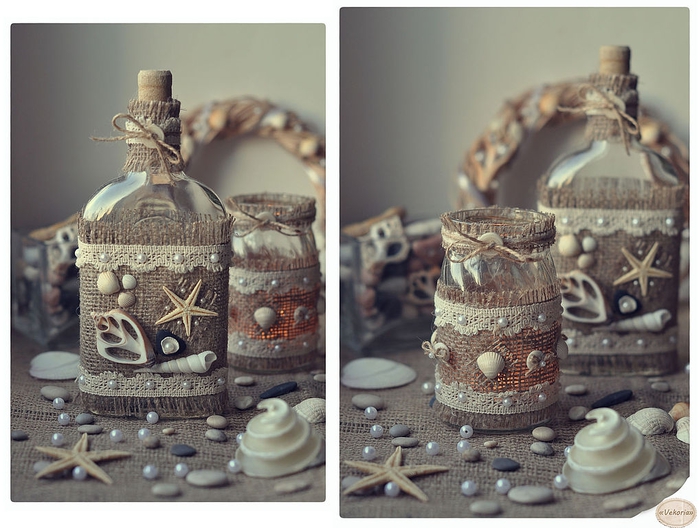
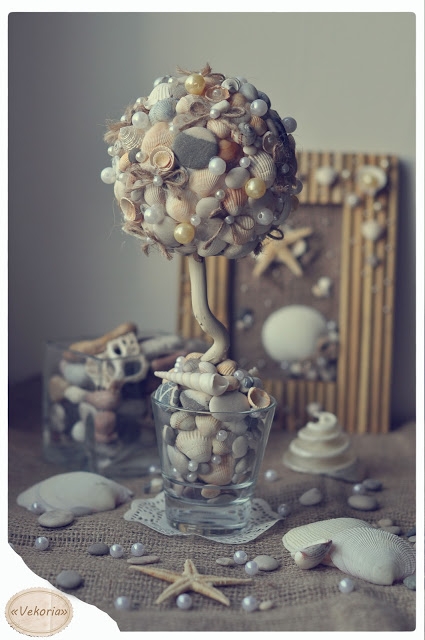
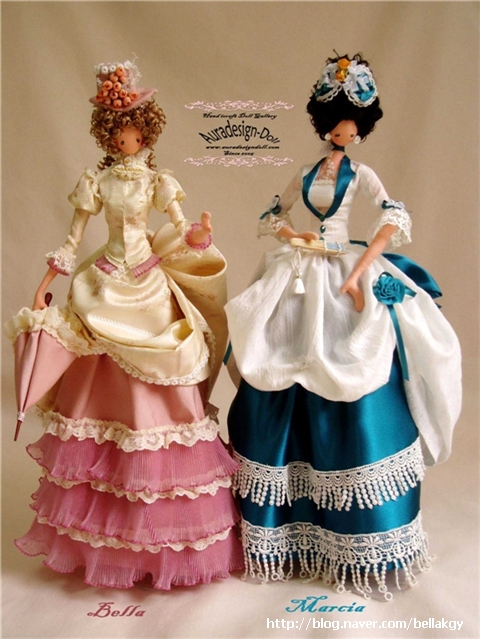
�������� ������� �� ������ |
�������� ������� �� ������. ������ �����

��� ������� ��� ���������� ������ ��������� �����, ������� ���� ��������� � ����� 1800-� � ������ 1900-� �����, �� ������� ������������� �����.

���������
������
��������
������ ����
����-��������
����������� ������
������ ������
������ ���� ��� �����
������ ������ ��� �������� ���������
�����: ������ ����� �������� ������� �� ������ ������ |
| ��������: | [1] |