 MerlettKA все записи автора
 |
|
DIY проект - Увидев мастер-
класс вы поймёте, что это
не сложно и красиво
NOT BUYING NEW – VISIBLE MENDING
MATERIALS
Knitwear with a hole Darning yarn
in different colours
Sewing needle Tapestry needle
|
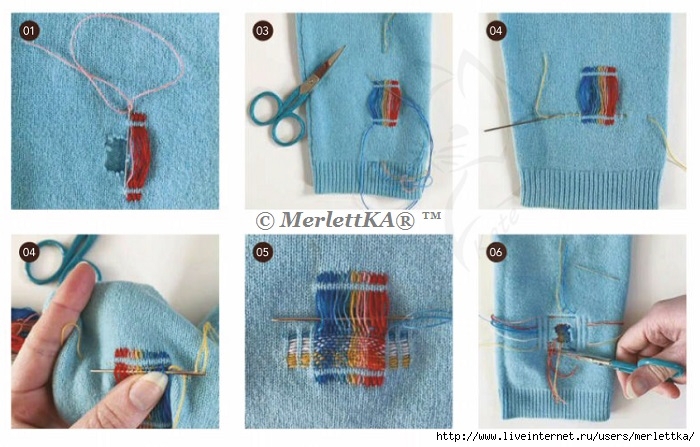

01 Position your knitwear with the hole facing up. Leaving a good amount of room around the hole to prevent any further unravelling, thread the sewing needle with the first coloured yarn, then bring it up from the inside of the jumper, above the hole and to the right. Take the needle back down roughly 0.5cm ( ") along, bring it back up 0.25cm (1/8") along, then take it back down over the other side of the hole. Repeat the same process of going under, over, then under the fabric again, as shown, to create the first row of mending.
02 Bring the needle up next to the bottom of the first stitch, half a knitted stitch over, then repeat Step 2, this time sewing upwards. Repeat for a few rows, making sure the threads don’t pull on the fabric, or become loopy. Cut the yarn, leaving a tail for weaving in.
03 Repeat Steps 1-2 with another yarn, then continue with the other colours until the hole is completely covered.
04 Thread the tapestry needle and repeat Step 1 across the bottom of the mending, using the image as a guide to placement, and this time taking the needle over the first row of mending, under the second, over the third, and so on.
Bring the needle back up half a knitted stitch over, then on the next row weave over the threads you went under, and under those you went over.
05 Repeat until all the centre rows of mending have been woven over, switching yarn colours as you go.
06 To finish, turn the knitwear wrong side out, weave in the ends to secure them, then trim off any excess yarn. You can also use this method to cover over stains or marks.


