Анна Москвичева ...
Le Borse di Mirtilla №15 2017 - (0)Издательство: Sprea SPA Язык: итальянский Журнал посвящен созданию сумок: вязание крючком...
РАДУЖНЫЙ ДЖЕМПЕР НА ОСНОВЕ "БАБУШКИНОГО КВАДРАТА" - (0)Inside Crochet №132 2021 - (0)
Издательство: Tailor Made Publishing Ltd Язык: английский Журнал по вязанию крючком из Ве...
Вязание крючком. Брюггское кружево для начинающих. Видео, схемы, описания. Продолжение следует... - (0)Вязание крючком. Брюггское кружево для начинающих. Видео, схемы, описания. Продолжение следует... ...
МК по изготовлению ёлочных украшений из упаковочной бумаги |
 /www.diyinspired.com/wp-content/uploads/2015/10/DIY-Paper-Christmas-Ornaments.jpg" target="_blank">http://www.diyinspired.com/wp-content/uploads/2015...-Paper-Christmas-Ornaments.jpg 750w" width="750" />
Time: 20-30 minutes
Materials:
Instructions:
Step 1: To maximize the use of paper, first cut 12” strips as follows:
 /www.diyinspired.com/wp-content/uploads/2015/10/Paper-Strips.jpg" target="_blank">http://www.diyinspired.com/wp-content/uploads/2015/10/Paper-Strips.jpg 750w" width="750" />
Step 2: Step 3: Next, make the following cuts (see photo below):
Step 4: Tape the corresponding strips together as shown below.
Step 5: Fold each strip like an accordion.
Step 6: Use hot glue to glue the ends of each strip together. Here is a top and side view.
 /www.diyinspired.com/wp-content/uploads/2015/10/DIY-Paper-Christmas-Ornaments-How-To.jpg" target="_blank">http://www.diyinspired.com/wp-content/uploads/2015...Christmas-Ornaments-How-To.jpg 750w" width="750" />
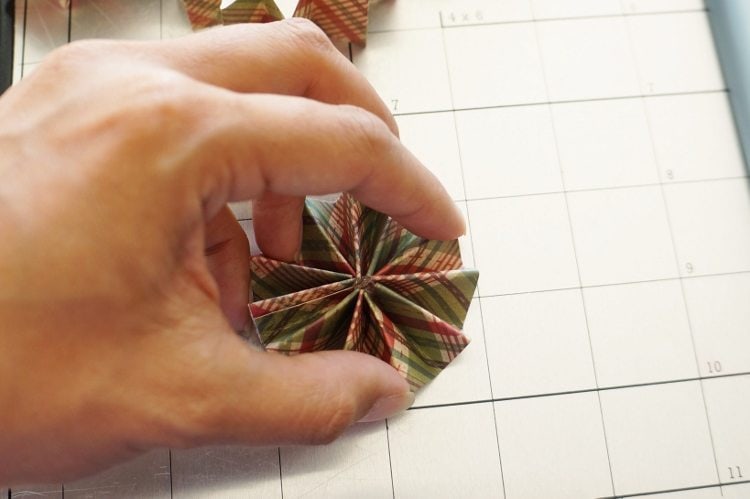
Step 7: Bend the circle strip inward to form a medallion. Add a drop of hot glue in the middle and hold the medallion together for a few seconds until the glue is dry. Blowing helps!
Repeat for each strip until you have five medallions.
Step 8: Hot glue each layer together to form a sphere as shown.
Step 9: Cut a piece of twine and hot glue it to the top of the ornament for the hanger.
 /www.diyinspired.com/wp-content/uploads/2015/10/DIY-Paper-Christmas-Ornaments-Twine.jpg" target="_blank">http://www.diyinspired.com/wp-content/uploads/2015...-Christmas-Ornaments-Twine.jpg 750w" width="750" />
Step 10: Tie a ribbon bow around the top.
 /www.diyinspired.com/wp-content/uploads/2015/10/DIY-Paper-Christmas-Ornaments-Ribbon.jpg" target="_blank">http://www.diyinspired.com/wp-content/uploads/2015...Christmas-Ornaments-Ribbon.jpg 750w" width="750" />
 /www.diyinspired.com/wp-content/uploads/2015/10/DIY-Paper-Christmas-Ornaments-DIY-Inspired-300x452.jpg" target="_blank">http://www.diyinspired.com/wp-content/uploads/2015...ments-DIY-Inspired-300x452.jpg 300w, http://www.diyinspired.com/wp-content/uploads/2015...mas-Ornaments-DIY-Inspired.jpg 498w" width="498" />
с благодарностью взято от Дианы Вульф
| Рубрики: | D.I.Y. |
| Комментировать | « Пред. запись — К дневнику — След. запись » | Страницы: [1] [Новые] |
 /www.diyinspired.com/wp-content/uploads/2015/10/DIY-Paper-Christmas-Ornaments-Measurements.jpg" target="_blank">http://www.diyinspired.com/wp-content/uploads/2015...mas-Ornaments-Measurements.jpg
 /www.diyinspired.com/wp-content/uploads/2015/10/DIY-Paper-Christmas-Ornaments-Scrapbook-Paper.jpg" target="_blank">http://www.diyinspired.com/wp-content/uploads/2015...-Ornaments-Scrapbook-Paper.jpg
 /www.diyinspired.com/wp-content/uploads/2015/10/DIY-Paper-Christmas-Ornaments-Accordion-Medallions.jpg" target="_blank">http://www.diyinspired.com/wp-content/uploads/2015...ments-Accordion-Medallions.jpg
 /www.diyinspired.com/wp-content/uploads/2015/10/DIY-Paper-Christmas-Ornaments-with-Glue.jpg" target="_blank">http://www.diyinspired.com/wp-content/uploads/2015...istmas-Ornaments-with-Glue.jpg
 /www.diyinspired.com/wp-content/uploads/2015/10/DIY-Paper-Christmas-Ornaments-Tutorial.jpg" target="_blank">http://www.diyinspired.com/wp-content/uploads/2015...ristmas-Ornaments-Tutorial.jpg
 /www.diyinspired.com/wp-content/uploads/2015/10/DIY-Paper-Christmas-Ornaments-Medallions.jpg" target="_blank">http://www.diyinspired.com/wp-content/uploads/2015...stmas-Ornaments-Medallions.jpg
 /www.diyinspired.com/wp-content/uploads/2015/10/DIY-Paper-Christmas-Ornaments-Hot-Glue.jpg" target="_blank">http://www.diyinspired.com/wp-content/uploads/2015...ristmas-Ornaments-Hot-Glue.jpg


