Анна Москвичева ...
Le Borse di Mirtilla №15 2017 - (0)Издательство: Sprea SPA Язык: итальянский Журнал посвящен созданию сумок: вязание крючком...
РАДУЖНЫЙ ДЖЕМПЕР НА ОСНОВЕ "БАБУШКИНОГО КВАДРАТА" - (0)Inside Crochet №132 2021 - (0)
Издательство: Tailor Made Publishing Ltd Язык: английский Журнал по вязанию крючком из Ве...
Вязание крючком. Брюггское кружево для начинающих. Видео, схемы, описания. Продолжение следует... - (0)Вязание крючком. Брюггское кружево для начинающих. Видео, схемы, описания. Продолжение следует... ...
Кружево крючком |
|
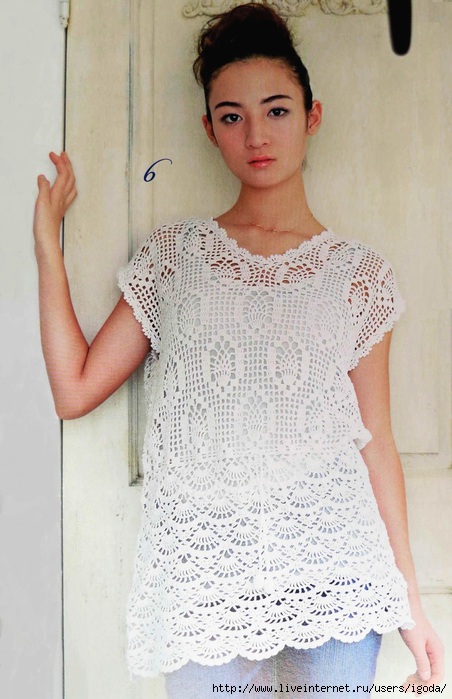
Очень красивая ТУНИКА крючком (японские ажуры) |


|
Декор картины солью! |
Здравствуйте, дорогие читатели ! Предлагаю Вам изучить оригинальную технику окрашивания при помощи клея ПВА и соли.
Этой солевой техникой окрашивания можно увлечь даже своих детей на художественное творчество :)

|
Способ вывязывания пико от Sônia Maria. МК |
|
Рыбный кекс «Нежный ломтик» |

|
Журналы по вязанию - просто нажми картинку |


|
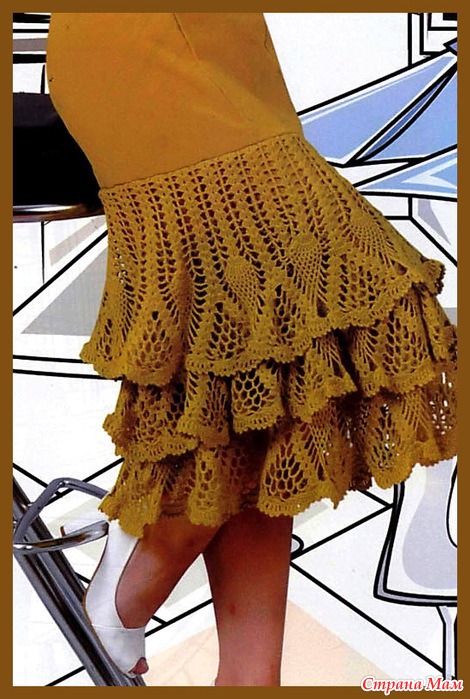
Первая юбка-комби с инета - с описанием... |
Наткнулась случайно на такую модель! Более-менее - с описанием!!! Спешу поделиться!
Размер: ширина одного яруса каймы около 30 см.
Потребуется: 300 г горчичной тонкой пряжи (100% акрил, 100 г / 1000 м), крючок № 2.
Основной узор: схема 1.
Описание.
Юбка сшита из плотной ткани прямого силуэта и для декора используется три яруса вывязанной ажурной каймы. Если у вас есть надоевшая модель юбки, то ее можно обновить этой же каймой. Пряжу подберите в тон ткани. Свяжите 3 оборки узором по схеме 1 из 18-и, 20-и, 22-х раппортов.
Желательно, чтобы верхний край каждой оборки соответствовал окружности юбки по линии, где будет пришита оборка. Каждую оборку вяжите по кругу без шва.
Если это сложно, то свяжите просто полосу и сшейте ее в кольцо. Шов впоследствии старайтесь расположить на боковом шве юбки. Готовые оборки отпарьте и пришейте каскадом к юбке в три яруса таким образом, чтобы 2-я и 3-я закрывались предыдущей на высоту 13-14 рядов.
|
Сарафаны ткань+вязание |


|
Декоративная застёжка с применением техники китайских узлов |


For an upcoming project in Threads, I decided to make a vest to showcase a special embellishment technique and added this frog closure. Knowing some of you might want to know how to make this frog, I've decided to post the method here. We'll share photos of the vest as it gets closer to the issue it appears in.
I'm using a "shoelace" cord to demonstrate the technique, and recommend this, or another smooth round cord to practice with. After you're proficient, you can branch out to other, more decorative cords.
The photos used in this blog post are excerpted from a class I teach on Patternreview.com demonstrating Frogs and Closures. You may want to take this class sometime.
|
 |
Step 1: To begin, whether you have a loop or knot at the end, stitch about 2" up from the cut cord end. |
 |
The success of working this frog comes from two things: work the frog horizontally instead of vertically, and pass the frog from hand to hand for each loop. Also, don't hold onto it too tightly--a light touch makes your work easier. |
 |
Step 2: Hold the work in your right hand. Pass the long end of the cord over the tail end to the left, away from you. |
 |
 |
Step 3: Change the frog to the left hand, use your right hand to pass the cord up and over the loop end. |
 |
Wrap the cord around the loop. |
 |
Step 4: Change the frog to the right hand, use the left hand to pass the cord over, and behind the loop of the previous loop on the tail end. |
 |
Wrap the cord around the frog. |
 |
Step 5: Change the frog back to the left hand, and bring the cord up and around the loop end, making sure the cord sits on top of the previous loop. |
 |
Wrap the cord around the frog. |
 |
Repeat these steps as many times as desired to make the size frog you want. |
 |
 |
 |
Step 6: After you pass the cord around the loop end of the frog for the last time, secure it to the back of the frog with needle and thread. |
 |
Then you can cut the cord. |
 |
Make a few stitches through the frog, at the intersections of the cords, to keep everything in place. |
 |
Finally, you need to trim the loose end of the cord. |
 |
Pull the cord backwards through the end loop, and trim close to the frog to conceal it. |
 |
Step 7: And you're done and ready to attach it to the garment! |
www.threadsmagazine.com/item/27361/how-to-make-a-snail-frog-closure/page/all
|
Плетение коврика из старых футболок |
 I thought that with all of the emphasis on recycling and reusing these days, a no-sew rag rug post would be more common. However, in my own internet research, I find that it’s something of a unicorn.
It follows the same principle that we all used in making those funny cotton loop potholders–under, over, under, over. See? You’ve already got 3/4ths of the technique.
No-Sew Homemade Rag Rug (Or trivet, potholder, centerpiece, place mat, what-have-you.)
1. Cut strips of fabric 1-3 inches wide and remove seams. I like three foot strips, but the length only matters for how often you want to be taking the time to join new strips.

2. Tie two strips in a simple loose knot. You’ll be trying to shove fabric through this later, so too tight and you might get aggravated. Also, notice that the pieces in the picture are UNEVEN. At the end of every strand, you’ll have to join a new one, and it looks better if that’s staggered.

3. If you want stripes like mine, arrange your strips so that they alternate A,B,A,B when you lay them flat. Then take the one on the right side and go under, over, under.
 4. Continue taking each right-hand strand and going under, over, under (Notice that it’s not a TIGHT braid. Just snug enough to lay flat and hold it’s shape.)

5. When you get a braid about 1/2 the length of the rug you want, it’s time to turn. I went under, over, under with that gray strip and then turned it to the right so I could tuck it in the edge of the original braid.
 Depending on your material, your rug may not want to lie flat if you turn it too quickly, so you may not get to tuck EVERY strand into the original braid. Sometimes you might have to skip tucking a couple so you can turn the corner smoothly.
6. Work your way back down to the starting knot following the exact same pattern as you used to make the original braid, just tucking the end through each time. (If you want the stripes, tuck it in it’s OWN color as you come around and down.)

7. Once you get back down to the original knot, and work your way around the curve, skipping and tucking as necessary to lay flat, it’s time to add a strip! To maintain the stripes, I joined one of each color together and stuck it through the starting knot in a way that kept the pattern. Then I continued braiding the same way I had been all along, but now it was under, over, under, over, under–>TUCK!
 You can’t see, but there’s SIX strips now.
Intermission: WHEW, this is way harder to explain than it is to do! For another explanation, in fact the only other explanation I’ve seen on the whole internet, click here.
Let’s also pause to learn how to join (slip-knot) strips to each other:
Cut a hole in the ends of both strips you want to join. Shove the new on through the old one. Then push the tail end of the new strip through it’s own hole and tug until snug.
Back to our regularly scheduled tutorial…
8. Braid all of the way down to the end and back up the other side to the original knot. Add another strip where ever you can sneak it in to make eight strips.
 9. Pick up that right-hand gray one, and go under, over, under, over, under, over, under, over, under–>TUCK!

9. Every time you work yourself back to the beginning knot, add another set of strips until you get the size rug you’re looking for.
10. Once the rug is the width you want it across
the middle, it’s time to work yourself back down to 8 strips, then 6, 4, 2, and finally none in a way that doesn’t throw off your overall shape. When I decreased in the picture, I went under, over, under, over, under–>TUCK–>TUCK AGAIN under two more blues horizontally—>snip off the excess. Continue until you run out of strands.

http://littlehouseinthesuburbs.com/2008/11/secrets-of-no-sew-rag-rug.html
Метки: плетение коврика коврик из старых футболок пряжа из футболок |
Как смотать пряжу в аккуратный клубок |
|
Как сделать держатель для хранения спиц |
 I found some cute pencil toppers
  Materials and Tools:


|
Морковь по-корейски |
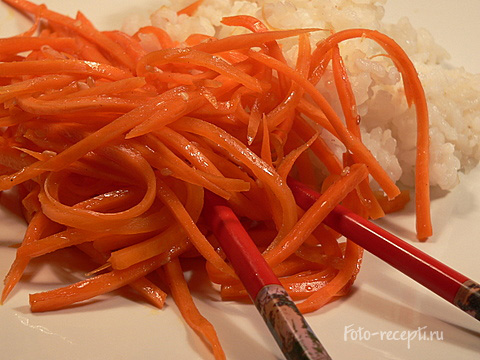
Ингредиенты
500 г моркови
500 г лука
100 мл растительного масла
1 ч.л. уксуса 70%
1 ст.л. сахара
3-4 зубчика чеснока
красный острый перец
соль
приготовление
Лук крупно нарезать.
Морковь натереть на специальной терке или нарезать длинной тонкой соломкой.
Посолить, перемешать и дать постоять 20-30 минут.
В морковь добавить сахар, красный перец (я добавляю 0.5 ч.л.).
Хорошо перемешать.
Обжарить лук на растительном масле до темно-золотистого цвета.
Затем лук убрать, он нам не понадобится.
Масло убрать с огня, немного остудить, добавить уксус.
Горячим маслом залить морковь, перемешать.
Добавить выдавленный через чеснокодавку чеснок.
Все хорошо перемешать.
Перед употреблением дать постоять в холодильнике 2-3 часа.
|
Жакет с английским воротником из Crochet Today! |

|
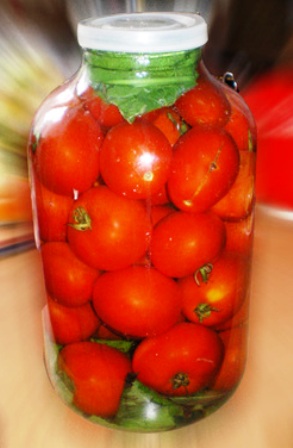
РЕЦЕПТЫ ОТ ТАТЬЯНЫ - холодная засолка помидоров |
|
ОРИГИНАЛЬНЫЙ ДЖЕМПЕР! два мастер-класса! |
|
Подборка лучших диетических супов |
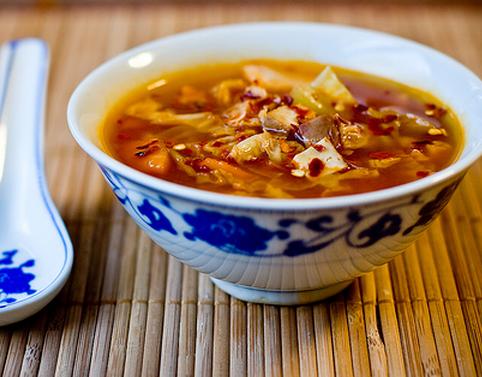
Супы являются необходимым компонентов рациона каждого человека, без их употребление невозможно нормальное пищеварение. Сочетание полезных натуральных компонентов и жидкой основы исключительно благоприятно действует на самочувствие и здоровье человека. Особенно полезны для здоровья легкие овощные супы и овощные супы-пюре, они не только прекрасно питают организм, но и очищают пищеварительную систему.
Мы подготовили для вас подборку лучших диетических супов:
|
быстро-вкусный пирог с луком и яйцом "На раз-два!" |

 Приготовить его очень просто.
|