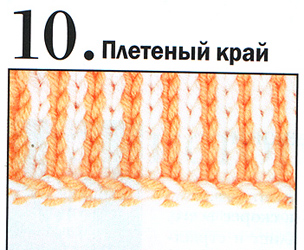
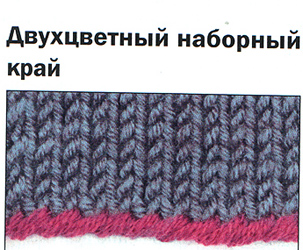
")
Помимо того, что этот прием позволяет «вышивать» гораздо быстрее — он еще и с точки зрения декоративности, мне кажется, выглядит очень интересно. Большая часть
рисунка «забивается» краской по ткани (не забудьте прогладить очень горячим утюгом для закрепления краски - перед вышивкой) а сама вышивка, объемной гладью, идет только одним цветом, добавляя рисунку выпуклой фактуры:
")
")
")
Можно «вышивать» и по готовому рисунку — например, усложнить так внешний вид платья с цветочным рисунком. Мне кажется даже рисунок — надпись в стиле граффити можно так интересно обыграть.
The full how-to continues after the jump…

Materials
Template (download here)
20 x 20” pillow cover (or make your own! I did using a yard of Kaufman Organic Canvas from Purl Soho)
20 x 20” pillow insert
Pebeo Setacolor fabric paint, Fawn (or any fabric paint)
Paint brush
Embroidery hoop/ 6x Q-Snap (http://www.qsnap.com/all_products.asp )
Embroidery floss, DMC 310 (black), DMC 3865 (white)
Size 5 embroidery needle
Scissors
Instructions
1. Print, center and transfer your pattern onto the pillow form. Since I made my own pillow I used a window as a light box and transferred the pattern with a water soluble pen. If you are using a premade pillow cover a transfer pen/pencil would be best, Just note that the image will be in reverse.


2. Paint the body of the tiger, avoiding the stripes, outlines and eye, with fabric paint. Let dry and heat set (check instructions on bottle for exact time).


3. Stretch your fabric in a hoop or Q-snap. I love q-snaps! They are basically PVC pipe square embroidery hoops that are perfect for larger/rectangular imagery. Use the satin stitch in 6ply to fill in the stripes in black, and teeth and nails in white.
First, I like to outline my shape in a rough, quick backstitch. This will be covered so don’t labor over perfect stitches here. This outline helps to define the shape, gives a smoother edge and adds a more three-dimensional finish. It also helps cover any uneven paint edges.
Break up your shape into two parts work from the center out one way and then come back to the center and work to the other end to complete the shape. I work in halves to help keep my stitches even or else they tend to slant. Start in the center of the shape coming up from the back of the fabric and going down into fabric on the opposite edge just beyond your outline. Make parallel, straight stitches that are close, but don’t overlap. Try to keep the stitches smooth and even.

4. Outline your tiger in a 6ply backstitch.
5. Remove any left over water soluble markers lines with water and a paint brush. Enjoy the hell out of all your hard work! If necessary, spot clean/hand wash your finished piece and iron from the reverse.
Источник


 Humour.FutbolkaBest.ru - Дневник Хорошего Настроения:)