Анна Москвичева ...
Le Borse di Mirtilla №15 2017 - (0)Издательство: Sprea SPA Язык: итальянский Журнал посвящен созданию сумок: вязание крючком...
РАДУЖНЫЙ ДЖЕМПЕР НА ОСНОВЕ "БАБУШКИНОГО КВАДРАТА" - (0)Inside Crochet №132 2021 - (0)
Издательство: Tailor Made Publishing Ltd Язык: английский Журнал по вязанию крючком из Ве...
Вязание крючком. Брюггское кружево для начинающих. Видео, схемы, описания. Продолжение следует... - (0)Вязание крючком. Брюггское кружево для начинающих. Видео, схемы, описания. Продолжение следует... ...
ВЕК ВЯЖИ-ВЕК УЧИСЬ! ПЛЕТЕНЫЙ НАБОР ПЕТЕЛЬ (KNITTED CAST-ON)+ВИДЕО |
http://knitting-club.blogspot.com/2011/06/knitted-cast-on.html

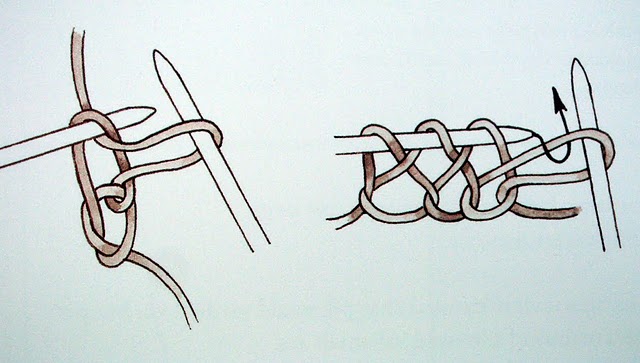
Набор петель, выполняемый одной нитью. Удобен, когда нужно набрать некоторое количество петель в конце ряда.
Двойной плетеный набор. Выполняется аналогично, но правая спица вводится в две последние петли на левой спице (то есть вязать 2 вместе лицевой вместо одной лицевой).
|
Без заголовка |
www.wikihow.com/Type-Symbols-Using-the-ALT-Key

The ALT key can help you access alt codes, or characters that aren't readily available on a normal keyboard. These codes can be used to write in foreign languages, mathematical equations, or to add fun symbols to your messages. Below ☟ is how to do it on a PC or a Mac, then a list of symbols such as π, ♫ and ♥.
/pad2.whstatic.com/skins/WikiHow/images/sub_header_end.gif" target="_blank">http://pad2.whstatic.com/skins/WikiHow/images/sub_header_end.gif); background-color: rgb(231, 227, 215); width: 625.875px; height: 31px; line-height: 30px; background-position: 100% 0%; background-repeat: no-repeat no-repeat;">On a PC


|
Symbols With the ALT key plus numbers
|
Symbols With the ALT key plus numbers
|
|
|
Без заголовка |
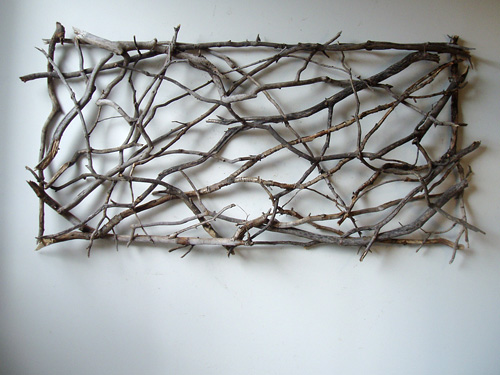
Метки: экологическое искусство |
Помощь пернатым в весеннем обустройстве гнёзд |
www.fiberfarm.com/2011/03/the-first-day-of-spring
Здесь показана замечательная на мой взгляд идея.
Понадобится:
 Недорогая кормушка для хомячков, морских свинок ,
 Остатки разноцветной пряжи любого вида,


|
Туники связаные крючком(подборка) |


|
Туничка-топ |


|
жакет |


|
Casalguidi (касалгиди ) - вышивка апликаций 3D |
 |
To work the Casalguidi stitch here, I’m using #5 perle cotton, which I think is a bit heavy for this technique. A finer thread can be packed closer, resulting in a smoother finish overall. But the perle cotton serves to show off the technique, and I have to admit, I do like the texture in this sample!
 |
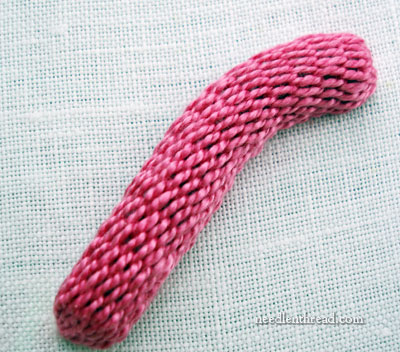
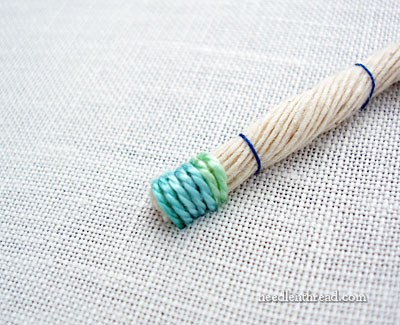
I began with a thick bundle of fine strings twisted into a kind of soft rope. You can use whatever type of string you have about – you can even bunch together a thickness of embroidery floss, if you want. But since I have an abundance of this stuff (not sure what it’s called, exactly!), I tend to use it for padding under raised stitching. (In fact, later on, I’ll show you how to manipulate this kind of padding to achieve both thick and thin areas from the same bunch of string… but more on that down the road!)
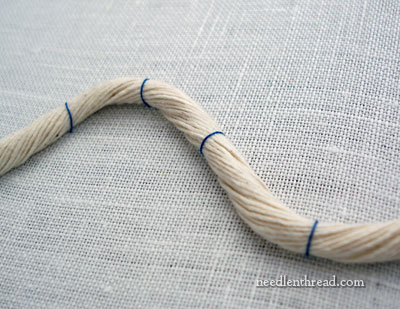 |
Using sewing thread, I loosely couched the string in the shape I wanted it. I used a contrasting color of thread here so that you can see the development of the technique – when you do this, use a thread that matches your padding.
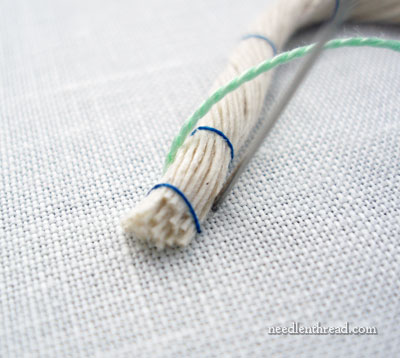 |
I’m going to use perle cotton at each stage of this sample, but I’ll change the colors so that you can see each stage clearly as the piece develops. The first layer of stitching is simply an “overcast” stitch or a satin stitch straight over the string. The stitches should be perpendicular to the path you’re following (dictated by the string). I started a little way from the beginning of the string padding, worked back to the beginning, and then went back to my starting point and continued down the string.
 |
You can see that the satin stitches are close together, just touching shoulders, but not tightly crowded or overlapping. This layer of stitches is pulled relatively tight over the string.
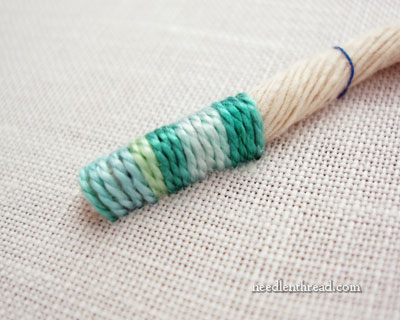 |
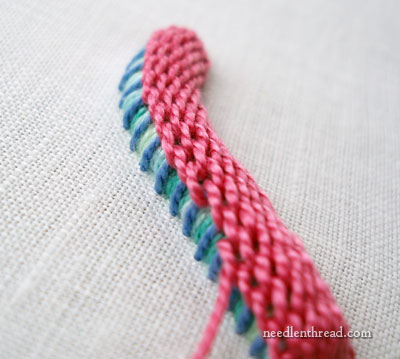
I continued down the line of string, covering it with satin stitches. This happens to be a variegated thread, so you can see a striped effect beginning to develop.
 |
As you come to a curve, you have to “fan” the satin stitches a little bit, so that they take the curve gracefully. In the photo above, you’re looking at the back of the bunch of string. You can see that my next stitch on this side of the string (the top of the satin stitch) is not right up against the previous satin stitch.
 |
However, on the front side of the string (the side I’m facing as I’m stitching), the needle goes down right next to the previous satin stitch. In this way, you can ease your satin stitching around the curve, maintaining the integrity of the satin stitch, but taking the curve without losing that perpendicular angle to the string.
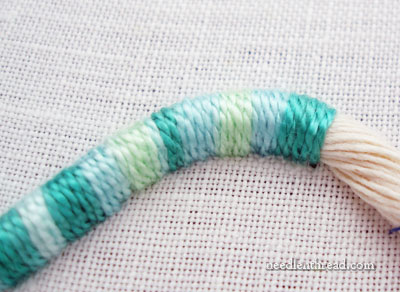 |
You can see that the satin stitches take the curve, but remain looking like satin stitches, even though I “fanned” them out a bit at the top, and they also remain perpendicular to the string padding.
Now, at this stage, you could actually stop and just enjoy a very nice, high-relief, satin stitch line!
But let’s keep going…
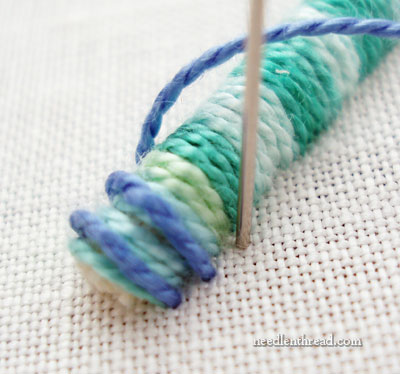 |
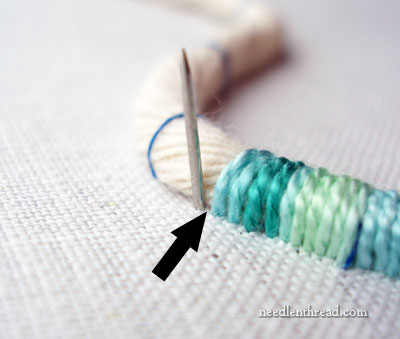
Once the string padding was covered with the satin stitches, I went back to the beginning to stitch the “bars” over which the stem stitch will be worked. I switched to a different color thread here so that you can see it clearly.
Maintaining equal spacing along the string, I’m stitching over the satin stitch layer rather loosely. This layer of stitches should just barely lie on top of the satin stitches. If you pull this layer too tightly, then it will be difficult to do the stem stitch in the next step.
 |
Here, you can see the second layer of “bars” over which the stem stitch will be worked.
 |
Initially, I was going to show you a trick with the rest of the string there, but this tutorial is long enough, isn’t it? So I cut the rest of the string off at this point.
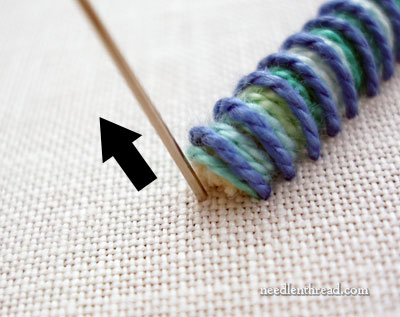 |
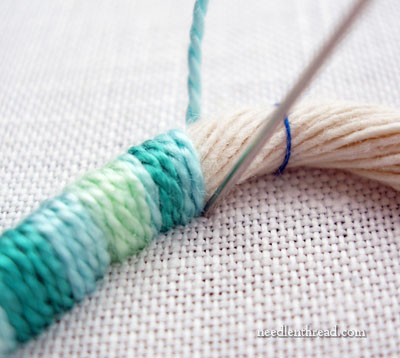
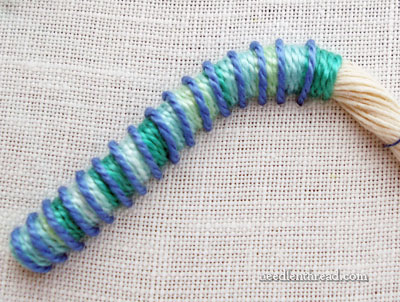
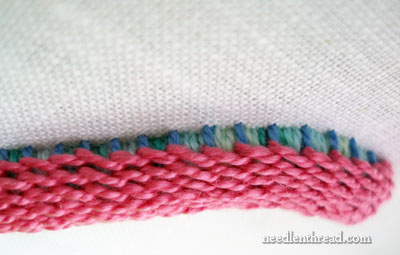
Now for the layer of stem stitch!
At this point, you may wish to switch to a tapestry needle. It will be easier to work the stem stitch with a tapestry needle, which has a blunt tip! But if you don’t have one, don’t fret. You can always work the stem stitch eye first (pushing the eye of the needle under the bar stitches, rather than the point of the needle). This way, you avoid sticking the sharp point of your needle into any of the previous layers of stitching.
Bring your needle up in the fabric, at the center point in front of the rope.
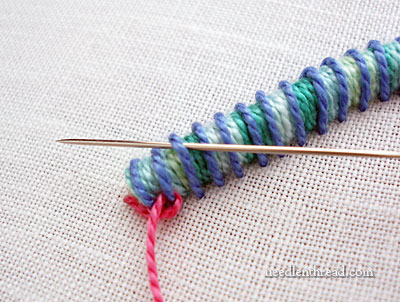 |
Begin working the stem stitch over the bars, going between the “bar” stitches (that’s the blue layer of stitches) and the satin stitches, and be very careful not to pierce any of the threads in either layer. (You can see how the stem stitch worked over “bars” in this article on raised stem stitch.)
 |
Work all the way down to the other end of the rope.
 |
This is the first line of stem stitch. Now, at this point, you could say you’ve created a pretty interesting line (something akin to a centipede again!), and call it quits!
But we’ll keep going…
 |
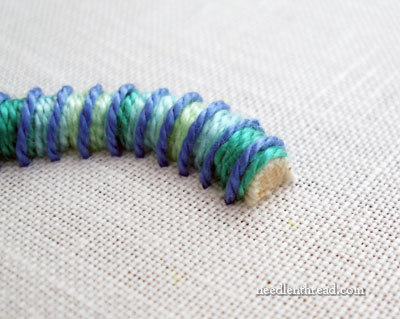
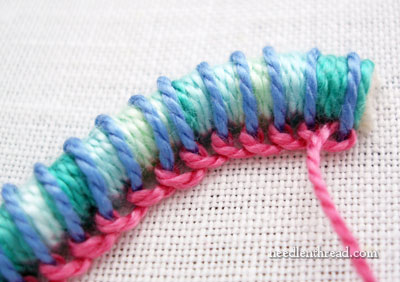
To end the first line of stem stitch, take the needle down in front of the end of your rope, in the middle. Each line of stem stitch is going to start and end in the same place, creating a covered end to the rope.
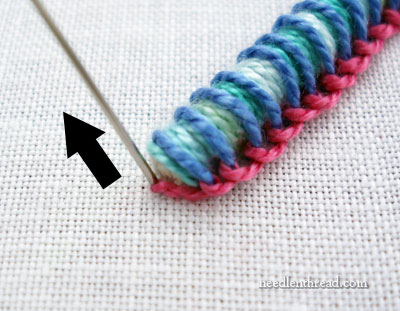 |
Start the next line of stem stitch back at the beginning. Each line should be worked from the same direction, so if your thread is long enough, you can run it under the stitches on the back of your work, back to the starting point, or you can end it and start a new thread. You want to make sure your thread is long enough to stem stitch the whole length of your rope.
 |
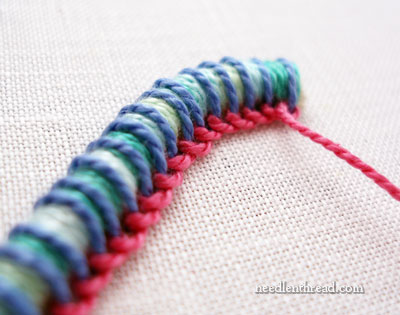
The second line of stem stitch ends in the same hole as the first. Pack your lines of stem stitches close together as you finish each line.
 |
Keep going…
 |
And going…
 |
And going!
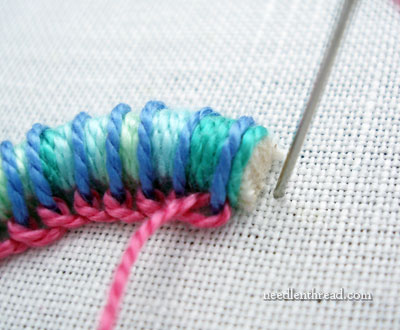
Not to make you seasick or anything, but as you stitch over to the other side of the rope, you’re going to feel as if you are stitching upside down. I just put the camera where my hands were working, and this is what it saw!
|
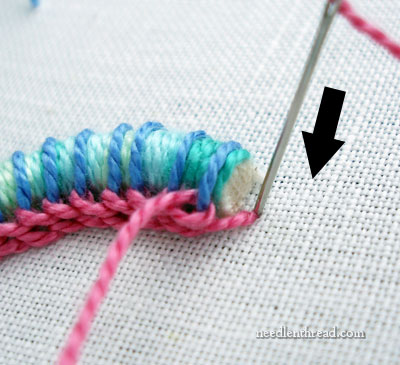
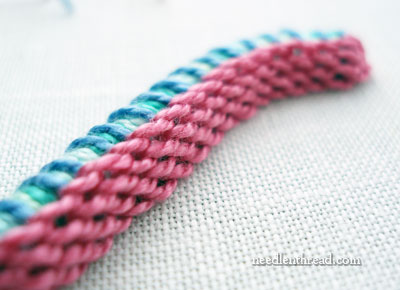
Continue until the whole rope is completely covered.
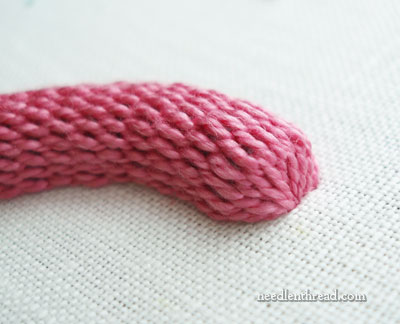 |
The ends will look like this.
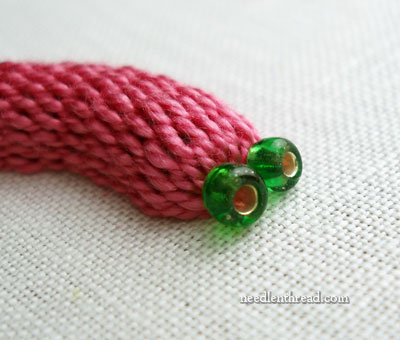
This sample is quite reminiscent of the rare and seldom-seen Kansas Pink Slug. The only thing missing are its notorious googley green eyes…
 |
www.needlenthread.com/2012/03/stitch-play-casalguidi-stitch.html#more-13574
Метки: вышивка апликация 3D |
Шикарная кружевная маска своими руками |

Распечатаем на принтере образец (пройти по ссылке на сайт и скачать)


Кусок тюли


sprinklesinsprings.com/wp-content/uploads/2011/10/mask-temp.jpg
|
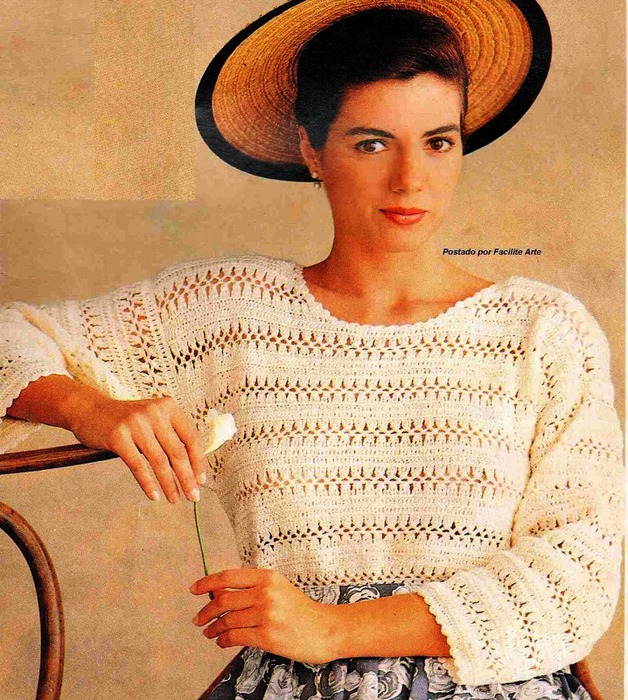
БЕЛЫЙ АЖУРНЫЙ ДЖЕМПЕР |
|
Юбочка Victoria's Secret, Схемки.. |


|
Изящная бабочка |
|
Прихватки |
Сейчас прихватки - это не просто нужная на кухне вещь.
Прихватки теперь ещё носят функцию украшать кухню, делать её более яркой и уютной.
Предлагаю вашему вниманию вот такие яркие и можно сказать стильные прихваточки.
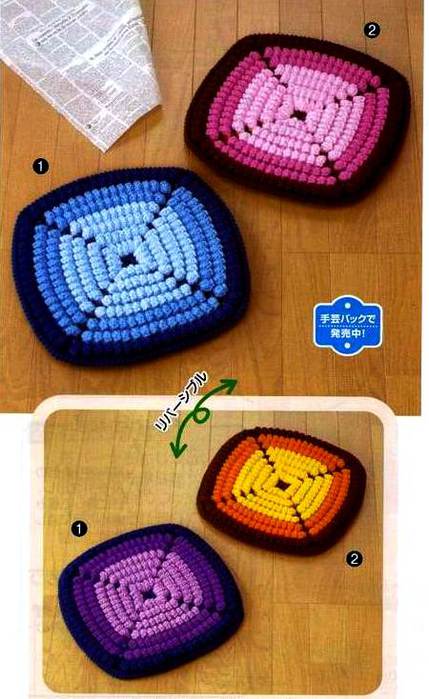
Схема тоже достаточно простая и я бы сказала универсальная, потому что позволяет также связать подстилочки на стулья и оформить кухню в одном стиле и цветовом решении.
|
Мастер-класс по вязанию крючком: цветок кувшинки |

Шестиугольник с цветком из шишечек может использоваться для создания пэчворковых изделий, для которых объем мотива не повредит, а напротив сыграет на руку. Например, коврики, чехлы на табуретки, подушки, пледы, дамские сумки и др.
|
Вязаный воротничок (идея для круглой кокетки, обвязки изделия) |


|
Журнал: Чудесный крючок №2 2011 |
|
Сумка из треугольничков - крючок |
|
пуловер крючком(идея для вязания) |
|
Снуд саломоновыми петлями (спицы, крючок) |


|
Домашний майонез Мастер-класс. |
Домашний майонез гораздо натуральнее покупного. К тому же делать его не дольше пяти минут.
Ингредиенты: 1 яйцо (целое) и 1 желток, 1 ст. ложка горчицы, 350—400 г подсолнечного масла (рафинированного), сок половины лимона, соль

Приготовление
1. В стакан для блендера выпустить полтора яйца (целое и желток), туда же добавить горчицу, лимонный сок, крепко посолить, влить 300—400 г масла и взбить погружным блендером.
Домашний майонез готов!
Совет:
Домашний майонез гораздо натуральнее покупного. К тому же делать его не дольше пяти минут.
Ингредиенты: 1 яйцо (целое) и 1 желток, 1 ст. ложка горчицы, 350—400 г подсолнечного масла (рафинированного), сок половины лимона, соль
Приготовление
1. В стакан для блендера выпустить полтора яйца (целое и желток), туда же добавить горчицу, лимонный сок, крепко посолить, влить 300—400 г масла и взбить погружным блендером.
Домашний майонез готов!
Совет:
|