Анна Москвичева ...
Le Borse di Mirtilla №15 2017 - (0)Издательство: Sprea SPA Язык: итальянский Журнал посвящен созданию сумок: вязание крючком...
РАДУЖНЫЙ ДЖЕМПЕР НА ОСНОВЕ "БАБУШКИНОГО КВАДРАТА" - (0)Inside Crochet №132 2021 - (0)
Издательство: Tailor Made Publishing Ltd Язык: английский Журнал по вязанию крючком из Ве...
Вязание крючком. Брюггское кружево для начинающих. Видео, схемы, описания. Продолжение следует... - (0)Вязание крючком. Брюггское кружево для начинающих. Видео, схемы, описания. Продолжение следует... ...
Пасхальные декорации : цыплята и яички |
 It's been a very long, very snowy winter in New York and, so, Easter is especially welcome to me this year. I can't wait for a holiday that celebrates spring's harbingers: baby chicks and lambs, budding daffodils, the bright colors of a warm, sunny day. To get the feeling started early, I made these Fuzzy Easter Chicks and Mini Easter Eggs. They fill me with anticipation and the hope that, yes, spring will actually come. I was excited to use Alchemy Yarn's latest inspiration called Kozmos. A fascinating blend of silk, mohair, cotton and wool, this yarn is unlike any other. Each yarn absorbs the dye differently, creating a complex depth of color that seems to shimmer and glow. The diaphanous halo of sweet fuzziness is perfect for the creation of a baby chick.
Happy Easter! --Whitney

6 stitches = 1 inch in stockinette stitch with the Main Yarn.
About 5 inches high
The chick is weighed down by a small bean bag filled with lentils. You won't use it until a little later, but it's kind of satisfying to have it ready to go when you do need it.
Fold the fabric in half with its right sides facing each other. Trace a 3 1/2 inch circle onto the fabric, and cut the circle out, giving you two identical circles.
Sew the circles together with about a 1/4 inch seam allowance, leaving a 1 1/2 inch opening (Don't worry about perfection here. No one will ever see it!)

Turn the circles right side out and fill the pouch with lentils, using a funnel or a piece of paper taped into a cone.
Sew the opening closed however you want, or, in my case, however you can.

Now you can set the little bean bag aside and start knitting!
NOTE: The pattern begins at the chick's tail and makes its way to the beak.
With US #7 double pointed needles and the Main Yarn, cast on 6 stitches.
Join for working in the round, being careful to not twist the stitches.
Round 1: Knit.
Round 2: *Knit into the front and back (kfb), repeat from * to end of round. (12 stitches)
Round 3: Knit
Round 4: *K1, kfb, repeat from * to end of round. (18 stitches)
Round 5: Knit
Round 6: *K2, kfb, repeat from * to end of round. (24 stitches)
Round 7: Knit
Round 8: *K3, kfb, repeat from * to end of round. (30 stitches)
Round 9: Knit
Round 10: *K4, kfb, repeat from * to end of round. (36 stitches)
Round 11: Knit
Round 12: *K5, kfb, repeat from * to end of round. (42 stitches)
Round 13: Knit
Round 14: *K6, kfb, repeat from * to end of round. (48 stitches)
Round 15: Knit
Round 16: *K7, kfb, repeat from * to end of round. (54 stitches)
Knit 8 rounds.
Next Round: K24, slip slip knit (ssk), place a marker, k2, k2tog, knit to end of round. (52 stitches)
Next Round: Knit to 2 stitches before marker, ssk, slip the marker, k2, k2tog, knit to end of round. (2 stitches decreased)
Repeat the last round 11 more times. (28 stitches remaining)
Now is a good time to start stuffing your chick. First place the bean bag in the area between the tail and the beginning of the decreases. (The dotted lines are outlining where I put my bean bag.)

Fill in the rest of the body with stuffing, keeping in mind that the lines of decreases are the chick's chest. Make the chick nice and plump!

NOTE: Because the opening will get smaller and smaller as you knit the head, be sure to stuff as you go. Also, try not to overstuff the neck area.
Round 1: Removing the stitch marker when you get to it, *K2, k2tog, repeat from * to end of round. (21 stitches)
Round 2: [K1, kfb] 3 times, [kfb] 9 times, [k1, kfb] 3 times. (36 stitches)
Knit 6 rounds.
Round 9: *K4, k2tog, repeat from * to end of round. (30 stitches)
Round 10: Knit.
Round 11: *K3, k2tog, repeat from * to end of round. (24 stitches)
Round 12: Knit.
Round 13: *K2, k2tog, repeat from * to end of round. (18 stitches)
Round 14: Knit.
Round 15: *K1, k2tog, repeat from * to end of round. (12 stitches)
Round 16: With US #5 double pointed needles and the Contrast Yarn, knit.
Round 17: *K2tog, repeat from * to end of round. (6 stitches)
Knit 3 rounds.
Round 21: *K2tog, repeat from * to end of round. (3 stitches)
Cut the yarn, and thread it through the remaining stitches.

Weave all the tails into the inside of the chick.
Using just two US #7 double pointed needles and the Main Yarn, cast on 3 stitches. (Leave an 8 inch tail.)
Row 1: K1, purl to last stitch, k1.
Row 2: K1, make 1 right (m1R), k1, make 1 left (m1L), k1. (5 stitches)
Row 3: K1, purl to last stitch, k1.
Row 4: K2, m1R, k1, m1L, k2. (7 stitches)
Row 5: K1, purl to last stitch, k1.
Row 4: K3, m1R, k1, m1L, k3. (9 stitches)
Row 5: K1, purl to last stitch, k1.
Row 6: K4, m1R, k1, m1L, k4. (11 stitches)
Row 7: K1, purl to last stitch, k1.
Row 8: Knit.
Row 9: K1, purl to last stitch, k1.
Row 10: K5, m1R, k1, m1L, k5. (13 stitches)
Row 11: K1, purl to last stitch, k1.
Row 12: Knit.
Row 13: K1, purl to last stitch, k1.
Row 14: K6, m1R, k1, m1L, k6. (15 stitches)
Row 15: K1, purl to last stitch, k1.
Rows 16-18: Knit.
Row 19: K1, purl to last stitch, k1.
Row 20: K5, ssk, k1, k2tog, k5. (13 stitches)
Row 21: K1, purl to last stitch, k1.
Row 22: Knit.
Row 23: K1, purl to last stitch, k1.
Row 24: K4, ssk, k1, k2tog, k4. (11 stitches)
Row 25: K1, purl to last stitch, k1.
Row 26: Knit.
Row 27: K1, purl to last stitch, k1.
Row 28: K3, ssk, k1, k2tog, k3. (9 stitches)
Row 29: K1, purl to last stitch, k1.
Row 30: K2, ssk, k1, k2tog, k2. (7 stitches)
Row 31: K1, purl to last stitch, k1.
Row 32: K1, ssk, k1, k2tog, k1. (5 stitches)
Row 33: K1, purl to last stitch, k1.
Row 34: Ssk, k1, slip the first stitch over, k2tog, slip the remaining stitch over. (1 stitch) (If this row confuses you, think of it as the cast off row with simultaneous decreases.)
Cut the yarn so there is an 8 inch tail.

Fold the wing in half at the purl ridge (purl sides facing each other), and use the tails to sew the edges of the wings together.

Make another wing identical to the first.
Use one of the tails to sew the first wing to the chick's body. You can put the increase or decrease side up, just make sure you do the next one the same way.

Sew the second wing on as symmetrically to the first as you can.
With a US #5 needle and the Contrast Yarn, pick up 4 stitches along the bottom of the chick, slightly to the left or right of center.

Make a 1 1/2 inch I-cord.
Next Row: K1, [kfb] 2 times, k1. (6 stitches)
Without turning the work, slip the first 4 stitches off the right end of the needle onto an extra US #5 needle.

With the 2 stitches remaining on the left needle, * work 3 rows of an I-cord. Slip the first stitch over the second, cut the yarn and pull it through the last stitch.**
Slip the next 2 stitches off the left end of the needle onto an extra needle. With those stitches and new yarn, work from * to **.

With the final 2 stitches and new yarn, work from * to **.
Weave in the ends.

Make an identical second leg on the other side of center.
With some white scrap yarn, sew three parallel lines for the first eye.

Thread the yarn through to the other side of the head and sew the second eye.
Use a contrasting color to sew two lines perpendicular to the white lines.

Bring that yarn to the other side of the head and finish the second eye.


7 stitches = 1 inch in stockinette stitch
About 1 1/2 inches tall and 3 3/4 inches in circumference
With US #3 double pointed needles and fingering weight yarn, cast on 8 stitches.
Join for working in the round, being careful to not twist the stitches.
Round 1: *K1, kfb, repeat from * to end of round. (12 stitches)
Round 2: *K2, kfb, repeat from * to end of round. (16 stitches)
Round 3: *K3, kfb, repeat from * to end of round. (20 stitches)
Round 4: Knit.
Round 5: *K4, kfb, repeat from * to end of round. (24 stitches)
Rounds 6-10: Knit.
Round 11: *K4, k2tog, repeat from * to end of round. (20 stitches)
Round 12: Knit.
Round 13: *K3, k2tog, repeat from * to end of round. (16 stitches)
Round 14: Knit
Round 15: *K2, k2tog, repeat from * to end of round. (12 stitches)
Round 16: Knit.
Round 17: *K1, k2tog, repeat from * to end of round. (8 stitches)
Cut the yarn and thread it through the remaining stitches, but do not pull it tight yet. First fill the egg with stuffing, then you can pull the tail tight and weave in the ends.
You can keep your eggs plain and simple, or knit some stripes into the pattern, or try some duplicate stitching to create polka dots, vertical stripes, or any other embellishment you can think of.

|
Удобный органайзер для круговых спиц |

Few things are more unruly than a bunch of circular needles! I've come up with a simple way to keep them all organized, and my life hasn't been the same since!


www.purlbee.com/the-purl-bee/2008/1/29/whits-knits-circular-needle-organizer.html
|
Без заголовка |
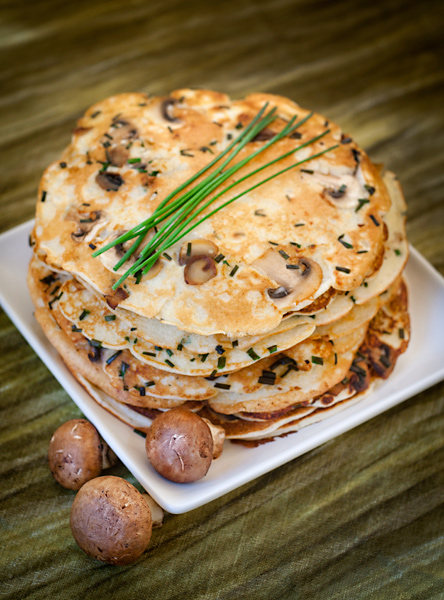
Не знаю, как Вы, а я обожаю блины и при чем любые. Есть сайт, который полностью посвящен блинам))) Он так и называется "Рецепты блинов" Представляете?
На нем каких только вкусняшек нет, например, рецепт блины с припеком.
Ингредиенты для теста:
Мука 200 гр.,молоко0,5 л.яйца 2 шт, сахар 1 ч.л., сухие дрожжи 10 гр., соль на кончике ножа, сливочное масло 50 гр.
Ингредиенты для припёка:
Грибы 100 гр. сушёных или же 500 гр. свежезамороженных
Лук репчатый 1 шт. (небольшая).
Растительное масло для жарки
Для начала надо сделать опару. Для этого в глубокой мисочке надо смешать немного подогретого, но не кипяченого молока, дрожжи, сахар и половину муки. Всё это надо накрыть крышкой или же чистым полотенцем и оставить в тёплом месте на 1-2 часа. Затем надо хорошо перемешать тесто и добавить к нему оставшиеся продукты: яйца, растопленное масло, молоко, соль и муку.
Теперь тесту надо полежать ещё 1 часик. Рецепт блинов с припёком достаточно долгий, но совсем не сложный.
Теперь готовим припёк. Для этого обжариваем мелко нарезанные грибы и лук. Всё это немного остужаем и подмешиваем к тесту. Затем можно жарить блины с припёком.
Есть ещё и другой рецепт блинов с припёком. Он отличается от первого тем, что обжаренные грибы с луком не добавляются в тесто, а выкладываются на сковороду следующим образом. Сначала на сковороду наливается первый очень тонкий слой теста и немного обжаривается. Сверху на него насыпается немного припёка, а сверху на припёк ещё один слой теста.
По моему замечательные получатся блины. Надо заняться. Зайдите на сайт, поищите еще рцепты. Вам понравится
|
Узоры крючком |
|
Ажурные блинчики |
|
Век вяжи - век учись! Кромочные петли с накидом. Мини МК |
Автор: Наталия
Кромочные петли с накидом, простое решение для шарфов, поясов, планок.
Край получается аккуратным и более плотным.
Узелковый край с накидом
Продолжение мастер-класса здесь:
http://forum.knitting-info.ru/index.php?s=b378b10e...mp;p=1075514&#entry1075514
|
Ананасовый узор крючком |
Make a chain.
1st Row - Draw yarn through 4th stitch from hook, skip 1 chain, draw through next chain and draw through the 3 loops on hook; chain 1. * Draw loop through the same stitch as last loop, skip 1 chain, draw through next chain, draw through the 3 loops on hook; chain 1. Repeat from * to end of row. Break off.

2nd Row - Fasten yarn through chain of 1st row; chain 4. Draw loop through 1st space, through 2nd space, through the 3 loops on hook; chain 1. * Draw loop through space last used, through next space, through 3 loops on hook; chain 1. Repeat from * to end of row. Break off. Repeat 2nd row.
2-й ряд - Закрепите нить через цепочку 1-й ряд, цепочки 4. Нарисуйте контур через первое пространство, через второй пространства, через 3 петли на крючке; цепи 1. * Нарисуйте контур в пространстве последнего использования, в течение следующего пространства, через 3 петли на крючке; цепи 1. Повторить от * до конца ряда. Оторвать. Повторите 2-й ряд.
Source: Woolco Knitting & Crocheting Manual
NOTE: This is not the crochet pineapple shape. This stitch is an antique pineapple stitch first published in crochet books in the early 1900s.
Качеством перевода я не довольна. Будем разбираться по-своему.
freevintagecrochet.com/how-to-crochet/pineapple-stitch


")
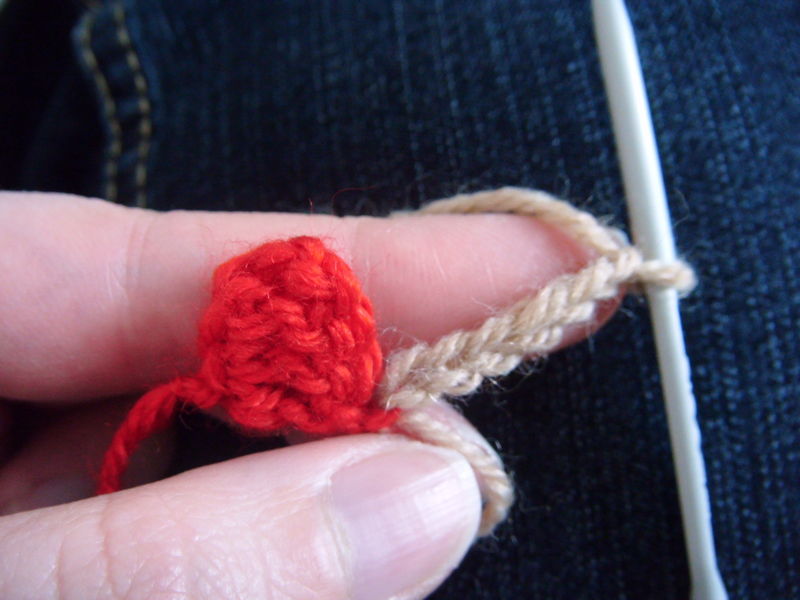
The pineapple stitch is one of my favorite crochet stitches ever.After I discovered this stitch in one of the volumes of a needlecraft encyclopedia in my college library, I've been hooked. The look of inverted hearts piled over each otherand the thick textured crochet fabricit produces is more than enough to entice me.
However, it's a mystery to me why I haven't found any modern pattern using this stitch. When I Googled it, the pages that came out only shows how to do the stitch and NOT how to use it. Even Ravelry does not include the stitch in its listing of crochet techniques.
It probably has to do with the way the pineapple stitch is crocheted to make a rectangle. It is worked from the one side only which requires breaking off at each end of the row and attaching yarn again at the beginning of the row.
This results into a lot of loose ends, which can be utilized as fringes. But working this way is cumbersome, wastes a lot of yarn, and well, uhm, boring.
Moreover, the resulting crochet fabric is slightly biased. Blocking is very much required.
Well I don't want this beautiful stitch to rot in vintage crochet books. Here are various ways to work the pineapple stitch and use it in crochet projects, too.

Before crocheting the pineapple stitch, it is best to study its anatomy first. This will make it easier to give instructions about its variations later on.
The diagram floating right will be used as the chart symbol for the pineapple stitch in all of my patterns. The pineapple stitch will be abbreviated as ps.
Top Loop - connects the ps to other ps's or other stitches and where subsequent ps's will be anchored
Leg Loops - anchors the ps in place
Lid Chain - caps ps to make the "heart" or "pineapple" pattern more pronounced


 loops on hook.")


")


The following pattern is probably what you will find in vintage crochet books made available on the net.
Break off BUT DO NOT fasten off YET.
Метки: ананасовый узор |
Сердечки |
|
Без заголовка |
When I posted about my finished Guernsey Wrap, I said that I would write about the sewn bind off that I did to finish it. Jared recommended a stretchy bind off in the pattern and so I did Elizabeth Zimmerman’s sewn bind off. I think it’s my favorite yet. It’s not only easy to execute but it has a nice finished look to it and is super stretchy. Here is how it’s done:

Cut your yarn to a length about 3 times as long as the knitting and thread it onto a needle. Insert the needle into the first two stitches, purlwise . . .

. . . and draw it through

insert the needle into the first stitch on the knitting needle as if to knit, draw the yarn through and . . .

. . . slip the stitch off

Repeat.

This creates a super stretchy bind off that actually resembles your long tail cast on. My new favorite.
Источник: italiandishknits.com/2012/03/25/super-stretchy-super-easy-sewn-bind-off/
|
Без заголовка |
ВЯЗАНИЕ ГРУППАМИ СТОЛБИКОВ ПО ДИАГОНАЛИ
В сумме у нас получается довольно простым методом очень интересный эффект энтерлак. Результат очень интересный и даёт возможность пофантазировать. Описание на английском языке, но всё понятно, благодаря довольно обстоятельному МК.
Since I have been asked several times, here is the tutorial in English. (Sorry if there are any mistakes, don't hesitate to correct me! )

What you need:
Wool in several colors (there are 13 colors in the sample above)
A crochet (the size recommended for the wool)
Scissors
That's all!
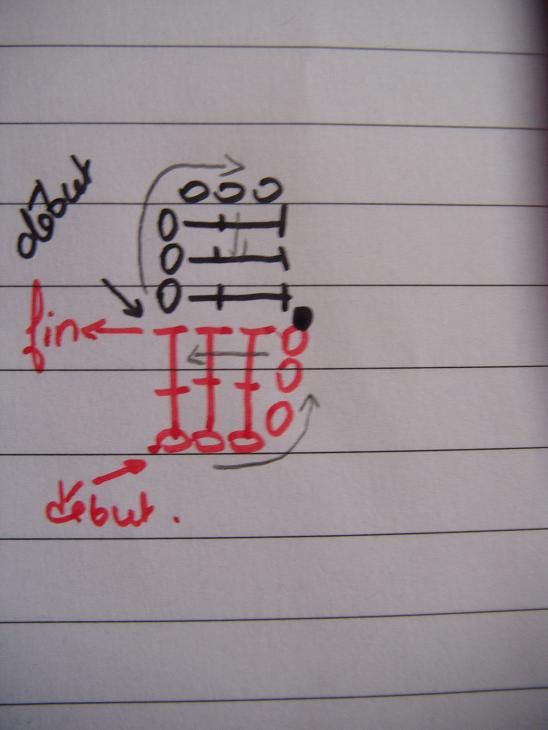
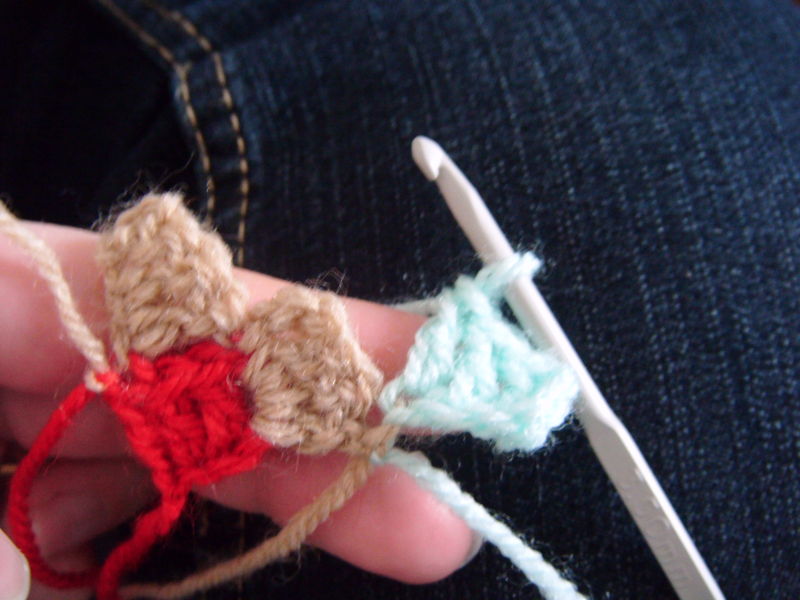
This is made in two steps : one for increases, one for decreases. The only change is in the beginning and the end of each row, but the idea stays the same.
!!You will need to turn your work between each row!!
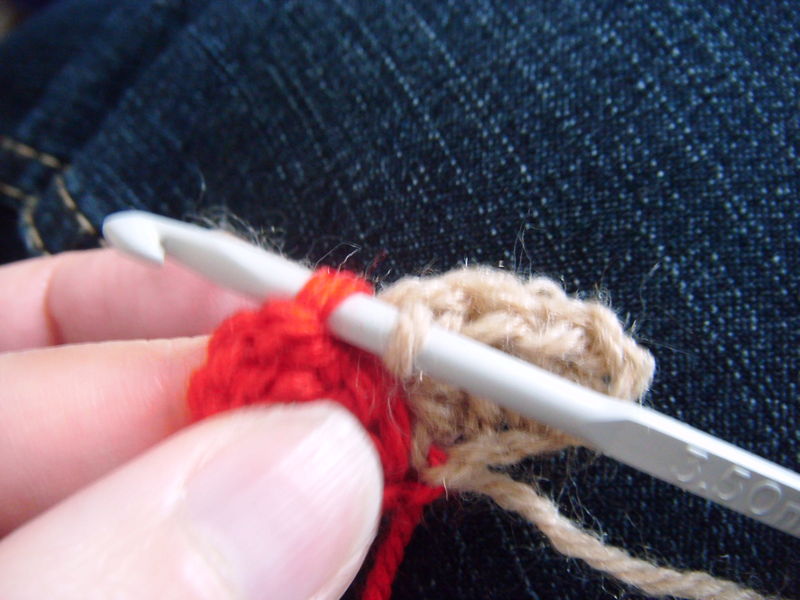
What I call treble is treble for UK, double for US:
yarn over, insert hook through next stitch, yarn over, hook back through stitch (3 loops on hook), yarn over and pull through 2 loops (2 loops on hook). yarn over and pull through 2 remaining loops.
To begin :

Chain 6 (=3 chain + 1 treble).

Then do 1 treble in the third chain from the beginning, and 2 other treble in 2nd and 1st chain.


There you are, the first square is done. Cut your thread if you want to change color.
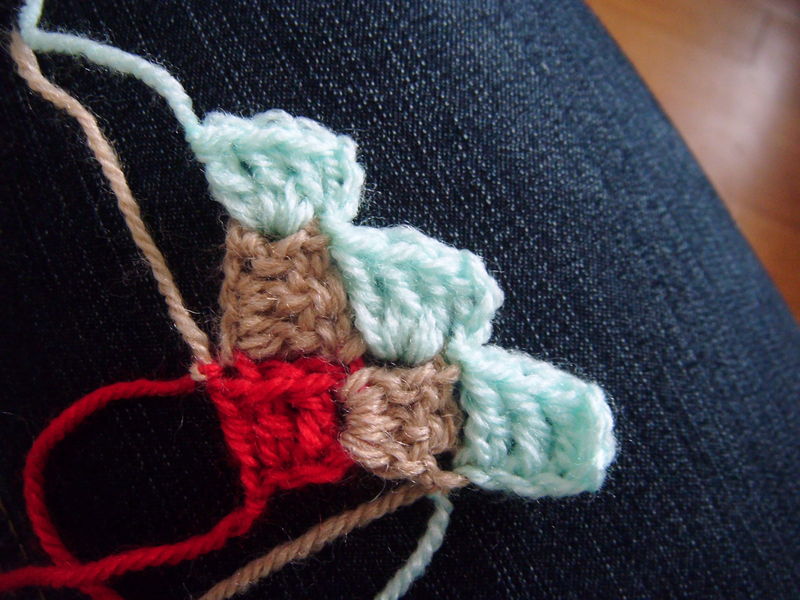
Increase rows :
Begin by joining the new color (knot the new yarn with the one you cut before). Turn your work.
Chain 6 (= 3 chain + 1 treble)

You will work this first square just as the first one in the beginning, aka 3 treble in the first 3 chains.

Here, you join with a slip stitch to the top of the previous row/square:
Then again : 3 chain followed by 3 treble in the space between the 2 first treble of the square of the row under.
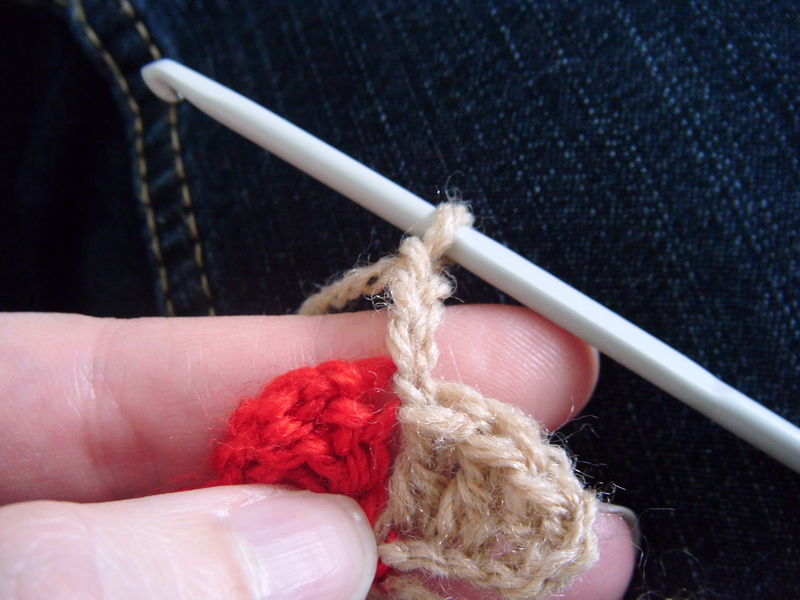

(It means there will only be 3 trebles shown by square when the work is done, since the 4th will be hidden under the trebles of the row above)Then you cut your thread, and make a knot with the following color.

And then again :
Turn Work
Chain 6
3 treble in the first 3 chain followed by a slip stitch in the row before to join:

Then Chain 3 and work 3 trebles in the first 3 chain of the previous row, join, etc.

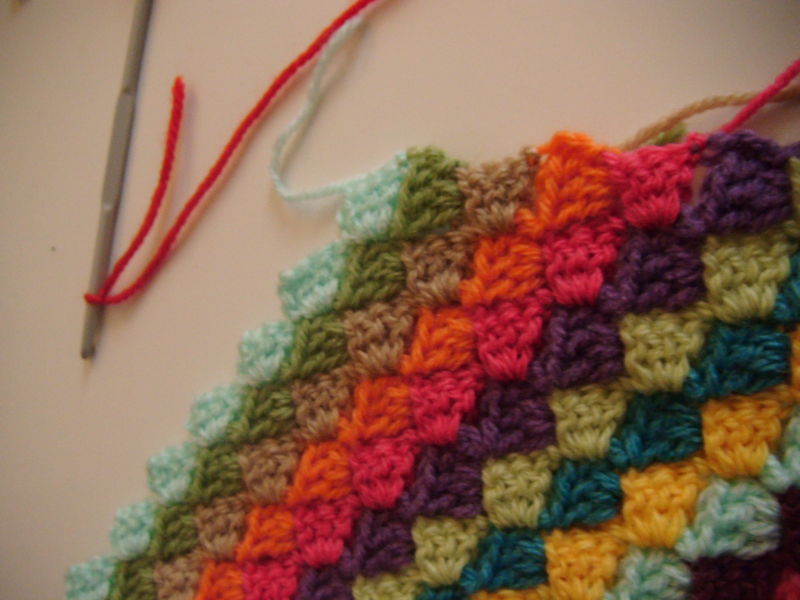
You are done with the increases. Keep doing this until you reach the width you want.
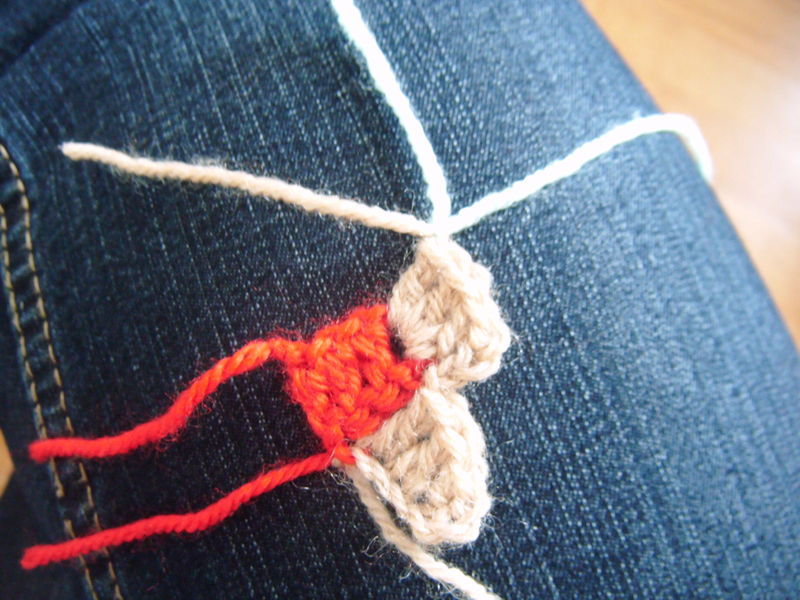
To decrease :
The idea stays the same for the inside of the rows. The only change is in the beginning and the end of each row.
Begin by a slip stitch in the beginning of the row (see pictures) :

Then work as follow :
Chain 3 and make 3 treble in the previous row.
Join with a slip stitch.

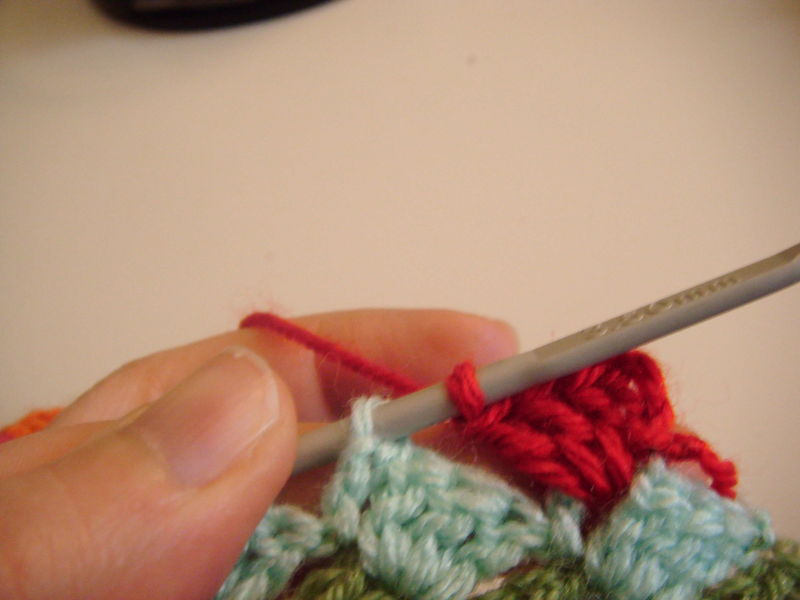
Work the rest of the row as usual, but to end the row you will need to stop one square before (join with a slip stitch and cut your yarn.)


To sum it up :

This is it! I hope this helps. Don't hesitate to ask questions in the comments if you need any help. And I would be delighted to see what you make with this tutorial.
Источник: fantaisiesdeflo.canalblog.com/archives/2011/10/13/22328113.html
|
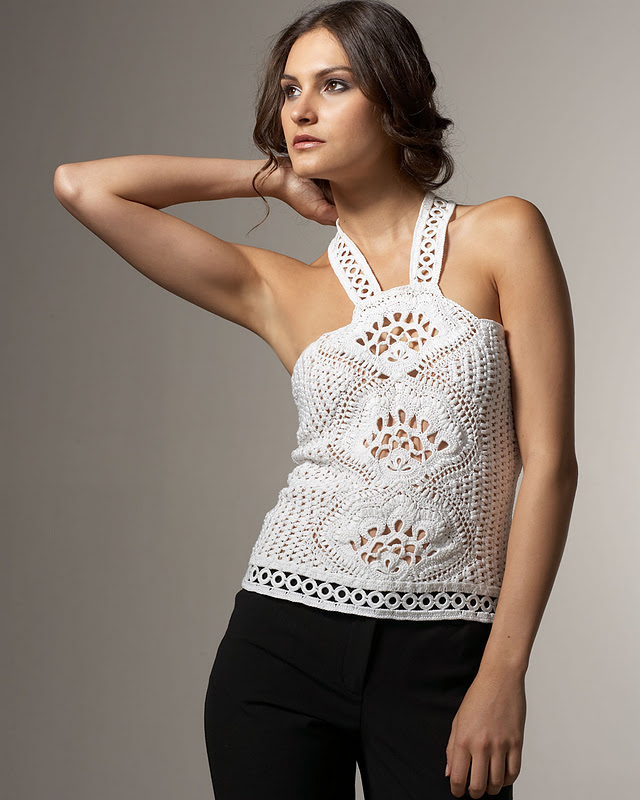
Очаровательное болеро и топ |
Charming top & bolero for girls, crochet patterns
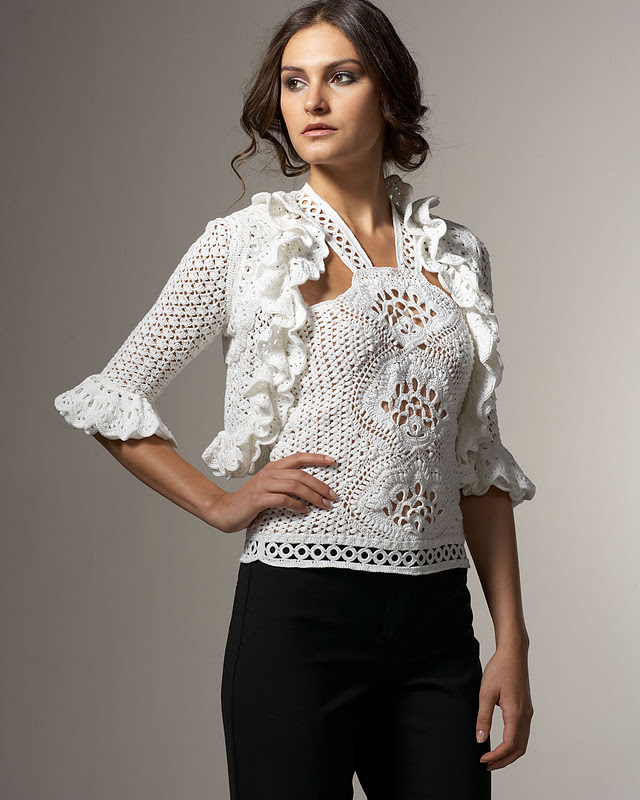
Charming top & bolero for girls, crochet patterns


|
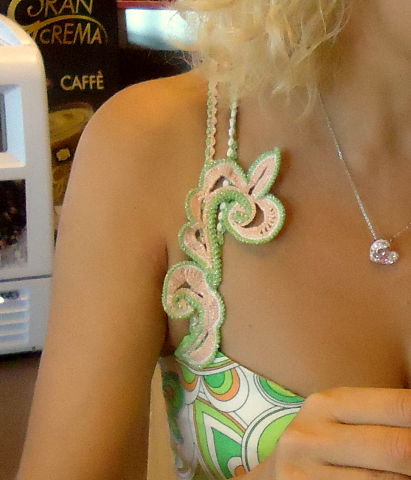
Идеи шарфов с цветами |
|
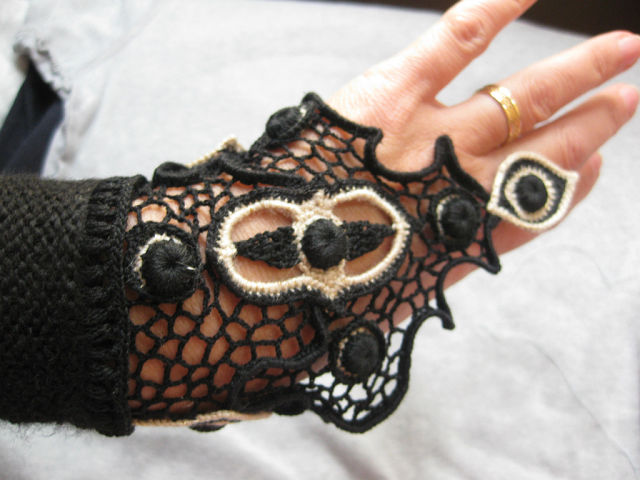
Перчатки вязанные крючком из разных ниток |
Перчатки у нас будут состоять из двух половинок - верхней и нижней.
Этап первый. Половина верхняя.
1. Перво-наперво, набираем воздушных петель столько, сколько вам надо от вершины мизинчика до той длины, которой у вас будут перчатки. Конкретно у меня это вышло 38.

2.Во-вторых, провязываем пальчик. Конкретно у меня это вышло: 1 ряд столбики с 1 накидом и ряд столбиков без накида. Провязали мизиниец.
3. Затем опять ряд столбиков без накида, НО до того момента, где у вас начинается безымянный палец. С того места набираем воздушные петли по его длине. И начинаем вязать второй пальчик.

Конкретно у меня это вышло: 2 ряда столбиков с 1 накидом.
4. Точно такая же операция для среднего пальца.

У меня это опять получилось 2 ряда столбиков с 1 накидом.
5. Точно такая же операция для указательного пальца. Опять же у меня вышло 2 ряда столбиков с 1 накидом.
Насколько я из практики поняла, по ширине меньше вяжется лишь мизинчик.
Итак, мы имеем почти готовую верхнюю половину перчатки

6. Обвязываем её полностью столбиками без накида.Верхняя половина готова.

Этап второй. Нижняя половина.
1. Мизинец, безымянный и средний пальцы вяжем по той же схеме, что и для верхней половинки.
2. Затем провязываем указательный палец, оставляя место для большого пальца. Я это делала обрывая вязание, двумя нитками.

3. Опять же все обвязываем. Над пропуском для большого пальца навязываем столько же петель, сколько снизу пропущено. конкретно у меня было 6.

Этап третий.
1. связваем все это вместе опять же столбиками без накида.

2. ну и последнее - большой палец
Набираем петельки там, где оставляли для него место и провязываем с постепенным сужением.

Вот что получается в самом конце=)

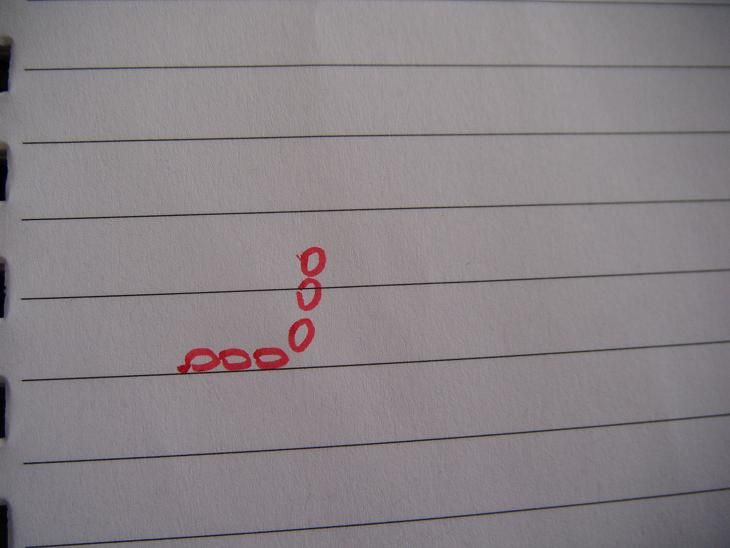
Ну и может быть кому-то будет проще. Попыталась схемку сообразить. Учитывайте, что все это строго индивидуально и зависит от ниток и от размера руки=)
верхняя половина. красные хвостики - в том месте я начинала новую нитку.

нижняя половина

Если говорить о трудностях, то в самой первой связанной мной перчатке я не рассчитала правильно место большого пальца.
Сейчас все на глаз делаю, попутно примеряя.
Удачи=)
Надеюсь, кому-нибудь поможет=)
Взято с сайта Привет ру
|
Ананасы по диагонали |
|
|
Шарф Molly by Susan Mills |
Как вам такой шарфик с Ravelry?

.

Описание нашлось только такое:
 Попробовала перевести
Набрать 32 петли (насчет кромочных ничего не сказано)
1 и 2 ряд: 10 Изн., (2 Лиц., 2 Изн.)х3 раза, 10 Лиц.
3 и 4 ряды укороченные: 6 Лиц., "обернуть и повернуть", 6 Изн., повернуть вязание 9 Лиц., "обернуть и повернуть" 9 Изн., повернуть вязание 6 Лиц, "обернуть и повернуть", 6 Изн., повернуть вязание, 10 Изн, (2 Лиц., 2 Изн.)х3 раза, 10Лиц.
Термин " обернуть и повернуть" - я понимаю так: повернуть вязание, снять первую петлю на другую спицу, сильно затянуть (так чтобы она получилась как бы с накидом перед ней). Я сумбурно объясняю, в крайнем случае можно найти в интернете описание вязания укороченных рядов.
Повторять эти 4 ряда до 72 дюймов.
|
Бежевая туника с шарфом-трубой |
|
Один узор-три модели |
|
КОРИЧНЕВАЯ ТУНИКА КРЮЧКОМ |
|
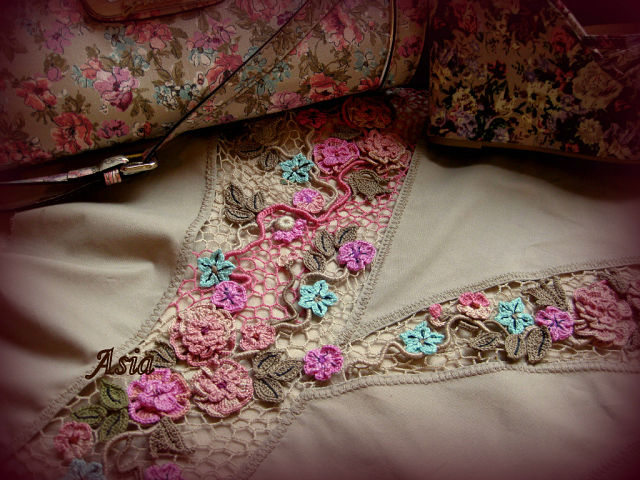
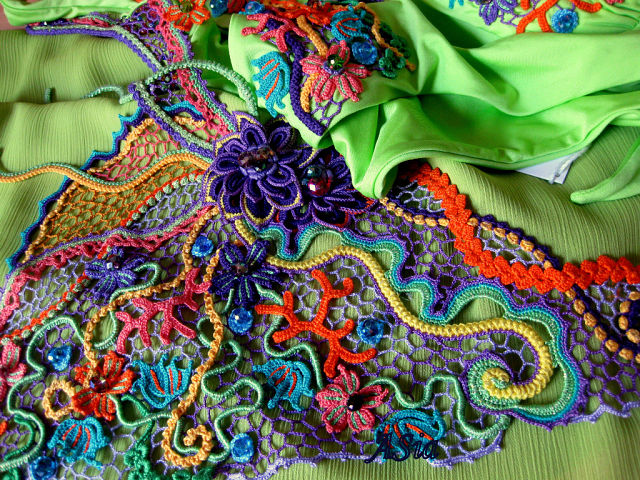
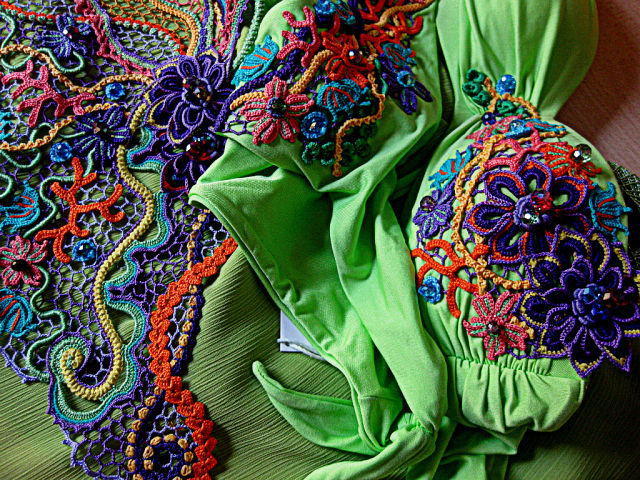
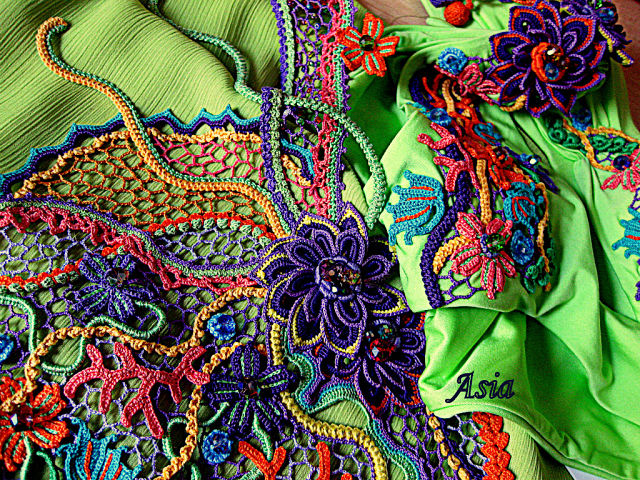
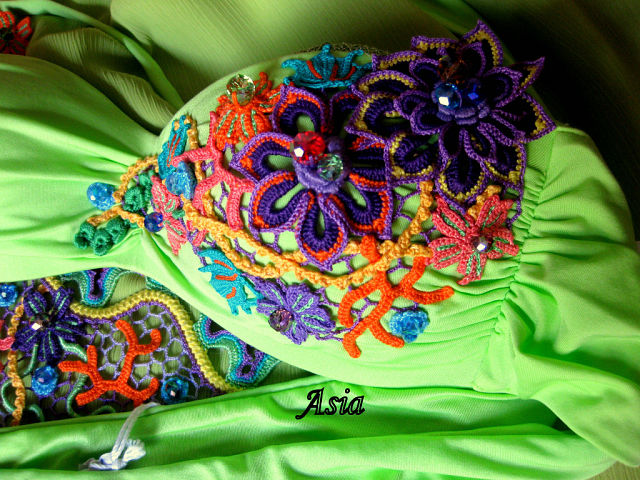
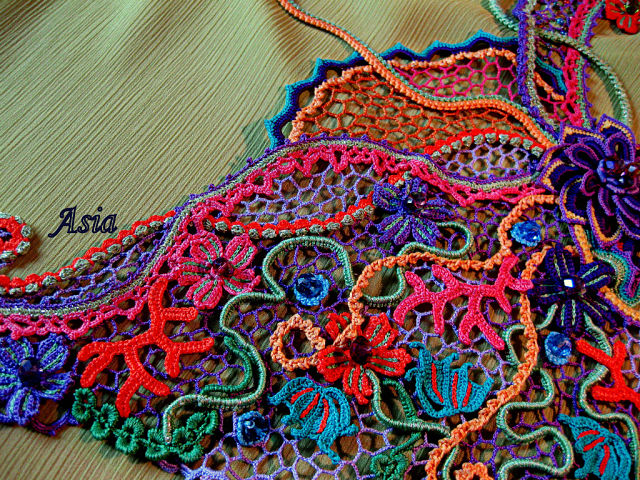
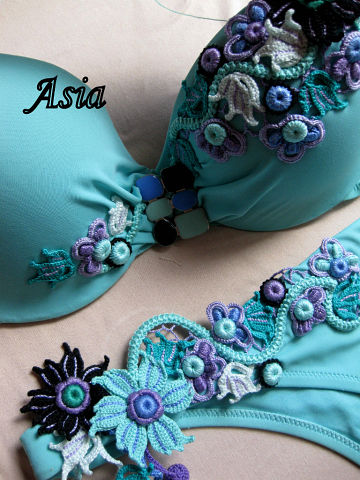
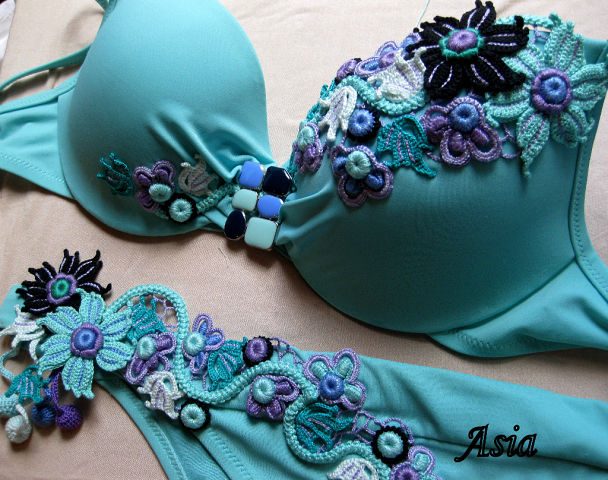
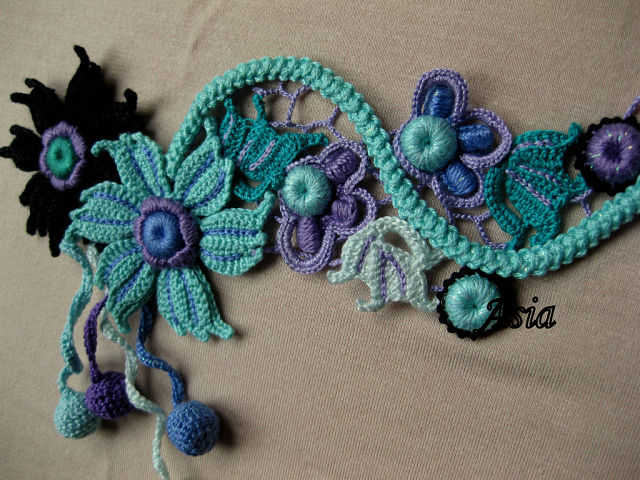
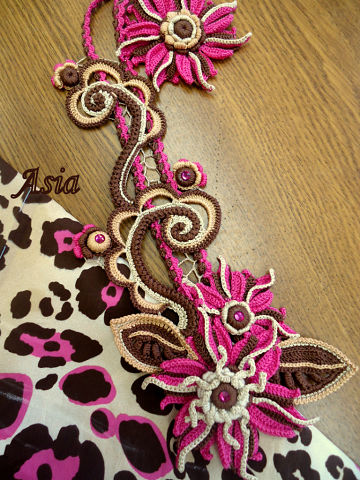
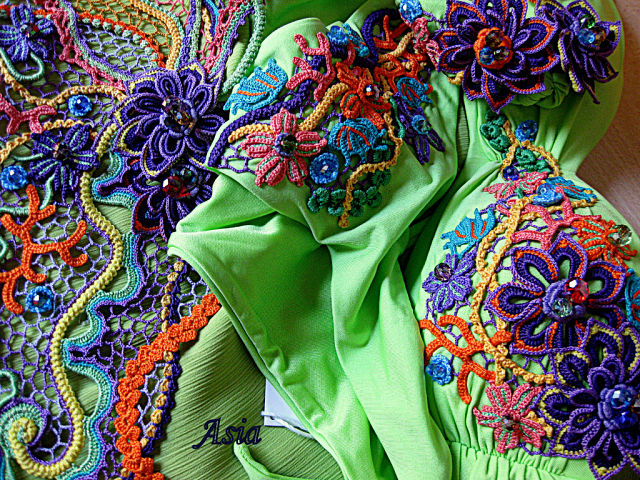
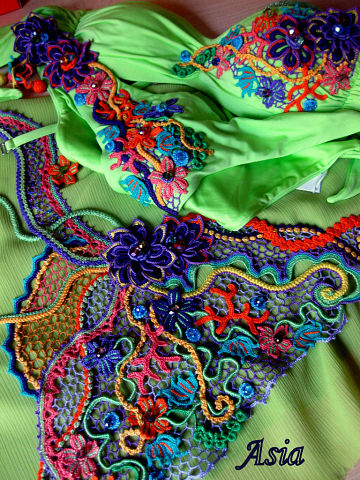
Малые формы.Ася Вертен |


|
ОРИГИНАЛЬНЫЙ ВОЗДУШНЫЙ ШАРФ КРЮЧКОМ. |
|