


Анна Москвичева ...
Le Borse di Mirtilla №15 2017 - (0)Издательство: Sprea SPA Язык: итальянский Журнал посвящен созданию сумок: вязание крючком...
РАДУЖНЫЙ ДЖЕМПЕР НА ОСНОВЕ "БАБУШКИНОГО КВАДРАТА" - (0)Inside Crochet №132 2021 - (0)
Издательство: Tailor Made Publishing Ltd Язык: английский Журнал по вязанию крючком из Ве...
Вязание крючком. Брюггское кружево для начинающих. Видео, схемы, описания. Продолжение следует... - (0)Вязание крючком. Брюггское кружево для начинающих. Видео, схемы, описания. Продолжение следует... ...
Без заголовка |

Скопировав формулы, вы стираете слова ПЕРВАЯ ЧАСТЬ ПОСТА, и ставите ВМЕСТО НИХ СВОЮ ПЕРВУЮ ЧАСТЬ. Я в примере ставлю ДВА ПЕРВЫЕ СТОЛБИКА СТИХОТВОРЕНИЯ. Затем стираете слова ВТОРАЯ ЧАСТЬ ПОСТА, и вместо них (между кавычек) СТАВИТЕ ВТОРУЮ ЧАСТЬ ПОСТА. В моем примере это третий и четвертый столбик стихов. Но если вам хочется как то оживить пост, украсить его, то между четверостишьями поставьте любой блинг, украшение, короткий разделитель, или просто звездочки. Вставьте как обычную картинку. СМОТРИМ на рисунке Перед кодом картинок стоит тег - РАСПОЛАГАТЬ ПО СЕРЕДИНЕ. Что б он встал посредине четверостишья.  С картинками пост будет чуть оживлен и е будет выглядеть вот так.
Ну и что бы окончательно завершить пост, я взяла его в обыкновенную рамку с разрывом, поставила фон рамки, картинку в разрыве. Как делать такие рамки подробно НАПИСАНО ВОТ ЗДЕСЬ. Там же даны и коды таких рамочек. Все это несложно, сделать по уроку один раз, и все запомнится. главное НЕ БОЙТЕСЬ ПРОБОВАТЬ! И У ВАС ВСЕ ПОЛУЧИТСЯ. Успехов в вашем творчестве. |

|
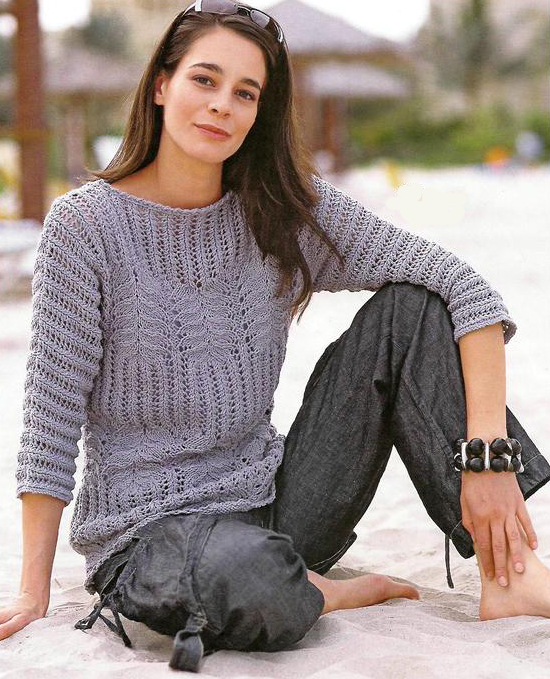
Серый узорчатый пуловер |
|
Зимнее настроение) |

|
Делаем конверт для диска |
|
Вязание и трикотаж в мире модных дизайнеров |
Anna Sui’s crochet owl hat in two colours:


Marc Jacobs shawl crochet with yarn of different thickness.


Anthropologie


Veronica Beard. Interesting solution of scarf for some imitation.


SONIA RYKIEL Accessories. Beautiful solutions of colours and textures for knitting.


………………………………………………………………
источник:
www.mypicot.com/club/groups/crochet-for-inspiratio...or-accessories-stitch-pattern/
Метки: вязание шапка сова трикотаж инспирации известные дизайнеры |
Dolce & Gabbana. Реконструкция узоров из коллекции 2013. |
The first reconstruction was stitch patterns for skirt and jacket for this design.

For jacket:


And for skirt:


These pattens very similar. Pattern for jacket has smaller spaces between the stitches. I think, it was created from pattern of skirt. And it was made because they decided to use more thick yarn for jacket, and spaces between stiches was to big.
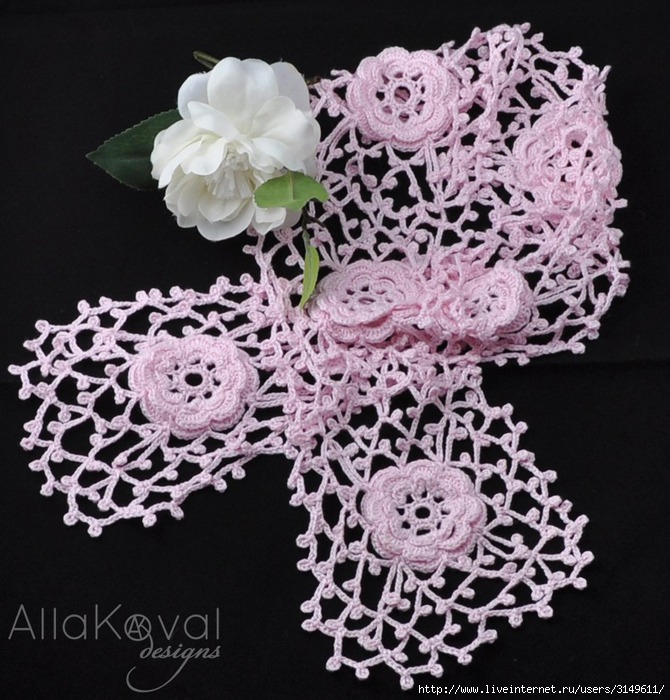
For the next I tried to make stitch pattern for dress/tunica and here I found more fun.


So, what I got:


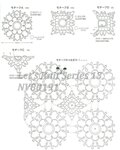
This dress/tunica was crocheted from top to down. Pattern consist of lace strip which connect each to another with slip stitch. Below I created a little tutorial how to make it.
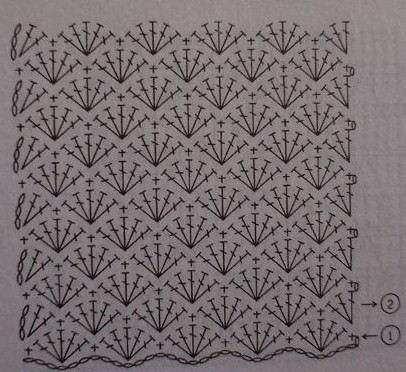
1. Follow diagram: make 13 chs, 1 dc/sc in seventh stitch from hook, 6 chs, 1 dc/sc in last st. Turn and work next row: 7 chs, 10 tr/dc with 1 ch between in space of 6 chains, 7 chs and slip stitch in last st.

2. Turn and work last row of this first lace motif: 10 dc/sc in space of 7 chs; than work 4 times in each space of 1 ch: 1 dc/sc, 3 chs, 1 dc/sc; 1 dc/sc in next space of 1 ch.

3. Now begin to work second lace motif: make 13 chs, 1 dc/sc in seventh stitch from hook;

4. 6 chs, 1 dc/sc in the same space of 1 ch of previous lace motif.

5. Turn and work next row: 7 chs, 10 tr/dc with 1 ch between in space of 6 chains, 7 chs and slip stitch.

6. Turn and work last row of this second lace motif: 10 dc/sc in space of 7 chs; than work 4 times in each space of 1 ch: 1 dc/sc, 3 chs, 1 dc/sc; 1 dc/sc in next space of 1 ch.

7. Work next lace motifs like second until you get desired length. Now I’ve got 4 lace motifs and I’d like to finish it.

8. For last motif work dc/sc with 3 chs between in space of 1 ch and 10 dc/sc in space of 7 ch.

9 -10. Work dc/sc in next lace motif and finishing it by working dc/sc with 3 chs between in space of 1 ch and 10 dc/sc in space of 7 ch.


11. Continue work in this way until you finish all motifs.

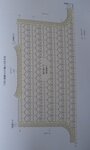
12. Now start to crochet second lace strip. Work it like first but in last row connect it to first by slip stitch in first grup of ds/sc and 3 ch. (See diagram).

13-14. Work second strip in the same manner.


15. Finish second strip like first.
Next lace strips work like second.

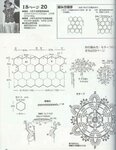
I tried to make some experiment with lace motifs and what I’ve got:
I worked puff stitches instead tr/dc.

Diagram:

And I worked relief dc/sc instead tr/dc:

Diagram:

источник
Метки: Dolce & Gabbana реконструкция узора узор крючком коллекция 2013 |
Двойная шапочка, теперь от BEROCCO |
Метки: двойная шапочка Berocco |
Боснийский бактус |
Метки: боснийское вязание бактус |
Изумительная простота |
|
ШАРФЫ (ассорти). |
|
Топы и маечки вязаные (подборка-13) |
|
Вяжем цепь крючком |

Метки: вяжем цепочку цепочка крючком вязанная цепочка бижутерия крючком |
В интерьере кружева |
Метки: кружева крючком в интерьере кружева люстры из кружев |
Без заголовка |
If you can Knit and Purl 12 stitches, you can easily make this jewelry. In fact if you can just do the Knit stitch you can make it, too!

I wanted to make Winter jewelry to wear with sweaters and coats and it seemed to me that it should be as snugged up as I am when it’s cold!

The process is simple. A little mohair yarn

and some beads

or vase fillers (any color will do!)

Some metallic cord.

And a little knitting.

On my teal colored necklace I used vase fillers I got in a bag from the Dollar Tree store.

Use some thin yarn that you like.

If you’re using a large flat bead or a vase filler that’s about 1″ to 1-1/4″ in diameter, use a US size 7 needle, and Cast-On 12 stitches and Knit in Stocknet stitch (which means Knit one row, then Purl one row—if you don’t know how to Purl, just knit the whole thing, it will be just as cute!) and keep going until you get approximately the length you want—-but DON’T BIND OFF YET!!
***If you are proficient at knitting circularly on double-pointed needles, knit this project that way and skip sewing it up.

If you’d like to use smaller beads or vase fillers like I did for the bracelet (they are approximately 3/4″ in diameter) use a US size 5 needle and cast on 12 stitches, knit in Stocknet Stitch (which is Knit one row, then Purl one row) until you have approximately the length you want, BUT DON’T BIND OFF!

With the knitting needles still in, gather the Cast-On edge together like this.

Pull it so that it is cinched like this.

Then whip stitch the back to close the seam. A whip stitch is when you take a stitch sideways from right to left (if you are right handed and reversed if you are left handed), and “whip” the yarn back over the seam to the right and take another stitch from the right again.

Once you’ve taken a few stitches, put one of your beads or vase fillers inside the tube like this.

Continue to sew up the back until you’ve enclosed the first bead and then a little more. Now tie some metallic thread (or cord) to cinch it into place like this. I tied two metallic thread cords between each bead. Continue working this way, one bead at a time.
Notice I haven’t bound off the knitting! That’s done at the very end.

When you’ve worked your necklace or bracelet to about the right length, then you’ll be able to calculate whether you must add a row or two before binding off. This way you will be absolutely sure that it’s the right length when you get to the end.
Add a fancy closure and some beads to finish by sewing them on.

Or a simple closure like this one.

Make a white necklace

Or a brightly colored one.

Make one for yourself, and more as gifts. Your friends will love you for it!
Метки: бусы бижутерия вязание и бижутерия |
Фото из Pinterest |

к сожалению не могу найти автора
|
Выставка колекционера моды Daphne Guinness |
http://myurbanrunway.blogspot.com/2011/08/fearless-chic-on-display-in-fit-daphne.html


Метки: Daphne Guinness Alexander McQueen Chanel Karl Lagerfeld Azzedine Alaia Rick Owens |