-Рубрики

 -Приложения

  • Перейти к приложению Дешевые авиабилеты Дешевые авиабилетыВыгодные цены, удобный поиск, без комиссии, 24 часа. Бронируй сейчас – плати потом!
  • Перейти к приложению Я - фотограф Я - фотографПлагин для публикации фотографий в дневнике пользователя. Минимальные системные требования: Internet Explorer 6, Fire Fox 1.5, Opera 9.5, Safari 3.1.1 со включенным JavaScript. Возможно это будет рабо
  • Перейти к приложению Открытки ОткрыткиПерерожденный каталог открыток на все случаи жизни
  • Настольные игры онлайнМы предлагаем Вам сразиться в любимые настольные игры со своими друзьями, не отходя от компьютера. У нас вы сможете поиграть в дурака, преферанс, тысячу, нарды, шахматы, шашки, крестики-нолики, точки,

 -Поиск по дневнику

Поиск сообщений в M_A_G_D_A

 -Подписка по e-mail


 -Статистика

Статистика LiveInternet.ru: показано количество хитов и посетителей
Создан: 13.01.2010
Записей:
Комментариев:
Написано: 4255


1302386254_60162972_1276215401_window (400x274, 1349Kb) 


39 (472x176, 85Kb)


accordion frame from DVD cases

Среда, 02 Мая 2012 г. 00:43 + в цитатник


Dinner and a movie? I prefer crafting and a movie! Next time you're watching your favorite film, transform the DVD case into a handmade picture frame. DVD cases make great frames, with their thin black border and clear plastic cover that creates a glass-like shine for your photos. Attach two or more cases to create an accordion-like frame, perfect to display on that empty mantle! 

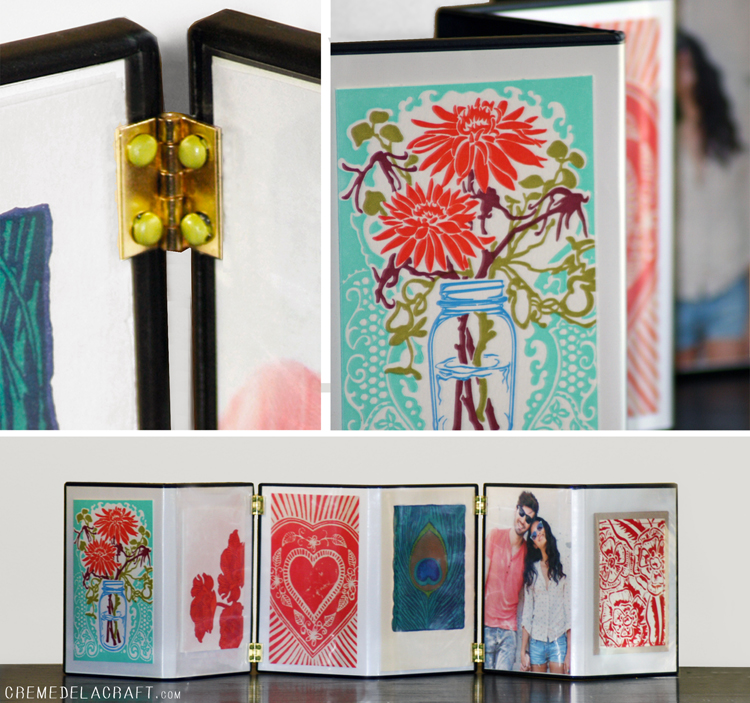
Materials: DVD Cases — Cards, Decorative Paper and/or Photos — Small Hinges (found at craft or hardware stores) — Small Brads — Glue Stick — Glue Gun

Steps: 
• Pull out the paper jackets from the DVD cases and turn them over so the white side is facing up.
• Using a glue stick, attach your photos/decorative paper to the white side of the paper. 
• Slide them back into the cases.
• Insert the brads into the hinges.
• Using a glue gun, attach the hinges onto the edges of the DVD cases to connect them.


And voilà! Share your creation with our Facebook community and subscribe here to receive our weekly DIY projects via email. 
 

Серия сообщений "CDs":
Часть 1 - vinyl record into candle holder
Часть 2 - Rrecycled CD case
...
Часть 13 - recycled lamp
Часть 14 - box with recycled cds
Часть 15 - accordion frame from DVD cases
Часть 16 - box
Часть 17 - curtain tie back
Часть 18 - cd storage
Часть 19 - kitchen

Рубрики:  DECOR/Frames, wall art, mirror

Метки:  


Процитировано 3 раз

Bias Tape Maker from a cutter

Среда, 02 Мая 2012 г. 00:41 + в цитатник


Hi!  This post is to share my recent discovery when I came across a bias tape maker in Susie Can Stitch.  I''m still learning to sew and seeing the cute little bias tape maker she have...make me want to have one too!...even though I haven't decide what to do with bias tape...but making them looks so much fun.

Since I don't have a bias tape maker...so, I just sort of 'make' one.... This is how I do it...

Material : Craft cutting blade, some fabric straps, hair straightener (yup...)

These are what I have on hand
a common craft cutting blade..
 
Prepare some fabric straps
 
Remove the end of the cutting blade
 
Remove the blade inside as well
 
Fold your fabric strap whichever way you want to bias tape to be... 
 
Insert the strap into the blade casing

A needle to push it will be helpful
 
Pull the strap from the tip...
 
Here comes the bias tape!!!
 
Use the thinner casing just the same way to product thinner bias tape
 
 
Easy Peasy...Quick! 
 
 Firm the shape with a hair straightener
 
What do you think?
Will you try this?
Let me know if this is useful!
 
 
Рубрики:  FASHION/Sewing patterns
USEFUL

Метки:  


Процитировано 181 раз
Понравилось: 5 пользователям

Printable Bias Tape Maker

Среда, 02 Мая 2012 г. 00:29 + в цитатник


Printable Bias Tape Maker

scientific_seamstress_bias_tape_maker.jpg
Something magical happens when a scientist switches out her lab coat for a sewing machine. When creative sensibilities are combined with a scientific approach to problem-solving, you get ideas that are at once innovative and completely logical. This printable bias tape maker by Carla from the Scientific Seamstress Blog is a perfect example of what can happen when you bring a science-based skill set into the studio. By thinking through all of the details required to make even, usable bias tape, she created a simple, straight-forward tool that anyone can make—and it only requires sheet of paper!
 
Рубрики:  FASHION/Sewing patterns
USEFUL

Метки:  


Процитировано 2 раз

clocks............

Воскресенье, 29 Апреля 2012 г. 01:05 + в цитатник


Серия сообщений "Clocks":
Часть 1 - craft book
Часть 2 - clocks
...
Часть 15 - clothpin crafts
Часть 16 - clocks
Часть 17 - clocks............
Часть 18 - decorate with coffee
Часть 19 - box & clocks
...
Часть 27 - ideas for kids rooms
Часть 28 - with coffee bean
Часть 29 - clocks

Серия сообщений "Furniture":
Часть 1 - Crafts room in a closet
Часть 2 - kids rooms
...
Часть 21 - CD stand
Часть 22 - get creative with tires
Часть 23 - clocks............
Часть 24 - table from old books
Часть 25 - door handle
...
Часть 30 - using pallets
Часть 31 - ideas
Часть 32 - cloth pin decoration


Метки:  


Процитировано 15 раз
Понравилось: 4 пользователям

zipper flowers

Воскресенье, 22 Апреля 2012 г. 02:02 + в цитатник


Серия сообщений "Zipper":
Часть 1 - Zipper lampshade
Часть 2 - Zipper Accessories
...
Часть 13 - zipper accessory
Часть 14 - recycled zippers
Часть 15 - zipper flowers
Часть 16 - zipper bracelet
Часть 17 - zipper accessories
Часть 18 - zipper button
Часть 19 - stylish bracelet

Рубрики:  FASHION/Embllishment
FASHION/Accessories
Flower Making

Метки:  


Процитировано 8 раз
Понравилось: 1 пользователю

diy rug

Воскресенье, 22 Апреля 2012 г. 01:53 + в цитатник

Как сделать оригинальный коврик своими руками

своими рукамиБез ковров и ковриков - никуда.

Но не всегда имеет смысл бежать в магазин и покупать готовый ковер.

В некоторых случаях, не только дешевле и оригинальнее, но и разумнее сделать коврик своими руками из льна или другой "летней" ткани.

Ведь летом такой коврик намного приятнее, чем шерстяной.

К тому же, согласитесь, этот коврик выглядит очень стильно, современно, и украсит любой интерьер.

Итак, чтобы сделать такой коврик, Вам понадобится грубое полотно.

Будет ли это лен, "диагональ", джинс или что-то еще - выбирайте сами.

Понадобится полоса длиною в 2 м 20 см и шириной в 51 см для верхней части


коврик своими рукамиИ прямоугольник 51 см х 63 см для основы

На этой схеме - все размеры

Обратите внимание на схему В.

Там Вы увидите, как правильно закладывать склады.

Итак, приступим.

Расчерчиваете линии на длинной полосе и закладываете склады.

Первую лучше сразу пристрочить. Остальные можно просто закрепить булавками или прометать. На Ваш вкус.


коврик своими руками

Каждую полосу-складу нужно присторочить и очень надежно. Можно двойной строчкой


как сделать коврик своими руками

То, что получится - уже интересный коврик.


коврик своими руками

Но мы пойдем дальше.

Некоторые полосы мы будем надрезать как показано на фото


коврик своими руками

В этом примере три полосы оставлены целыми, следующие три режем, следующие три опять целыми. И так до конца.

Теперь нужно взять жесткую щетку и "разлохматить" срезы.

Получается во такое полотно.


как сделать коврик своими руками

Ваш коврик готов!


Серия сообщений "Rugs & floor":
Часть 1 - Kids Rug
Часть 2 - Bathroom decoration
...
Часть 19 - mat from remnant
Часть 20 - carpet of remnants
Часть 21 - diy rug
Часть 22 - children mat
Часть 23 - rope mat
Часть 24 - fluffy rug
Часть 25 - rug
Часть 26 - rug

Рубрики:  RECYCLE/Blankets, jeans,leather....etc

Метки:  


Процитировано 16 раз
Понравилось: 2 пользователям

space saving kietchen

Пятница, 20 Апреля 2012 г. 20:49 + в цитатник


saving system 1

Michel Corno designs a new kitchen cabinets and drawers. The black and silver storage spaces hang on the wall make them look nice and simple. It is a dynamic space-saving interior design system. The main kitchen unit can be found at the core: stove, oven, faucet, sink with a preparation surface in between and a refrigerator to one side. This saving system can be applied not only for the kitchen, but you can also apply this system for bed, televisions, and many other household objects. The advantage of this system is you can slid up and down the objects and move them out when you are no longer use them. The objection of this system is on allowing plumbing-or-piping-required fixtures to float freely in space.

saving system 2saving system 3


Tags:

Рубрики:  DECOR/Kitchen

Метки:  


Процитировано 3 раз

no comment!!!!!!!!!!!!!!

Среда, 04 Апреля 2012 г. 21:44 + в цитатник


Рубрики:  USEFUL

Метки:  


Процитировано 3 раз
Понравилось: 1 пользователю

natural frame

Среда, 04 Апреля 2012 г. 18:45 + в цитатник


Серия сообщений "Branches":
Часть 1 - Decorative Bottles
Часть 2 - candles
...
Часть 28 - twig chandlier
Часть 29 - decoration out of green branches
Часть 30 - natural frame
Часть 31 - decorate with branches
Часть 32 - jewelry tree

Рубрики:  DECOR/Frames, wall art, mirror
RECYCLE/Blankets, jeans,leather....etc

Метки:  


Процитировано 11 раз
Понравилось: 4 пользователям

tiles with figure

Среда, 04 Апреля 2012 г. 18:03 + в цитатник


Want to make a unique piece of art to decorate your empty walls? Or do you want to make the perfect gift grandparents or relatives? Tile with the figure - this is a very original gift, especially if it is made ​​by hand.
Here is a simple way to make this a modern and minimalist design, using a tile, tissue paper and a printer. Such tiles patterned to give pleasure

Tile with the figure


Step 1: Getting Started

You will need:
1. The qualitative picture 2. Computer 3. 9 tiles in size 10x10 cm 4. 5 sheets of paper for printing 5. 5 strips of tissue paper the size of 10x20 cm 6. Double-sided tape 7. Printer 8. Stationery Knife 9. Decoupage glue 10. Brush Step 2: Compilation and editing photos - First, select a good photo. Be sure to take a photo where you do not cut off important parts (eg eyes) in the future. - Choose how much picture you want to use and cut the it into a square. Place the box in the new document. - In this document, you can: Change the image size up to 30x30 Desaturate the image. Change brightness and contrast to produce the desired result. Use the "brush" to get rid of unwanted items in the background. Step 3: Divide the your image into smaller elements. To print a document, you have to make a few extra steps. - Make a grid on the edited photo to line 10 and 20 cm - Cut the squares between the lines. Cut off 0.5 cm from the line! Otherwise, eventually you'll get a distorted face. - Place boxes in five different instruments, 2 in each, except the last one in which to insert only one. - If necessary, turn the new documents to make them suitable for printing. Step 4: Print the image on tissue paper. Obviously, it's hard to put tissue paper in an ordinary laser printer. There is a good trick to do it. 1. Take a 10x20 cm strips of brown paper. Stick double-sided tape on the top and bottom sides. 2. Attach them to the middle of the paper. 3. Do not use an ordinary glue, since it will melt and ruin your printer and paper and printers (believe me). 4. Type 5 documents to 5 pieces of tissue paper. Step 5: Cut the parts do not need further explanation. Cut all 9 squares. By the way, try not to cut yourself. Step 6: sticking Apply glue to decoupage on tiles. Glue the tissue paper. If you want a softer look of the image, paste pieces of the printed side of the tiles for a more clear view, glue the printed side out. During the drying process, add at least 2 layers of decoupage glue on the surface of the tissue paper. Step 7: Done! Now you can put the tiles into the frame, or just stick to the board or wall. Good luck!


Tile with the figure Tile with the figure


Tile with the figure Tile with the figure


Tile with the figure


Tile with the figure


Tile with the figure


Tile with the figure


Tile with the figure


Tile with the figure Tile with the figure


Tile with the figure Tile with the figure

Tile with the figure


Tile with the figure
 
Рубрики:  DECOR/Frames, wall art, mirror
DECOR/Walls

Метки:  


Процитировано 8 раз
Понравилось: 1 пользователю

more ideas

Воскресенье, 01 Апреля 2012 г. 02:01 + в цитатник


http://coisasdagil.blogspot.com

Серия сообщений "Shelves":
Часть 1 - Ideas for BOOKS
Часть 2 - Ideas from old books
...
Часть 24 - suitcase shelves
Часть 25 - storing shoes
Часть 26 - more ideas
Часть 27 - useful furniture ideas
Часть 28 - decor with tennis ball
...
Часть 32 - shoe shelves
Часть 33 - storage
Часть 34 - ideas

Рубрики:  DECOR/Kitchen
FASHION/Bags

Метки:  


Процитировано 4 раз
Понравилось: 1 пользователю

ideas

Воскресенье, 01 Апреля 2012 г. 01:48 + в цитатник


Серия сообщений "Bathroom":
Часть 1 - Bathroom decoration
Часть 2 - Sea Shell Beauty
...
Часть 11 - cute ideas
Часть 12 - toilet covers
Часть 13 - ideas
Часть 14 - SRE
Часть 15 - bath towel
...
Часть 21 - recycled lighthouse
Часть 22 - bathroom set
Часть 23 - creative ideas

Рубрики:  COOKING/Dessert
DECOR/Baby Stuff
DECOR/Kitchen
RECYCLE/Blankets, jeans,leather....etc
COOKING/Decorative Serving

Метки:  


Процитировано 7 раз
Понравилось: 3 пользователям

re style old shirts

Воскресенье, 01 Апреля 2012 г. 01:34 + в цитатник


 http://wobisobi.blogspot.com/2011/06/mens-shirt-to-halter-diy.html
 

Customização de duas camisas masculinas de cores diferentes, tanto que dá para observar que no encontro das duas no abotoamento da frente elas desencontram, o ultimo botão está desaotoado porque desencontrou.

 
msmadelyn.blogspot.com
Isso é para a garotada, a camisa virou uma saia, neste site cada uma deu sua versão para a camisa.

Рубрики:  FASHION/Re-fashion
RECYCLE/Blankets, jeans,leather....etc

Метки:  


Процитировано 28 раз
Понравилось: 2 пользователям

place mats into a clutch

Воскресенье, 01 Апреля 2012 г. 01:30 + в цитатник


Pinned Image
#23 Re-style some place mats into a clutch

http://pinterest.com/pin/258534834828447216/

Рубрики:  FASHION/Bags

Метки:  


Процитировано 5 раз
Понравилось: 1 пользователю

Men's t shirt to------>

Воскресенье, 01 Апреля 2012 г. 01:29 + в цитатник


Men's Shirt to Halter, DIY

 
After I made my Re-Style this week,  I was left with a pitiful, sleeveless, men's shirt.  I went directly to the internet and started to search ideas.   Then I remembered that Keira, from the Blog A Pretty Penny, had posted a Re-Style about a Halter made out of a men's shirt,HERE. She, in turn, got this fantastic idea from, Christina, and her cute  blog~ 6 petals, Here.   I thought this would be an excellent idea for my poor over sized, sleeveless shirt. Just look how sad my shirt looks, down below, before the Re-Style. 
Seriously, it needed some love.

 Tutorial
Things You Need.
1. Men's shirt
2. Scissors
3. Sewing Machine
4. Large safety Pins
 
 
 Take your scissors and cut from the arm pit to the top collar, like the picture above.

Then on the back, cut out  from the arm pit straight across to the middle leaving a 5 inch band, do that on both sides.


 Try on the shirt inside out and pin under your arms to make the shirt fit, then pin all the way down. I darted on the chest area, to take out extra material.
Try on the shirt again after you have sewn it to make sure it fits.  Now is the time to make any corrections.
Once you like how everything looks, you can trim all the excess material.
and Iron.


Then I attached the braid to the top.
  I ironed and hemmed the arms, to make it have a finished look.
 
Рубрики:  FASHION/Re-fashion

Метки:  


Процитировано 40 раз
Понравилось: 3 пользователям

embellishment

Воскресенье, 01 Апреля 2012 г. 00:03 + в цитатник


osinka.ru
 
Рубрики:  FASHION/Embllishment

Метки:  


Процитировано 41 раз
Понравилось: 4 пользователям

Поиск сообщений в M_A_G_D_A
Страницы: 23 ... 21 20 [19] 18 17 ..
.. 1 Календарь