Дешевые авиабилетыВыгодные цены, удобный поиск, без комиссии, 24 часа. Бронируй сейчас – плати потом!
 Я - фотографПлагин для публикации фотографий в дневнике пользователя. Минимальные системные требования: Internet Explorer 6, Fire Fox 1.5, Opera 9.5, Safari 3.1.1 со включенным JavaScript. Возможно это будет рабо
 ОткрыткиПерерожденный каталог открыток на все случаи жизни

baby shower |
 |
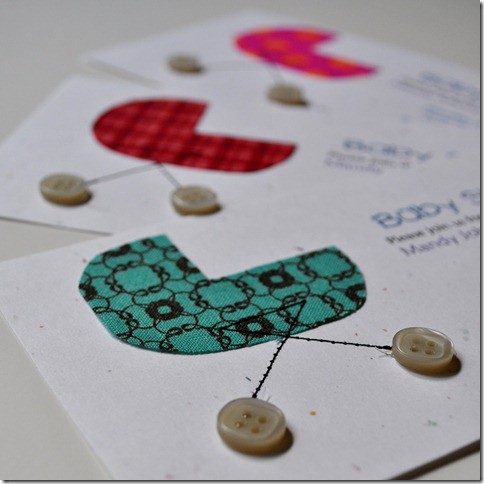 |
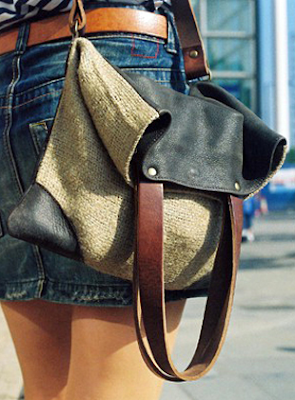
Tão charmoso só que precisa costurar e colar os botões.
 |
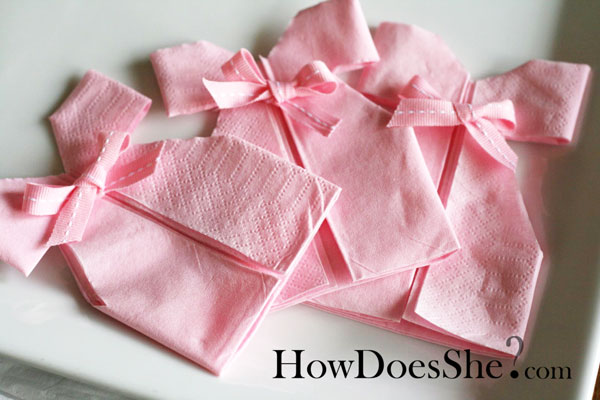 |
| http://www.howdoesshe.com/napkin-dress-tutorial-perfect-for-a-shower |
Метки: baby stuff |
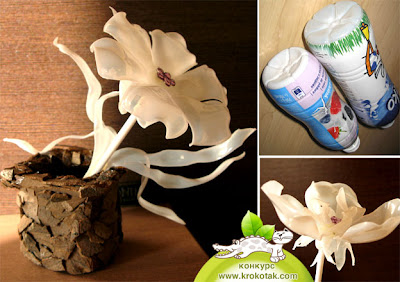
recycled plastic bottle |
 |
| http://www.gulnurozdaglar.com/buttons.html |
       http://coisasdagil.blogspot.com/ |
Серия сообщений "Vertical Garden":
Часть 1 - vertical flowers
Часть 2 - Vertical planting
...
Часть 7 - garden in a frame
Часть 8 - vertical garden
Часть 9 - recycled plastic bottle
Часть 10 - wire flower hanger
Часть 11 - vertical garden
Часть 12 - planter
Часть 13 - garden of plastic bottles
Серия сообщений "Buttons":
Часть 1 - zigzag flower
Часть 2 - New ways to stich your buttons
...
Часть 12 - buttons
Часть 13 - covering a button
Часть 14 - recycled plastic bottle
Часть 15 - Chinese buttons
Часть 16 - embellishment
...
Часть 19 - zipper button
Часть 20 - rock buttons
Часть 21 - useful
Метки: plastic bottles |
recycled zippers |
 |
http://www.portalsaofrancisco.com.br/alfa/historia-do-ziper/historia-do-ziper.php
http://www.askandyaboutclothes.com/Teasers/Teasers/ZipperHistory.htm
http://www.fashionebook.com.br/e-book/?p=2078
http://www.answerbag.com/a_view.php/1793#ixzz18eFTn43x
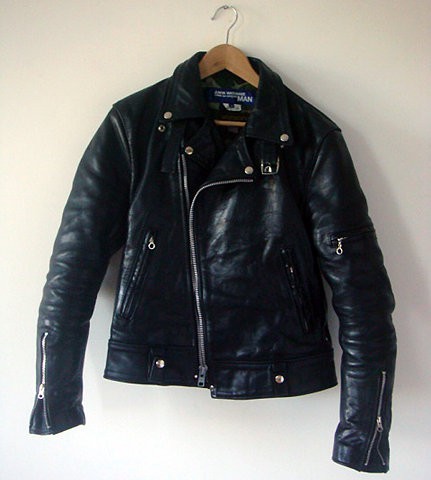 |
O zíper pode ainda ser fixo ou destacável. O zíper destacável é usado em jaquetas que precisam ser abertas totalmente e seus ganchos normalmente são de peso médio porque se adaptam melhor ao peso da peça.
O zíper dentro do conceito Rock é o mais apropriado em seu conceito.
 |
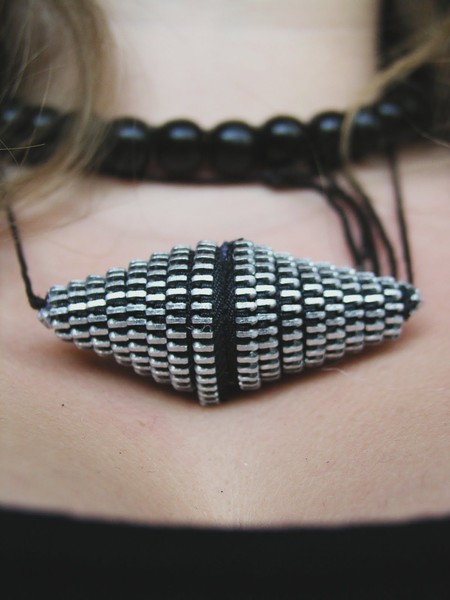 |
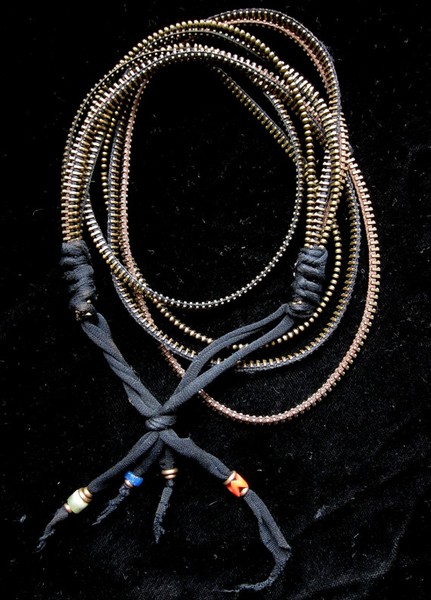
http://make-handmade.com/2011/11/03/crafty-jewelry-with-zipper/
 |
|
http://www.toxel.com/inspiration/2011/01/05/stylish-and-creative-necklaces/ |
 |
 |
 |
 |
Desde então, por várias vezes, o zíper entrou e saiu da moda, tendo sido usado por estilistas e designers. A coleção de Christian Dior, para o verão do ano 2000, teve, como estrela principal, o zíper, usado de todas as formas, na vertical, horizontal, nas barras das calças e até no cabelo.
consumo no mercado nacional está assim dividido:
 |
http://www.zonamanualidades.com/2010/10/20/como-ha...emallera-para-adornar-diadema/
 |
http://shannonmakesstuff.blogspot.com/2011/03/pleated-zipper-flower.html
 |
http://lefrufrublog.blogspot.com/
 |
http://www.craftaholicsanonymous.net/zipperrectangularish-square
 |
| http://maverydesigns-fashionlab.blogspot.com/ |
 |
| http://www.sammoon.com/product.asp?cat=handbag |
 |
 |
 |
http://www.craftaholicsanonymous.net/zipper-flower-tutorial
 |
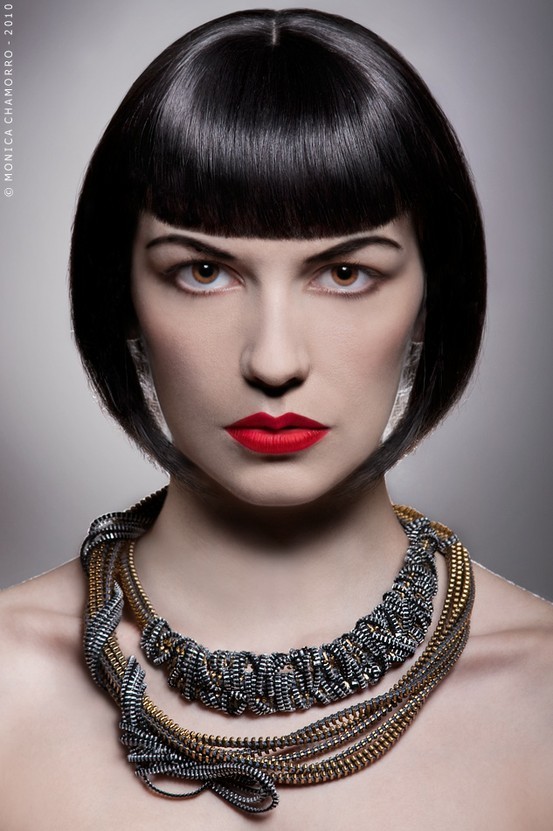
| http://www.katecusack.com/zipper-jewelry/zipper-necklaces.html/ |
 |
 |
 |
 |
 |
 |
 |
Серия сообщений "Zipper":
Часть 1 - Zipper lampshade
Часть 2 - Zipper Accessories
...
Часть 12 - all zippers bags
Часть 13 - zipper accessory
Часть 14 - recycled zippers
Часть 15 - zipper flowers
Часть 16 - zipper bracelet
Часть 17 - zipper accessories
Часть 18 - zipper button
Часть 19 - stylish bracelet
Метки: recycle zipper |
recycled belts |


Серия сообщений "Tires":
Часть 1 - planter out of a tire
Часть 2 - Tire planter
Часть 3 - Kids chairs from tires
Часть 4 - chair of tires
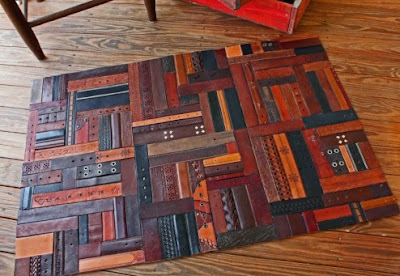
Часть 5 - recycled belts
Часть 6 - tire cutting pattern
Часть 7 - canon & tank out of tires
Часть 8 - out of tires
Метки: recycle belts |
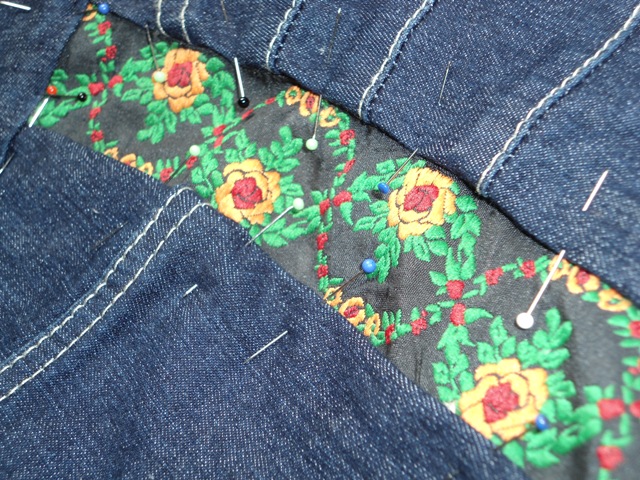
widen pants |
 |
| Marquei 3cm sendo 1.5 de cada lado da costura |
 |
| Desmanchei as costuras do cos (10cm apenas na lateral), da lateral e da bainha. Dobrei 1.5cm de cada lado da costura por 10 cm, aparei e passei na overlock. |
 |
| Alfinetei uma fita com 4cm de largura, sendo que fica 3cm aparente. |
 |
|
|
A fita aumeta em 3cm de cada lado por toda a lateral da calca apartir dos quadris, mantendo a cintura do mesmo tamanho. |
 |
| Presponto toda a lateral com linha na mesma cor e espesura da usada na calça. |
 |
||
| Introduzo a fita no cós. |
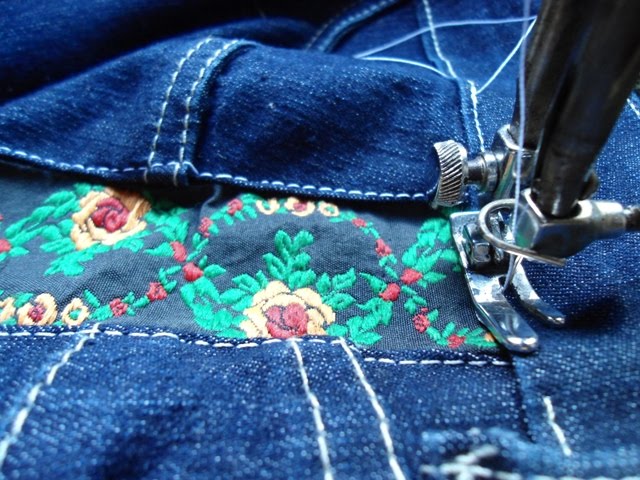 |
| Presponto o cós tomando cuidado para unir a cosrturas. |
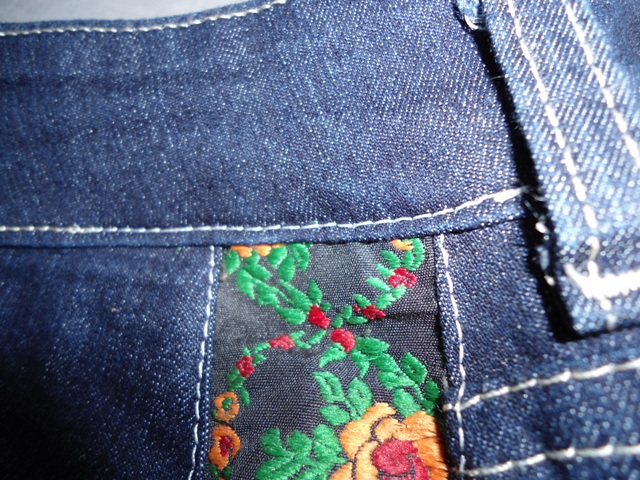 |
| O cós prespontado. |
 |
|
A barra da calça deve deve mander a mesma altura em ambos os lados (frente e costas). |
 |
| Fiz a bainha no mesmo lugar. Deixando o aspecto mais original possivel. |
Серия сообщений "Mending":
Часть 1 - Mending bag's corners
Часть 2 - using lace
...
Часть 5 - mending a shirt
Часть 6 - solution for faulty pattern
Часть 7 - widen pants
Часть 8 - diy belts
Часть 9 - re fashion a skirt
|
Метки: amendment mending |
covering a button |
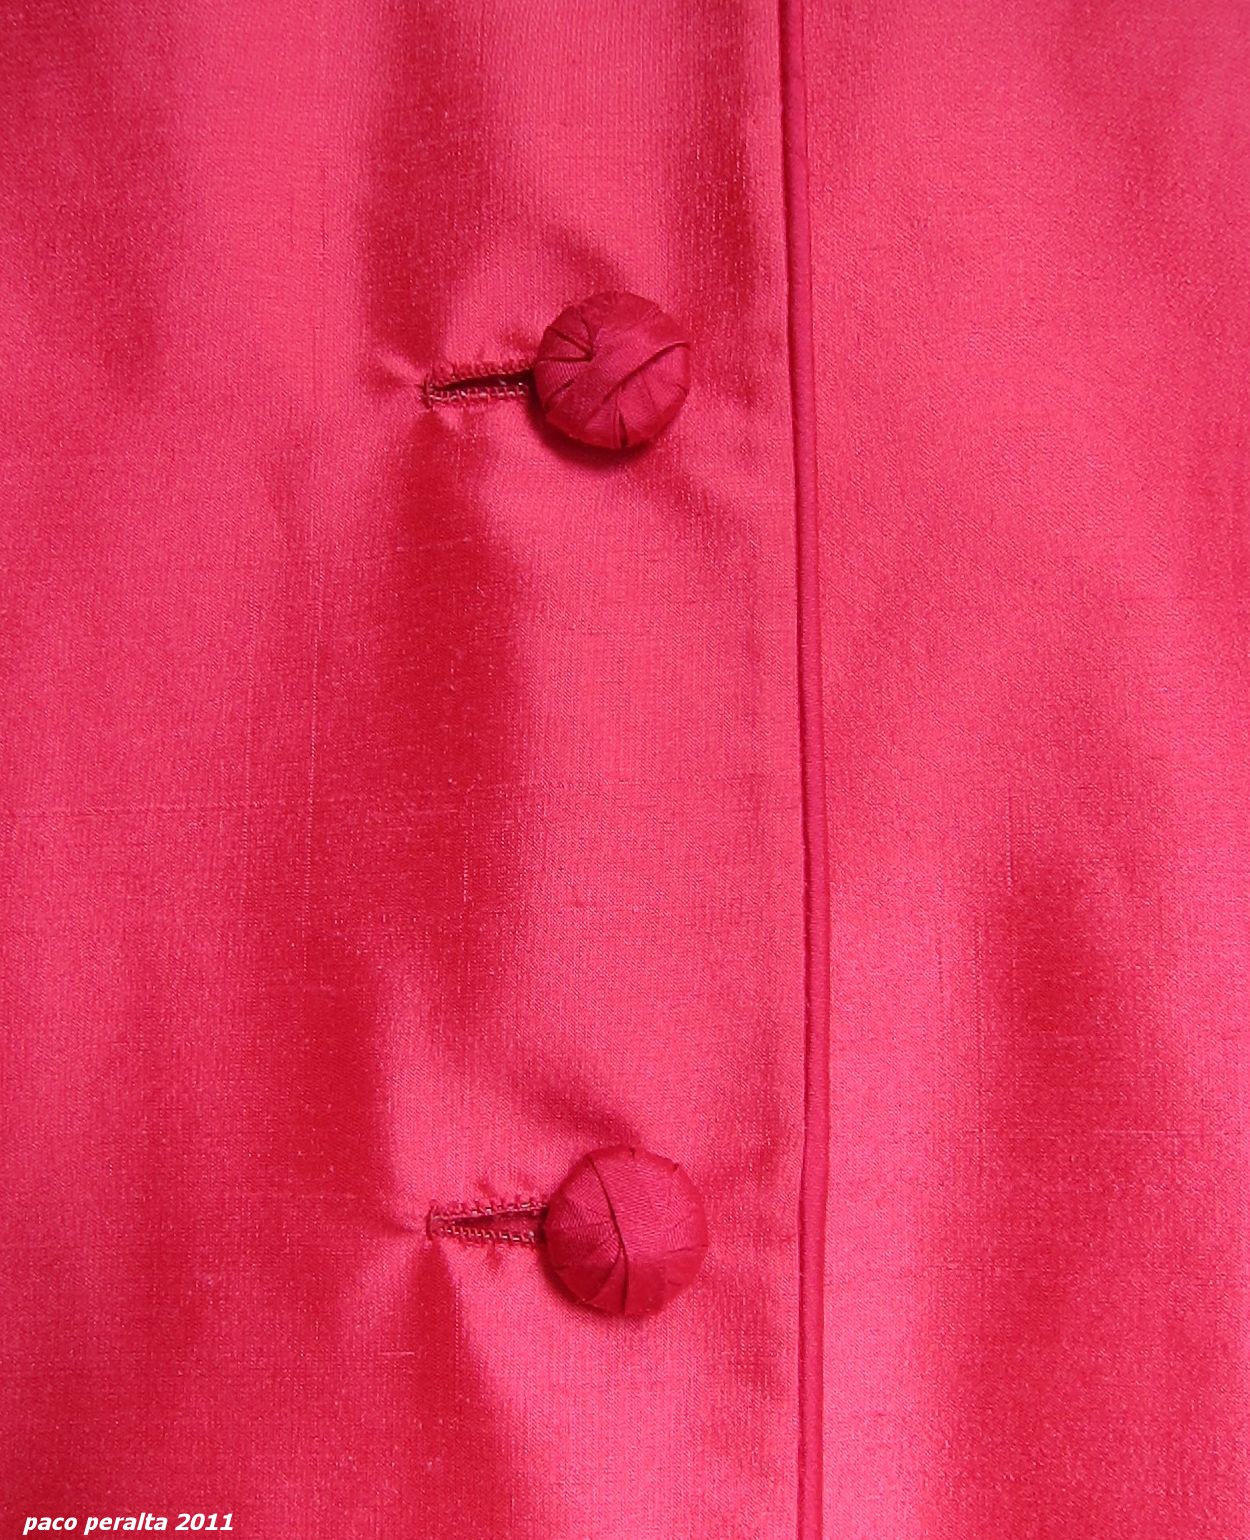
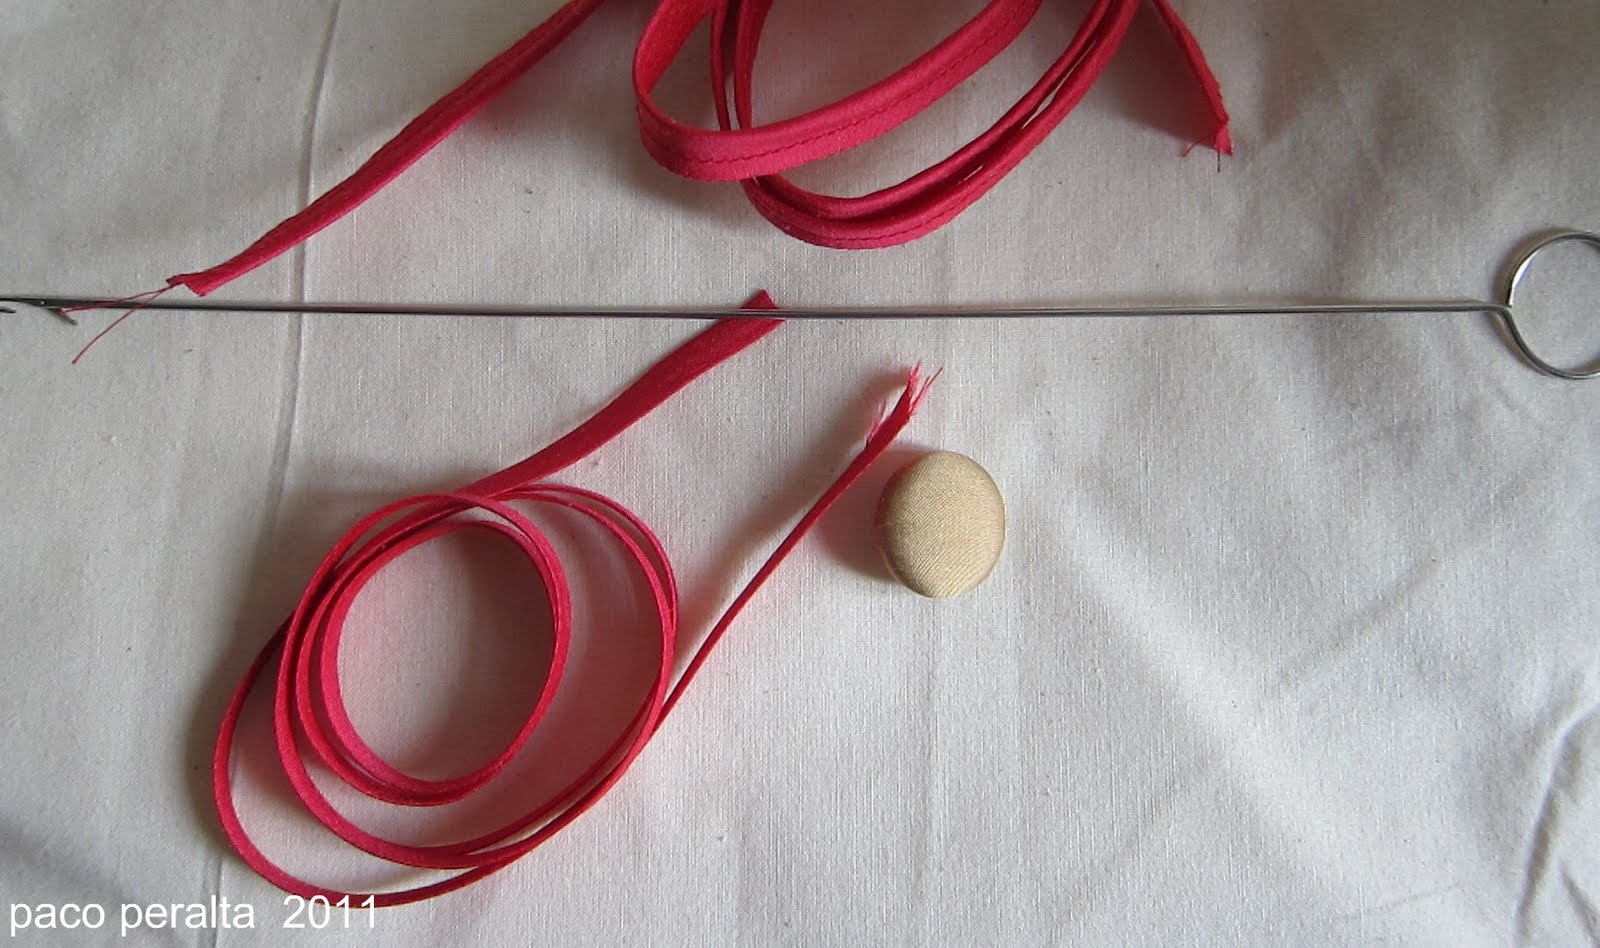
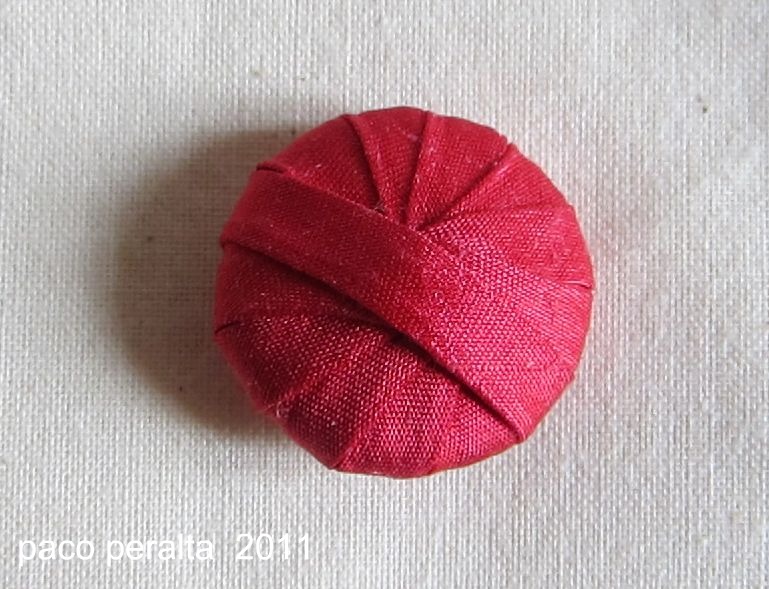
TUTORIAL BOTONES FORRADOS (Handmade covered buttons tutorial).-
Para realizar este tipo de botones, debemos disponer como base, de un botón forrado del mismo tejido a utilizar, y de una tira al bies pulida, de aproximadamente 5 a 7 mm. de ancho.
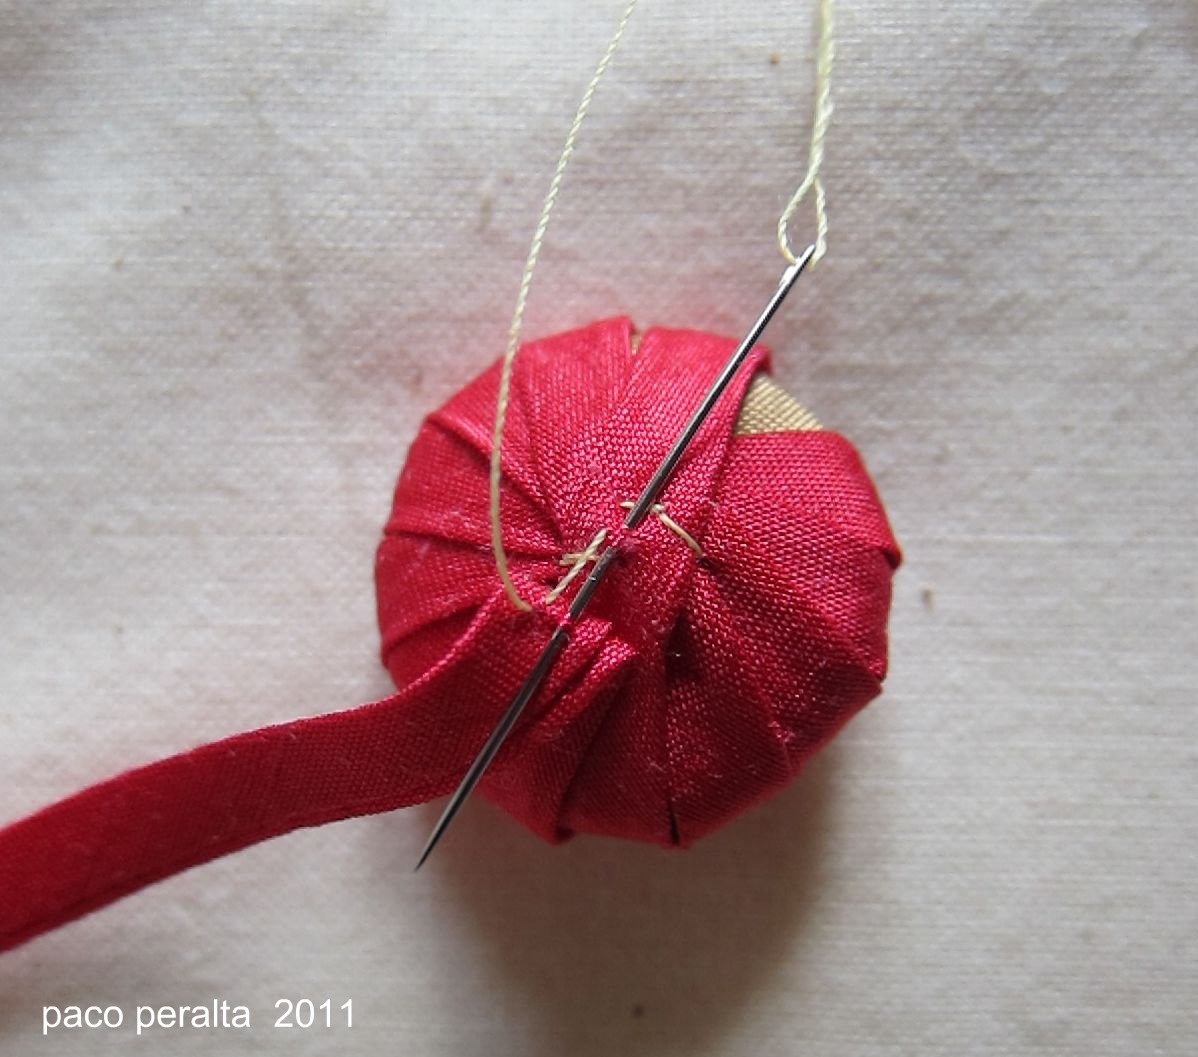
 El primer paso será sujetar el principio de la tira en el centro del botón y sobre el tejido de base.-
 Continuamos forrando el botón, solapando las siguientes vueltas de modo que se unan en el centro, donde sujetaremos con unas puntadas.-
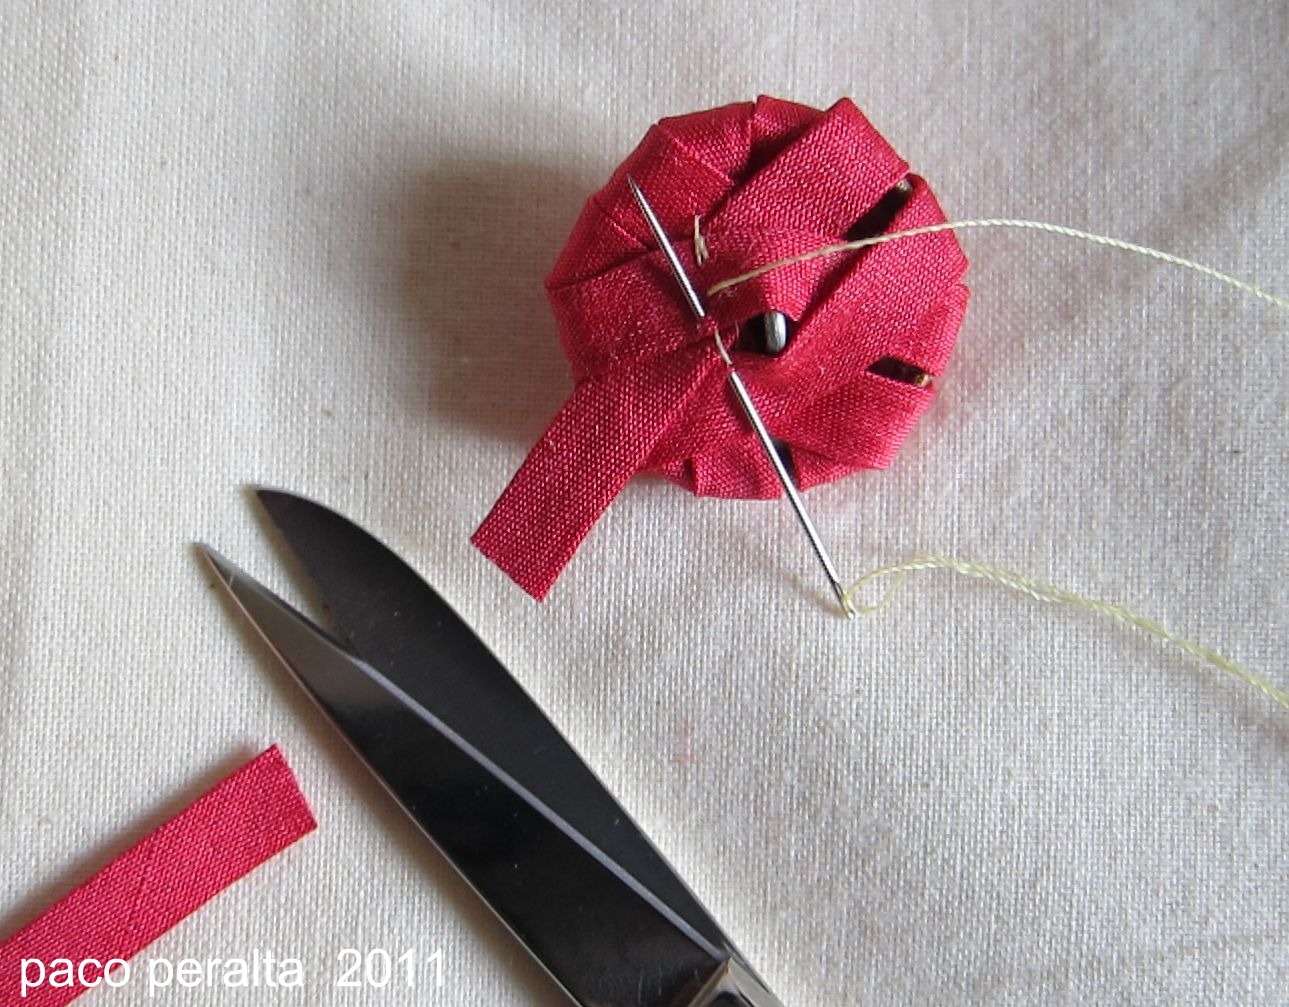
 Terminamos de cubrir todo el botón, y cosemos la última vuelta por el revés de la tira, teniendo cuidado de no traspasar la aguja hacia el exterior.-
 Por el revés: Pasamos la tira de tela entre las vueltas del entramado, y cortamos el largo sobrante.-
 Por último, afianzamos concienzudamente todas las vueltas de tela, uniéndolas entre sí con el fin de no dejar ningún espacio del "chásis" visible. Intentamos también dejar libre el "ojo" o "presilla" por donde se ha de coser el botón.-
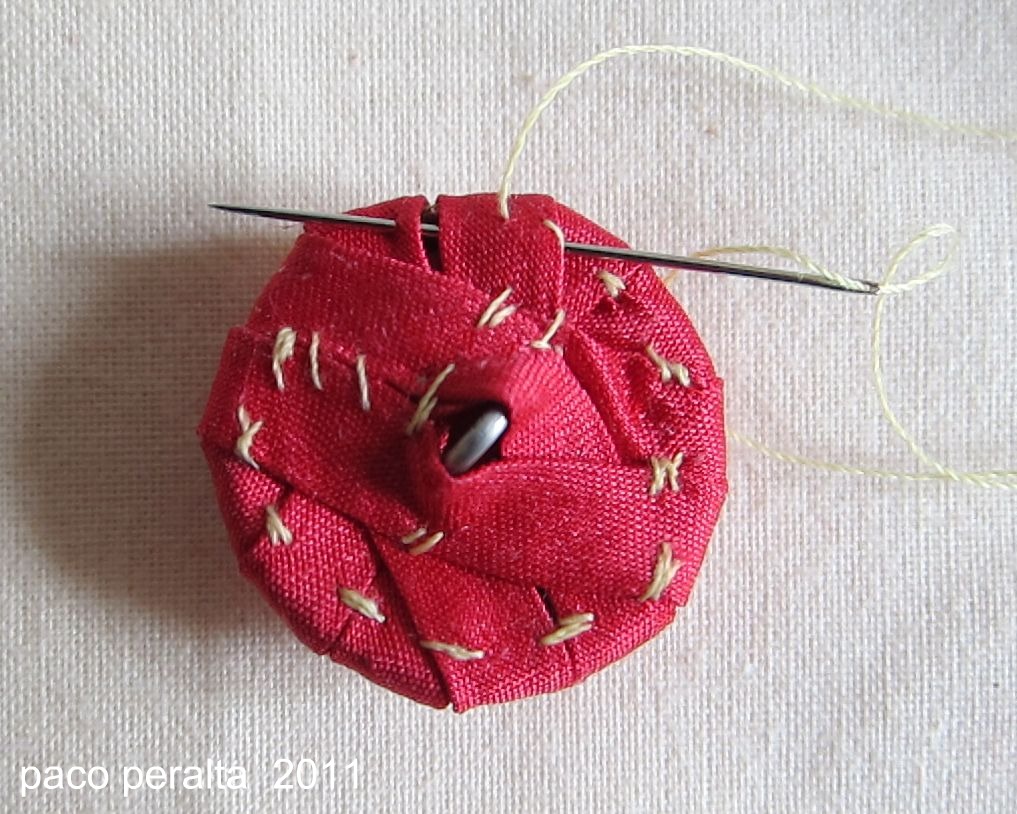 Este será el aspecto del botón terminado, por el revés.-
 Y aspecto del botón terminado.-
Серия сообщений "Buttons":
Часть 1 - zigzag flower
Часть 2 - New ways to stich your buttons
...
Часть 11 - accessory with zigzag flower
Часть 12 - buttons
Часть 13 - covering a button
Часть 14 - recycled plastic bottle
Часть 15 - Chinese buttons
...
Часть 19 - zipper button
Часть 20 - rock buttons
Часть 21 - useful
|
Метки: button |
hems by machine |
Hems (rolled hem by machine)
 7).- Aspecto del dobladillo enrollado, cosido a máquina.
7.- Appearance of the rolled hem sewn by machine.
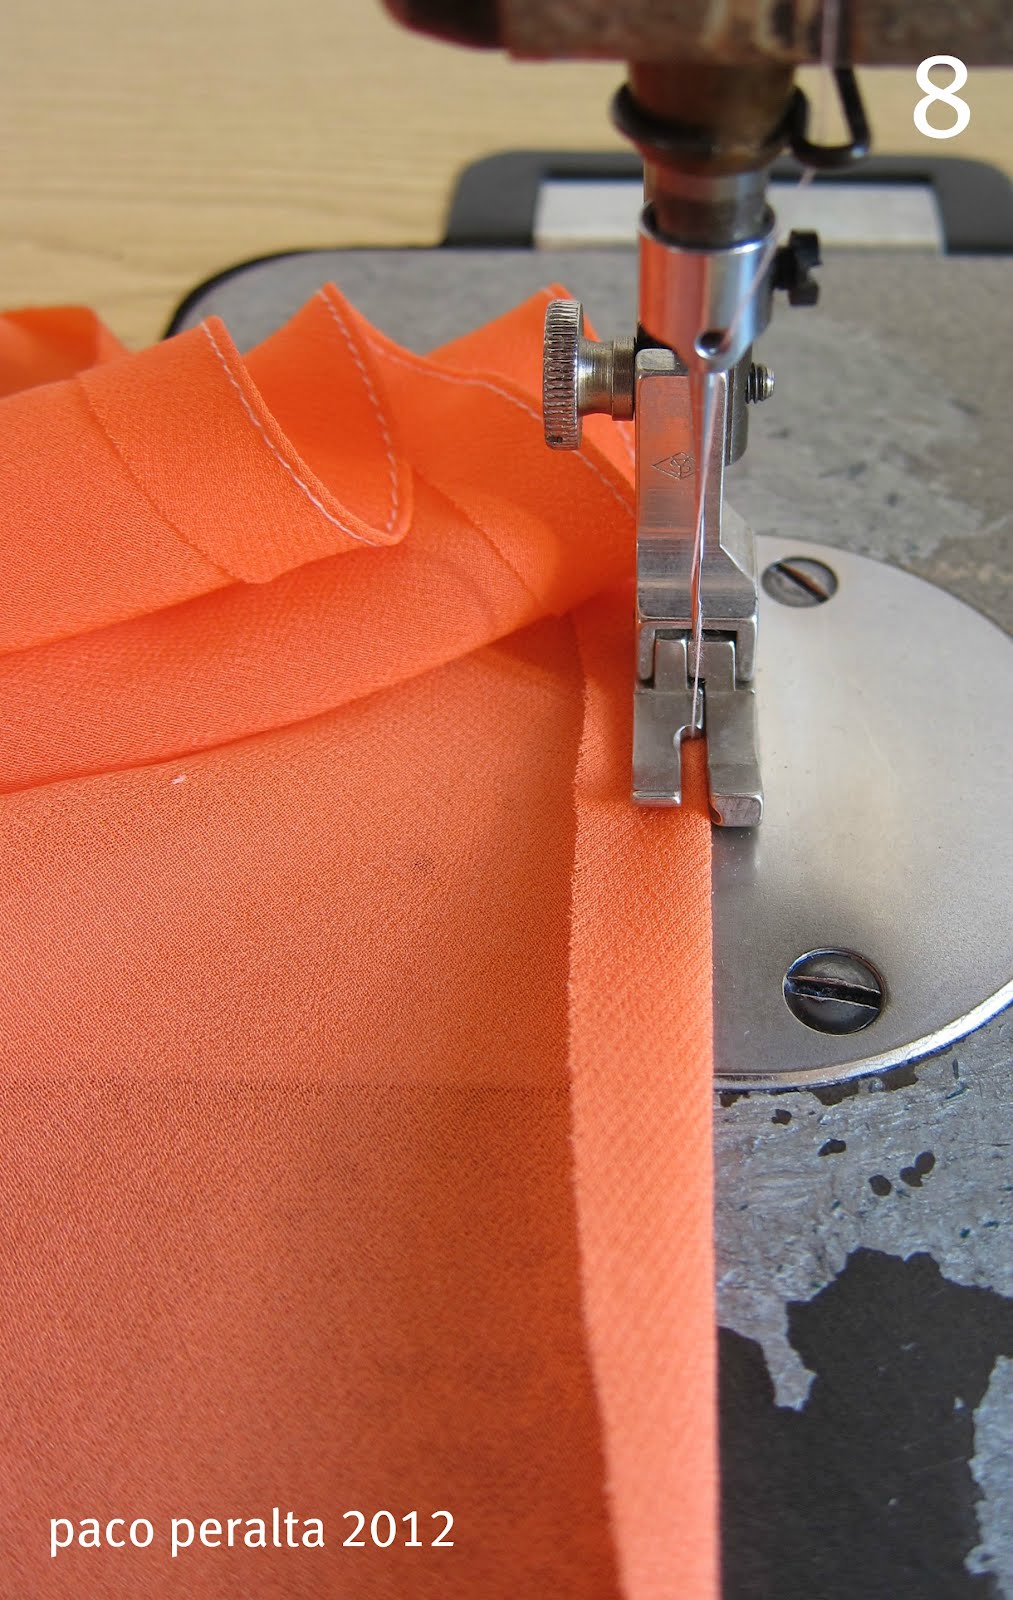 8).- Para realizar este tipo de dobladillos, solamente tenemos que doblar el margen del mismo y, en primer lugar, pasar un pespunte a 1 mm. del borde. Podemos utilizar un prensatelas compensado para pespuntes al canto, que nos facilitará esta labor.
8.-To get this kind of hem, you only have to fold over the seam
allowance, and in the first step sew 1 mm from the folded edge.
We can use a special presser foot that facilitates the work.
 9).- Siguiente paso: Recortamos el margen doblado hasta el pespunte, procurando no dañar el mismo.
9.- Next step:  Cut the seam allowance next to the stitch, making sure
not to cut the fabric or stitch.
 10).- Por último, doblamos de nuevo el canto recortado hacia el interior y pasamos otro pespunte por el borde, utilizando el prensatelas compensado.
10.- Finally, we fold the fabric over again toward the inside, and pass
another line of stitching along the edge, again using the special
foot.
Dobladillos (Dobladillo con punto zig-zag).-
Hems (Hem with zigzag stitch).-
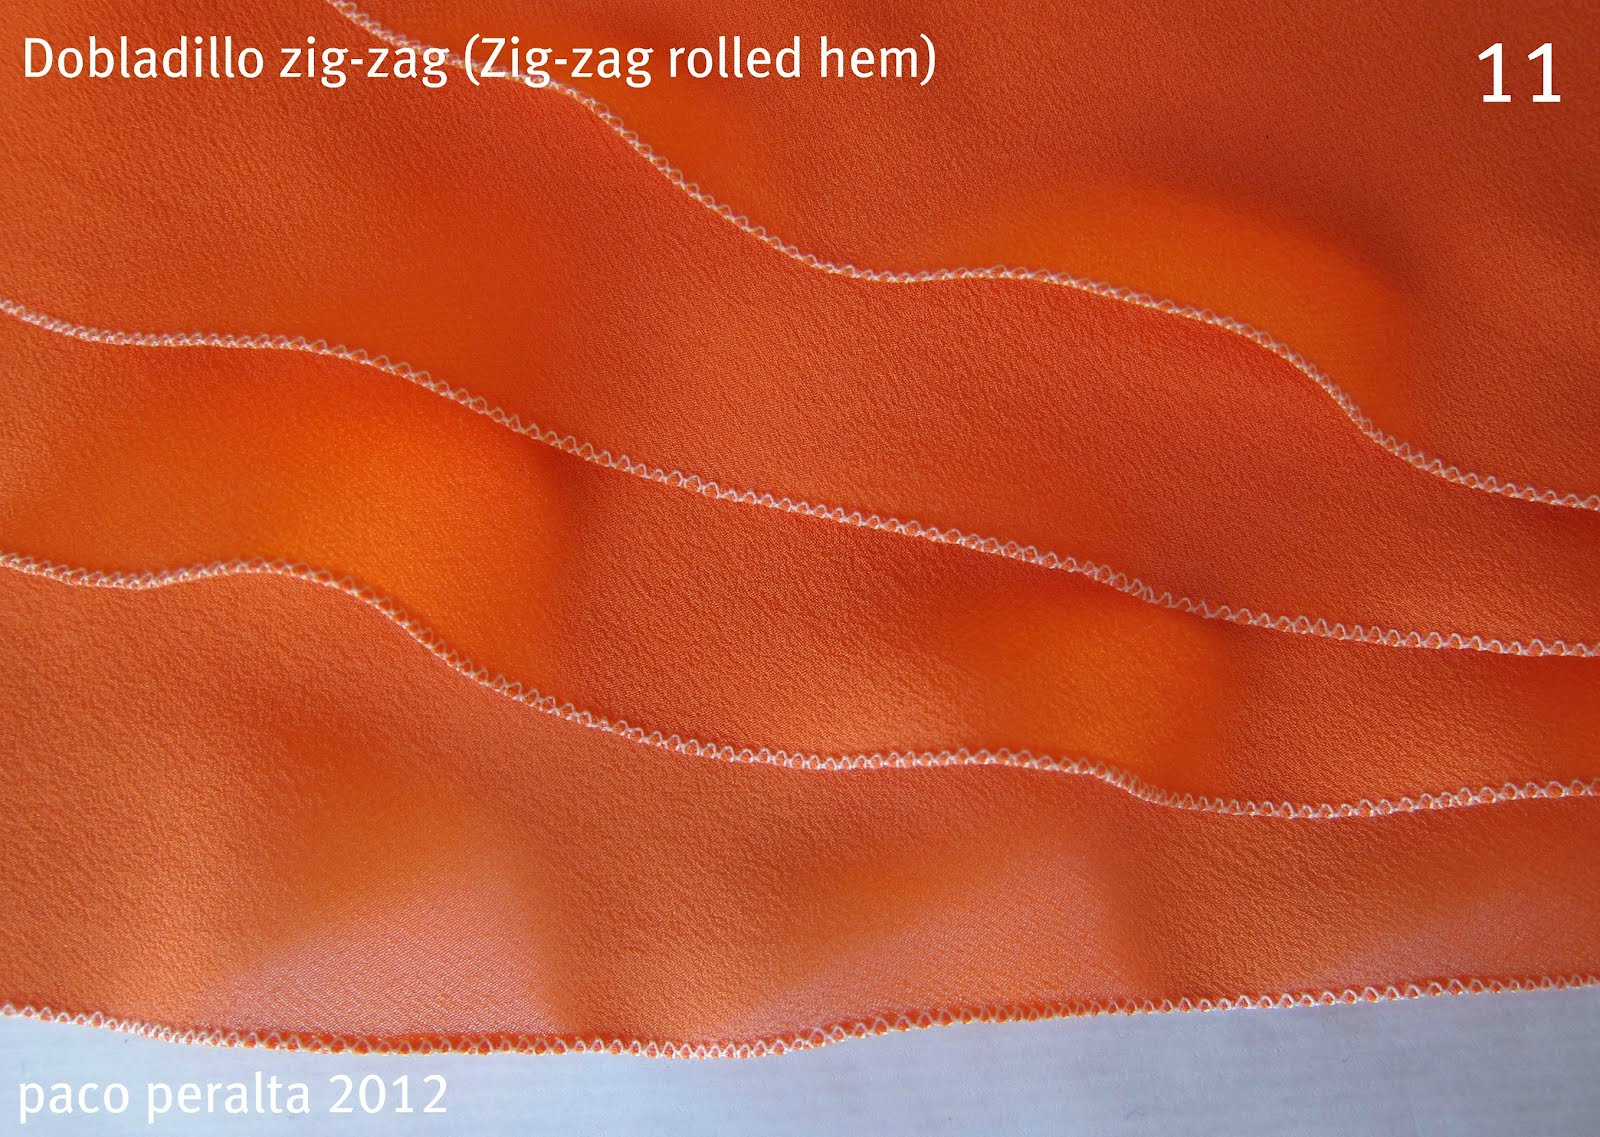 11).- Este es un tipo de dobladillo muy utilizado en los tejidos de gasa, chifón, etc. Es muy fácil de realizar y óptimo para dobladillos al biés en faldas, vestidos...
11.- This is a type of hem that is often used in fabrics like gauze,
chiffon, etc.  It is very easy to do and optimal for hems on the bias
in skirts, dresses...
 12).- Solamente hay un paso a seguir para realizar este dobladillo: Entornar el margen de costura hacia el interior, pasar un pespunte zig-zag tupido y recortar el sobrante.
12.- It only takes one step to finish this hem:  Turn the hem allowance
to the inside, run a zigzag stitch along the folded edge, and recut the
seam allowance next to the stitch.
http://pacoperaltarovira.blogspot.com/
Метки: sewing embllishment |
one shoes= multiforms |


1. What’s the name of your business and what do create and sell?
My business name is Mohop – it’s the phonetic pronunciation of my last name Mohaupt, which is of German origin. I make wood-soled shoes.
2. Tell us how you got started with your indie business.
As soon as I starting working as an architectural intern after graduating from college, I felt like a desk job was not for me. After spending years stalking the websites of some of my favorite indie start-ups, as well as messing around with different crafts, it finally occurred to me one day: I should make shoes. Bells starting ringing, the angles sang, and I knew at that moment that I had found my career ’sole’ mate. [Plus, there are so, so many shoe-related puns to have fun with
]

3. What are your inspirations in your art and in life?
I’m inspired by other indie artisans, friends and family, the materials I use or would like to work with in the future, my gifted assistants and interns, fashion magazines, different fabrication processes, and lots of other random stuff.
4. Are there any pearls of wisdom you’d like to share with newbie indie business owners?
Don’t forget that making and selling cool products is only a part of a successful business. There are 5 million other things that need to be done to run a business, and those 5 million things will take up an enormous amount of your time, especially if you plan on growing your business. Take advantage of the free business counseling in your area – most cities have programs and resources to help small businesses.

5. If you were stranded on a deserted island, what 3 things would you like to have with you?
My husband, my dog, and an enormous solar-powered refrigerator filled with vegan cupcakes and tofu.
6. What’s the best thing about what you do? And the worst?
The best thing is that I get to design and make shoes for a living, and I never get tired of it. The worst thing is that I’m ALWAYS working – to the point that my poor dear husband has to take care of the essentials such as cooking and cleaning. I rarely have time to spend with friends and family. My ‘real’ life is basically on hold until I can figure out a way to become more productive and profitable in the business.

7. What blogs and mags do you read and what shops do you shop at?
I browse some of the gossip and fashion blogs to keep up with what’s going on – I actually am steadily gaining new celebrity customers every couple weeks – so I find it helps to know who’s who, as I otherwise live in a shoe-related vacuum. I don’t have any real time to shop, unfortunately, but sometimes I do swaps with other designers, so I have a nice wardrobe of clothes and accessories. Otherwise, it’s Target, which right between my house and studio.
8. Were you an artsy craftsy kid? If so, what kinds of things did you do?
I was definitely. I grew up out in the country, without many neighbors to play with or even anything on TV, so I spent my time sewing, drawing, weaving, basically anything to keep my hands occupied. (I also liked riding my bike and reading.) My mom is a gifted artist and crafter, and taught me all sorts of things.

9. Do you like to cook, if so, share your favorite thing to cook. If not, share something you enjoy that someone else prepares for you.
I only like to cook (or preferably bake) every once in a while. I do enjoy making the cupcakes in “Vegan Cupcakes Take Over the World” which are seriously the best cupcakes ever, better even than ‘regular’ cupcakes.
10. What does indie mean to you? You can give a literal definition, choose to be a little esoteric or a combination of both. ![]()
That’s tough… I think for me it refers to a creative business endeavor that has roots outside the mainstream. Profit isn’t the main goal, but is usually necessary to sustain the endeavor in the long term.

11. What are you reading, watching and listening to?
Reading: When You Are Engulfed in Flames by David Sedaris
Watching: Season One of Flight of the Conchords on DVD
Listening: My personal TV On the Radio station on Pandora.com
12. What’s one thing you’ve learned as an adult that you wish you knew when you were a kid?
I don’t know – I think I had a decent head on my shoulders as a kid. I’m much dumber now… all I think about are shoes.

13. What’s new? Any new plans or products that you want to share?
I have just updated my wedge line – the new wedges have a pretty curved shape and an ‘ergonomic’ footbed like a clog, so they are ridiculously comfortable. I’ve ruined myself for all non-Mohop shoes – other shoes pinch or are not supportive enough. I’m no longer willing to suffer for fashionable shoes… Also, I’m hoping to come up with a close-toed variation for winter. But I say that every year, so we’ll see!

Метки: shoes |
hidden beds |
 Photo: Esapce Loggia
 Photo: Home Design Decorates
 Photo: Resource Furniture
 Photo: Resource Furniture
 Photo: Resource Furniture
 Photo: Resource Furniture
 Photo: Home Decor Arcade
 Photo: Every Small Space
 Photo: Flying Beds
 Photo: Peckham House
 Photo: Wall Beds n More
 Photo: Wall Beds n More
 Photo: Wall Beds n More
 Photo: Round Top Hill Antiques
 Photo: Round Top Hill Antiques
Серия сообщений "Bedroom":
Часть 1 - no-sew blanket
Часть 2 - Royal Bedrooms
...
Часть 19 - miniature dress-form tutorial
Часть 20 - again miniature dress form
Часть 21 - hidden beds
Часть 22 - storing shoes
Часть 23 - beautiful umbrellas
...
Часть 27 - bed table
Часть 28 - useful ideas
Часть 29 - creative ideas
|
Метки: beds |
metallic wall art |
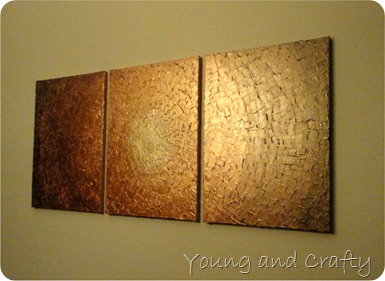

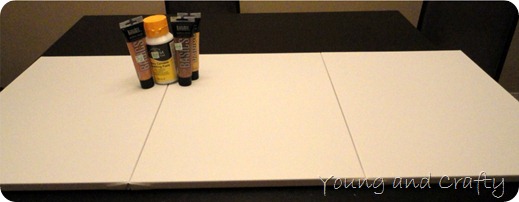
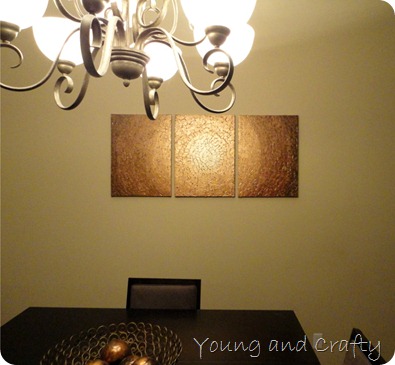
Метки: wall art plaster |
sweater refahsion |
|
Posted: 26 Jan 2012 07:49 PM PST
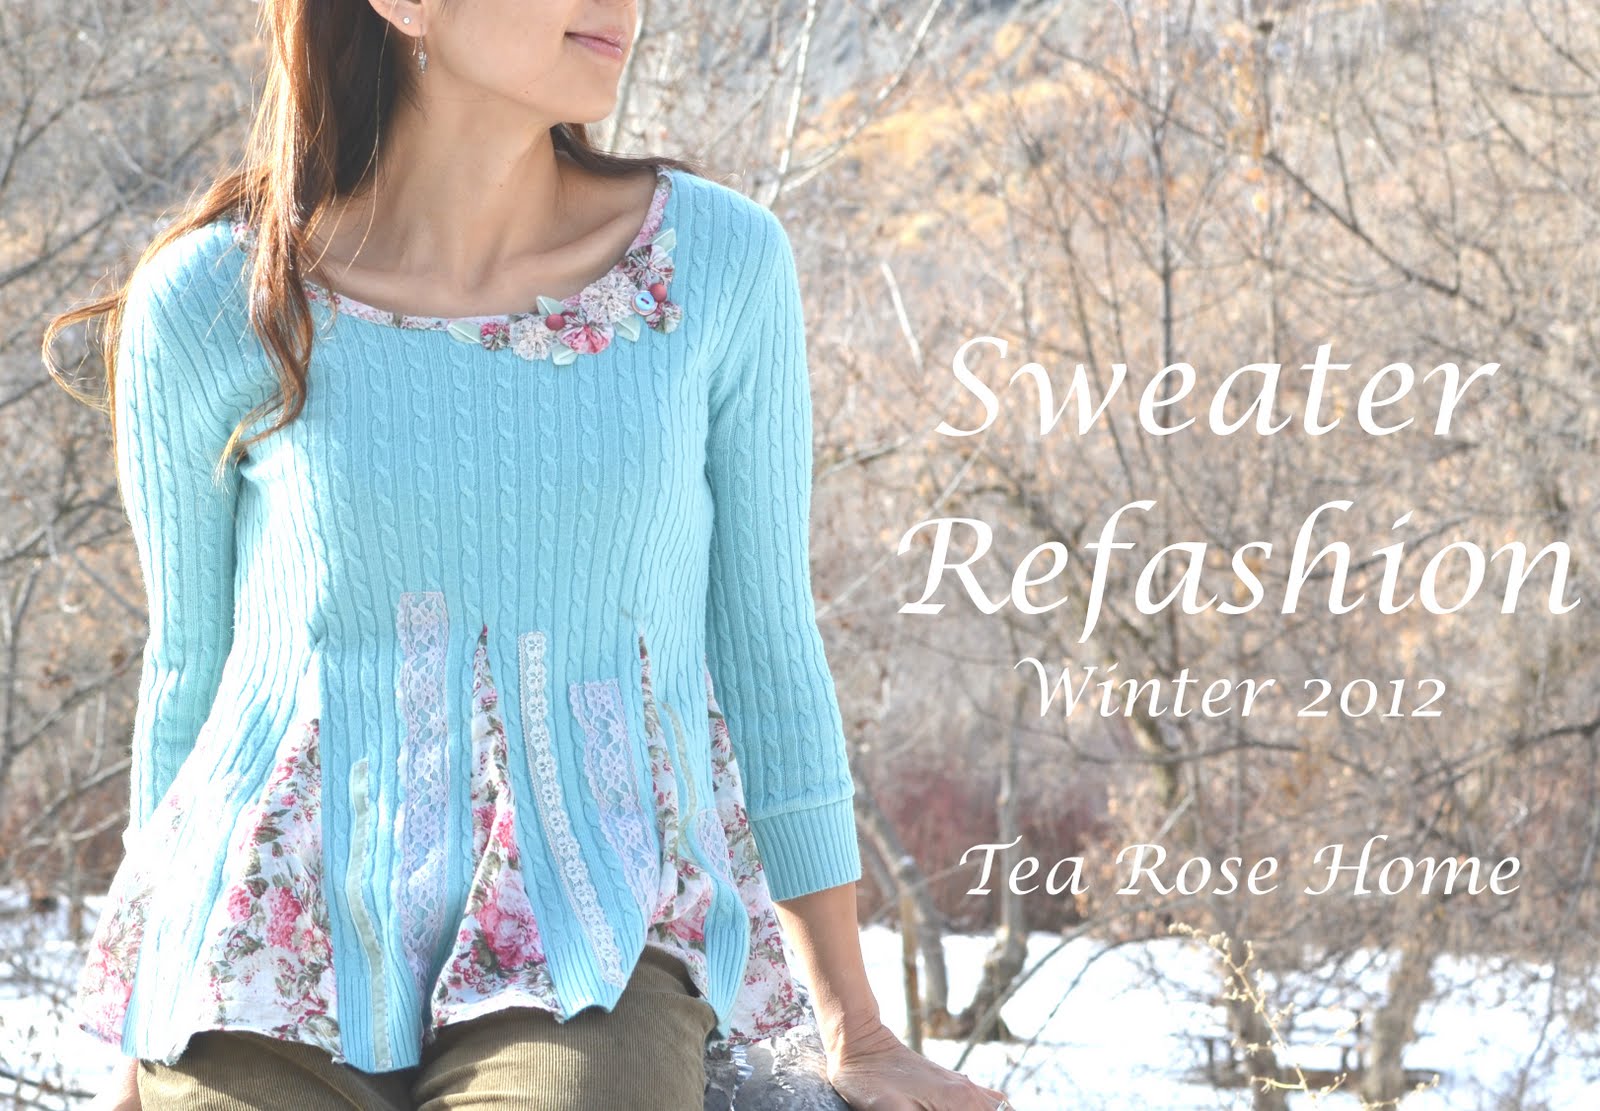 I shared this sweater refashion at Me Sew Crazy last week. I am posting this here today just in case you missed it!  {You will need} Sweater Fabric Laces, Ribbons and buttons Matching thread {How to} 1. Wear the sweater and decided how high you want the triangles to go. For example, just below the bust line or a few inches below the bust line. Also, mark the center with a pin. 2. I made a triangle template out of a cereal box and cut 8 triangles out of the fabric. The size of the triangles all depend on how long you cut into the sweater. If you want a more flared look, make sure that the triangle has a wide bottom. If you want a subtle flare, the triangle needs to have a narrow bottom. 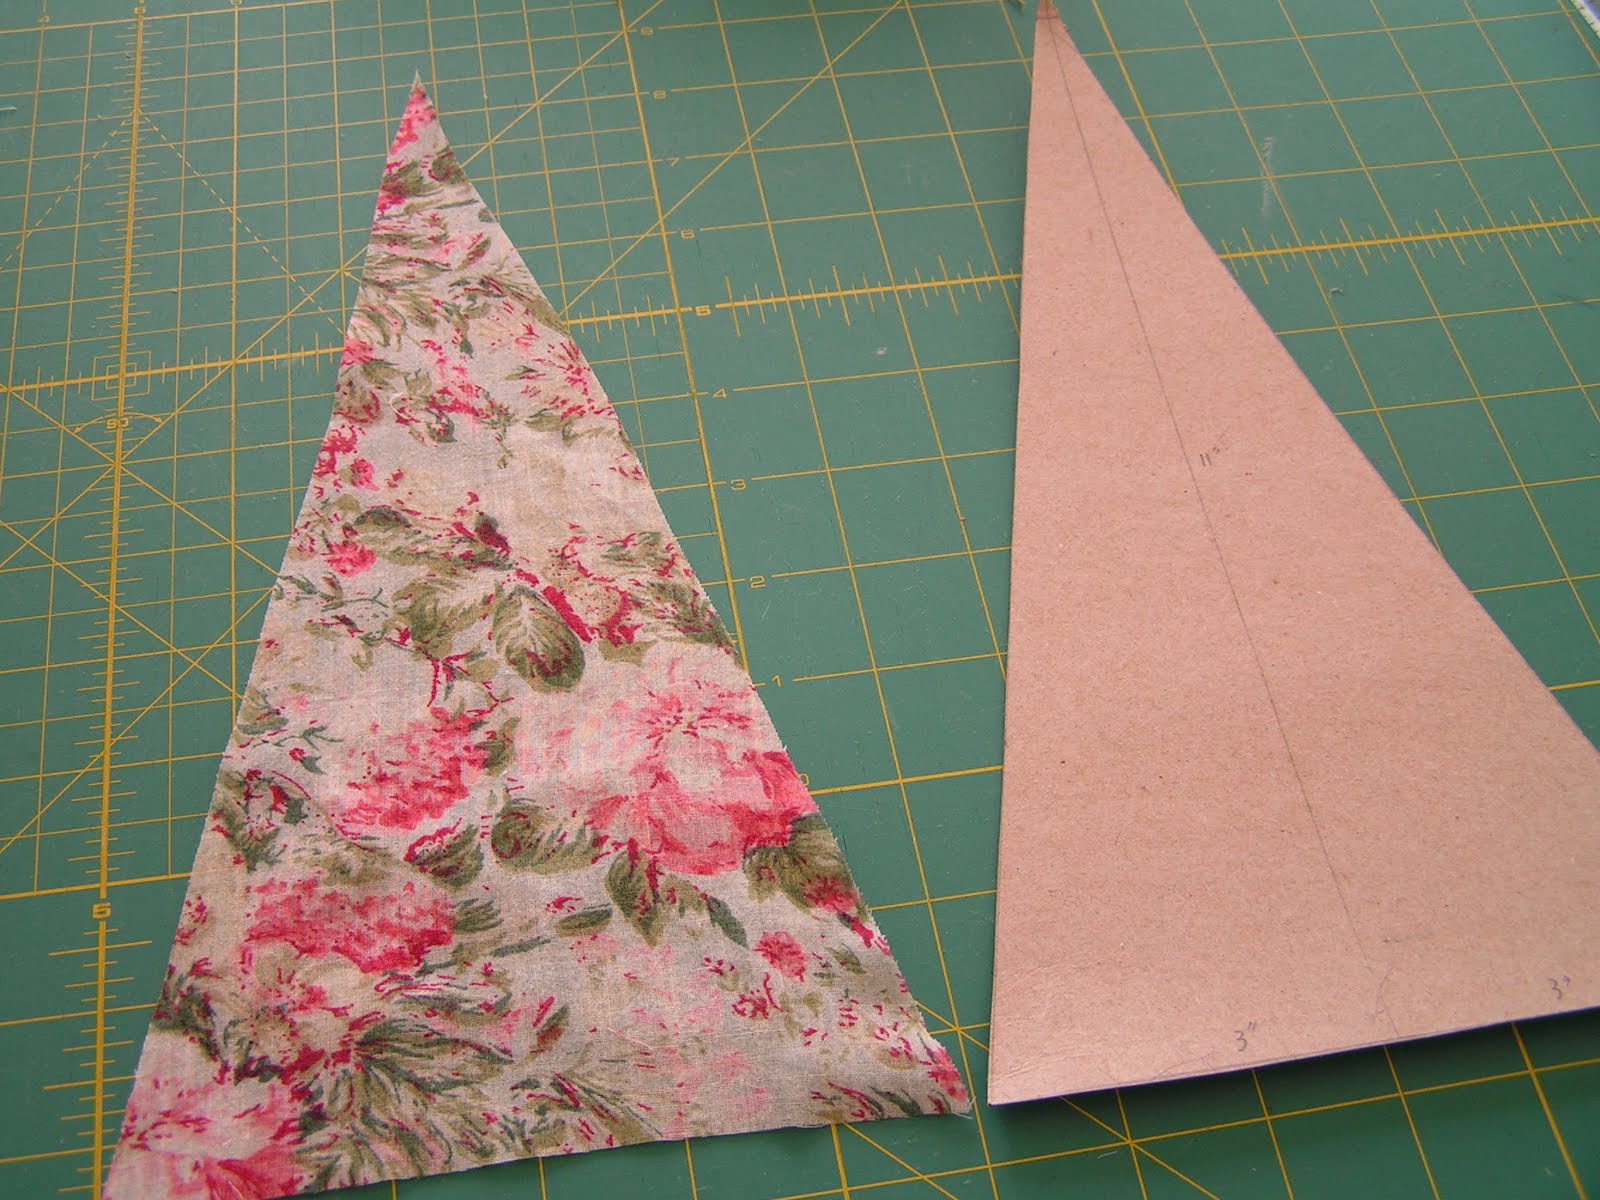 3. Start making the cuts to the sweater. I made 8 cuts in all. In the center on the front and back, just to either side to those center cuts, and the sides of the sweater. They are about 4" apart, but you need to adjust that according to the width of the sweater. Just make sure that they are equal and well balanced. 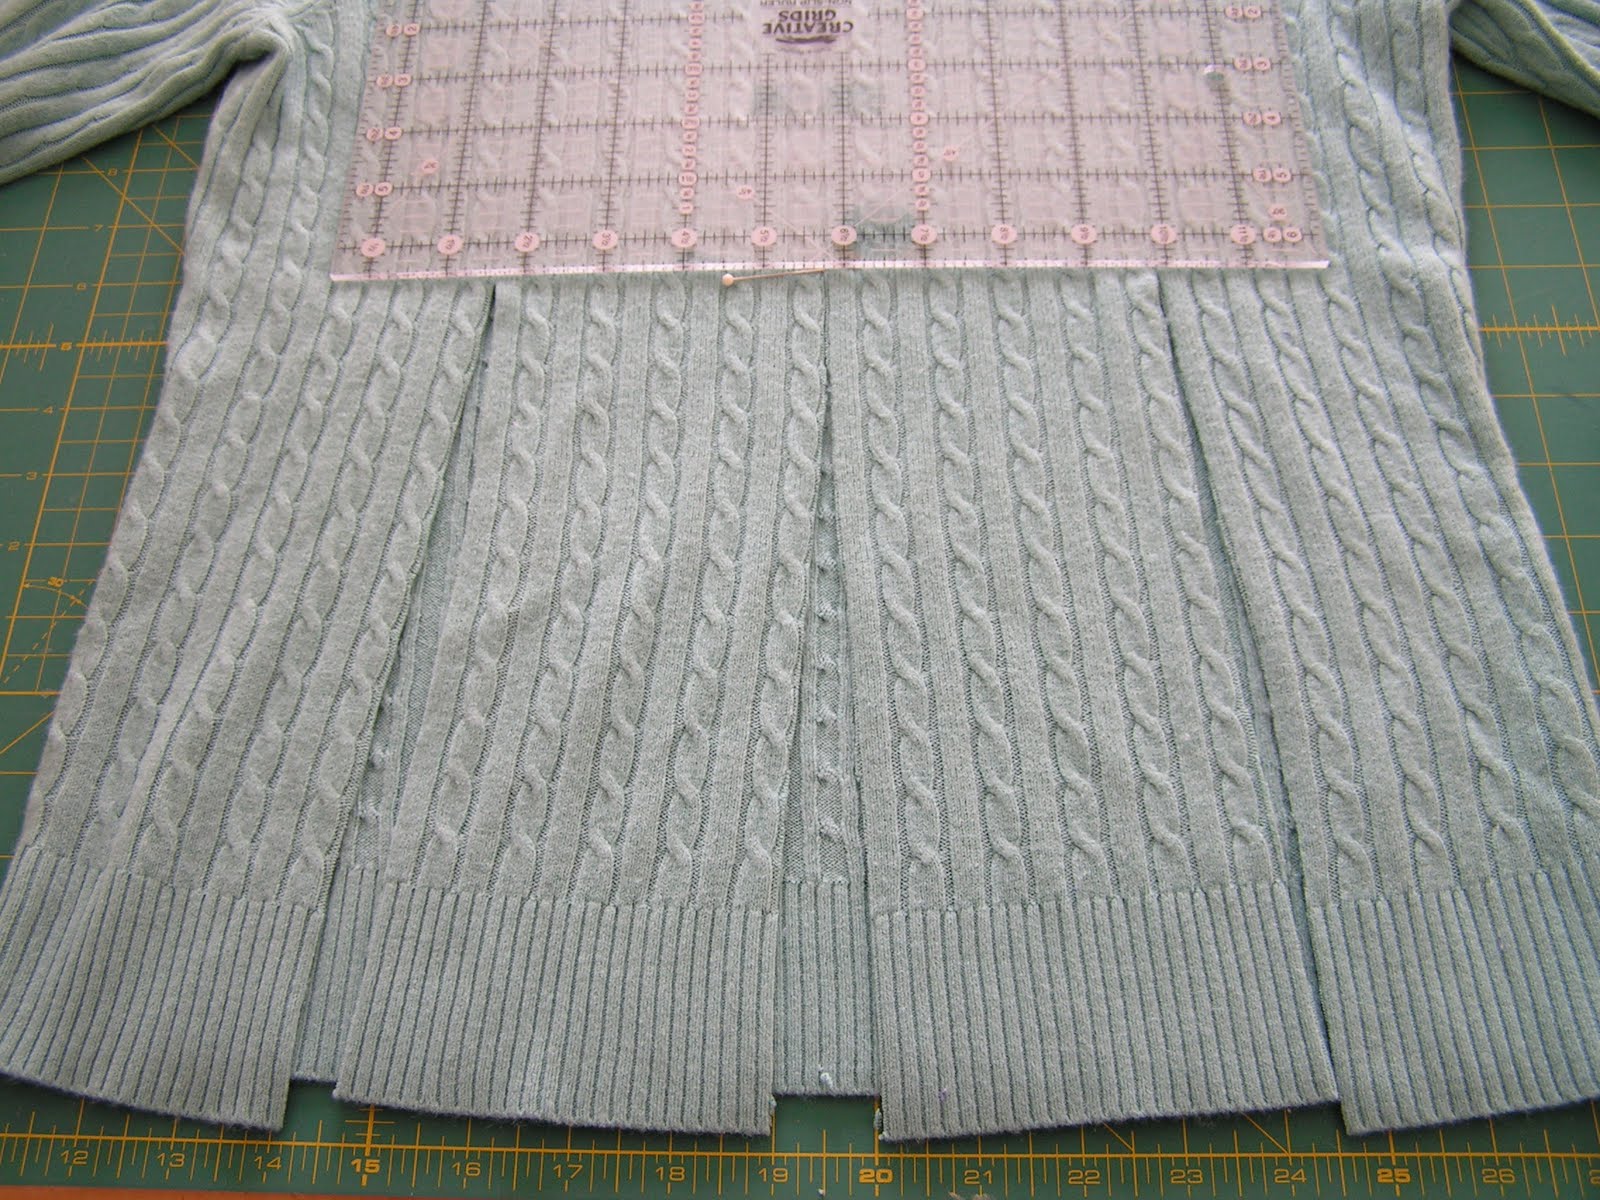 4. Fold the bottom of the triangles and sew.  5. Sew the triangles to the sweater using a Serger or zigzag stitches. 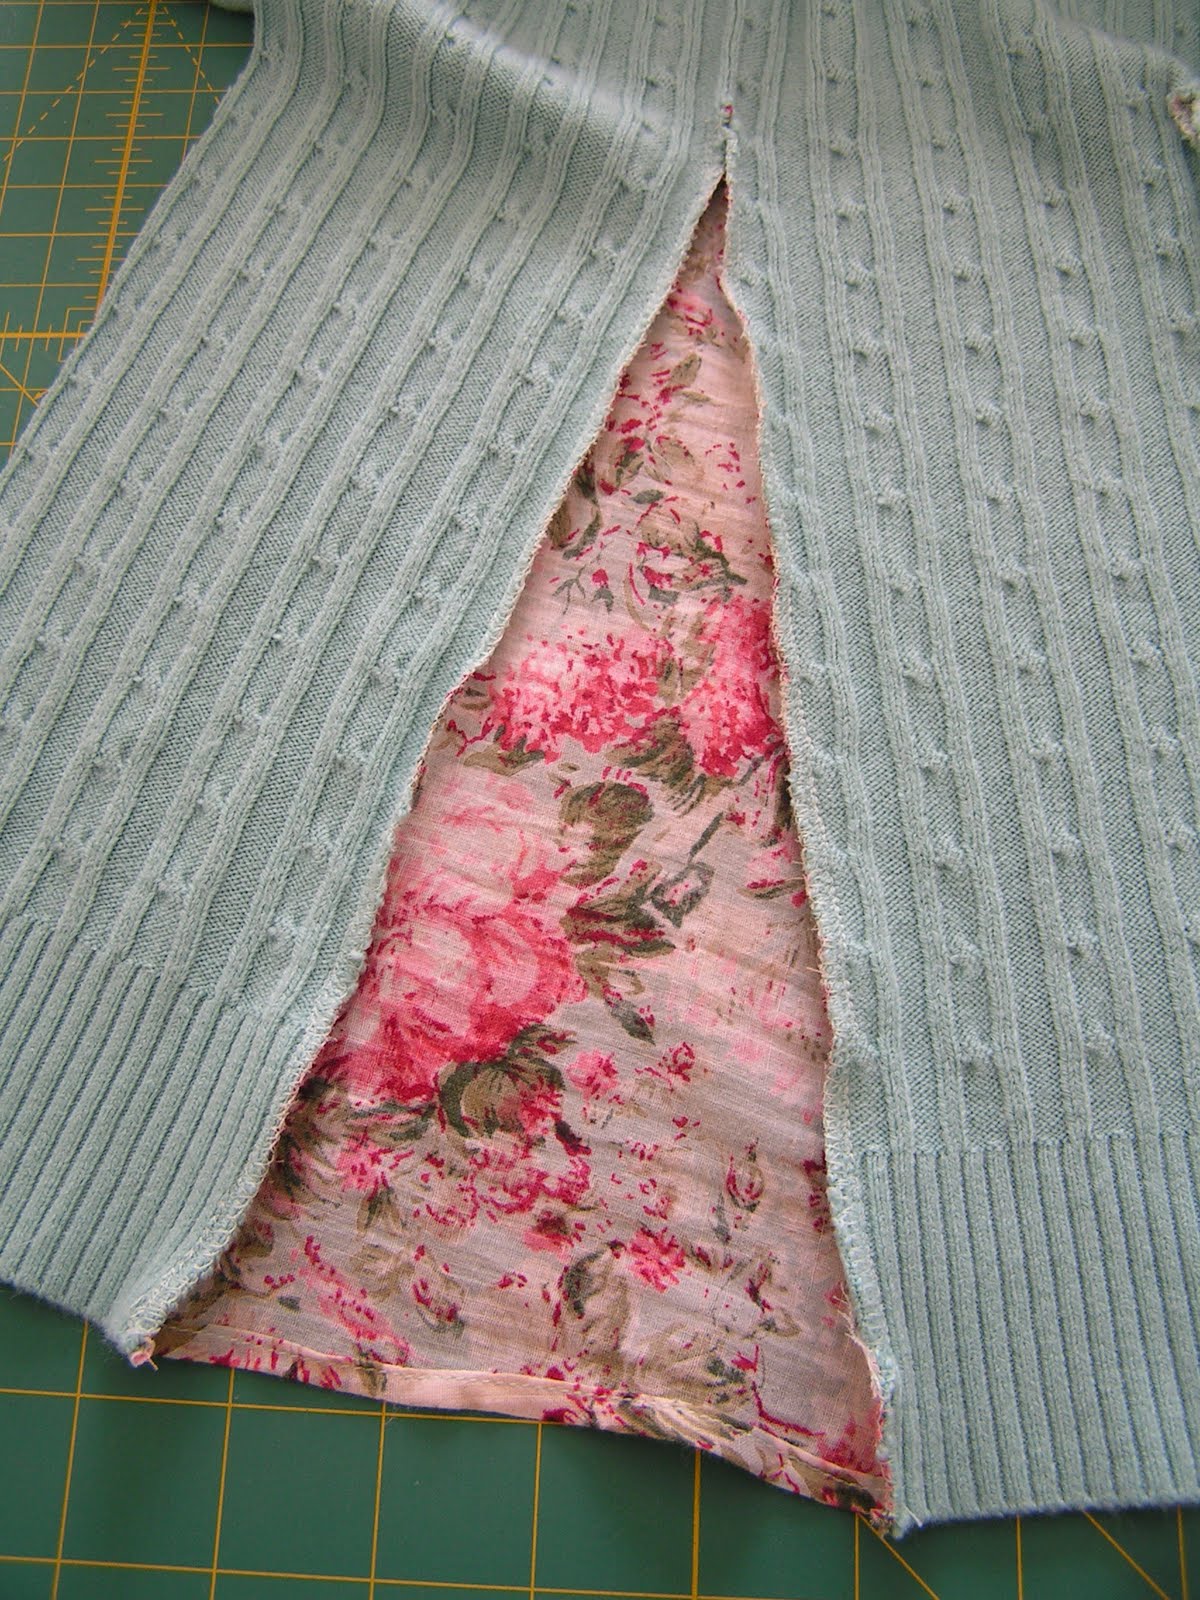 6. Since the sweater was one size bigger than my size, I cut off some fabric from the sides and under the arm.  7. Pin, and sew the side. Make sure to sew in the fabric triangle to the sides at this step.   8. Make sure to mark the center of the neckline. I wanted the neckline to be slightly lower, so I drew the line and made the cut around the neck.   9. Make bias tape for the neckline. I cut mine 1 3/4" wide.  10. Sew the bias tape around the neck with zigzag stitches.  11. Start adding lace & ribbons between the triangles. Cut them to random lengths and seal the ends with fray check. Pin them in the desired places to check the balance and sew.  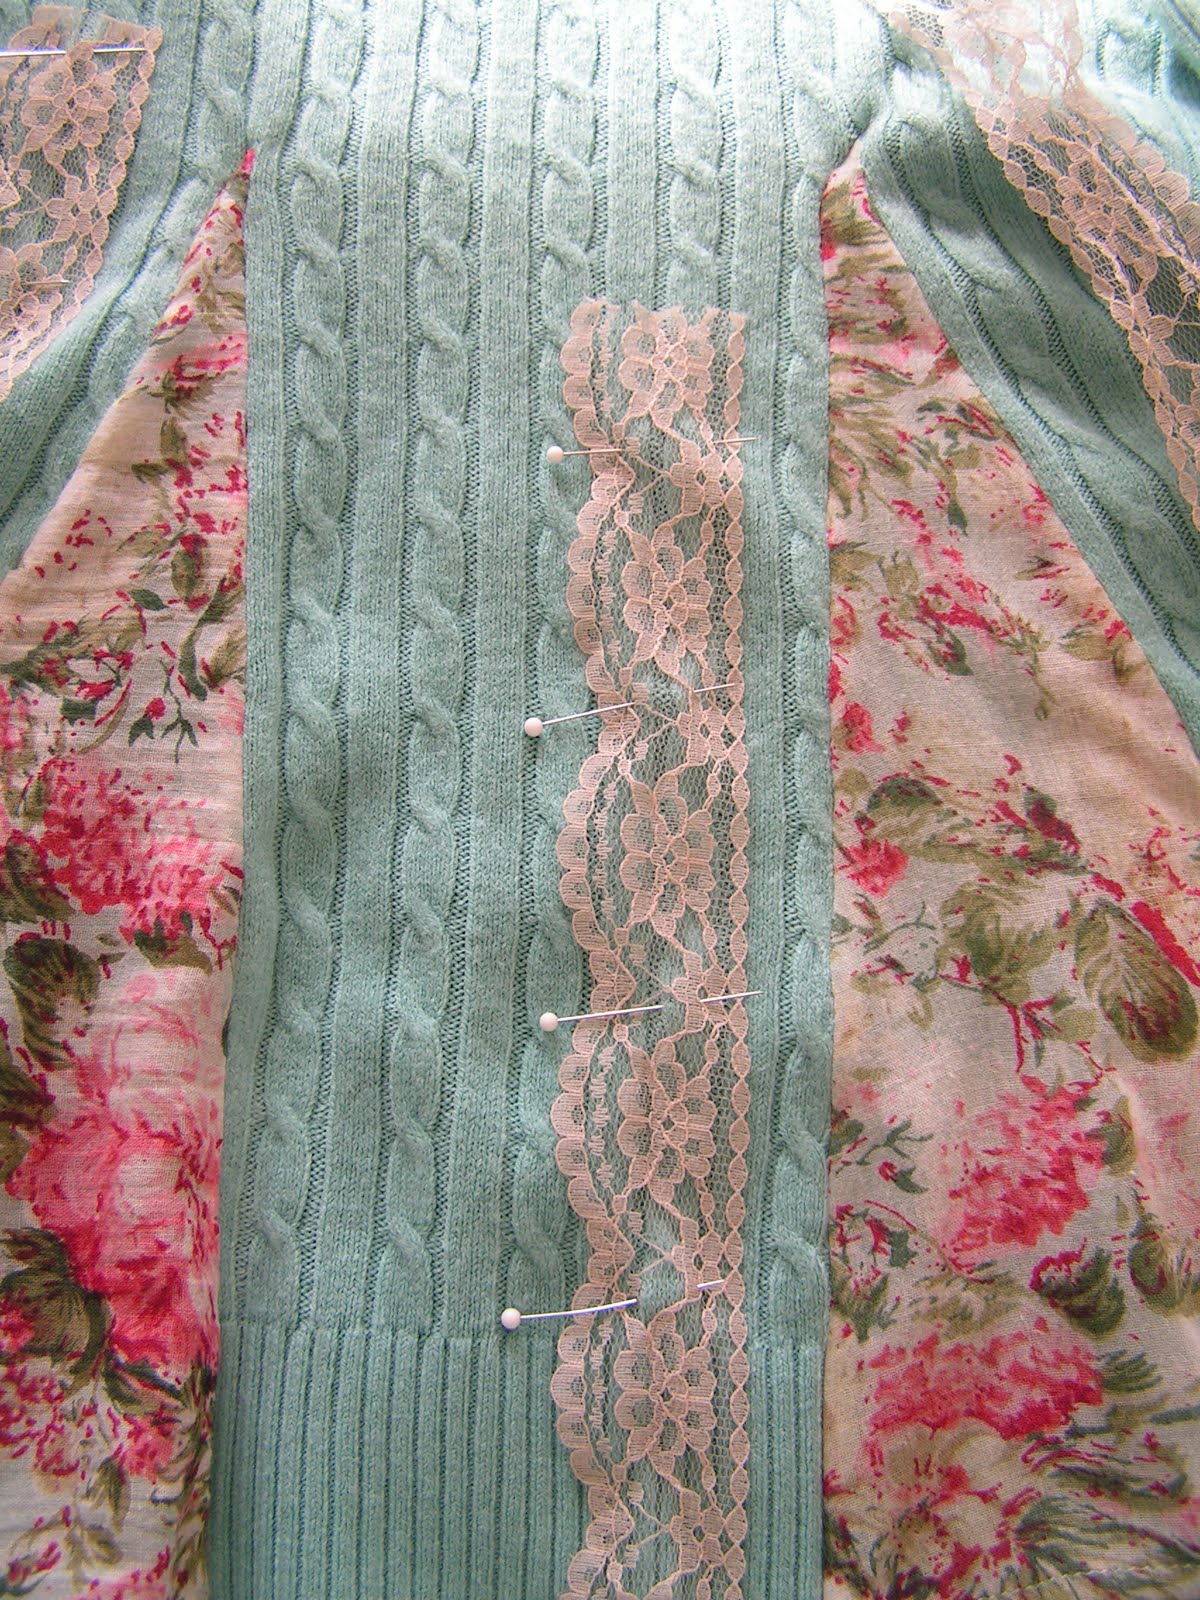 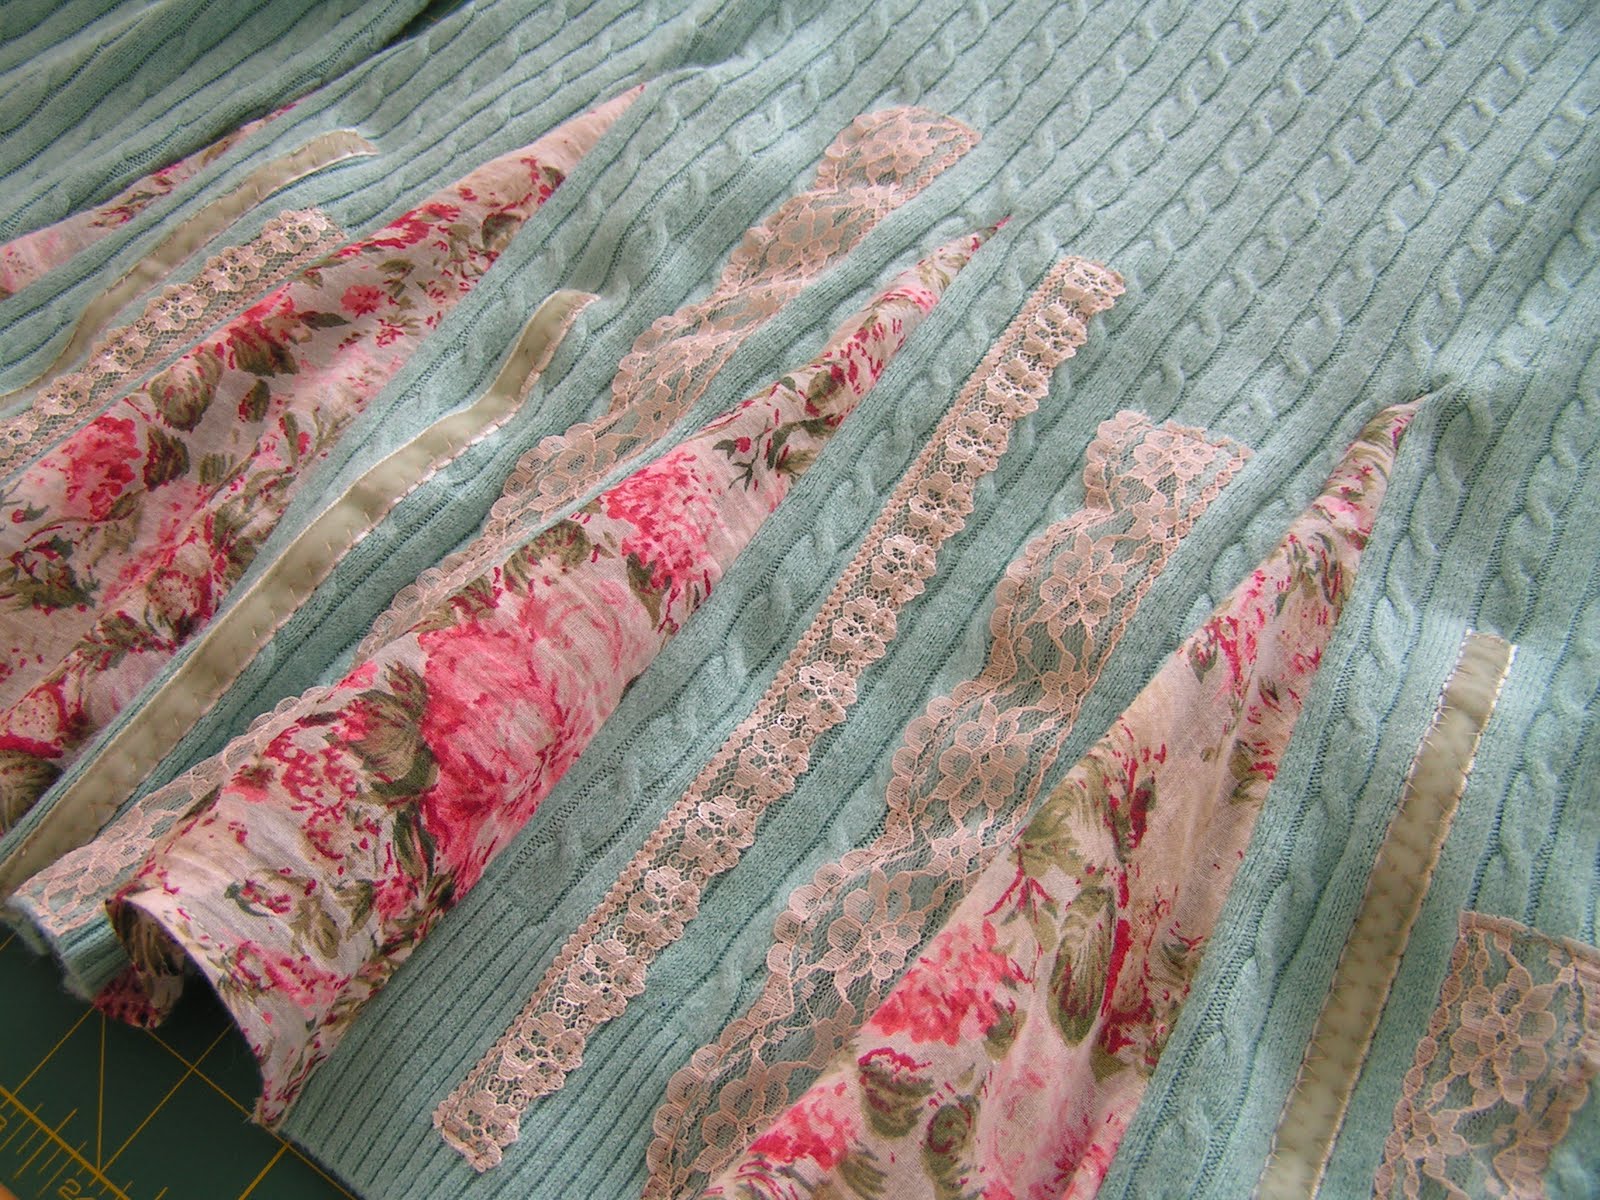 12. I didn't care for the long sleeves, so I cut them... I made the cut at the ribbed part, and took 6" off. 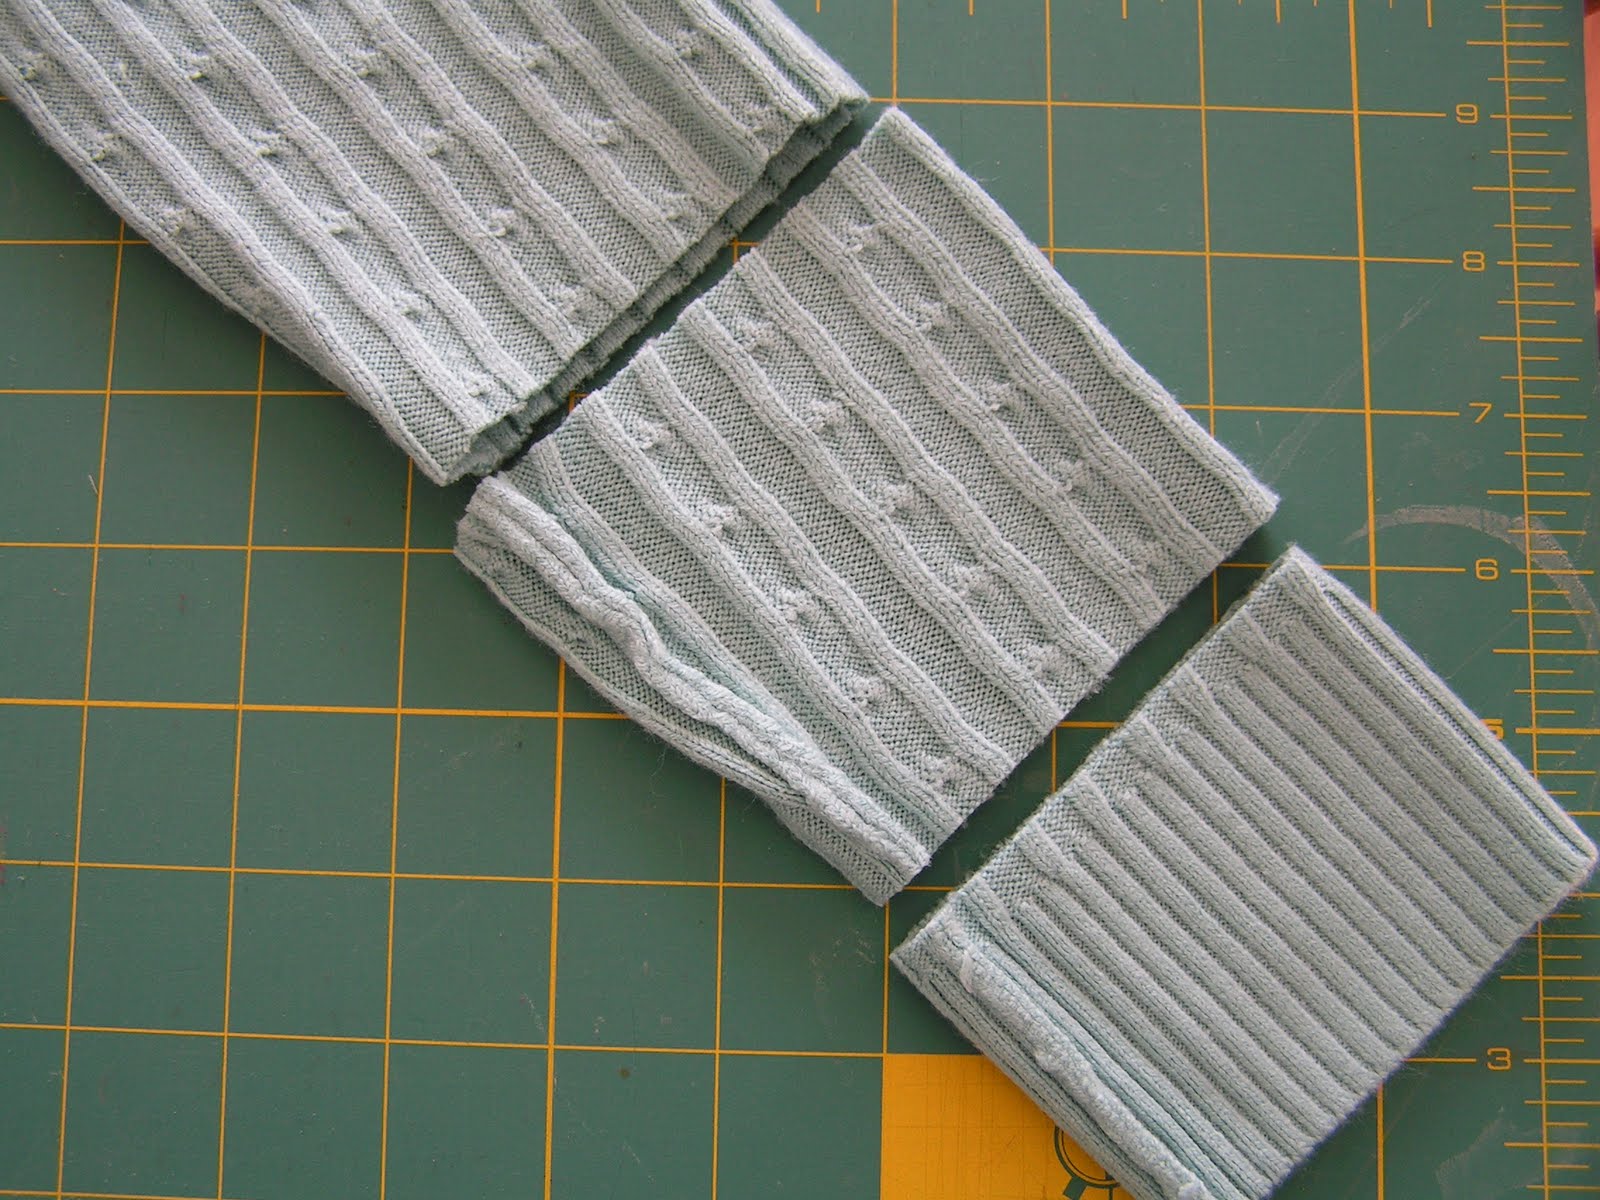 13. Sew the ribbed part back to the sleeves. I made it into 3/4 sleeves.  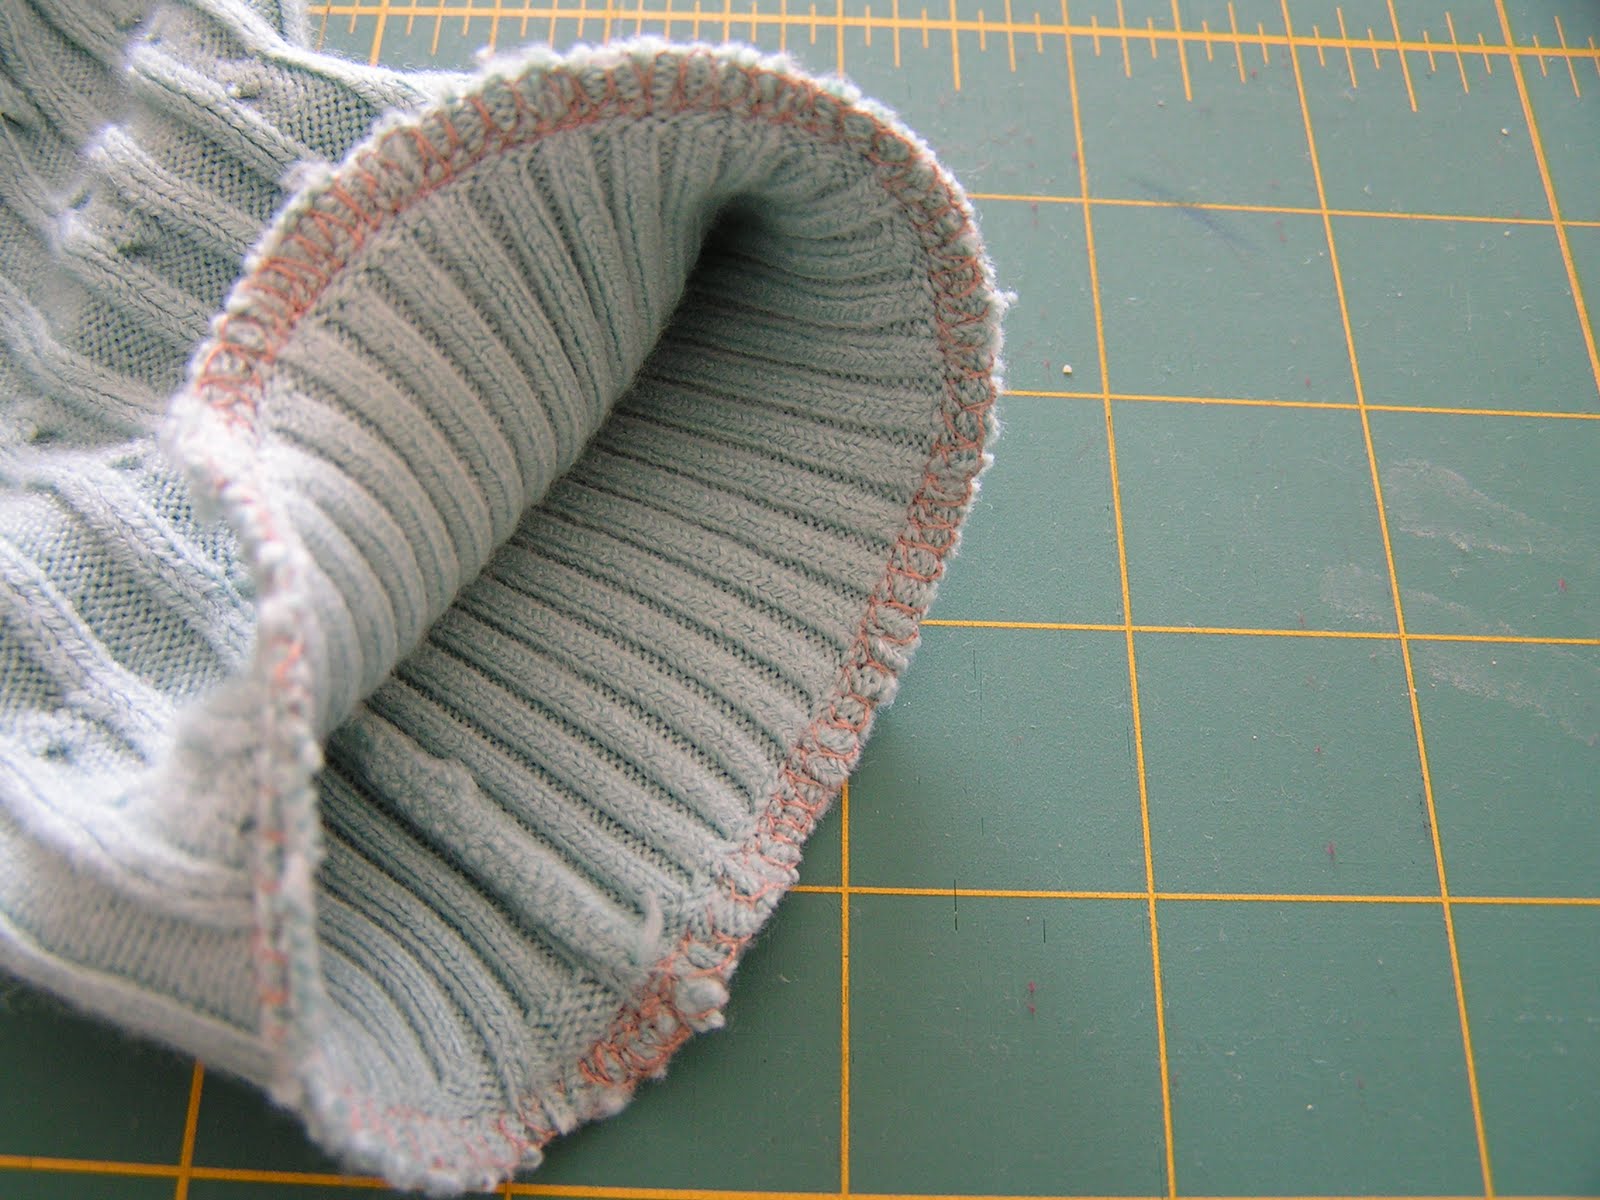  14. I thought it was a little bare around the neck, so I decided to decorate a little. I made some yo-yo's, leaves, and flowers out of lace. Pinned all the embellishments onto the sweater to decide where I wanted everything. 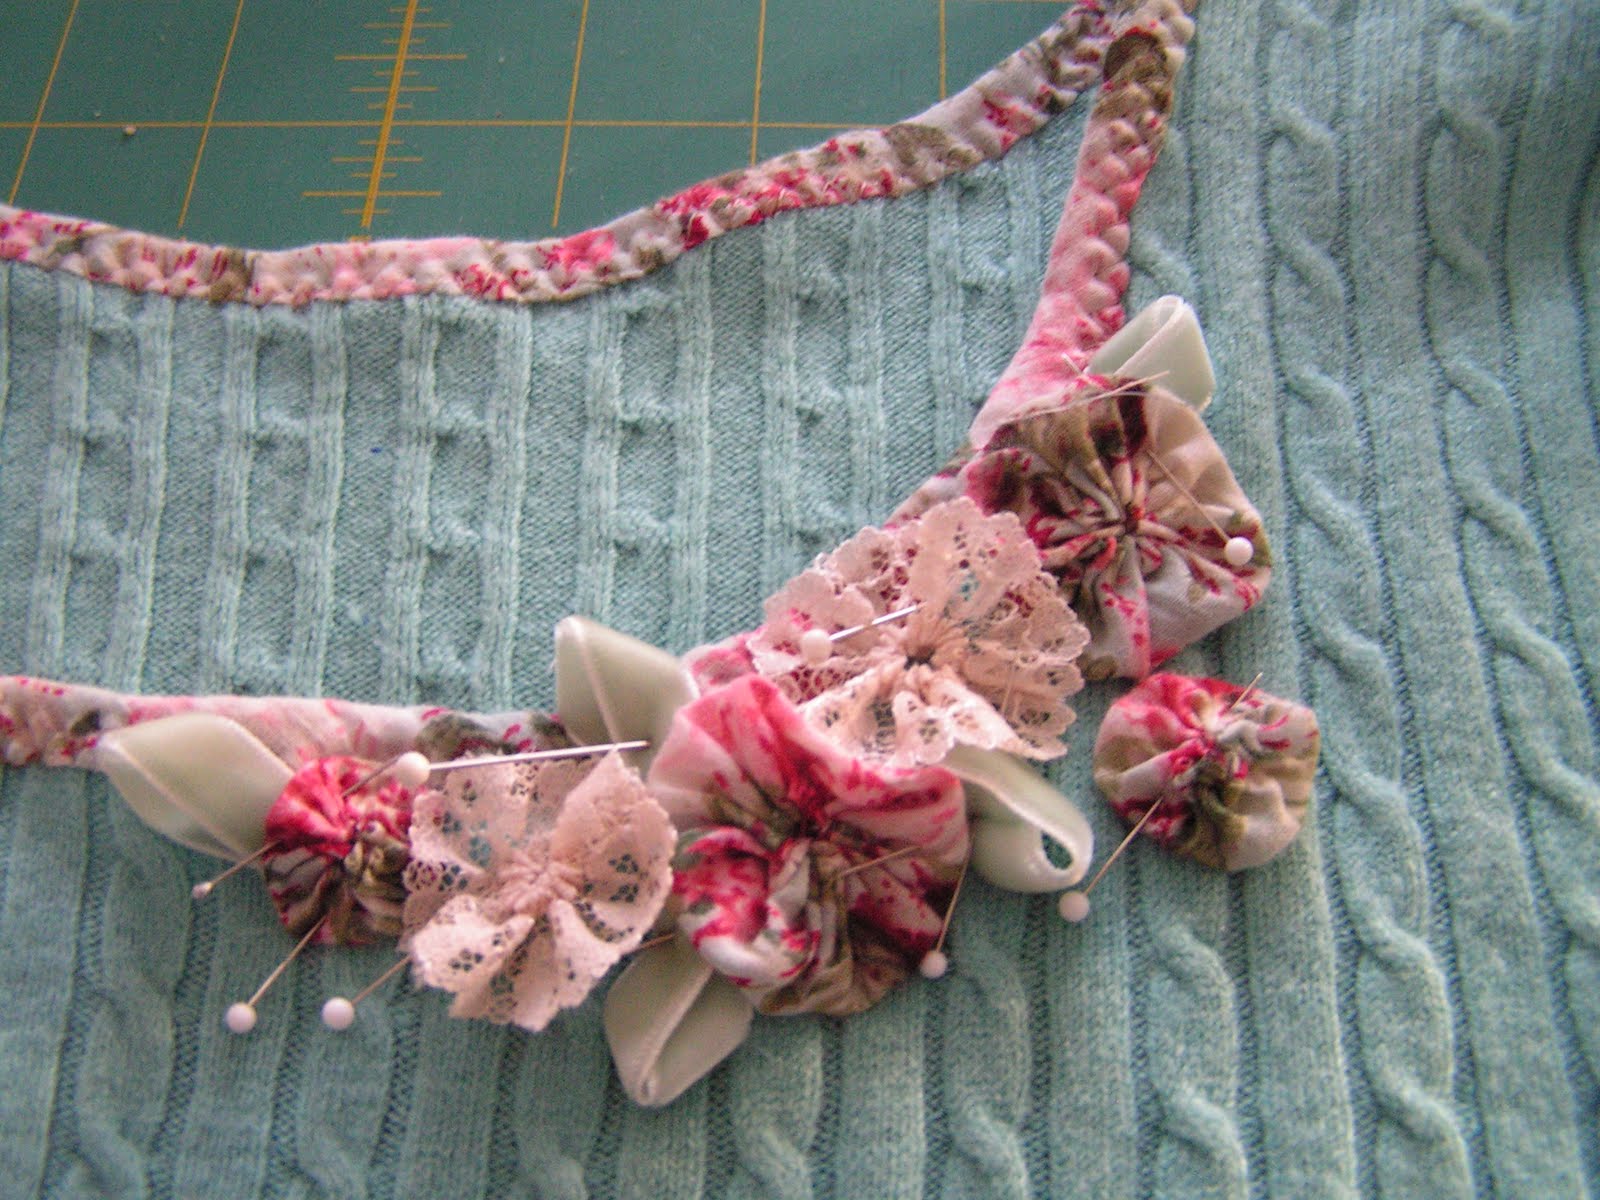 * Sizing for the embellishments * Yo-yo's: (S) cut 1 1/2"circles, (L) 2 1/2" circles (here is the link to how to make yo-yo's) * Leaves: use 3/8" wide velvet ribbon. Cut 2" and fold it in half and lay both ends together and sew. * Lace flowers: (I used 5/8" wide lace.) Cut a piece 5" long and gather the top and make a flower. 15. I wanted a little something at the back of the neck too. So, I added a tag with ribbon. 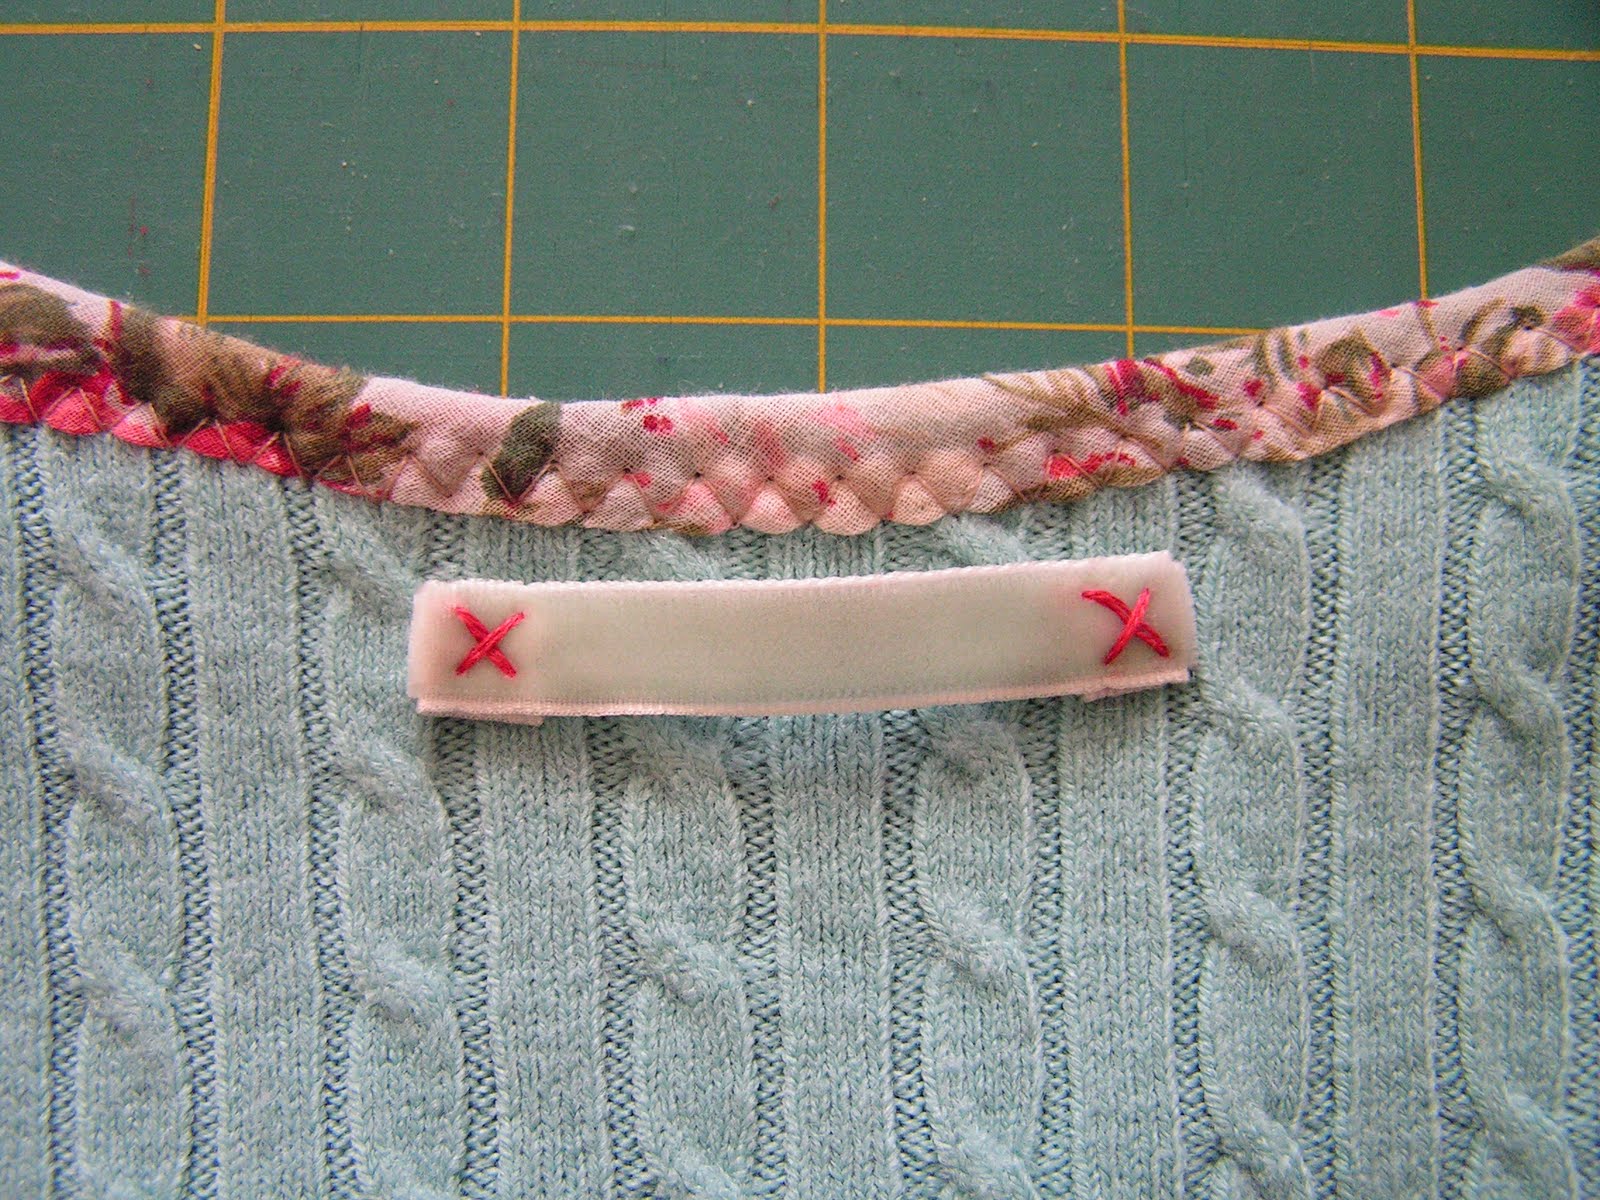 It is all done. All I needed to do was to try it on...  LOOVE it!  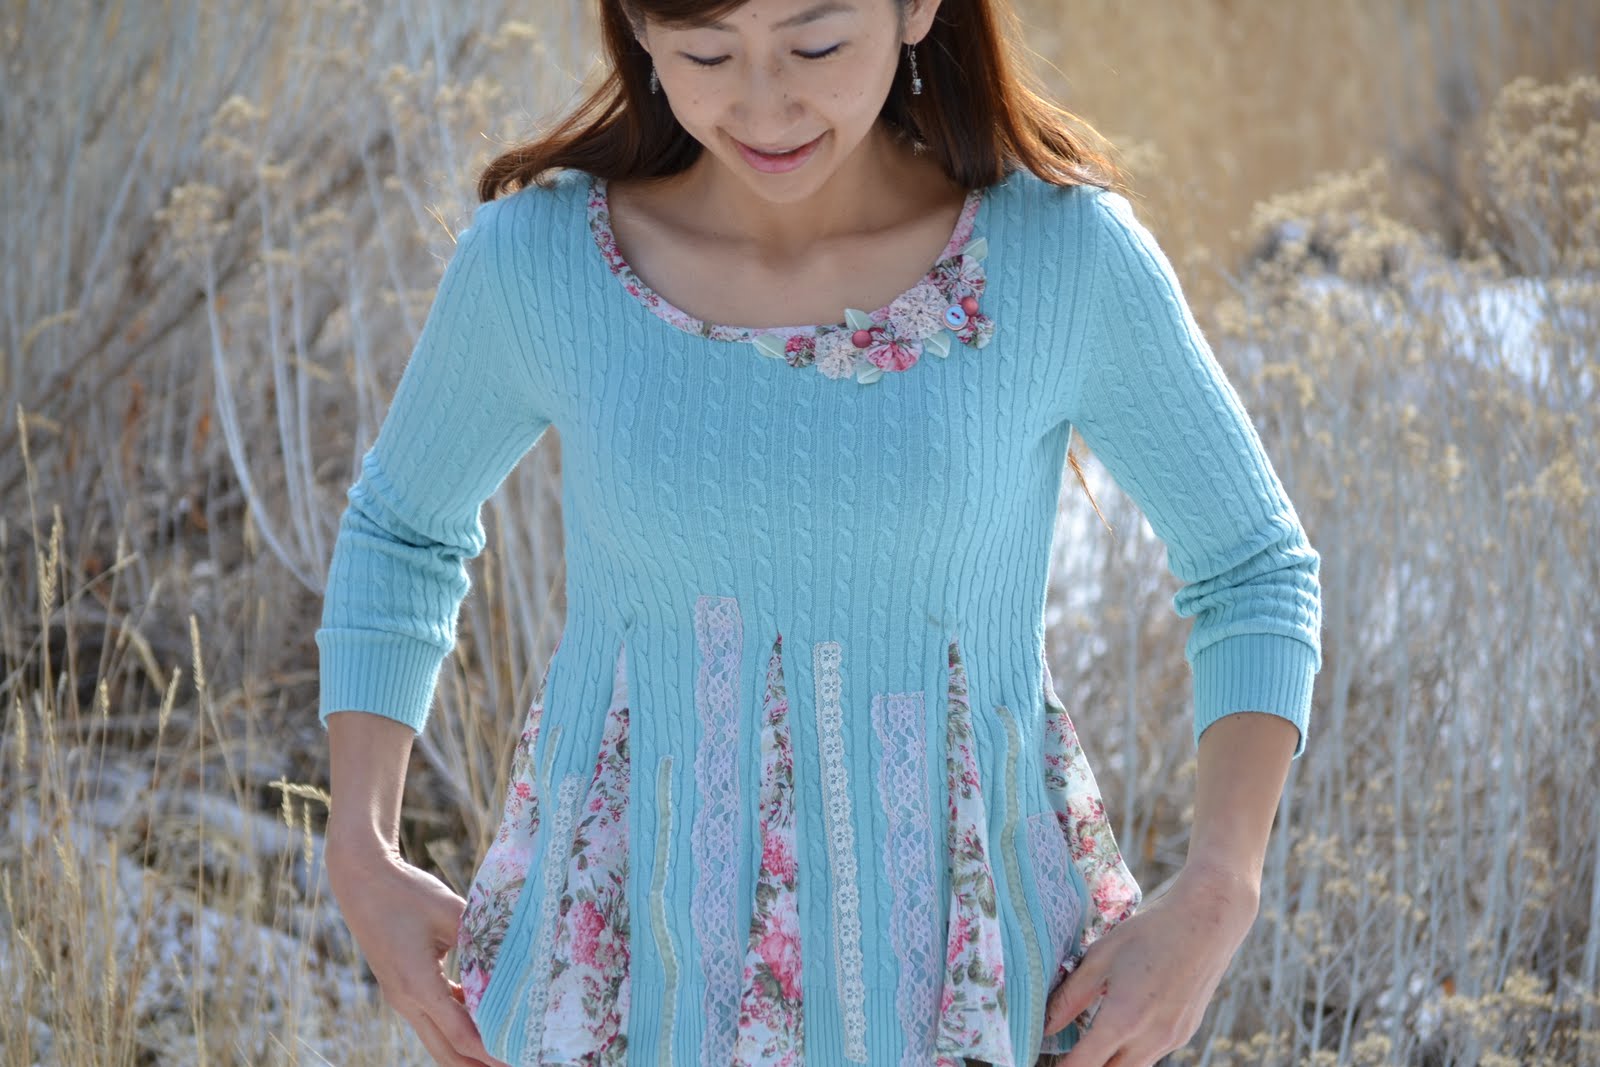   |
Метки: refashion |
doily plate |
31. Januar 2011


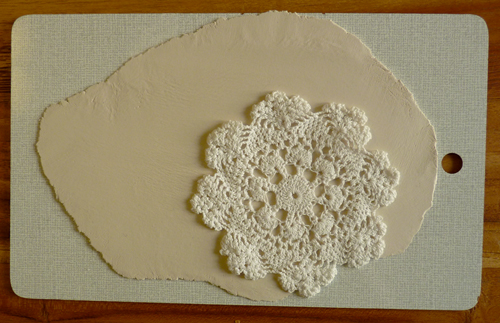


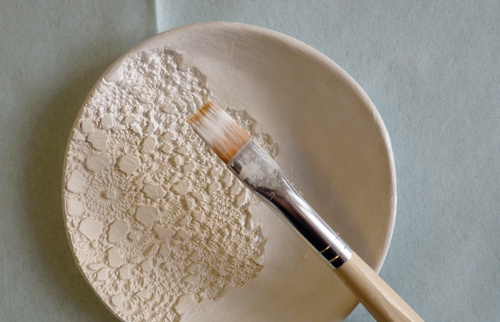

Метки: kitchen items plaster doily |
car USB |
|
Серия сообщений "Backgrounds":
Часть 1 - another collection of CLOCKS
Часть 2 - And again CLOCKS
...
Часть 37 - backgrounds
Часть 38 - backgrounds
Часть 39 - car USB
Часть 40 - backgrounds with interior
Часть 41 - desktop wallpaper
Часть 42 - wallpaper 2
|
Метки: USB |
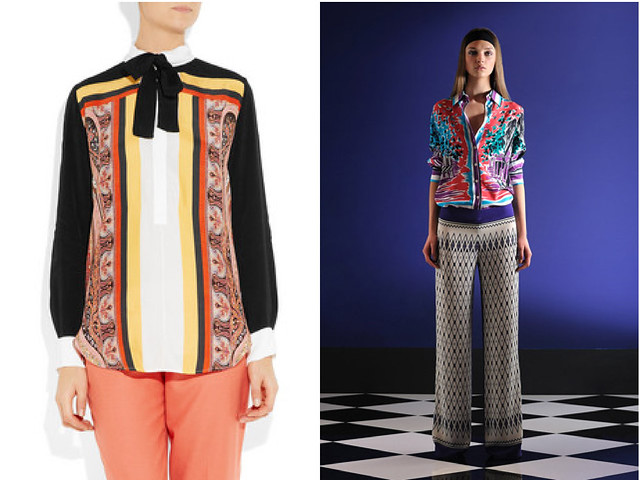
scarf fashion |


Серия сообщений "Scarfs":
Часть 1 - Just tie it on!!!
Часть 2 - All from SCARFS
...
Часть 19 - scarf vest
Часть 20 - scarf in 5 min.
Часть 21 - scarf fashion
Часть 22 - from scarfs
Часть 23 - scarf with lace
...
Часть 26 - quick tops from scarfs
Часть 27 - blouse from piece of fabric
Часть 28 - coat
|
Метки: scarf |
fudge in 3 minutes |


 Combine the chocolate chips and the butter in a microwavable safe bowl.
  Add the 2 cans of sweetened condensed milk.
  Cover the bowl with wax paper. Microwave for about 3 minutes, stirring every minute, until everything is melted and smooth.
 Spread the mixture evenly into a greased 9 x 13 pan. Cover and let the pan sit overnight in the fridge.
  Slice into 1" squares and enjoy!
Серия сообщений "in minutes":
Часть 1 - microwave cake in minutes
Часть 2 - 5 minutes chocolate cake
...
Часть 6 - Five Minute Ice Cream
Часть 7 - heal yourself - palm massage
Часть 8 - fudge in 3 minutes
Часть 9 - sewing a dress in minutes
Часть 10 - dress in 20 minutes
...
Часть 15 - Nutella in 5 minutes
Часть 16 - very useful tips
Часть 17 - egg white dessert
Серия сообщений "Chocolate ":
Часть 1 - Nutella
Часть 2 - Edible Flower Pot
...
Часть 23 - choclate cake with prunes
Часть 24 - chocolate cake
Часть 25 - fudge in 3 minutes
Часть 26 - chocolate plate
Часть 27 - delicious cake
...
Часть 44 - velvet cake
Часть 45 - cherry cake
Часть 46 - cake with meringue
Метки: dessert in minutes |
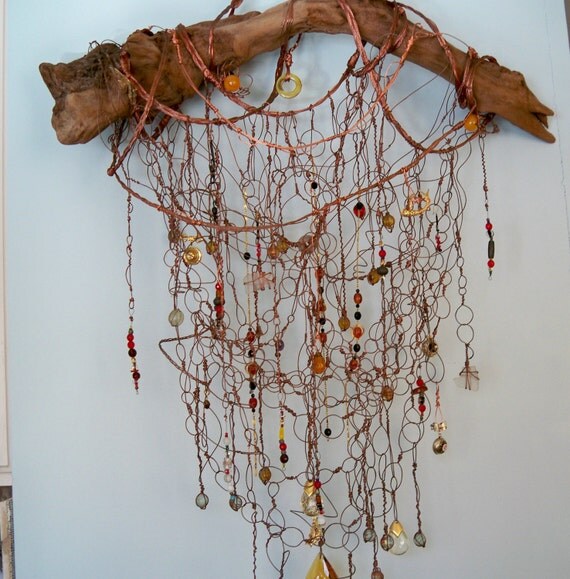
artful wall hangings |
Метки: wall hanging |
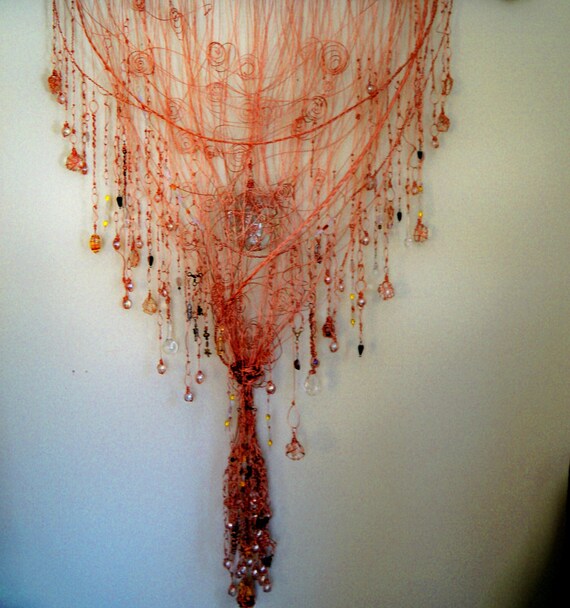
fabric chandelier |
ara quem tem muito retalho e não sabe o que fazer com eles encontramos neste bloghttp://ourhomescool.com/2011/09/27/scrappy-lampshade/ uma ótima idéia: Lustre com armação de arame e retalhos !!!


Muito legal !!!! Nós amamossss esta idéia!!!
Espero que tenham gostado!!!
Bjosssss
Метки: lamp |
diy umbrella |
The idea of A sweet bell like to thank the Internet User ytenok .
The Most Difficult stage in the Preparation of Our Umbrella - A selection of materials, so this time it WAS material I WAS paying more Attention and Will try to Write in detail. At the Same time it is my Duty to WARN you That this work is not for the Beginner, it requires Certain skills in the manufacture of candy bouquets, Especially Stands out to work with hot glue, here it is very time consuming - you need Precision, Patience, and, Most importantly, time. Working with lace, in my opinion, almost jewelry.
So, we need an umbrella for:
A. Truncated cone of foam, you CAN Buy stuff at the store "Tiimari", in A set of Three pieces, and CAN be cut by the cone-Shaped foam (foam is sold in sheets of stroymagazinah). I took it in here "Tiimari" in the "Alpha".
Two. Lace Umbrella for the Self, of A width of About 15 centimeters, can take any color, any fabric (except organza), but not very heavy, about 1.5 meters.
 |
 |
 |
Three. A piece of cardboard (preferably white) to cut out A Small Circle of diameter, calculate the diameter of Approximately 10 centimeters. 4. 1.0 A wire with white ribbon teip, it Turns out 8 halves, then there Should be four integers. You CAN use skewers Also, if you want the spokes on an Umbrella is not bent and it Could be put to One Side. |
 |
Five. Cable, such That A well-bent and fixed, are They Different, this is 0.96 centimes per meter, bought in the DEPO, we need to be 38 centimeters (by trial and error I realized that this length is ideal) - 1 cm in diameter |
 |
6. Lace, One to Hide the seams of the Upper, the Other (But CAN be the Same) on the Edge, Look to Combine with the main color of the Umbrella, plus, if They are on the Edges and seams are Different, then it is Also Necessary so That it is combined and the texture and color. 7. Satin ribbon width Slightly greater than 1 cm, the length of this to wrap the cardboard circle, well, take a meter 3, 4 can be, just in case. Eight. Organza ribbon, wrap the leg Beautifully Umbrella, See That, again, Match the color, it Should be About Three and A half feet. |
Next, you will need glue (take spare wheel), a white ribbon and teip all-all-all in order to decorate the top, that is, to make all the usual candy bouquet, just watch what you want to combine what color umbrella .
Remember That the Tip of the colors Should not be too bulky, do not make large flowers. Perfect candy "Mercy," "Geisha."
|
A. First, Take the Cable and wrapped around His white (in Our Case) teip tape, shakes very Carefully. Tip One of the Cable Beautifully wrapped Will be, Will it bend, and the Second we Leave A length of 1.5-2 About cm for pasting into a cone. Two. swathes of satin cord, ribbon or Any Other, in Other words, Decorate it, Sometimes A bit of glue drips, Fix. |
 |
3. Take the foam cone, Scissors, done A little hole for the Cable (in the Wider Part of the cone) and glue A piece of Cable, we Decorate. |
 |
4. Cut out flat cardboard Circle with diameter of A About 10 cm, making it the middle of the hole diameter of 1 cm (for Cable). Our Circle of swathes of beautiful ribbon. |
 |
Five. very Carefully threaded through the Cable Circle and glue to the cone. |
 |
6. Take Our eight halves of the wire (or skewers), wraps Them teip tape. On the One Hand beautiful Finish, and the Second, Which Will we paste into the cone, you CAN not wrap an inch and half A. |
 |
7. At this stage we need to paste Will Our wire crosswise (or spokes in the Umbrella) in the cone. In order to Ensure That They pasted EXACTLY, we need to measure the first One - to what we PLACE Will paste - Mark marker and Mark it on the Other seven, then we have an Umbrella spokes are Equal length. Moreover's, the paste must be so That They do not touch the Cable, That is, not very deeply into the cone. Plus, we do it at Almost the Base, Almost immediately on cardboard Our Circle. (This is done so That When we Look at Our Umbrella from the bottom, the spokes Would be neat, Close fit with the cardboard and there WAS A hole.) |
 |
8. Getting the Most laborious work, Measured and glued the fabric on the spokes. Immediately Decide Whether to stick your Umbrella tips of needles or not - depends on how you glue the Sector Will - or in Whole, or not reaching the Edge. As for gluing say A few words. I do so - enclose A piece of fabric, Needle stick gently (See That the glue WAS not visible from the bottom, Remove the excess drops at once), then cut, and so each Sector. That is , I do not cut the pieces at once - first stick, and then I cut. Try it, maybe you Get A Different way. |
9. Now we need to Close the joints. We Take Our beautiful ribbons and glue, Carefully working with glue, to Avoid Unnecessary drops back.
 |
 |
 |
 |
10. That's All, Our Framework is Ready, proceed to Decorate the top with candy and Other decorations.
If you have REACHED this stage, it is Safe to say That you have Moved to new A Level in the Production of flowers, and from now on Will be Able to make Almost Any song.
I congratulate you with an Umbrella victory! I hope That was helpful!
 |
 |

Метки: miniature |
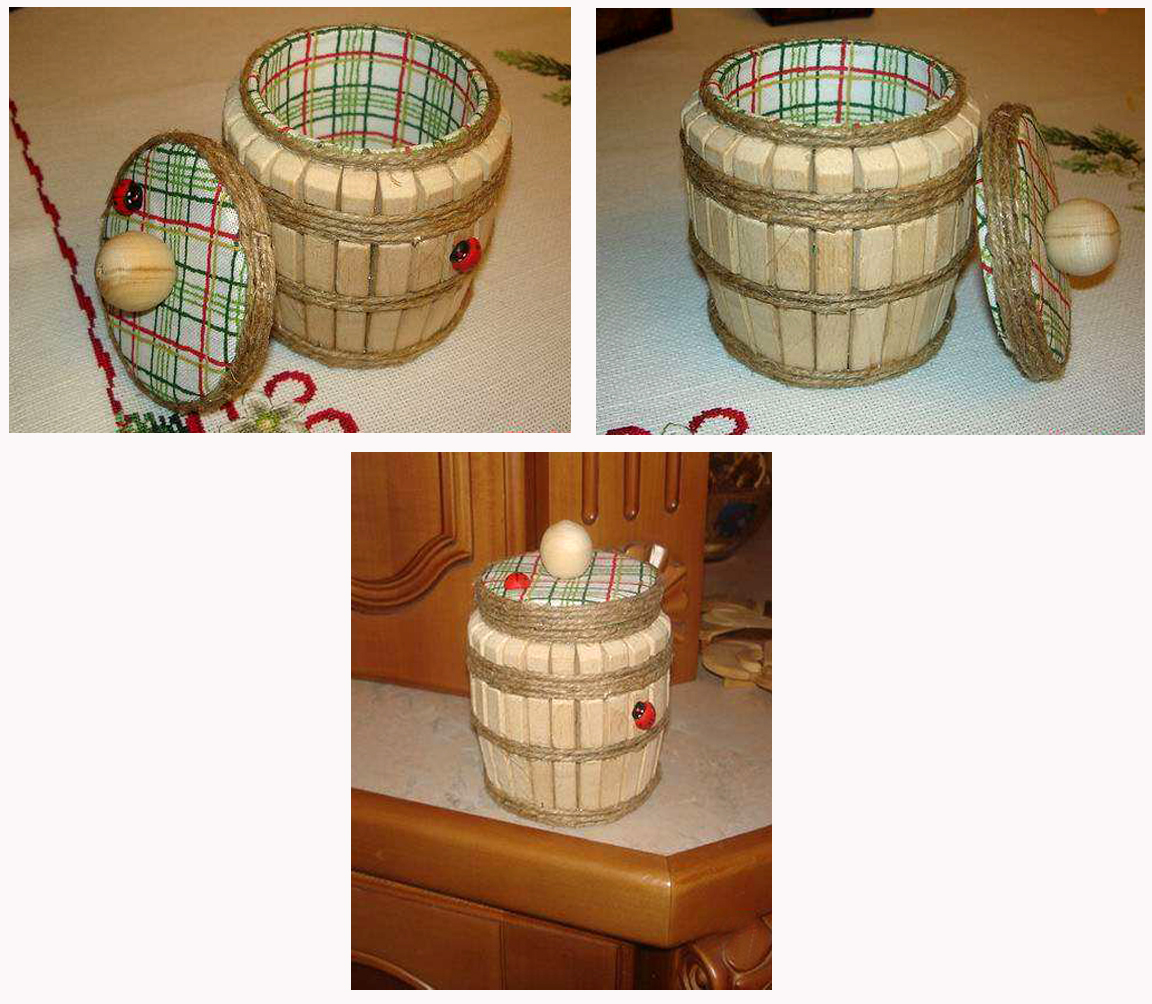
box with cloth pins |
taken from uzoranet in the barrel of the pegs. Master Class.![]()
Серия сообщений "Cloth Pin":
Часть 1 - Recycle ice cream sticks - links to picasaweb
Часть 2 - Miniature cloth pin chair
...
Часть 7 - jar covered with cloth pins
Часть 8 - miniature furniture
Часть 9 - box with cloth pins
Часть 10 - decorative bottles
Часть 11 - lamp of cloth pins
Часть 12 - frame with cloth pins
Часть 13 - cloth pin decoration
Часть 14 - clothpin chair
Метки: box cloth pins |