-Рубрики

 -Приложения

  • Перейти к приложению Дешевые авиабилеты Дешевые авиабилетыВыгодные цены, удобный поиск, без комиссии, 24 часа. Бронируй сейчас – плати потом!
  • Перейти к приложению Я - фотограф Я - фотографПлагин для публикации фотографий в дневнике пользователя. Минимальные системные требования: Internet Explorer 6, Fire Fox 1.5, Opera 9.5, Safari 3.1.1 со включенным JavaScript. Возможно это будет рабо
  • Перейти к приложению Открытки ОткрыткиПерерожденный каталог открыток на все случаи жизни
  • Настольные игры онлайнМы предлагаем Вам сразиться в любимые настольные игры со своими друзьями, не отходя от компьютера. У нас вы сможете поиграть в дурака, преферанс, тысячу, нарды, шахматы, шашки, крестики-нолики, точки,

 -Поиск по дневнику

Поиск сообщений в M_A_G_D_A

 -Подписка по e-mail


 -Статистика

Статистика LiveInternet.ru: показано количество хитов и посетителей
Создан: 13.01.2010
Записей:
Комментариев:
Написано: 4255


1302386254_60162972_1276215401_window (400x274, 1349Kb) 


39 (472x176, 85Kb)


skirts patterns

Пятница, 30 Марта 2012 г. 10:49 + в цитатник


Выкройки готовых моделей юбок

  • Юбка с круговыми односторонними складками

    Юбка с круговыми односторонними складками


    Линия талии оформлена притачным поясом.

    Ткань — шерсть, полушерсть, ситец, сатин, штапель, шелк, велюр, тонкосуконная.

    Расход ткани в зависимости от расчета построения.


  • Юбка с клиньями годе

    Юбка с клиньями годе


    Юбки с клиньями годе. Линия талии оформлена притачным поясом. Застежка на молнии.

    Ткань — любая мягкая, не очень плотная, хорошо драпирующаяся.

    Расход ткани определяется предварительной раскладкой и зависит от количества клиньев, ширины их по линии низа, ширины ткани, направления рисунка или ворса и размера изделия.


  • Юбка-клеш со шлейфом

    Юбка-клеш со шлейфом


    Юбка-клеш «полусолнце», длинная, со шлейфом. Застежка на молнии в среднем заднем шве. Линия талии оформлена поясом.

    Ткань — шерсть, полушерсть, велюр с ворсом.


  • Юбка-клеш на кокетке

    Юбка-клеш на кокетке


    Юбка-клеш полное «солнце» на кокетке. Линия талии оформлена поясом. Застежка на молнии.

    Ткань — шерсть, полушерсть, шелк.

    Расход ткани при длине юбки 70 см — 120x130 см, при длине 90 см — 140x150 см.

    Модель рассчитана на высокую стройную фигуру.


  • Юбка с густыми пучками сборок

    Юбка с густыми пучками сборок


    Юбка-клеш «полусолнце» с одним или двумя швами с густыми пучками сборок. Линия талии оформлена притачным поясом. Застежка на молнии в левом боковом шве.

    Ткань — шелк, сатин, штапель.

    Расход ткани при ширине 1 м 40 см — две длины юбки плюс одна выемка по талии и плюс 30—35 см.


  • Юбка с глубокими запахивающимися мягкими складками на переднем полотнище

    Юбка с глубокими запахивающимися мягкими складками на переднем полотнище


    Юбка-клеш «полусолнце» с двумя швами. Переднее полотнище с запахивающимися глубокими мягкими складками. Застежка в левом боковом шве. Линия талии оформлена притачным поясом.

    Ткань — шерсть, полушерсть, шелк.

    Расход ткани при ширине 1 м 40 см — три длины юбки плюс 10 см.


  • Юбка «полусолнце» c мягкими складками по талии

    Юбка «полусолнце» c мягкими складками по талии


    Юбка-клеш «полусолнце» с одним или двумя швами. Линия талии оформлена заложенными складками. Застежка в левом боковом шве по разрезу. Линия талии оформлена поясом.

    Ткань — шерсть, полушерсть,

    шелк.

    Расход ткани при ширине 1 м 40 см — две длины юбки плюс две выемки по талии и плюс 10 см.


  • Юбка «полусолнце» c заутюженными складками

    Юбка «полусолнце» c заутюженными складками


    Юбка-клеш «полусолнце» с заутюженными складками от линии бедер. Линия талии оформлена притачным поясом.

    Ткань — шерсть, полушерсть, шелк.

    Расход ткани при ширине 1 м 40 см — две длины юбки плюс одна выемка по талии и плюс 10 см.


http://nantoo.ru/ready/skirts.html
Рубрики:  FASHION/Sewing patterns

Метки:  


Процитировано 3 раз

wedding glass

Пятница, 30 Марта 2012 г. 09:53 + в цитатник

Wedding Accessories handmade.  Fair Masters - handmade wedding set "Champagne."  Handmade.

 
Wedding Accessories handmade.  Fair Masters - Handmade Wedding glasses "Lace."  Handmade.
Wedding Accessories handmade.  Fair Masters - Handmade Wedding glasses "Spring".  Handmade.
 
Читать далее...

Серия сообщений "Glass":
Часть 1 - weding glasses
Часть 2 - wedding glasses
...
Часть 19 - decorative bottles & glasses
Часть 20 - wedding glasses
Часть 21 - wedding glass
Часть 22 - wedding glass
Часть 23 - wedding glass
Часть 24 - wedding glass
Часть 25 - wedding glasses
Часть 26 - wedding glsses


Метки:  


Процитировано 85 раз
Понравилось: 21 пользователям

bleach dye

Четверг, 29 Марта 2012 г. 00:11 + в цитатник


To DIY For: The Bleached Mini Dress

Posted by Loret Gamboa on Fri, Sep 25, 2009 at 1:44 PM


Finished bleached dress
To DIY For is back! I figured you had enough fashion tips and advice to digest during Fashion Week without my forcing more clothes down your throats! It's officially fall now, so I will be cutting you no more slack and will expect nothing less than full completion of weekly assignments.


So, I hope everyone had a fabulous and enlightening Fashion Week. Almost as fun as watching the fashion shows themselves is looking at what the fashionable attendees of said fashion shows are wearing. It's a great barometer of what the trends will look like this fall from fashion insiders. As the folks over at Fashionista quite observantly pointed out, the long-sleeved mini dress was everywhere. Here, I created my own version of this versatile fall staple that can be worn for almost any occasion, and it will look great with tights when the temperature begins to dip. I also incorporated another fall trend, strong shoulders which, as Laurel already told you in our Fall Fashion issue, are, well, BIG.

TOOLS
—long-sleeved mini dress
—bleach
—shoulder pads
—plastic bucket
—rubber bands (about 40)

Step 1 
Start with a long-sleeve American Apparel dress—I know you have one. I bought this little double u-neck number; I went for the black because it's pretty classic and simple, but I think this would also work really well in other colors. I'd love to see how a purple one would turn out!


Original dress


Step 2
Gather the dress into a vertical strip with the sleeves aligned with the body of the dress. The overall effect we're trying to achieve with this is horizontal bleached stripes. You'll need a lot of rubber bands to ensure the bleached and unbleached portions are even. Those really thick rubber bands; the ones that crush paper and posters, as it turns out, are perfect for this project. The finished product should look something like a sandworm.


Rubber bands


Step 3
Dilute bleach in two parts water and pour to cover the dress. Let soak until the desired color is achieved. I wanted to bleach out as much of the color as possible so I let mine sit for about an hour, but it bleached all it was going to bleach in the first 20 minutes or so.


Dress in a bucket


Step 4
I had a pair of shoulder pads lying around from a shirt I bought at a thrift store, but you can probably purchase a pair from any trimming store. They come in a variety of sizes and shapes. These are on the conservative side. To attach, simply sew along the edge of the neck. This should keep it in place, but I would recommend you make a small stitch at the tip of the shoulder pad to prevent moving .


shoulder pads


There you have it! A great fall party dress. You know what would go really well with this? A chunky, shiny statement necklace! Stay tuned next week when I attempt my first accessory!


finished.jpg
 

Серия сообщений "Dye, stamp":
Часть 1 - natural dye
Часть 2 - painting easy
...
Часть 5 - dye with bleach
Часть 6 - different effects by paint
Часть 7 - bleach dye
Часть 8 - dye a shirt
Часть 9 - dye t-shirt
...
Часть 12 - dye a t shirt
Часть 13 - stencil animal skin
Часть 14 - dye


Метки:  


Процитировано 1 раз

dyed feather pen

Пятница, 23 Марта 2012 г. 13:20 + в цитатник


来源:

/www.google.com.hk/s2/u/0/favicons?domain=huaban.com" target="_blank">http://www.google.com.hk/s2/u/0/favicons?domain=huaban.com); background-attachment: initial; background-origin: initial; background-clip: initial; background-color: initial; padding-left: 20px; background-position: 0px 8px; background-repeat: no-repeat no-repeat; " title="花花_的采集 - 复古鹅毛笔DIY,很美~~快来学习...">huaban.com  花花_的采集 - 复古鹅毛笔DIY,很美~~快来学.../cdn.duitang.com/img/0/mdetail.png?20120315" target="_blank">http://cdn.duitang.com/img/0/mdetail.png?20120315); float: right; padding-top: 0px; padding-right: 20px; padding-bottom: 0px; padding-left: 0px; line-height: 31px; background-position: 100% 8px; background-repeat: no-repeat no-repeat; ">查看来源
复古鹅毛笔DIY,很美~~快来学习吧!——更多内容,请关注

Серия сообщений "Feather":
Часть 1 - Peacock Wedding Items
Часть 2 - Feather Broach
...
Часть 6 - feather flowers
Часть 7 - thread feather
Часть 8 - dyed feather pen

Серия сообщений "Dye, stamp":
Часть 1 - natural dye
Часть 2 - painting easy
Часть 3 - dyed feather pen
Часть 4 - dye the whole fabric
Часть 5 - dye with bleach
...
Часть 12 - dye a t shirt
Часть 13 - stencil animal skin
Часть 14 - dye


Метки:  


Процитировано 2 раз
Понравилось: 1 пользователю

cute ideas

Пятница, 23 Марта 2012 г. 12:57 + в цитатник


 Vou acabar com as colheres da minha casa, se sumir não me perguntem, pq eu não sei onde elas foram parar, eu contei 9 colheres para cada luminária então vou sumir com todas e meus netos vão ter que comer e aprender a comer com garfo!!!!!


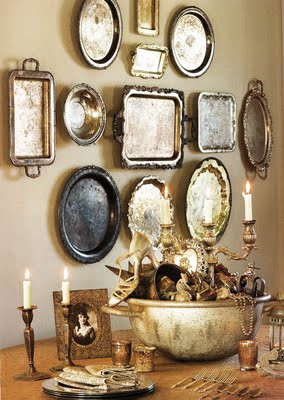
 Quando eu servir o café, a água, o suco de laranja tb. não me perguntem pq eu sumí com as bandejas, vou dizer que é uma questão de organização, estarão todas enfileiradinhas na parede pq. eu tenho TOC aquela mania que as pessoas tem que ficar colocando tudo em ordem, pois é, vou organizar minhas bandejas!!!!


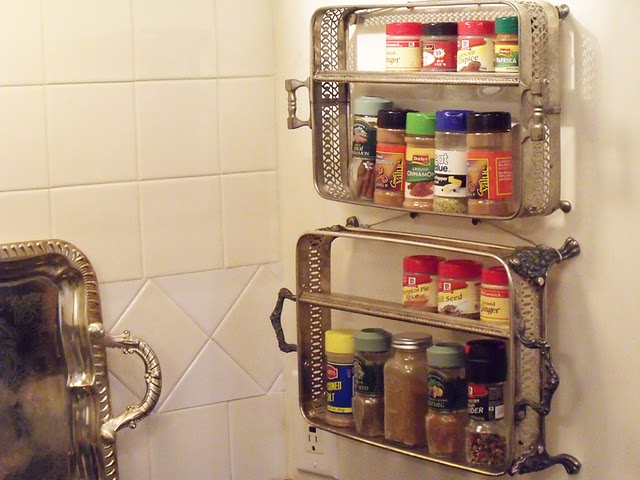
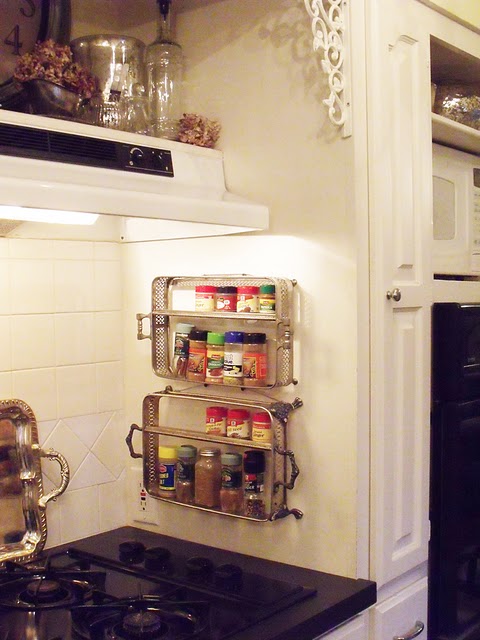
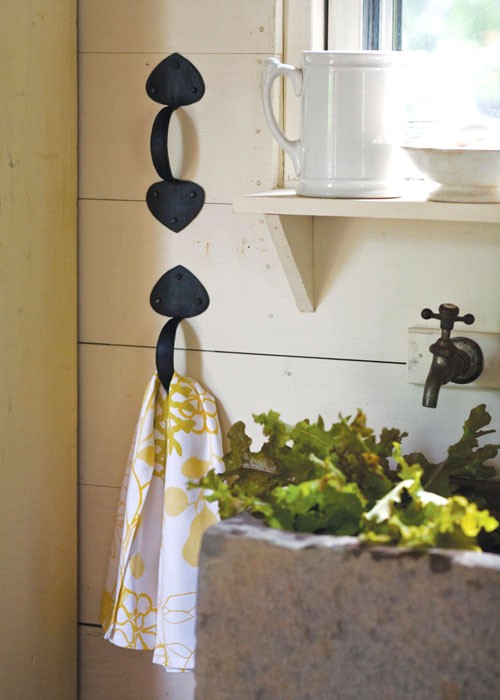
 Inclusive estarão na cozinha, pois é, continuando com a organização, os meus temperos tb. estarão organizadinhos na parede da cozinha dentro de uma bandeja customizada.


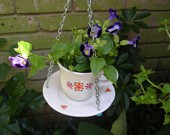
 As minhas xícaras estarão no jardim.


 A bicicleta pedalou para o banheiro.


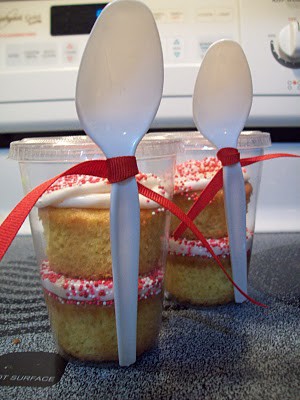
 Olha só o lanchinho, a festinha, organizado, bonito ....hummmm.....idéia bem gostosa!!!


 A mesa da cozinha ficou de pernas para o ar, que idéia é essa?


Серия сообщений "Bathroom":
Часть 1 - Bathroom decoration
Часть 2 - Sea Shell Beauty
...
Часть 9 - interesting items
Часть 10 - recycled towel
Часть 11 - cute ideas
Часть 12 - toilet covers
Часть 13 - ideas
...
Часть 21 - recycled lighthouse
Часть 22 - bathroom set
Часть 23 - creative ideas

Серия сообщений "Bedroom":
Часть 1 - no-sew blanket
Часть 2 - Royal Bedrooms
...
Часть 22 - storing shoes
Часть 23 - beautiful umbrellas
Часть 24 - cute ideas
Часть 25 - jewelry holder
Часть 26 - victorian collection
Часть 27 - bed table
Часть 28 - useful ideas
Часть 29 - creative ideas

Рубрики:  DECOR/Kitchen

Метки:  


Процитировано 5 раз

ribbon rose

Пятница, 23 Марта 2012 г. 12:47 + в цитатник


 I’m going to show you how to create ribbon rosettes suitable for paper crafting… with recycled and new materials you may already have in your home!

P1000495

Wouldn’t these ribbon rosettes look fabulous on your lapel, a paper project, headband, or gift bag?

Here’s the supply list for a 3” Ribbon Rosette:

  • Chipboard… this can be recycled cardboard from packaging and/or cardstock. I prefer 1/8” thick or better.
  • Paper piercing tool and snips and/or Japanese Hole Punch and snips.
  • Ribbon… I prefer 1/2” or wider, approximately 4 feet of ribbon is needed for a 3” ribbon rosette.
  • Hemp Twine*
  • Household Tape
  • Mat Pack
  • 3” sizzix circle die
  • Big Shot Machine


P1000466


Step by Step Directions:

  • Cut a 3” circle using the Big Shot Machine and Die from scrap chipboard.
  • Find the center of the chipboard by drawing a line both the 1.5” line horizontally and vertically.  As you can see in the photo below, I used the self healing mat that came with my SU! Mat Pack to find the center of the 3” circle die cut.P1000461
  • Pierce a hole where the lines cross… I used my Japanese Hole Punch to make the hole, but you could just as easily use a paper piercing tool.
  • Use the fine point tip of your paper snips and a twisting downward motion to increase the size of the center hole.  You will be threading hemp twine* through the hole several times, it needs to be approximately 1/4” in diameter. 
  • Thread hemp twine* through the center hole, and attach to the 3” chipboard circle with household tape.  The center whole in the photo below is actually smaller than it should be… I had to increase the size with paper snips before completing the project!P1000467
  • Wrap hemp twine* around the 3” circle, threading forward through the center hole….P1000468
  • Repeat the process until you have 7 spokes, or more on your 3” chipboard circle disc.P1000470
  • In order for this ribbon rosette to form properly, you need to have an odd number of hemp twine* spokes.  You may increase and/or decrease spokes as desired.
  • Using the very end of your ribbon of choice, wrap the ribbon twice to tie a knot which will become the center of your ribbon rosette.P1000472
  • Snug the ribbon down, but not too tightly… you want a nice and fluffy flower center!
  • Insert the tail of the knot through the 3” chipboard circle and secure to the back with household tape.P1000476
  • Using an over/under motion, begin threading the ribbon through the spokes.. under the first spoke, over the next… etcetera.P1000478
  • Be mindful to straighten out the ribbon as you tug it towards the center… the twist in the photo below is NOT good… see the big red X?P1000481
  • The ribbon should be flat and flowing in one direction as you work around the 3” chipboard circle.P1000482


  • Continue working around the circle in an over/under motion until the entire 3” chipboard circle has been covered with ribbon, snugging the ribbon in even tugging motions.P1000484
  • Once the 3” chipboard circle has been filled with ribbon, attach the last ribbon end to the back of the 3” chipboard circle with household tape.P1000486
  • Your 3” Chipboard Ribbon Rosette is now ready to use for that special paper crafting project..Isn’t it lovely?P1000485
  • Wouldn’t the ribbon rosette look fabulous on a gift bag?  Or a fabulous vintage sweater or card?P1000487
  • Of course it would be even more fabulous with some antique brads, pearls or rhinestones LOL!  But I’m cleaning closets so didn’t really have time to kick it up!  (Maybe tomorrow LOL.)
  • Varying the size of the chipboard circle, you can have perfect ribbon rosettes for wedding invitations, cards, scrapbook pages.. imagine the possibilities!!
  • This rosette began with just a 1-3/8” chipboard circle punch. P1000495
  • A crop-a-dile tool was used to create the center hole, linen thread was used to make the spokes, and paper snips were used to increase the size of the hole to just under 3/4”.

*Instead of hemp twine or linen thread, use matching ribbon in a narrower version to ‘hide’ thread and hemp trails.  When I made rosettes with Elly Sienkiewicz, we always used matching thread.  We never used chipboard LOL… we used fabric as the backing!

http://createdbyu.blogspot.com/2011/01/super-


Рубрики:  FASHION/Embllishment
Flower Making

Метки:  


Процитировано 23 раз
Понравилось: 2 пользователям

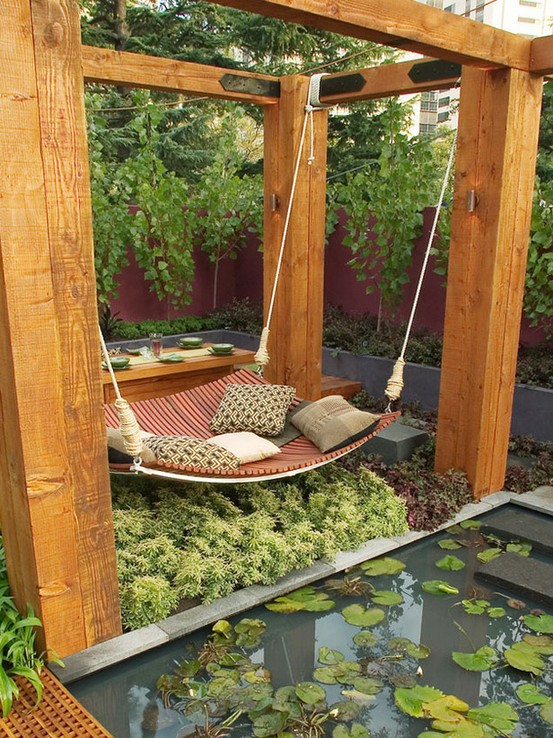
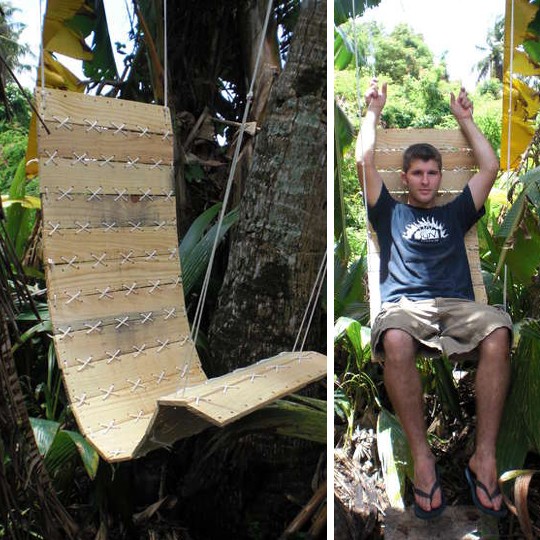
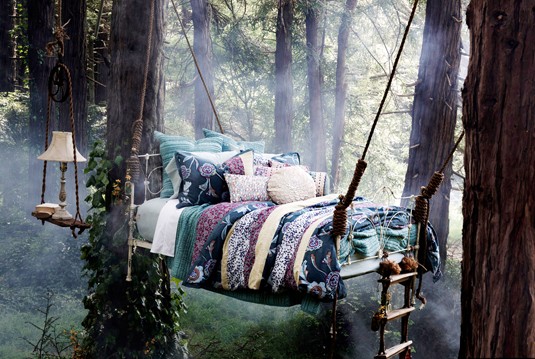
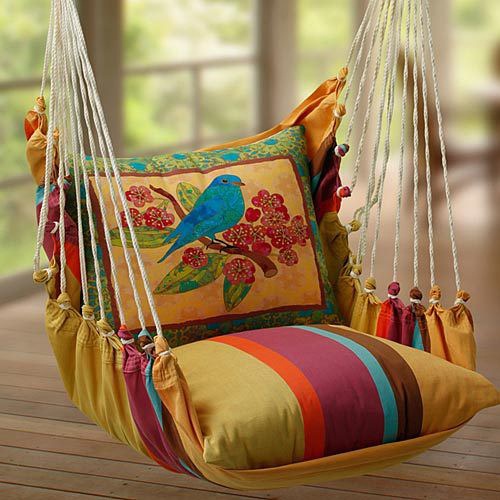
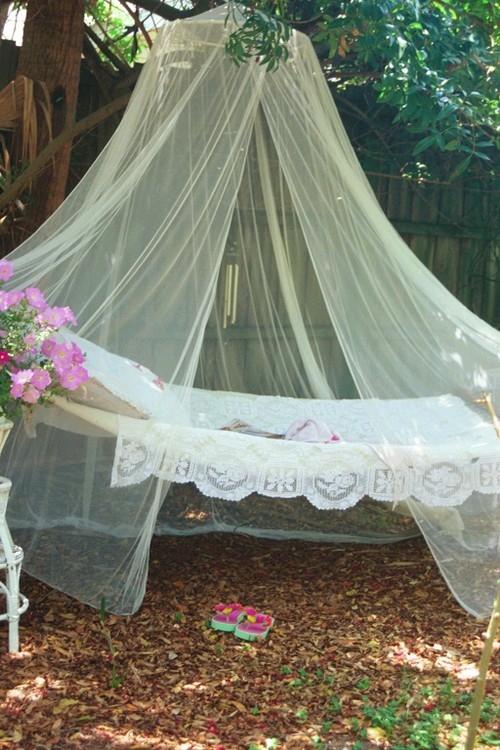
hanging beds, chairs and hammocks

Пятница, 23 Марта 2012 г. 12:20 + в цитатник


medo do que tinha embaixo da cama?
 

Estas redes quase que faziam parte do corpo, pois era muito fácil dobrar e sair pelas matas com a cama de dormir nas costas, na pré-história já usavam uma capa tipo super-homem só que de couro de animais e usavam para dormir no chão. Lembro do Homem do Gelo encontrado em 1991 nos Alpes Italianos, estudava Moda e estudamos suas roupas, então lembrei de uma capa de grama entrelaçada que usava para dormir. Ficamos a pensar quem resistiria a uma rede? Os escravos gostavam de dormir no chão e se usavam na pré-história capas para dormir no chão deve ser bem difícil como tudo começou.


Imaginou costurar ripas de madeira e fazer um balanço.... Fiquei imaginando o que dá para  
fazer com estas madeiras costuradas, até cabeceira da cama, uma de cada cor, na 
parede
 
 
 Jorge Fernandes 
 Poema de 1927.
 
REDE...
 
 
Embaladora do sono...
Balanço dos alpendres e dos ranchos...
Vai e vem nas modinhas langorosas...
Vai e vem de embalos e canções...
Professora de violões...
Tipóia dos amores nordestinos...
Grande... larga e forte... pra casais...
Berço de grande raça
 
Guardadora de sonhos...
Pra madorna ao meio-dia...
Grande... côncava...
Lá no fundo dorme um bichinho...
— ô...ô...ô...ôô...ôôôôôôôôô...
 
— Balança o punho da rede pro menino durmir...


Tipo criança?


Ou copiar a ideia para uma simples mesa de apoio, simplesmente penso que a madeira tem que ser bem
pesada para não ficar balançando e brincando com os objetos de decoração exposto.


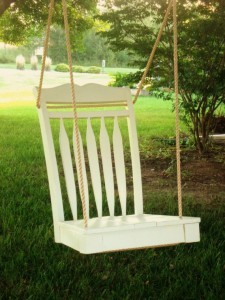
Você tem uma cadeira com as pernas bambas? Que delícia este balanço!


Varias sugestões de decoração com camas suspensas

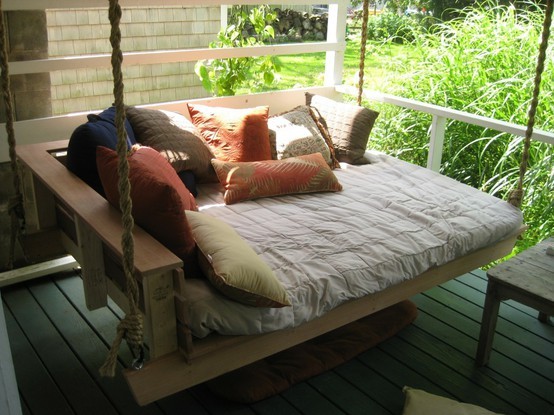
Parece uma rede com uma madeira de apoio e o colchão, talvez por isso eu lembrei da rede
 

Bem mais confiável pois está presa na parede

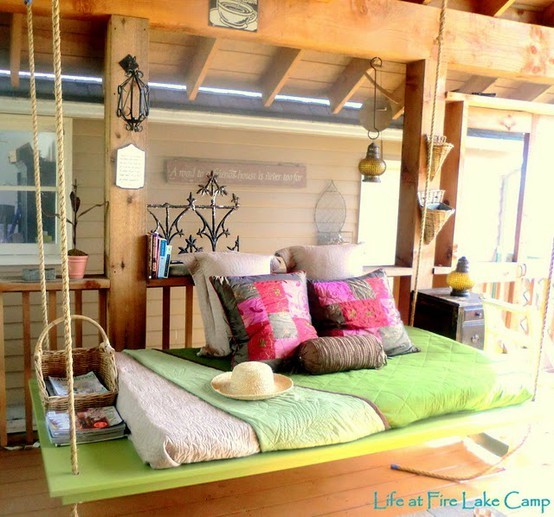
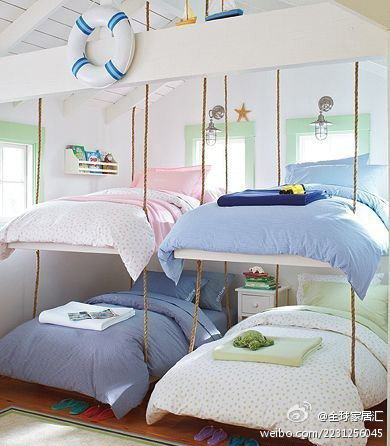
Olha que lindo este cantinho, gostei como arrumaram os lençóis, enviesados e em degradê

O teto parece que é de madeira, pra colocar uma cama destas é preciso uma laje, então a sustentação desta cama está acima deste forro de madeira, um trabalhão, este reforço com certeza foi colocado antes do forro de madeira.

Cria-se uma alavanca, deve ser por isso que aguenta tanto peso, ganhou espaço com esta cama aérea, rs

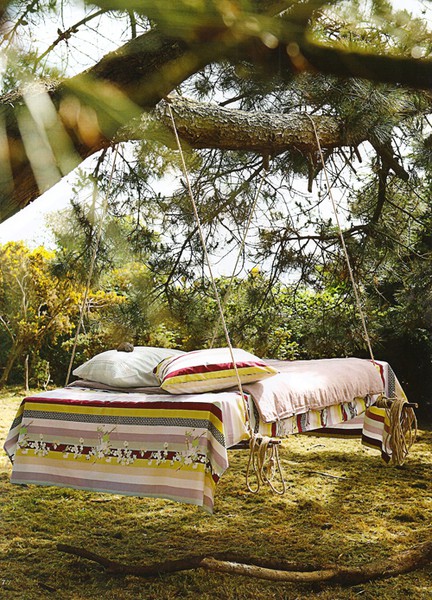
Não parece um cenário para fazer propaganda de lençol? Só em sonho!!!
 

Lembra um SPA esta aqui, bem que dá para colocar uma imagem destas só pra enganar na parede.


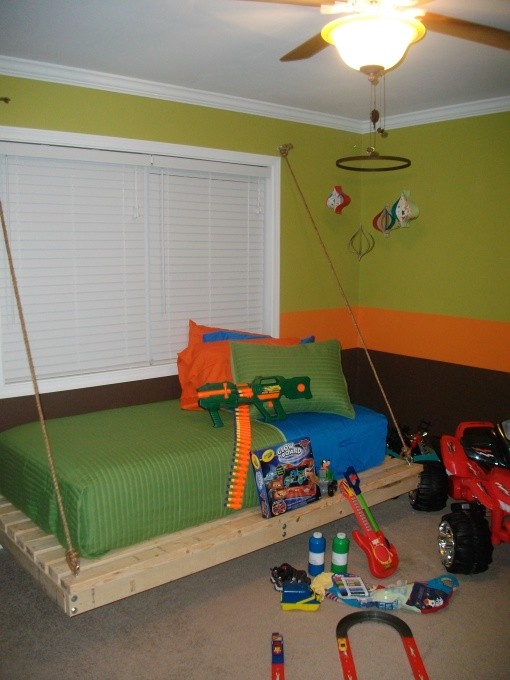
Pallets para fazer esta cama suspensa e o balanço para a área externa.


Gostei do encosto tipo cabeceira, sofá pq assim dá para sentar e apreciar a natureza.


Se tem criança e a área não é externa, com certeza complica, porém ficou aconchegante.


Isso é coisa de cinema, não é real! é uma visão, ficção, rs


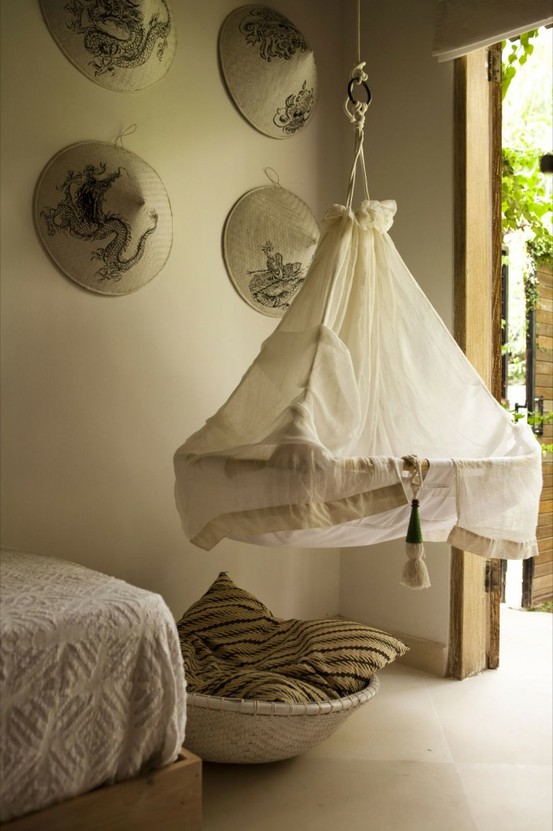
É um SPA, rs,  o mosqueteiro vem junto com a história da rede por causa dos insetos,  a noite em sítios ou chácaras realmente tira o sossego os insetos.
 

http://coisasdagil.blogspot.com

Рубрики:  GARDEN

Метки:  


Процитировано 20 раз
Понравилось: 3 пользователям

reflecting areas of organs on foot

Пятница, 23 Марта 2012 г. 05:04 + в цитатник

Метки:  


Процитировано 1 раз

painting easy

Пятница, 23 Марта 2012 г. 02:54 + в цитатник


来源:

/www.google.com.hk/s2/u/0/favicons?domain=weibo.com" target="_blank">http://www.google.com.hk/s2/u/0/favicons?domain=weibo.com); background-attachment: initial; background-origin: initial; background-clip: initial; background-color: initial; padding-left: 20px; background-position: 0px 8px; background-repeat: no-repeat no-repeat; " title="我的首页 新浪微博-随时随地分享身边的新鲜事儿">weibo.com  我的首页 新浪微博-随时随地分享身边的新鲜.../cdn.duitang.com/img/0/mdetail.png?20120315" target="_blank">http://cdn.duitang.com/img/0/mdetail.png?20120315); float: right; padding-top: 0px; padding-right: 20px; padding-bottom: 0px; padding-left: 0px; line-height: 31px; background-position: 100% 8px; background-repeat: no-repeat no-repeat; ">查看来源
owl【自己动手】这,用的是一次性饭盒吗?真是简易的吹塑纸版画啊。
/cdn.duitang.com/img/0/quot.gif" target="_blank">http://cdn.duitang.com/img/0/quot.gif); background-attachment: initial; background-origin: initial; background-clip: initial; background-color: transparent; background-repeat: no-repeat no-repeat; "> 

owl【自己动手】这,用的是一次性饭盒吗?真是简易的吹塑纸版画啊

Серия сообщений "China & Kitchen ware":
Часть 1 - decorative plates
Часть 2 - lamps out of recycled items
Часть 3 - painting easy

Серия сообщений "Dye, stamp":
Часть 1 - natural dye
Часть 2 - painting easy
Часть 3 - dyed feather pen
Часть 4 - dye the whole fabric
...
Часть 12 - dye a t shirt
Часть 13 - stencil animal skin
Часть 14 - dye

Рубрики:  DECOR/Painting, stamp

Метки:  


Процитировано 10 раз
Понравилось: 1 пользователю

simple candle light

Четверг, 22 Марта 2012 г. 02:35 + в цитатник


来源:用户上传

一个一次性纸杯,一个高脚杯。一根小蜡烛。ok啦。【阿团丸子】

Серия сообщений "Candles":
Часть 1 - candles out of baby jars
Часть 2 - candles
...
Часть 29 - mesh candle holder
Часть 30 - houses by night
Часть 31 - simple candle light
Часть 32 - candles
Часть 33 - decorate with branches
...
Часть 39 - with coffee bean
Часть 40 - candle holder
Часть 41 - diy candleholder

Серия сообщений "Plastic Spoons":
Часть 1 - Toy's Eyes
Часть 2 - lamp from recycled plastic bottle and spoons
Часть 3 - fan from plastic forks
Часть 4 - simple candle light
Часть 5 - spoon mirror


Метки:  


Процитировано 1 раз

beautiful umbrellas

Четверг, 22 Марта 2012 г. 02:08 + в цитатник


来源:用户上传

哪把是你们最爱的菜啊~~


Серия сообщений "Bedroom":
Часть 1 - no-sew blanket
Часть 2 - Royal Bedrooms
...
Часть 21 - hidden beds
Часть 22 - storing shoes
Часть 23 - beautiful umbrellas
Часть 24 - cute ideas
Часть 25 - jewelry holder
...
Часть 27 - bed table
Часть 28 - useful ideas
Часть 29 - creative ideas

Рубрики:  FASHION/Accessories
DECOR/Walls

Метки:  


Процитировано 4 раз
Понравилось: 1 пользователю

natural dye

Четверг, 22 Марта 2012 г. 01:58 + в цитатник


/www.google.com.hk/s2/u/0/favicons?domain=weibo.com" target="_blank">http://www.google.com.hk/s2/u/0/favicons?domain=weibo.com); background-attachment: initial; background-origin: initial; background-clip: initial; background-color: initial; padding-left: 20px; background-position: 0px 8px; background-repeat: no-repeat no-repeat; " title="我的微博 新浪微博-随时随地分享身边的新鲜事儿">weibo.com  我的微博 新浪微博-随时随地分享身边的新鲜.../cdn.duitang.com/img/0/mdetail.png?20120315" target="_blank">http://cdn.duitang.com/img/0/mdetail.png?20120315); float: right; padding-top: 0px; padding-right: 20px; padding-bottom: 0px; padding-left: 0px; line-height: 31px; background-position: 100% 8px; background-repeat: no-repeat no-repeat; ">查看来源
【自己动手】有人用感光面料和自己种在花园里的植物DIY了一件漂亮的衣服和一幅精美的画。步骤不是很复杂,但效果非常神奇。

Серия сообщений "Dye, stamp":
Часть 1 - natural dye
Часть 2 - painting easy
Часть 3 - dyed feather pen
...
Часть 12 - dye a t shirt
Часть 13 - stencil animal skin
Часть 14 - dye

Рубрики:  DECOR/Frames, wall art, mirror

Метки:  


Процитировано 8 раз
Понравилось: 1 пользователю

sandy light bulb

Четверг, 22 Марта 2012 г. 01:54 + в цитатник

The 〖teach you DIY matte light home〗 too beautiful to create a bar atmosphere, absolutely worth learning

 
duitang.com

Серия сообщений "Light Bulbs":
Часть 1 - BULB LAMP
Часть 2 - Bulb Lamp
Часть 3 - sandy light bulb
Часть 4 - decorative light pulps

Рубрики:  LIGHT/Lamps

Метки:  

cutting a glass bottle

Четверг, 22 Марта 2012 г. 01:50 + в цитатник


:用户上传

用啤酒瓶改造成造型花瓶,小孩子切勿模仿。
/cdn.duitang.com/img/0/quot.gif" target="_blank">http://cdn.duitang.com/img/0/quot.gif); background-attachment: initial; background-origin: initial; background-clip: initial; background-color: transparent; background-repeat: no-repeat no-repeat; "> 

用啤酒瓶改造成造型花瓶,小孩子切勿模仿。

duitang.com

Серия сообщений "glass bottles":
Часть 1 - cutting a glass bottle
Часть 2 - Fake sea glass

Рубрики:  GARDEN

Метки:  


Процитировано 2 раз

recycled light bulb

Четверг, 22 Марта 2012 г. 01:45 + в цитатник


来源:

/www.google.com.hk/s2/u/0/favicons?domain=weibo.com" target="_blank">http://www.google.com.hk/s2/u/0/favicons?domain=weibo.com); background-attachment: initial; background-origin: initial; background-clip: initial; background-color: initial; padding-left: 20px; background-position: 0px 8px; background-repeat: no-repeat no-repeat; " title="">http://weibo.com/myprofile.php?uid=17587.../cdn.duitang.com/img/0/mdetail.png?20120315" target="_blank">http://cdn.duitang.com/img/0/mdetail.png?20120315); float: right; padding-top: 0px; padding-right: 20px; padding-bottom: 0px; padding-left: 0px; line-height: 31px; background-position: 100% 8px; background-repeat: no-repeat no-repeat; ">查看来源
白炽灯泡新玩法——DIY热气球,美绝了

Серия сообщений "light bulb":
Часть 1 - recycled light bulb

Рубрики:  DECOR/Kids Rooms

Метки:  


Процитировано 4 раз
Понравилось: 1 пользователю

mini pom pom

Четверг, 22 Марта 2012 г. 01:41 + в цитатник

教你做毛毛球嘛


来源:

/www.google.com.hk/s2/u/0/favicons?domain=pinterest.com" target="_blank">http://www.google.com.hk/s2/u/0/favicons?domain=pinterest.com); background-attachment: initial; background-origin: initial; background-clip: initial; background-color: initial; padding-left: 20px; background-position: 0px 8px; background-repeat: no-repeat no-repeat; " title="crafts / mini pom pom tutorial">pinterest.com  crafts / mini pom pom tutorial/cdn.duitang.com/img/0/mdetail.png?20120315" target="_blank">http://cdn.duitang.com/img/0/mdetail.png?20120315); float: right; padding-top: 0px; padding-right: 20px; padding-bottom: 0px; padding-left: 0px; line-height: 31px; background-position: 100% 8px; background-repeat: no-repeat no-repeat; ">查看来源
Рубрики:  DECOR/Miniatures
FASHION/Embllishment

Метки:  


Процитировано 3 раз
Понравилось: 1 пользователю

storing shoes

Четверг, 22 Марта 2012 г. 01:14 + в цитатник

【DIY鞋盒】许多人在买了鞋子之后,会将鞋盒扔掉,太浪费了。如果在传统鞋盒的两个长边增加了两条方便对折的斜线,让鞋盒的侧面可以往内压平,就能变成一个开口的鞋盒多个这样的鞋盒。可以直接堆叠起来,变成一个简易鞋架,不会有灰进入,而正面开口,方便存取鞋子。童鞋们赶紧来DIY吧!

Серия сообщений "Shelves":
Часть 1 - Ideas for BOOKS
Часть 2 - Ideas from old books
...
Часть 23 - amazing bookshleves
Часть 24 - suitcase shelves
Часть 25 - storing shoes
Часть 26 - more ideas
Часть 27 - useful furniture ideas
...
Часть 32 - shoe shelves
Часть 33 - storage
Часть 34 - ideas

Серия сообщений "Bedroom":
Часть 1 - no-sew blanket
Часть 2 - Royal Bedrooms
...
Часть 20 - again miniature dress form
Часть 21 - hidden beds
Часть 22 - storing shoes
Часть 23 - beautiful umbrellas
Часть 24 - cute ideas
...
Часть 27 - bed table
Часть 28 - useful ideas
Часть 29 - creative ideas

Рубрики:  FASHION/Shoes
RECYCLE/Carton

Метки:  


Процитировано 4 раз
Понравилось: 1 пользователю

french bread with banana

Четверг, 22 Марта 2012 г. 01:02 + в цитатник


来源:用户上传

DIY香蕉土司卷】1.寿司帘上面放上一片吐司,吐司上放剥好的香蕉,像卷寿司一样紧紧卷起来。2.把卷好的食材裹上蛋液,下锅煎至微微金黄。3.炸好盛出切段,撒上白糖或喜欢的酱料即可。

Серия сообщений "Toast":
Часть 1 - french bread with banana

Серия сообщений "Banana":
Часть 1 - banana with chocolate
Часть 2 - french bread with banana
Часть 3 - dessert
Часть 4 - banana dessert
...
Часть 8 - banana chocolate jam
Часть 9 - biscuit cake
Часть 10 - just banana icecream

Рубрики:  COOKING/Dessert

Метки:  

drawing with plastic bottle

Четверг, 22 Марта 2012 г. 00:57 + в цитатник


来源:

/www.google.com.hk/s2/u/0/favicons?domain=weibo.com" target="_blank">http://www.google.com.hk/s2/u/0/favicons?domain=weibo.com); background-attachment: initial; background-origin: initial; background-clip: initial; background-color: initial; padding-left: 20px; background-position: 0px 8px; background-repeat: no-repeat no-repeat; " title="我的首页 新浪微博-随时随地分享身边的新鲜事儿">weibo.com  我的首页 新浪微博-随时随地分享身边的新鲜.../cdn.duitang.com/img/0/mdetail.png?20120315" target="_blank">http://cdn.duitang.com/img/0/mdetail.png?20120315); float: right; padding-top: 0px; padding-right: 20px; padding-bottom: 0px; padding-left: 0px; line-height: 31px; background-position: 100% 8px; background-repeat: no-repeat no-repeat; ">查看来源
樱花到来的季节
/cdn.duitang.com/img/0/quot.gif" target="_blank">http://cdn.duitang.com/img/0/quot.gif); background-attachment: initial; background-origin: initial; background-clip: initial; background-color: transparent; background-repeat: no-repeat no-repeat; "> 

樱花到来的季节

/cdn.duitang.com/img/0/quot.gif" target="_blank">http://cdn.duitang.com/img/0/quot.gif); background-attachment: initial; background-origin: initial; background-clip: initial; background-color: transparent; background-position: 100% 100%; background-repeat: no-repeat no-repeat; "> 


/cdn.duitang.com/img/0/quot.gif" target="_blank">http://cdn.duitang.com/img/0/quot.gif); background-attachment: initial; background-origin: initial; background-clip: initial; background-color: transparent; background-position: 100% 100%; background-repeat: no-repeat no-repeat; ">http://www.duitang.com/
Рубрики:  RECYCLE/Plastic Bottles
DECOR/Painting, stamp

Метки:  


Процитировано 11 раз
Понравилось: 1 пользователю

his to hers t-shirt

Среда, 21 Марта 2012 г. 02:32 + в цитатник


Revamp His Shirt for Her

August 25, 2009 at 4:53 PM  9 comments

By Roseann

shirt_front


Revamping an old tee shirt is one of my favorite DIY fashion projects, and since most of us have so many, we can sacrifice a few for fashion’s greater good.  With a little innovation and feminine lace (lace inserts are one of fall’s hottest trends) we can create a men’s small tee shirt into a comfortable and effortlessly chic women’s top.   

shirt

shirt_back


Materials:


Instructions:

  1. Lay your shirt out flat and decide how long or short you want your finished top to be.  Note that you will be adding extra length at the shoulders if you use the same lace as I did you will add 3 ½” to the length of the shirt. 
  2. Once you have chosen the length measure equally across the bottom of the shirt and pin and crop.
  3. If you shirt has ribbing around the neck cut around to remove it.  Do the same to the seam at the bottom of the sleeve.

 blog_t-shirt

  1. Using a ruler and your chalk draw a strait line starting at the shoulder seam at the neck line to the bottom of the sleeve.  Cut. See image above.
  2. Mark a strait line from the seam at the inner arm to the edge of the top of the sleeve.  Cut.  If this is not done the new sleeve you are creating will not hang correctly.
  3. Measure the length of the top of the sleeve to the neckline.  Add 1” to this measurement and cut lace.
  4. Hand stitch the lace to each or your shoulder pieces with ½” left on each side.  Fold excess over and stitch a hem.  Sewing can be done on a machine; however I feel that you can hide your stitching better if this is done by hand.
  5. Measure the bottom of your shirt, cut lace with extra 1” and sew to the bottom.  I left the seam open in the back.
  6. Now try your shirt on.   Depending on the type of lace you used the neckline may or may not be too big.  If it is, like it was on me, this is easily fixed by adding pleats to the back neckline. 
  7. I added 4 ½” pleats to bring the neckline in 2”.  Decide how much you need to bring the neckline in.  Once you have done this divide your measurement by the number of pleats you want to add.  Start in the middle of the neckline and begin measuring towards the sides. Fold, pin, stitch down 1 ½”.  I used the lines in the jersey knit as guide to make sure my pleats were straight.
  8. For a more glam look bead your lace with bugle beads, sequin, or any other embellishment you desire.  M&J has a plethora of fashion accents, and more is more this fall  so go nuts!

shouldershirtcloseup

http://blog.mjtrim.com/

Рубрики:  FASHION/Re-fashion
FASHION/T-shirts transformation

Метки:  


Процитировано 473 раз
Понравилось: 14 пользователям

Поиск сообщений в M_A_G_D_A
Страницы: 23 ... 20 19 [18] 17 16 ..
.. 1 Календарь