Яйца из бисера. Золотая коллекция. 2007-01 //s017.radikal.ru/i427/12...
Без заголовка - (0)Собачки. Бисер Источник Материалы: бисер чех - один цвет для шкурки черный - для глаз бусин...
Без заголовка - (0)Техника «ручное ткачество», или «квадратный стежок». Схема 1 - начало плетения: весь ряд набирает...
Стильные штучки из бисера - (0)Книга: Стильные штучки из бисера. Объемные фигурки, коллекция идей. 1. 2...
Беккер.Волшебные фигурки и животные из бисера - (0)Беккер.Волшебные фигурки и животные из бисера. https://www.liveinternet.ru/users/6020430/post438...
Век роскоши,галантности... Henry Victor Lesur |
Век роскоши,галантности... Henry Victor Lesur
Французский художник Henry Victor Lesur.
|
|
Ссылки на видео МК от Карлы Кам - для начинающих делать бижутерию. |
Этот пост посвящен тем, кто хочет начать свои первые шаги и не знает как. В ВидеоМК представлены такие важные детали, как работа с круглогубцами и плоскогубцами, как закрепить бусины в серьгах или присоеденить замок. Лучше один раз увидеть, чем сто раз услышать!
Желаю красивых украшений и яркой жизни!
http://www.youtube.com/watch?v=ABmlSNmyWbs&feature... бусы и серьги бижу
http://www.youtube.com/watch?v=IUtWMZLiJ3k&feature... серьги со штифтами
http://www.youtube.com/watch?v=tV-CcyOGPEQ&feature... серьги с кольцами
http://www.youtube.com/watch?v=lOXF7JnN_uM&feature... сваровски на цепочке
http://www.youtube.com/watch?v=aWRiITYUKM0&feature... браслет на резинке
http://www.youtube.com/watch?v=pkGTet2BQgM&feature... кольцо из проволоки
http://www.youtube.com/watch?v=eLA6txLO_ek&feature... колечки из бусин
http://www.youtube.com/watch?v=s5lv0ZpUs5o&feature... браслет из бусин из сваровски
http://www.youtube.com/watch?v=B4m-SXc6EcM&feature... жгут
http://www.youtube.com/watch?v=QZMh1YqX8GE&feature... браслет вязанный из проволоки
http://www.youtube.com/watch?v=FQNuLVyqS7w&feature... работа с колечками штифтами ланкой и т.д….
http://www.youtube.com/watch?v=4aFEXhRrxs8&feature... кулончики с проволокой
http://www.youtube.com/watch?v=5txKcTcXQ-s&feature... кулон-цветок из сваровски
http://www.youtube.com/watch?v=P1i0VU7CpII&feature... бусины из проволоки
http://www.youtube.com/watch?v=oiB_PID3sC4 популярная цепочка
|
Метки: Рукоделие МК ссылки бижутерия |
Декор "Кружева" |

|
Метки: Фотошоп клипарт |
МК по лепке из холодного фарфора. Ландыши |
МК по лепке из холодного фарфора. Ландыши

Автор: ClayART
Для выполнения данной работы нам понадобятся следующие материалы и инструменты:
- холодный фарфор или близкая ему по качеству глинка
- проволока № 28
- масляные краски
- простой стек и шариковый стек
- клей ПВА
Метки: Рукоделие лепка холодный фарфор цветы ландыши |
Трафареты-вырезалки. |
|
Метки: Рукоделие трафареты бумага вырезалки |
Готовимся ко Дню Святого Валентина: сердечки-валентинки с кодами |
|
Метки: комментарии валентинки коды оформление дневника |
Самодельный паста имитирующая снег. МК |
Автор мастер класса Валерия Сидельникова
Как-то купив пасту "Снег", я задалась мыслью, а из чего она собственно сделана. Уж больно дорогая за такое количество. Методом эксперимента и логики, родился ее аналог. Ничем не хуже фабричного. Фото делать не стала, так как сам процесс изготовления безумно простой. В качестве основы у вас могут совершенно различные варианты: мелкий кварцевый песок, манка, пенопластовая крошка. От вашего наполнителя будет зависеть и сама фактура. В миску насыпаем небольшое количество выбранного вами материала. Примерно 1 граненый стакан. В данный сыпучий материал начинаем понемногу добавлять белую акриловую краску. По опыту лучше покупать ее в строительном магазине для фасадных работ. Добавляем до такого состояния, чтобы наши сыпучие частицы слиплись между собой, но не плавали в жидкости. Затем добавляем ПВА, желательно густой. Добавляем также совсем немного, чтобы смесь была эластичной и тягучей. Ну, и немного серебрянных блесток. Все перемешиваем и вуа-ля!!! Приятного творчества. (Изготавливать лучше небольшими партиями.)

автор сей красоты Asket из Польши
|
Метки: Рукоделие материалы снег мастер-класс |
Очень подробный МК по кукольной ножке! |
Очень подробный МК по кукольной ножке!
Стащила отсюда http://members.home.nl/asrai/cursus-en.htm
|
The foot in this tutorial is from heel to big toe about 1.8 inch long. Always use the head as a comparison for the size of the feet. The length of the feet is equal to the size of the head. |
 |
 |
|
In this tutorial I will only make the right foot. Try to work simultaneously on both feet because it is hard to make an equal looking foot afterwards. You start off by making a 2.5 inch long cylinder shaped roll of clay, about 0.8 inch thick (pict. 1). Bend the roll of clay in an angle like in pict. 2. The top will become a part leg and the other part the foot. |
|
 |
 |
| Flatten the clay by pressing it together between thumb and point finger towards the 'toes'. Be careful not to make it too flat. (pict. 3 + 4). | |
 |
 |
|
Now it is time to form the heel. Push/smear some clay from under the foot backwards (towards the heel) and push/smear some clay from the lower leg down (towards the heel) (pict. 5). This way you'll get more clay on the heel and a better shape at the sole of the foot. Press the clay with your thumb on the inside of the foot to make it more hollow (pict. 6). |
|
 |
 |
|
Before you can make incisions for the toes, the front of the foot needs to be reshaped a bit. Cut off a piece of clay slantwise starting at the 'big toe' (pict. 7). After this smooth the edge with your fingers (pict. 8). |
|
 |
 |
|
Look at the foot to see if it's not too thick, if it is you can make it thinner by smearing the clay from the instep to the leg. You can also smear clay upwards just above the heel towards the leg, this way the foot will become slimmer (pict. 9). Sculpt as smooth as possible, use a damp finger to rub the clay for a smooth finish. Now you can make incisions for the toes with the help of a sharp tool. Don't forget the big toe needs to be bigger than the other toes (pict. 10). |
|
 |
 |
|
Spread out the toes gently so you have more working space (pict. 11). Hold the toes one by one between your point finger and thumb. While warming the clay by the warmth of your hands, very gently roll the toes slightly back and forth, so the inside of the toes will also become round. This will probably make the toes become too long but that doesn't matter (pict. 12). When the toes have the right thickness and are nice and round, you can cut them off at the right size. Smooth the edges of the toes with your fingers. |
|
 |
 |
|
You can use a sculpting tool for the areas that are difficult to reach, like between the toes (pict. 13). If everything is nice and smooth, we are ready to make the nails (pict. 14). |
|
 |
 |
|
You could use the small hollow chisel again as I used in the hands lesson, but this time I will sculpt the lines by hand. For this I used a sharp sculpting tool, the one in pict. 10. You could also use a small knife (not too sharp). Press left and right from the 'nail' a straight line in the clay (pict. 15). Now you have to connect those two lines, this is a very precise work. You could also use a sharp wooden toothpick for this (pict. 16). They start to look more and more like real nails. |
|
 |
 |
|
Some polymer clay brands can become overworked, it can become too soft. So at this time I gave the nails some rest and focused on the sole of the foot. Halfway each toe I draw a line on the inside, except the small and the great toe (pict. 17) The nails weren't finished yet. We also have to connect the lines at the front of the toe with a sharp tool, as you can see in pict. 18. |
|
 |
 |
|
Draw lines on the 'knuckle' area of the toes with a small sculpting tool or toothpick , the same way as I did in the hands tutorial. This makes it look more natural (pict. 19). The sole of the foot needs some more modeling. Place 3 slices of clay on the heel, ball and big toe, like in pict. 20, carefully blend the seams with your sculpting tool or fingers until the seams are blended in with the sole. |
|
 |
 |
|
Moisten your finger and polish everything smooth.This also works for removing unwanted fingerprints. At pict. 21 you can see a sideview of the foot, it looks much better now because of the modeling we did at the sole of the foot. Use a sculpting tool or rubbertip brush to add lines to accentuate the tendons/bones of the foot (pict. 22). |
|
 |
 |
|
Rub the lines with a wet finger to blur and make it look more natural (pict. 23). Now it's time to make the knuckles on the ankles. Before you start check out the foot from all sides to see if it still looks okay (pict. 24). |
|
 |
 |
|
Pay attention to the ankle area that it is not too fat. If it is you still have the chance now to sculpt it slimmer (pict. 25). Place a small slice of clay on both sides of the ankle where the knuckle should be. Study your own foot to see how this looks (pict. 26). |
|
 |
 |
|
Blend the seams with a sculpting tool (pict. 27), don't blend it too wide because it wouldn't look like bone anymore. Just blend only the edges. Gently rub over the knuckles with a slightly wet finger to make it smooth (pict. 28). |
|
 |
 |
|
The foot is almost ready now. Before curing check the feet from all sides and correct any mistakes, don't forget the sole of the feet (pict. 29 + 30). |
|
 |
 |
|
Cut off the leg at about 1.40 inch. Use a wooden toothpick to make a hole in the leg, make sure it's deep enough, about 0.80 inch. Twist the stick a little to make the holes wider so it will fit the armature. I use a small wooden board with big nails through it, as a stand to place the feet on (pict. 31). I pre-heat the oven at 220-266 Fahrenheit and bake the feet for about 30 minutes. Always use an oven thermometer to make sure the oven is at the right temperature, because if it gets too hot the polymer clay may turn yellow/brown. Leave the feet to cool in the oven before you take them out (pict. 32). |
|
 |
 |
|
After cooling down I made it a little smoother by sanding the clay with a polishing sponge. Sometimes rubbing it with a soft cloth is enough. If there are any small scratches visible, you can gently touch them with some acetone on a brush and usually they disappear. Use very little acetone because too much can give white spots on the clay! Next step is painting and coloring the foot. This can be done by either acrylics, watercolor paint or water- or oil based patina. For this foot I use watercolor paint and acrylic paint (pict. 33). First I rub the clay in with some skin powder make-up to give it a warmer tone. The color of the nails was created by blending different shades of watercolor paint. I use a thin paintbrush to apply the paint, I paint the nails several times, letting it dry in between coats. This paint is transparent and doesn't really stick to the clay. So you need to do this a few times, some of the paint's pigment will be absorbed by the clay, just enough for a natural color (pict. 34). |
|
 |
 |
|
I mix white acrylic paint with a bit black or yellow to get an off-white shade. With a very thin painting brush I paint the 'half moons' and the 'nail borders' (pict. 35). After the paint is dry I add some Fimo gloss varnish (not the water-based one) to finish the nails (pict. 36). I like this varnish a lot, it will not turn yellow and even after several years it will still look glossy. Now the foot is finished...! (pict. 37) |
|
 |
|
|
You can now attach the feet to the armature. If the hole in the leg is too wide you can add some papertape to the wire for a better fit. Later on you can use some glue (for instance hot glue gun) to attach them permanently.
|
|
 |
|
| The best moment for this depends on the kind of clothes he or she will be wearing. Sometimes it is easier dressing the doll, if the feet can still be detached from the legs. | |
 |
|
Метки: Рукоделие лепка кукла |
Очень подробный МК по кукольной ручке!! |
Очень подробный МК по кукольной ручке!!
Опять с заграничного сайта! Ну очень подробно!!!!!!!! Стащила отсюда! Классный сайт по куклам! http://members.home.nl/asrai/cursus-en.htm
|
The hand I made for this lesson is from the palm of the hand to the finger tips about 1.80 inch. It is a bit bigger than I usually make, smaller gave some photographic problems 'cause I don't have a macro lens. |
 |
 |
|
The size of the hands depend on the size of the head. The length of a hand is equal to the length from chin to halfway the forehead. A face is usually about 2 hands wide. This can always vary a bit depending on the kind of doll. You start off by making 2 cylinder shaped rolls of fimo, in this lesson they are about 2.6 inch long and 0.60 inch thick (pict. 1). Sculpt one end in a kind of spoon shape by pressing the clay with your thumb. Sculpt the hand thinner to the "finger tips' by pushing it more flat (pict. 2). |
|
 |
 |
|
For this lesson I'll continue with the making of the right hand. Try to work simultaneously on both hands because it is hard to make an equal looking hand afterwards. To make a wrist, roll the clay between thumb and point finger like pict. 3 You now have a roughly shaped hand with a part arm. Make the arm thinner if necessary. Smooth the hand nice and round. The hollow part is the inside/hand palm of the hand (pict. 4). |
|
 |
 |
|
At pict. 5 you see the back of the hand. You will now make 3 incisions with a knife for separating the fingers. The thumb will be added later. Because this will be a right hand, the incision for the little finger is cut a little further than the other incisions, take your own hand as example. Bend the 2 outer fingers gently side wards so you have more space (pict. 6). Hold the fingers between your point finger and thumb. While warming the clay by the warmth of your hands, very gently roll the fingers slightly back and forth, so the inside of the fingers will also become round. You can use a sculpting tool for the areas that are difficult to reach. |
|
 |
 |
|
When the two outer fingers are smoothed, you start with the middle two. Bend them slightly apart and again roll them gently back and forth to round off the edges on the inside of the fingers (pict. 7). Do this very slowly, it is important that while you are doing this, the clay will be warmed by your fingers so they don't rip at the beginning. Use a sculpting tool to smooth the areas that are hard to reach (pict. 8). |
|
 |
 |
|
Because of the smoothing of the fingers they usually will get a little too long, cut them off at the right size (pict. 9). Round off the finger tops again (pict. 10). |
|
 |
 |
|
The fingers of the hand should now look something like pict. 11 We will now continue with the inside of the hand. Make the dimple of the hand a little more distinct by pressing the palm slightly with your thumb and smudging clay towards the wrist. (pict. 12). |
|
 |
 |
|
Press the clay on the wrist like in pict. 13, so you will clearly see the difference between the wrist and where the handpalm begins (pict. 14). |
|
 |
 |
|
Next step is making a thumb. Sculpt a pear shape piece of fimo, make an incision in the broad part of the thumb' (pict. 15) Pull the parts a bit side-wards and place the thumb on the hand as in pict. 16. |
|
 |
 |
||||||||||||||||||||||||||||||||
|
Push the thumb firmly against the hand, blend the seams on all sides with a sculpting tool and smooth with your fingers (pict. 17-18). When the thumb is too long or thick, cut off a piece and re-shape the thumb. |
|||||||||||||||||||||||||||||||||
 |
 |
||||||||||||||||||||||||||||||||
|
Nails can be made in many ways. You can draw lines with a knife or other sharp tool. You can also slantwise cut off a piece of a lemonade straw and use this to make an indent of a nail. For this lesson I used a little hollow chisel. They are normally used for chiseling wood but they are also very handy (when you turn them around) for making nail prints on clay fingers (pict. 19). Use a sharp tool to correct the lines if necessary (pict. 20). |
|||||||||||||||||||||||||||||||||
 |
 |
||||||||||||||||||||||||||||||||
|
Don't forget to attach the lines at the fingertips, so the nails will look like they lay on the finger (pict. 21). This is very precise work. We will now continue with the palm of the hand. You can make it as detailed as you like, it also depends on the pose of the doll and if the palms of the hands are visible or not. If they are not visible you can keep it more simple. Place a C-shaped slice of fimo on the palm and an extra slice at the beginning of the thumb (not too thick) as in pict. 22. |
|||||||||||||||||||||||||||||||||
 |
 |
||||||||||||||||||||||||||||||||
|
Press the slices and the seams firmly, gently blend the seams using a sculpting tool (pict. 23) make sure the palm looks natural. When all the seams are blended (pict. 24), moisten your finger and smooth the hand palm by rubbing it with your finger. |
|||||||||||||||||||||||||||||||||
 |
 |
||||||||||||||||||||||||||||||||
|
Now it is time to add some lines to the hand palm, you can use a thin sculpting tool for this (pict. 25). Look at your own hands where the lines should be. Add some lines at the beginning of the fingers using a mini tool or a toothpick (pict. 26). |
|||||||||||||||||||||||||||||||||
 |
 |
||||||||||||||||||||||||||||||||
|
Also draw lines on the inside of the fingers, again watch your own hand closely to see how this looks. (pict. 27). The inside of the hand is finished now, we turn the hand around and continue with the back. It depends on the kind of hands you want, how you will proceed. If you want real smooth elegant hands, you better not add big knuckles. Just a few 'knuckle lines' at the place of the knuckles will look nice too. If you want more detailed hands you proceed like this. Place thin slices of fimo in the middle of each finger and slices just under the fingernail. You also add slices fimo on the knuckles of the hand (pict. 28). |
|||||||||||||||||||||||||||||||||
 |
 |
||||||||||||||||||||||||||||||||
|
Carefully blend the seams with your sculpting tool until the seams are smoothened. (pict. 29-30), don't forget the sides of the fingers. Try to hold on to the shape of the knuckle, don't blend too wide, or it might end up looking more like a tumor than a knuckle... ;-). This is very precise work that will take some time. |
|||||||||||||||||||||||||||||||||
 |
 |
||||||||||||||||||||||||||||||||
|
It still looks a bit rough at this point. Moisten your finger and 'polish' the fingers to make them smooth, without fading out the knuckles (pict. 31). Between the knuckles on the hand, you draw some lines with your sculpting tool towards the arm, to accentuate some of the muscles (pict. 32). Rub the lines with a finger to blur and make it look more natural.
|
|||||||||||||||||||||||||||||||||
Метки: Рукоделие лепка куклы |
"Девушка с жемчужной сережкой" Яна Вермеера |
Источник:http://kaplyasveta.ru/istoriya-odnoj-kartiny/devushka-s-zhemchuzhnoj-seryozhkoj.html
Рубрика «История одной картины»
Автор: Юлия Риа
Холст, масло. 44,5 на 39 см

Благодаря фильму Питера Уэббера «Девушка с жемчужиной серёжкой» 2003 года, огромное количество людей, далёких от живописи, узнали о замечательном нидерландском художнике Яне Вермеере, а также о его самой известной картине «Девушка с жемчужиной серёжкой».
Фильм этот снят по роману Трейси Шевалье, в котором писательница предлагает довольно вольную трактовку создания картины. И, кончено, многие, кто видел фильм, уверены, что это правдивая версия. Но, обо всём по порядку.
Картина «Девушка с жемчужиной серёжкой» (нидер. «Het meisje met de parel»)написана около 1665 года. В данное время хранится в музее Маурицхёйс, город Гаага, Нидерланды, и является визитной карточкой музея. Картина, получившая прозвище голландской Моны Лизы, или Моны Лизы Севера, написана в жанре Tronie (от нидер. слова «голова», «лицо»). Этот жанр — разновидность портрета — популярный в Голландии в 17 веке. Модели изображались анонимно, с необычным выражением на лице или в необычном наряде.
Так и модель картины Вермеера достоверно неизвестна. Существует несколько гипотез. Во-первых, считается, что моделью могла быть дочь Вермеера, Мария. В 1665 году ей как раз было около 12-13 лет. По второй гипотезе, позировала дочь покровителя Вермеера мецената Рюйвена, ровесница Марии.
По третьей версии () на картине изображена служанка-любовница Грид, имя которой якобы означает жемчужина, отсюда и отождествление девушки и жемчужины. Однако полное название «Девушка с жемчужиной серёжкой» картина получила только в двадцатом веке, а ранее называлась «Девушка в тюрбане», или просто «Девушка». Поэтому такая версия, лёгшая в основу фильма, лишь красивая история, ничуть не претендующая на правду. Кроме этого, по свидетельствам, брак Яна Вермеера был счастливым. Его жена, в отличие от той, какая была показана в романе и фильме, была красива, выступала моделью для многих картин мужа. У них было 15 детей, что для Голландии XVII века, когда уже знали о контрацепции, было большим числом.
О самой картине.
Поза девушки запечатлена в движении, со спины. Мы смотрим на неё сбоку, она поворачивается к нам, и смотрит так, словно хочет отвести взгляд. Но её рот слегка приоткрыт: в голландской живописи такой жест часто служит знаком обращения.
Элементы картины:
Тюрбан.
Использовать экзотические элементы «врагов христиан» (турков) в Европе стали с XV века. В своих работах Вермеер нередко использует такие декоративные элементы. И тюрбан на голове модели не редкость. Однако у Вермеера форма тюрбана весьма интересна. Он состоит из двух частей: первый кусок ткани яркого ультрамаринового цвета плотно облегает голову девушки, подчёркивая форму черепа. Вторая часть, лимонного цвета спадает, как фата, практически вертикально, что служит неким визуальным якорем поворота девушки.

Платье и белый воротничок.
Одета девушка в грубое жёлтое (можно сказать, землистого цвета) платье (желтый цвет символичен для многих картин Вермеера). На этом фоне сильно контрастирует белоснежный воротник девушки. Он выполнен дерзко, чистой краской.
Однако, сейчас цвет воротничка не похож на первоначальный. Свинцовые белила со временем изменили свой цвет.
Жемчуг.
На картине внимание привлекает жемчужная серьга. Она большая, каплевидной формы, отливающая перламутром. Этот блеск повторяется и в глазах, и на губах девушки.

Мог бы быть жемчуг настоящим в серьге? Достоверное неизвестно. Но размер жемчужины представляется слишком большим. Она могла быть увеличена фантазией автора, либо изначально быть искусственной.
Между прочим, такая же серьга изображена ещё на восьми картинах Вермеера («Женщина с жемчужным ожерельем», «Женщина с лютней», «Госпожа и служанка», и др.)

Тёмный фон.
Сейчас на картине фон кажется практически чёрным. Изначально же он был выполнен глубоким зеленоватым цветом. Этого Вермеер добился тем, что сначала прописал фон чёрной краской, а сверху смесью красок индиго и резедовой жёлтой. Обе краски очень прозрачны и прекрасно подходят для лессировки. Но со временем индиго почти полностью потемнел, и сейчас уже мы не может видеть того эффекта, какой придавал картине зеленоватый оттенок.
Автору удалось прекрасно передать некую связь между моделью и художником. Она передаётся в движении девушки при повороте головы, тогда как всё её тело направлено в другую сторону. Так создаётся напряжение, но у Вермеера это напряжение тягуче и спокойно.
С двух сторон негативные пространства (треугольник справа и прямоугольник слева) различны, и задают этим интересный, своеобразный ритм.
С момента написания картины прошло много лет, проведены исследования, но вопросы так и остаются: кто эта загадочная модель, почему она одета в тюрбан и платье, не свойственное тогдашней моде, что символизирует жемчужина в форме слезы, и на что так смотрит девушка, с какими чувствами? Эти вопросы, разумеется, так и останутся. Ответы на них может дать лишь сама картина, для каждого свои
Метки: Живопись картина художник женский образ Ян Вермеер |
Цикламены из холодного фарфора |
Метки: Рукоделие лепка холодный фарфор цветы |
Бутоньерка из роз. Лепка. Отличный мастер-класс |
Бутоньерка из роз. Лепка. Отличный мастер-класс.
Источник. Далее текст автора.

Предлагаем вам изготовить своими руками потрясающую бутоньерку из нежных роз в модной технике лепки из полимерной глины. Эффектное украшение делается в течение считанных минут и через сутки становится красивой брошью или заколкой
Метки: Рукоделие лепка цветы |
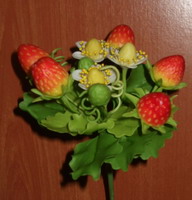
Мастер-класс - земляника,клубника из холодного фарфора, полимерн |
Мастер-класс - земляника,клубника из холодного фарфора, полимерн
Мастер-класс - земляника,клубника из холодного фарфора, полимерной глины
Как слепить землянику, клубнику
<<
Метки: Рукоделие лепка |
Мк Цветы сакуры от Амазонки с сайта clayart.com |
Мк Цветы сакуры от Амазонки с сайта clayart.com
Мк Цветы сакуры от Амазонки с сайта clayart.com
Мастер класс Цветы сакурыот Амазонки
На сайте clayart.com. нашла такой замечательный МК от Амазонки, не удержалась, забрала к себе. Такая красота!!!
Начнем с того что я делала каждую тычиночку отдельно. Брала кусочек лески №2, над зажигалкой каждую лесочку опаливала что б образовался шарик и этот шарик кунала в желтую акриловую краску. Затем сушила и укорачивала до нужной длинны. Для каждого цветочка понадобится около 10 таких тычинок. Потом каждую тычинку я приклеивала супермоментом к проволочке (без петельки)

<<
Метки: Рукоделие лепка холодный фарфор цветы сакура |
Распакованный скрап-набор "Утренее чаепитие" |


Очень нежный скрап-набор. В нем Вы найдете множество цветов, заварочный пакетик чая, печенья, торт и пирожные, баночку меда, заварочный чайник и море красивейшего и интересного декора.
|
Метки: Скрап-набор клипарт |
Распакованный скрап-набор "Маленькое рождественское чудо" |


Очаровательный детский скрап-набор рождественской тематики. Еловые ветки, пряничный домик, рождественский венок, снеговик и дед мороз, море новогодних и детских игрушек. Прекрасный скрап-набор для оформления детских рождественских фоторафий!
|
Метки: Скрап-набор клип-арт дети рождество |
Зимняя анимация с храмами |
|
Метки: Картинки анимация храмы |
Молды самодельные для ХФ, МК |
|
Метки: Рукоделие лепка |
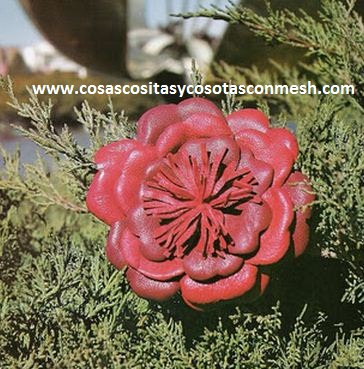
Цветок из кожи. |
|
Метки: Рукоделие изделия из кожи цветы |
Открытки со Старым Новым годом! |
|
Метки: Открытки Старый новый год |