-Рубрики

 -Приложения

  • Перейти к приложению Дешевые авиабилеты Дешевые авиабилетыВыгодные цены, удобный поиск, без комиссии, 24 часа. Бронируй сейчас – плати потом!
  • Перейти к приложению Я - фотограф Я - фотографПлагин для публикации фотографий в дневнике пользователя. Минимальные системные требования: Internet Explorer 6, Fire Fox 1.5, Opera 9.5, Safari 3.1.1 со включенным JavaScript. Возможно это будет рабо
  • Перейти к приложению Открытки ОткрыткиПерерожденный каталог открыток на все случаи жизни
  • Настольные игры онлайнМы предлагаем Вам сразиться в любимые настольные игры со своими друзьями, не отходя от компьютера. У нас вы сможете поиграть в дурака, преферанс, тысячу, нарды, шахматы, шашки, крестики-нолики, точки,

 -Поиск по дневнику

Поиск сообщений в M_A_G_D_A

 -Подписка по e-mail


 -Статистика

Статистика LiveInternet.ru: показано количество хитов и посетителей
Создан: 13.01.2010
Записей:
Комментариев:
Написано: 4255


1302386254_60162972_1276215401_window (400x274, 1349Kb) 


39 (472x176, 85Kb)


one piece blouse

Вторник, 13 Сентября 2011 г. 19:02 + в цитатник


et me begin with my inspiration. While skimming vintage ads I ran across this:

Find more of the “wrapped clothing” series in the LIFE Archives.
 
    You Will Need:

1. Fabric (Mine measured 56×34 inches. However, you can judge this based on your size and the length you prefer. This was more than enough for the shirt and strap.)
2. Sewing Machine
3. Scissors
4. Fabric Marker or pencil
5. Something round for the neck-

http://freshlygiven.com/blog/


Рубрики:  FASHION/Re-fashion
FASHION/Sewing patterns

Метки:  


Процитировано 109 раз
Понравилось: 5 пользователям

scarf vest

Вторник, 06 Сентября 2011 г. 02:57 + в цитатник


DIY: Scarf Vest


One step DIY's are the best. Am I right or am I right?

I recently made this scarf into a more wearable piece of clothing, by simply cutting two slits. It's all about where you cut the slits. The best part: you can still wear it as a scarf if you wanted to. 

Some of you might also recognize it from the pictures I posted from the ReadyMade Magazine Party. My style is more on the casual side, so this scarf vest is a perfect way to dress up an otherwise plain t-shirt. 


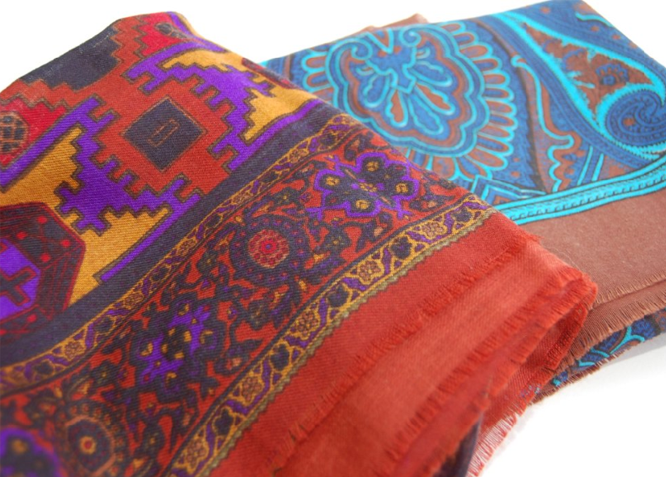
I used a 30x30 vintage square scarf. It's already on the bigger side of scarves, so I'd recommend finding the largest square scarf you can find. For reference - I'm about 5'2", and you can check out the pictures above to see how a 30x30 scarf vest fit me. It'll all depend on your height, your preference, and the scarf you use, but the pictures above will help you gauge how your finished piece will look.

Supplies:

- Large square scarf or fabric
- Scissors
- 3 minutes of your time


First and only step: cut two diagonal slits on either side of the scarf's midpoint.
That's it!
 
 
Don't worry about making everything perfectly straight. You can tell just by looking at the above picture that I didn't even cut them straight, either. When worn, the scarf will flow and fold within itself - so being a few inches off won't matter at all.

I eyeballed this and didn't measure anything before hand, but I understand that's not everyone's style. SO if you're still hesitant, check out the diagram below. I included measurements for my particular vest, but keep in mind that it was done on a 30x30 scarf. You can always adjust accordingly depending on the size of your scarf.
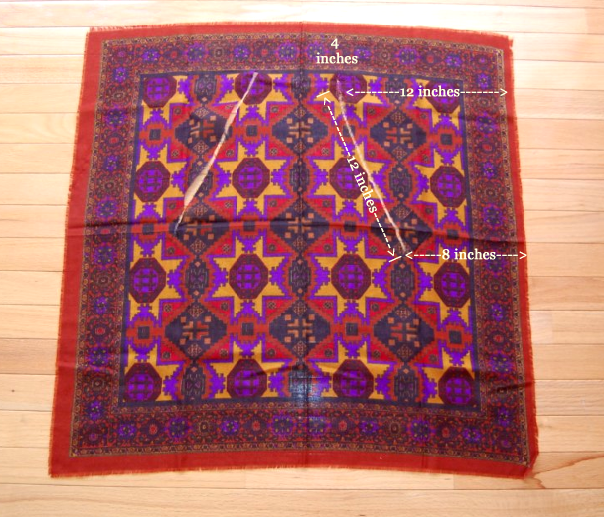

(Click to enlarge)

You don't even have to use a scarf if you don't want to. If you have a large piece of fabric laying around...by all means, make that into a vest, too!

studs&pearls

Серия сообщений "Scarfs":
Часть 1 - Just tie it on!!!
Часть 2 - All from SCARFS
...
Часть 17 - easy knitted scarf
Часть 18 - one scarf many styles
Часть 19 - scarf vest
Часть 20 - scarf in 5 min.
Часть 21 - scarf fashion
...
Часть 26 - quick tops from scarfs
Часть 27 - blouse from piece of fabric
Часть 28 - coat

Серия сообщений "No-Sew":
Часть 1 - tie a scarf
Часть 2 - Night dress from a cloth
...
Часть 4 - super simple pattrens
Часть 5 - easy pattern
Часть 6 - scarf vest
Часть 7 - blanket edging
Часть 8 - fun towel
...
Часть 13 - cat house
Часть 14 - no sew
Часть 15 - circle vest

Рубрики:  FASHION/Re-fashion

Метки:  


Процитировано 20 раз
Понравилось: 3 пользователям

paper lamp

Вторник, 06 Сентября 2011 г. 01:49 + в цитатник
Рубрики:  LIGHT/Lamps
LIGHT/Chandelier

Метки:  


Процитировано 2 раз
Понравилось: 2 пользователям

chain bracelet

Вторник, 06 Сентября 2011 г. 01:34 + в цитатник


his statement bracelet looks complicated, but it really isn’t! I love the combination of different textures, between the chain and the cord.

Supplies:
Cord/Braid Item# 887060198 in Ovocado (1.800.9.MJTRIM) , about 60 inches
Kelly Green Color thread Item#42681
1 Fashion Dome Buttons Item# 46459 in Teal
- Thick wide curb chain
- Sewing needle
- Scissors
- Jewelry pliers
- Jewelry clasp and jump rings
- Clear nailpolish

Tip: Wrap tape around the ends of the cord to prevent them from fraying while you make the bracelet.
1) Cut the cord into two 30 inch pieces, and thread one piece through the first link of the curb chain. Fold the thread in half to make sure that there’s the same amount of thread on either side. Take the bottom strand, fold it over the top strand and then through the second link. 
2) Take this strand and fold it back over the chain, and under the other strand. That other strand then goes through the chain.

3) Repeat steps 1-2 until you reach the end

4) Thread the other piece of cord through the first link of the chain, and repeat until you’ve braided the other side.

5) Sew the ends together, and sew on the button to accent the bracelet.

6) Sew the clasp onto the cord, trim the ends and secure with clear nail polish to prevent fraying.

_____

http://blog.mjtrim.com/

Рубрики:  FASHION/Accessories

Метки:  


Процитировано 25 раз
Понравилось: 2 пользователям

chain bracelet

Четверг, 01 Сентября 2011 г. 21:09 + в цитатник
 
Thrifted bracelet, DIY bracelet, Gruen Watch, Thrifted gold necklace, Urban Outfitters silver necklace, "J" necklace gift
I am currently obsessed with mixing metals, and wanted a bracelet to match the new gold & silver watch I bought. Weaving together two chains and rhinestones with rope created the perfect statement bracelet to stack!
 
Supplies: Gold and silver chain from M&J Trimming, Rhinestone, Black Suede rope, pliers, bracelet closure. Click below for the steps. 


Tie together the two pieces of chain (two chain should be the same size links so they match up when weaving rope) with a double knot.

Start by weaving together the first link of the chains. 

Place the rhinestones in between the two pieces of chain and begin weaving all three. 

 
Continue weaving down the chains, pulling the rope tightly between each link. 
 
Using your pliers, remove any extra links so all three chains line up. Double knot at the end.

Tie the closures on each end. Trim excess rope
 
 
Рубрики:  FASHION/Accessories

Метки:  


Процитировано 18 раз

faux metal wall hanging

Пятница, 26 Августа 2011 г. 01:32 + в цитатник


Mural for photographs in the technique kvilling - master class


panel kvilling master class

Sometimes beautiful things can get downright ... from nothing! Technique kvilling - work with twisted strips of paper, you can create a beautiful openwork decoration in the interior, and requires little or no cost. Usually used for crafts construction paper (Whatman) or cardboard.In this case, to create a lace panel that's found on the website Suzys Artsy-Craftsy Sitcomused cardboard spools from the toilet paper:)


In order to make such a panel with photo frames, you will need: 4 frame, 5 wooden slats, PVA glue, cardboard, scissors, white paint in the can.

Performing panel is simple - first planted in the skeleton frame (see photo below). This is done using wooden battens with glue. Then, between the castles is laid in a patterntechnique kvilling of twisted paper strips. In the center you can make some exquisite flower in the art kvilling. At the end of the whole structure is painted with paint from a container in white color. And do not forget to remove the glass from the frames with paint!

See below for step-pictures of the work.

kvilling master class

kvilling master class

kvilling master class

kvilling master class

kvilling master class

kvilling master class

kvilling master class

kvilling master class

kvilling master class

kvilling master class

kvilling master class

kvilling master class

kvilling master class

kvilling master class

kvilling master class

kvilling master class

kvilling master class

@ Sweet home

Серия сообщений "Pipes & Tubes":
Часть 1 - DIY Bracelet
Часть 2 - Lamp out of PVC pipes
...
Часть 16 - pouffe
Часть 17 - faux metal squares
Часть 18 - faux metal wall hanging
Часть 19 - mirror
Часть 20 - amazing bookshleves
...
Часть 28 - box
Часть 29 - breakfast table
Часть 30 - wall art

Рубрики:  DECOR/Frames, wall art, mirror

Метки:  


Процитировано 44 раз
Понравилось: 3 пользователям

flower lamp

Четверг, 25 Августа 2011 г. 19:27 + в цитатник


Люстра своими руками – романтичный белый абажур из лепестков роз


люстра своими руками

Автор этой необычной люстры пошла нетрадиционным путем – она сделала абажур своими руками из трех пялец для вышивания разного размера и искусственных лепестков роз, купленных в магазине для декораторов. Можно, конечно, поискать искусственные лепестки роз и в наших магазинах, но можно и облегчить себе задачу – просто использовать кружки, вырезанные из белой ткани.


Для того, чтобы сделать такую люстру, вам понадобится: белая ткань со слабо осыпающимся краем, ножницы, три кольца (деревянных или пластмассовых), клей для ткани (или клей для декупажа на ткани) или клейстер из крахмала, толстая белая хб/нить, леска, белая акриловая краска

люстра своими руками

Если у нас нет искусственных лепестков роз, то мы просто вырежем из белой ткани кружки. Затем нужно склеить кружки попарно, проложив внутрь белую нить. Длина каждой нитки около 40-50 см (по желанию). для склеивания можно воспользоваться клейстером из крахмала, если у вас нет клея для декупажа по ткни.

люстра своими руками

Вы можете сделать эти висящие нити одинаковой или разной длины.

люстра своими руками

Затем нам нужно покрасить наши кольца белой краской (если они деревянные) и подвесить их на леске в такой последовательности, как на фото.


люстра своими руками

Теперь нам нужно привязать нити с лепестками к кольцам, а места, где мы их привяжем – также заклеить кружочками ткани.

люстра своими руками

Процесс этот довольно трудоемкий, но результат того стоит.

люстра своими руками


люстра своими руками

@Мой Милый Дом

Рубрики:  LIGHT/Lamps
LIGHT/Chandelier

Метки:  


Процитировано 14 раз
Понравилось: 1 пользователю

twig chandlier

Четверг, 25 Августа 2011 г. 19:14 + в цитатник


Decor chandeliers with their hands - a master class


decor chandeliers master class


Make a new chandelier with his own hands, you see, not very easy. But then do decorchandeliers with their hands can practically everyone. The main thing - to have on hand a chandelier, which do not mind experimenting, and keep in mind the concept of decoration.We will serve you an idea of how to decorate an old metal chandelier to give it with one hand - the vintage look, but on the other - a natural.

You can search the old chandelier in my house or at your rodtvennikov or friends. You may even decide to buy a new cheap chandeliers , which can be decorated to your liking.

The author of this chandelier has decided to modify somewhat its luster with the shoots of grapes. Indeed, the vine is quite decorative and well bent (that is important). Once consolidated the hostess with the wire a few shoots of vine wire, she also joined the vines adjacent horns chandelier (see photo)

After this it remains only to paint the chandelier in white (black, red, silver or any other) color spray paint. Agree - the chandelier has a spectacular view. Not everyone in the interior of a chandelier suitable (that is - that is), but a good fit in a vintage style, Shabba-chic, country style rooms. And to give a luster - just shine!

See a master class in Photos

decor chandeliers master class

decor chandeliers master class

decor chandeliers master class

decor chandeliers master class

decor chandeliers master class

decor chandeliers master class

@ Sweet home

Серия сообщений "Branches":
Часть 1 - Decorative Bottles
Часть 2 - candles
...
Часть 26 - recycled branches
Часть 27 - clocks
Часть 28 - twig chandlier
Часть 29 - decoration out of green branches
Часть 30 - natural frame
Часть 31 - decorate with branches
Часть 32 - jewelry tree

Рубрики:  LIGHT/Chandelier

Метки:  


Процитировано 1 раз
Понравилось: 2 пользователям

recycled rugs

Четверг, 25 Августа 2011 г. 18:39 + в цитатник


Needlework unusual rugNeedlework unusual rugNeedlework unusual rug


одеяло из галстуков своими руками на сайте вторая улица коврик из косичек на сайте secondstreet.ru

Серия сообщений "Rugs & floor":
Часть 1 - Kids Rug
Часть 2 - Bathroom decoration
...
Часть 16 - cushion
Часть 17 - fix burned carpet
Часть 18 - recycled rugs
Часть 19 - mat from remnant
Часть 20 - carpet of remnants
...
Часть 24 - fluffy rug
Часть 25 - rug
Часть 26 - rug


Метки:  


Процитировано 6 раз
Понравилось: 2 пользователям

box out of old book

Четверг, 25 Августа 2011 г. 18:38 + в цитатник


secondstreet.ruhow to make a clutch bag of books 

Рубрики:  DECOR/Box & basket

Метки:  


Процитировано 9 раз
Понравилось: 2 пользователям

spray t-shirt

Четверг, 25 Августа 2011 г. 03:24 + в цитатник


Рубрики:  FASHION/Re-fashion
FASHION/T-shirts transformation

Метки:  


Процитировано 2 раз

for girls rooms

Четверг, 28 Июля 2011 г. 01:55 + в цитатник


Рубрики:  DECOR/Kids Rooms

Метки:  


Процитировано 13 раз
Понравилось: 5 пользователям

cover for your feet

Воскресенье, 24 Июля 2011 г. 00:34 + в цитатник


osinka.ru

Рубрики:  FASHION/Shoes

Метки:  


Процитировано 3 раз
Понравилось: 2 пользователям

chair

Четверг, 21 Июля 2011 г. 02:11 + в цитатник


Бескаркасная мебель трансформер; кресло тюфяк
Мягкие кресла тюфяки, которые можно разложить в спальное место Кресло напольное бескаркасное
 

http://secondstreet.ru/

Серия сообщений "pouffe":
Часть 1 - knot pouffe
Часть 2 - another pouffe out of plastic bottles
...
Часть 5 - pouffe
Часть 6 - pouffe
Часть 7 - chair
Часть 8 - chair of tires
Часть 9 - out of tires
...
Часть 13 - chair
Часть 14 - pouffe
Часть 15 - pouffe


Метки:  


Процитировано 56 раз
Понравилось: 7 пользователям

fixing a flip-flop

Четверг, 21 Июля 2011 г. 00:51 + в цитатник


переделка обуви – шлепанцев

как переделать обувь шлепки - с сайта www.secondstreet.ru

По многочисленным просьбам – обещаю чаще писать про переделку обуви.Сегодняшний мастер класс – вот эти шикарные тапки- шлепанцы. Обратите внимание – еще и сбоку петли для устойчивости добавили:

secondstreet.ru переделка обуви

Подробнее – под катом:


secondstreet.ru переделка обуви

Вам понадобятся самые дешевые шлепки, какие только найдете. Отрезаете пластиковые крепления для пальцев и выкидываете – Вам понадобится одна только подошва.

secondstreet.ru переделка обуви

Отверстия этих креплений со стороны дороги, скажем так)) – надо углубить и расширить ножницами на треть.

secondstreet.ru переделка обуви

secondstreet.ru переделка обуви

Из старой футболки сплетите  косичку из 5 полосок (ссылка на мастер класс по плетению именно  таких косичек) .  Ткань обязательно должна быть трикотаж – чтобы ремешок был упругим и плотно прилегал к Вашим ногам.

Чтобы убедиться, что длины косички Вам хватает, время от времени оборачивайте ее вокруг пятки и сквозь пальцы. Вам нужна такая длина, чтобы хватило для комфортного удержания шлепок на ногах и при этом остался немного запас на узелки снаружи.

secondstreet.ru переделка обуви

Чтобы засунуть широкую косичку в отверстие, можно воспользоваться шилом или ручкой.

secondstreet.ru переделка обуви

Второй конец так же засовываете туда же, следите, чтобы плоская лента косички не перекручивалась при этом.

secondstreet.ru переделка обуви

Завязываете ОЧЕНЬ прочные узелки, излишки ткани обрезаются, а сами узелки утапливаются в отверстиях, сверху фиксируясь горячим клеем из клеевого пистолета.

Пока клей горячий – можно вообще отлично утрамбовать там узелок, сравняв практически с подошвой.

Теперь из остаток трикотажа осталось сделать воздушные петельки по бокам – они будут дополнительно фиксировать на ногах получившиеся сандалии. Их фиксируете таким же образом:

secondstreet.ru переделка обуви

И вот что Вы получите в итоге:

secondstreet.ru переделка обуви

Следующий шаг является необязательным, но полезным советом: чтобы толстая косичка не натирала между пальцами – просто постарайтесь ее закруглить, обвивая вокруг этого «столбика» нить: .

secondstreet.ru переделка обуви

http://secondstreet.ru/


Рубрики:  FASHION/Shoes

Метки:  


Процитировано 30 раз
Понравилось: 4 пользователям

recycled jeans

Суббота, 16 Июля 2011 г. 03:48 + в цитатник


osinka.ru
Рубрики:  RECYCLE/Blankets, jeans,leather....etc

Метки:  


Процитировано 3 раз
Понравилось: 2 пользователям

fix burned carpet

Пятница, 15 Июля 2011 г. 02:21 + в цитатник


People smoking at home will inevitably accidentally scorch the carpet, and now teach you how to repair a ruined carpet New!

P1010748.JPG

What You Need: paper cutter, glue stick, hot melt guns, scissors, of course, if the gun can not melt the candle instead of

P1010754.JPG

First, the edge of the carpet cut a small piece, as a patch of raw materials

P1010754.JPG

Cut down the carpet fabric

P1010754.JPG

Some of these fabrics crumble

P1010758.JPG

To scorch the carpet coated with hot melt adhesive, be careful not to get a good place to go

P1010767.JPG

Nianshang Qu these carpet debris, and then use scissors to trim flat

P1010767.JPG

Well, a new repair, how to buy with almost new!


rouding.com

Серия сообщений "Rugs & floor":
Часть 1 - Kids Rug
Часть 2 - Bathroom decoration
...
Часть 15 - rug
Часть 16 - cushion
Часть 17 - fix burned carpet
Часть 18 - recycled rugs
Часть 19 - mat from remnant
...
Часть 24 - fluffy rug
Часть 25 - rug
Часть 26 - rug


Метки:  


Процитировано 4 раз
Понравилось: 1 пользователю

creative hangers

Четверг, 14 Июля 2011 г. 02:05 + в цитатник


Let your personality it has hangers, racks of various shapes, not seen on the market is really like Oh, and if there is a business made to be very popular, it also looks very clever to do simple, fast hands-bar, third from left bottom right three times, pretty creative hangers out!


http://www.rouding.com/
 
Рубрики:  DECOR/Kids Rooms
DECOR/Baby Stuff
RECYCLE/Thread, Rope & Wire

Метки:  


Процитировано 4 раз
Понравилось: 1 пользователю

noooooo... unblievable!!!!

Четверг, 14 Июля 2011 г. 01:55 + в цитатник


Sanitary napkin production of slippers, not mine you die!

Diced today works out to find a funny to share with you, the cubes over courageous to try it, although the sanitary napkin more expensive than the paper slippers, but the creativity and personality is money can not buy, say health ran out of towels can be of no use, and throw away the strange pity. . Ha ha ha

More sanitary napkin slippers effect 


Sanitary napkin production of slippers, not mine you die!

Sanitary napkin production of slippers, not mine you die!

Sanitary napkin production of slippers, not mine you die!

Sanitary napkin production of slippers, not mine you die!

http://www.rouding.com/

Рубрики:  FASHION/Shoes

Метки:  

Понравилось: 1 пользователю

frame decorated with pasta

Понедельник, 11 Июля 2011 г. 01:29 + в цитатник


Рамка для фотографии, декорированная горохом, перловкой и фигурными макаронами. Мастер-класс.

Для создания такой рамки мне понадобились: деревянная рамка, горох, перловая крупа, фигурные макароны «листочки», клей титан, клеевой термопистолет, аэрозольная эмаль.


1.На деревянную рамку наношу клей «Титан» и приклеиваю на него горох, перемешанный с перловой крупой.

2.Когда высох клей, клеевым термопистолетом склеиваю макароны листочки между собой, так, чтобы получился лист, похожий на лист рябины. Делаю два таких листа, затем приклеиваю их поверх гороха в уголках рамки клеевым термопистолетом.

3.Затем всё это крашу аэрозольной эмалью сначала коричневого, затем золотистого цветов. Рамка готова.

http://masterica.maxiwebsite.ru/archives/5490#more-5490

Рубрики:  DECOR/Frames, wall art, mirror
RECYCLE/Pasta

Метки:  


Процитировано 13 раз
Понравилось: 3 пользователям

Поиск сообщений в M_A_G_D_A
Страницы: 23 ... 16 15 [14] 13 12 ..
.. 1 Календарь