-Рубрики

 -Приложения

  • Перейти к приложению Дешевые авиабилеты Дешевые авиабилетыВыгодные цены, удобный поиск, без комиссии, 24 часа. Бронируй сейчас – плати потом!
  • Перейти к приложению Я - фотограф Я - фотографПлагин для публикации фотографий в дневнике пользователя. Минимальные системные требования: Internet Explorer 6, Fire Fox 1.5, Opera 9.5, Safari 3.1.1 со включенным JavaScript. Возможно это будет рабо
  • Перейти к приложению Открытки ОткрыткиПерерожденный каталог открыток на все случаи жизни
  • Настольные игры онлайнМы предлагаем Вам сразиться в любимые настольные игры со своими друзьями, не отходя от компьютера. У нас вы сможете поиграть в дурака, преферанс, тысячу, нарды, шахматы, шашки, крестики-нолики, точки,

 -Поиск по дневнику

Поиск сообщений в M_A_G_D_A

 -Подписка по e-mail


 -Статистика

Статистика LiveInternet.ru: показано количество хитов и посетителей
Создан: 13.01.2010
Записей:
Комментариев:
Написано: 4255


1302386254_60162972_1276215401_window (400x274, 1349Kb) 


39 (472x176, 85Kb)


animation

Вторник, 14 Декабря 2010 г. 00:49 + в цитатник

Коллекция красивых анимаций: СВЕЧИ

Коллекция красивых анимаций: СВЕЧИ

Читать далее...

Серия сообщений "Backgrounds":
Часть 1 - another collection of CLOCKS
Часть 2 - And again CLOCKS
...
Часть 21 - backgrounds
Часть 22 - animation
Часть 23 - animation
Часть 24 - cool icons
Часть 25 - emotion faces
...
Часть 40 - backgrounds with interior
Часть 41 - desktop wallpaper
Часть 42 - wallpaper 2


Метки:  


Процитировано 4 раз
Понравилось: 1 пользователю

decorative plates

Понедельник, 13 Декабря 2010 г. 22:29 + в цитатник

Мастер-класс тарелочка «Кошачий танец»


14.11.2010 02:27   |   Комментариев: 6    |   Просмотров: 2793
 
Виды творчества:  ДекупажДекорирование


Обратный декупаж на тарелочке.

Материалы: Тарелка, салфетка, глиттер  Marabu, распечатка, клей, черный акрил, акриловый лак (у меня Поли-Р).

Время: 2 дня (с учетом высыхания)

Сложность: 2


http://old.livemaster.ru/topic/44355-master-klass-tarelochka-koshachij-tanets

Серия сообщений "China & Kitchen ware":
Часть 1 - decorative plates
Часть 2 - lamps out of recycled items
Часть 3 - painting easy

Рубрики:  RECYCLE/Decorative Bottles
DECOR/Frames, wall art, mirror

Метки:  


Процитировано 42 раз
Понравилось: 8 пользователям

cutting a glass bottle

Вторник, 07 Декабря 2010 г. 19:10 + в цитатник

Фото №1 - исходная бутылка

Фото №2 - импровизированный "верстак"

Фото №3 - бутылка аккуратно вращается одной рукой, стеклорезом в другой руке прочерчивается линия реза. Главное, чтобы начало и конец линии реза совпали.

Фото №4 - бутылка ставится в ёмкость с холодной водой, и в неё заливается
кипяток.
http://keep4u.ru/full/070426/169568e526ab5d5a33/jpg

Фото №5 - бутылка треснула по линии реза
http://keep4u.ru/full/070426/37cf643ecd78a00844/jpg

Фото №6 - обработка линии реза абразивным брусочком.
http://keep4u.ru/full/070426/1a1f66e72257dd15ce/jpg
 
Фото №7 - отсекание горловины бутылки
http://keep4u.ru/full/070426/5e884bc92df4539b97/jpg

Фото №8 - готовый светильник
http://keep4u.ru/full/070426/9358a427b7212c4495/jpg

Фото №9 - готовый светильник (подключён)
http://keep4u.ru/full/070426/aa2cf1636d61d4ea3d/jpg

Подробно рассказывать о монтаже электротехнической части, наверное, не имеет смысла - и так слишком много материала получилось...
P.S. Оказывается, опоздала с отправкой- пропустила сообщение Геннадия Л.... icon_sad.gif


http://dacha.wcb.ru/index.php?showtopic=11864&st=40

Рубрики:  RECYCLE/Decorative Bottles

Метки:  


Процитировано 125 раз
Понравилось: 4 пользователям

decorative bottles

Вторник, 07 Декабря 2010 г. 00:18 + в цитатник
Рубрики:  RECYCLE/Decorative Bottles

Метки:  


Процитировано 123 раз
Понравилось: 7 пользователям

decorative bottles

Вторник, 07 Декабря 2010 г. 00:02 + в цитатник
Рубрики:  RECYCLE/Decorative Bottles

Метки:  


Процитировано 221 раз
Понравилось: 12 пользователям

animation

Пятница, 03 Декабря 2010 г. 02:11 + в цитатник

 (460x460, 163Kb)

ККК (400x500, 1714 Kb)


123956915 (393x600, 268 Kb)


 (600x450, 1079Kb)


 (500x527, 477Kb)


первый-снег (303x362, 1583 Kb)


 (570x428, 2316Kb)


 (500x378, 435Kb)

 (500x372, 367Kb)

Серия сообщений "Backgrounds":
Часть 1 - another collection of CLOCKS
Часть 2 - And again CLOCKS
...
Часть 20 - background
Часть 21 - backgrounds
Часть 22 - animation
Часть 23 - animation
Часть 24 - cool icons
...
Часть 40 - backgrounds with interior
Часть 41 - desktop wallpaper
Часть 42 - wallpaper 2


Метки:  


Процитировано 5 раз
Понравилось: 1 пользователю

sandwiches

Пятница, 03 Декабря 2010 г. 01:22 + в цитатник


Серия сообщений "Food Decoration":
Часть 1 - egg jello
Часть 2 - fake mushroom..... LOL
...
Часть 12 - Food decoration
Часть 13 - food decoration
Часть 14 - sandwiches
Часть 15 - tomato nice serving
Часть 16 - latte art
...
Часть 18 - food decoration
Часть 19 - mayonnaise without eggs
Часть 20 - decorative serving

Серия сообщений "Rolls":
Часть 1 - Multi Layers Roll
Часть 2 - Chicken Rolls
...
Часть 13 - Mixed Pie
Часть 14 - Bread Rolls
Часть 15 - sandwiches
Часть 16 - easy rolls
Часть 17 - meatloaf with pasta

Серия сообщений "Bread":
Часть 1 - Multi Layers Roll
Часть 2 - Stuffed Bread
...
Часть 14 - Bread Rolls
Часть 15 - sandwich
Часть 16 - sandwiches
Часть 17 - easy rolls
Часть 18 - delicious cake
...
Часть 21 - making cups out of toast
Часть 22 - meat cake
Часть 23 - bread with eggs

Серия сообщений "Pizza":
Часть 1 - Delicious breakfast
Часть 2 - Mixed Pie
Часть 3 - sandwiches
Часть 4 - potato pizza
Часть 5 - unusual pizza

Рубрики:  COOKING/Decorative Serving

Метки:  


Процитировано 9 раз
Понравилось: 2 пользователям

egg-carton art

Четверг, 02 Декабря 2010 г. 22:15 + в цитатник
photo

Серия сообщений "Egg Carton":
Часть 1 - Bells out of egg carton
Часть 2 - Egg Carton Papaer Dough
...
Часть 5 - Decorative Flower Pot
Часть 6 - Flowers from egg cartons
Часть 7 - egg-carton art
Часть 8 - recycle egg carton
Часть 9 - recycled egg carton
...
Часть 12 - star frame
Часть 13 - flowers
Часть 14 - wall

Рубрики:  DECOR/Frames, wall art, mirror

Метки:  


Процитировано 1 раз
Понравилось: 2 пользователям

milk jug lamp

Четверг, 02 Декабря 2010 г. 21:29 + в цитатник

how to make lamp roses


.
You will need: a container of disinfectant, 44 roses coffee filter (see how in the previous post), 2m cord, a socket for the photo, a male pin, a switch, two small screws with nut, secure socket; hot glue gun.
.
.
For the base, use a container of disinfectant white (translucent), round or oval. Do not serve the square and those which have grooves on the bottom.

Читать далее...
Рубрики:  RECYCLE/Plastic Bottles
LIGHT/Lamps
LIGHT/Chandelier

Метки:  


Процитировано 20 раз
Понравилось: 2 пользователям

furniture out of recycled items

Четверг, 02 Декабря 2010 г. 21:24 + в цитатник


End table. Materials: Bucket, recycled wood, plastic bottles, plaster, enamel paint.


End table. Materials: cardboard packaging, wood, recycled, plastic bottles, plaster, enamel paint.


End table. Materials: tin of paint, reclaimed wood, pots of butter, plaster, enamel paint.


Mini drawer. Materials: recycled wood, tinner cans, soda bottles, spray paint.


Coffee table "Insomnia." Materials: recycled wood, cardboard tubes, glass cup, durepoxi, plaster, rollers, enamel paint.

Bedside table. Materials: paint bucket, broom handles, wood recycled bottles, pitchula, plaster, enamel paint

http://ateliedolixo.blogspot.com/

Серия сообщений "Tins & Cans":
Часть 1 - candles out of baby jars
Часть 2 - Thread storage
...
Часть 14 - Random Candle Screen
Часть 15 - lamp out of plastic cups
Часть 16 - furniture out of recycled items
Часть 17 - vase
Часть 18 - again wooden spoons and others......
...
Часть 20 - nut jewelry
Часть 21 - making your own cutters
Часть 22 - recycled lighthouse

Серия сообщений "Furniture":
Часть 1 - Crafts room in a closet
Часть 2 - kids rooms
Часть 3 - column from CD cases
Часть 4 - table
Часть 5 - furniture out of recycled items
Часть 6 - magazine rack
Часть 7 - folding tables
...
Часть 30 - using pallets
Часть 31 - ideas
Часть 32 - cloth pin decoration

Рубрики:  RECYCLE/Plastic Bottles

Метки:  


Процитировано 5 раз
Понравилось: 2 пользователям

2 types paper frames

Четверг, 02 Декабря 2010 г. 20:32 + в цитатник

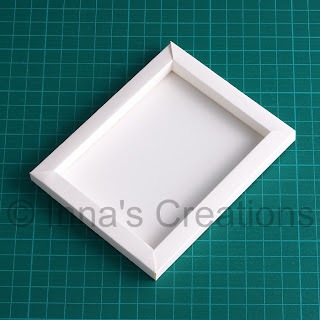
How to make a beveled picture frame out of paper

 
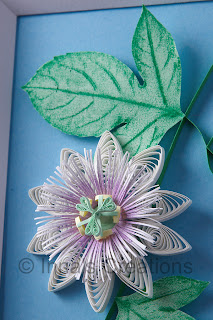
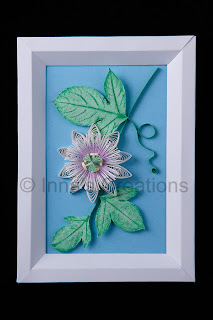
Quilled passionflower in a paper frame  

Long awaited instructions and templates for making a beveled paper frame I've used for my quilling projects "Poppies" and "Dandelions and raspberries". To additionally illustrate the use of a frame like this, I've created a quilled passionflower, which isn't a thoroughly designed work, so be indulgent, please.

We're going to make a frame that is 2.5 cm (1 inch) wide and 2 cm (6/16 inch) deep. I'm sorry, but you'll have to use a ruler with metric system units for this project.

Step 1: Preparing a paper rectangle

Measure the artwork to frame, add 10.5 cm at each side and cut out a rectangle of the dimensions you've calculated. Use heavyweight (240 gsm) cardstock paper.

Step 2: Drafting

Paper frame diagram

Use one of the following methods to draw the lines: print out the template, cut it out and transfer onto the piece of cardstock you've prepared; alternatively, you may just draw the lines with a pencil according to the diagram above.

Templates for download

Download one of the PDF templates for the right paper size and print it out. Make sure you don't resize or scale the page when printing.

Template for A4 size

Template for US Letter size

There's no need to download a template if you're not going to print it. Just draw the lines following the diagram above.

Notice that the corners are marked "top right", "bottom left" etc. Line up a cutout with a corresponding corner of the rectangle. Transfer the lines by pressing them into the paper, using a needle, or tracing the template around like shown in the photo. Using a pencil, mark with dots the points where the creases start.

After repeating the procedure for all the four corners, connect the dots with lines that go along the paper edges.
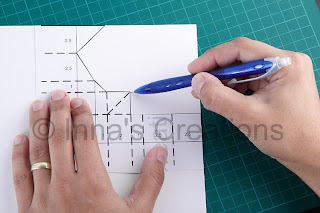
Tracing the template

Step 3: The cutout

Carefully cut away the corners. Score the cardstock according to the crease lines and fold like shown below.

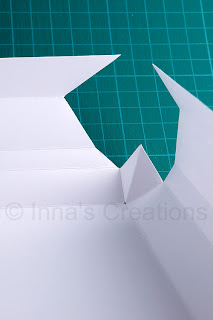
Paper frame cutout Corner ready for assembling

Step 3: Assembling

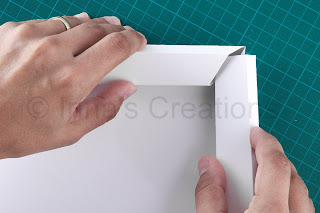
Start assembling the frame. If you don't use the back of the frame as a background, glue your picture down to the frame at this point. Then fold the border like shown in the pictures, simultaneously inserting the sides of a corner into each other.
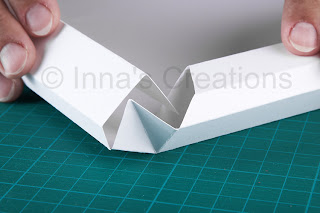
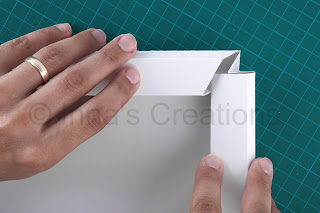
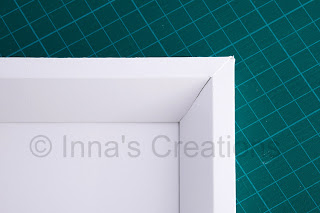
Starting assembling the frame Assembling the frame Finishing assembling the frame Corner of the finished frame

Repeat for the rest of the corners. When done, carefully glue the bottom of the border to the back of the frame.

Have you noticed that little square I'd left in the corner? It folds into a triangle, goes inside the border and gives the frame extra rigidness. I must credit Svetlana for this idea.

Quilled passionflower, closeup

How to make a simple paper frame


This time I'd like to share with you a simple and easy way to make a paper picture frame, like the one shown in the photo above. Personally, I like using such paper frames for my quilling.

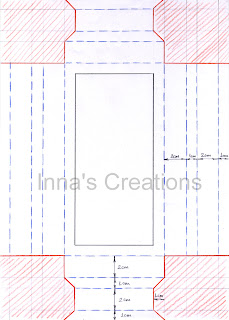
This is how the template for such a frame looks like. Please note, that not the absolute size but the ratios are important for this explanation. Using this template you can make a frame that has borders of equal width and height. The parts to be removed are marked in red, the inner bold rectangle shows the part of a picture that will be visible.
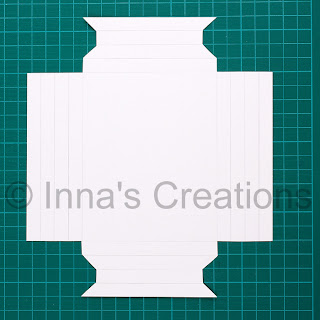
So, first measure a picture you'd like to frame. Add ten times the width of the frame border to both dimensions. For example, if your picture is 10x15cm with 1cm wide border, the resulting size would be 10+10*1 by 15+10*1 = 20x25cm. Draw a rectangle according to your calculations and cut it out. Then measure and mark the folding lines and corners as the template shows. Start measuring from the outer edges of the paper. Cut away the parts shaded with red.

To remind you, only the relative size of the parts is important. That is, if you want to make wider (and higher) borders, just multiply each number in the picture by the same factor.

Score the folding lines marked with blue dashes on the template. Use a special scoring tool, a thin embossing tool or simply a stick with rounded tip. Then fold as shown in the picture.

If you already have a picture to frame, glue it down now and then start assembling your paper frame.

Insert an end of each side border into its neighbor's end at the corners, one by one, like shown in the photos.
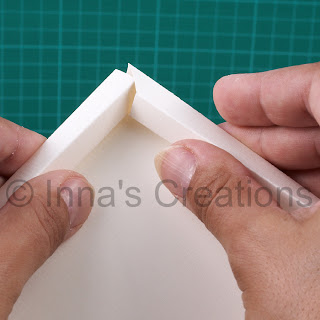
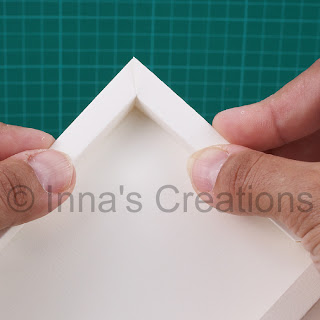
Generally, no adhesive is needed, but you may want to secure the frame with a small amount of glue.
If you want to make a frame with wide borders, the template will look like this (pay attention to the proportions):

And this one is for a deep frame, where the border's height is greater than its width.
The same principles apply for these templates as well: if you want another size, just multiply the numbers by a constant factor.


http://increations.blogspot.com/

Рубрики:  RECYCLE/Paper & newspaper
DECOR/Frames, wall art, mirror

Метки:  


Процитировано 42 раз
Понравилось: 3 пользователям

tie die

Четверг, 02 Декабря 2010 г. 13:24 + в цитатник


evening handbag

Четверг, 02 Декабря 2010 г. 13:05 + в цитатник

Рубрики:  FASHION/Beads
FASHION/Bags

Метки:  


Процитировано 135 раз
Понравилось: 6 пользователям

evening gown

Четверг, 02 Декабря 2010 г. 13:02 + в цитатник
Рубрики:  FASHION/Sewing patterns

Метки:  


Процитировано 9 раз
Понравилось: 1 пользователю

bag

Четверг, 02 Декабря 2010 г. 12:49 + в цитатник
Рубрики:  FASHION/Embllishment
FASHION/Bags

Метки:  


Процитировано 7 раз
Понравилось: 2 пользователям

column from CD cases

Вторник, 23 Ноября 2010 г. 00:25 + в цитатник

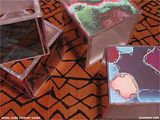
If you still have unused transparent boxes to sit, then you may have to make a nice cube for the pictures, beautiful pictures or works from your portfolio.

Photobucket

Additional material here is not needed at all. Only need patience and skill. Surprisingly, components of such boxes are joined together perfectly, as a designer.


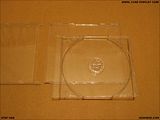
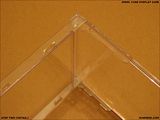
1. Carefully disassemble the box to the components.
Photobucket

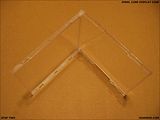
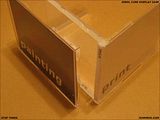
2. Now start the pieces as shown in the photo.
Photobucket

Look closer:
Photobucket

Sometimes the front of the box does not fit in with the back of the other boxes. Set it aside until later, you can use it to connect to another back.

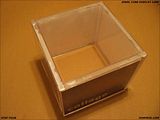
3. Attach the side pieces. Do not forget to put in the photo or image, then to once again design does not disassemble.
Photobucket

4. And that's what we must have.
Photobucket

For more ideas:

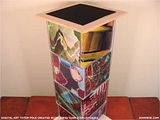
You can make more of these and turn them into a column:
Photobucket


(C) instructables.com

Серия сообщений "CDs":
Часть 1 - vinyl record into candle holder
Часть 2 - Rrecycled CD case
...
Часть 8 - Recycled CDs
Часть 9 - frame
Часть 10 - column from CD cases
Часть 11 - recycled CDs & plastic bottles=lamp
Часть 12 - recycled CD & plastic bottle
...
Часть 17 - curtain tie back
Часть 18 - cd storage
Часть 19 - kitchen

Серия сообщений "Furniture":
Часть 1 - Crafts room in a closet
Часть 2 - kids rooms
Часть 3 - column from CD cases
Часть 4 - table
Часть 5 - furniture out of recycled items
...
Часть 30 - using pallets
Часть 31 - ideas
Часть 32 - cloth pin decoration


Метки:  


Процитировано 1 раз

vase

Вторник, 23 Ноября 2010 г. 00:14 + в цитатник

Чего только не делали из пластиковых бутылок! И воронки, и заменители парников на дачах, и даже вазы. Причем, вазы - в первую очередь. Согласитесь, куда еще проще всего поставить цветы, когда нет другой тары? Но никто никогда не делал из бутылок мятые вазы, образец современного дизайна!

Вам понадобится:
 

  • бутылка из-под разливного вина;
  • два цвета акриловой краски;
  • контур по стеклу;
  • крутой кипяток;

    1. Срежьте горлышко с бутылки. Если пластик тонкий, воспользуйтесь ножницами, если достаточно толстый, придется пилить ножовкой. Срез не обязательно должен быть ровным, срежьте, как придется, и зачистите его шкуркой.


2. Затем обработайте бутылку кипятком. Для этого поставьте ее в раковину и приготовьте два инструмента для придания будущей вазе формы.В данном случае взяты две пары плоскогубцев, но можно обойтись, например, двумя вилками. Придерживая бутылку плоскогубцами за горлышко, аккуратно наливайте в нее кипяток, при этом она на время размякнет. Вторыми плоскогубцами формируйте на бутылке вмятины, одновременно прижимая бутылку ко дну раковины, что бы донышко вазы оставалось устойчивым.
3. Вот и получилась заготовка для вазы. Пока это просто мятая бутылка. Однако, самый трудный этап работы завершен!


4. Краской темного цвета окрасьте бутылку, тщательно прокрашивая все складочки.
5. Чтобы цвет был ровным и плотным, покрасьте вазу в 2-3 слоя.


6. Сухой кистью нанесите золотую краску на поверхность вазы. Для этого, возьмите на сухую кисть немного краски и сделайте несколько мазков по бумаге или газете, пока на кисте почти ничего не останется. Такой кистью проводите по выпуклым поверхностям вазы, как бы вытирая ее о ребра вазы.
7. Золото на складках придаст объем, и никто не догадается, что ваза изначально сделана из пластика.
8. Золотым контуром по стеклу нарисуйте маленькие штрихи, в виде иероглифов, по окружности вазы.
9. В заключении контуром обведите горлышко.
10. Такая ваза предназначена для сухих цветов, но если вы хотите использовать ее для живых растений, нанесите на вазу несколько слоев мебельного лака.

© С. Барсуковой

http://www.diary.ru/~sdelai-sam/

Рубрики:  RECYCLE/Plastic Bottles

Метки:  


Процитировано 4 раз

wedding glasses

Воскресенье, 21 Ноября 2010 г. 00:26 + в цитатник

http://kiev.prom.ua/p752240-svadebnyj-nabor-bokaly--svechki-kalla.html

Серия сообщений "Glass":
Часть 1 - weding glasses
Часть 2 - wedding glasses
...
Часть 7 - decorative bottles and glasses
Часть 8 - decorative bottles and glasses
Часть 9 - wedding glasses
Часть 10 - wedding set
Часть 11 - painting on glass
...
Часть 24 - wedding glass
Часть 25 - wedding glasses
Часть 26 - wedding glsses


Метки:  


Процитировано 89 раз
Понравилось: 5 пользователям

jeans skirts

Суббота, 20 Ноября 2010 г. 23:58 + в цитатник
Рубрики:  FASHION/Re-fashion

Метки:  


Процитировано 8 раз
Понравилось: 1 пользователю

decorative bottles

Суббота, 20 Ноября 2010 г. 23:46 + в цитатник
Рубрики:  RECYCLE/Decorative Bottles

Метки:  


Процитировано 41 раз
Понравилось: 4 пользователям

Поиск сообщений в M_A_G_D_A
Страницы: 23 ... 13 12 [11] 10 9 ..
.. 1 Календарь