-Метки
Чеснок альбом афоризмы баклажаны басик блокнот бумага видео внешность - уход вторсырье выкройка выпечка вырубка вышивка дача декупаж детское джинсовка дом домашнее хозяйство заготовки здоровье игольница идеи инструменты интересно интернет интерьер-идеи история картинки для творчества квиллинг компьютер конверт коробочки крафт-бумага кулинария куриное кухня лекарственные растения литература лицо массаж мастер-класс материалы миниальбом мои творческие работы мудрость мужское музыка мясное напитки новогоднее новогодние поделки новорожденный ноги ножи для вырубки обзор овощи огурцы органайзер открытки открытки своими руками переплет петербург печень полезная информация полезные советы похудение православие притчи продукты пятна религия ремонт рисование рукоделие рыба сад-огород самосовершенствование свадебный альбом свадьба своими руками скрап-бумага скрапбукинг стирка сумки схемы тканевая обложка украшения упаковка упражнения фетр физкультура фоны фоторамка хорошие стихи цветы из бумаги шаблоны и трафареты шитье шкатулки
-Рубрики
- Аудиокниги, радиоспектакли (58)
- Моя родословная (5)
- Внешность - уход (277)
- волосы (51)
- лицо (142)
- ноги (70)
- руки (36)
- тело (27)
- Домашнее хозяйство (258)
- Порядок в доме (53)
- Пятновыведение, стирка и т.п. (115)
- чистота в доме (75)
- чистота на кухне (58)
- Здоровье (1387)
- Лекарственные растения (152)
- Квиллинг (352)
- Дачные хлопоты. Огород на подоконнике. Комнатные (418)
- Комнатные цветы (143)
- Дачные хлопоты. Всегда с урожаем (230)
- Кулинария (1066)
- Аэрогриль (7)
- Выпечка (80)
- Запеканка (15)
- Конфеты (23)
- Напитки (81)
- Праздничное оформление (70)
- Литература (245)
- Афоризмы (123)
- Притчи (72)
- Мои творческие работы (81)
- Другие поделки (7)
- Закладки для книг (3)
- Игольницы (1)
- Конверты для открыток, денег, CD-дисков (6)
- Открытки своими руками (50)
- Скрап-страницы (1)
- Фотографии (11)
- Музыка (131)
- Романс (17)
- Пергамано (31)
- Путешествия (16)
- Киев (4)
- Путешествия по миру (6)
- Путешествия по России (166)
- Байкал (2)
- Красноярск (68)
- Москва (11)
- Петербург (75)
- Рукоделие (2639)
- Вышивка крестом (797)
- Полезные советы (5)
- точечная роспись (19)
- Шитье (1120)
- Скрапбукинг (3587)
- Зарубежные скрапмастера (193)
- Инструменты (68)
- Материалы (214)
- открытки других авторов (152)
- Скрапмастера России (387)
- Шаблоны и трафареты (2)
- тело (0)
- Хорошие стихи (349)
- Цветы из бумаги, ткани, лент (723)
- Цветы из бумаги (359)
- Цветы из лент (87)
- Цветы из ткани (171)
- Электронная библиотека (32)
-Музыка
- Armik / Meet you in heaven.
- Слушали: 99431 Комментарии: 0
- Scorpions - Still Loving You/Все Еще Люблю Тебя
- Слушали: 97834 Комментарии: 2
- Михаил Круг и Вика Цыганова. Приходите в мой дом
- Слушали: 7299 Комментарии: 2
- Елена Камбурова Любовь и разлука
- Слушали: 4180 Комментарии: 2
- Надежда.Анна Герман
- Слушали: 5180 Комментарии: 1
-Поиск по дневнику
-Подписка по e-mail
-Друзья
Друзья онлайн
КРАСОТА_ЗДОРОВЬЯ
Шрек_Лесной
Друзья оффлайнКого давно нет? Кого добавить?
Alexandra-Victoria
Dmitry_Shvarts
Galche
heregirl
japonka-55
kashtan23
lokvi
Marino_Blu
Matrioshka
natali6276
Nebulus
Nina62
Nitocris_73
Olana05
Prudent
Svetlana---
tata-l200
tata-stern
VerAGRI
Будмен
Бусильда50
Валентина_Козлова
Ваша_ТАНЯ_идущая_по_Судьбе
Волшебный__Свет_Души
Волшебство__Жизни
Глебова_Елена
Жанна-Анна
ИНТЕРЕСНЫЙ_БЛОГ_ЛесякаРу
Капочка_Капа
Клуб_мастериц
лариса_67
ЛИТЕРАТУРНАЯ
Майя_Пешкова
макошь311
Мама_Дина
Марриэтта
милена70
Ольга-В
Оля_Исаева
ОранжеваяКошка
Отражение_в_воде
Перуанка
Подарки_своими_руками
Путь_к_истинной_себе
Радуга_Подруга
Ромашка_2012
смольникова_екатерина
Татьяна_Бугрова
Шьющая_красоту
ЯНЗА
-Статистика
Красивый букет своими руками |
http://stampin-n-stuff.blogspot.ru/2011/04/flower-daisy-2-die-tutorial.html

Flower Daisy #2 Die Tutorial
Ok then. I've done the photos and as I've a never ending 'to-do-list' before Sunday's event, I thought I'd get this on the blog for you to start creating asap. Plus I'm the worlds worst for being sidetracked so as promised, here it is.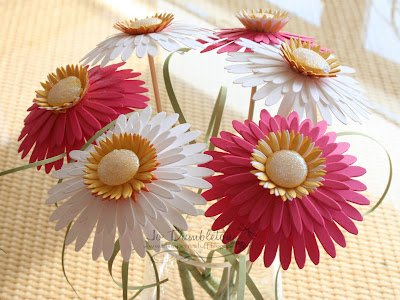
Firstly you will need to die cut 2 of the large, 2 medium and 3 small daisies. If you don't know what the die looks like, all three sizes are on the one die. I actually cut my pieces of c/s for each flower which were 10x10cm for the large one, 7x7cm for the medium and 5x5cm for the small. I found it much easier that way especially as I had loads to cut. Also I cut 2-3 at a time of the same flower and that's the beauty of the Big Shot, it easily cuts through layers. Glue each of the flower sizes together as shown. I used a little tombow around the edge of the centres.
 Turn the largest flower over,punch a 1" circle and stick on the back. Then punch a 1/2" circle and stick to the top of the smallest daisy.
 Glue all 3 daisies together and then stick 3 dimensionals on top of each other in the centre, leaving the top bit of the dimensional on for now.
 Turn the daisy over and with a mat pack underneath, pierce a hole all the way through with a pokey tool - including through the dimensionals. I then used a skewer as my stem and just nicked off the very top so it wasn't too pointy and skewered my daisy. You will feel the top of the skewer on the other side but that's ok, it won't show at all when this is completed.
 At this stage I would shape the petals.
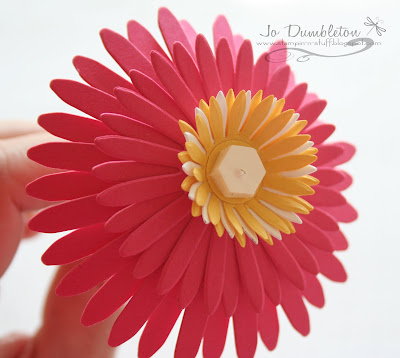 The next bit is for the centre of your daisy. Punch a 3/4" circle and using the mat pack and the end of your pokey tool, press hard and in a circle to shape your paper into a dome. You could always use an embossing tool if you had one or even the end of a pen. The more you press around the outside edge of the cirlce the more domed it will become.
 Pop this onto your dimensional.
 Add a fairly generous amount of Crystal Effects....
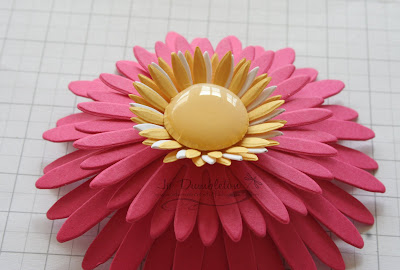 ...and sprinkle with Dazzling Diamonds. Be careful when shaking the DD off, the Crystal Effects will still be runny. If you've not used it before it will take about 20 mins to go off but leave for a good few hours before it's completely dry.
And that's your flower done.
For the stem and fronds I cut 4 very thin strips of c/s - approximately the length of A4. Three of them I attached to some cellotape. The picture isn't very clear on this but hopefully you get the gist.
Wrap them around the skewer and just above the cellotape add a glue dot.
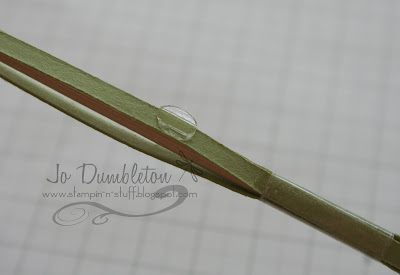 Attach your 4th strip of c/s to the glue dot and wrap arond the skewer.
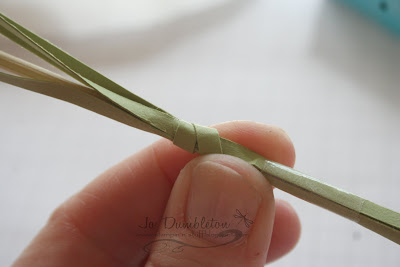
Continue to wrap to the bottom and secure with another glue dot.
Voila! All done!
It might be better to do your fronds first and that way you won't have to wait for the crystal effects to dry. The daisy heads can easily be removed so you could change them when you want, transport them without breaking, and they will always look 'fresh as a daisy!!!'
| Рубрики: | Скрапбукинг |
Процитировано 4 раз
Понравилось: 2 пользователям
| Комментировать | « Пред. запись — К дневнику — След. запись » | Страницы: [1] [Новые] |


