Mozilla B-Team: happy bmo push day! |
the following changes have been pushed to bugzilla.mozilla.org:
- [1487171] Allow setting bug flags when creating/updating attachment with API
- [1497077] Convert links, image/iframe sources, form actions to absolute path
- [1469733] Fix scrolling glitch on Safari
- [1496057] Security bugs report october update
- [1499905] Update BMO enter bug workflow to include Data Science
- [1370855] Add a…
|
|
Chris H-C: New Laptop Setup: Stickers |

As I mentioned before, I underwent a hardware refresh and set up a laptop. However, I failed to mention the most important consideration: laptops come with blank canvases waiting for stickers. So let’s dive into what it means to have an empty laptop lid and a drawer full of stickers.
On :bwinton’s recommendation I acquired a blank Gelaskin. This will in the future allow me to remove and retain all of the stickers when I retire the laptop, or when I just decide to start afresh.
I was surprised twice by the ‘skin. Firstly, I was expecting it to be clear. Luckily, a white top on the black laptop makes a strong statement that I like so I’m a little glad. Also a surprise: the curved edges. There is a very clear type of laptop this is for (macbooks) and mine is not of that type. These were just minor things. A little trimming of the long edge later, and I was in business.
With the canvas thus prepared the question became how to fill it. I imagine there are as many schools of thought in this as there are people with laptops, but this is my approach when I have a blank laptop and quite a few stickers stockpiled:
I’m loathe to add anything with dates on it that I didn’t bring this laptop to. This means no All Hands stickers (until December), and no conferences.
I’m also not planning on layering them over each other too much. Corners can overlap, but aside from censoring the top-right sticker’s profanity (about which I am unduly proud) I want to let them speak for themselves in their entirety.
I left some significant space. Not because I know how to use negative space (I mean, look at it) but because I expect to greatly increase my supply of stickers that need applying in the near term and I’ll need the room to grow.
It makes for an imbalanced, unjustified, off-centre melange of stickers that I just have to make my peace with. I will never not see the fractional radians the Berlin sticker is off. No one will fail to notice the millimetres from true the Mozilla sticker in the “middle” is. I didn’t use a ruler, and now they are applied there is no way to change them. So sticker application at some point becomes an intersection between accepting one’s fallibility and learning to accept the results of permanent actions.
And it is also an exercise in impermanence. The top-left is the last of my “Telemetry From Outer Space” rectangles. I could (and probably will) print more, but I will change the wording, and the colouration will be slightly different. This is the last of that cohort, never again to exist unstuck.
But enough philosophizing. Stickers! They’re great.
If you want to make some to bring to an event in the near future, I have a guide you may find useful.
:chutten
https://chuttenblog.wordpress.com/2018/10/30/new-laptop-setup-stickers/
|
|
Cameron Kaiser: The Space Grey Mac mini is too little, too late and too much |
If you really, really, really want an updated mini, well, here's your chance. But with all the delays in production and Apple's bizarrely variable loadouts over the years the mini almost doesn't matter anymore and the price isn't cheap Mac territory anymore either (remember that the first G4 Mac mini started at $500 in 2005 and people even complained that was too much). If you want low-end, then you're going to buy a NUC-type device or an ARM board and jam that into a tiny case, and you can do it for less unless you need a crapload of external storage (the four Thunderbolt 3 ports on the Space Grey mini are admittedly quite compelling). You can even go Power ISA if you want to: the "Tiny Talos" a/k/a Raptor Blackbird is just around the corner, with the same POWER9 goodness of the bigger T2 systems in a single socket and the (in fairness: unofficial) aim is to get it under $700. That's what I'm gonna buy. Heck, if I didn't have the objections I do to x86, I could probably buy a lot more off-the-shelf for $800 and get more out of it since I'm already transitioning to Linux at home anyway. Why would I bother with chaining myself to the sinking ship that is macOS when it's clear Apple's bottom line is all about iOS?
Don't get me wrong: I'm glad to see Apple at least make a token move to take their computer lines seriously and the upgrade, though horribly delayed and notable more for its tardiness than what's actually in it, is truly welcome. And it certainly would build optimism and some much-needed good faith for whatever the next Mac Pro is being more than vapourware. But I've moved on and while I like my old minis, this one wouldn't lure me back.
http://tenfourfox.blogspot.com/2018/10/the-space-grey-mac-mini-is-too-little.html
|
|
Firefox UX: The User Journey for Firefox Extensions Discovery |
The ability to customize and extend Firefox are important parts of Firefox’s value to many users. Extensions are small tools that allow developers and users who install the extensions to modify, customize, and extend the functionality of Firefox. For example, during our workflows research in 2016, we interviewed a participant who was a graduate student in Milwaukee, Wisconsin. While she used Safari as her primary browser for common browsing, she used Firefox specifically for her academic work because of the extension Zotero was the best choice for keeping track of her academic work and citations within the browser. The features offered by Zotero aren’t built into Firefox, but added to Firefox by an independent developer.
Popular categories of extensions include ad blockers, password managers, and video downloaders. Given the variety of extensions and the benefits to customization they offer, why is it that only 40% of Firefox users have installed at least one extension? Certainly, some portion of Firefox users may be aware of extensions but have no need or desire to install one. However, some users could find value in some extensions but simply may not be aware of the existence of extensions in the first place.
Why not? How can Mozilla facilitate the extension discovery process?
A fundamental assumption about the extension discovery process is that users will learn about extensions through the browser, through word of mouth, or through searching to solve a specific problem. We were interested in setting aside this assumption and to observe the steps participants take and the decisions they make in their journey toward possibly discovering extensions. To this end, the Firefox user research team ran two small qualitative studies to understand better how participants solved a particular problem in the browser that could be solved by installing an extension. Our study helped us understand how participants do — or do not — discover a specific category of extension.
Because ad blockers are easily the most popular type of extension in installation volume on Firefox (more generally, some kind of ad blocking is being used on 615 million devices worldwide in 2017), we chose them as an obvious candidate for this study. Their popularity and many users’ perception of some advertising as invasive and distracting is a good mix that we believed could pose a common solvable problem for participants to engage with. (Please do not take our choice of this category of extensions for this study as an official or unofficial endorsement or statement from Mozilla about ad blocking as a user tool.)

In order to understand better how users might discover extensions (and why those chose a particular path), we conducted two small qualitative studies. The first study was conducted in-person in our Portland, Oregon offices with five participants. To gather more data, we conducted a remote, unmoderated study using usertesting.com with nine participants in the US, UK, and Canada. In total, we worked with fourteen participants. These participants used Firefox as their primary web browser and were screened to make certain that they had no previous experience with extensions in Firefox.
In both iterations of the study, we asked participants to complete the following task in Firefox:
Let’s imagine for a moment that you are tired of seeing advertising in Firefox while you are reading a news story online. You feel like ads have become too distracting and you are tired of ads following you around while you visit different sites. You want to figure out a way to make advertisements go away while you browse in Firefox. How would you go about doing that? Show us. Take as much time as you need to reach a solution that you are satisfied with.
Participants fell into roughly two categories: those who installed an ad blocking extension — such as Ad Block Plus or uBlock Origin — and those who did not. The participants who did not install an extension came up with a more diverse set of solutions.
First, among the fourteen participants across the two studies, only six completed the task by discovering an ad blocking extension (two of these did not install the extension for other reasons). The participants who completed the task in this manner all followed a similar path: they searched via a search engine to seek an answer. Most of these participants were not satisfied with accepting only the extensions that were surfaced from search results. Instead, these participants exhibited a high degree of information literacy and used independent reviews to assess and triangulate the quality, reputation, and reliability of the ad blocking extension they selected. More generally, they used the task as an opportunity to build knowledge about online advertising and ad blocking; they looked outside of their familiar tools and information sources.
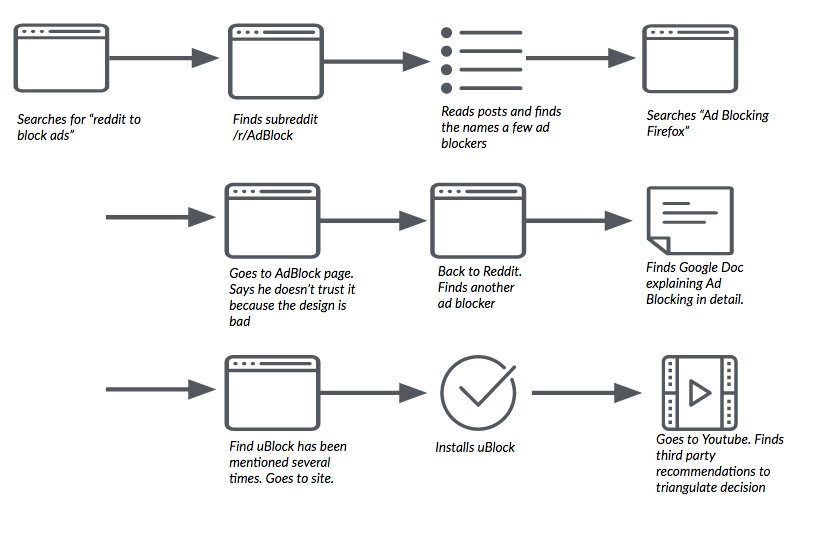
One participant (who we’ll call “Andrew”) in our first study is a technically savvy user but does not frequently customize the software he uses. When prompted by our task, he said, “I’m going to do what I always do in situations where I don’t know the answer…I’m going to search around for information.” In this case, Andrew recalled that he had heard someone once mention something about blocking ads online and searched for “firefox ad block” in DuckDuckGo. Looking through the search results, he found a review on CNET.com that described various ad blockers, including uBlock Origin. While Andrew says that he “trusts CNET,” he wanted to find a second review source that would provide him with more information. After reading an additional review, he follows a link to the uBlock Firefox extension page, reads the reviews and ratings there (specifically, he is looking for a large number of positive reviews as a proxy for reliability and trustworthiness), and installs the extension. For his final step, Andrew visits two sites (wired.com and huffingtonpost.com) that he believes use a large number of display ads and confirms that the ad blocker is suppressing their display.
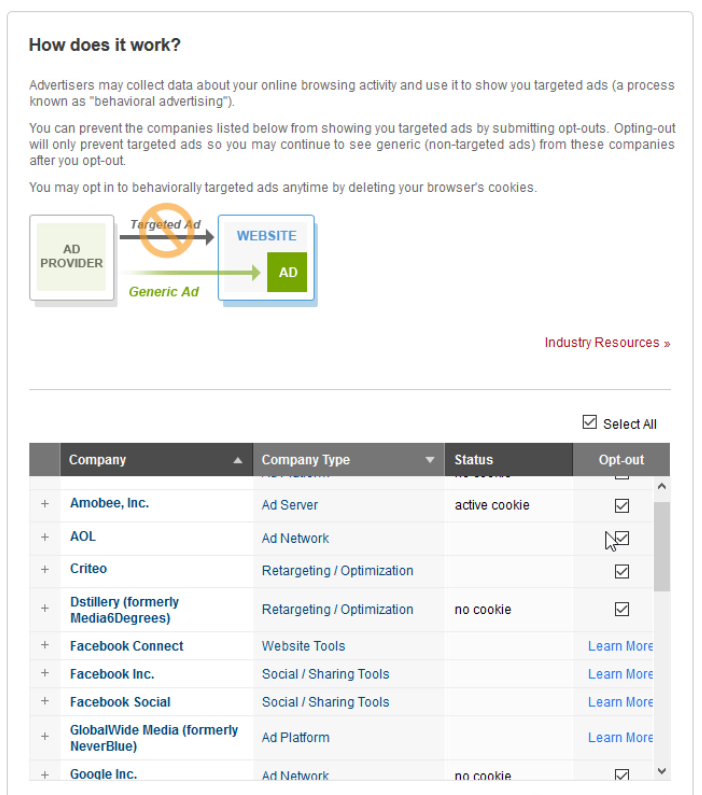
The remaining participants did not install an ad blocking extension to complete the task. Unlike the participants who ultimately installed an ad blocking extension, these participants did not use a search engine or an outside information source in order to seek a solution to the task. Instead, they fell back on and looked inside tools and resources with which they were already familiar. Also, unlike the participants who were successful installing an ad blocking extension, these participants typically said they were dissatisfied with their solutions.
These participants generally followed two main routes to complete the task: they either looked within the browser in Preferences or other menus or they looked into the ads themselves. For the participants who looked in Preferences, many found privacy and security related options, but none related to blocking advertising. These participants did not seek out outside information sources via a search engine and eventually they gave up on the task.
A participant (“Marion”) in our first study recalled that she had seen a link once in an advertisement offering her “Ad Choices.” Ad Choices is a self-regulatory program in North America and the EU that is “aimed to give consumers enhanced transparency and control.” Marion navigated to a site she remembered had display advertising that offered a link to information on the program. She followed the link which took her to a long list of options for opting out of specific advertising themes and networks. Marion selected and deselected the choices she believed were relevant to her. Unfortunately, the confirmations from the various ad networks for her actions either did not work or did not provide much certainty into her actions. She navigated back to the site that she visited previously and could not discern any real difference in display advertising before and after enrolling in the Ad Choices program.
There were some limitations with this research. The task provided to participants is only a single situation that would cue them to seek out an extension to solve a problem. Rather, we imagine a cumulative sense of frustration might prompt users to seek out a solution. We would anticipate that they may hear about ad blocking from word of mouth or a news story (as participants in a similar study run at the same time with participants who were familiar with extensions demonstrated). Also, ad blocking is a specific domain of extension that has its own players and ecosystem. If we asked participants for example to find a solution to managing their passwords, we would expect a different set of solutions.
At a high level, those participants who displayed elements of traditionally defined digital information literacy were successful in discovering extensions to complete the task. This observation emerged through the analysis process in our second study. In future research, it would be useful to include some measurement of participants’ digital literacy or include related tasks to determine the strength of this relationship.
Nevertheless, this study provided us with insight into how users seek out information to discover solutions to problems in their browser. We gathered useful data on users’ mental model of the software discovery process, the information sources they looked to discover new functionality, and finally what kinds of information was important, reliable, and trustworthy. Those participants who did not seek out independent answers, fell back on the tools and information with which they were already familiar; these participants were also less satisfied with their solutions. These results demonstrate a need to provide cues to participants about Extensions within tools they are familiar with already such as Firefox’s Preferences/Options menu. Further, we need to surface cues in other channels (such as search engine results pages) that could lead Firefox users to relevant extensions.
Thanks to Philip Walmsley, Markus Jaritz, and Emanuela Damiani for their participation in this research project. Thanks to Jennifer Davidson and Heather McGaw for proofreading and suggestions.
The User Journey for Firefox Extensions Discovery was originally published in Firefox User Experience on Medium, where people are continuing the conversation by highlighting and responding to this story.
|
|
Firefox UX: Why Do We Conduct Qualitative User Research? |
The following post is based on a talk I presented at AmuseConf in Budapest about interviewing users.
I recently had a conversation with a former colleague who now works for a major social network. In the course of our conversation this former colleague said to me, “You know, we have all the data in the world. We know what our users are doing and have analytics to track and measure it, but we don’t know why they do it. We don’t have any frameworks for understanding behavior outside of what we speculate about inside the building.”
In many technology organizations, the default assumption of user research is that it will be primarily quantitative research such as telemetry analyses, surveys, and A/B testing. Technology and business organizations often default to a positivist worldview and subsequently believe that quantitative results that provide numeric measures have the most value. The hype surrounding big data methods (and the billions spent on marketing by vendors making certain you know about their enterprise big data tools) goes hand-in-hand with the perceived correctness of this set of assumptions. Given this ecosystem of belief, it’s not surprising that user research employing quantitative methods is perceived by many in our industry as the only user research an organization would need to conduct.
I work as a Lead User Researcher on Firefox. While I do conduct some quantitative user research, the focus of most of my work is qualitative research. In the technology environment described above, the qualitative research we conduct is sometimes met with skepticism. Some audiences believe our work is too “subjective” or “not reproducible.” Others may believe we simply run antiquated, market research-style focus groups (for the record, the Mozilla UR team doesn’t employ focus groups as a methodology).
I want to explain why qualitative research methods are essential for technology user research because of one well-documented and consistently observed facet of human social life: the concept of homophily.

This is a map of New York City based on the ethnicity of residents. Red is White, Blue is Black, Green is Asian, Orange is Hispanic, Yellow is Other, and each dot is 25 residents. Of course, there are historical and cultural reasons for the clustering, but these factors are part of the overall social dynamic.
Source: https://www.flickr.com/photos/walkingsf/
Homophily is the tendency of individuals to associate and bond with similar others (the now classic study of homophily in social networks). In other words, individuals are more likely to associate with others based on similarities rather than differences. Social scientists have studied social actors associating along multiple types of ascribed characteristics (status homophily) including gender, ethnicity, economic and social status, education, and occupation. Further, homophily exists among groups of individuals based on internal characteristics (value homophily) including values, beliefs, and attitudes. Studies have demonstrated both status and value homophilic clustering in smaller ethnographic studies and larger scale analyses of social network associations such as political beliefs on Twitter.

Photos on Flickr taken in NY by tourists and locals. Blue pictures are by locals. Red pictures are by tourists. Yellow pictures might be by either. Source: https://www.flickr.com/photos/walkingsf
I bring up this concept to emphasize how those of us who work in technology form our own homophilic bubble. We share similar experiences, information, beliefs, and processes about not just how to design and build products and services, but also in how many of us use those products and services. These beliefs and behaviors become reinforced through the conversations we have with colleagues, the news we read in our press daily, and the conferences we attend to learn from others within our industry. The most insidious part of this homophilic bubble is how natural and self-evident the beliefs, knowledge, and behaviors generated within it appears to be.
Here’s another fact: other attitudes, beliefs, and motivations exist outside of our technology industry bubble. Many members of these groups use our products and services. Other groups share values and statuses that are similar to the technology world, but there are other, different values and different statuses. Further, there are values and statuses that are radically different from ours so as to be not assumed in the common vocabulary of our own technology industry homophilic bubble. To borrow from former US Secretary of Defense, Donald Rumsfeld, “there are also unknown unknowns, things we don’t know we don’t know.”
This is all to say that insights, answers, and explanations are limited by the breadth of a researcher’s understanding of users’ behaviors. The only way to increase the breadth of that understanding is by actually interacting with and investigating behaviors, beliefs, and assumptions outside of our own behaviors, beliefs, and assumptions. Qualitative research provides multiple methodologies for getting outside of our homophilic bubble. We conduct in situ interviews, diary studies, and user tests (among other qualitative methods) in order to uncover these insights and unknown unknowns. The most exciting part of my own work is feeling surprised with a new insight or observation of what our users do, say, and believe. In research on various topics, we’ve seen and heard so many surprising answers.
There is no one research method that satisfies answering all of our questions. If the questions we are asking about user behavior, attitudes, and beliefs are based solely on assumptions formed in our homophilic bubble, we will not generate accurate insights about our users no matter how large the dataset. In other words, we only know what we know and can only ask questions framed about what we know. If we are measuring, we can only measure what we know to ask. Quantitative user research needs qualitative user research methods in order to know what we should be measuring and to provide examples, theories, and explanations. Likewise, qualitative research needs quantitative research to measure and validate our work as well as to uncover larger patterns we cannot see.
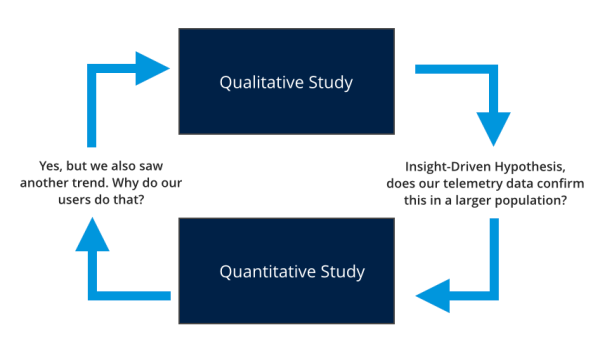
An example of quantitative and qualitative research working iteratively.
It is a disservice to users and ourselves to ask only how much or how often and to avoid understanding why or how. User research methods work best as an accumulation of triangulation points of data in a mutually supportive, on-going inquiry. More data points from multiple methods mean deeper insights and a deeper understanding. A deeper connection with our users means more human-centered and usable technology products and services. We can only get at that deeper connection by leaving the technology bubble and engaging with the complex, messy world outside of it. Have the courage to feel surprised and your assumptions challenged.
(Thanks to my colleague Gemma Petrie for her thoughts and suggestions.)
Originally published at blog.mozilla.org on October 30, 2014.
Why Do We Conduct Qualitative User Research? was originally published in Firefox User Experience on Medium, where people are continuing the conversation by highlighting and responding to this story.
|
|
Francois Marier: Installing Vidyo on Ubuntu 18.04 |
Following these instructions as well as the comments in there, I was able to get Vidyo, the proprietary videoconferencing system that Mozilla uses internally, to work on Ubuntu 18.04 (Bionic Beaver). The same instructions should work on recent versions of Debian too.
First of all, install all of the package dependencies:
sudo apt install libqt4-designer libqt4-opengl libqt4-svg libqtgui4 libqtwebkit4 sni-qt overlay-scrollbar-gtk2 libcanberra-gtk-module
Then, ensure you have a system tray application running. This should be the case for most desktop environments.
Download version 3.6.3 from the CERN Vidyo Portal but don't expect to be able to install it right away.
You need to first hack the package in order to remove obsolete dependencies.
Once that's done, install the resulting package:
sudo dpkg -i vidyodesktop-custom.deb
There are a few more things to fix before it's ready to be used.
First, fix the ownership on the main executable:
sudo chown root:root /usr/bin/VidyoDesktop
Then disable autostart since you don't probably don't want to keep the client running all of the time (and listening on the network) given it hasn't received any updates in a long time and has apparently been abandoned by Vidyo:
sudo rm /etc/xdg/autostart/VidyoDesktop.desktop
Remove any old configs in your home directory that could interfere with this version:
rm -rf ~/.vidyo ~/.config/Vidyo
Finally, launch VidyoDesktop and go into the settings to check "Always use
VidyoProxy".
http://feeding.cloud.geek.nz/posts/installing-vidyo-on-ubuntu-1804/
|
|
Daniel Pocock: FOSDEM 2019 Real-Time Communications Call for Participation |
FOSDEM is one of the world's premier meetings of free software developers, with over five thousand people attending each year. FOSDEM 2019 takes place 2-3 February 2019 in Brussels, Belgium.
This email contains information about:
The Real-Time Communications dev-room and Real-Time lounge is about all things involving real-time communication, including: XMPP, SIP, WebRTC, telephony, mobile VoIP, codecs, peer-to-peer, privacy and encryption. The dev-room is a successor to the previous XMPP and telephony dev-rooms. We are looking for speakers for the dev-room and volunteers and participants for the tables in the Real-Time lounge.
The dev-room is only on Sunday, 3rd of February 2019. The lounge will be present for both days.
To discuss the dev-room and lounge, please join the Free RTC mailing list.
To be kept aware of major developments in Free RTC, without being on the discussion list, please join the Free-RTC Announce list.
Note: if you used FOSDEM Pentabarf before, please use the same account/username
Real-Time Communications dev-room: deadline 23:59 UTC on 2nd of December. Please use the Pentabarf system to submit a talk proposal for the dev-room. On the "General" tab, please look for the "Track" option and choose "Real Time Communications devroom". Link to talk submission.
Other dev-rooms and lightning talks: some speakers may find their topic is in the scope of more than one dev-room. It is encouraged to apply to more than one dev-room and also consider proposing a lightning talk, but please be kind enough to tell us if you do this by filling out the notes in the form.
You can find the full list of dev-rooms on this page and apply for a lightning talk at https://fosdem.org/submit
Main track: the deadline for main track presentations is 23:59 UTC 3 November. Leading developers in the Real-Time Communications field are encouraged to consider submitting a presentation to the main track.
FOSDEM dev-rooms are a welcoming environment for people who have never given a talk before. Please feel free to contact the dev-room administrators personally if you would like to ask any questions about it.
The Pentabarf system will ask for many of the essential details. Please remember to re-use your account from previous years if you have one.
In the "Submission notes", please tell us about:
You can use HTML and links in your bio, abstract and description.
If you maintain a blog, please consider providing us with the URL of a feed with posts tagged for your RTC-related work.
We will be looking for relevance to the conference and dev-room themes, presentations aimed at developers of free and open source software about RTC-related topics.
Please feel free to suggest a duration between 20 minutes and 55 minutes but note that the final decision on talk durations will be made by the dev-room administrators based on the received proposals. As the two previous dev-rooms have been combined into one, we may decide to give shorter slots than in previous years so that more speakers can participate.
Please note FOSDEM aims to record and live-stream all talks. The CC-BY license is used.
To make the dev-room and lounge run successfully, we are looking for volunteers:
The traditional FOSDEM beer night occurs on Friday, 1st of February.
On Saturday night, there are usually dinners associated with each of the dev-rooms. Most restaurants in Brussels are not so large so these dinners have space constraints and reservations are essential. Please subscribe to the Free-RTC mailing list for further details about the Saturday night dinner options and how you can register for a seat.
If you know of any mailing lists where this CfP would be relevant, please forward this email. If this dev-room excites you, please blog or microblog about it, especially if you are submitting a talk.
If you regularly blog about RTC topics, please send details about your blog to the planet site administrators:
| Planet site | Admin contact | |
|---|---|---|
| All projects | Free-RTC Planet (http://planet.freertc.org) | contact planet@freertc.org |
| XMPP | Planet Jabber (http://planet.jabber.org) | contact ralphm@ik.nu |
| SIP | Planet SIP (http://planet.sip5060.net) | contact planet@sip5060.net |
| SIP (Espa~nol) | Planet SIP-es (http://planet.sip5060.net/es/) | contact planet@sip5060.net |
Please also link to the Planet sites from your own blog or web site as this helps everybody in the free real-time communications community.
For any private queries, contact us directly using the address fosdem-rtc-admin@freertc.org and for any other queries please ask on the Free-RTC mailing list.
The dev-room administration team:
|
|
K Lars Lohn: Things Gateway - the Refrigerator and the Samsung Buttons |

class PantryLightTimerRule(Rule):(see this code in situ in the timer_light_rule.py file in the pywot rule system demo directory)
def register_triggers(self):
self.delay_timer = DelayTimer(self.config, "adjustable_delay", "10m")
self.PantryButton.subscribe_to_event('pressed')
self.PantryButton.subscribe_to_event('longPressed')
return (self.PantryButton, self.delay_timer, self.PantryLight)
def action(self, the_triggering_thing, the_trigger_event, new_value):
if the_triggering_thing is self.PantryButton and the_trigger_event == 'pressed':
if self.PantryLight.on:
self.delay_timer.add_time() # add ten minutes
else:
self.PantryLight.on = True
elif the_triggering_thing is self.PantryButton and the_trigger_event == 'longPressed':
self.PantryLight.on = False
elif the_triggering_thing is self.delay_timer:
self.PantryLight.on = False
elif the_triggering_thing is self.PantryLight and new_value is False:
self.delay_timer.cancel()
elif the_triggering_thing is self.PantryLight and new_value is True:
self.delay_timer.add_time() # add ten minutes

class CombinationLightRule(Rule):(see this code in situ in the combination_light_rule.py file in the pywot rule system demo directory)
def initial_state(self):
self.index = 0
self.combinations = [
(False, False, False),
(True, False, False),
(True, True, False),
(True, True, True),
(False, True, True),
(False, False, True),
(False, True, False),
]
def register_triggers(self):
self.KitchenButton.subscribe_to_event('pressed')
self.KitchenButton.subscribe_to_event('longPressed')
return (self.KitchenButton, )
def set_bulb_state(self):
self.StoveLight.on = self.combinations[self.index][0]
self.CounterLight.on = self.combinations[self.index][1]
self.SinkLight.on = self.combinations[self.index][2]
def action(self, the_triggering_thing, the_trigger_event, new_value):
if the_trigger_event == "pressed":
self.index = (self.index + 1) % len(self.combinations)
self.set_bulb_state()
elif the_trigger_event == "longPressed":
self.index = 0
self.set_bulb_state()
http://www.twobraids.com/2018/10/things-gateway-refrigerator-and-samsung.html
|
|
Hacks.Mozilla.Org: Testing Privacy-Preserving Telemetry with Prio |
Building a browser is hard; building a good browser inevitably requires gathering a lot of data to make sure that things that work in the lab work in the field. But as soon as you gather data, you have to make sure you protect user privacy. We’re always looking at ways to improve the security of our data collection, and lately we’ve been experimenting with a really cool technique called Prio.
Currently, all the major browsers do more or less the same thing for data reporting: the browser collects a bunch of statistics and sends it back to the browser maker for analysis; in Firefox, we call this system Telemetry. The challenge with building a Telemetry system is that data is sensitive. In order to ensure that we are safeguarding our users’ privacy, Mozilla has built a set of transparent data practices which determine what we can collect and under what conditions. For particularly sensitive categories of data, we ask users to opt-in to the collection and ensure that the data is handled securely.
We understand that this requires users to trust Mozilla — that we won’t misuse their data, that the data won’t be exposed in a breach, and that Mozilla won’t be compelled to provide access to the data by another party. In the future, we would prefer users to not have to just trust Mozilla, especially when we’re collecting data that is sufficiently sensitive to require an opt-in. This is why we’re exploring new ways to preserve your data privacy and security without compromising access to the information we need to build the best products and services.
Obviously, not collecting any data at all is best for privacy, but it also blinds us to real issues in the field, which makes it hard for us to build features — including privacy features — which we know our users want. This is a common problem and there has been quite a bit of work on what’s called “privacy-preserving data collection”, including systems developed by Google (RAPPOR, PROCHLO) and Apple. Each of these systems has advantages and disadvantages that are beyond the scope of this post, but suffice to say that this is an area of very active work.
In recent months, we’ve been experimenting with one such system: Prio, developed by Professor Dan Boneh and PhD student Henry Corrigan-Gibbs of Stanford University’s Computer Science department. The basic insight behind Prio is that for most purposes we don’t need to collect individual data, but rather only aggregates. Prio, which is in the public domain, lets Mozilla collect aggregate data without collecting anyone’s individual data. It does this by having the browser break the data up into two “shares”, each of which is sent to a different server. Individually the shares don’t tell you anything about the data being reported, but together they do. Each server collects the shares from all the clients and adds them up. If the servers then take their sum values and put them together, the result is the sum of all the users’ values. As long as one server is honest, then there’s no way to recover the individual values.

We’ve been working with the Stanford team to test Prio in Firefox. In the first stage of the experiment we want to make sure that it works efficiently at scale and produces the expected results. This is something that should just work, but as we mentioned before, building systems is a lot harder in practice than theory. In order to test our integration, we’re doing a simple deployment where we take nonsensitive data that we already collect using Telemetry and collect it via Prio as well. This lets us prove out the technology without interfering with our existing, careful handling of sensitive data. This part is in Nightly now and reporting back already. In order to process the data, we’ve integrated support for Prio into our Spark-based telemetry analysis system, so it automatically talks to the Prio servers to compute the aggregates.
Our initial results are promising: we’ve been running Prio in Nightly for 6 weeks, gathered over 3 million data values, and after fixing a small glitch where we were getting bogus results, our Prio results match our Telemetry results perfectly. Processing time and bandwidth also look good. Over the next few months we’ll be doing further testing to verify that Prio continues to produce the right answers and works well with our existing data pipeline.
Most importantly, in a production deployment we need to make sure that user privacy doesn’t depend on trusting a single party. This means distributing trust by selecting a third party (or parties) that users can have confidence in. This third party would never see any individual user data, but they would be responsible for keeping us honest by ensuring that we never see any individual user data either. To that end, it’s important to select a third party that users can trust; we’ll have more to say about this as we firm up our plans.
We don’t yet have concrete plans for what data we’ll protect with Prio and when. Once we’ve validated that it’s working as expected and provides the privacy guarantees we require, we can move forward in applying it where it is needed most. Expect to hear more from us in future, but for now it’s exciting to be able to take the first step towards privacy preserving data collection.
The post Testing Privacy-Preserving Telemetry with Prio appeared first on Mozilla Hacks - the Web developer blog.
https://hacks.mozilla.org/2018/10/testing-privacy-preserving-telemetry-with-prio/
|
|
The Firefox Frontier: Your browser is hijacked, now what? |
You’re looking for a cornbread recipe, but your search is redirected to a site crammed with ads. Your homepage is now a billboard for the most dubious products and services. … Read more
The post Your browser is hijacked, now what? appeared first on The Firefox Frontier.
https://blog.mozilla.org/firefox/your-browser-is-hijacked-now-what/
|
|
Rabimba: ARCore and Arkit: What is under the hood : Anchors and World Mapping (Part 1) |

 |
| Image credits: Rosten E., Drummond T. (2006) Machine Learning for High-Speed Corner Detection.. Computer Vision – ECCV 2006. |
 |
| Image credits: S. Leutenegger, M. Chli and R. Y. Siegwart, “BRISK: Binary Robust invariant scalable keypoints”, 2011 International Conference on Computer Vision |
 |
| Original Image Link |
 |
| Original Image Link |


https://blog.rabimba.com/2018/10/arcore-and-arkit-what-is-under-hood.html
|
|
Rabimba: ARCore and Arkit: What is under the hood : Anchors and World Mapping (Part 1) |
|
| Image credits: Rosten E., Drummond T. (2006) Machine Learning for High-Speed Corner Detection.. Computer Vision – ECCV 2006. |
|
| Image credits: S. Leutenegger, M. Chli and R. Y. Siegwart, “BRISK: Binary Robust invariant scalable keypoints”, 2011 International Conference on Computer Vision |
|
| Original Image Link |
|
| Original Image Link |
https://blog.rabimba.com/2018/10/arcore-and-arkit-what-is-under-hood.html
|
|
Cameron Kaiser: And now for something completely different: Make your radio station Power Mac your recording radio station Power Mac |
My machine uses a RadioSHARK 2 as its repeater source as previously mentioned in our last article on this topic, and if it were simply a matter of recording from that, you could just (duh) use the RadioSHARK's own software for that purpose as designed. But on my machine, I'm using the Shark with my own custom software to tune and play through USB audio; the RadioSHARK software isn't even involved.
The easiest way to skin this cat, especially on a stand-alone machine which isn't doing anything else, is just to AppleScript QuickTime and use that to do the recording. Unfortunately most of the how-tos you'll find to do this don't work for QuickTime 7 because the dictionary became wildly different (better, too, but different). Here's a quick AppleScript to make QuickTime 7 record 60 seconds from the currently set audio input:
What this will do is close all open documents (just in case, to have a predictable state), then create a new audio recording, start it, record 60 seconds from the default audio input, stop it, and then save it to the Desktop as an audio-only QuickTime movie named something like Audio.mov or Audio 2.mov, etc. Despite the saving no at the end, the file actually is saved, in fact at the point where the recording is stopped no matter what you actually do at the time you close it.
tell application "QuickTime Player"
        activate
        close every window saving no

        new audio recording
        start (first document)
        delay 60
        stop (first document)

        close (first document) saving no
        quit
end tell
If you don't like restricting this to the "first document," you can also do something like set new_movie to id of front movie to get the ID of what's recording, and then use start movie id new_movie and so forth to reference it specifically. Modifying this for the general case without having to close windows and so on is left as an exercise for the reader.
On my radio station Mac, I have a cron job that pipes this to osascript (the commandline AppleScript runtime) to record certain radio shows at certain times, and then copies the resulting file off somewhere for me to play later. There doesn't seem to be a way in this version of QuickTime to change the default filename, but since I don't use the system to record any other audio, I always know the file will be stored as ~/Desktop/Audio.mov and can just move that. Best of all, by using QuickTime to do this job while the USB audio streaming daemon is running, I can still listen simultaneously while it records if I like.
Now, if you'll excuse me, I've got some queued up Handel on the Law to listen to, simultaneously the best and worst legal show on radio.
http://tenfourfox.blogspot.com/2018/10/and-now-for-something-completely.html
|
|
Mozilla Addons Blog: Firefox, Chrome and the Future of Trustworthy Extensions |
Browser extensions are wonderful. Nearly every day I come across a new Firefox extension that customizes my browser in some creative way I’d never even considered. Some provide amusement for a short time, while others have become indispensable to my work and life. Extensions are a real-world manifestation of one of Mozilla’s core principles — that individuals must have the ability to shape the internet and their experiences on it.
Another of Mozilla’s core principles is that an individual’s security and privacy on the internet are fundamental and must not be treated as optional. We’ve made the decision to support extensions, but it is definitely a balancing act. Our users’ freedom to customize their browser – their “user agent” – and to personalize their experience on the web can also be exploited by malicious actors to compromise users’ security and privacy.
At Mozilla, we continually strive to honor both principles. It’s why Firefox extensions written to the WebExtensions API are limited in their abilities and have good oversight, including automatic and manual review. It’s also why we make sure users can understand exactly what permissions they’ve granted to those extensions and what parts of their browser they can access.
In short, Mozilla makes every effort to ensure that the extensions we offer are trustworthy.
So it was with great interest that I read Google’s recent Chromium Blog blog post entitled “Trustworthy Chrome Extensions, by default.” It outlines upcoming changes to Chrome’s extension architecture designed to make “extensions trustworthy by default.” I thought it would be interesting to explore each of the announced changes and compare them to what Mozilla has built into Firefox.
“Beginning in Chrome 70, users will have the choice to restrict extension host access to a custom list of sites, or to configure extensions to require a click to gain access to the current page.”
Being able to review and modify the sites that an extension has access to, especially those extensions that ask to “access your data for all websites,” is a worthy goal. Mozilla has discussed similar ideas, but the problem always comes down presenting this in a clear, uncomplicated way to a majority of users.
Having played a bit with this feature in Chrome, the implementation definitely seems targeted at power users. Extensions that request access to all websites still get installed with that access, so the default behavior has not changed.
The click-to-script option is intriguing, although the UX is a bit awkward. It’s workable if you have a single extension, but becomes unwieldy to click and reload every site visited for every installed extension.
Admittedly, getting this interface right in an intuitive and easy-to-use manner is not straightforward and I applaud Google for taking a shot at it. Meanwhile Mozilla will continue to look for ways Firefox can provide more permission control to a majority of extension users.
“Going forward, extensions that request powerful permissions will be subject to additional compliance review.”
The post is vague about exactly what this means, but it likely means these extensions will be flagged for manual review. This brings Chrome up to the standard that Firefox set last year, which is great news for the web. More manual review means fewer malicious extensions.
“We’re also looking very closely at extensions that use remotely hosted code, with ongoing monitoring.”
Firefox expressly forbids remotely hosted code. Our feeling is that no amount of review can eliminate the risks introduced when developers can easily and undetectably change what code is loaded by extensions. Mozilla’s policy ensures that no unreviewed code is ever loaded into the browser, and enforced signatures prevents reviewed code from being altered after release.
“Starting today, Chrome Web Store will no longer allow extensions with obfuscated code…minification will still be allowed.”
In reality, minified and obfuscated code are not very useful in extensions. In both Chrome and Firefox, extensions load locally (not over the network) so there is almost no performance advantage to minification, and obfuscation can be overcome by a dedicated person with readily available tools and sufficient effort.
Nevertheless, Mozilla permits both obfuscated and minified extensions in our store. Critically, though, Mozilla requires all developers to submit original, non-obfuscated, non-minified code for review, along with instructions on how to reproduce (including any obfuscation or minification) the store version. This ensures that reviewers are able to review and understand every extension, and that the store version is unaltered from the reviewed version.
As you might expect, this takes a significant investment of time and energy for both Mozilla and developers. We believe it is worth it, though, to allow developers to secure their code, if desired, while simultaneously providing thoroughly reviewed extensions that maintain user security and privacy.
As a whole, the web is moving in this direction and requiring it for developer accounts is a strong step towards protecting users. Mozilla recently added two-step authentication for Firefox Sync accounts, and two-step authentication for Firefox extension developers is on the roadmap for the fourth quarter of 2018. Like Google, we expect to have this feature enabled by 2019.
“In 2019 we will introduce the next extensions manifest version…We intend to make the transition to manifest v3 as smooth as possible and we’re thinking carefully about the rollout plan.”
In 2015, Mozilla announced we were deprecating our extremely popular extension system in favor of WebExtensions, an API compatible with Chrome, as well as Edge and Opera. There were several reasons for this, but a large part of the motivation was standards — a fundamental belief that adopting the API of the market leader, in effect creating a de facto standard, was in the best interests of all users.
It was a controversial decision, but it was right for the web and it represents who Mozilla is and our core mission. Three years later, while there still isn’t an official standard for browser extensions, the web is a place where developers can quickly and easily create cross-browser extensions that run nearly unchanged on every major platform.
So I would like to publicly invite Google to collaborate with Mozilla and other browser vendors on manifest v3. It is an incredible opportunity to show that Chrome embodies Google’s philosophy to “focus on the user,” would reaffirm the Chrome team’s commitment to open standards and an interoperable web, and be a powerful statement that working together on the future of browser extensions is in the best interests of a healthy internet.
While all of the changes Google outlined are interesting, some of them could go a step further in protecting users online. Nevertheless, I’d like say — bravo! The motivation behind these changes is definitely in the spirit of Mozilla’s mission and a gain for the open web. With Chrome’s market share, these initiatives will have a positive impact in protecting the security and privacy of millions of users around the world, and the web will be a better place for it.
A lot of work remains, though. Expect Mozilla to keep fighting for users on the web, launching new initiatives, like Firefox Monitor, to keep people safe, and advancing Firefox to be the best user agent you can have in your online journies.
The post Firefox, Chrome and the Future of Trustworthy Extensions appeared first on Mozilla Add-ons Blog.
https://blog.mozilla.org/addons/2018/10/26/firefox-chrome-and-the-future-of-trustworthy-extensions/
|
|
The Mozilla Blog: Women Who Tech and Mozilla Announce Winners of Women Startup Challenge Europe |
Europe was at the center of a milestone for women in tech today as nonprofit Women Who Tech and tech giant Mozilla announced the winners of the Women Startup Challenge Europe. Women-led startup finalists from across Europe pitched their ventures before a prestigious panel of tech industry executives and investors on 25 October at Paris’s City Hall, co-hosted by the office of Mayor Anne Hidalgo.
“While it’s alarming to see the amount of funding for women-led startups compared to European companies as a whole go down from 14% to 11% between 2016 and 2018, the Women Startup Challenge is on a mission to close the funding gap once and for all. If the tech world wants to innovate and solve the world’s toughest problems and generate record returns, they will invest in diverse startups,” said Allyson Kapin, founder of Women Who Tech. “If investors don’t know where to look, our Women Startup Challenge program has a pipeline of over 2,300 women-led ventures who are ready to scale.”
Sampson Solutions from the UK won the grand prize, receiving $35,000 in funding via Women Who Tech to help scale their startup. The Audience Choice Award went to Inorevia from Paris, France. Mozilla awarded an additional $25,000 cash grant to Vitrue from the UK, selected by jury member Mitchell Baker, Chairwoman of Mozilla.
“Paris is determined to provide girls and women with the resources to occupy their rightful place in the society and in the tech industry. We were thrilled to co-host the Women Startup Challenge Europe and showcase 10 talented women-led startups who are making an impact in this world,” said Deputy Mayor Jean-Louis Missika.
“I’m honored to award the Mozilla prize for privacy, transparency and accountability to Vitrue Health,” said Mitchell. “Vitrue creates data about mobility capabilities, makes that data accessible and useful, and provides it to patients. By providing patients with access to their data in a useful way, Vitrue offers us an example of how creating new data — even personal data — can be quite positive when it is handled well.”
The in-person jury included Mitchell Baker, Jean-Louis Missika, Deputy Mayor of Paris, Fatou Diagne, Partner and Cofounder at Bootstrap Europe, Julien Quintard, Managing Director of Techstars Paris, and St'ephanie Hospital, Cofounder and CEO of OneRagtime.
The post Women Who Tech and Mozilla Announce Winners of Women Startup Challenge Europe appeared first on The Mozilla Blog.
|
|
K Lars Lohn: Things Gateway - Running Web Thing API Applications in Python |


    pi@gateway:~ $ sudo apt-get update
    pi@gateway:~ $ sudo apt-get install build-essential tk-dev libncurses5-dev libncursesw5-dev libreadline6-dev libdb5.3-dev libgdbm-dev libsqlite3-dev libssl-dev libbz2-dev libexpat1-dev liblzma-dev zlib1g-dev
The next step is to compile it. This takes a lot of time. Mine ran for just under 30 minutes:
    pi@gateway:~ $ wget https://www.python.org/ftp/python/3.6.6/Python-3.6.6.tar.xz
    pi@gateway:~ $ tar xf Python-3.6.6.tar.xz
    pi@gateway:~ $ cd Python-3.6.6
    pi@gateway:~/Python-3.6.6 $ ./configure
Now you've got to tag this version of Python as an alternative to the default Python. This command took just over 4 minutes on my RPi:
pi@gateway:~/Python-3.6.6 $ make
Finally, a bit of clean up:
pi@gateway:~/Python-3.6.6 $ sudo make altinstall
    pi@gateway:~/Python-3.6.6 $ cd ..
    pi@gateway:~ $ rm Python-3.6.6.tar.xz
    pi@gateway:~ $ sudo rm -r Python-3.6.6
    pi@gateway:~ $
This has given you a private version of Python3.6 that you can customize at will without interfering with any other Python applications that may be tied to specific versions. Each time you want to run programs with this Python3.6 virtual environment, you need to activate it:
pi@gateway:~ $ python3.6 -m venv py36
    pi@gateway:~ $ . ~/py36/bin/activate
    (py36) pi@gateway:~ $
Did you get a message saying, "You should consider upgrading via the 'pip install --upgrade pip' command." ? I suggest that you do not do that. It made a mess when I tried it and I'm not too inclined to figure out why. Things will work fine if you skip that no-so-helpful suggestion.
    (py36) pi@gateway:~ $ mkdir dev
    (py36) pi@gateway:~ $ cd dev
    (py36) pi@gateway:~/dev $ git clone https://github.com/twobraids/pywot.git
    (py36) pi@gateway:~/dev $ pip install -e pywot
    (py36) pi@gateway:~/dev $
    (py36) pi@gateway:~/dev $ . ./pywot/demo/auth_key.sh
    Enter      URL: http://gateway.local:8080
    Enter    email: your.email@somewhere.com
    Enter password: your_password
    (py36) pi@gateway:~/dev $ ls sample_auth.ini
    sample_auth.ini
    (py36) pi@gateway:~/dev $
Open example.ini in a text editor of your choice. Using the Authorization key you generated in the file ~/dev/sample_auth.ini, uncomment and set the value of things_gateway_auth_key. Set your local timezone on the local_timezone line. Finally set the value of system_timezone. If you're using the Gateway's Raspberry Pi, you can leave it as UTC Otherwise set it whatever timezone your system is using.
    (py36) pi@gateway:~/dev $ cd ./demo/rule_system
    (py36) pi@gateway:~/dev/demo/rule_system $ ./example_if_rule.py --admin.dump_conf=example.ini
    (py36) pi@gateway:~/dev $ cat example.ini
    # a URL for fetching all things data
    #http_things_gateway_host=http://gateway.local

    # the name of the timezone where the Things are ('US/Pacific, UTC, ...')
    local_timezone=US/Pacific

    # format string for logging
    #logging_format=%(asctime)s %(filename)s:%(lineno)s %(levelname)s %(message)s

    # log level (DEBUG, INFO, WARNING, ERROR, CRITICAL)
    #logging_level=DEBUG

    # the fully qualified name of the RuleSystem class
    #rule_system_class=pywot.rules.RuleSystem

    # the number of seconds to allow for fetching data
    #seconds_for_timeout=10

    # the name of the default timezone running on the system ('US/Pacific, UTC, ...')
    system_timezone=UTC

    # the api key to access the Things Gateway
    #things_gateway_auth_key=THINGS GATEWAY AUTH KEY
    (py36) pi@gateway:~/dev/demo/rule_system $
The script will echo its configuration to the log and then start listening to the Thing Gateway. As soon as your target light bulb is turned on, the other bulb(s) in the action will also turn on. You can explore the rest of the demos using the same method of creating configuration files.
(py36) pi@gateway:~/dev $ ./example_if_rule.py --admin.config=example.ini
http://www.twobraids.com/2018/10/things-gateway-running-web-things-api.html
|
|
Wladimir Palant: Should your next web-based login form avoid sending passwords in clear text? |
TL;DR: The answer to the question in the title is most likely “no.” While the OPAQUE protocol is a fascinating approach to authentication, for web applications it doesn’t provide any security advantages.
I read an interesting post by Matthew Green where he presents ways to authenticate users by password without actually transmitting the password to the server, in particular a protocol called OPAQUE. It works roughly like that:
The server has the user’s salt and public key, the client knows the password. Through application of some highly advanced magic, a private key materializes in the client, matching the public key known to the server. This only works if the password known to the client is correct, yet the client doesn’t learn the salt and the server doesn’t learn the password in the process. From that point on, the client can sign any requests sent to the server, and the server can verify them as belonging to this user.
The fact that you can do it like this is amazing. Yet the blog post seems to suggest that websites should adopt this approach. I wrote a comment mentioning this being pointless. The resulting discussion with another commenter made obvious that the fundamental issues of browser-based cryptography that I first saw mentioned in Javascript Cryptography Considered Harmful (2011) still aren’t widely known.
Before we can have a meaningful discussion on the advantages of an approach we need to decide: what are the scenarios we are protecting against? In 2018, there is no excuse for avoiding HTTPS, so we can assume that any communication between the client and the server is encrypted. Even if the server receives the password in clear text, a responsible implementation will always hash the password before storing it in the database. So the potential attacks seem to be:
With OPAQUE, the password is never sent to the server, so it cannot be intercepted in transit. However, with web applications the server controls both the server and the client side. So all it has to do is giving you a slightly modified version of its JavaScript code on the login page. That code can then intercept the password as you enter it into the login form. The user cannot notice this manipulation, with JavaScript code often going into megabytes these days, inspecting it every time just isn’t possible. Monitoring network traffic won’t help either if the data being sent is obfuscated.
This is no different with the Man-in-the-Middle attack, somebody who managed to break up your HTTPS connection will also be able to modify JavaScript code in transit. So OPAQUE only helps with the scenario where the attacker has to be completely passive, typically because they only manage to decrypt the data after the fact. With this scenario being extremely uncommon compared to compromised servers, it doesn’t justify the significant added complexity of the OPAQUE protocol.
Very often however, the attackers will not compromise a server completely but “merely” extract its database, e.g. via an SQL injection vulnerability. The passwords in this database will hopefully be hashed, so the attackers will run an offline brute-force attack to extract the original passwords: hash various guesses and test whether the resulting hash matches the one in the database. Whether they succeed depends largely on the hashing function used. While storing passwords hashed with a fast hashing function like SHA-1 is only marginally better than storing passwords as clear text, a hashing function that is hard to speed up such as scrypt or argon2 with well-chosen parameters will be far more resilient.
It is a bit surprising at first, but using OPAQUE doesn’t really change anything here. Even though the database no longer stores the password (not even as a hash), it still contains all the data that attackers would need to test their password guesses. If you think about it, there is nothing special about the client. It doesn’t know any salts or other secrets, it only knows the password. So an attacker could just do everything that the client does to test a password guess. And the only factor slowing them down is again the hashing function, only that with OPAQUE this hashing function is applied on the client side.
In fact, it seems that OPAQUE might make things worse in this scenario. The server’s capability for hashing is well-known. It is relatively easy to tell what parameters will be doable, and it is also possible to throw more hardware at the problem if necessary. But what if hashing needs to be done on the client? We don’t know what hardware the client is running, so we have to assume the worst. And the worst is currently a low-end smartphone with a browser that doesn’t optimize JavaScript well. So chances are that a website deploying OPAQUE will choose comparatively weak parameters for the hashing function rather than risk some users to be upset about extensive delays.
Adding OPAQUE support to the browsers would address a part of the performance concerns. Then again, browsers that would add this feature should have highly-optimized JavaScript engines and Web Crypto API already. But the fundamental issue is passwords being entered into untrusted user interface, so the browser would also have to take over querying the password, probably the way it is done for HTTP authentication (everybody loves those prompts, right?). A compromised web server could still show a regular login form instead, but maybe the users will suspect something then? Yeah, not likely.
But wait, there is another issue. The attacker in the Man-in-the-Middle scenario doesn’t really need your password, they merely need a way to access your account even after they got out of your connection. The OPAQUE protocol results in a private key on the client side, and having that private key is almost as good as having the password — it means permanent access to the account. So the browser’s OPAQUE implementation doesn’t merely have to handle the password entry, it also needs to keep the private key for itself and sign requests made by the web application to the server. Doable? Yes, should be. Likely to get implemented and adopted by websites? Rather questionable.
|
|


