ОткрыткиПерерожденный каталог открыток на все случаи жизни
 Я - фотографПлагин для публикации фотографий в дневнике пользователя. Минимальные системные требования: Internet Explorer 6, Fire Fox 1.5, Opera 9.5, Safari 3.1.1 со включенным JavaScript. Возможно это будет рабо
 Онлайн-игра "Большая ферма"Дядя Джордж оставил тебе свою ферму, но, к сожалению, она не в очень хорошем состоянии. Но благодаря твоей деловой хватке и помощи соседей, друзей и родных ты в состоянии превратить захиревшее хозяйст
 Всегда под рукойаналогов нет ^_^
Позволяет вставить в профиль панель с произвольным Html-кодом. Можно разместить там банеры, счетчики и прочее
Всегда под рукойаналогов нет ^_^
Позволяет вставить в профиль панель с произвольным Html-кодом. Можно разместить там банеры, счетчики и прочее Онлайн-игра "Empire"Преврати свой маленький замок в могущественную крепость и стань правителем величайшего королевства в игре Goodgame Empire.
Строй свою собственную империю, расширяй ее и защищай от других игроков. Б
Онлайн-игра "Empire"Преврати свой маленький замок в могущественную крепость и стань правителем величайшего королевства в игре Goodgame Empire.
Строй свою собственную империю, расширяй ее и защищай от других игроков. Б


Let's Knit №190 2022 Издательство: Aceville Publications Ltd Язык: английский Журнал д...
Шарф из остатков ниток - (0)Шарф из остатков ниток http://naturallycaron.com/projects/basel/basel_7.html#schematics перев...
Рассказываю, как вязать цепляющие взгляд узоры со сбрасываемыми накидами. Справятся и новички - (0)Рассказываю, как вязать цепляющие взгляд узоры со сбрасываемыми накидами. Справятся и новички ...
Вязаные ажурные летние туники - (0)Вязаные ажурные летние туники. deguciai на Яндекс.Фотках //img1.liveinternet.ru/images/attach/...
Croche Acessorios ed01 2023 - (0)Croche Acessorios ed01 2023 Издательство: EdiCase Язык: португальский Бразильский журн...
LILAE SHAWL BY VERAXANGAI |


|
LILAE SHAWL |


|
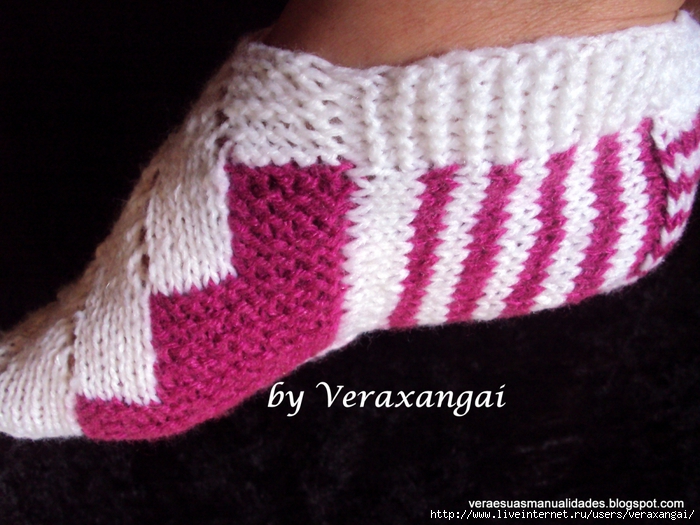
PANTUFAS BY VERAXANGAI |
|
CACHECOL TRICO |

.
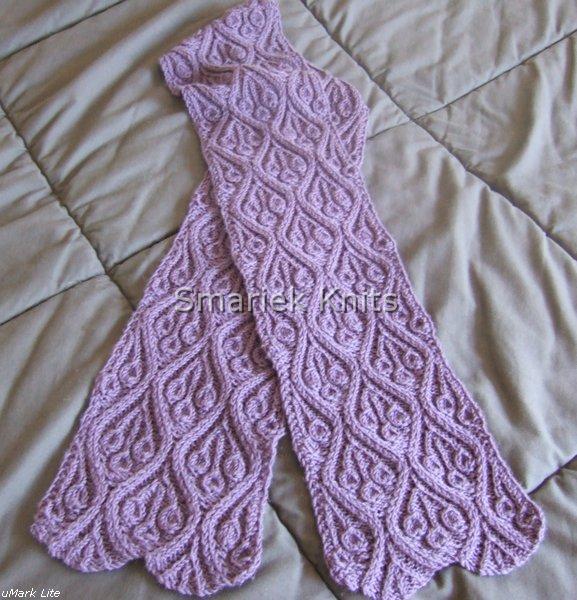
Marijke Scarf
© Designed by S.M. Kahn, March 2008
Smariek Knits -=<>=- http://smariek.blogspot.com
YARN, NEEDLE & GAUGE:
Online Linie Marly (DK weight yarn), about 500 yards (more if you want a longer scarf)
4.0 mm (US6)
Guage is not critical. Use a needle size appropriate for the yarn you are using. Thicker yarn & larger needles will give you a larger scarf. Thinner yarn & smaller needles will give you a smaller scarf.
NOTES:
K = Knit
K1-B (Knit 1 through back loop) = Insert needle into the back loop of the stitch and knit it.
K2-B (Knit 2 through back loop) = Same as K1-b, except you knit 2 stitches through the back loop (one stitch after the other, not K2Tog through back loop).
K2Tog = Knit 2 Together
M1 (Make One) = Insert needle from behind under running thread between the stitch just worked and the next stitch, and PURL this thread.
M5 (Make Five, a 5 stitch increase) = (K1, YO, K1, YO, K1) into the next stitch.
P = Purl
P2Tog = Purl 2 stitches together
P3Tog = Purl 3 stitches together
SK2P (Slip 1, Knit 2 Together, Pass over) is done as follows:
1. Slip 1 stitch.
2. Knit 2 stitches together.
3. Pass the slipped stitch over.
SSK = Slip, Slip, Knit
PATTERN INSTRUCTIONS:
Cast on 41 stitches (or 59 stitches if you want a wider scarf).
Row 1: K2, P1, * M1, K2-B, P2Tog, P1, (K1-B, P2) twice, K1-B, P1, P2Tog, K2-B, M1, P1 *, end K2
Row 2: K4, * P2, (K2, P1) three times, K2, P2, K3 *, end K1
Row 3: K2, P2, * M1, K2-B, P2, SSK, P1, K1-B, P1, K2Tog, P2, K2-B, M1, P3 *, end last repeat P2, K2 instead of P3
Row 4: K5, * P2, K2, (P1, K1) twice, P1, K2, P2, K5 *
Row 5: K2, M5, * P2, M1, K2-B, P2, SSK, K1-B, K2Tog, P2, K2-B, M1, P2, M5 *, end K2
Row 6: K2, P5, * K3, P2, K2, P3, K2, P2, K3, P5 *, end K2
Row 7: K7, * P3, M1, K2-B, P2, SK2P, P2, K2-B, M1, P3, K5 *, end K2
Row 8: K2, P5, * K4, P2, K2, P1, K2, P2, K4, P5 *, end K2
Row 9: K2, SSK, K1, K2Tog, * P2, M5, P1, M1, K2-B, P2Tog, K1-B, P2Tog, K2-B, M1, P1, M5, P2, SSK, K1, K2Tog *, end K2
Row 10: K2, P3Tog, * K2, P5, K2, P2, K1, P1, K1, P2, K2, P5, K2, P3Tog *, end K2
Row 11: K2, K1-B, * P2, K5, P2, M1, K2-B, P3Tog, K2-B, M1, P2, K5, P2, K1-B *, end K2
Row 12: K2, P1, * K2, P5, K3, P2, K1, P2, K3, P5, K2, P1 *, end K2
Row 13: K2, K1-B, * P2, SSK, K1, K2Tog, P3, K2-B, P1, K2-B, P3, SSK, K1, K2Tog, P2, K1-B *, end K2
Row 14: K2, P1, * K2, P3Tog, K3, P2, K1, P2, K3, P3Tog, K2, P1 *, end K2
Row 15: K2, K1-B, * P2, K1-B, P1, P2Tog, K2-B, M1, P1, M1, K2-B, P2Tog, P1, K1-B, P2, K1-B *, end K2
Row 16: K2, P1, * K2, P1, K2, P2, K3, P2, (K2, P1) twice *, end K2
Row 17: K2, K1-B, * P1, K2Tog, P2, K2-B, M1, P3, M1, K2-B, P2, SSK, P1, K1-B * , end K2
Row 18: K2, P1, * K1, P1, K2, P2, K5, P2, K2, P1, K1, P1 *, end K2
Row 19: K2, K1-B, * K2Tog, P2, K2-B, M1, P2, M5, P2, M1, K2-B, P2, SSK, K1-B *, end K2
Row 20: K2, P2, * K2, P2, K3, P5, K3, P2, K2, P3 *, end P2, K2 instead of P3
Row 21: K2, K2Tog, * P2, K2-B, M1, P3, K5, P3, M1, K2-B, P2, SK2P *, end last repeat SSK, K2 instead of SK2P
Row 22: K2, P1, * K2, P2, K4, P5, K4, P2, K2, P1 *, end K2
Row 23: K2, K1-B, * P2Tog, K2-B, M1, P1, M5, P2, SSK, K1, K2Tog, P2, M5, P1, M1, K2-B, P2Tog, K1-B *, end K2
Row 24: K2, P1, * K1, P2, K2, P5, K2, P3Tog, K2, P5, K2, P2, K1, P1 *, end K2
Row 25: K2, P2Tog, * K2-B, M1, P2, K5, P2, K1-B, P2, K5, P2, M1, K2-B, P3Tog *, end last repeat P2Tog, K2 instead of P3Tog
Row 26: K3, * P2, K3, P5, K2, P1, K2, P5, K3, P2, K1 *, end K2
Row 27: K2, P1, * K2-B, P3, SSK, K1, K2Tog, P2, K1-B, P2, SSK, K1, K2Tog, P3, K2-B, P1 *, end K2
Row 28: K3, * P2, K3, P3Tog, K2, P1, K2, P3Tog, K3, P2, K1 *, end K2
Repeat rows 1 to 28 for pattern, knit until scarf is half of desired length.
Do not bind off. Place stitches on stitch holder, spare knitting needle, or whatever works for you.
Knit another half, then graft both halves at the center using the Kitchener Stitch.
Weave in ends. Block scarf to make pattern "bloom". You can choose to block the edges straight/flat, or make them scalloped.

It can be challenging to take photos of my knitting. Miss M always wants to "help" by patting, pulling, or flipping over the knitting. She paws at the knitting, or she's leaning on me while I'm taking the photo. I tend to get lots of unfocused/blurry photos when she does the latter. The photo above is one of the better ones even though she was reaching for the scarf.
And here are a couple more photos of the scarf...


.
Stitches used in this scarf include:
Medallion with Cherries, BW2 pg 141
.
Серия сообщений "CACHECOL":
Часть 1 - CACHECOL CROCHE GRAMPO-Шарф, связанный на вилке
Часть 2 - CACHECOL NATAL-шарфик
...
Часть 12 - CACHECOL GATINHO-Котошарф
Часть 13 - CACHECOL-Шарф "Красные небеса ночью"!
Часть 14 - CACHECOL TRICO
Часть 15 - CACHECOL-Шарф "Домино"
Часть 16 - CACHECOL-Вязаный шарф
...
Часть 48 - Боснийское вязание крючком
Часть 49 - Шапки вязаные спицами женские и шарф хомут спицами схема вязания
Часть 50 - ШАРФЫ, ШАПКИ и т.д. в технике Энтрелак!
|
|
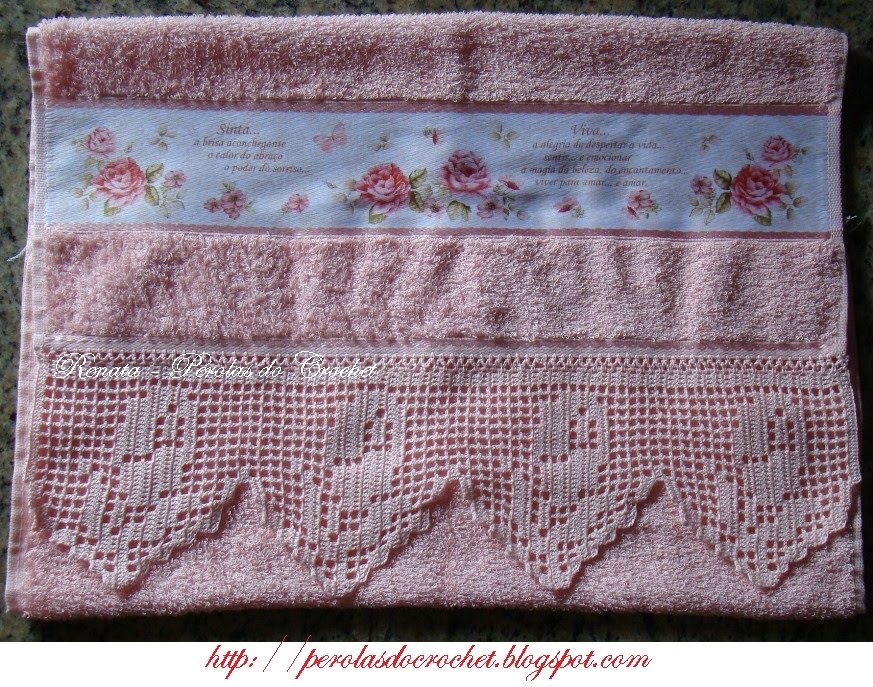
Free Lace Hand Towel Knitting Pattern |

Delicate hand-knit hand towels look much more complicated than they are.
Add simple knitted lace edging to everyday hand towels, and smile as guests admire your handiwork. These edgings are worked sideways after casting on a few stitches. Work the lace in any length, and apply to pillowcases, afghans, scarves, and more.
Binding off -- BO
Casting on - CO
Knit in front and back of same stitch - k1f&b
Knit 2 together -- k2tog
Purl 2 together -- p2tog
Slip slip knit decrease -- ssk
Yarn over -- yo
Natural edging on sage towel: 24 stitches/36 rows=4" (10cm) in pattern
Natural edging on natural towel: 24 stitches/38 rows=4" (10cm) in pattern
Sage edging on natural towel: 24 stitches/32 rows=4" (10cm) in pattern
What You'll Need
Yarn: 50 yards (46m) sport weight 100% cotton (natural edging on sage towel); 70 yards (63.7m) sport weight 100% cotton (natural edging on natural towel); 70 yards (63.7m) sport weight 100% cotton (sage edging on natural towel)
We used: Needful Yarns Lana Gatto Skipper (100% cotton): #124 natural, 1 ball each for natural edging on natural towel and natural edging on sage towel; #123 sage, 1 ball
Needles: US size 2 (2.75mm)
Notions: Tapestry needle; long pins with large heads; sewing needle and thread to match
Miscellaneous: 16x24 inches (40.5X61cm) hand towel, or desired size
Cast on 8 stitches.
Row 1: Knit 3, yarn over, knit 2 together, yarn over, knit 3. (9 stitches)
Rows 2, 4, 6, 8, and 10: Knit.
Row 3: Knit 3, yarn over, knit 2 together, yarn over, knit 4. (10 stitches)
Row 5: Knit 3, yarn over, knit 2 together, yarn over, knit 5. (11 stitches)
Row 7: Knit 3, yarn over, knit 2 together, yarn over, knit 6. (12 stitches)
Row 9: Knit 3, yarn over, knit 2 together, yarn over, knit 7. (13 stitches)
Row 11: Knit 3, yarn over, knit 2 together, yarn over, knit 8. (14 stitches)
Row 12: Bind off 6 stitches, knit to the end of the row. (8 stitches)
Repeat rows 1-12 for pattern. Continue in pattern until the edging, when slightly stretched, fits across bottom edge of towel. Complete edging, binding off all stitches at row 12.
Cast on 12 stitches.
Row 1: Knit 4, yarn over, knit 2 together, knit 2, yarn over, knit 2 together, yarn over, knit 2. (13 stitches)
Row 2: Yarn over, knit 2 together, knit 11.
Row 3: Knit 3, [yarn over, knit 2 together] 2 times, knit 2, yarn over, knit 2 together, yarn over, knit 2. (14 stitches)
Row 4: Yarn over, knit 2 together, knit 12.
Row 5: Knit 4, [yarn over, knit 2 together] 2 times, knit 2, yarn over, knit 2 together, yarn over, knit 2. (15 stitches)
Row 6: Yarn over, knit 2 together, knit 13.
Row 7: Knit 3, [yarn over, knit 2 together] 3 times, knit 2, yarn over, knit 2 together, yarn over, knit 2. (16 stitches)
Row 8: Yarn over, knit 2 together, knit 14.
Row 9: Knit 3, [knit 2 together, yarn over] 2 times, knit 2, knit 2 together, [yarn over, knit 2 together] 2 times, knit 1. (15 stitches)
Row 10: Yarn over, knit 2 together, knit 13.
Row 11: Knit 2, [knit 2 together, yarn over] 2 times, knit 2, knit 2 together, [yarn over, knit 2 together] 2 times, knit 1. (14 stitches)
Row 12: Yarn over, knit 2 together, knit 12.
Row 13: Knit 3, knit 2 together, yarn over, knit 2, knit 2 together, [yarn over, knit 2 together] 2 times, knit 1. (13 stitches)
Row 14: Yarn over, knit 2 together, knit 11.
Row 15: Knit 2, knit 2 together, yarn over, knit 2, knit 2 together, [yarn over, knit 2 together] 2 times, knit 1. (12 stitches)
Row 16: Yarn over, knit 2 together, knit 10.
Repeat rows 1-16 for pattern. Continue in pattern until the piece, when slightly stretched, fits across bottom edge of towel.
Complete edging, working row 16 of pattern repeat as follows: Yarn over, knit 2 together, bind off 1 stitch (this will be the yarn over the stitch remaining from the decrease), *knit 1, bind off 1 stitch**. Repeat from * to ** to end of row. See Finishing, below.
Cast on 8 stitches.
Row 1: Knit 5, yarn over, knit 1, yarn over, knit 2. (10 stitches)
Row 2: Purl 6, increase in next stitch by knitting into front and back loops, knit 3. (11 stitches)
Row 3: Knit 4, purl 1, knit 2, yarn over, knit 1, yarn over, knit 3. (13 stitches)
Row 4: Purl 8, knit 1 front and back, knit 4. (14 stitches)
Row 5: Knit 4, purl 2, knit 3, yarn over, knit 1, yarn over, knit 4. (16 stitches)
Row 6: Purl 10, knit 1 front and back, knit 5. (17 stitches)
Row 7: Knit 4, purl 3, knit 4, yarn over, knit 1, yarn over, knit 5. (19 stitches)
Row 8: Purl 12, knit 1 front and back, knit 6. (20 stitches)
Row 9: Knit 4, purl 4, slip slip knit, knit 7, knit 2 together, knit 1. (18 stitches)
Row 10: Purl 10, knit 1 front and back, knit 7. (19 stitches)
Row 11: Knit 4, purl 5, slip slip knit, knit 5, knit 2 together, knit 1. (17 stitches)
Row 12: Purl 8, knit 1 front and back, knit 2, purl 1, knit 5. (18 stitches)
Row 13: Knit 4, purl 1, knit 1, purl 4, slip slip knit, knit 3, knit 2 together, knit 1. (16 stitches)
Row 14: Purl 6, knit 1 front and back, knit 3, purl 1, knit 5. (17 stitches)
Row 15: Knit 4, purl 1, knit 1, purl 5, slip slip knit, knit 1, knit 2 together, knit 1. (15 stitches)
Row 16: Purl 4, knit 1 front and back, knit 4, purl 1, knit 5. (16 stitches)
Row 17: Knit 4, purl 1, knit 1, purl 6, slip 1 knitwise, knit 2 together, pass slipped stitch over, knit 1. (14 stitches)
Row 18: Purl 2 together, bind off 5 stitches, purl 3, knit 4. (8 stitches)
Repeat row 1-18 for pattern. Work in pattern until the piece, when slightly stretched, fits across bottom edge of towel. Complete edging, binding off all stitches in pattern at row 18. See Finishing, below.
Weave in all yarn tails to wrong side of work. Block. Pin edging to 1 end of towel; thread sewing needle with matching thread, and attach edging to towel with overcast stitch. Remove all pins.
Go to the next page for another style of towels that you can easily learn to knit: Designer dishtowels.
|
BUNNIES |

I am obsessed with trying to find ways to use up scraps of yarn and leftover partial skeins. If you don’t believe me or haven’t been following long enough you can check these out: Pencil Sleeves, Curvy Pouch, Picture Frames, Pencil Toppers andCoasters.
I have been wanting to make bunnies for a long time and yesterday the idea just popped in my head and I made a bunny.
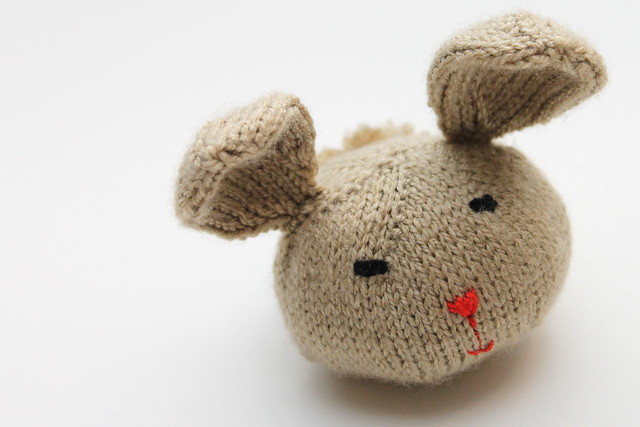
And because bunnies need friends, I made another one.
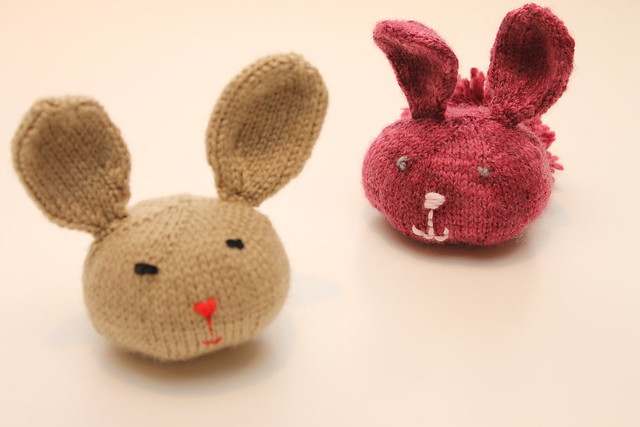
I even caught them telling each other secrets.
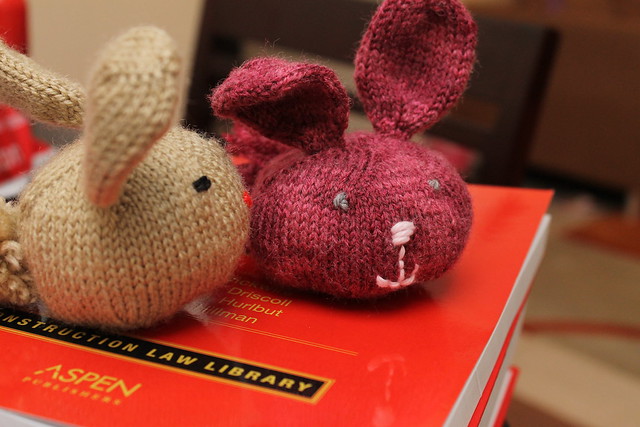
So do you want to make a bunny
DK weight yarn (You can use any weight of yarn, just use needles two sizes smaller than the ball band suggests, so the stuffing doesn’t show)
Size US 2 DPNS
Tapestry needle
Microfilling (or anything you would like to use for stuffing)
Scrap embroidery floss or yarn for embroidering the eyes and nose.
Kfb Knit front and back in the same stitch
K2tog Knit two stitches together.
* … * repeat stitches between the asterisks
Cast on 6 stitches, arrange on 3 needles, join in the round and mark the first stitch.
Round 1: Kfb all stitches (12 stitches)
Round 2: *Kfb, K1* (18 stitches)
Round 3: *Kfb, K2* (24 stitches)
Round 4: *Kfb, K3* (30 stitches)
Round 5: *Kfb, K4* (36 stitches)
Round 6: *Kfb, K5* (42 stitches)
Round 7: *Kfb, K6* (48 stitches)
Round 8: *Kfb, K7* (54 stitches)
Round 9: *Kfb, K8* (60 stitches)
Round 10: *Kfb, K9* (66 stitches)
Round 11 – 21 : Knit all stitches around. (66 stitches)
Round 22:*K2tog, K 9* (60 stitches)
Round 23:*K2tog, K 8* (54 stitches)
Round 24:*K2tog, K 7* (48 stitches)
Round 25:*K2tog, K 6* (42 stitches)
Now would be a good time to embroider the face and stuff the bunny half full.
Round 26:*K2tog, K 5* (36 stitches)
Round 27:*K2tog, K 4* (30 stitches)
Add some more stuffing
Round 28:*K2tog, K 3* (24 stitches)
Round 29:*K2tog, K 2* (18 stitches)
Add some more stuffing
Round 30:*K2tog, K 1* (12 stitches)
Round 31:*K2tog* ( 6stitches)
Add more stuffing if you can.
Cut off a long tail and using a tapestry needle thread through the remaining stitches, pull tight and weave in ends.
Cast on 6 stitches, arrange on 3 needles, join in the round and mark the first stitch.
Round 1: Kfb all stitches (12 stitches)
Round 2: *Kfb, K3* (15 stitches)
Round 3: *Kfb, K4* (18 stitches)
Round 4: *Kfb, K5* (21 stitches)
Round 5: *Kfb, K6* (24 stitches)
Round 6 – 16 : Knit all stitches around
Round 17: *K2tog, k6* (21 stitches )
Round 18: *K2tog, k5* (18 stitches )
Round 19: *K2tog, k4* (15 stitches )
Round 20: *K2tog, k3* (12 stitches )
Round 21: *K2tog, k2* (9 stitches )
Bind off, leaving a long tail.
Sew the ears on the bunny and weave in any remaining ends.
Make a pompom and sew it on as a tail.
|
BLUE BIRD-AMIGURI |
http://www.berroco.com/exclusives/bluebird/bluebird.html
|
|
|
![]()
(If you can’t open this PDF file you need Adobe Acrobat Reader. Get it here.)
SIZE
Approximately 3” across x 3” high
1 Ball BERROCO COMFORT (100 grs), #9735 Delft Blue, and a small amount each #9743 Goldenrod (gold) and #9734 Liquorice (black)
1 Set (4) double pointed knitting needles (dpn), size 7 (4.50 mm) OR SIZE TO OBTAIN GAUGE
Tapestry needle
Polyester stuffing
1 St marker
22 sts = 4”; 29 rows = 4” in St st
TO SAVE TIME, TAKE TIME TO CHECK GAUGE
BIRD
With dpn’s, using blue, cast on 9 sts. Divide sts evenly onto 3 needles (3 sts per needle). Join, being careful not to twists sts. Mark for beg of rnd and carry marker up.
Rnds 1, 3, 5, 7, 9, 11 and 13: Knit.
Rnd 2: * K1, M1k, k2, rep from * twice more – 12 sts.
Rnd 4: * K1, M1k, k3, rep from * twice more – 15 sts.
Rnd 6: * K1, M1k, k4, rep from * twice more – 18 sts. Continue to inc 3 sts in this manner every other rnd, having 1 more st between incs each time until there are 30 sts on needles (10 sts per needle). Work even in St st (k EVERY rnd) for 6 rnds.
Dec Rnd 1: * SSK, k1, k2 tog, k5, rep from * twice more – 24 sts. Knit 2 rnds.
Dec Rnd 2: * SSK, k1, k2 tog, k3, rep from * twice more – 18 sts. Knit 2 rnds.
Dec Rnd 3: * SSK, k1, k2 tog, k1, rep from * twice more – 12 sts. Knit 2 rnds.
Dec Rnd 4: * SSK, k2 tog, rep from * twice more – 6 sts. Break off yarn leaving a long tail. Thread tail into tapestry needle and draw through all sts on needles. Stuff bird firmly. Pull up sts and secure. Thread cast-on tail into tapestry needle and thread through cast-on sts. Pull in tightly and secure.
WINGS AND TAIL (Make 3)
Note: Sl the first st of every row purlwise.
With 2 dpn’s, using blue, cast on 8 sts.
Rows 1 and 2: Knit.
Row 3: K to last 3 sts, k2 tog, k1 – 7 sts. Rep Row 3 four times more – 3 sts. Break off yarn leaving a long tail. Thread tail into tapestry needle and draw through all sts on needle. Pull up tightly and secure.
Note: Sl the first st of every row knitwise on knit side and purlwise on purl side.
With 2 dpn’s, using gold, cast on 8 sts.
Row 1: Purl.
Row 2: K to last 3 sts, k2 tog, k1 – 7 sts.
Row 3: P to last 3 sts, p2 tog, p1 – 6 sts. Rep Rows 2 and 3 once more – 4 sts. Break off yarn leaving a long end. Thread end into tapestry needle and draw through all sts on needle. Pull up tightly and secure.
With tapestry needle, using blue, weave yarn in and out of bird 1/3 down from top. Pull in tightly and secure forming neck. Sew wings to each side along this line. Sew tail to back. With gold, sew beak to face. With tapestry needle and black, embroider eyes as in photo.
|
KNITTING POUCH |

I hate those half skein leftovers. They take up valuable space that could house full skeins. Yes I have lots of those half skeins or less. So, last night I decided to find a use for them and since my husband was out for the evening I made 2 in a couple of hours. They take around 50 m /60 yards of yarn and are seamless, knit from the top down.
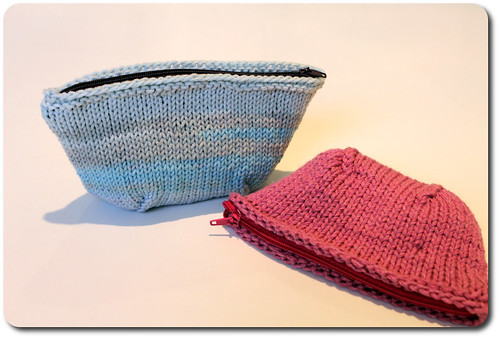
They would make great gifts or stocking stuffers. I made mine on the smallish side (6.5 inches across and 4 inches high) but the pattern includes information on how to make the size you want.
I am using it to carry my knitting notions.
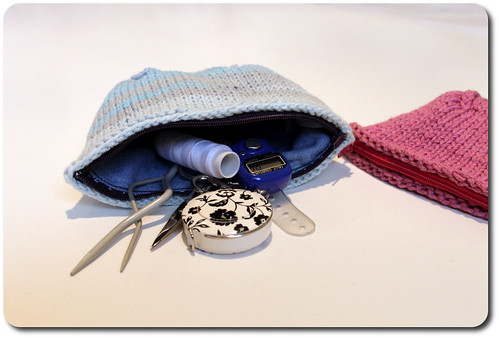
And yes those are cable needles, I got them a couple of weeks ago because I have been eyeing those pretty cables for a while now and I think I am ready to learn cabling.
If you want to make one, just click on the image below to get the pattern.
**Edited to add: the pattern is in pdf format, you need to click the image below to get it, if you are having difficulty getting it leave a comment or email me [ jessyz [at] chocolatemintsinajar [dot] com] and I’ll send it to you. The reason it is in PDF form is so you can download it and print it easily or store it on your smart phone and use it from there without needing to print it at all **

I also have a tutorial for adding zippered linings to your finished items which you can find by clicking the image below

|
KNITTING NEEDLE ROLL |
by Linda
Basically, it's a knitted rectangle with ties on it. From the wrong side, you push your knitting needles through to the right side, then back to the wrong side (like using a safety pin). You can also store cable needles and circular needles, too. When done, start at one short end and roll it up like a jelly roll. There's an i-cord tie attached to the outside so you can tie it shut. Tada!
![[Knitting Needle Roll Closed - Click for Larger Image]](http://www.planetshoup.com/easy/images/rollndlc_02.jpg)
Gosh, after that description, you won't need to read the pattern. :)
![[Knitting Needle Roll Open - Click for Larger Image]](http://www.planetshoup.com/easy/images/rollndlo_01.jpg)
|
TUTORIAL CIRCULAR NEEDLES |
|
MEET POSEY |
Our family had to take a long drive the other day down to New Jersey and I kept happily busy with this lil' pattern. Easy to design and easy to knit. It was finished in a few hours.

Pattern: Posey
Needles: US Size #6, 4.0mm double pointed needles
Yarn: I used Lily's Sugar'n Cream
but any worsted weight yarn will work.
Materials: Fiber fill or scrap yarn for stuffing,
Tapestry Needle
Stitch marker
Extra yarn for sewing.
Button
Scissor
Finished Measurements : Approx. 3"width 3½" height
Pattern:
Bottom Flower
CO 6sts arranging 2 on each needle. Join for knitting in the round and place stitch marker being careful not to twist sts.
K 1 rnd
Round 1: kfb all sts (12)
Round 2: k all sts
Round 3: kfb all sts (24)
Round 4: k all sts
Round 5: k1, kfb for entire round (36)
Round 6: k all sts
Round 7: k3, kfb for entire round (45)
Rounds 8 - 18: k all sts
Round 19: k3, k2tog for entire round (36)
Round 20: k all sts
Round 21: k1, k2tog for entire round (24)
Round 22: k all sts
Round 23: k2tog for entire round (12)
Round 24: k all sts
Round 25: k2tog for entire round (6)
Round 26: k all sts.
Break yarn leaving at least 8" and thread with tapestry needle through all 6 sts. Remove double pointed needles but do not pull closed.
Middle Flower
CO 6sts arranging 2 on each needle. Join for knitting in the round and place stitch marker being careful not to twist sts.
K 1 rnd
Round 1: kfb all sts (12)
Round 2: k all sts
Round 3: kfb all sts (24)
Round 4: k all sts
Round 5: k1, kfb for entire round (36)
Round 6- 14: k all sts
Round 15: k1, k2tog for entire round (24)
Round 16: k all sts
Round 17: k2tog for entire round (12)
Round 18: k all sts
Round 19: k2tog for entire round (6)
Round 20: k all sts.
Break yarn leaving at least 8" and thread with tapestry needle through all 6 sts. Remove double pointed needles but do not pull closed.
Top Flower
CO 6sts arranging 2 on each needle. Join for knitting in the round and place stitch marker being careful not to twist sts.
K 1 rnd
Round 1: kfb all sts (12)
Round 2: k all sts
Round 3: kfb all sts (24)
Round 4- 12: k all sts
Round 13: k2tog for entire round (12)
Round 14: k all sts
Round 15: k2tog for entire round (6)
Round 16: k all sts.
Break yarn leaving at least 8" and thread with tapestry needle through all 6 sts. Remove double pointed needles but do not pull closed.

Finishing
Repeat for all three sizes:
Stuff each layer with scrap yarn or fiberfill and shape into a flattened ball pulling thread so that the top is closed.
Measure out two 12" strands of yarn in a contrasting color.
Thread the tapestry needle with the yarn down the middle of the ball and back up around the side.
Continue going down through the middle and around the side to the top a total of six times pulling tightly to create the flower shape.
Tie a knot around a strand at the top to secure.
Stitch layers to each other and secure yarn. Add a button with some yarn for detail and your done!
If you have any questions about this design or need help you can leave a comment or an email at kris@krisknits.com or on Ravelry via KristenKnits. I will try and help as best I can.
Hope everyone is having a great summer!
|
Spring Explosion Tea Cozy! |
Helloooooo!!!!!
Welcome to our spot today! It’s a grey and rainy day in Wellington today, quite horrible in fact, so today is the perfect day for me to post my latest FO, as well as do a nice, long and involved tutorial for it in case you want to make one too, and get myself immersed in colourful woolly goodness!
Raymond is sleeping his unhappiness off right now, wrapped in his blanket… he was out last night, doing “fur patrol” around the neighbourhood, but during the night it started to rain, very hard, and he came in this morning wet and angry…. KB is having a nap too actually, on the day bed, surrounded by beautiful crochet cushions which she is not allowed to put her head on because she’ll wear them out, (oh God, I’m a tyrant!) so right now, I’m the only one in the family being productive!
OK, enough babbling from me….. shall I show you the “Spring Explosion” tea cozy? (Named by KB who LOVES it…. *joy* because she doesn’t like woolly flowers and right now cannot understand why our tea pot needs more than one cozy…. it’s ART darling!)
Ta Daaaaaaaaaaaaaaaaaaaaaaaaaaaaaaaaaaaaaaaaa!!!!!

This is what gardens all over the place look like right now… beautiful colourful goodness! I’ve been seeing pictures on Northern Hemisphere blogs lately and wow, it’s foggy and dark and frosty and also quite cozy! I’ve said it before, I love seeing what the other side of the world looks like right now, my first change of season as a blogger! I hope you’re all having fun wearing all of your knitted and crocheted happiness and keeping cozy under your blankets, next to the fire!

While the idea for this cozy is hardly original…. flowers on top and all that, I’m quite in love with it, as I am with most of my creations! I’ve been so deeply inspired by tea cozies around the place (Oh Penelope, I would just die to have one of your little birds adorning mine, but they are just beyond me!!!) and have in fact, posted one I made a loooooooong time ago, my first real knitting creation in fact, which was covered in knitted roses. I’ve been wanting to make a better one now that I’ve got the crochet flowers happening, and here it is! It took about three days to make and by last night, I had had enough! I had decided I just didn’t like it, and it wasn’t as nice as I wanted it to be, and it didn’t match the vision in my head, but when I got up this morning and found it sitting next to my chair, I decided that it was in fact, perfect and I loved it deeply.
So as I made it, I wrote out a pattern. I had fun with it, and deem it a perfect project for a beginner knitter like myself, as it is knitted on two needles, not in the round, it is just plain old stocking stitch, no fancy business, and it means you get to have fun putting stitches on stitch holders and then back on the needles. It’s a very satisfying project and I promise those of you who are beginner knitters, if I can do it, so can you!!! (Don’t be fooled by the Harvey Kimono, remember I had Mum help me with the hardest bits!)
The only problem is…. I’m POSITIVE that the pattern works for righty’s as well as lefty’s like myself, but I wonder if there is a righty knitter out there who can knit this up quick smart, just to make sure that it makes sense for the majority of the population! I’ve sat there, trying to imagine it being knitted the opposite way, but here is what happens to my brain when I try doing that……
Серия сообщений "DECORAR A CASA":
Часть 1 - PORTA-AGULHAS CROCHE
Часть 2 - Объемные цветы крючком. Мастер-класс
Часть 3 - CORTINA CROCHE-Uzuolaida. Juoda- balta
Часть 4 - аквариум из бисера
Часть 5 - Spring Explosion Tea Cozy!
Часть 6 - GELADEIRA-Как необычно украсить холодильник?
Часть 7 - caixa croche-шкатулка
...
Часть 21 - decoração
Часть 22 - felted roses tutorial
Часть 23 - Интерьеры спален
|
|
BARRADO CROCHE |
|
BARRADO CROCHE |

|
TAPETES COM FLORES CROCHE |

Серия сообщений "TAPETES":
Часть 1 - TAPETES-Вязаные коврики.Красота!!!
Часть 2 - TAPETES CROCHE
...
Часть 30 - TAPETE COM FLOR
Часть 31 - TAPETE INFANTIL
Часть 32 - TAPETES COM FLORES CROCHE
Часть 33 - Королевская бабочка вязаная крючком видео-урок
Часть 34 - tapete coruja-КОВРИК - СОВА
...
Часть 41 - Без заголовка
Часть 42 - TAPETE-Коврик для ванной, сделанный из камешков своими руками.
Часть 43 - Коврик - Стиль бабушки. Мастер класс.
|
|
CARDIGAN |
|
|
LOVELY TREASURES |
|
PASHMINA |
|
BEBES- |
|
PONCHO CROCHE |
|
PONCHO LINHA SEDA |
 [
[
more=>>>>>>>>>>>>>>>>]

|
PONCHO- |
|
CUFFIA A RIGHE FACILISSIMA |
http://www.ravelry.com/ Avanzi di lana verde e fuxia ferri3,5 e 3 misura 1/2 anni La cuffia parte dal davanti, quindi se la volete più o meno grande basterà montare più o meno maglie e lavorare più o meno ferri. TECNICHE M LEGACCIO-tutti i ferri al diritto I-CORD: montare 3m su un ferro a doppie punte, lavorarle al diritto, portare il ferro con le 3m a sinistraSENZA GIRARLO, ricominciare a lavorare a diritto DALLA PRIMA M LAVORATA portando il filoDIETRO LE MAGLIE da sinistra a destra e tirando ,riiniziare a lavorare le 3m con quel filo, si continua così fino ad arrivare alla lunghezza desiderata, poi chiudere le m. Si possono anche riprendere 3m direttamente agli angoli della cuffia. Montare 80m con i ferri 3,5 e il col verde. Lavorare 10 ferri a legaccio e poi alternare 2 ferri fuxia e 2 ferri verde, sempre continuando a lavorare a legaccio. Ripetere per 9 volte Chiudere ,piegare il lavoro in due e cucire tra loro le 2 parti del ferro di montaggio. LACCETTI Con due ferri a doppie punte, montare 3m e lavorare un i-cord per 25cm. farne un altro e attaccarli alle punte della cuffia. NASTRINO Montare 15m con i ferri 3,lavorare 15 feri a legacciopoi chiudere. Cucirlo al berretto. |
|
PONCHO-Пончо |
|
PONCHO-Пончо |
|
PONCHO-Пончо |
|
PONCHO |
|
BOLSA |

Серия сообщений "BOLSAS":
Часть 1 - BOLSA INFANTIL-ABACAXI
Часть 2 - BOLSA CROCHE
...
Часть 12 - BOLSA SQUARES-Красивая вязаная сумка крючком. Мастер класс и схема.
Часть 13 - BOLSA CROCHE-Сумка к лету
Часть 14 - BOLSA
Часть 15 - BOLSA CROCHE-Сумочка
Часть 16 - BOLSAS-Очаровательная сумочка-мешочек
...
Часть 32 - bosas-Сумки крючком
Часть 33 - bolsas-Вязание крючком. Сумка.
Часть 34 - Красивая сумочка из мотивов крючком
|
|
TAPETE INFANTIL |

Серия сообщений "TAPETES":
Часть 1 - TAPETES-Вязаные коврики.Красота!!!
Часть 2 - TAPETES CROCHE
...
Часть 29 - TAPETE CISNE
Часть 30 - TAPETE COM FLOR
Часть 31 - TAPETE INFANTIL
Часть 32 - TAPETES COM FLORES CROCHE
Часть 33 - Королевская бабочка вязаная крючком видео-урок
...
Часть 41 - Без заголовка
Часть 42 - TAPETE-Коврик для ванной, сделанный из камешков своими руками.
Часть 43 - Коврик - Стиль бабушки. Мастер класс.
|
|
TAPETE COM FLOR |

Серия сообщений "TAPETES":
Часть 1 - TAPETES-Вязаные коврики.Красота!!!
Часть 2 - TAPETES CROCHE
...
Часть 28 - COZINHA CROCHE
Часть 29 - TAPETE CISNE
Часть 30 - TAPETE COM FLOR
Часть 31 - TAPETE INFANTIL
Часть 32 - TAPETES COM FLORES CROCHE
...
Часть 41 - Без заголовка
Часть 42 - TAPETE-Коврик для ванной, сделанный из камешков своими руками.
Часть 43 - Коврик - Стиль бабушки. Мастер класс.
|
|
TAPETE CISNE |

Серия сообщений "TAPETES":
Часть 1 - TAPETES-Вязаные коврики.Красота!!!
Часть 2 - TAPETES CROCHE
...
Часть 27 - JOGO BANHEIRO CROCHE
Часть 28 - COZINHA CROCHE
Часть 29 - TAPETE CISNE
Часть 30 - TAPETE COM FLOR
Часть 31 - TAPETE INFANTIL
...
Часть 41 - Без заголовка
Часть 42 - TAPETE-Коврик для ванной, сделанный из камешков своими руками.
Часть 43 - Коврик - Стиль бабушки. Мастер класс.
|
|
GUARDANAPO |
|
COZINHA CROCHE |


Серия сообщений "TAPETES":
Часть 1 - TAPETES-Вязаные коврики.Красота!!!
Часть 2 - TAPETES CROCHE
...
Часть 26 - TAPETE REDONDO
Часть 27 - JOGO BANHEIRO CROCHE
Часть 28 - COZINHA CROCHE
Часть 29 - TAPETE CISNE
Часть 30 - TAPETE COM FLOR
...
Часть 41 - Без заголовка
Часть 42 - TAPETE-Коврик для ванной, сделанный из камешков своими руками.
Часть 43 - Коврик - Стиль бабушки. Мастер класс.
|
|
JOGO BANHEIRO CROCHE |

Серия сообщений "TAPETES":
Часть 1 - TAPETES-Вязаные коврики.Красота!!!
Часть 2 - TAPETES CROCHE
...
Часть 25 - TAPETE SANTA
Часть 26 - TAPETE REDONDO
Часть 27 - JOGO BANHEIRO CROCHE
Часть 28 - COZINHA CROCHE
Часть 29 - TAPETE CISNE
...
Часть 41 - Без заголовка
Часть 42 - TAPETE-Коврик для ванной, сделанный из камешков своими руками.
Часть 43 - Коврик - Стиль бабушки. Мастер класс.
|
|
BLUSA CIRCULO |
|
DINO-SWEATER |
|
CORTINA CROCHE |
|
TAPETE REDONDO |

http://www.programaartebrasil.com.br/passo/passo_resultado.asp?id_evento=987
Серия сообщений "TAPETES":
Часть 1 - TAPETES-Вязаные коврики.Красота!!!
Часть 2 - TAPETES CROCHE
...
Часть 24 - TAPETES EM CROCHE-VIDEO
Часть 25 - TAPETE SANTA
Часть 26 - TAPETE REDONDO
Часть 27 - JOGO BANHEIRO CROCHE
Часть 28 - COZINHA CROCHE
...
Часть 41 - Без заголовка
Часть 42 - TAPETE-Коврик для ванной, сделанный из камешков своими руками.
Часть 43 - Коврик - Стиль бабушки. Мастер класс.
|
TAPETE SANTA |

Серия сообщений "TAPETES":
Часть 1 - TAPETES-Вязаные коврики.Красота!!!
Часть 2 - TAPETES CROCHE
...
Часть 23 - TAPETE BARBANTE
Часть 24 - TAPETES EM CROCHE-VIDEO
Часть 25 - TAPETE SANTA
Часть 26 - TAPETE REDONDO
Часть 27 - JOGO BANHEIRO CROCHE
...
Часть 41 - Без заголовка
Часть 42 - TAPETE-Коврик для ванной, сделанный из камешков своими руками.
Часть 43 - Коврик - Стиль бабушки. Мастер класс.
|
|
TOALHA |
MAIS>>>>>>>>>>>>
|
TAPETE CROCHE |
|
|
TAPETES EM CROCHE-VIDEO |
Серия сообщений "TAPETES":
Часть 1 - TAPETES-Вязаные коврики.Красота!!!
Часть 2 - TAPETES CROCHE
...
Часть 22 - TAPETE MOTIVOS
Часть 23 - TAPETE BARBANTE
Часть 24 - TAPETES EM CROCHE-VIDEO
Часть 25 - TAPETE SANTA
Часть 26 - TAPETE REDONDO
...
Часть 41 - Без заголовка
Часть 42 - TAPETE-Коврик для ванной, сделанный из камешков своими руками.
Часть 43 - Коврик - Стиль бабушки. Мастер класс.
|
MANTA EM CROCHE-VIDEO |
|
CASAQUINHO INFANTIL- |
|
TRICO NA PASSARELA |


|