Без заголовка |
|
Без заголовка |

Ингредиенты:
Сок свеклы – 1-2 столовых ложки
Сок морковки – 1 столовая ложка
Желток – 1 шт
Сок шпината – 1 столовая ложка
Сок черники – 1 столовая ложка
Сок ежевики – 1 столовая ложка
|
Без заголовка |
|
Без заголовка |

Условные обозначения
I - лицевая
— - изнаночная
1-3 - конец правой спицы проденьте в промежуток между второй и третьей лицевыми петлями и вытяните на себя обхватывающую петлю. Придерживая эту петлю на спице указательным пальцем, сделайте накид. Затем провяжите оставшиеся в обхвате 3 петли вместе лицевой, подхватывая их за задние стенки.
http://www.knittingpattern.ru/pattern.html?num=33&menu=1
1.

|
Без заголовка |
|
Без заголовка |
Комплект розовый.
Работа автора : Виринея
Огромное спасибо за описание шапочки!!!!


|
Без заголовка |
|
Без заголовка |
 ОЧЕНЬ РАДА, ЧТО МНОГИМ ПОНРАВИЛИСЬ ЭТИ ЛОДОЧКИ, ДА, Я ПРЕТЕНДУЮ НА АВТОРСТВО, Т. К. СЧИТАЮ ИХ СВОИМ ДЕТИЩЕМ... ОПУБЛИКОВАНЫ ОНИ БЫЛИ ТОЛЬКО НА ЭТОМ РЕСУРСЕ!!! ВСЕ ОСТАЛЬНЫЕ УПОМИНАНИЯ ЯВЛЯЮТСЯ ЛИШЬ ПЕРЕПОСТОМ... ПОСВЕЩАЮ ИХ ТЕБЕ. МОЙ ЛЮБИМЫЙ ГРЕБЕННИКОВ А. В.!!!мои вкусные порционные лодочки подойдут и для праздника и для семейного ужина... мой девиз-быстро, просто, вкусно!!!
|
Без заголовка |

|
Без заголовка |
|
Без заголовка |
Источник http://vkusnogotovim.com

Для приготовления теста: ¾ ст. молока, 30 гр. свежих дрожжей (или 1 пакетик сухих), 100 гр. маргарина, 2 ст.л. сахара, 0,5 ч.л. соли, 3 ст. муки. Для приготовления начинки: 300 гр. свежей или мороженой клубники, 0,5 ст. сахара. + 1 яйцо для смазывания, растительное масло для выпечки.

1. Дрожжи растворите в теплом молоке. Добавьте растопленный маргарин, сахар, соль, перемешайте.

2. Затем всыпьте муку и замесите тесто.

3. Разделите тесто на три части.

4. Каждую часть раскатайте в прямоугольник. Посыпьте порезанной на кубики клубникой и посыпьте сахаром. Плотно сверните в рулеты.

5. Выложите рулеты на смазанный маслом противень. С одного края рулеты соедините. Сверху на каждом рулете сделайте продольный разрез.

6. Аккуратно сплетите в косу. Концы защипите, верх смажьте желтком. Выпекайте в предварительно разогретой до 180°С духовке в течение 30 мин.

|
Без заголовка |
|
Без заголовка |
 http://korzinochka.3dn.ru/news/top_s_uzorom_iz_lis...azanija_spicami/2012-03-29-641

|
Без заголовка |
|
|
Без заголовка |
Перевод Svetanik (Осинка)


|
Без заголовка |
Getting Started | Instructions
Asterisks, Parentheses, and Brackets | Knitting Garments
Once you’ve learned the basics of knitting – how to cast on and bind off, how to work the knit stitch and the purl stitch –you’ll be ready to start your first pattern. (If you need help with learning the basics, visit www.LearnToKnit.com.) In the beginning, looking at a knitting pattern can be very confusing — is that a foreign language it is written in?
Well, no, but it is the special language of knitting, which uses many abbreviations and terms, which save space and make patterns easier to read. So the first thing you need to do is become familiar with the knitting abbreviations.
Some of them are easy to understand, like these:
K or k = knit stitch
P or p = purl stitch
A complete list of knitting abbreviations and terms and their meaning can be found at (Полный список сокращений, терминов и их значений по вязанию на спицах Вы можете найти здесь) : www.YarnStandards.com.
|
Terms represent things you are to do, like these: |
|
|---|---|
|
CO = Cast on |
(This is how you begin each knitted piece.)
|
|
BO = Bind off |
(This is how you finish most knitted pieces. Binding off is sometimes
called casting off. They mean the same thing.) |
|
Inc = Increase |
(Add one or more stitches. The most basic increase is to work in the front, and then again in the back, of the same stitch. This can be done in both knit and purl stitches.)
|
|
Dec = decrease |
(Eliminate one or more stitches. The most basic decrease is to work two stitches together as one. This can be done in both knit and purl stitches. Different ways of increasing and decreasing change the way the project will look, and most designers have a specific method in mind. So usually your pattern will tell you how to do this.)
|
|
Rep = repeat |
(Do the same thing again the number of times stated in the pattern.)
|
|
Sl = Slip |
(Slip a stitch or stitches from one needle to the other, without working it.)
|
|
YO = yarn over |
(Take the yarn over the needle.)
|
|
Tog = together |
(Work 2 or more sts together, forming a decrease.)
|
|
Work even |
Continue what you have been doing, without any increases or decreases.
|
|
Maintain pattern as established |
This is usually used when you are working a pattern stitch and are increasing (or decreasing) at the edges. It means that you keep the center part in the pattern as you have already set it up, and will add (or subtract) stitches at each end without disturbing that pattern. When enough new stitches have been added, they should be incorporated into the pattern.
|
|
|
|
With the abbreviations and terms at hand, let’s look at a typical knitting pattern. Knitted items can be worked back and forth in rows to form a flat piece, or in rounds to form a tube with no seams, such as socks or hats. Special needles are used to work in rounds.
Let’s start by working a flat piece.
First the instructions will tell you to cast on a certain number of stitches.
But wait – before you can start casting on, you must place a slip knot on one of the needles.
Patterns never tell you to do this – they just assume you know it. Here’s how you make a slip knot (See Figures 1 & 2).
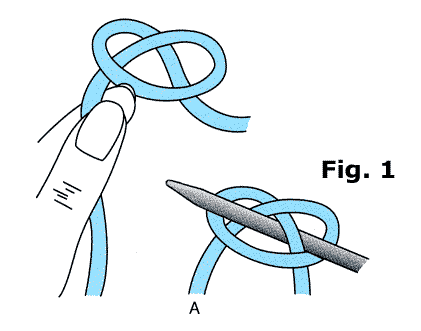
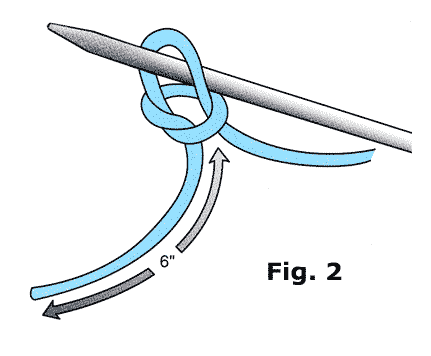
There are many methods of casting on. Some give a nice stretchy edge;
others give a firm base. Unless the pattern tells you differently, use the method you were first taught.
Now let’s look at a typical pattern.
Продолжение здесь: http://www.craftyarncouncil.com/tip_knit.html
Серия сообщений "СЛОВАРИ":
Часть 1 - Перевод вязальных терминов с разных языков
Часть 2 - Англо-русский словарь швейных терминов
Часть 3 - Словари вязальных терминов + размеры одежды
Часть 4 - Как читать английские описания вязания спицами. Термины и сокращения
|
Без заголовка |
|
Без заголовка |

|
Без заголовка |

"Ну наконец!" - подумали многие из вас. "Ну наконец!" - подумала я. Как же долго я готовила вторую часть поста про лепестки и наконец приготовила. За все это время я поняла, что будет еще, как минимум, третья часть!!! Ведь мастерицы канзаши не перестают удивлять новыми выдумками и мастер классами.
|
Без заголовка |
 Огромная благодарность автору: оля-в
|


