-Рубрики

 -Приложения

  • Перейти к приложению Дешевые авиабилеты Дешевые авиабилетыВыгодные цены, удобный поиск, без комиссии, 24 часа. Бронируй сейчас – плати потом!
  • Перейти к приложению Я - фотограф Я - фотографПлагин для публикации фотографий в дневнике пользователя. Минимальные системные требования: Internet Explorer 6, Fire Fox 1.5, Opera 9.5, Safari 3.1.1 со включенным JavaScript. Возможно это будет рабо
  • Перейти к приложению Открытки ОткрыткиПерерожденный каталог открыток на все случаи жизни
  • Настольные игры онлайнМы предлагаем Вам сразиться в любимые настольные игры со своими друзьями, не отходя от компьютера. У нас вы сможете поиграть в дурака, преферанс, тысячу, нарды, шахматы, шашки, крестики-нолики, точки,

 -Поиск по дневнику

Поиск сообщений в M_A_G_D_A

 -Подписка по e-mail


 -Статистика

Статистика LiveInternet.ru: показано количество хитов и посетителей
Создан: 13.01.2010
Записей:
Комментариев:
Написано: 4255

Выбрана рубрика Chandelier.


Соседние рубрики: Lamps(107), Baby Lights(8)

Другие рубрики в этом дневнике: WEDDING(44), VICTORIAN(35), USEFUL (103), RECYCLE(694), PRIVATE(3), LINKS To Crafts(22), LIGHT(148), in minutes(17), health & beauty(67), GARDEN(63), Games(7), Flower Making(115), FASHION(818), DECOR(1018), COOKING(310), Computer & internet(12), Cats(29), Beautiful Places(32), Backgrounds(42), Alphabet(5)

Thread Lamp

Понедельник, 07 Июня 2010 г. 01:49 + в цитатник
Это цитата сообщения Liza_Boguc [Прочитать целиком + В свой цитатник или сообщество!]

АБАЖУР ИЗ НИТОК


ПРОСТО_ВИОЛА

Читать далее...
Рубрики:  LIGHT/Chandelier
RECYCLE/Thread, Rope & Wire
DECOR

Метки:  

plant lamp

Вторник, 08 Июня 2010 г. 19:21 + в цитатник
Это цитата сообщения Бабочччка [Прочитать целиком + В свой цитатник или сообщество!]

ЛАМПА ИЗ КОМНАТНЫХ ЦВЕТОВ.УКРАСИТ ЛЮБОЙ ИНТЕРЬЕР!
 

Декоративные комнатные растения являются прекрасным украшением любого дома или офиса. А такая композиция совмещает в себе достоинства приглушенного освещения и одновременно украшает помещение.


Нам понадобится следующий инструмент:
- канцелярский нож;
- плоскогубцы;
- ножницы;
- дырокол.

Из расходного материала нам потребуется:
- проволока D-3мм.;
- тонкий скотч;
- капроновая нить;
- пластиковая бутылка;
- энергосберегающая лампа 11 Вт.;
- эллектрический патрон;
- пластиковая бутылка.

Читать далее...
Рубрики:  LIGHT/Chandelier

Метки:  

candles out of baby jars

Воскресенье, 04 Июля 2010 г. 00:16 + в цитатник
Это цитата сообщения korowka [Прочитать целиком + В свой цитатник или сообщество!]

уличный светильник


Романтичный уличный светильник


Читать далее...
Рубрики:  LIGHT/Chandelier

Метки:  

Re-style your lamps

Воскресенье, 04 Июля 2010 г. 01:04 + в цитатник
Это цитата сообщения Шрек_Лесной [Прочитать целиком + В свой цитатник или сообщество!]

Шаровидная клумба


 Этапы мастер-класса. Декор светильника.Декоратор Наталья Скобкина

Читать далее...
Рубрики:  LIGHT/Lamps
LIGHT/Chandelier

Метки:  

Lamp out of PVC pipes

Дневник

Воскресенье, 04 Июля 2010 г. 01:11 + в цитатник

Lamp assembled from golden ringlets , has turned out light, airy and glittering , as if built of soap bubbles.


Lamp . Masterclass Master class is Dmitrieva Ekaterina
Materials and tools . Lamp tube. Masterclass

Materials and tools

  • plastic tubes of four different diameters (from 6 m)
  • hacksaw
  • glue
  • gold enamel in the can
  • cartridge
  • electric cord
Lamp tube. Stages of a master- class. Ekaterina Dmitrieva

1 . Plastic tubes be cut with a hacksaw at the ring width of about 1,5 cm

Lamp tube. Stages of a master- class. Ekaterina Dmitrieva Lamp tube. Stages of a master- class. Ekaterina Dmitrieva
Lamp tube. Stages of a master- class. Ekaterina Dmitrieva

2. Of the five rings of glue the pieces : three rectangles and two squares . As a template using a sheet of paper : Put the rings of different diameters on the sheet and glued together by a transparent quick- adhesive .

Lamp tube. Stages of a master- class. Ekaterina Dmitrieva Lamp tube. Stages of a master- class. Ekaterina Dmitrieva
Lamp tube. Stages of a master- class. Ekaterina Dmitrieva

3 . These pieces combine a 90 degree angle and measure the adhesive. Rings of small diameter use as auxiliary , connecting lines between them.

Lamp tube. Stages of a master- class . Ekaterina Dmitrieva Lamp tube. Stages of a master- class . Ekaterina Dmitrieva
Lamp tube. Steps master class. Ekaterina Dmitrieva

4. The lamp is ready , it remains only to attach a cartridge with the same rings. Put the cartridge into and paste to ring anchorages .

Lamp tube. Stages of a master- class. Ekaterina Dmitrieva

5. Light gold with enamel paint from a container .

Masterclasses

Other materials facilities

SOURCE: http://kvotvet.ru/doc/1045.htm

Рубрики:  LIGHT/Lamps
LIGHT/Chandelier

Метки:  

Easy way to re-style your lampshade

Понедельник, 05 Июля 2010 г. 17:44 + в цитатник
Это цитата сообщения Irinas_HM [Прочитать целиком + В свой цитатник или сообщество!]

Добавим идею в Икею


Икея славится своими дешевыми предметами для дома, но чаще всего они слишком просты и неинтересны. Но сегодня я предложу вам отличную идею, как из пятидолларового светильника сделать вполне дизайнерский и экстровагантный)

img_2638.jpg

img_2640.jpg

Все, что нам понадобится, это сам светильник(кажется его называют Риголит), упаковка салфеток и клей.

img_2644.jpg

Начиная снизу, мы будем приклеивать кусочки салфеток, постепенно продвигаясь к верхушке. Конечный результат потрясающий. Светильник выглядит как обитатель морских глубин))

Источник http://beauty-light.ru/2009/03/26/dobavim-ideyu-v-ikeyu/

Рубрики:  LIGHT/Lamps
LIGHT/Chandelier

Метки:  

Lampshades - links to picasaweb

Понедельник, 05 Июля 2010 г. 18:22 + в цитатник
Это цитата сообщения podborka [Прочитать целиком + В свой цитатник или сообщество!]

Абажуры своими руками


Читать далее


Рубрики:  LIGHT/Lamps
LIGHT/Chandelier

Метки:  

decoration using ballon and thread

Понедельник, 05 Июля 2010 г. 18:43 + в цитатник
Это цитата сообщения Рождена_Весной [Прочитать целиком + В свой цитатник или сообщество!]

Шары из ниток.


Шары можно использовать по-разному. Кто-то делает абажуры, кто-то экибано, можно сделать елочные игрушки, интерьерные украшения, шаром можно закрыть связку торчащих из стенки проводов (как в моей ситуации) - на что хватит фантазии. Идея проста в реализации.  Вот фото готовых изделий, можно приблизительно прицениться.


more...
Рубрики:  LIGHT/Lamps
LIGHT/Chandelier
RECYCLE/Thread, Rope & Wire
Flower Making

Метки:  

decorate your lampshade

Понедельник, 05 Июля 2010 г. 18:53 + в цитатник
Это цитата сообщения katco [Прочитать целиком + В свой цитатник или сообщество!]

Как сделать светильник, украшенный цветами

Читать далее...
Рубрики:  LIGHT/Lamps
LIGHT/Chandelier

Метки:  

Lampshade from laminated paper

Понедельник, 05 Июля 2010 г. 19:04 + в цитатник
Это цитата сообщения katco [Прочитать целиком + В свой цитатник или сообщество!]

Как сделать необычный абажур


Чтобы обновить бабушкину лампу нам понадобится только бумага и швейная машинка. Мы уже писали про такой абажур, но он был однотонным, а сегодня мы расскажем про цветной абажур.
Читать далее...
Рубрики:  LIGHT/Lamps
LIGHT/Chandelier

Метки:  

Zipper lampshade

Понедельник, 05 Июля 2010 г. 19:18 + в цитатник
Это цитата сообщения ЖЕНА [Прочитать целиком + В свой цитатник или сообщество!]

Вжик — и готово!


 (650x650, 96Kb)

Очень понравилась идея, которую может повторить каждый, кто умеет пользоваться даже не инструментами, а обычной иголкой. Ну да, абажур лампы попросту сшит из множества обычных застёжек-молний. Нетрудно понять, что на основе этой идеи можно придумать тысячи и тысячи самых разнообразных светильников, и настольных, и напольных, и потолочных — да каких угодно! Ведь так легко подобрать застёжки-молнии самой разной длины, ширины и цвета, и каждый раз будут получаться неповторимые вещицы. А основой может послужить старая лампа с древним абажуром на металлическом каркасе.

Рубрики:  LIGHT/Lamps
LIGHT/Chandelier

Метки:  

easy to make at home

Понедельник, 05 Июля 2010 г. 19:34 + в цитатник
Это цитата сообщения jelena88 [Прочитать целиком + В свой цитатник или сообщество!]

Абажур своими руками.

Абажур своими руками-все предельно просто:http://www.easydiyathome.com/search/label/Lamp
 (560x420, 11Kb)

Читать далее...
Рубрики:  RECYCLE/Plastic Bottles
LIGHT/Lamps
RECYCLE/Carton
LIGHT/Chandelier

Метки:  

lampshade with chinese drawing

Понедельник, 05 Июля 2010 г. 19:50 + в цитатник
Это цитата сообщения Lovmom [Прочитать целиком + В свой цитатник или сообщество!]

весеннее настроение или почти сакура


милая лампа. из икеи, немного фантазии и времени, и эту нежность можно повторить! 

 (423x640, 51Kb)


картинки что и как
Рубрики:  LIGHT/Lamps
LIGHT/Chandelier

Метки:  

Lampshade with pearls

Понедельник, 05 Июля 2010 г. 20:16 + в цитатник
Это цитата сообщения besta-aks [Прочитать целиком + В свой цитатник или сообщество!]

Если долго мучится -Красота получится


Читать далее...
Рубрики:  LIGHT/Lamps
LIGHT/Chandelier

Метки:  

Ways to change your lamp

Понедельник, 05 Июля 2010 г. 21:03 + в цитатник
Это цитата сообщения Vikylia68 [Прочитать целиком + В свой цитатник или сообщество!]

Абажуры своими руками.

 (488x699, 61Kb)
 (453x699, 43Kb)
Читать далее

Рубрики:  LIGHT/Lamps
LIGHT/Chandelier

Метки:  

Hanging baskets chandelier

Дневник

Четверг, 29 Июля 2010 г. 20:35 + в цитатник

DIY Chandelier........tutorial


Glamour, bling, sparkle....those are a few words that come to mind when I look at this chandelier. And that is exactly the look I was going for. I needed to add a bit of glamour and sparkle to a corner of my daughter's bedroom.....

 
And when you can't thrift one to makeover, why not make one yourself! Can you guess what I used?........Hanging flower baskets!!!! You can make one too!

 
DIY Chandelier
Materials:
4 - 10" wire hanging baskets - (got mine at the $1 store!)
Wire (I used 19 gauge I had on hand)
Needle nose pliers/wire cutters
Hot Glue Gun
Spray Paint
Embellishments - crystals, beaded necklaces (I bought a pack of silver ones at the $1 store), round mirror pieces, colored beads, jump rings, etc - whatever you like!

 
**Share your finished project in the Brassy Apple Flickr Group!**
download the full tutorial to keep/print HERE

Let's go!

 
Step1: Place 2 baskets together - rounded side up/flat side down. Connect them in the middle using wire. Wind tightly. Be sure to space the "loops" to the sides as shown in the photos below.


Step 2:  Take your 3rd basket and thread the hook and chains up through the middle hole and lay off to one side.

 
(threading up...)
(laying off to one side....)

 
Step 3: Place this 3rd basket in the middle of the other 2 that you connected - rounded up side/flat side down.


Connect the 4 points that touch (2 on each side. See photo below) with wire. To wrap these with wire easily, apply a small dot of hot glue and then wind the wire around.


Step 4: Turn the entire piece over.....


and place the 4th basket in the middle -flat side down (see photo below). Attached it with wire at the 4 points that are touching as before.


(a close up of how I connected the pieces together with wire)


Flip it back over. Using the top basket that you threaded the hook and chain through the center, the entire connected "chandelier" should now look like this:


Step 5: PAINT! (optional) Hang, spray paint and let dry. We used "berry pink" ultra cover by Rustoleum.


and came out with this beauty! (squeal! White would have been pretty too! just think of all the fun colors you could do!)


Step 6: Give your chandelier a bit of "shape" (this step is easiest to do if it is hanging). Take the 2 outside hooks and place on the inner rings on each side (see photos below). Secure the hook in place with a small dot of hot glue.

 
Now the chains that hang have some curves, shape and loop to them.

Step 7: EMBELLISH! now the fun really begins! If you have a supplies stash, you may have some gems you can use. If not, this step can be the "spendy" part. Be sure to look for sales or use coupons at your local craft stores if you can when shopping for crystal embellishments. Don't forget - we picked up a pack of silver "mardi gras" style necklaces at the $1 store. 6 came in a pack too!


 There are soooo many hoops, ledges, chains and other surfaces to attach beads and jewels to on your new chandelier - so have fun! Here are a few ideas of places we attached our embellishments....

Detach the center bottom hanging hook and replaced it with a large crystal and jump ring.


I hung teardrop style crystals from the bottoms of each of the loops on the outside chains (pictured above) and also hung smaller round crystals on the chains above the teardrop crystals.
Dress up the center and outside rings....


Draped beaded necklaces on the center front and back. Just a dot of hot glue on each side....


  I also glued some beading to the frame on the sides and draped it into the middle....repeated on the opposite side......


Just have fun where and how your embellish, drape and dress up your chandelier!


http://brassyapple.blogspot.com/

Рубрики:  LIGHT/Chandelier
DECOR
RECYCLE

Punky Newspaper&wire Lamp Shade

Дневник

Четверг, 29 Июля 2010 г. 20:41 + в цитатник


Punky Newspaper Lamp Shade


April 13th, 2007

Finished Lamp Wrapping  paper lamp


The idea for this was inspired by one of my high school students who covers everything in newspaper. I added neon/fluorescent pink embellishments because I like the contrast of B&W with the bright colors. And, using the mesh adds a technical, grid-look to the lamp.

Materials:

Hardware Cloth – I used the 1/2″ kind that comes in a 2′ x 5′ roll. (usually with the fence-building supplies at the hardware store)

Twist ties or the wire that holds the hardware cloth can be used

Tin Snips

Gloves (to protect hands when cutting the mesh)

Newspapers – I like Asian newspapers because of the added contrast created by the calligraphy or other type of paper (wrapping and art papers make nice lamps also)

Spray Adhesive

Lace and Flourescent Spray Paint (optional)

Neon Address labels (optional) – These only come in LASER, so either make sure you have a way to print on them or use a rubber stamp to create designs. You could also use a shaped paper punch. (Office Depot)

Hanging lamp fixture (Ikea)

Flame Retardant spray (Dharma trading)

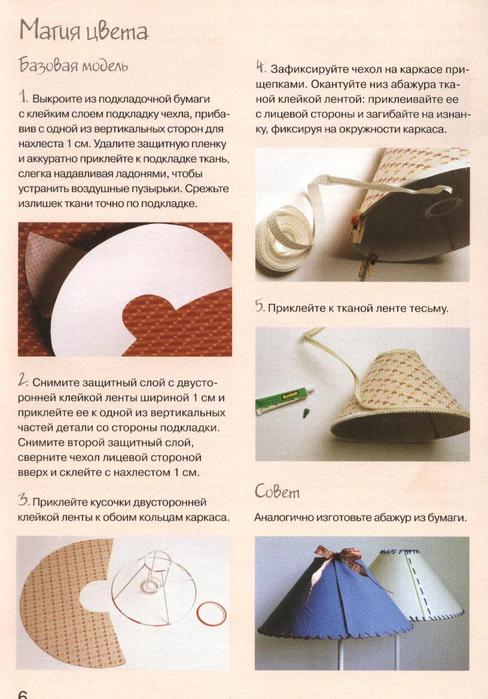
1. Cut hardware cloth, using tin snips. I cut mine the size 12″ x 28″ since my newspaper was 30″ long. Make sure you can get your paper around it w/a bit of overlap. I chose 12″ tall because the mesh is 24″ in width and I figured I could get 2 lamps out of it. Leave some excess mesh to create the top of your lamp. **Hardware cloth can be difficult to flatten, but just make sure to wear gloves when unrolling and place it flat on the ground and step on it.


Cut the mesh

2. Attach long ends of mesh together with twist ties. Attach from the inside, otherwise they will be visible through the paper.


Use Twist ties to connect

3. Measure, mark and cut out the top. I use the cylinder created to measure a circle out onto the mesh. I then, cut it out the best I can (it will not be exact). I also cut a hole to fit the light fixture. Next, I insert the top into the cylinder and attach it with twist ties about 2 squares down (this gives room to wrap the paper over the top).

Inserting topAttached 2 squares down with cable ties

4. Spray flame retardant on newspaper. I’m not sure if this step is necessary, but I feel alot better if I just do it.


Spray Newspaper with Flame Retardant

5. When dry, wrap newspaper around the cylinder. I chose to do mine diagonally because I liked the design created. Use spray adhesive to attach where the paper overlaps. Then, trim around the top and bottom. Use the trimmed corners to fill in the gaps left on the cylinder. Then, fold in paper top and bottom of the lamp, use spray adhesive to attach.

Glue overlapping newspaper Trim around top and bottom


Spray and fold under

6. Print out labels, cut them out and stick to your lamp.

Printed labels


7. Spray paint lace, using flourescent spray paint. I just use the regular kind available at the hardware store, it covers nicely and since this will not be worn or washed there’s no need to use fabric paints. I got the lace at a thrift store for very cheap, so I have no idea what it is made of. It’s very wide and off-white, that’s all I know. I used double-sided tape to attach it to the lamp.

8. Insert light fixture. Hanging lamp fixtures are nice because there is a ring that holds everything in place. Unscrew the ring, insert lamp fixture into lamp shade and screw ring back on. Then insert a light bulb that is the appropriate wattage for your lamp and you’re all done!


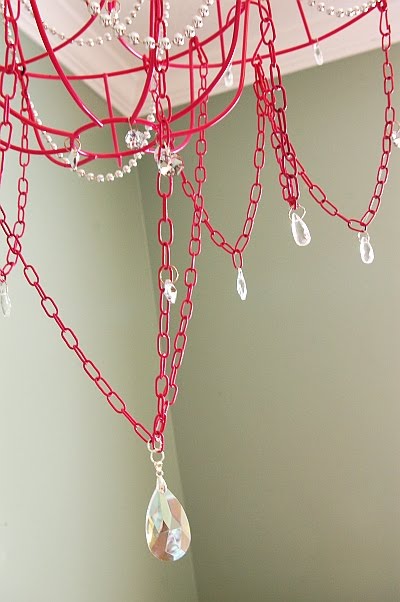
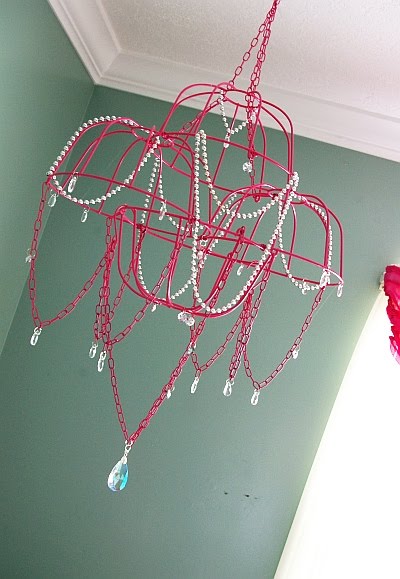
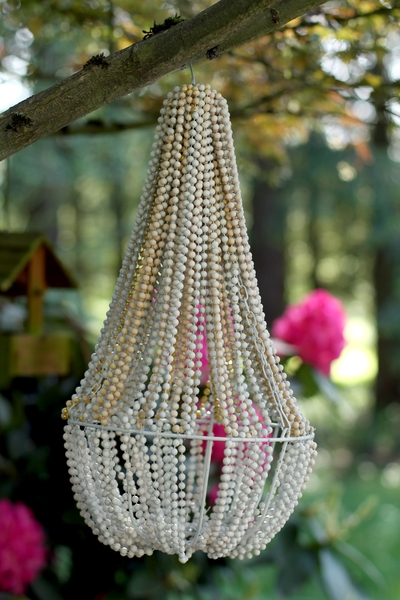
Here is an example of another lamp I made using wrapping paper and chandelier diamonds.


Wrapping  paper lamp


 http://craftchi.com/


Рубрики:  LIGHT/Lamps
LIGHT/Chandelier
DECOR
RECYCLE

Метки:  

Hanging Placemat Pendant

Дневник

Суббота, 31 Июля 2010 г. 17:47 + в цитатник
11:48 PM | Posted by StepThruCrazy | Edit Post
First let me say HOLY GUACAMOLE I have about a million things going on at once right now!  So many projects, so little time.  It's all good though, that means more tutorials!  I made this hanging pendant a while ago, and am now just getting to blogging about it.


Читать далее...
Рубрики:  RECYCLE/Plastic Bottles
LIGHT/Lamps
RECYCLE/Paper & newspaper
LIGHT/Chandelier
DECOR

Метки:  

Make a Beaded Chandelier

Дневник

Воскресенье, 01 Августа 2010 г. 19:32 + в цитатник
Рубрики:  LIGHT/Chandelier
RECYCLE

Метки:  

Plastic Bottle Chandelier

Дневник

Воскресенье, 01 Августа 2010 г. 20:04 + в цитатник
Рубрики:  RECYCLE/Plastic Bottles
LIGHT/Chandelier
DECOR

Метки:  

 Страницы: [4] 3 2 1