


 Дешевые авиабилетыВыгодные цены, удобный поиск, без комиссии, 24 часа. Бронируй сейчас – плати потом!
 Я - фотографПлагин для публикации фотографий в дневнике пользователя. Минимальные системные требования: Internet Explorer 6, Fire Fox 1.5, Opera 9.5, Safari 3.1.1 со включенным JavaScript. Возможно это будет рабо
 ОткрыткиПерерожденный каталог открыток на все случаи жизни

gold |
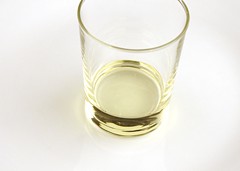
Picture of Gold Recovery
Wait don’t throw those old electronics in the garbage, there’s gold in them there things. How about putting it in your pockets instead of someone else’s pocket?
Laptops, phones, cameras, and the like are filled with gold plated circuit boards even printers and scanners have gold, silver, and copper, even platinum in them.
Gold is a precious, conductive, and pliable metal that retains a stable value better than many commodities. Its chemical properties make it useful for the manufacture of computers parts and electronics. Some people find it profitable to attempt to extract the gold from these scraps, then refine and sell it. This complicated process requires chemical expertise as well as access to various chemistry equipment. However, with the right knowledge, experience and tools, you can remove valuable gold from computer parts, other discarded electronics.
Things You Will Need:
Scrap electronics
Rubber gloves
Rubber apron
Goggles
Hydrogen Peroxide 3% I got from local pharmacy.
Muriatic acid 31% local hardware store.
Methyl Hydrate is 99.9% methyl alcohol it is used for fuel line antifreeze and can be purchased at your local hardware or automotive supply.
Funnel filter I used a drip coffee filter
2 large glass containers I like coffee pots for chemical heat.
Stir stick glass or plastic
Weigh scale mine is accurate to 1/10th of a grain.
Blow Torch hot enough to hard solder.
Borax
Clay bowls just about anything that has a melting point 500o above the melting point of gold will do.
Measuring cup anything you can use to make a 2:1 mix will do.
Although no special skills are needed one should follow all chemical and heat safety procedures.
Remove these adsRemove these ads by Signing Up
Step 1: Extracting Gold from Scraps
Picture of Extracting Gold from Scraps
Gold 2b.JPG
Gold 2c.JPG
Gold 3a.JPG
Gold 3b.JPG
Gold 4a.JPG
Show All 10 Items
Collect any gold-containing metal scraps to which you have access, including jewelry, computer processors, old telephone wiring or gold tooth crowns. Keep in mind that outdated electronics are likelier to produce parts with a high enough level of gold to make the procedure worthwhile.
This is the gold I collected in a bucket over three months.
Sort the gold into circuits that need cleaning, gold plated parts, gold plated pins, gold fingers, and solid gold large and small. Use a magnet to separate all gold plated steel this needs a different process than I am demonstrating.
Step 2: Stripping the Fingers and Clean Circuits
Picture of Stripping the Fingers and Clean Circuits
Gold 5b.JPG
Gold 5c.JPG
Gold 5d.JPG
Gold 5e.JPG
Apply all safety gear correctly before working with chemicals and do this outside as the fumes are nasty.
Put the gold fingers and clean circuit boards in the coffee pot, in another container mix two parts muriatic acid and one part hydrogen peroxide and add to the coffee pot until it just covers the gold fingers and wait a week giving it a stir daily. Since I have a week I will move on to processing my solid low grade gold parts.
Step 3: My Scale
Picture of My Scale
Gold 6b.JPG
Gold 6c.JPG
My RCBS scale is accurate to 1/10th of a grain when setup right however do not go by the Oz to grain chart on the scale. A grain is a grain however a troy Oz is 1/12th of a troy pound and a regular Oz is 1/16th of a pound so a Troy Oz is 480 grains not 437.5 grains. Setup the scale remembering to zero it by adjusting the screw on the left.
Step 4: Cupellation
Picture of Cupellation
Gold 7b.JPG
Gold 7c.JPG
Gold 7d.JPG
Cupellation is a process where ores or alloyed metals are treated under high temperatures and controlled operations to separate noble metals, like gold and silver, from base metals like led, copper, zinc, and others present in the ore or alloyed metal. The process is based on the principle that precious metals do not oxidize or react chemically, like the base metals; so when they are heated at high temperatures, the precious metals remain apart and the others react forming slags or other compounds. This process has been in use since the Bronze Age and still used today able to raise the gold and silver content to 95%, however the process cannot separate silver from gold, but this is good enough for me.
Cupellation is simple weigh the solid pieces of low grade gold, burn the crap out of it until you get no more slag and it becomes a nice bright yellow bead, and then you weigh it after it cools.
My solid low grade gold parts with garbage attached went from 180 grains to 75.9 grains of high grade gold with no garbage attached.
Step 5: Gold Flakes and Dust
Picture of Gold Flakes and Dust
Gold 8b.JPG
Gold 8c.JPG
Gold 9a.JPG
Gold 9b.JPG
Gold 9c.JPG
Show All 12 Items
A week has passed and it is time to collect your gold flakes and dust from your cleaned fingers and circuit boards, after a week the acid darkens and with a stir the flakes of gold can be seen floating around in the pot.
Pouring the acid into a coffee filter the acid passes through the filter leaving the gold behind, save the acid do not dump it down the drain.
Next dump the remaining fingers and circuit boards into a deep plastic tray and add water, sort out the cleaned of gold parts, put the cleaned parts in the waist and save the un-cleaned parts for re-dipping.
After you have sorted the circuit board parts pour the water off through the coffee filter and flush with methyl hydrate to clean. Since the methyl hydrate is 99.9% methyl alcohol it cleans and dries the gold flakes better and faster than water, water will cling to the gold flakes and give you a false weight.
Step 6: Using Borax with your Salvaged Gold
Picture of Using Borax with your Salvaged Gold
Gold 11b.JPG
There are basically two methods of melting gold flakes and dust to recover gold available to the average person, the mercury method called Gold-Mercury Amalgam with its obviously toxic by-products and the Borax Method.
I do not recommend the mercury method it works but it is extremely toxic for generations.
The Borax Method is a technique of artisanal gold mining, with its basis in the principle that borax reduces the melting point of all minerals, including precious metals like gold. The melting point of gold is 1063 ˚C, which is a higher temperature than can be obtained by cheap torches and burners. By adding borax to the heavy mineral concentrate, the melting point temperature decreases, allowing people to melt gold out of their concentrate and salvage. By using borax, no mercury flour is produced, and gold recovery increases.
Step 7: Melting Your Gold Flakes
Picture of Melting Your Gold Flakes
Gold 12b.JPG
Gold 12c.JPG
Gold 12d.JPG
Gold 12e.JPG
Gold 12f.JPG
Show All 7 Items
Take your cleaned gold flakes and weigh them, this tells you how much you lose in melting and cupellation when melting the flakes.
Heat your clay bowl, don’t worry if the bowl cracks or splits, add borax to the hot bowl, when the borax melts add the gold flakes and more borax then heat until you get a nice bead of gold, let it cool and weigh to see how much you lost.
Step 8: Gold
Picture of Gold
Gold 13c.JPG
There you have it gold from electronics, one troy Oz is 480 grains and I have 576.5 grains or somewhere between 600 and 1600 bucks for three months work. I think I will retire.
Метки: useful |
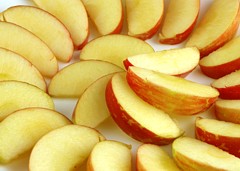
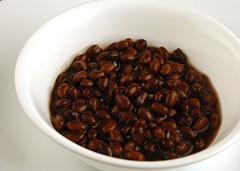
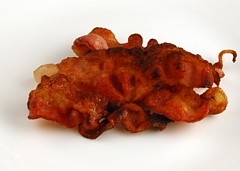
200 calories |


Метки: health & bueaty |
crazy wool |
You are not tired of my Crazy? No? Then all the fears - away!
New handbag needed companion!
How I did it is here http://stranamasterov.ru/node/179354
Make a scarf! With butterflies, as the bag.
Draw (well, as best I can) butterfly on a piece of A4
And suddenly find that the water-soluble paper
is not enough! Do you think this stops me? Knowing what it is then I otoletsya,
taking ordinary tracing paper and translate it to the two ends of my masterpiece "butterfly"
Spread on marked lines thread. Took wool. But then I realize the advantages and blueprints! Coated with PVA and its just glue the thread - it allows to put the intricate twists
I start to fall asleep all threads, each new layer squirting hairspray. Crap, of course, but the glue - I do not spray!
She took the white threads of two types -
x \ b, and wool, thinking thereby to make the texture more interesting.
However, looking ahead, I will say that
if we make a scarf for spring,
then x \ b thread of one color is enough
All, it is time to stop.
But, it turned out, my table is shorter than the next scarf - will complicate your life! Who table is greater than or less than the scarf, you can safely go to step 13.
And we are doing double duty: (
Covering the top of water-soluble paper (the regulator will call it - a long time to write)
Baste.
uzelochki advise on the end of a thread does not tie - and the hunt!
The left edge of wrap and move the work to the left.
Well, all from the beginning!
Close work entirely
Dometyvayu to the end.
It reminds me of spaghetti with Korean carrot ... Maybe I want to eat?
With an inner shudder going to sew. First stitch across. Machine, surprisingly, is going very well and willingly, although the firm is called the machine "is not a fountain." You know this?
Now stitch along. Squares out about 1cm * 1cm. I advise not to boil the pot 1.5cm squares and more to do!
Who does not miser and put stabilizer on both sides - can banter and giggle at me. This lucky guy is already ready to rinse practically scarf. I say goodbye to you and sit vykolupyvat tracing ...
Years passed ... ... Bag, which was placed in a couple of scarf, long wear, children grown up ... But I have repeatedly presented himself to the title of "Honorary schipalschik" still did it! And even already washed away scarf - this land
To do solidity brush.
Really - ready? Yes! And even today, was commissioned by walking the exam. Results - below.
Soft and supple, "4 -" (sorry to put "3 +" - all because of the extra yarn from wool - see paragraph 7)
Beauty and brightness - "5 +"
shocking effect on others - "5 +"
Giving hostess scarf feelings its exclusivity - "5 +"
For the last three items I (or any of you) is willing to suffer first, especially as the process of making socks scarf softer and softer! (I hope that I do not think!)
Scarf Size: 30 * 170 with tassels. Sizes were tied to the size of the remaining pieces of the stabilizer.
Метки: knitting |
knitting |
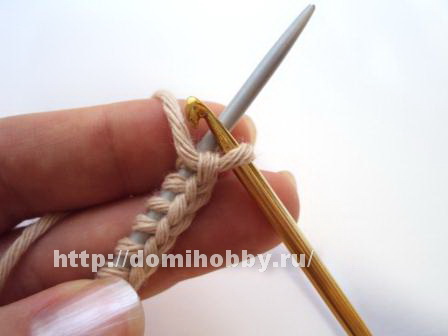
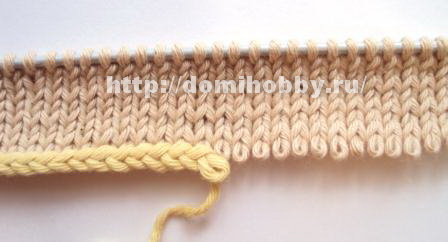
Set of loops pigtail
Easy and fast set of loops on one needle with a hook . When used in this method, a set of knitting loops you get a neat smooth edge that is suitable for further knitting stitch front, since the edge is not twisted and not stretched. Also, this method is perfect if you want to get an edge with open loops.

To start a set of loops to make primary loop hook, located on the left hand needle, get a working thread for needle. Then grab the hook before the main thread needle and pull it through the initial loop.

On needle formed the first loop of the initial series.
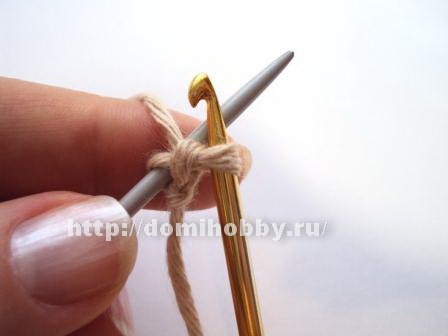
Next, move the working yarn over needle, again * grab hook needle and thread to work even following an air loop chain, and the spoke recruited new loop.
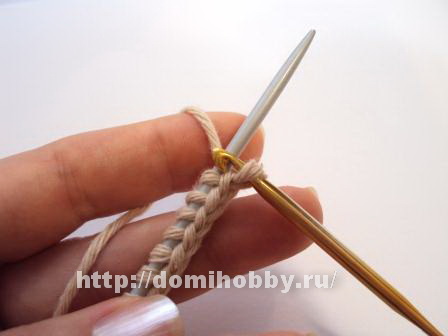
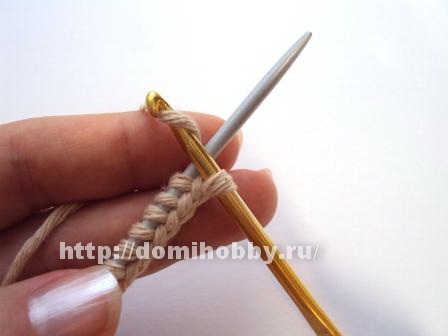
Again kiddle working thread for needle and repeat from * until you get to the required number of needle loops.
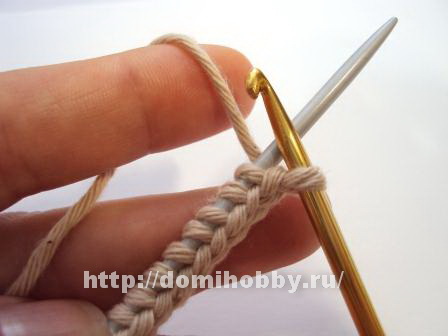

Then loop the hook put it on and start knitting needle selected pattern.
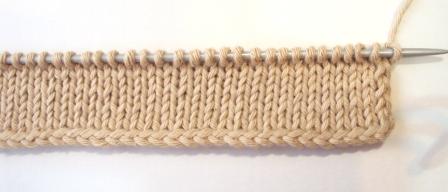
For the set of loops of open loop type the initial number of additional loops thread, cut the thread and secure the last loop, passing through it, the end of the thread.
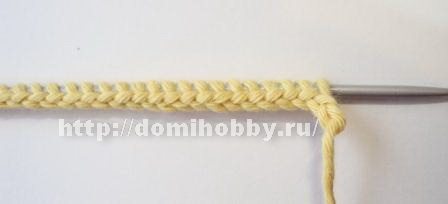
Then knit a few rows of warp yarn, it's easy to dismiss the pigtail releasing loop.Since the initial series is a chain of stitches, it will be enough to dissolve the fixed loop and gently pull the thread.
Метки: knitting |
ideas |


Серия сообщений "Shelves":
Часть 1 - Ideas for BOOKS
Часть 2 - Ideas from old books
...
Часть 32 - shoe shelves
Часть 33 - storage
Часть 34 - ideas
Серия сообщений "Storage":
Часть 1 - Wall Pockets
Часть 2 - Creative Shopping Bags
...
Часть 43 - cd storage
Часть 44 - storage
Часть 45 - ideas
Часть 46 - useful
Метки: ideas |
wall of hearts |

Метки: wall art |
rainbow |

Метки: painting |
bags |
Метки: bags mesh |
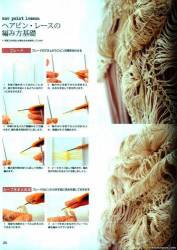
shawl on fork knitting |
Old shawl on a fork
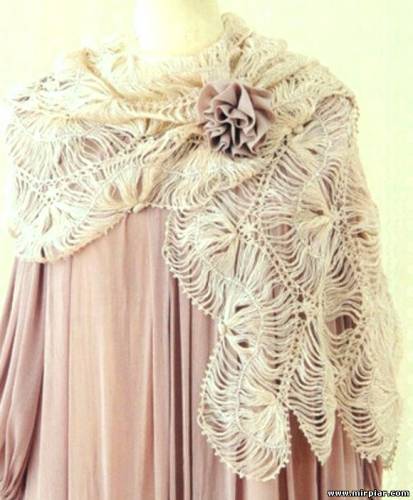
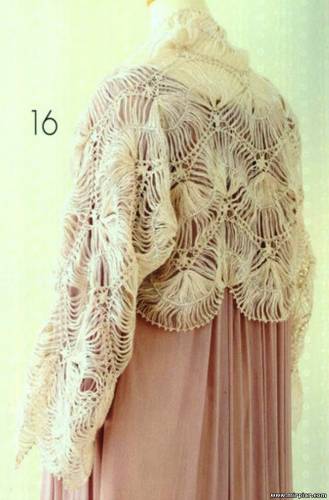
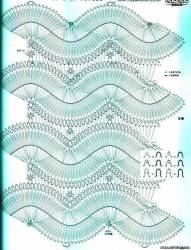
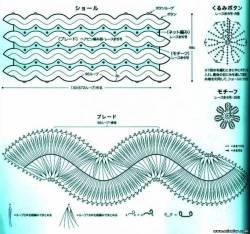
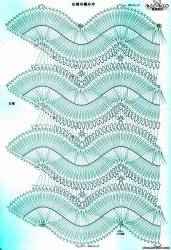
Серия сообщений "Shawl":
Часть 1 - Shawl in half an hour
Часть 2 - Misses' Shawl, Blankets and Booties
...
Часть 15 - cape
Часть 16 - shawl
Часть 17 - shawl on fork knitting
Часть 18 - shawl with sleeves
Часть 19 - shawl + bolero
Метки: knitting shawl |
clothpin chair |
Supplies Needed
17 Spring-Type Clothespins
Tacky Glue
Small Saw (to cut clothespins)
Paint or Varnish (as desired)
Tip: Always allow glue to dry completely. If you attempt to go on to the next step without allowing the glue to dry,
everything will fall apart in your hands and make you say some bad words that young Hittys should not hear.
Remove the wire springs from the 17 clothespins. From now on, each half will be referred to as a 'stick'.
1. Take 12 sticks, and glue them into pairs, as shown, flat side to flat side. Make sure you glue them end-for-end (like a 96).
Make 6 pairs. Set aside to glue.
When the glue has dried, take two of the pairs, and cut off 1" from one end. These will be the 'wings' referred to later.
2. Take 2 of the pairs, and lay them out as shown. Make sure the flat narrow ends face each other at the top. Glue a support stick across the bottom, just at the top of the curve. Make sure you keep these level. Now, glue one on the other side of the support, at exactly the same height.
Make two sets. Allow to dry completely.
3. Set the sides upright, and glue a back and front support stick in place, as shown. I made sure that the 'fat' ends were both on the same side. Let glue dry completely.
4. Take five sticks, and glue in seat. Make sure that the fat ends of the sticks are all on one side. This will be the back of the chair.
Allow glue to dry completely.
6. Now, get the shortened sets from step one.
Glue one stick on the front edge of the back post, flat side in. Glue the shortened set to the back, as shown. Allow to dry completely.
7. Glue two pins across the back, as shown. Allow to dry.
8. Lay the chair on its back and glue in the sticks for the back. Space carefully. The picture shown shows the sticks raised slightly above the side supports. You can also set them in lower, as shown in Chris' pictures at the top of the page.
Add the arms, as shown. There is a line in the side supports that the arm will slide right 'into', and a curve on the bottom of the arm that fits just right on the leg posts. If this is confusing, just hold your stick up to the chair and check it out. It will come clear!
Finish your chair with stain or paint.
http://www.julieoldcrow.com/
Серия сообщений "Cloth Pin":
Часть 1 - Recycle ice cream sticks - links to picasaweb
Часть 2 - Miniature cloth pin chair
...
Часть 12 - frame with cloth pins
Часть 13 - cloth pin decoration
Часть 14 - clothpin chair
Метки: miniature |
heart charm |

2.

3.
4.

5.

6.
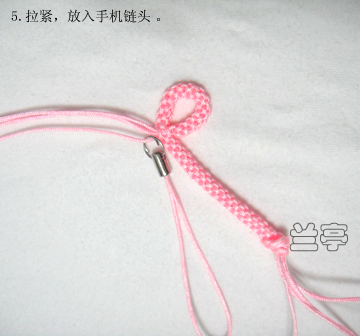
7.
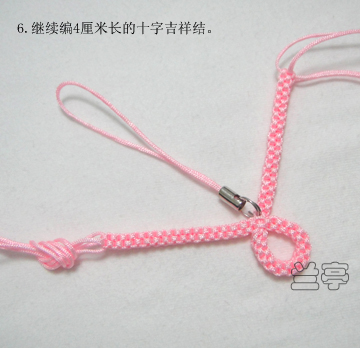
8.

|
face without wrinkles |
My secret or face without wrinkles!
1] Make juice from aloe, freeze and wipe cubes face at night.
2] In the morning rubbed ice cubes of lime and nettles (1-1).
3] From small wrinkles well wipe the face with tincture of rosemary (buy in the pharmacy).
4] Bake one onion, rub with 2 tablespoons honey and apply on your face is good))) I will soften and moisturize the skin, nourish it Vitaminka.The main thing to do warm.
5] very productive next mask, but I warn you!)), It is a bit laborious.Need to cook beans, rub through a sieve, add the lemon juice and olive oil. It is well smoothes wrinkles, including around the eyes.
6] In the bath very often make vitamin mask to the face (ingredients available over the counter):
1.st. l. baby cream
1 egg yolk
10 drops of Vitamin A
5 drops of vitamin D
5 drops of vitamin E
Must be mixed thoroughly and apply on the face for 20-30 minutes.
7] In the eyes put a crumb of white bread soaked in milk. It is enough to put on the face for 15 minutes. The treatment mesh around the eyes - one month.
Метки: useful |

