Мы говорим о голове сложного кроя, состоящей из трёх деталей.
Но прежде, чем приступить к работе, рассмотрите, пожалуйста, фото и ответьте на вопрос,
можно ли голову человека назвать круглой?
Рукоделка Ура! Наконец-то она готова! Моя полезнючая рукоделишна =) Долго не могла я ее закончить, но, наконец, звезды сложились и все удалось =) Во |
Метки: кухня |
Процесс лепки куклы из полимерной глины. |
К сожалению картинки без перевода. Но всё интуитивно понятно.
На столько подробный мастер класс, что понятен без слов.
1.

|
Мастерим из картона, бумаги или ткани шкатулочку в виде домика |

Давайте изучим материал, который взят у японских мастериц . Такая шкатулочка вполне может вписаться в любой интерьер детской , кухни , да и в гостиной ей вполне может найтись достойное место, а также может быть и прекрасным подарком-сувениром.
Метки: шкатулки |
Как самим сделать шкатулку, обтянутую тканью. |
Давайте посмотрим фото мастер-класс как самим сделать тканевую шкатулочку.

По снимкам из журнала настолько хорошо всё понятно, что не требует дополнительного разъяснения :) Давайте просто молча рассмотрим картинки по которым нам сразу станет всё понятно , как это делается:)
Метки: шкатулки |
Приспособление для рулика |


Метки: шитье |
Бисерные валентинки |
Автор МК: Бригантина
Скоро День Влюблённых. Пора готовить сюрпризы-валентинки! Предлагаю сделать вот такие бисерно-пайеточные вальки!
ЭТОТ МК СМОЖЕТ ОСИЛИТЬ ЛЮБОЙ! Для этого нужны материалы и немного усидчивости. Вид плетения - монастырское (крестик).
![]()
![]()

Метки: валентинка |
ПЛАТЬЕ "КОРОЛЕВА РОЗ |
Метки: куклы |
Сборка и утяжки головы текстильной куклы. МК от Марыси |
http://withlovemarysia.blogspot.com/
Метки: куклы |
МК короткая прическа |

Серия сообщений "Кукольные сайты, блоги":
Часть 1 - Нежные куклы из Чехии
Часть 2 - Море вдохновения
...
Часть 30 - Marlene
Часть 31 - живые куклы Т.Овчинниковой.
Часть 32 - МК короткая прическа
Часть 33 - Милые куклы от Veselinda
Часть 34 - Кукла
...
Часть 42 - Elena Evidaida
Часть 43 - Новогодние выкройки от Эрики
Часть 44 - Примитивный домашний декор и подарки (куклы).
Серия сообщений "Секреты шитья от мастериц":
Часть 1 - Секреты шитья от Надежды Панькив.
Часть 2 - Мастер- классы от Эли
...
Часть 13 - Делаем кудряшки Тыквоголовке.
Часть 14 - >Крепление головы куклы через винт.
Часть 15 - МК короткая прическа
Часть 16 - "Как я рисую лица куклам" от "Стрекозы"
Часть 17 - Кукла-матрешка МАСТЕР-КЛАСС
Метки: куклы |
Рисуем глазки текстильной кукле. |
Метки: куклы |
Немного теории о детских и взрослых лицах. |

Метки: куклы |
Подставка для куклы |


Метки: куклы |
Сумка-кошелек. |
Метки: сумка |
Очень полезный японский журнальчик |


Метки: вязание |
Мастер-класс по вязанию жаккарда без перетяжек |
Метки: вязание |
Как связать шарик крючком (секрет расчета) |

Источник http://leonalife.forumbook.ru/t342-topic
Серия сообщений "Оформление игрушек":
Часть 1 - МК Волнистые волосы для куклы
Часть 2 - МК – Ещё один интересный способ крепления волос куклам.
...
Часть 7 - Основные виды петель амигуруми
Часть 8 - Чудесный нос для мишки, а ещё его можно пришить!
Часть 9 - Как связать шарик крючком (секрет расчета)
Часть 10 - Как сделать незаметной смену цвета в круговом вязании крючком (МК)
Часть 11 - Смена цвета при двухцветном вязании крючком. Мастер-класс
...
Часть 26 - Вяжем глазки
Часть 27 - Таблица определения петель для вязания
Часть 28 - Многоцветное вязание без путаницы в клубках
Метки: вязание |
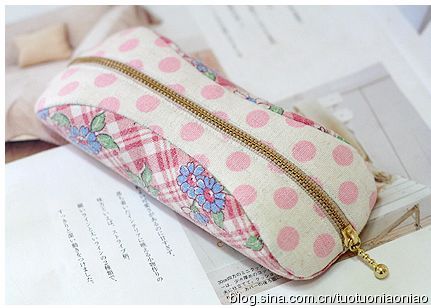
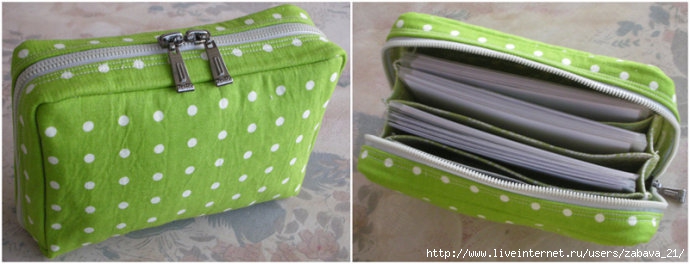
Косметичка. МК. |
Метки: сумки |
МК одуванчика. |
В этой работе надо решить несколько задач.
![]() Из чего делать сами пушинки-парашютики?
Из чего делать сами пушинки-парашютики?
![]() Как прикрепить парашютики к ножке?
Как прикрепить парашютики к ножке?
![]() Как прикрепить ножку к основанию?
Как прикрепить ножку к основанию?
![]() Какое выбрать основание?
Какое выбрать основание?
Верх парашютика можно оформить несколькими способами.
![]() Например, из тоненькой ткани вырезать полоску, одну длинную сторону освободить от нитей и накрутить и приклеить на ножку.
Например, из тоненькой ткани вырезать полоску, одну длинную сторону освободить от нитей и накрутить и приклеить на ножку.

От этого способа я сразу отказалась, потому что в том месте, где меньше всего нужен объём, то есть в точке соединения ножки с пушинками, остаются поперёчные нити ткани, они этот объём неминуемо создадут.
![]() Второй способ неплохо подошёл бы для натуральных тканей, например, шёлковая органза, газ, газ-шифон. Ткани должны быть тонкие и упругие.
Второй способ неплохо подошёл бы для натуральных тканей, например, шёлковая органза, газ, газ-шифон. Ткани должны быть тонкие и упругие.
Я для пробы использовала нитки из синтетической тафты и шёлк для машинной вышивки, состав – вискоза.
Пучки ниток разложила на стекле и прикрепила тонкими полосками лейкопластыря к стеклу через каждые 5 см. Острым ножом разрезала их на короткие отрезки, прямо с пластырем.
Клей «Титан» наносила точечно на середину отрезков. Клей быстросохнущий, поэтому одновременно клеила не больше 5-8 штук. Отрезок снимала со стекла и сдавливала, скручивала в том месте, где клей. Получалась тоненькая «талия».


Как клей подсох. сняла пластырь и вырезала склеенную перемычку, оставив лишь 1-2мм для каждой кисточки.
В склеенное основание кисточки иголкой протыкала место для проволочки и вставляла тонкую проволку с каплей клея на кончике.
Место крепления получилось вполне ненавязчивым. 

Надо из кисточки сделать парашютик, чтоб сбоку он был максимально похож на букву Т. Дула в серединку метёлки и приглаживала к горячей бульке или к утюгу. Натуральная нить хорошо держит форму. А синтетика – так себе. Что и видно по печальному результату №1. 

Плохо ещё и то, что использована проволочка. Слишком заметна. Нитки оказались грубыми, никакого воздуха. На фотографии это особенно видно.
Вполне вероятно, что если бы в этом случае я взяла тонкую натуральную ткань и леску для ножек, то получилось бы очень даже приемлемо. Возможно, похоже на это:
Ну… делаю, что могу, с тем, что имею. Пробую ещё иной способ
![]() Синтетическую органзу вырезала квадратом. Сначала по периметру вытянула нитки по краям, сколько это было возможно без трудностей, и приметила, какая сторона легче «отпускает» нитки, с ней и работала потом.
Синтетическую органзу вырезала квадратом. Сначала по периметру вытянула нитки по краям, сколько это было возможно без трудностей, и приметила, какая сторона легче «отпускает» нитки, с ней и работала потом.
На рабочей стороне отрезала бахрому и снова вытягивала ниточки. И так несколько раз, пока весь квадратик превратился в пучок длинных ниток и кучку коротких. Всего ушло два таких квадратика.
От пучка длинных ниток отрезала 4 см, и их раскладывала на стекле в виде звёздочки. В одной порции получалось 10 звёздочек.
Металлическую линейку ложила на звёздочку так, чтоб центр звезды был посередине дырочки в линейке, и прижимала. Горячим выжигателем, можно паяльником, внутри дырочки сплавляла нитки.
Изготовила порядка 50 звёздочек.


Приготовила леску диаметром 0,4мм (такая была).
Отрезала от котушки всю необходимую длину и прогладила под тёплым утюгом. Просто утюг поставила на доску и протянула леску под его подошвой.
Разделила на кусочки длиной 10 см.
Короткие ниточки перемешала в кучке и прижала рукой, чтоб лежали поплотнее. Кончик лески подожгла над огнём (не свечка, она коптит) и быстро – в кучку ниток и прижимаю ногтями. Ногти могут пострадать немножко. Но если не прижать – приварится очень жиденькая порция ниток, её будет мало.
А так – хорошенькие таки пушиночки-снежиночки.
Вот эти пушинки, как грибочки на ножках, продеваю в большую звёздочку, в дырочку по центру, и приклеиваю прозрачным клеем. 


Использовала «Момент Кристалл». Хотела «Титан», потому что без запаха, но он тягучий, ниточки клея портят работу.
Думаю, в серединку звёздочки вместо «снежинки», приваренной к леске, можно использовать бисер, стразы. Дырочка спрячется и нарядится.
Но надо пробовать, это может быть лишним весом и леска может прогибаться.
Теперь парашютики нравятся, поговорим об креплении к основанию и самом основании.
Светлая голова Ирочки Лелио выдала мысль, что если у пенопластового бутона-заготовки для розы отрезать плосковатый низ, то получится вполне хорошее основание: лёгкое по весу, лёгкое в работе, и форма хорошая, лучше, чем полусфера.
Я, как всегда, пожадничала ![]() , купила пенопластовые шары 5см в диаметре, отрезала бочок, а окружность уменьшила прямо ножницами, подогнала под круглое основание для броши. Кстати, на фотографии – универсальное крепление, потом я опомнилась, что крокодильчик будет виден и оторвала его.
, купила пенопластовые шары 5см в диаметре, отрезала бочок, а окружность уменьшила прямо ножницами, подогнала под круглое основание для броши. Кстати, на фотографии – универсальное крепление, потом я опомнилась, что крокодильчик будет виден и оторвала его. 


В первой моей попытке я обклеила пенопласт велюром и в него втыкала ножки-проволочки. Сначала иглой намечала нужное место и в это место тыкала проволоку, кончик которой в ПВА. Клей сползал наверх по проволоке, на ворсе остались желтоватые пятнишки. Хоть издалека и незаметно, но некрасиво.
Второй раз пенопласт не обклеивала, сначала крепила пушинки. Проколов иголкой, обозначаю место крепления. В отверстие вставляю леску. Снизу торчит хвостик лески. Так прикрепляю все парашютики, потом сверху равняю, а снизу закрепляю хвостики клеем. Пробовала «Титаном», но долго сохнет, думаю – лучше пистолетом. Выдавить каплю и прижать плашмя лезвием ножниц. Остатки лески поотрезать. Приклеила пенопласт к основе-броши.
Между лесками сверху кисточкой нанесла ПВА и присыпала резанными нитками.
Вот второй одуванчик, изготовленный уже другим способом. Диаметр 12 см. 

Тоже не фонтан. Но перспективный ![]() . При определённой коррекции пропорций может быть похож на вот эти одуванчики:
. При определённой коррекции пропорций может быть похож на вот эти одуванчики: 

На фотографиях хорошо видны недостатки и можно делать выводы:
1. Леску брать отрезками сантиметров 15, не меньше. Лучше потом отрезать лишнее.
2. Основу для броши брать меньшего размера (у меня диаметр 3 см).
3. Звёздочки делать не такие плотные, и лучики не такие длинные.
Я нитки отрезала по 4 см, наверно, надо по 3, даже 2.5 см…
Работать есть над чем. Но есть и от чего оттолкнуться. Во всяком случае, вы уже будете знать, как делать не надо ![]() , тоже неплохо.
, тоже неплохо.
А если у меня появятся ещё какие-то мысли - обязательно расскажу. ![]()
http://club.osinka.ru/topic-102832?p=9474021&sid=4fa66b492b79599b41000023#9474021
Метки: цветы |
Два в одном: сумка в кошельке или ЭкоБаг |
Эта сумка очень интересна по своей конструктивности. Дно от сумки - это маленький кошелёк. Когда сумка не используется, её можно легко сложить и застегнуть в кошелёк, так что она не будет занимать много места.


Сумочка очень понравится вашей дочке и пригодится вам.


Метки: сумки |
ПРОСТАЯ КОСМЕТИЧКА "ПЕЛЬМЕШКА". |
Метки: рукоделие |
 провязываем 2 столбика без накида в один столбик предыдущего ряда, потом 1 столбик без накида в 1 столбик предыдущего ряда. От