(� ��� 27977 ������� �� ����� ������������ ����� �����)
������ ����� ������������ ↓
��������� ������� ����� �������� �������� ������� ������� ������� ������� ������� ������� ������� ���� ������� ��� ����� ������ ������� ������� ������� ���� �������� ������ ����� ������ ����� ������-����� �� ���� ����� ����� ������ �������� ������� ������ ����� ����� ������ ������ ������� ������ ����� ���� ������� ������ ����� ����� ����� ����� ������� ���� ����� ���� ���� ����� �����
Burda special. ���� ��� ��������� �1 �656 2002 (����� � ����) |
������� |

��������: Burda Special
�����: ���������
������������:
��� �������: 2002
����� �������: 1 (E656)
ISBN -
����: �����
��������: �������
������: 29 ��
���������� �������: 30 + �������� + ����������
��� �������: ������
����: �������
�������:


�����: ������ ����� ��������� �������� ����� |
���� ����� |
�����: ����� ����� ����� |
������-�����������. |
���� ��� ���������� ���������� �� ������ � ����� ������ ���� ���.� ��� ����������� ������� �� Victoria's Secret:


����� ������ ������ �������� ���� ��������!��� ����������� 3 ����� ������ �����.������ ��������, ��� �������� �� �������� ����, ������������ ������ ���, ������� ����� ������� ��� �������. ���� ������������ ��� ������� - � ����������� �������� ����� �������� ���� ������� ��������� ���� ���� � ���, ��� ������ � ���� ��� ������:
�����: ������ ����� ���� |
Ottobre design �3 2012(�����) |
������� |
��������: ������� - ������� ������ �� �����. ������ ��� ����� �� ����� ����. ����+����������+��������.
��������: Ottobre design
������������: Ottobre
���: 2012
�����: 3
������: PDF � RAR
����: ����������
������: 134.28 Mb
�����: ������ ������ ������� ����� |
����� ����� �� ������ �������� (�����, �������) |
������� |
 � ���, � ������ ������������� ���������� ���� ��������� ������� � �����.
 ���������� � ����� ������������� ������ �������� ��� ����� ������ ������� - ��������� ����.
�������� ������ - � ����� �� ������� ���������, ������� ����� �������� ��������� ��� ������������ ����������� ����-������������"
����� ����, ��������� ��, ��� ��, ��� � �, ���������� ����� � ��������, ����������� ������ ���� �������� � �������� ������.
�, ��������, � ��� ���� ��������� ������ ������ ��������, ������� ����� ��� � ������ ������, � ��������� �����, � �� ������ ������� ���� �� �����������.
������� �� ����� ���� �����, ��� ������ �����, �� �����, ������� ��� ���������� � ������ ����, � �����, � ����.
� �����, � ���� �������� � ����� ���������� �� �������?
������� ������:
1) � ����� ���� ��� ���� �������� ��������� ������ ���������� ������� ������� �������� (��� ������� �������� � ������� ������ �� ������� ��� ������) , ��� ���� �� ���������� � ������ �������� - ����� ����� �� ���������, �� �������.
�������� �� �.�. ��������� ���������, �� ���� ��������� �� ���������� - ���� � ������ ��������.
2). ����� ������ ������ ����, ������� ������, ������, ��� ����� (������, ���������) � ���������� ��� ���������������� ����������� �� ��������, �������� 10 - 15 ��.
������ ��������� - � ��������� ����.
� ����������� ������ (������ - �����������) - ���� �� ��������� � ������ ������ �� �������� ���������� ��������� � �������������� ����. ������� �� �����������!
�����: ��������� ������ ������� ����� |
����� |
�����: ����� ����� �������� ������-����� |
������������ ����� |
������������ �����
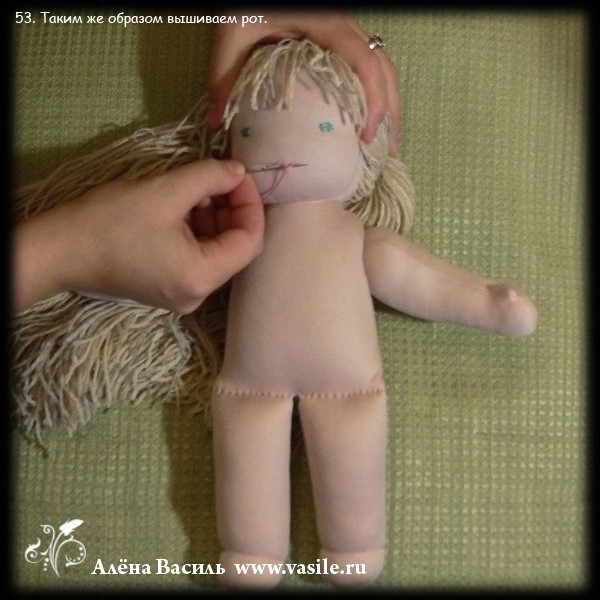
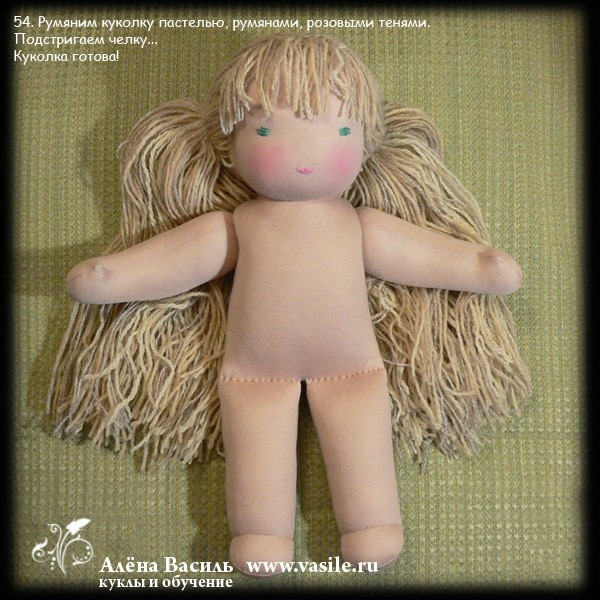
�������� �� ������ � ������� ������ ������ � ����� �� ��� - ������������ �����. ��������� � ������� �������, �� ������� .... ����������� ���� ��������, ���� ����������, ������� ����� � ������� ��������� � ������...
������� �� ���� � ���� �������� ������ ��� �����. �� ��� ���� �� ��������� - �������� �����. � ��� ��� ������ ������ ��� ����� (���� �������� � ����������), ����������� ��� ������.
������ ������ ���� ������ �����, �� ����� ��� � ����� ������ www.vasile.ru �� ����������... ������� ��� ����... ������ ���� ���������� ���������� ������� ����� � ��� �� ���� � ���������� � ������������ ������.
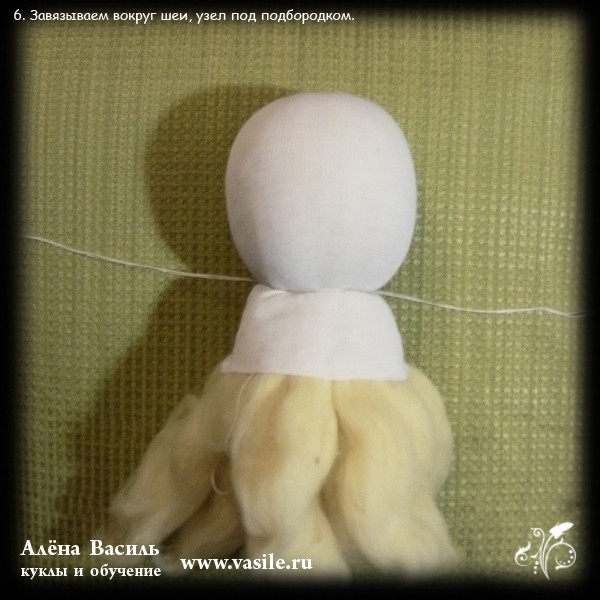
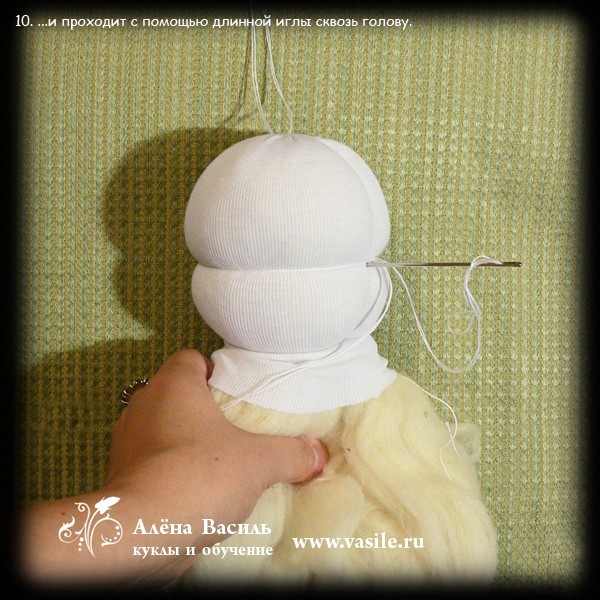
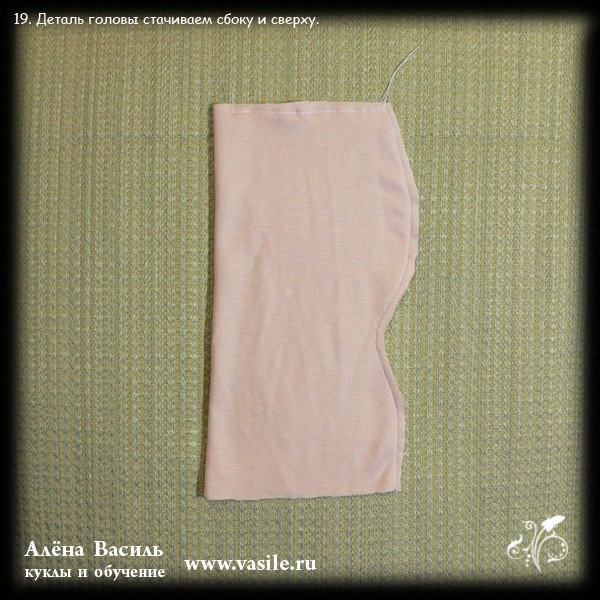
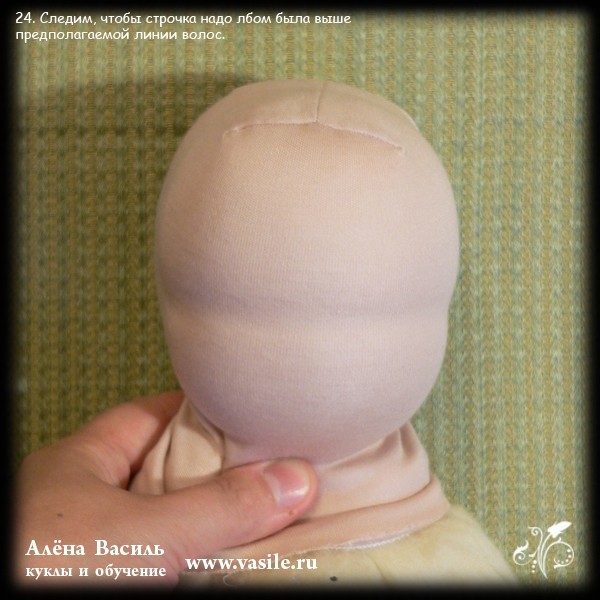
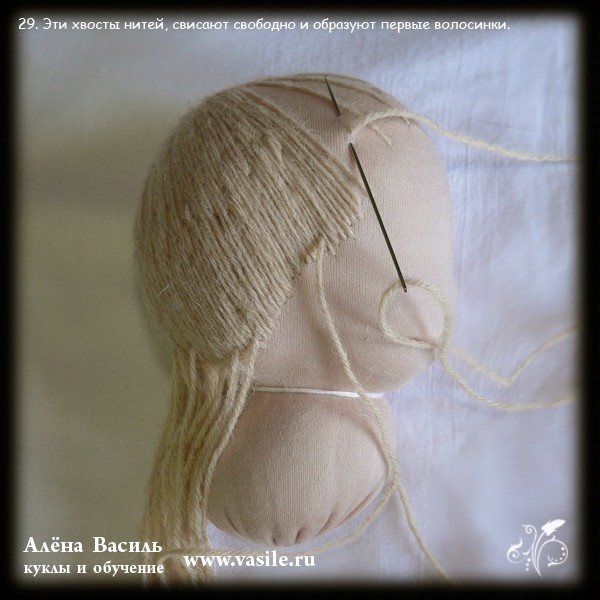
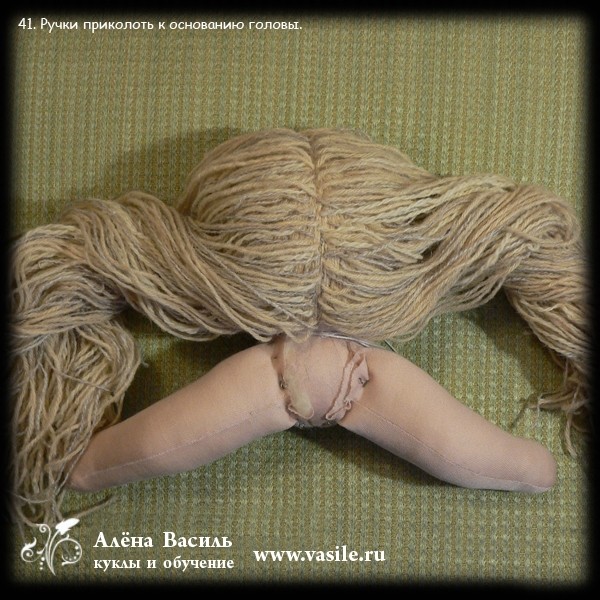
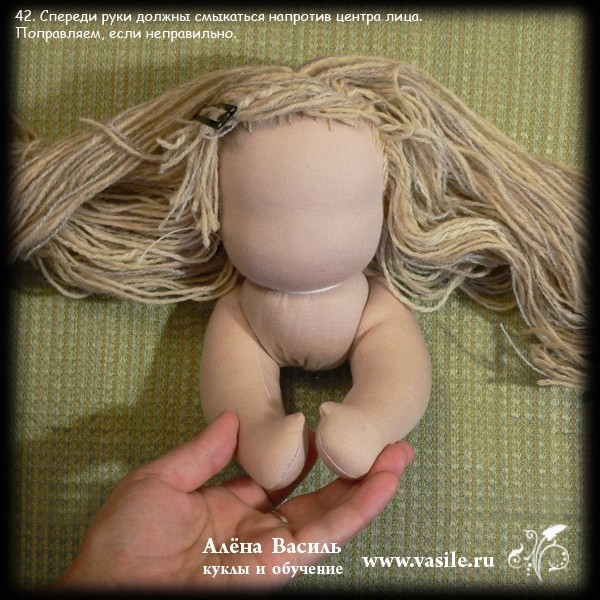
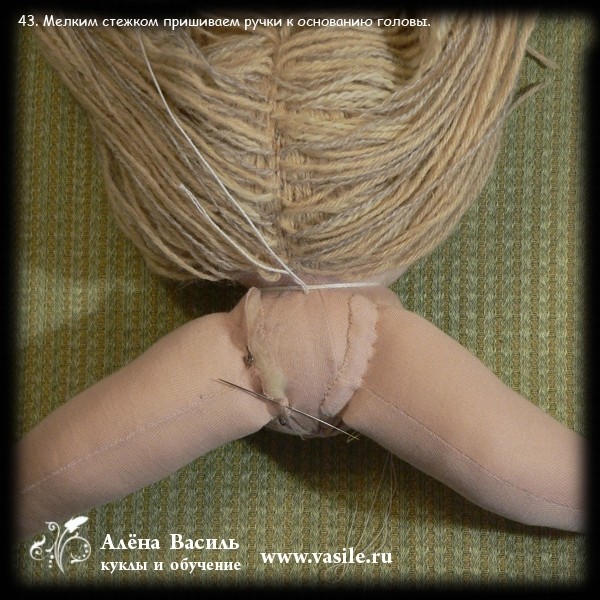
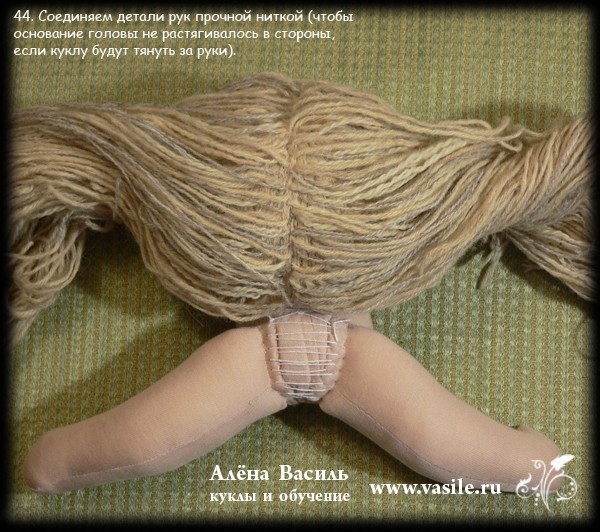
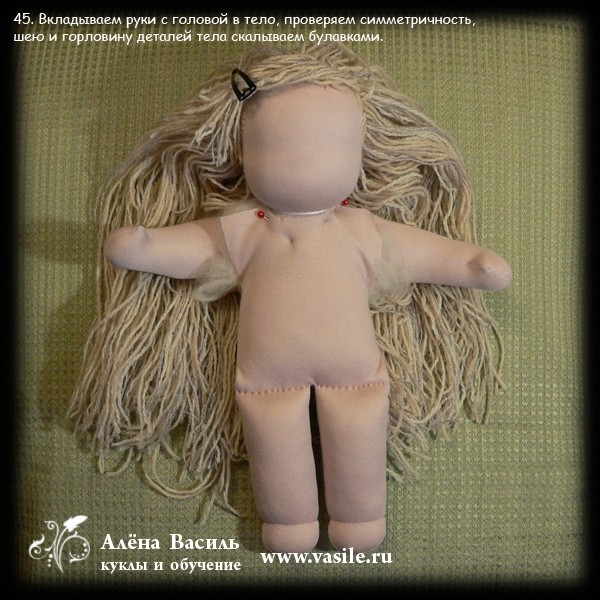
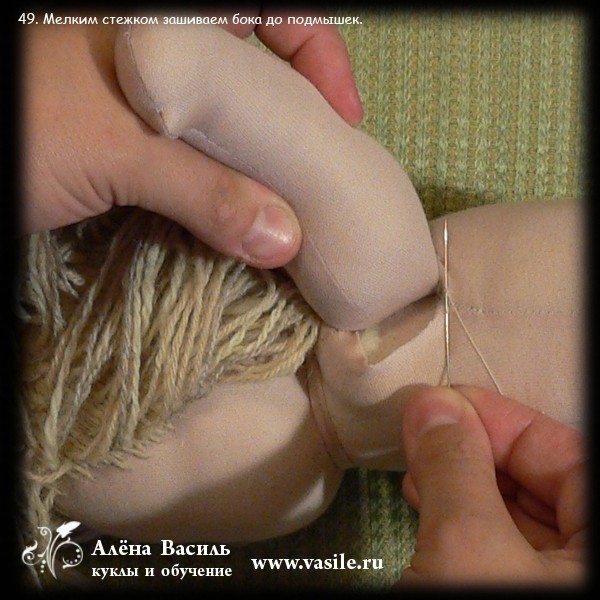
������-����� �� ����� ������. ������ ������ �����.

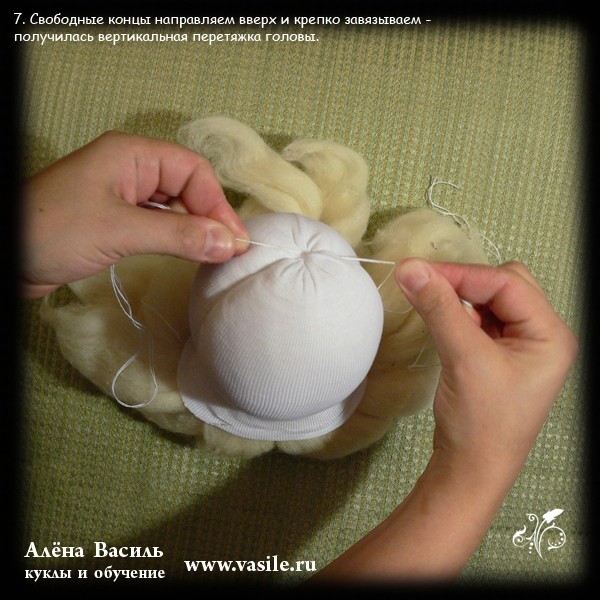
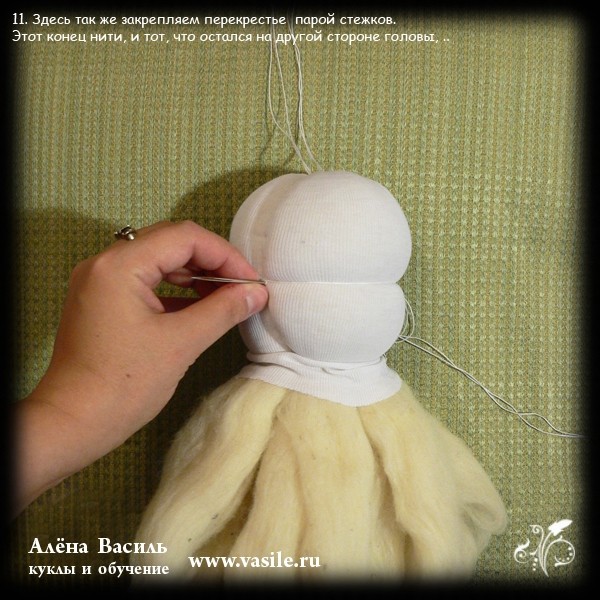
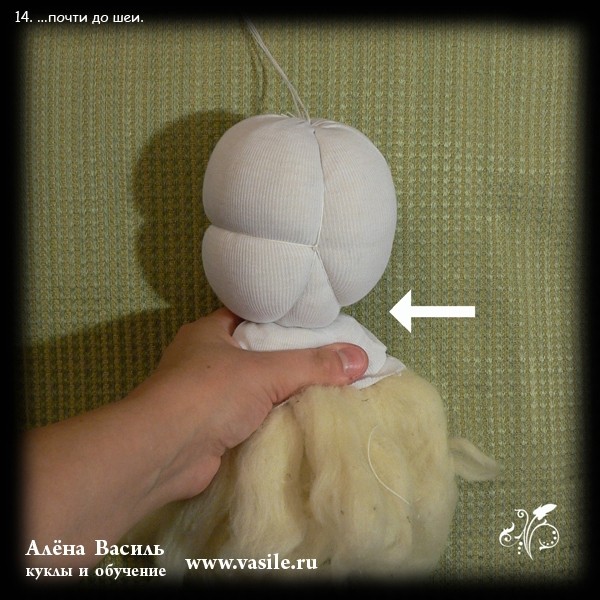
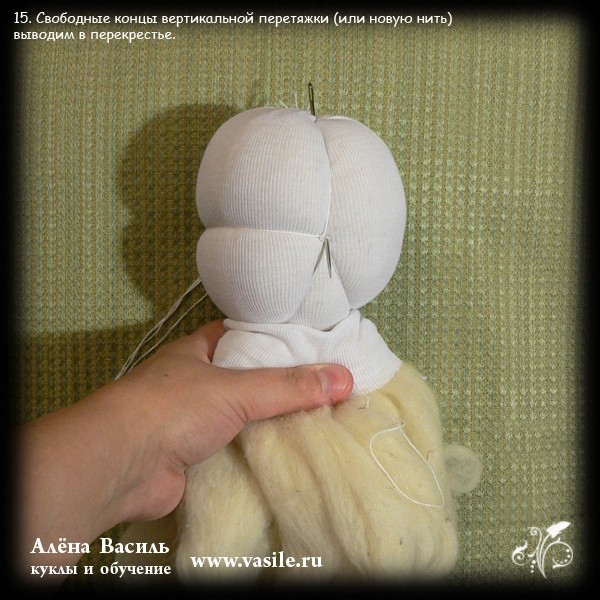
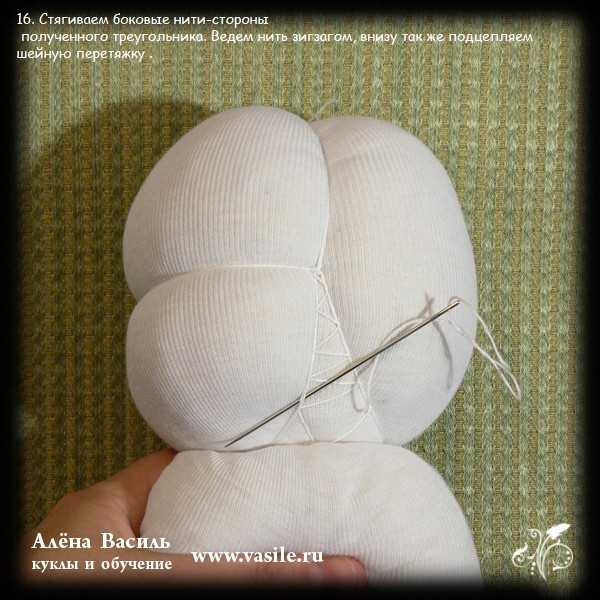
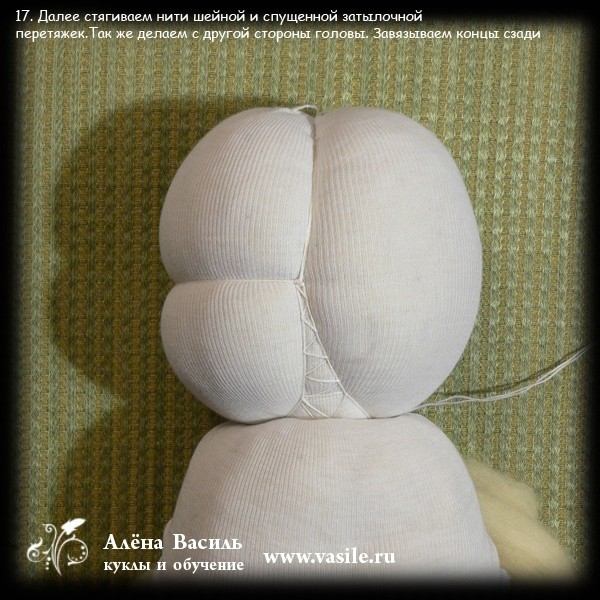

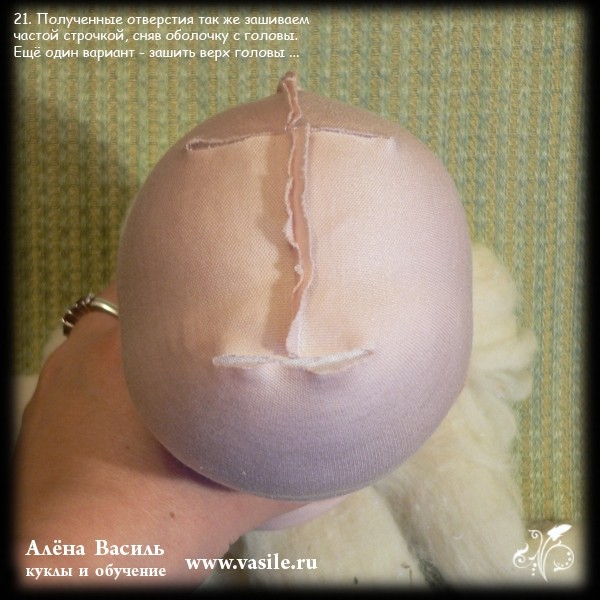
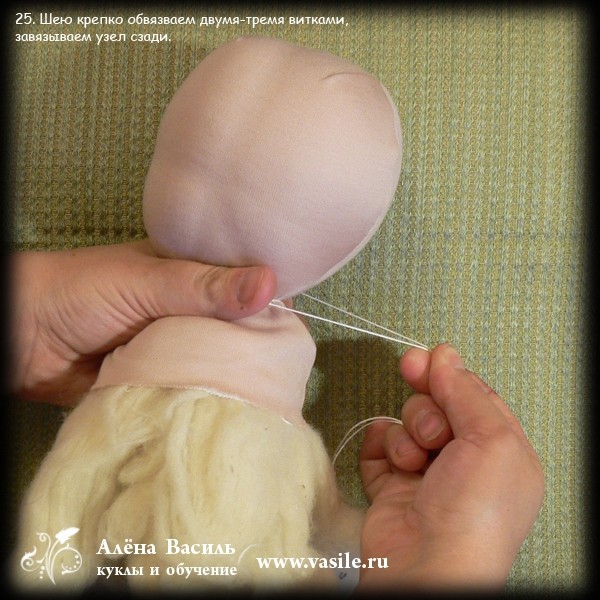
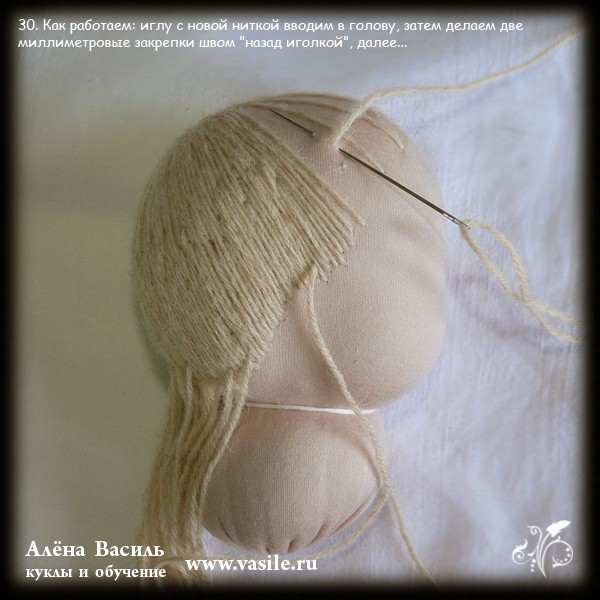
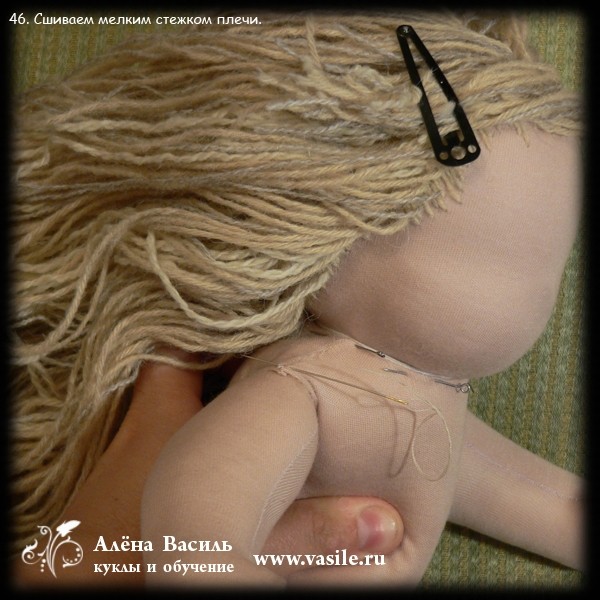
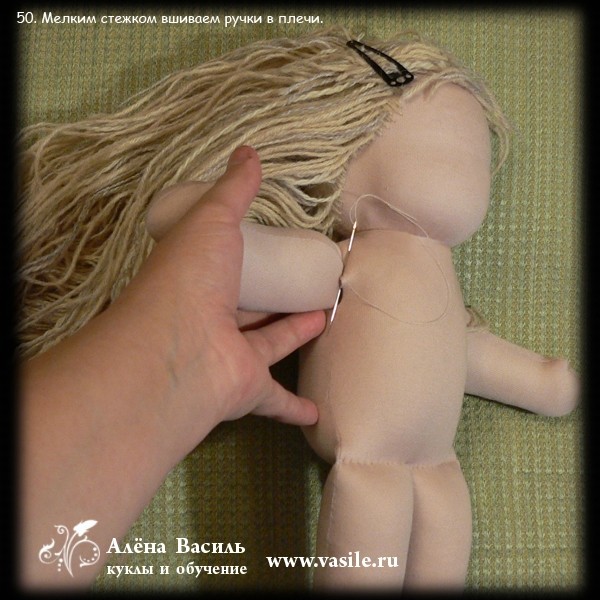
������-����� �� ����� ������. ��������� ������.

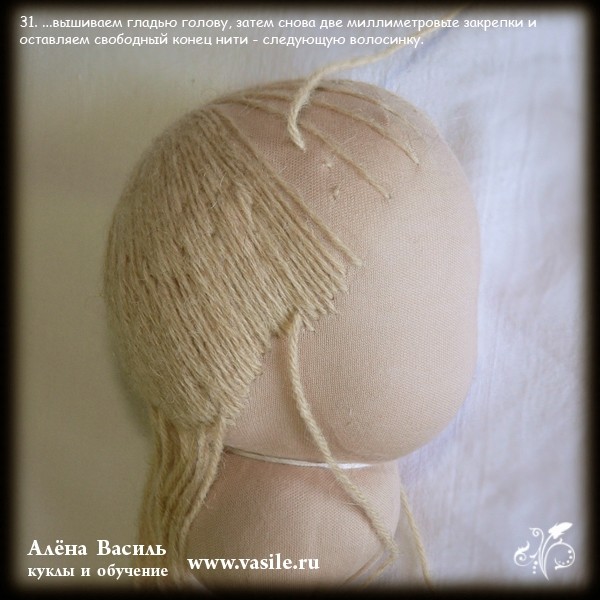
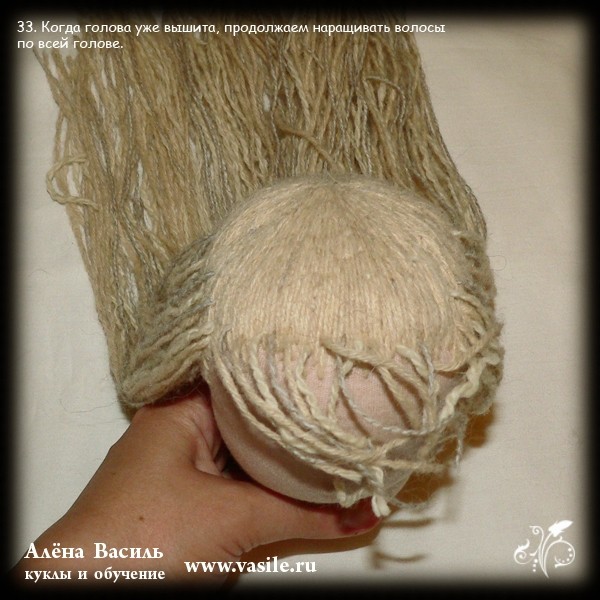
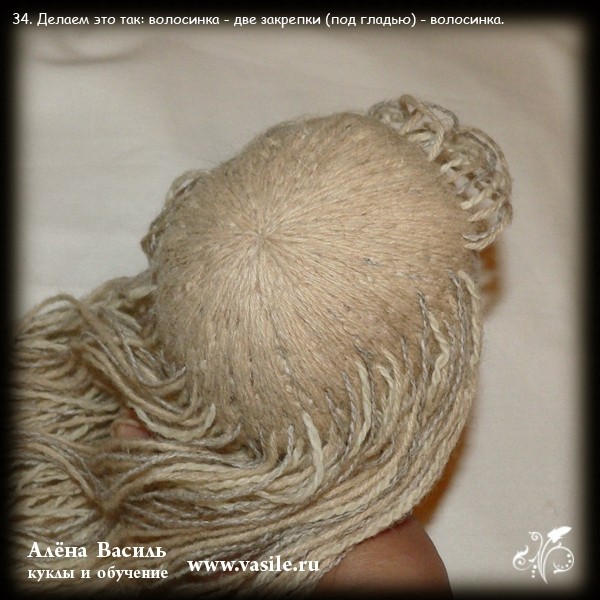
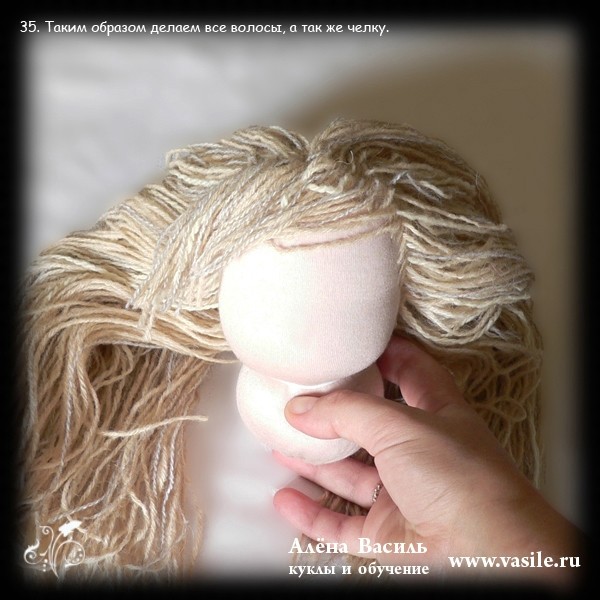
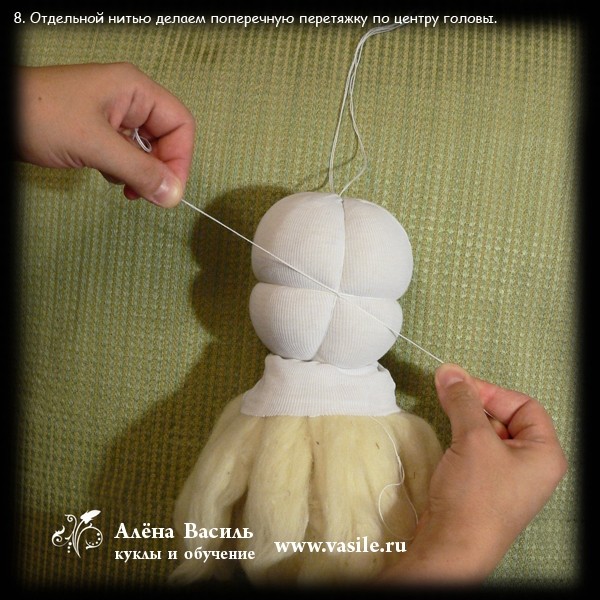
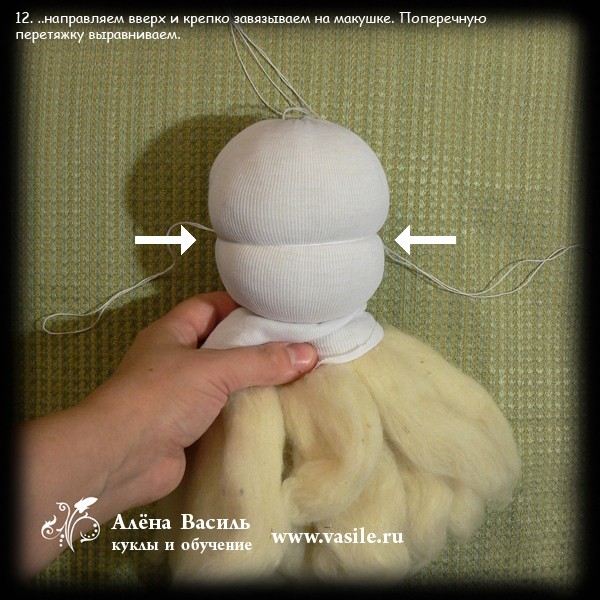
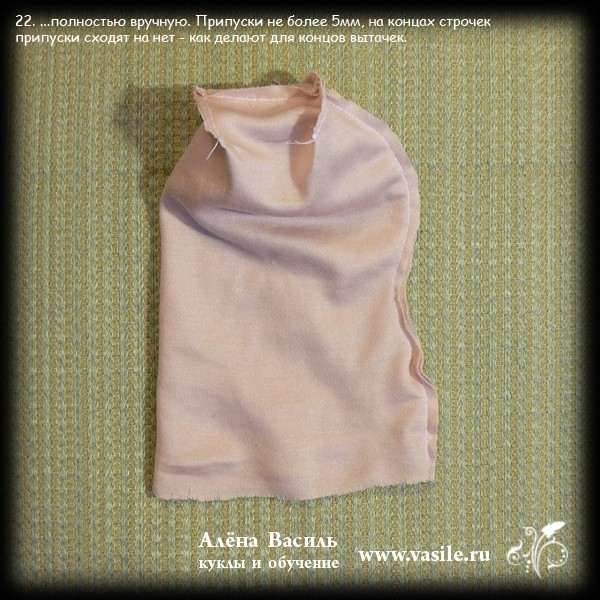
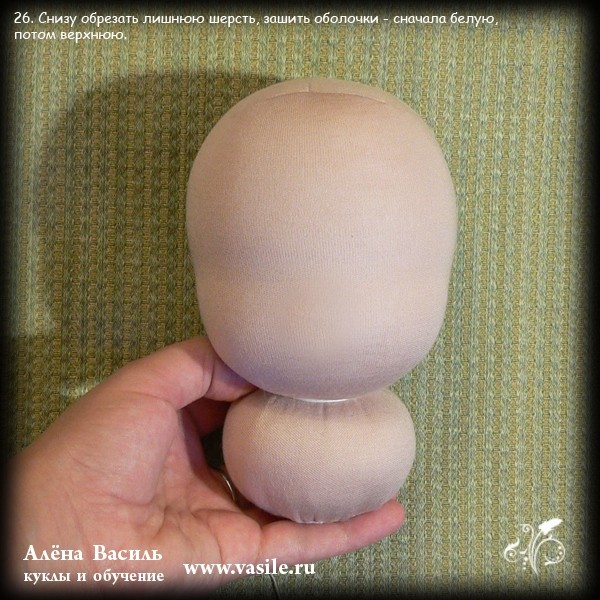
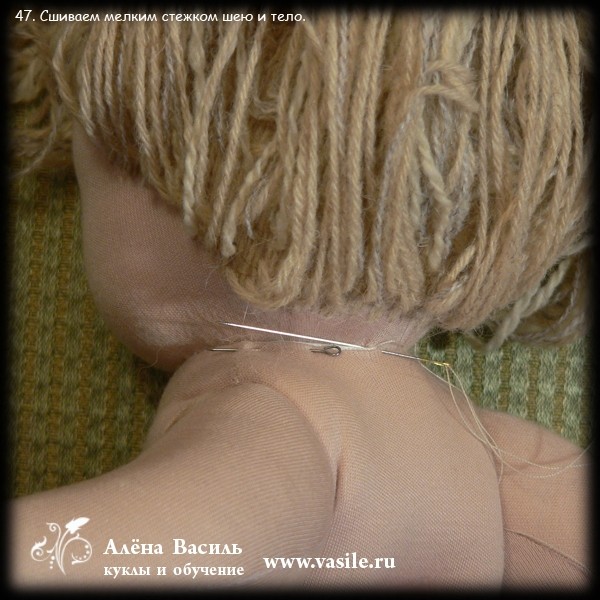
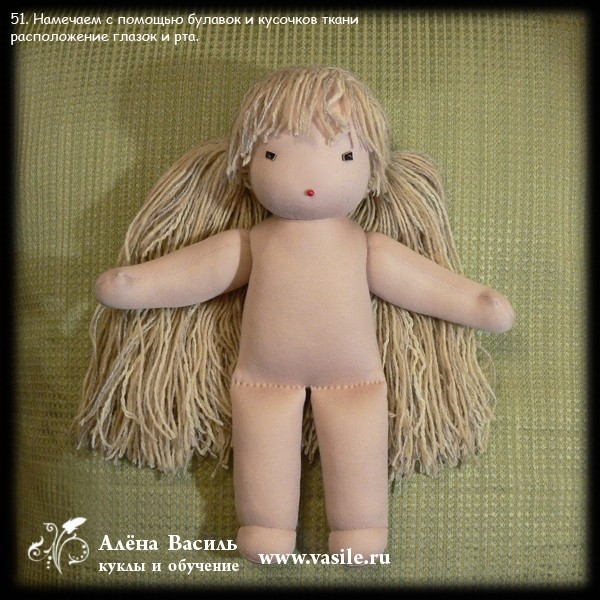
������-����� �� ����� ������. ������ �������� �����.

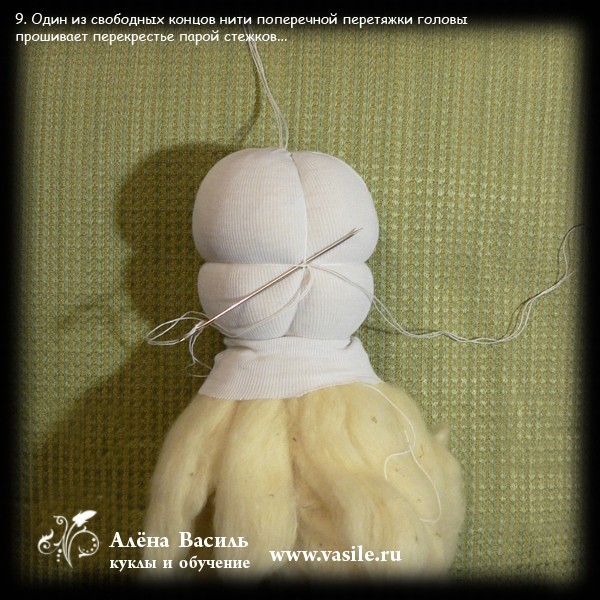
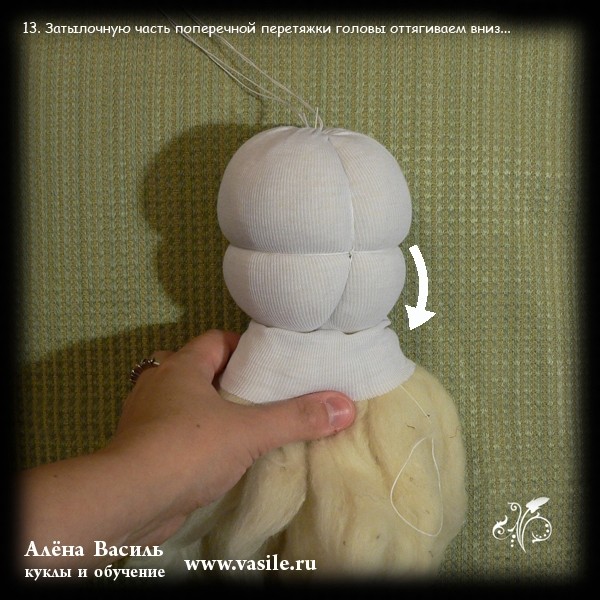
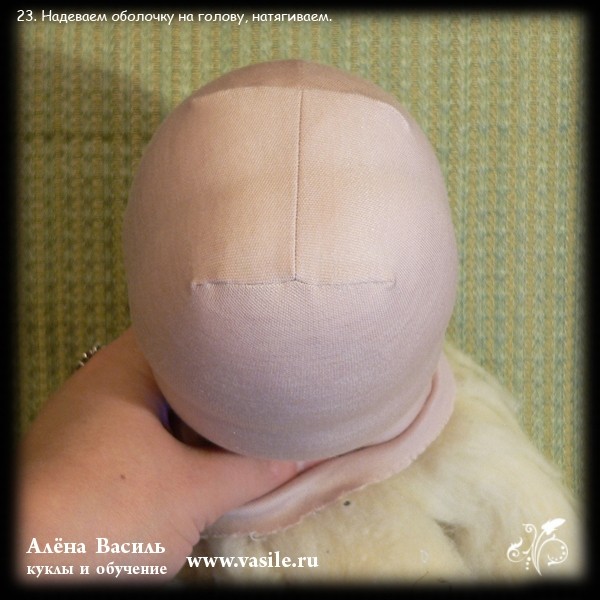
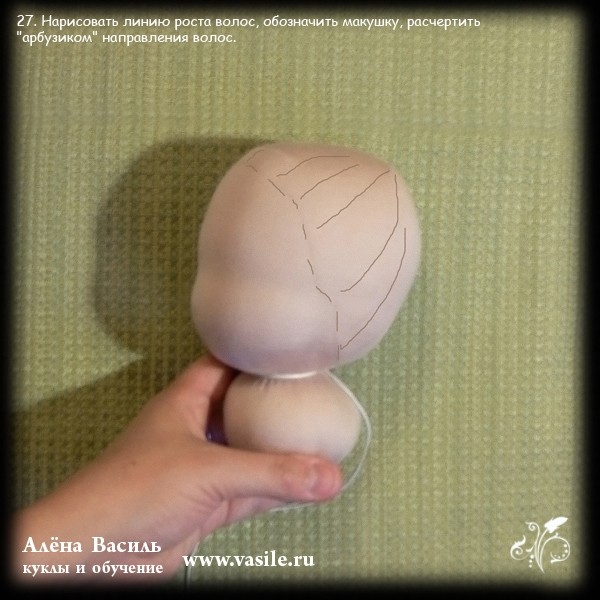
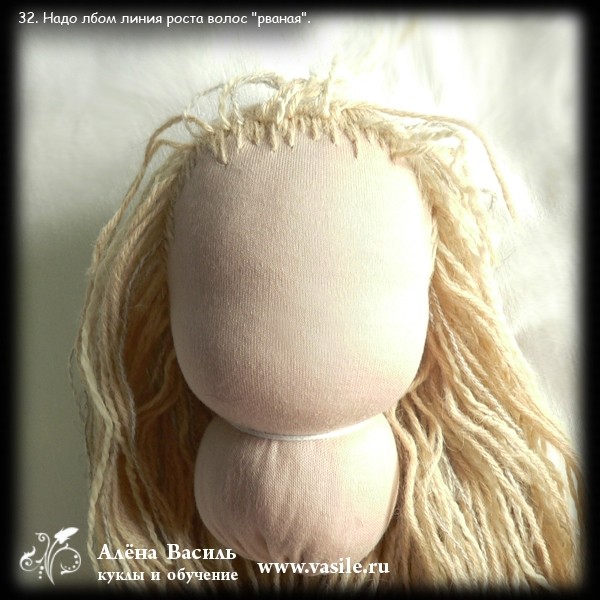
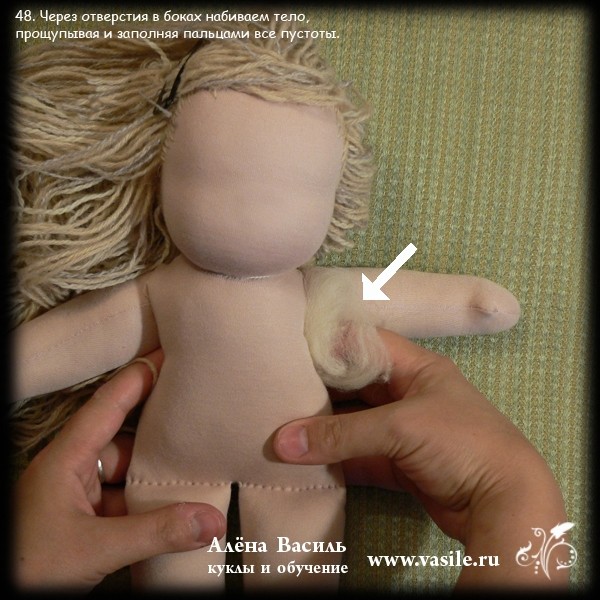
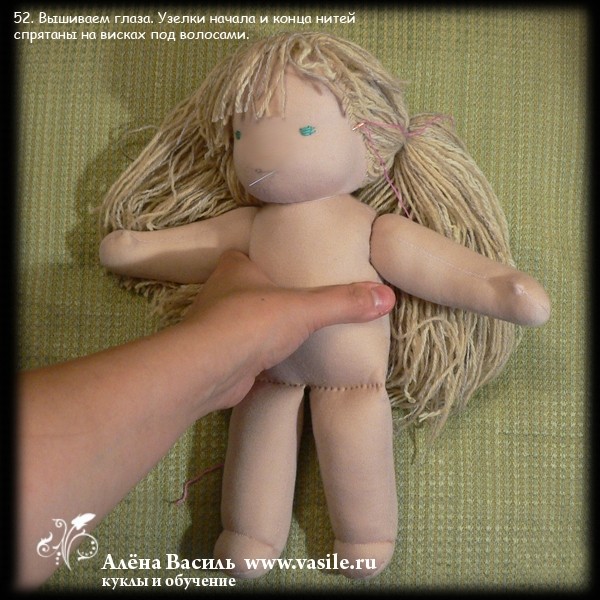
������-����� �� ����� ������. ������ �����.
��� ����� ����������, ��� ���� ������� ����������� ������������ ��������� �������. :)
�������� �� � ������ � ���� (��� ������� ������), ������ ��� ������ �� ��,
��� ���� �� ����� ��� ����, ����� ������ ������������ ����� ���������� � �����������.
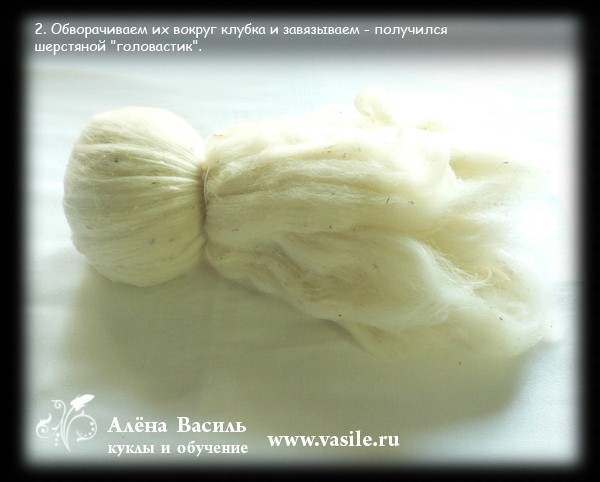
������� ����������� - ��� ���������� � ����������� ������������ ����� � ����� ������.
����� ����� "����������" �������� � ���������� �����.
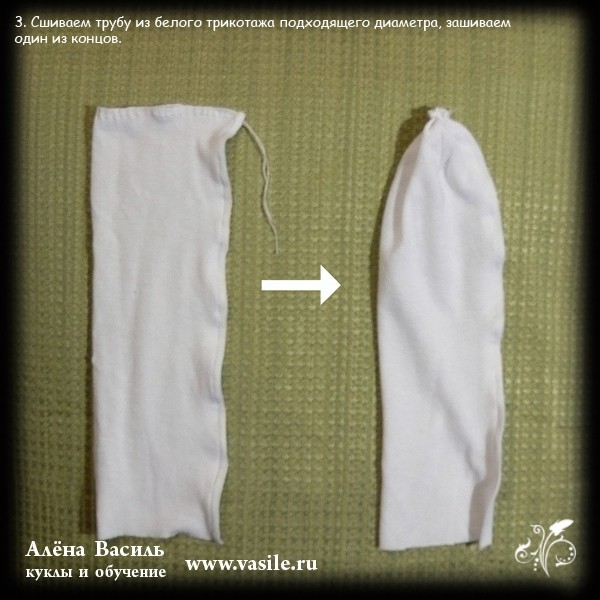
�� ����� �� ����� ��������� �����. � ��� ������� �� ������ ����������� ����
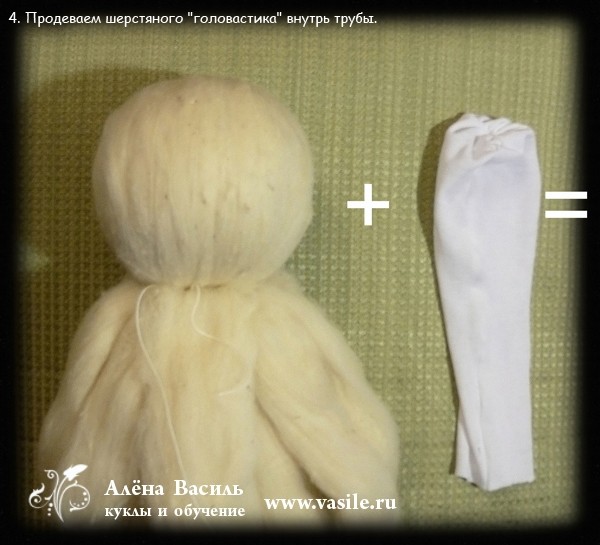
� ���� ������������� ���������� � ������ ���������� ������ �� ��� ��� ����� ������ ���������.:)
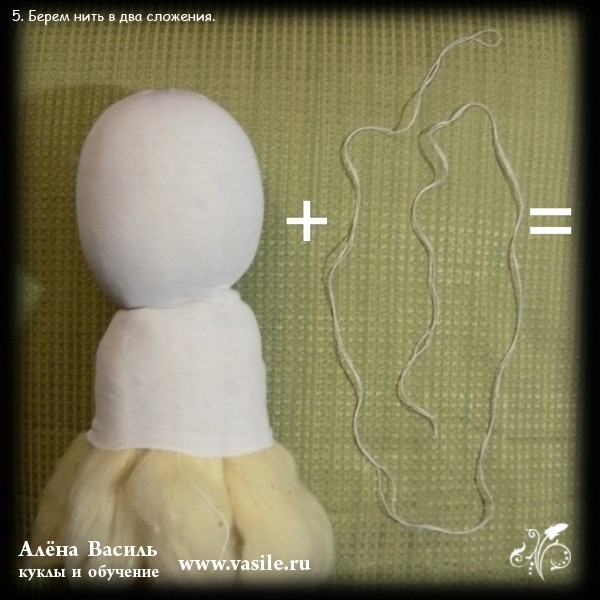
����� ������� �� ��� ������ ���������� ����� ���� ��� ������,
����� ������ ���� � ���������������� ���������� ��������������,
�� � ������ ��� ��� ������ ���������� ���� ���� � ���� ���������:
������� ����� ������ ���������� ������������ � ��-���� ����� "������� ����� ������������ ������",
��� ��� ���������� ��������� �������, ��������������� ���������
� ������������ ������������� �������� ����������� ������������ �����.
����� �����, �� ��� � �� ������ ������� ���, �������� ������ � ���������� �����
� ���������� ������ ����� �� ������� ������� ������� (��� ���� ����� �������!)
��� ������ ������� � ���������� ��� �� ��� �����. :)
��� �� ���� ���� ����� ������� ���, ��� ����� ������ ���� ���������� �����
�� ������ ��� ����� �����, �� � ��� ������ ������
- � ����� �, ����� ����, ���� ��������. :)
���� ��� ���������� ��� ������� ����������� � �� ������ ����� ������,
���� ������ �����, ��� �� ��� ����� �������� ��� ��-���� ���� -
��� ����:
"������� ����� ������������ ������"
http://www.vasile.ru/kurs.html
�����: ����� ����� ������ ����� |
�������� ���������� � �������� |
�����: ����� ���������� ���� ����� |
����������� �����-��������. |
�����: ����� ���������� ����� ���� |
������. ��+��������. |
�����: ����� ����� ������ ����� |
������� (��������) |
������� |

�������� � �������� ������������� ���������� ������, ������ �� ����� � �������� �����.
�������� �� ����������. ���� ������������� ��� ����� (����� �� ��� ���� ��� �����, ������ - �� ���������).


�����: ������� ����� ����� |
���� �������: ������ |
|
|
|
|
|
|
|
�������� � ����� ������� |
|
|
|
|
|
|
|
|
|
|
|
����� ��������� "���������� ��� ��������":
����� 1 - �������� ����� � ������
����� 2 - ��������
...
����� 6 - ����� ; 50 ������� � ��������
����� 7 - ����� �������: �������
����� 8 - ���� �������: ������
����� 9 - ����� �������: ������� 2
�����: ����� ����� ����� ������ |
����� 40-� �����, �����, �������� |
������� |

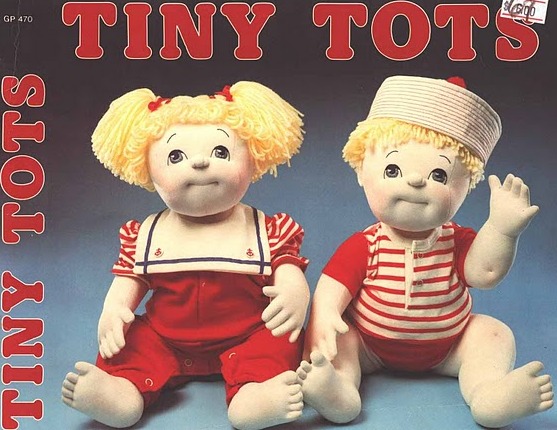
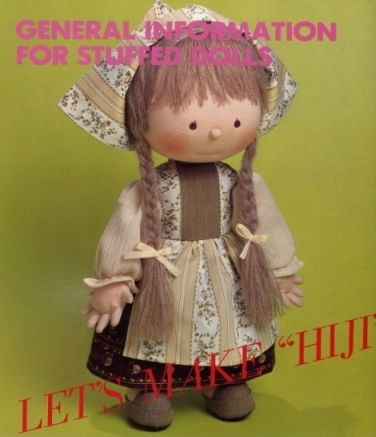
 This page contains patterns for a doll and three sets of clothes. The doll's body may be made of flesh, tan or peach broadcloth, percale or any plain cotton material. The blouse, panties and nurse's uniform are white and the pajamas and jumper in color print. All clothes may be made of percale, calico, chambray, gingham or any similar material. Use oilcloth, felt or material for shoes. Use six strand cotton for embroidery and straw yarn for hair. Cotton batting or a similar material is used for stuffing.
Material Requirements: (Use material that is 36 inches wide unless another width is given). Doll: 1/4 yard; embroidery thread; straw yarn for hair; string for attaching arms and legs; stuffing material. Pajamas: 1/4 yard; 3 tiny buttons, 3 snaps; 3/4 yard tiny edging. Jumper: 1/8 yard; 3 snaps. Blouse, Panties, and Nurse's Uniform: 1/4 yard; 5 inches of very narrow ribbon for bow; 8 tiny buttons; 11 snaps.
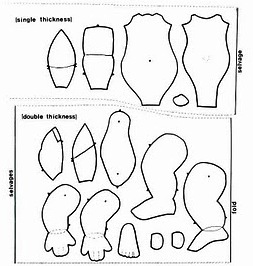
Transferring Pattern: Originally this was a transfer pattern. If you print out the JPEG image it should print the appropriate size. However, I have used a ruler so you can measure and make sure the size is correct. If it is the wrong size you should be able to go down to a copy shop and resize it or possibly you have a program for you to edit the JPEG. The clothing was not to be transferred. Use the pieces as you would a tissue pattern, cutting out all pieces as marked on patterns. Cut the remaining pieces from the pattern. Pin securely in place. You can use dressmarkers's carbon paper and a tracing wheel to transfer makings.
Cutting Directions: Note*To scan the pattern piece that runs down the center of the head and body I had to cut it in half. After copying the pattern all you need to do is tape them together. Cut on the outer line; the inner broken line is the sewing line. The small lines at right angles to the outer lines indicate slashes. Cut slashes. Nurses Head-Dress: Cut a piece of material 5X9 inches for nurse's head-dress.
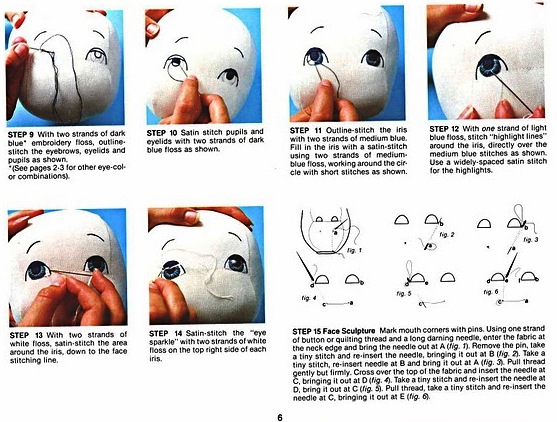
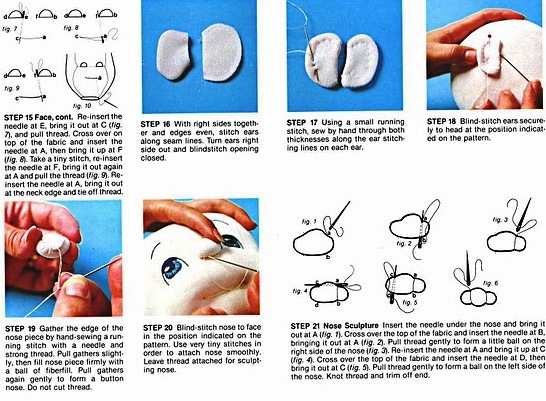
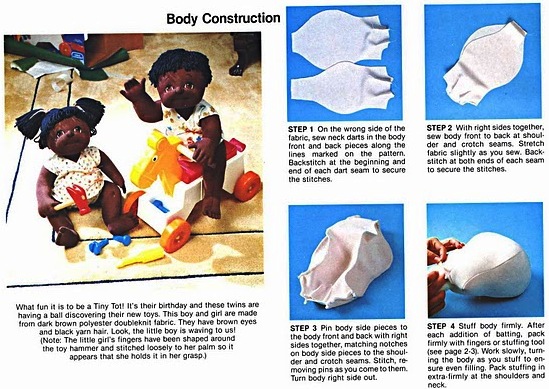
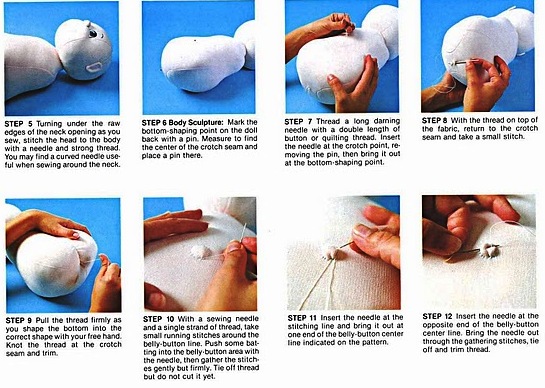
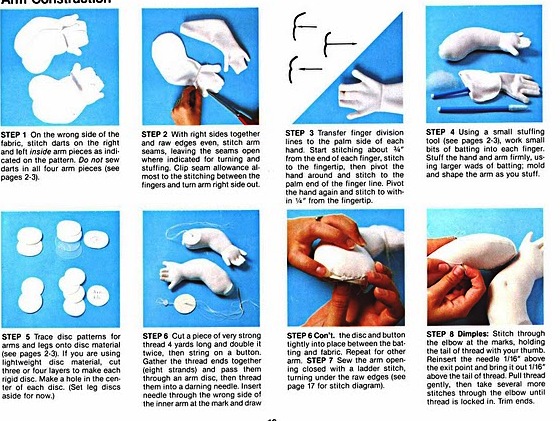
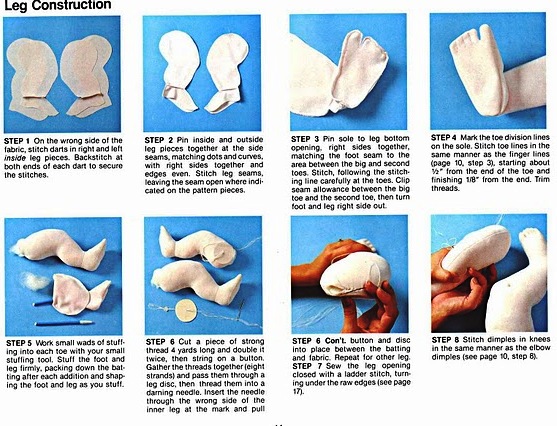
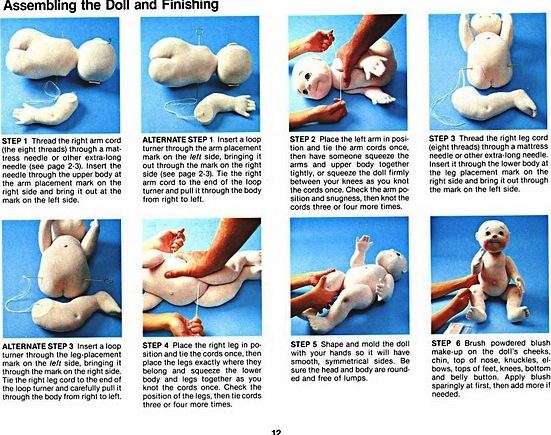
Sewing Directions: Embroidery: Work nose and mouth in outline stitch. The eyes are to be embroidered in satin and outline stitch after doll is stuffed. Embroider red crosses on nurse's uniform in satin stitch. Making Doll: Sew all darts; the doll's body is made of three pieces. Match parts of eyes on the long piece with those on the side body pieces and seam all three pieces together wrong sides out leaving a small opening in one seam. Slash edges; turn and stuff body. Sew opening shut. Join two pieces together for each leg and arm; slash edges; turn and stuff them. Sew openings shut. Thread a needle with string and attach legs onto each side of body pushing needle through circles on each leg and lower part of body. Knot ends of string so that legs will be held firmly to body, yet are movable. Attach arms to body in the same manner. Embroider eyes; color cheeks with a pink wax crayon.
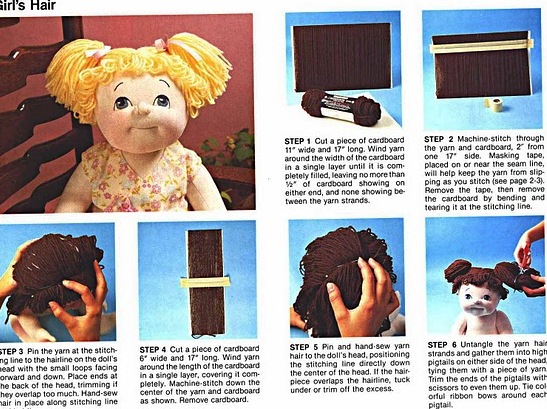
Making Hair: Sew straw yarn to head along guide dots as follows: Place a single strand of yarn on first dot and tack firmly to head allowing 3 inches of yarn to extend from either side of dot. Do not break thread. Take a stitch on next dot and sew yarn to head in same manner; see detail. Sew yarn to all dots leaving 3 inch lengths toward front of head, 4 inch lengths at sides and 2 inch lengths at back. This makes hair shorter at front and gradually longer at back. Tack yarn to head along dashed lines. Roll a cloth 7 inches long and about as thick around as a pencil and pin to head underneath hair just below dashed line, staring at forehead; see detail. Pin roll around side to bottom back of head and around other side ending at forehead again. Place hair around outside of roll, tucking in all loose ends. Dampen hair around roll and leave until thoroughly dry. Remove roll and comb hair around finger.
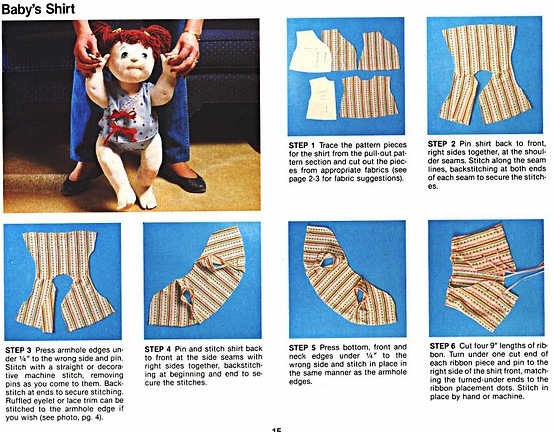
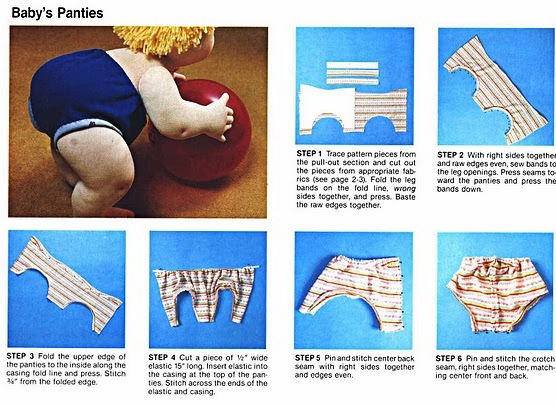
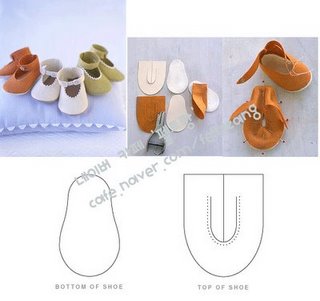
Making Clothes: Panties Seam front and back seams. Place these together and seam leg seams. Hem top and leg openings. Work a running stitch around hem line of leg openings with six strand cotton and gather, leaving ends extend to tie in a bow. Pajamas:Seam shoulder and side seams of pajamas top. Seam sleeves. Match underarms seams and sew sleeves to armhole, easing sleeve slightly across top to fit. Hem neck, front opening, bottom, edge and sleeves, attach edging. Sew fastenings to opening. On the pajama bottom, seam center back and front and leg seams same as panties. Hem top and leg openings. Blouse:Seam shoulder and side seams. Seam sleeves, gather top to fit armhold and sew to armhole. Hem bottom of sleeves and gather to fit arms. Hem neck, back opening and bottom edge. Sew snaps to back opening and tack a tiny bow at front of neck. Jumper: Seam shoulder and side seams. Hem neck, armholes and back edges. Seam short edges of skirt 2 inches and make a placket by hemming rest of seam. Gather top edge of skirt to fit waist of jumper. Sew skirt and top together. Hem lower edge of skirt. Sew snaps to back eges. Nurse's Uniform: Embroider crosses on dress and head-dress. Seam shoulder and side seams. Seam gores together for skirt. Sew top and skirt together, easing top to fit top of skirt. Sew collar to neck edge. Seam sleeves to with 1/2 inch of lower edge and hem rest of seam to form a placket. Gather lower edge to fit between dots on cuff. Bind bottom with cuff. letting cuff extend at back edge to overlap. Sew sleeves to armholes easing them to fit. Hem front opening and lower edge. Sew buttons and snaps in place. Make belt. Hem edge of piece for head-dress and sew snap at back for fastening. Shoe and Slippers: Seam front and back seams on shoe top. Place cardboard sole between the two pieces of material for sole. Turn raw edges in and overcast pieces together. Sew sole to top of shoe. Hem top opening. Make other shoe and slippers in same manner. Attach pomons to slippers.

 |
 |
 |
|---|---|---|
 |
 |
 |
To print the patterns first download doll-pat.zip. This file has all six pattern sheets and the above stitching guide. Each pattern is exactly the same width is size.
Load a pattern sheet with a graphics program and print it to get an idea of the scale. There is a ruler at the top of each page.
To make pages print larger crop the width of the page following the ruler guide and print it again. Each page will need to be cropped in an identical manner to keep all pattern pieces to the same scale. If you do crop the images, make sure the width of each page image is exactly the same, before you print them.
�����: ����� ������� �������� ����� |
������� �������(������� ��������) |
�����: ������� ����� �������� |
����� ��� ����� � ����� 2 |
�����: ����� ��� ���� ����� ����� ��� ����� |
Burda. ����� � ��� ������! � 1 2012 (���� � �����) |
������� |
����� ������ �� ������� ���� � �����.


������ ����� ������ ������� �� Burda �������� �������� ������ ���� � �����. "���� ������ ������" – ��� ����� ��������� ��������� �� ����, ��� ����� ������� �����������, �������� ���� ����������������, ����� ����������� �����. ��� �� �� �� ����: ����������� ��� �������� ��������-���������� – ��� ������� ������ ��� ��� ������������ ������������ �� �����! �� ��� ��������� �� ������� ���������� � ������� ��������� �� � �� � � ���������� �������������. � ������ ������ ����������: ��� ��������� ������ ����������, ��� ������� �������� �����, ����� �������� ��������� �������� �� ����� ������, ��� ��������� ����� ����� � ���������� ���� ������, ��� ������������ ������� ����� ��� �����, � ������ � �������� ����, �� ��������� ������ � �������, � ����� � ������ ������.
��������: Burda. ����� – ��� ������!
�����: ���������
������������: Aenne Burda GmbH & Co. KG
��� �������: 2012
�����: 1
����: �����
��������: ��������
������: 31,2 Mb
���������� �������: 71
ISSN: 2222-8497
��� �������: ������
����: �������
������� ����:
�����: ������ ������ ����� ���� ����� |
������ ��� ������-��������� (�������� ��� �������, �����) |
������� |


�����: ����� ��� ���� ����� ����� |
Burda Special �2 2012 (�033). ������� ���� (�����) |
������� |
���� – ������ ��������� ��� ����, ����� ������ ����. ����������� ������ ������� Burda, ����������� ������� ����, � ������� �� ������� ������ ������ ������� � ������ ��� ������� ������� � ���������� ������������ � ����������.
��������: Burda Special �2 2012 (�033). ������� ����
�����: ���������
������������: ������ �����
��� �������: 2012
����� �������: �2(�033)
ISBN -
����: �����
��������: �������
������: PDF + JPEG
������: 70,2 ��
���������� �������: 61 + ��������
��� �������: ������
����:�������
�������:
�����: ������ ����� ��� ����� |
����� �������(����) |
������� |

这是一个很形象的布娃娃,而且制作也非常简单!
提示:纸样特为A4打印纸绘制,所以被分为两部分,打印好之后要记得要粘贴使用!
1. 依据纸样裁剪两块面料,然后将它们正面朝里对齐缝合一圈,头顶不要缝上:

2. 翻到正面,从头顶往里面塞填充棉,先塞满双腿,然后用丝带把关节处系住(目的是便于活动):

3. 继续塞填充棉,把胳肢窝、脖子也系上丝带:


4. 接着来做 Baby 的头发,方法也很简单,在一束毛线当中裹进一个小球,然后扎紧就行了:

5. 再接下去就是把Baby的头发装上并把头顶开口收紧,最后就是修饰Baby的脸部了, 你可以使用手绘或者手绣的手法。最后在Baby的脸蛋和手背上抹一点腮红。

呵呵,给他穿件衣服试试!

�����: ������� ����� ���� ����� |
������� ������� ( ����� ������-�����) |
������� |
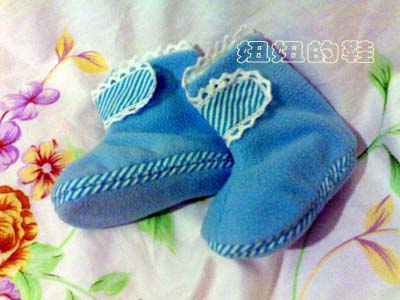
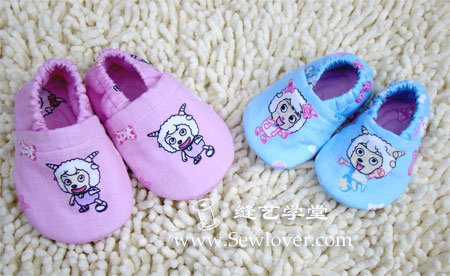
������ �� ��������� ����� http://www.sewlover.com/ ��� ����� ����������� ���������. ���� ��� � �� ��������� �� ����� �������� � ��� ��������!

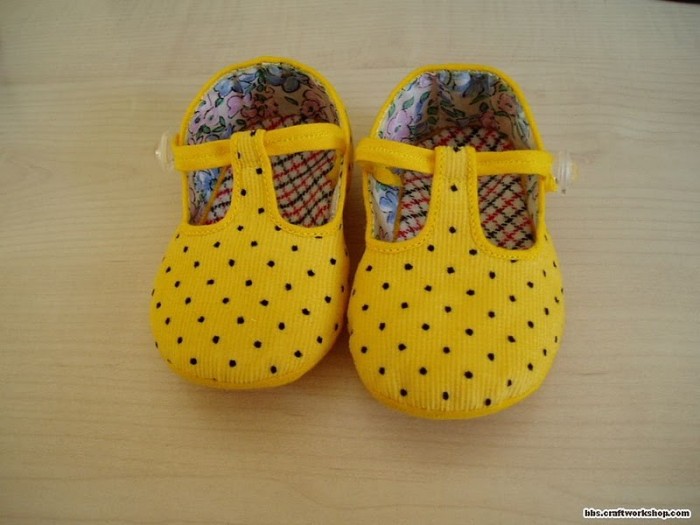
1. 鞋子的这些零部件包括表布、里布、内衬若是一片片裁剪很麻烦的~~ 为此我们可以将所需的所有层裁剪成一大片熨烫粘合在一起后再裁剪。鞋底部分相对要厚一些,我们就把它们单独分开,它们的用料长度也就是鞋底的长度略微加 长,宽度是鞋底的2倍宽度+。剩下的鞋面和鞋帮用料是一样的,2个鞋面+2个鞋帮的总用料约为22cm宽× 25cm长,这样大小即使最大的12号也够了。

再来看下鞋底的用料,从下到上分别是一层防滑点塑布、硬衬、辅棉和表布,它们的大小一样,为方便制作,可再裁剪几片双面热熔胶将它们相互粘合。熨烫 的方法是,点塑布铺在最下面,再上面铺上硬衬熨烫粘合;然后在硬衬上+双面胶+辅棉+双面胶+表布,熨斗开蒸汽压在表布上方将所有层粘合。
鞋面和鞋帮用料从里到外分别是一层里布、一层布衬(或辅棉),一层表布,他们相互间同样需要用双面热熔胶来粘合。

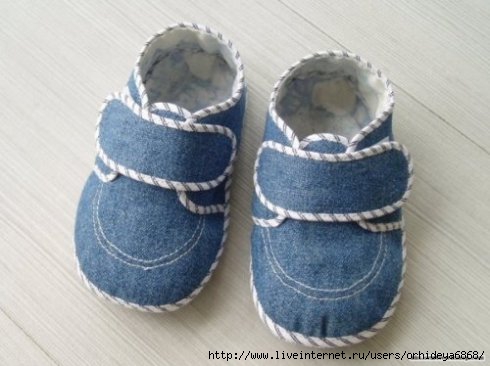
2. 用纸型在熨烫粘合在一起的鞋底上画出轮廓线,同时做出记号点,注意两只鞋底要成镜像摆放:

3. 如下图的排版方式在另一块粘合好的布布上画出两只鞋面和两只鞋帮的轮廓线:
4.沿轮廓线内侧将所有的零部件剪下:

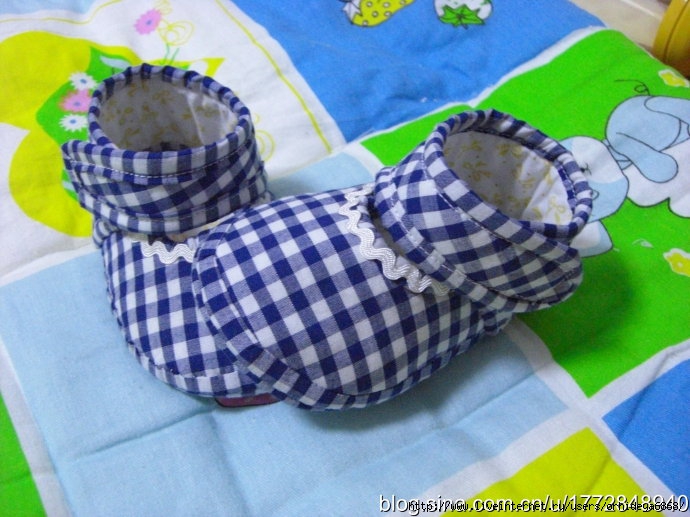
5. 在鞋帮和鞋带上缝合魔术贴,注意把魔术贴的毛毛面缝在鞋带这边,这样就不会勾到宝宝的袜子了~~ 同时要主意一边缝在表布上另一边缝在里布上的哦~~ 通常的魔术贴会比鞋带宽,因此我们可将魔术贴垫在鞋带底下沿边缘疏缝,然后沿鞋带边缘修剪魔术贴:

6. 给鞋面和鞋帮进行滚边,滚边的位置如下图所示。滚边不宜过宽,0.5厘米宽就行。所以滚边条也只要2厘米宽就够了。滚边的方法你可以自由选择,怎么拿手就怎么来~~

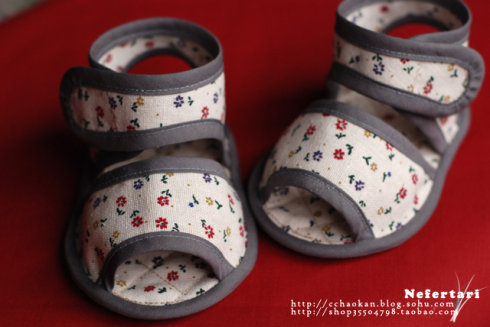
7.将鞋面上的带子朝里面对折并缝合。然后 将鞋面和鞋帮固定缝合在鞋底上。鞋底前面有两个记号点,分别将鞋面的前端对准记号点缝合,而鞋帮正好和鞋面相连接就可以了。注意鞋带是从内侧往外扣的,位置别弄反了:

8. 最后对鞋底边缘进行滚边,鞋底较厚,所以滚边条需要裁剪成2.5厘米左右才够哦~~


�����: ����� ��������� ���� ������-����� ����� |


![[2-774726.jpg]](http://1.bp.blogspot.com/_qgukoTt2wXw/SXSuUAx-RfI/AAAAAAAAA0w/W43YIPXqQmU/s1600/2-774726.jpg)
![[1-773777.jpg]](http://2.bp.blogspot.com/_qgukoTt2wXw/SXSuUAYDvDI/AAAAAAAAA0o/HimRPqkGS30/s1600/1-773777.jpg)
![[3575094077_c2fea29187.jpg]](http://3.bp.blogspot.com/_qgukoTt2wXw/Std0IlbjiJI/AAAAAAAACFo/8-5ycJ6bYjI/s1600/3575094077_c2fea29187.jpg)
![[3575902070_b3da83f1fc.jpg]](http://1.bp.blogspot.com/_qgukoTt2wXw/Std0Iyd0QrI/AAAAAAAACFw/KM5cp9U6YCU/s1600/3575902070_b3da83f1fc.jpg)
![[3362118151_4039bf72cc.jpg]](http://3.bp.blogspot.com/_qgukoTt2wXw/StdzI5WqXiI/AAAAAAAACFA/3yjYAjEYTnY/s1600/3362118151_4039bf72cc.jpg)
![[3202369330_183b265b9e.jpg]](http://3.bp.blogspot.com/_qgukoTt2wXw/StdzIIRJacI/AAAAAAAACE4/64UWkqR2rvY/s1600/3202369330_183b265b9e.jpg)

 <>
<>


