-Подписка по e-mail


 -Рубрики

 -Метки

дидактическая игра по математике дидактическая игра по теме "фрукты" домик для кукол своими руками жираф жираф поделки жираф сказки занятия с детьми игрушки своими руками избушка на курьих ножках своими руками кукольная мебель своими руками кукольная миниатюра кукольная миниатюра 1:12 кукольная миниатюра своими руками кукольные домики кукольные домики своими руками кукольный домик кукольный домик ручной работы кукольный домик своими руками лягушка мебель своими руками миниатюрные домики миниатюрный домик своими руками новогодние игрушки своими руками новогодние поделки своими руками новогодний декор новогодний сувенир новый год поделки из картона поделки из яичных лотков поделки по теме "колокольчик" поделки по теме "цветы" поделки с детьми развивающие игрушки своими руками саванна животные саванна макеты саванна поделки саванна растения сказочные домики сказочный домик слон слон поделки слон сказки творческие занятия с детьми текстильная игрушка текстильная лягушка текстильные игрушки текстильные игрушки своими руками тематическое занятие тематическое занятие саванна цветы из бумаги

 -Музыка

 -Поиск по дневнику

Поиск сообщений в NadinkaNadinka

 -Сообщества

Читатель сообществ (Всего в списке: 1) Полезные_хитрости

 -Статистика

Статистика LiveInternet.ru: показано количество хитов и посетителей
Создан: 11.05.2012
Записей: 2661
Комментариев: 1486
Написано: 5352

Серия сообщений "СУМКИ, ЧЕМОДАНЧИКИ":
Часть 1 - Маленький чемодан (кукольникам) Мастер-класс.
Часть 2 - Сумочка
Часть 3 - Сумочка
Часть 4 - Сумочка
Часть 5 - Сумочка для кукольного домика
Часть 6 - Чемоданчик для кукольного домика
Часть 7 - Подарочный пакет для кукольного домика
Часть 8 - Сумочка для кукольного домика
Часть 9 - Сумочка

Выбрана рубрика СУМКИ, ЧЕМОДАНЧИКИ.


Соседние рубрики: Часики.(2), Скамейки(3), ПОСУДКА(17), ПЕРСОНАЖИ, КУКОЛКИ, ЗВЕРИКИ(19), Освещение, лампочки, абажуры(1), МЕБЕЛЬ(9), КОРОБОЧКИ, ТУЕСКИ, БОЧОНКИ(4), Корзинки.(10), Колясочки(2), КАК СТРОИТЬ(14), ИМИТАЦИЯ СНЕГА, ИНЕЯ(4), ИМИТАЦИЯ КАМНЯ(11), ИГРУШКИ(14), Еда, продукты(1), ДОМИКИ(5), ДЕРЕВЬЯ(8), АКСЕССУАРЫ(36)

Другие рубрики в этом дневнике: ЦВЕТНОЕ, РАЗНОЦВЕТНОЕ(2), Фотография(0), УХОД ЗА СОБОЙ(14), Смешное)))(7), Светлое, доброе(146), РУКОДЕЛКИ. ЦВЕТЫ, ДЕРЕВЬЯ И ГРИБЫ(44), РУКОДЕЛКИ. ТЕКСТИЛЬНАЯ ЕДА(39), РУКОДЕЛКИ. СУМОЧКИ(7), РУКОДЕЛКИ. ПРИЕМЫ, ТЕХНИКИ, ТОНКОСТИ,(9), РУКОДЕЛКИ. ПЛЕДЫ(2), РУКОДЕЛКИ. ПАННО(9), РУКОДЕЛКИ. КОВРИКИ(10), РУКОДЕЛКИ. ИЗ РАЗНЫХ МАТЕРИАЛОВ(54), РУКОДЕЛКИ. ЗВЕРУШКИ И ПТИЧКИ(118), РУКОДЕЛКИ. ДЛЯ ДЕТЕЙ(183), РУКОДЕЛКИ. ВЯЗАНИЕ.МК(31), РУКОДЕЛКИ. АППЛИКАЦИИ(21), РУКОДЕЛКИ. КУКЛЫ(77), РУКОДЕЛКИ(381), РЕЦЕПТЫ(273), РАЗНОЕ(4), ПРАЗДНИКИ(11), Полезное(36), НОВЫЙ ГОД(247), НАСТРОЕНЧЕСКОЕ(12), МОИ РАБОТЫ(48), Мои дети.(10), ЛИЧНОЕ, ЖИЗНЕННЫЕ ПЛАНЫ(7), КЮСША-НАСТЮША И ВСЕ-ВСЕ-ВСЕ(17), КУКОЛЬНАЯ МИНИАТЮРА. МАСТЕР-КЛАССЫ.(173), КУКОЛЬНАЯ МИНИАТЮРА(103), КОМПЬЮТЕР, ПРОГРАММЫ(21), Колокольчик. Поделки(0), Интересное(11), ЗДОРОВЬЕ(74), ДОМИКИ(36), ДЛЯ ДУШИ(438), ДЛЯ ДОМА(186), ДЛЯ ДЕТЕЙ. Тематические занятия. (57), ДЛЯ ДЕТЕЙ. МАТЕМАТИКА.(4), ДЛЯ ДЕТЕЙ(199), ГОРОДСКОЙ ПЕЙЗАЖ(243), Божья коровка. Аппликации, поделки(0)
Комментарии (0)

Маленький чемодан (кукольникам) Мастер-класс.

Четверг, 07 Мая 2015 г. 18:50 + в цитатник
Это цитата сообщения Da_O [Прочитать целиком + В свой цитатник или сообщество!]


1.
11 (500x340, 13Kb)

2.
12 (500x361, 17Kb)

3.
13 (500x343, 9Kb)

4.
14 (500x437, 16Kb)

5.
15 (500x442, 14Kb)

6.
16 (356x500, 22Kb)

Рубрики:  КУКОЛЬНАЯ МИНИАТЮРА. МАСТЕР-КЛАССЫ.

Комментарии (0)

Сумочка

Дневник

Среда, 03 Февраля 2016 г. 00:12 + в цитатник

Источник: http://lasminisdeeden.blogspot.ru/2007/12/tutorial-bolso-de-viaje.html

TUTORIAL BOLSO DE VIAJE

 
HOY PONGO ESTE TUTORIAL , ESPERO QUE OS GUSTE
SE NECESITA TELA DE TAPICERIA O LONETA O ALGUNA QUE SEA FUERTE
UN RECTANGULO DE 7X5 Y DOS RECTANGULOS DE 1X2,5

SI PICAIS EN LAS FOTOS SE VEN MAS GRANDES

SE COLOCAN COMO SE VE EN LA FOTO Y SE EMPIZA A COSER POR EL REVES ESTANDO LAS TELAS DERCHO CON DERECHOAQUI YA SE VEN COSIDAS LAS BASES


AHORA VAMOS COSIENDO LAS RESTANTES COSTURAS UNA DE CADA LADO


HASTA QUE TENGAMOS ESTA ESPECIE DE SACO


HACEMOS UN PEQUEÑO PLIEGUE EN LOS LATERALES ARRIBA PARA DARLE UN POCO DE FORMA, Y QUE QUEDE MAS ESTRECHO DE ARRIBA QUE DE ABAJO


LE DAMOS LA VUELTA Y YA TENEMOS EL BOLSO FORMADO


YO HE USADO TROCITOS DE ANTE DE UN COLOR CONTRASTADO , PERO ESTOY SEGURA QUE IRIA MEJOR ANTELINA QUE ES UN GENERO MAS FINO
LE VAMOS PEGANDO TIRAS
ESTA ESTA PEGADADA LA MITAD POR DENTRO Y LA MITAD POR FUERA PARA TENER EL BORDE DEL BOLSO DENTRO


CON ALAMBRE DORADO SE HACEN UNAS ARANDELAS DEL TAMAÑO DE UN PALILLO DE BROCHETA


CON DOS TIRAS DE ANTE PEGADAS SE HACEN LAS ASAS


Y VAMOS ADORNANDO COMO QUERAMOS
ESTE LLEVA TRE TIRAS PEGADAS A LA PARTE DE ATRAS Y ABROCHADAS DELANTE A OTRAS TRES TIRAS CON ARANDELAS Y POR ULTIMO PEGAR UNA TABLILLA POR DENTRO DEL TAMAÑO ADECUADO A LA BASE
ESPERO QUE OS GUSTE


Рубрики:  КУКОЛЬНАЯ МИНИАТЮРА. МАСТЕР-КЛАССЫ.

Комментарии (0)

Сумочка

Дневник

Среда, 03 Февраля 2016 г. 00:33 + в цитатник

http://liimanappi.vuodatus.net/lue/2008/10/salkun-kaava-omasta-paasta


Tässäpä vähän kaavaa tuohon yksinkertaiseen salkkuun, joita lauantaina värkkäilimme.

1967800.jpg

Toteutushan menee niin, että: 1. sivukappaleet liimataan kiinni pohjaan ja etu- ja takakappaleiden sivuihin. 2. Tasku liimataan etukapaleeseen. 3. kantokahva liimataan paikalleen. 4. viimeistellään nahkasuikaleilla ja soljilla.

1968050.jpg

1968048.jpg

Kaavaa muokkaamalla salkun ulkoasua on helppo muuttaa. Esim leikkaamalla sivukappaleet ylhäältä kapeammiksi. Läpän muotoa voi myös vaihdella. Taskujakin voisi olla vaikka kaksi, ja niissä vielä jotain koristusta...

Рубрики:  КУКОЛЬНАЯ МИНИАТЮРА. МАСТЕР-КЛАССЫ.

Комментарии (0)

Сумочка

Дневник

Среда, 03 Февраля 2016 г. 00:40 + в цитатник


http://littlebirdiesecrets.blogspot.fr/2010/04/cards-with-pursenality.html

CARDS WITH "PURSE"NALITY!


Here is a tutorial for a simple purse that can be used on almost anything. 


You will need:

Ribbon
Glue
Sewing Machine (optional)
String of beads--not sure what this is really called. You can find it at craft stores or cake decorating stores and it is sold by the yard


Fold your purse ribbon in half and then make a pleat at the top.

Sew it in place. If you don't have a sewing machine you can either hand sew it or try gluing it.


Next, glue on your coordinating ribbon and then the purse "handles".


Now add this to your card, scrapbook page, or gift tag!


Рубрики:  КУКОЛЬНАЯ МИНИАТЮРА. МАСТЕР-КЛАССЫ.

Метки:  
Комментарии (0)

Сумочка для кукольного домика

Дневник

Среда, 03 Февраля 2016 г. 00:43 + в цитатник
Рубрики:  КУКОЛЬНАЯ МИНИАТЮРА. МАСТЕР-КЛАССЫ.

Комментарии (0)

Сумочка для кукольного домика

Дневник

Среда, 03 Февраля 2016 г. 01:23 + в цитатник


http://caseymini.blogspot.ru/2008/03/barrel-bag-tutorial.html

Barrel Bag Tutorial

 
OK. You asked for it. For now I am just going to give you the simplest bag to make.

This is a barrel bag or duffel, depending on what size you make it.

I am doing one made from the outside of a size small Tampax tube. You need Tampax brand regular, not any of the fancy ones. They are the ones that have cardboard tubes. Maybe I should start with a list of supplies.

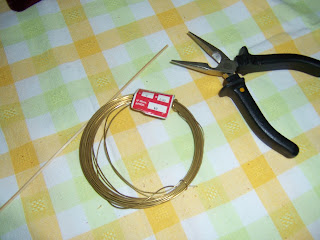
Tools: small sharp scissors, white glue(I use Elmer's white in a needle nose bottle) , and exacto knife to cut the tube. It is helpful to have a needle nosed glue bottle if you have one.
lined index card. Also 1/4" graph paper for measuring if desired.

1. I generally buy one of the Tampax boxes that has 3 sizes in one. That will give you a LOT of different sized bags.

2. A 6"square piece of natural fabric. Use cotton, silk or linen. Polyester and polyester blends just give you a headache. They don't glue well at all.

3. A 7" long piece of ribbon or trim. This is for the handle and can be longer if you want a shoulder type bag.

4. A piece of metallic trim for the zipper. It should be a little longer than the purse. You will have to put glue on the ends and cut through to keep it from fraying.

5. Four metal rings. The ones in the photo are from an old necklace that I tore apart.

6. One piece of a finding for the zipper pull if you want one.

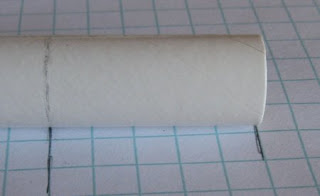
The first thing you do is either with a piece of graph paper (1/4" squares) or a lined index card(they are lined in 1/4"), make a mark on the tube 1 1/4" from the end all the way around. I find it easiest to use the graph paper because you can cut a strip 1 1/4" wide, wrap it around the tube and mark it.


Next you cut a piece of the index card that is the same width. In this case,it's 1 1/4" wide. Then cut it to exactly fit around the tube.

Then you cut a and glue a piece of fabric to the outside. Miter the corners. Fold to the inside and glue.


Cut two circles of fabric about 1/8" bigger than the end of the tube. Run a fine line of glue around the very edge of the tube and stick one circle to each end. Let them dry a little and then cut little "V"s in the fabric all around the edge of the circles.


Glue down the clipped part of the circles to the body of the bag. It should look like this. Now take a scrap of fabric about 1/4"wide and not quite as long as the purse and glue it where you want to put the zipper. This is in case the zipper doesn't cover the gap when you wrap the outside around the bag.

You can find different metallic trims that work for zippers. There are a couple in the photo. The silver I found at a mini show. The gold is from a plain old fabric store.

If you have trouble finding something, take a close look at wider trims. Sometimes they can be cut apart to make them work.

Put some glue on one end of the trim and also in from the end about the length of the purse. Most of the braided trims will unravel unless you do this.


Now put glue on the inside of the covered index card piece and wrap it around starting by one edge of the zipper. 
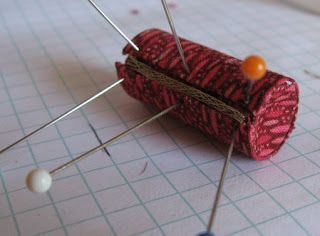
Like magic, the thickness of the fabric will make a gap in the edge just about perfect for the zipper.


Poke pins in the edge and let it dry.


Next we come to the handle.Starting at the center bottom, 1/4" in from the edge, run a thin line of glue up the side of the purse and glue one end of the handle on that line, sliding a ring down to sit about 1/4" from the zipper.

Now take the opposite end of the handle piece and do the same on the opposite side of the same end. Make sure that it's not twisted.

You should have handle and rings both glued on one end and the middle of the handle loose.

Run a line of glue on the other end to match the first one. Take the middle and center it on the bottom of the other end. Pull the handle up, gluing the rings level with the ones on the other edge.
Glue your piece of finding to one end to represent the zipper pull if you would like one.

Happy purse making! Have fun!
Рубрики:  КУКОЛЬНАЯ МИНИАТЮРА. МАСТЕР-КЛАССЫ.


 Страницы: [1]