-Видео

- Тема "Саванна". Видео "Шишкина школа"
- Смотрели: 1 (0)

- Кукла-Снежка. МК.
- Смотрели: 32 (0)
-Подписка по e-mail
-Рубрики
- ГОРОДСКОЙ ПЕЙЗАЖ (243)
- Божья коровка. Аппликации, поделки (0)
- Колокольчик. Поделки (0)
- ДЛЯ ДЕТЕЙ (199)
- Детская психология (56)
- Про животных (1)
- Дидактические игры (18)
- Для детской комнаты (6)
- Занятия с детьми (81)
- Мастерим с детьми (41)
- ДЛЯ ДЕТЕЙ. МАТЕМАТИКА. (4)
- ДЛЯ ДЕТЕЙ. Тематические занятия. (57)
- Природные зоны. САВАННА (46)
- Природные зоны. ДЖУНГЛИ (1)
- Природные зоны. СЕВЕРНЫЙ ПОЛЮС (1)
- Окружающий мир. ПОЛЕ, ЛУГ (2)
- Окружающий мир. ЛЕС (2)
- Окру.жающий мир. ПРУД (2)
- ДЛЯ ДОМА (186)
- Вязаные вещицы (6)
- Декор (33)
- Для дверей (1)
- Для кухни. (30)
- Для хранения. (18)
- Интерьер (10)
- Мебель (13)
- От сквозняка (1)
- Хозяйство (50)
- Шторы (1)
- ДЛЯ ДУШИ (438)
- Болезнь (56)
- Аудиокниги (8)
- Живопись (177)
- Интересные места (1)
- История (13)
- Книги (32)
- Мудрые слова, выдержки из книг (9)
- Музыка (21)
- Стихи (16)
- Психология (114)
- Театр (3)
- Фильмы для души (2)
- ТВОРЧЕСТВО (4)
- ДОМИКИ (36)
- Вязаные домики (5)
- Домики из бутылок (5)
- Лепные домики (7)
- Разные домики (9)
- Текстильные домики (17)
- ЗДОРОВЬЕ (74)
- ОТ КАШЛЯ (3)
- Интересное (11)
- КОМПЬЮТЕР, ПРОГРАММЫ (21)
- КУКОЛЬНАЯ МИНИАТЮРА (103)
- Домики,замки (17)
- Игровые домики (20)
- Избушки (12)
- Интерьеры для вдохновения (10)
- Персонажи (5)
- Полезности (8)
- Разные домики (2)
- Румбоксы (5)
- КУКОЛЬНАЯ МИНИАТЮРА. МАСТЕР-КЛАССЫ. (173)
- АКСЕССУАРЫ (36)
- ДЕРЕВЬЯ (8)
- ДОМИКИ (5)
- Еда, продукты (1)
- ИГРУШКИ (14)
- ИМИТАЦИЯ КАМНЯ (11)
- ИМИТАЦИЯ СНЕГА, ИНЕЯ (4)
- КАК СТРОИТЬ (14)
- Колясочки (2)
- Корзинки. (10)
- КОРОБОЧКИ, ТУЕСКИ, БОЧОНКИ (4)
- МЕБЕЛЬ (9)
- Освещение, лампочки, абажуры (1)
- ПЕРСОНАЖИ, КУКОЛКИ, ЗВЕРИКИ (19)
- ПОСУДКА (17)
- Скамейки (3)
- СУМКИ, ЧЕМОДАНЧИКИ (9)
- Часики. (2)
- КЮСША-НАСТЮША И ВСЕ-ВСЕ-ВСЕ (17)
- ЛИЧНОЕ, ЖИЗНЕННЫЕ ПЛАНЫ (7)
- Мои дети. (10)
- Младшенькая. (7)
- Сынок (3)
- МОИ РАБОТЫ (48)
- НАСТРОЕНЧЕСКОЕ (12)
- Хорошее настроение (8)
- НОВЫЙ ГОД (247)
- Веночки (2)
- Вкусненькое (20)
- Всего понемногу (43)
- Гирлянды (2)
- Гномы и другие новогодние персонажи (16)
- Дедушки Морозы))) (15)
- Декор дома (20)
- Домики (6)
- Другие текстильные игрушки (12)
- Ёлочки (17)
- Лошадки (4)
- Новогодние карнавальные костюмы (1)
- Новогодние картинки (10)
- Олени (3)
- Панно (2)
- Подушки (5)
- Сердечки (2)
- Снеговики (18)
- Снежинки (5)
- Упаковка подарков (4)
- Фильмы (27)
- Юбки для ёлки (6)
- Полезное (36)
- ПРАЗДНИКИ (11)
- День Победы (3)
- ДНИ РОЖДЕНИЯ (2)
- ПАСХА (5)
- ХЭЛЛОУИН. (1)
- РАЗНОЕ (4)
- РЕЦЕПТЫ (273)
- Вторые блюда (21)
- Выпечка (69)
- Выпечка несладкая, пироги (15)
- Заготовки (21)
- Запеканки (25)
- Котлеты (8)
- Масло. (1)
- Мороженое (3)
- Мясо (9)
- РЫБКА (1)
- Салатики (16)
- Сладкое (32)
- Соусы (3)
- Специи (1)
- Супы (5)
- Творог (3)
- РУКОДЕЛКИ (381)
- Буквы и цифры (1)
- Вязаные игрушки и вещицы (1)
- ДЛЯ ПОДАРКОВ (6)
- Коробочки, корзиночки, шкатулочки, кармашки. (46)
- Лепка (12)
- Лоскутное шитье (15)
- Материалы (3)
- Организация рабочего места (1)
- открытки (1)
- Пасха (4)
- Пинетки (3)
- Плетение (1)
- Подарки и упаковки. (5)
- Подушки (29)
- Приемчики, хитрости (35)
- Развивающие коврики (3)
- Рукоделки для деток (61)
- Сумки (8)
- Тапочки (10)
- Текстильные штучки (32)
- Украшение окон (1)
- Украшения (1)
- Упаковка (3)
- Шитье (4)
- РУКОДЕЛКИ. КУКЛЫ (77)
- Ведьмочки, колдуньи (7)
- Одежка и обувка для кукол (20)
- РУКОДЕЛКИ. АППЛИКАЦИИ (21)
- РУКОДЕЛКИ. ВЯЗАНИЕ.МК (31)
- РУКОДЕЛКИ. ДЛЯ ДЕТЕЙ (183)
- ИГРУШКИ СВОИМИ РУКАМИ. (3)
- КУКОЛЬНЫЙ ТЕАТР (29)
- Развивающие игрушки (109)
- РАЗВИВАЮЩИЕ КНИЖКИ (45)
- РАЗВИВАЮЩИЕ КОВРИКИ (33)
- ШЬЕМ ДЕТЯМ (2)
- РУКОДЕЛКИ. ЗВЕРУШКИ И ПТИЧКИ (118)
- Волки (1)
- Жирафы (4)
- Зайцы-кролики (6)
- Котики (9)
- Курочки, петушки (19)
- Лошадки (4)
- Лягушки (4)
- Мышки (9)
- Овечки, козочки (1)
- Олени, лоси (1)
- Пингвины (4)
- Птички (18)
- Рыбки (13)
- Слоники (1)
- Собачки (1)
- Совушки (7)
- РУКОДЕЛКИ. ИЗ РАЗНЫХ МАТЕРИАЛОВ (54)
- Из бигуди (2)
- Из бумаги (1)
- Из веревки (1)
- Из камешков (1)
- Из одноразовых тарелок (1)
- Из пластиковых бутылок (1)
- Из проволоки (3)
- Из фетра (42)
- РУКОДЕЛКИ. КОВРИКИ (10)
- РУКОДЕЛКИ. ПАННО (9)
- РУКОДЕЛКИ. ПЛЕДЫ (2)
- РУКОДЕЛКИ. ПРИЕМЫ, ТЕХНИКИ, ТОНКОСТИ, (9)
- РУКОДЕЛКИ. СУМОЧКИ (7)
- РУКОДЕЛКИ. ТЕКСТИЛЬНАЯ ЕДА (39)
- Ананас (1)
- ГРИБЫ (11)
- Капуста (3)
- Лимончики, апельсинчики. (2)
- Лук, лучок. (2)
- Морковка (3)
- Помидорки (2)
- РУКОДЕЛКИ. ЦВЕТЫ, ДЕРЕВЬЯ И ГРИБЫ (44)
- ГРИБЫ (11)
- ДЕРЕВЬЯ (7)
- ЦВЕТЫ (15)
- Светлое, доброе (146)
- Смешное))) (7)
- УХОД ЗА СОБОЙ (14)
- Волосы (13)
- Фотография (0)
- ЦВЕТНОЕ, РАЗНОЦВЕТНОЕ (2)
-Метки
-Поиск по дневнику
-Друзья
-Постоянные читатели
-Сообщества
-Статистика
Записей: 2661
Комментариев: 1486
Написано: 5352
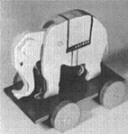
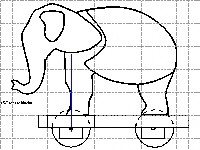
Слоник на колесиках |
http://www.thewoodcrafter.net/proj/elptoy.php
Heres is the first project I finished for the CD.
Detailed Instructions
*********** WARNING***********
Read my page on safety before building this item.
| Click on any picture (above) to open the project details in Adobe Acrobat. |
Materials needed:
1/2" thick clear pine 6" x 16" or 12" x 8"
1/4" thick clear pine 6" x 12"
1/4" wooden dowel 2" long.
Three wire coat hangers.
Two small eyehooks.
Four thin small flat washers (1/2" to 3/4")
Wood sealer & paints (if a colorful finish is desired).
Clear wood finish (if a natural finish is desired).
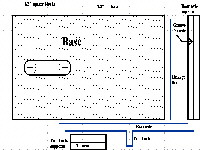
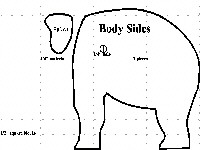
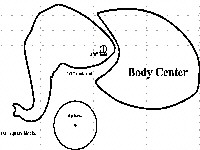
There are four scale drawings of the pieces. The first has the base(1), the wheel blocks(3) and the axle wires(2). The second contains the parts to be cut from 1/4 inch material and includes the wheels (4), the body side pieces (2) and the ear pieces (2). The third contains the parts to be cut from 1/2 inch material and includes the head (1) and the body center piece (1). The last page is a cutaway view of the assembled item.
Construction is very simple:
1. Print out the drawings in scale. The dotted blocks on the drawings should be 1/2 inch by 1/2 inch unless you wish to change the size of the finished project.
2. Use the drawings to cut out all the parts. A band saw works best but a scroll or saber saw will suffice.
3. Sand all edges smooth. Take care with this step as it will show the love and care you put into the final toy. Do not sand the front wheel edges to a completely smooth surface as some traction is needed.
4. Locate and drill the axle holes in the wheels. These should fit the axle very snugly.
5. Locate the centers of the two holes for the slot in the base. Drill pilot holes with a small bit (1/16"). Drill the final holes with a 1/2" bit.
6. Using a saber or coping saw, cut out the slot in the base.
7. Cut a groove in each axle support piece deep enough to receive the coat hanger wire loosely enough to allow the axle to turn but not wobble. Use a table saw, router, circular saw, or hand saw for this.
8. Cut out the straight section of all three coat hangers for the axles and linkage wire.
9. Bend one coat hanger to match the drawing. The bends can be made easily with a good pair of needle nose pliers.
10. Cut the axles to length as indicated in the drawings. Using a flat file, round both ends of each axle.
11. Position, glue and clamp the rear axle support in place.
12. Position one of the front axle supports to locate the axle 1 1/2" from the front edge then glue and clamp the support in place. Be sure to keep the support flush with the outer edge of the base.
13. Insert the front axle until the bend fits centered into the cutout groove in the base.
14. Position the other front axle support then glue and clamp it in place.
15. Locate and drill the dowel holes in the body sides and the head.
16. Using the body center as a guide, draw a light pencil line on the inner face of each body side
17. On both body sides, sand the inner face surface area that will not be glued to the body center piece. Sand it to a smooth finish and to allow the head to swing freely after assembly.
18. Cut off a 1" section of the dowel and insert it into one side body piece. Do NOT glue it at this time.
19. Position and glue the body center into place.
20. Position the head over the dowel, position and glue the other body side into place, and clamp the assembly firmly. Do NOT glue the dowel at this time.
21. Remove the dowel and the head.
22. Round/bevel all edges on the ears and the head piece then sand the flat surfaces smooth with 200 grit sandpaper to allow the head to swing freely after assembly and finishing.
23. Sand and glue the ears into place.
24. After all glued parts have dried thoroughly, sand all parts. Be sure to round/bevel all edges.
25. Finish/paint the body, the head, and the base.
26. Place the rear axle in the groove of the support
27. Add one wheel at a time.
28. Place a flat washer and one wheel on the axle then bend the protruding wire tightly against the wheel. Repeat for each wheel.
29. Bend the end of the head linkage wire loosely around a small eye hook.
30. Locate the small eye hook into the bottom of the head.
31. Position the head into the body then carefully glue the dowel into place being careful to not glue the head.
32. Position and glue the body into place on the base. You may wish to add a small (1/8") dowel through the base into the legs but be very careful as the alignment is critical.
33. Carefully bend the other end of the linkage wire around the front axle offset.
34. Insert an eye hook into the front of the base and attach a pull string.
Серия сообщений "ИГРУШКИ":
Часть 1 - Toys and Games.
Часть 2 - Миниатюрные игрушки для детей
...
Часть 7 - Лошадка
Часть 8 - Лошадка
Часть 9 - Слоник на колесиках
Часть 10 - Самокат
Часть 11 - Поделки из синельной (пушистой) проволоки
Часть 12 - Клоун-марионетка
Часть 13 - Jeu de construction
Часть 14 - cochon à roulettes
| Рубрики: | КУКОЛЬНАЯ МИНИАТЮРА. МАСТЕР-КЛАССЫ. |
| Комментировать | « Пред. запись — К дневнику — След. запись » | Страницы: [1] [Новые] |


