 Дешевые авиабилетыВыгодные цены, удобный поиск, без комиссии, 24 часа. Бронируй сейчас – плати потом!
 Я - фотографПлагин для публикации фотографий в дневнике пользователя. Минимальные системные требования: Internet Explorer 6, Fire Fox 1.5, Opera 9.5, Safari 3.1.1 со включенным JavaScript. Возможно это будет рабо
 ОткрыткиПерерожденный каталог открыток на все случаи жизни
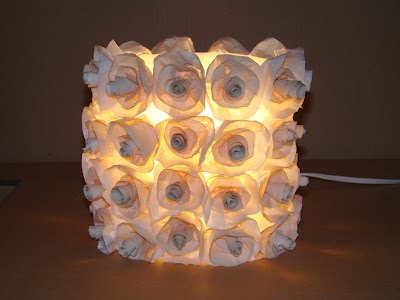
milk jug lamp |
..JPG)
You will need: a container of disinfectant, 44 roses coffee filter (see how in the previous post), 2m cord, a socket for the photo, a male pin, a switch, two small screws with nut, secure socket; hot glue gun.
.
 .
.
For the base, use a container of disinfectant white (translucent), round or oval. Do not serve the square and those which have grooves on the bottom.
.
.jpg) .
.
Cut the pack of disinfectant above the mark that separates the bottom.
.
.jpg) .
.
Cut along the mark again as well, taking care to give a good finish. It's the finish that defines a product well done!
.
.jpg) .
.
Turn the piece upside down, put the socket in half and mark the place of the two screws. Then make two small holes at the marked locations. I used a thin knife to make holes. A hot nail will do.
.
.jpg) .
.
Also make a hole 1.5 cm from the base of the lamp, large enough to pass the thread.
.
Before passing the wire, connect it to the socket and screw the socket on the base. Pass the wire out and install the switch and pin male.
.
If you've never messed with it, ask the store clerk electric material to explain how. It's easy! Women's courage: you do not need to get a Y chromosome.
.
.jpg) .
.
Put a good amount of hot glue around 1 cm of wire. Attach the rose immediately, before the glue cools. She should spend a little of the base line.
.
.jpg) .
..jpg) .
..jpg) .
..jpg) .
..jpg) .
..jpg) .
..JPG)
| Рубрики: | RECYCLE/Plastic Bottles LIGHT/Lamps LIGHT/Chandelier |
| Комментировать | « Пред. запись — К дневнику — След. запись » | Страницы: [1] [Новые] |


