КАК ПРАВИЛЬНО ПРИВИТЬ НА ОДНУ ЯБЛОНЮ НЕСКОЛЬКО СОРТОВ Серия сообщений "деревья...
Творожный пирог - нежный, просто тает во рту - (0)Творожный пирог - нежный, просто тает во рту Ингредиенты: творог мягкий —...
Безрукавка с косами из толстой пряжи - (0)Безрукавка с косами из толстой пряжи https://vjazalochka.com/vjazanie-dlja-zhenwin/vjazanie-sp...
Схемы СНЕЖИНОК крючком - (0)Схемы СНЕЖИНОК крючком Если вы хотите связать к Новому году снежинку крючком, предлагаю воспол...
Филейный пэчворк крючком. - (0)Филейный пэчворк крючком. Некоторые подробности вязания. Для вдохновения! Видео.&...
 ОткрыткиПерерожденный каталог открыток на все случаи жизни
 Всегда под рукойаналогов нет ^_^
Позволяет вставить в профиль панель с произвольным Html-кодом. Можно разместить там банеры, счетчики и прочее
Всегда под рукойаналогов нет ^_^
Позволяет вставить в профиль панель с произвольным Html-кодом. Можно разместить там банеры, счетчики и прочее Я - фотографПлагин для публикации фотографий в дневнике пользователя. Минимальные системные требования: Internet Explorer 6, Fire Fox 1.5, Opera 9.5, Safari 3.1.1 со включенным JavaScript. Возможно это будет рабо
 Онлайн-игра "Большая ферма"Дядя Джордж оставил тебе свою ферму, но, к сожалению, она не в очень хорошем состоянии. Но благодаря твоей деловой хватке и помощи соседей, друзей и родных ты в состоянии превратить захиревшее хозяйст
 ПереводчикОнлайн переводчик:Перевести текст или веб-страницу
")

Красивый узор для пледа от MYPICOT или Баварское вязание |
1.
2.
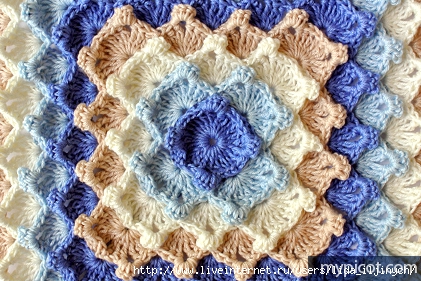
ОПИСАНИЕ НА АНГЛИЙСКОМ,но по фото хорошо видно,как вязать. Если возникнут вопросы-спрашивайте.
Techniques used in this stitch (British term / American term):
Chain stitch – ch
Slip stitch – sl.st
Double crochet / Single crochet – dc / sc
Double treble / Treble – d.tr / tr
Front Post dc / sc – FPdc / sc
Shell: work 3d.tr + 2ch + 3d.tr in the same space.
Stitch - st
For more information about the stitches please visit the page of Textured Bubble Stitch:

Make 6ch and sl.st in last ch.
Round 1: Make 5ch, 2 d.tr/tr in ring of 6ch, * 2ch, 6 d.tr/tr in ring; rep from * 2 times more, 2ch, 3 d.tr/tr in ring, sl.st in 5th ch, turn.

Round 2: 1ch, 1FPdc/sc over each of the next 3d.tr/tr below, * 7dc/sc in space of 2ch, 1FPdc/sc over each of the next 3d.tr/tr below, 2ch, 1FPdc/sc over each of the next 3d.tr/tr; rep form * 2 times more, 7dc/sc in space of 2ch, 1FPdc/sc over each of the next 2d.tr/tr below, 1FPdc/sc over 5ch, 1ch, 1dc/sc in 1st FPdc/sc of the round, turn.

Round 3: Make 5ch, 2 d.tr/tr + 2ch + 3 d.tr/tr in space between 1ch and dc/sc below, * work 1dc/sc through 1st and 7th sts below: insert your hook from front to back under the top 2 loops of 1st dc/sc, then from back to front under the top 2 loops of the 7th dc/sc and work dc/sc, 2 shells in space of 2ch; rep from * 2 times more, 1dc/sc through 1st and 7th dc/sc below, shell in space between 1ch and dc/sc below, sl.st in 5th ch, turn.

Round 4: 1ch, * 1FPdc/sc over each of the next 3d.tr/tr below, 7dc/sc in space of 2ch, 1FPdc/sc over each of the next 3d.tr/tr below, 1ch, 1FPdc/sc over each of the next 3d.tr/tr, 7dc/sc in space of 2ch, 1FPdc/sc over each of the next 3d.tr/tr below, 2ch; rep form * 2 times more, 1FPdc/sc over each of the next 3d.tr/tr below, 7dc/sc in space of 2ch, 1FPdc/sc over each of the next 3d.tr/tr below, 1ch, 1FPdc/sc over each of the next 3d.tr/tr, 7dc/sc in space of 2ch, 1FPdc/sc over each of the next 2d.tr/tr below, 1FPdc/sc over 5ch, 1ch, 1dc/sc in 1st FPdc/sc of the round, turn.

Round 5:
Work next steps:
1 - "Beginning of the round #1": 5ch, 2 d.tr/tr + 2ch + 3 d.tr/tr in space between 1ch and dc/sc below.
2 - "Middle stitches #1": 1dc/sc through 1st and 7th dc/sc below, shell in space of 1ch, 1dc/sc through 1st and 7th dc/sc below.
3 - "Point #1": work 2 shells in space of 2ch.
Repeat steps: 2 – 3 – 2 – 3 – 2.
4 - "Finishing of the round #1": work shell in space between 1ch and dc/sc below, sl.st in 5th ch, turn.

Round 6:
Work next steps:
1 - "Beginning of the round #2": 1ch, 1FPdc/sc over each of the next 3d.tr/tr below, 7dc/sc in space of 2ch, 1FPdc/sc over each of the next 3d.tr/tr.
2 - "Middle stitches #2": 1ch, 1FPdc/sc over each of the next 3d.tr/tr below, 7dc/sc in space of 2ch, 1FPdc/sc over each of the next 3d.tr/tr, 1ch.
3 - "Point #2": 1FPdc/sc over each of the next 3d.tr/tr, 7dc/sc in space of 2ch, 1FPdc/sc over each of the next 3d.tr/tr , 2ch, 1FPdc/sc over each of the next 3d.tr/tr, 7dc/sc in space of 2ch, 1FPdc/sc over each of the next 3d.tr/tr.
Repeat steps: 2 – 3 – 2 – 3 – 2.
4 - "Finishing of the round #2": 1FPdc/sc over each of the next 3d.tr/tr, 7dc/sc in space of 2ch, 1FPdc/sc over each of the next 2d.tr/tr below, 1FPdc/sc over 5ch, 1ch, 1dc/sc in 1st FPdc/sc of the round, turn.

Round 7:
Work next steps:
1 - "Beginning of the round #1": see Round 5.
2 - "Middle stitches #1": * 1dc/sc through 1st and 7th dc/sc below, shell in space of 1ch; rep from *, 1dc/sc through 1st and 7th dc/sc below.
3 - "Point #1": see Round 5.
Repeat steps: 2 – 3 – 2 – 3 – 2.
4 - "Finishing of the round #1": see Round 5.

Round 8:
Work next steps:
1 - "Beginning of the round #2": see Round 6.
2 - "Middle stitches #2": * 1ch, 1FPdc/sc over each of the next 3d.tr/tr below, 7dc/sc in space of 2ch, 1FPdc/sc over each of the next 3d.tr/tr; rep from *, 1ch..
3 - "Point #2": see Round 6.
Repeat steps: 2 – 3 – 2 – 3 – 2.
4 - "Finishing of the round #2": see Round 6.

Repeat rows 7 - 8 until you have reached your desired size of square.
Серия сообщений "видео по вязанию":
Часть 1 - Демонстрация ирландского кружева...МНОГО УРОКОВ ПО "ирландке"
Часть 2 - ВЯЖЕМ ПРЯЖУ-СЕТКУ!
...
Часть 42 - Цветок с бусинками в технике ирландского кружева
Часть 43 - Замысловатый красивый узор спицами (видео)
Часть 44 - Красивый узор для пледа от MYPICOT или Баварское вязание
Часть 45 - Петух Морхухн 6 видеоуроков
Часть 46 - способ для сшивания открытых петель
Часть 47 - Вязание: "Сколько стоит вязание/ handmade на заказ?"
Серия сообщений ""БАБУШКИНЫ КВАДРАТЫ"":
Часть 1 - ТОП И ШАРФИК ИЗ КВАДРАТОВ
Часть 2 - Идеи из квадратов/цветное вязание
...
Часть 10 - Вяжем из квадратов!
Часть 11 - Ян Итон: трехцветный квадрат.
Часть 12 - Красивый узор для пледа от MYPICOT или Баварское вязание
Часть 13 - Многоцветное вязание спицами и крючком
Часть 14 - Бабушкин квадрат (схемы и узоры)
Часть 15 - ВИДЕО МК.БАБУШКИН КВАДРАТ.
Часть 16 - "Бабушкины квадраты" и пледы крючком.
| Рубрики: | ВЯЗАНИЕ КРЮЧКОМ/узоры крючком |

| Комментировать | « Пред. запись — К дневнику — След. запись » | Страницы: [1] [Новые] |


