-Рубрики
- Вязание= основы (119)
- Домоводство (4)
- Вязание (3)
- Достопримечательности = Музеи и т.д. (0)
- журналы и книги (201)
- Language (32)
- liveinternet (2)
- Аудиокниги (1)
- в мире литературы (6)
- вяжем детям (123)
- Вяжем крючком (305)
- вяжем крючком тапочки, носочки, пинетки. (6)
- вяжем крючком-2 (59)
- вяжем по китайским журналам (44)
- вяжем спицами (314)
- Вяжем спицами 2 (17)
- Вяжем сумки (54)
- головные уборы (18)
- Детская кухня (15)
- Для детей (45)
- Для развития детей (16)
- Здоровье и красота (187)
- Интересные Статьи (113)
- История (7)
- картинки (6)
- Кино и ТВ (6)
- книги (10)
- кулинария (172)
- Кулинария =заметки= (2)
- Кулинария- Готовим в пароварке,микроволновке и т.д (5)
- Кулинария- завтраки (8)
- Кулинария-выпечка (200)
- кулинария-заготовки (37)
- кулинария-запекаем (3)
- кулинария-салаты (7)
- кулинария-супы (1)
- кулинария= сладости (3)
- кулинарные сайты,рецепты- ссылки (1)
- Мастер-класс по вязанию (6)
- Мастер-классы по вязанию игрушек (1)
- мастер-классы по кулинарии (0)
- музыка (31)
- музыка 2 (16)
- Обработка фотографий (6)
- Полезные программы (41)
- полезные ссылки (55)
- путешествия (3)
- рукоделие (46)
- рукоделие 2 (4)
- сайты игр (3)
- Салаты (3)
- ссылки (3)
- ссылки с сайта (26)
- Читаем (1)
- Шитье, Моделирование, Конструирование, Выкройки (162)
- шьем детям (92)
- Этикет (2)
-Музыка
- Adele - Rolling In The Deep
- Слушали: 473 Комментарии: 0
- Bad Boys Blue - You're A Woman
- Слушали: 12501 Комментарии: 0
- Елена Ваенга - Курю
- Слушали: 2545 Комментарии: 0
- ирина салтыкова-бегу за тобой
- Слушали: 227 Комментарии: 0
- Ирина Салтыкова - Ты прилетай
- Слушали: 284 Комментарии: 0
-
Радио в блоге
[Этот ролик находится на заблокированном домене]
Добавить плеер в свой журнал
© Накукрыскин
Добавить плеер в свой журнал
© Накукрыскин
-неизвестно
-Поиск по дневнику
-Подписка по e-mail
-Интересы
-Постоянные читатели
-Сообщества
Участник сообществ
(Всего в списке: 42)
Материнство_с_умом
Мамина_Радость
УРОКИ_ФОТОШОПА
Изучаем_языки
Мы_и_Дети
Хочу_знать_всё
История_костюма
Мамины_радости
Рецепты_домохозяек
полезные_игрушки
Ответ_на_вопрос
Мир_рукоделия
Поиск_Песен
-ЛюБовь_и_Секс-
Читальный_зал
ПО_ВОЛНАМ_ДЕТСТВА
АУДИО-КНИГИ
Путешествуем
Мы_беременные
О_детях
Всё_для_фотошопа
Аудиокниги
вязалочки
Рукоделочки
Всем_Вкусно
БУДЬ_ЗДОРОВ
Кулинарная_книга
Рукодельница
Книжный_БУМ
Рецепты
Хочу_иметь_ребенка
Школа_кулинара
Learning_English
topatun_ru
МОЙ_ЛИЧНЫЙ_ПОВАР
Вяжем_вместе
Моя_кулинарная_книга
Арт_Калейдоскоп
Вкусно_Быстро_Недорого
Готовим_малышам
Только_для_женщин
OSINKA_CLUB
Читатель сообществ
(Всего в списке: 4)
Ссылочки_малятам
Книжная_полка
Умелые_ручки
OSINKA_KNITTING
-Статистика
Создан: 25.08.2009
Записей: 2823
Комментариев: 263
Написано: 3100
Записей: 2823
Комментариев: 263
Написано: 3100
Мастер-класс по пошиву детской одежды |
Мастер класс по пошиву детского летнего топа
It's Tuesday! With warmer weather bound to show up soon, I made Leah a little summer top!
I think I got the idea for this shirt at a store, but I can't remember where....
Here's the tutorial:
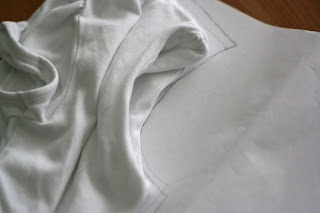
To make the pattern, I used a t-shirt that fit Leah:
I drew down the side, neck and shoulders. Then I folded the sleeve in for the armhole:
I straightened out the side, drew the length I wanted, added seam allowance just to the shoulder and side seams, and was left with this:
I also drew the lower neckline for the front (about 1" lower at center):
I wanted a back yoke, so I traced the pattern until about 3" from the shoulder. I drew a line straight across and then added seam allowance:
Then I traced the rest of the pattern piece and added seam allowance to the top:
Pattern pieces done:
Time to cut everything out!
I wanted 4 pleats in the back, so I cut the bottom back piece 1" from the fold:
Same for the front, 1" from fold for pleats:
Next, I cut the back yoke on the fold and also cut some 1 3/4" strips for bias tape (not shown):
I also cut a 2" by 19" piece for the ruffle and a 3/4" by 14" piece for the button tabs:
Time to mark pleats! For the back, first I marked the center. Then to the right from center, 1/4", 3/4", 1 1/4", and 1 3/4". Then repeated to the left.
For the front, I marked center, then 1", 1 1/2", 2", and 2 1/2" on both sides of center.
Looks kind of like that:
Then I matched the second mark to the third, and the fourth to the fifth on both sides of center. I sewed the pleats down about 4 1/2" in the front and about 1 1/2" in the back:
I cut 4 1/2" down the center for the opening:
Next, I sewed the back piece to the back yoke, finishing the seam and topstitching it:
and also sewed the shoulder seams:
Using the bias tape I made from the strips I cut, I finished the armholes:
and sewed the side seams:
I ironed the piece for the ruffle in half, the long way:
and ironed the strip for the button tabs with the long edges meeting in the middle:
and then in half, to make a skinny strip:
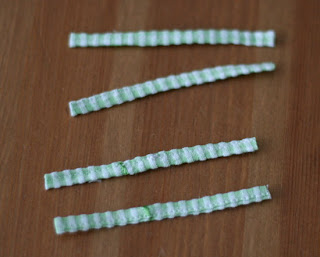
Topstitched this close to the open edge and cut it into 4- 3" pieces:
Next, I ran a gathering stitch for the ruffle, and pinned it around the front opening. I basted it down and then placed my button tabs evenly, 1/2" from the top and then every 1 1/4" after that:
After I sewed the ruffle and button tabs on, I sewed the bias tape around the front opening too:
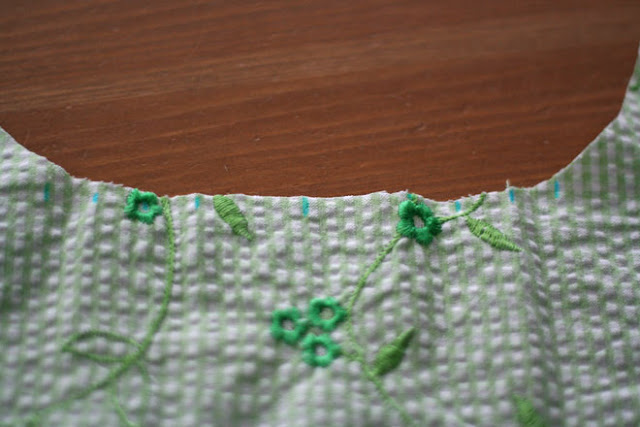
and then around the neck:
I folded the button tabs over and sewed them down:
Finally, I hemmed the bottom and added some 3/8" buttons!
Shirt finished:
http://www.freeneedle.com/directory.php?directory=Children-Clothes
| Рубрики: | шьем детям |
Процитировано 18 раз
Понравилось: 1 пользователю
| Комментировать | « Пред. запись — К дневнику — След. запись » | Страницы: [1] [Новые] |


