-Рубрики

 -Поиск по дневнику

Поиск сообщений в крапка_з_комою

 -Подписка по e-mail


 -Статистика

Статистика LiveInternet.ru: показано количество хитов и посетителей
Создан: 29.07.2015
Записей: 1989
Комментариев: 14
Написано: 2521


як вшити фермуар в сумку-гаманець

Воскресенье, 06 Декабря 2015 г. 19:29 + в цитатник
Это цитата сообщения Ltava [Прочитать целиком + В свой цитатник или сообщество!]

Как я вшиваю сумку в фермуар

Автор noncelatur ,большое Вам спасибо за мастер класс!!!

http://noncelatur.livejournal.com/22326.html#cutid1

82247_original (700x479, 70Kb)
Рубрики:  сумки & гаманці/інструкції для шиття сумок

газетниця мк

Воскресенье, 06 Декабря 2015 г. 19:28 + в цитатник
Это цитата сообщения Просто_Джаззи [Прочитать целиком + В свой цитатник или сообщество!]

Раскладная сумка - мастер класс

Это просто необходимая вещь в хозяйстве. Раскладная сумка, мастер класс по шитью которой вас сегодня ждет, может быть отличной сумкой для природы, мешком для игрушек, пригодится и в ванной вместо корзины для белья. Кстати, всем известный бренд IKEA уже давно выпускает подобные вещи, но эта сделана более прочно и добротно. 

3256587_raskladnaya_symka_master_klass (525x611, 190Kb)

Читать далее...
Рубрики:  меблі/меблі-органайзери, газетниці

сумка-портфель мк

Воскресенье, 06 Декабря 2015 г. 19:21 + в цитатник
liveinternet.ru/users/elena...244508685/

Сумка из сукна. Мастер-класс.

Автор: 

Кто просил мастер-класс по сумке?:) Я наконец-то взялась и запечатлела основные моменты процесса пошива сумочки. Смотрим и шьем вместе, комментируем и корректируем:) Надеюсь, у меня получится объяснить и показать понятно:) Качество фотографий хромает, поскольку процесс занимает не пару часов и время суток везде разное:)


!!! Пожалуйста, при использовании материалов мастер-класса, оставляйте ссылку на источник информации. 
Спасибо!


1. Готовим материалы
- основная ткань (если у вас в запасах не нашлось шинельного сукна, его может заменить драп или плотный деним. Если сумка небольшого размера, плотность ткани можно уменьшить) 
- подклад (я использую хлопок)
- дублерин на тканевой основе или клеевая бязь
- укрепляющий материал для донышка (фильц или иглопробивное полотно, или еще что-то подобное)
- фурнитура (молния, 4 кольца, хольнитены по возможности и желанию)
2. Кроим (предлагаю вам универсальный способ, по которому вы сможете выкроить сумку любого размера)
Я режу материал на 5 прямоугольников, размеры которых высчитываю исходя из пожеланий заказчика. Возьмем стандартный вариант 25*30*10 см. 
основная часть сумки - большой прямоугольник: длина = высота х 2 + ширина донышка + припуски (в числах 25х2+10+2=62 см), ширина по требуемому размеру + припуски (32 см)
средняя часть из двух составляющих: застежки и боковинок.
            Для застежки: два прямоугольника длиной равной ширине сумки (30см) + 12 см; шириной равной половине ширины донышка + припуски (5+2).
            Боковинки  - два небольших  прямоугольника кроим на ширину донышка с припусками (12 см) и высотой сумки с припусками - 5 см (22 см)
для ручек: 4 коротких прямоугольника по ширине металлических колец + припуски, длиной около 15 см, и 2 полосы такой же ширины, длиной около 45-50 см в зависимости от способа носки сумки (в руках, на локте или на плече).
- такие же 5 прямоугольников выкраиваем из подкладочной ткани
- скругляем по произвольному шаблону углы основных деталей

Должно получиться примерно вот так

3. Готовим детали сумки к сшиванию
- проклеиваем внешние детали дублирином (приклеиваем без пара по дублирину,оставляем деталь в покое до полного остывания)
3.1. Пришиваем карманы на подклад
я выкраиваю карманы произвольных размеров на основную деталь, для боковин делаю карманы на всю ширину основной детали и пришиваю только нижний край
- если ткань мягкая, я проклеиваю кармашки тонким флизелином
3.2. Собираем среднюю часть сумки
- втачиваем молнию. Расстегиваем молнию, укладываем на лицевую сторону прямоугольника (42*7 см), закрываем такой же деталью подклада, прокладываем строчку. То же самое проделываем с другой стороной молнии. Следите чтобы края деталей были на одном уровне и припуски были одинаковы!
 
- отворачиваем детали, утюжим, прокладываем отделочные строчки
- боковинки (прямоугольники 22*12см) из основной ткани и подклада соединяем с застежкой, отворачиваем на лицо, отстрачиваем (последнее действие сфотографировать забыла)
3.3. Делаем донышко
- находим середину основной детали, вырезаем из уплотнителя прямоугольник (можно два) по ширине донышка без припусков!

- берем прочные и красивые ниточки и иглу с острой заточкой (я использую вот такие). Ниточки в машину заправляем только сверху (в шпульке оставляем обычную нить в тон)

- соединяем деталь сумки и уплотнитель  по центру, затем по направителю прокладываем строчки, я отстрачиваю с интервалом 2 см 
Получается вот так (фото с лицевой и изнаночной стороны) 
3.4. Пришиваем крепления для ручек
- на четырех коротких прямоугольниках рисуем с лицевой стороны по шаблону контур детали, ориентируемся на ширину кольца, один край скругляем, другой сужаем. Лишнее отрезаем, не забывая высечь треугольнички на скруглении, припуск заметываем на изнаночную сторону. 

* если ваша ткань послушна, припуск можно просто заутюжить

- на каждой детали отмечаем линию притачивания и линию сгиба детали (у меня это 4 и 8 см)
- прокладываем отделочную строчку до линии притачивания крепления к сумке
- размечаем на основной детали желаемое положение ручек и внутреннюю линию притачивания крепления для кольца 
- пришиваем суженый край крепления, прикладывая деталь по верхней линии
- одеваем кольцо, сгибаем деталь, совмещаем края с разметкой, притачиваем, начиная строчку с середины отмеченной линии притачивания, и заканчивая точно в этой же точке. Ниточки вытягиваем на изнанку, закрепляем
- размечаем и устанавливаем хольнитены (этот пункт по желанию:) 
4. Соединяем детали сумки
- складываем детали основы и подклада изнаночными сторонами, склеиваем паутинкой посередине и в местах скруглений
- отмечаем с четырех сторон серединки деталей, совмещаем, скалываем. Прочной двойной нитью сшиваем детали через край.
!!! Ширина шва не должна превышать размер припуска, иначе после стачивания деталей на машине снаружи будут видны ручные стежки
- прострачиваем на машине
- открытые срезы закрываем косой бейкой. Я пришиваю вручную каждую сторону бейки, захватывая только подклад.
* если вы пришиваете насквозь сразу обе стороны бейки, прокладывайте стежки НАД швом стачивания, чтобы после выворачивания сумки их не было видно
- выворачиваем сумку, отпариваем на руке, завернутой в полотенце :) (к сожалению этот процесс сфотографировать нереально)
5. Делаем ручки
- детали ручек проклеиваем дублирином средней плотности или мягкой клеевой бортовкой
- припуски заутюживаем на изнаночную сторону, отстрачиваем
- перед разметкой лучше приколоть обе ручки к сумке и откорректировать их длину по необходимости

- отмечаем линию сгиба и линию соединительной строчки (расстояние такое же, как на креплениях, у меня это 4 см) на фото почему-то только линия сгиба, вторая, видимо, появилась потом в процессе:)

- прокладываем соединительную строчку, закрепляя ручки (строчка должна начинаться и заканчиваться в точке пересечения с продольной отстрочкой)
 вы не используете хольнитены, прострочить лучше несколько раз
 ручки пополам и тонкой обычной нитью сострачиваем края ручек поверх декоративной строчки, стараясь закончить строчку максимально близко к кольцу.
- размечаем и устанавливаем хольнитены на ручках.
Вот и все:) Выдыхаем, любуемся результатом и идем отдыхать и размышлять над декором новой сумки:)
Кто дочитал до конца? А может, кто-то уже сшил сумку?:)
Или три:)))
Рубрики:  сумки & гаманці/сумки

як зробити застібку клевант

Воскресенье, 06 Декабря 2015 г. 19:12 + в цитатник
klubok51.my1.ru/index/kak_s...vant/0-154

Как сделать застежку-клевант


Сейчас большую популярность завоевали застежки-клевант. Застежки-клевант состоят из петли, пуговицы и детали крепления. Да, они есть в продаже. Разных размеров и цветов. Но когда ищешь что-то определенное, по закону подлости его нет в магазинах. Я сама столкнулась с такой проблемой. Ну захотелось на пончо сделать застежки-клевант, а именно того, что виделось, в продаже не оказалось. Ладно, решила сделаю сама! 

Вопрос первый: "из чего?". Можно было, конечно, купить шнур в магазине, но я решила связать гусеничку из любимых ниток "Tulip". Вы можете взять любые нитки или готовый шнур, или сутаж. 
Вопрос второй: "какая пуговица?". Для клеванте пойдет всё, что угодно. Можно свернуть пуговицу из шнура (ниже будет показано как). Можно взять готовую, ту, что вам нравится, той формы, которую вы нафантазировали. Хотя классические застежки-клевант делают из свернутого шнура. Я предлагаю вам ещё один вариант - обвязать бусину
Вопрос третий: "форма". Вариантов много. Я постаралась собрать как можно больше видов застежек-клевант, хотя найти их было сложновато... 

Итак. Покажу, что получилось у меня. Связала гусеничку. Поскольку застежки должны быть одинаковые, считала повороты, чтобы и шнуры получились одной длины. Обвязала бусины. Завернула шнуры, скрепила их той же ниткой. Пришила пуговицы-бусины к одной стороне, ву-а-ля, получились очень красивые, а главное необычные застежки для моего пончо: 


Как сделать пуговицу для застежки-клевант, несколько вариантов:


Варианты форм застежек-клевант:


Рубрики:  сумки & гаманці/інструкції для шиття сумок
таємниці шиття


Процитировано 2 раз

сумка з вишивкою (схема та викрійка)

Воскресенье, 06 Декабря 2015 г. 19:10 + в цитатник
Рубрики:  сумки & гаманці/сумки

сумка з квадрату мк

Воскресенье, 06 Декабря 2015 г. 19:06 + в цитатник
Это цитата сообщения Иримед [Прочитать целиком + В свой цитатник или сообщество!]

Шьем сумочку из квадрата "Berlingot". Мини МК

Читать далее...
Рубрики:  сумки & гаманці/сумки

декоративна застібка та тверде дно для сумки

Воскресенье, 06 Декабря 2015 г. 19:05 + в цитатник
secretsbalcony.blogspot.ru/...st_26.html

МК "Декоративная застежка на сумке и жесткое дно в сумке"

Сумка сшита, МК заснят, но времени выложить нет...
И вот сейчас, когда вся семья тихо-мирно дрыхнет я покажу Вам некоторые моменты создания этой  своей крайней сумки: покажу как сделать декоративную застежку и как укрепить дно сумки.

Сделанная мною декоративная застежка ничто иное как  две рамки. Расскажу как это сделать.
 Берем деталь от сумки, которая предназначена быть клапаном и два маленьких кусочка замши или кожи размером чуть больше чем предполагаемая рамка.Намечает на маленьких кусочках саму рамку. ( Не смотрим на то что я начеркала на них, а только ориентируемся на рамку)


размечаем точно посередине место  рамки

 Прострачиваем ( только к одному слою клапана!!!), прорезаем отверстие и надсекаем уголки.

Выворачиваем и отпариваем

Складываем клапан вдвое  лицевыми сторонами и прострачиваем. Срезав уголки, выворачиваем и отпариваем.

Теперь откладываем клапан в сторону и берем полоску замши для хлястика. Шириной она должна быть равной ширине рамки +1 см, а длиной на несколько см больше чем расстояние от верха рамки до низа клапана.
На моем хлястике уголок острый. поэтому я разметила этот угол.


Сначала ставим одну часть магнитной застежки ( простите, фото стерлось). Сложив вдвое, прошиваем, оставив не зашитым верх. Срезаем лишние уголки, выворачиваем и отпариваем.

Отстрачиваем хлястик

 Нижнюю рамочку аккуратно отстрачиваем, захватив уже оба слоя. Аккуратно срезаем ткань от нижней части клапана, который попал в рамку. Получилось окошечко.

 Берем хлястик, вставляем его верхний кончик в верх верхней рамки на 0,5 см и прострачиваем.
Так же излишки срезаем.

Вот что получилось:

Ставим люверсы для красоты

Клапан готов!!!
Теперь расскажу как я делаю жесткое дно:
Раскраиваем дополнительную деталь, размером равным: длина=ширине сумки +2 см, ширина = ширине детали днища сумки.

  Когда начинаю вшивать дно  у сумки, то сложив деталь днища сумки и дополнительную деталь вшиваю их как одну  двойной строчкой ( для крепкости). С каждой стороны днища сумка припуск в 1 см застрачиваем наверх, надсекая уголки.

 Из пластика ( я использую  старую пластиковыю папку) вырезаем прямоугольник со сторонами равными: длина днища Х ширина днища-1,5 см и аккуратно вставляем в получившийся кармашек. Когда мы вывернем сумку, то те загибы наверх по 1 см не дадут выползать пластиковому вкладышу

Буду рада, если этот Мк кому-нибудь поможет. При использовани материала, ссылка на мой блог обязательна

Рубрики:  сумки & гаманці/інструкції для шиття сумок
таємниці шиття

термос для пляшечки, постіль, сумка для мами і т.д.

Воскресенье, 06 Декабря 2015 г. 18:56 + в цитатник
Это цитата сообщения Elena_laitdream [Прочитать целиком + В свой цитатник или сообщество!]

Несколько МК по шитью вещей для малыша:постель,бортик,термос для бутылочки,мамина сумка и т.п.

Собралась подборка детских швейных интересностей. Наверняка это тоже кому-нибудь потребуется,если не сейчас,то  позже...))))

Опять-таки все МК с одного сайта, англоязычного, есть функция автоперевода, но его надо адаптировать, т.к. местами полная абракадабра получается. Если кому-нибудь что-то надо внятно, пишите, сделаю перевод нормальный и понятный. Но по сути все понятно по фото - или очень многое понятно.))))

1.1. http://www.sew4home.com/projects/kitchen-linens/insulated-baby-bottle-carrier - чехол для бутылочек

 
2. http://www.sew4home.com/projects/storage-solutions...sunshine-laminated-diaper-tote - сумка для детских вещей на прогулку
 
Читать далее...
Рубрики:  органайзери/органайзери для дітей
сумки & гаманці/сумки

сумка мк

Воскресенье, 06 Декабря 2015 г. 18:52 + в цитатник
Это цитата сообщения ОКСАНА800 [Прочитать целиком + В свой цитатник или сообщество!]

Сумка. подробнейший МК

http://tanyahandmade.blogspot.com/


Вначале поговорим о ткани, об уплотнении основных частей. Выкроим основные детали, поработаем над организацией сумки внутри.


О тканях.


Мое предложение было использовать для основы сумки не толстый войлок. Оказывается, найти его сложно. Да и ладно! Чего нам зацикливаться на нем, если можно подобрать и другие материалы. Повторюсь немного для тех, кто не видел предыдущих постов на эту тему.

Читать далее...
Рубрики:  сумки & гаманці/сумки

косметички - прості викрійки мк

Воскресенье, 06 Декабря 2015 г. 18:43 + в цитатник
Это цитата сообщения Марриэтта [Прочитать целиком + В свой цитатник или сообщество!]

Это самый простой вариант пошива косметички. Внизу поста, вы найдете выкройку косметички в натуральную величину.

6a00e54fb575988834015434d4c07c970c (460x338, 109Kb)

6a00e54fb575988834014e8af1d9d0970d (460x372, 84Kb)6a00e54fb575988834015434d37eb2970c-800wi (460x388, 67Kb)6a00e54fb575988834015390fe7e1c970b-800wi (460x418, 116Kb)6a00e54fb575988834014e8af5218a970d-800wi (460x415, 79Kb)6a00e54fb575988834015391018579970b-800wi (460x387, 105Kb)6a00e54fb57598883401539101b024970b-800wi (460x392, 116Kb)6a00e54fb575988834015391019b20970b-800wi (460x353, 100Kb)6a00e54fb575988834015434d4c07c970c (460x338, 109Kb)Нашла на keyka.typepad.com/my_weblog/tutorials/

gujy (690x454, 62Kb)
Безымянный.pngtytut (445x700, 48Kb)


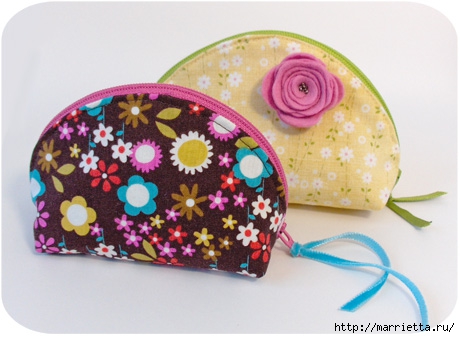
Я шила много вариантов чехлов и косметичек. Это самый легкий и быстрый по пошиву. И обеспечивает беспроигрышный аккуратный результат.

Откопала это чудо я у Лены-Швейки В БЛОГЕ. Там же и мастер-класс как его сшить.

Я, наверно, понимаю, почему косметичек такого фасона так мало шьют. Сложно построить выкройку и предугадать, что у тебя получится в итоге. Я со своим инженерным прошлым и успехами в начерталке (пространственным мышлением т.е.) тоже в данном случае получила не совсем ту форму, на которую рассчитывала.

Но если у меня возникает какой-то вопрос, то я не успокоюсь, пока не найду решение.  И я придумала, как построить выкройку пухлика. Такое построение, по-моему, доступно каждому. Немного порисовать, и можно будет зачехлить в доме все, что вам необходимо.
Форма реально очень удобная для всяких объемных штук. Давайте строить?
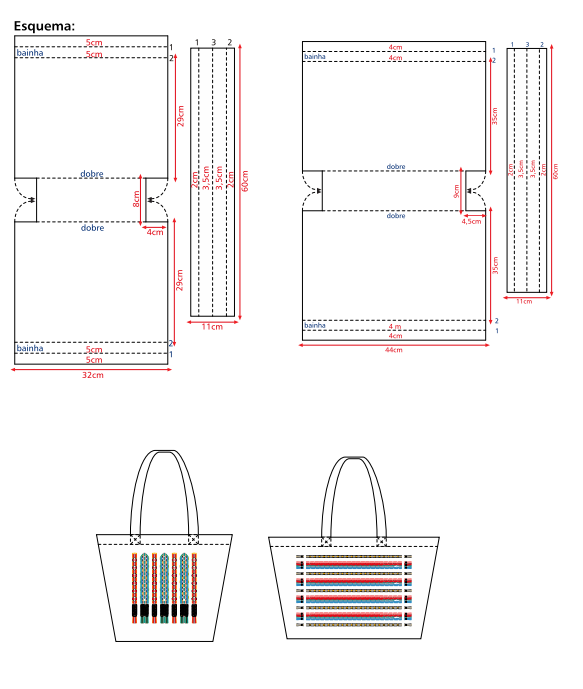
Итак. Первое: определяемся с необходимыми размерами.
Я люблю чертить выкройки косметичек не миллиметровке. Это очень удобно, выкройка обещает быть ровной и неперекошенной. Я набросала схему на обычном листе А4. Но это только для демонстрации схемы.
Опять, как инженер в прошлой жизни, я настоятельно рекомендую начинать построение с осевой линии. Поэтому в середине широкого листа проводим вертикальную осевую линию и относительно нее чертим профиль длинной стороны нашей будущей косметички. Эта модель будет смотреться лучше, когда боковые грани будут немного скошены. Поэтому форма профиля - это не прямоугольник, а трапеция. Не забудьте об этом.
Необходимо, чтобы со всех сторон от чертежа оставалось достаточно места, мы будем достраивать выкройку на этом листе. 

На отдельном небольшом листочке, тоже начиная от осевой линии, начертить профиль боковой стороны косметички. Это тоже будет трапеция. Высоты этих двух трапеций должны быть равны, на чертеже я их обозначила Н. Остальные размеры между собой не стыкуются, тут выбор за вами.

Также проводим горизонтальную линию, определяющую глубину застежки-молнии. Чертим вертикальный участок под молнию, достаточно ширины 1 см (по 0,5 см от осевой линии).

Проведя вертикальную черту, делим чертеж на 4 сектора. Там, где мы сейчас провели вертикальную линию в результате шва не будет, но нам все равно необходимо разделить этот участок на два.


Маркируем сектора цифрами от 1 до 4. Цифры надо расставить не в привычном для нас порядке, а так, как показано на рисунке. 

Также надо обозначить горизонтальную линию на каждом секторе, у меня зеленым цветом выделено. Можно провести волнистую линию. Это необходимо для того, чтобы, потом, когда мы разрежем деталь, мы ничего не поменяли местами.

Промаркировали. Теперь разрезаем на 5 частей (включая молнию). Кусочек с молнией выбрасываем, он нам больше не нужен.
Достаем большой лист с основным профилем косметички, и добавляем к большой трапеции четвертушки боковушек. Их можно просто приклеить, или обвести после того, как правильно обозначим их местонахождение.
А находим мы их место так:
1. Детали располагаем в углах трапеции.
2. Номера деталей теперь расположены в более привычном порядке: сверху вниз - слева направо. Короче - так, как на картинке.
3. Отмеченные линии (у меня зеленые) строго вертикальны и расположены с внешних сторон.

Вот.  Теперь проводим две горизонтальные линии (у меня красные), которые определяют среднюю линию дна (внизу) и линию притачивания молнии.
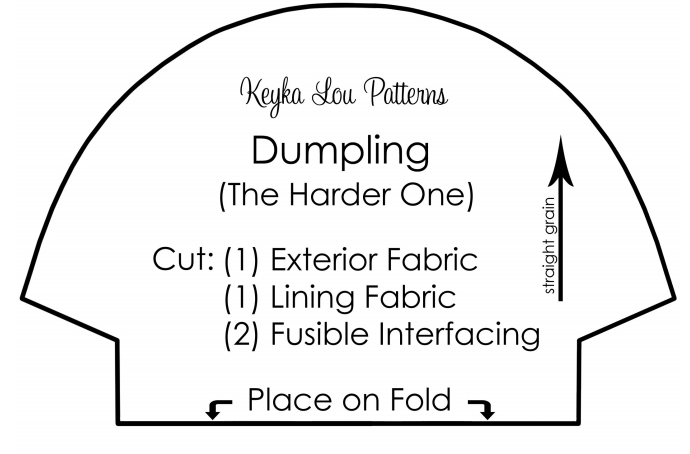
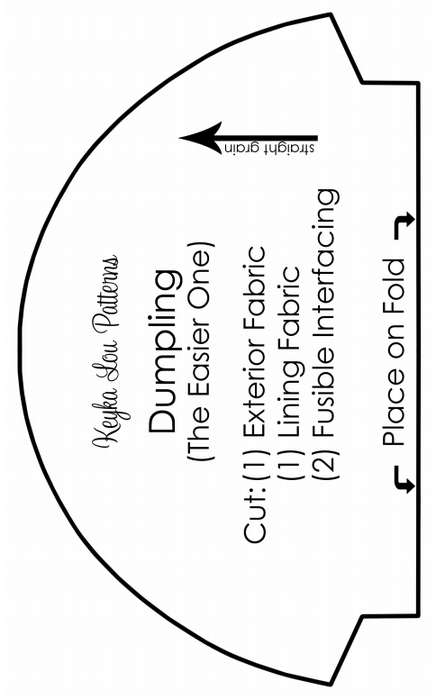
! Выкройка готова.

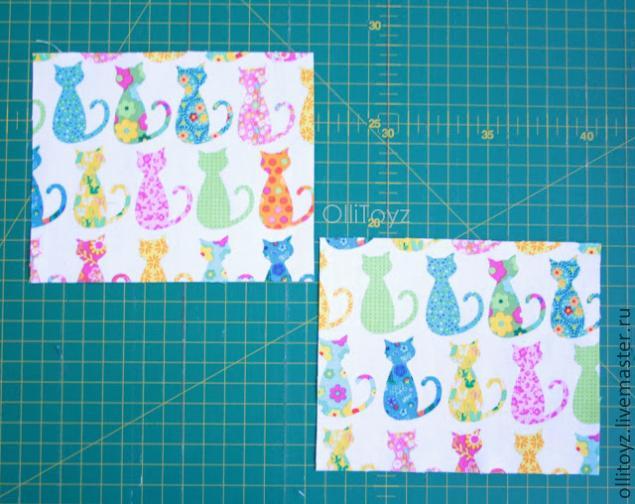
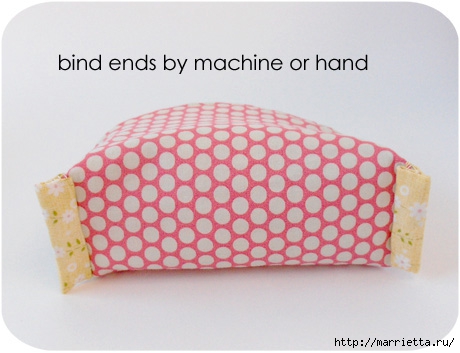
Необходимо выкроить одну большую деталь, учитывая линию сгиба. Выкройка без припусков на швы, поэтому не забудьте оставить припуски. В таких изделиях я оставляю припуски 1 см.
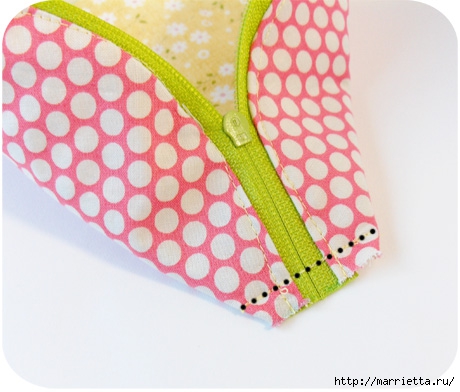
Первым делом вшить молнию. Потом сшить между собой срезы 2, потом 2а, потом 3, потом 3а.
Пять швов практически. Подкладка выкраивается и сшивается также. И вручную пришивается вдоль молнии.
Теперь действительно всё! 


Cut out 5 - 1 1/4" x 9 3/4" c


Cut out 2- 3" x 9 3/4" Wool felt.


I


Cut out 1 - 9" x 9 3/4" cotton fabric for lining.


 Cut out a 3 1/2" x 3 1/2" square.


Using the pattern you just made, cut out 2 pieces of felt and 2 pieces of the lining fabric. (The pattern includes seam allowances)


Now cut out 2 - 2" x 2" squares.


http://ayumills.blogspot.com.au/2008/06/how-to-make-stylish-pen-case.html

Рубрики:  сумки & гаманці/гаманці

як пошити кишеньки для сумок мк

Воскресенье, 06 Декабря 2015 г. 18:42 + в цитатник
Это цитата сообщения ОКСАНА800 [Прочитать целиком + В свой цитатник или сообщество!]

Карманы для сумок | Ярмарка Мастеров - ручная работа, handmade

Предлагаю поговорить о карманах. Карманы бывают самые разнообразные. Но, согласитесь, удобные карманы в сумке - это уже 50% успеха. А сегодня я предлагаю вам МК по трем видам карманов.

Карман первый со складкой

Для пошива такого кармана выкраиваем два прямоугольника. Размер по вашему желанию и требованию будущего кармана.

Складываем детали лицом друг к другу и по периметру прокладываем строчку, оставляем отверстие для выворачивания.

Читать далее...
Рубрики:  сумки & гаманці/інструкції для шиття сумок

складна сумка-торбинка мк

Воскресенье, 06 Декабря 2015 г. 18:32 + в цитатник
Это цитата сообщения Nikash [Прочитать целиком + В свой цитатник или сообщество!]

Действительно оригинальная сумка своими руками. МК

Своими руками можно изготовить не только различные поделки для дома, но и модные вещички. Например, стильную СУМОЧКУ. Хотите знать, как сшить сумку, изучите данный мастер-класс. 


Посмотрите на фото. Такую оригинальную сумку своими руками сделать очень просто.

>>>>>>>>>>>>>

Рубрики:  сумки & гаманці/сумки

сумочка-косметичка на руку мк

Воскресенье, 06 Декабря 2015 г. 18:30 + в цитатник
sew4home.com/projects/stora...s/wristlet

Click to EnlargeSometimes you want to travel light – with just the essentials at hand. For this, you need: the wristlet. A tiny, tidy tote that hangs from your wrist. It's just 5" x 7", but holds all the necessities with room to spare. Zip up your spending cash, a couple o' credit cards, maybe a bit of makeup and a comb. Ours has a detachable strap, so you can unclip it, and drop it into a bigger bag, like a handy wallet. So versatile, so itty-bitty cute, and with our excellent step-by-step instructions and photos ... so easy!

This is a perfect project to use up bits and pieces. Our wristlet was made from scraps of Heather Bailey's Freshcut we had leftover from the summer's Patio Party projects. We added a plain cream linen from our fabric stash, which coordinated nicely with everything. Our only purchases were a little interfacing, the zipper, and the hardware for the strap, which meant we still had a little folding money to put inside the wristlet.

Sewing Tools You Need

Fabric and Other Supplies

Click to Enlarge

  • Fabric scraps to work with the cutting dimensions shown below
  • ½ yard medium-weight fusible interfacing
  • ¼ yard light-weight fusible interfacing
  • 7" zipper
  • ¾" D ring
  • ¾" swivel clip
  • All purpose thread
  • See-through ruler
  • Fabric pencil
  • Scissors or rotary cutter and mat
  • Iron and ironing board
  • Straight pins

Getting Started

Click to Enlarge

Based on the diagram above, cut all the pieces listed below. These kinds of precise cuts of small pieces are best done with a rotary cutter, mat and see-through ruler. You'll get straighter edges and truer 90˚ corners.

For the bag:

A -- strap: 14" x 3"

B -- strap tab: 3" x 3"

C -- top front accent square: 2½" x 2½"

D -- top front rectangle: 6½" x 2½"

E -- bottom front: 8" x 4"

F -- back: 8" x 6"

For the lining:

G -- back lining: 8" x 6"

H -- front top lining: 8" x 2½"

I -- front bottom lining: 8" x 4:

From the medium-weight fusible interfacing:

C -- top front accent square: 2½" x 2½"

D -- top front rectangle: 6½" x 2½"

E -- bottom front: 8" x 4"

F -- back: 8" x 6"

G -- back lining: 8" x 6"

H -- front top lining: 8" x 2½"

I -- front bottom lining: 8" x 4:

From the light-weight fusible interfacing:

A -- strap: 14" x 3"

B -- strap tab: 3" x 3"

At Your Sewing Machine & Ironing Board

Fusing all pieces

  1. Match up each fabric piece with its corresponding interfacing piece. Following manufacturer's directions, use your iron to fuse the interfacing to the wrong side of each fabric piece. 
    Click to Enlarge
  2. It's easy to tell which side is which on fusible interfacing by feeling it. Rub your fingers over both sides; the side with the fusing will feel slightly bumpy. Place the bumpy side against your fabric and press to fuse. Don't set the temperature on your iron too high. I like to fuse from the interfacing side first, then flip the piece over and iron from the fabric side. This way I can make sure there aren't any weird little folds or wrinkles on either side. However, lightweight interfacing tends to be very sensitive to heat and can ripple easily. In this case, I reverse my normal method, and fuse from the fabric side first - only lightly pressing (if at all) from the interfacing side. Again, read and follow the manufacturer's directions that come with your interfacing for best results. 
    Click to Enlarge

Bottom front panel

  1. Take piece E (bag bottom front) and place it right side up on your work surface. Lay your zipper upside down (teeth facing down on the right side of the fabric). The edge of the zipper tape should be even with the fabric's raw edge. 
    Click to Enlarge
  2. Lay piece I (lining bottom front), right side down, on top of piece E, sandwiching the zipper in between the two pieces of fabric. As above, line up the top raw edge with the edge of the zipper tape. Pin all three layers together, being careful to pin through just the top of the zipper. You need to be able to open and close the zipper; you can't do that if you've pinned through the whole thing. 
    Click to Enlarge
  3. Fold back the lining (piece I) to reveal the zipper, and zip it open about half way. 
    Click to Enlarge
  4. Fold the lining back down into position and take the assembled layers to your machine. Attach your zipper foot. Your needle should be in the left-most position. 
    Click to Enlarge
  5. Stitch a ¼" seam. Go slowly. When you get to the middle, where you can start to feel you're approaching the zipper pull, stop with your needle in the down position. Twist your fabric around slightly and open up the layers so you can access the zipper. Be gentle! Carefully close the zipper. Re-position your fabric and finish sewing to the end. 
    Click to Enlarge
  6. When finished and open, your lining piece should be on one side of the zipper and your front piece on the other. 
    Click to Enlarge
  7. Fold lining and front piece wrong sides together, so the zipper stands straight up, and press. 
    Click to Enlarge

Top front panel

  1. Switch your machine from the zipper foot back to the regular all-purpose foot.
  2. Find piece C and piece D (the two pieces that make up the front top panel). Pin them, right sides together, along one 2½" edge.
  3. Stitch, using a ½" seam allowance, to create one finished top panel piece 8" x 2½". 
    Click to Enlarge
  4. You're now going to make another ‘fabric sandwich' out of the top panel pieces.
  5. Place piece H on your work surface (the front top lining piece), right side facing up. Place the finished front bottom panel (from step 7 in the section above) on top of piece H, right side facing also facing up. Finally place, the stitched-together top panel (from step 3) as the final layer, wrong side facing up. Make sure the accent square is to your left. Line up the top raw edges with the edge of the zipper tape. Pin all three layers together, being careful to pin through just the top of the zipper. As before, you need to be able to open and close the zipper and can't do that if you've pinned through the whole thing. 
    Click to Enlarge
  6. Fold up the top panel to reveal the zipper, and zip it open about half way. 
    Click to Enlarge
  7. Fold the top panel back down into position and take the assembled layers to your machine. Re-attach your zipper foot. Your needle should be in the left-most position. 
    Click to Enlarge
  8. Stitch a ¼" seam. Go slowly. Just like you did before, when you get to the middle, where you can start to feel you're approaching the zipper pull, stop with your needle in the down position. Twist your fabric around slightly and open up the layers so you can access the zipper. Be gentle! Carefully close the zipper. Re-position your fabric and finish sewing to the end.
  9. Fold lining and front panel wrong sides together, up and away from the zipper. Press. 
    Click to Enlarge
  10. Re-attach your regular sewing foot and top stitch 1/4" from each fabric edge on either side of the zipper. 
    Click to Enlarge 
    Click to Enlarge

Strap and tab

  1. Using your see-through ruler and fabric pencil, find and mark a center line through the middle of piece A and piece B. It's easier to work from the wrong side so you can easily see your line on the white interfacing. 
    Click to Enlarge
  2. On both pieces, fold the sides in to meet in the middle. Press in place. 
    Click to Enlarge
  3. Fold each piece in half again to end up with a ¾" finished width. Press in place. 
    Click to Enlarge
  4. Edgestitch down the double-folded edge of both the strap and the tab to secure. 
    Click to Enlarge
  5. Slip strap through swivel clip. Fold in half and pin raw edges together. 
    Click to Enlarge
  6. Stitch strap ends together close to the raw edge – about ¼" is good. Go back and forth on the seam line several times to make sure the seam is secure. 
    Click to Enlarge
  7. Flip strap right side out. The little seam you just made should now be pointing inwards. 
    Click to Enlarge
  8. Slide the swivel clip from the folded side to the seam side – so the clip's ring is sitting right against the seam.
  9. Re-attach the zipper foot, and make a seam across the strap, getting as close to the clip as you can. You are 'locking' the swivel clip into place at the seam end. Again, go back and forth along the seam line several times to make sure the seam is secure. 
    Click to Enlarge 
    Click to Enlarge

Positioning the strap tab

  1. Take your ¾" wide strap tab piece, fold it in half, and slip it through the D-ring, so the straight side of the ring sits against the fold.
  2. Lay your finished bag front right side up on your work surface, and find the center point of the top panel's accent square.
    Click to Enlarge
  3. Lay piece F (bag back piece) right side up, next to the front piece. Find the matching center point on the top RIGHT side of piece F. This is the position for your strap tab. 
    Click to Enlarge
  4. Align the raw edges and pin the tab in place. Then, hand baste or machine stitch the tab in place with a short line of stitching close to the raw edge. 
    Click to Enlarge

Finishing - the final sandwich

  1. Lay the finished bag front on your work surface, right side facing up. The zipper should be open about half way. 
    Click to Enlarge
  2. Lay the back panel (with the strap tab in place) on top of the front, right side down (the right sides of these first two layers are facing each other). The strap tab with its D-ring should be facing into the middle of the sandwich, and in position over the top panel's accent square. 
    Click to Enlarge
  3. Finally, lay back lining piece G on top, right side facing up. Match up the raw edges of all three layers so the bag is nice and square. Pin around all four sides. 
    Click to Enlarge
  4. Re-attach the regular sewing foot, and stitch a ½" seam around all four sides, pivoting with the needle in the down position at each corner. Stitch with the front panel side facing up so you can see the zipper. GO SLOWLY. You are stitching though a lot of layers. When you stitch across the zipper on each side, make sure your seam line is crossing just below the zipper stop (right side) and just above the zipper teeth (left side). This will help insure your zipper opening is a perfect fit side to side.
  5. Trim the seam allowances close to your stitching line on all four sides, and clip all corners at a diagonal. 
    Click to Enlarge
  6. Turn the bag right side out through the zipper opening. Your strap tab should pop out from the left seam. Use a blunt edged tool, like a large knitting needle, to poke out the corners so they are nice and sharp. You can also carefully pull out the corners from the outside with a straight pin. Press well. 
    Click to Enlarge
  7. Attach the swivel clip to the D-ring. 
    Click to Enlarge 
    Click to Enlarge 
    Click to Enlarge
Рубрики:  сумки & гаманці/гаманці
сумки & гаманці/сумки


Процитировано 1 раз

сумка мк

Воскресенье, 06 Декабря 2015 г. 18:20 + в цитатник
https://amingledyarn.wordpr...iaper-bag/

Tutorial: Hip Mama Diaper Bag

This project was frankly inspired by Queen Bee Creations’ diaper bag line. I love the idea of a functional diaper bag that doesn’t look like a diaper bag – and that can also, of course, be used as a regular messenger-style bag if you want.

The bag has a water-resistant vinyl lining to help make cleaning easy – but you can substitute a fabric lining if you want.

This bag’s finished dimensions are: 14″ long, 12″ high, 5″ wide, with a 36″ long strap. You can customize the bag by coming up with your own measurements – just remember to add 1″ for seam allowances.

Materials

1 1/4 yards cotton (44/45″ wide) for the exterior
1 yard water-resistant vinyl (44/45″ wide) for the lining
1 1/2 yards heavy-weight interfacing (unless you are using heavy-weight fabric for the exterior; if so, skip the interfacing)
coordinating thread
12″ coordinating zipper
2 metallic snaps
1/2 yard Velcro
5/8 yard 1/4″ elastic

Pattern

1. Cut out the pieces.

A) Strap: 37″ x 5″. Cut 1 of fabric and 1 of interfacing (I recommend interfacing the strap or adding another layer even if using heavyweight fabric).
B) Front/back/flap piece: 15″ x 13″. Cut 4 of lining, cut 2 of fabric, and cut 2 of interfacing.
C) Side gusset: 6″ x 13″. Cut 2 of fabric, 2 of lining, and 2 of interfacing.
D) Bottom gusset: 6″ x 15″. Cut 1 of fabric, 1 of lining, and 1 of interfacing.
E) Back zippered pocket piece #1: 15″ x 3″. Cut 1 of fabric.
F) Back zippered pocket piece #2: 15″ x 11″. Cut 1 of fabric.
G) Front exterior pocket: 15″ x 9″. Cut 2 from fabric.
H) Side exterior pockets: 6″ x 9″. Cut 4 from fabric.
I) Interior pockets: 17″ x 9″. Cut 2 from lining.

I recommend labeling your pieces with masking tape and marking them with letters corresponding to the list above. This will help you keep track of the pieces.

Also: if you are using a uni-directional fabric (with motifs that all point the same way, as in the fabric I’ve used) take care when laying and cutting your fabric.

2. Apply interfacing (if using).

Fuse or sew interfacing to strap (A), 2 front/back/flap pieces (B), 2 side gusset pieces (C) and 1 bottom gusset piece (D). Attach interfacing to exterior fabric, not lining.

3. Make strap.

Press under 1/2″ on each long side of strap piece (A). Then press under 1/2″ on each short side. Fold strap in half lengthwise, wrong sides together, matching up all pressed edges. Press flat. Keeping all pressed edges even, topstitch a 1/4″ seam on all 4 sides of the strap. Set aside.

4. Make flap.

a) You will need 1 fabric flap piece (B) and 1 lining flap piece (B). On the lining piece, attach smaller halves of metallic snaps to each corner on one long edge. Snaps should be placed so that they are 1″ in from each side of piece.

b) Pin lining piece to fabric piece, right sides together. Sew a 1/2″ seam around three sides, leaving one long edge (the side without the snaps) open. Turn right side out, using turning tool to push out corners. Topstitch a 1/4″ seam around three finished edges. Set aside.

5. Make exterior pockets.

a) Back zippered pocket: Pin piece E to piece F along long edge, right sides together. Using a 1/2″ seam allowance, stitch a 1.5″ long seam at each end. Stitch the remainder of the seam (12″ in the middle) with a long basting stitch. This will be where you insert the zipper. Press seam open. Pin zipper to middle basted section, placing top of zipper and zipper stop close to the ends of the basted section.

Using a zipper foot, attach the zipper. Remove basting thread. Pin wrong side of zippered pocket piece to right side of a back lining piece (B). Topstitch a 1/4″ seam around all four edges. The lining piece will serve as the pocket’s interior.

b) Side pockets: Pin two side exterior pockets (H) together along shorter edge, right sides together. Stitch a 1/2″ seam; trim. Turn, press, and topstitch a 1/4″ seam along edge. Cut a 2″ piece of Velcro. Stitch the fuzzy half to the interior of the pocket, 1/4″ down from the top edge.

Place the pocket piece against one of the interfaced side gusset pieces (C), matching bottom and side edges. Mark placement for other half of Velcro on piece C, then stitch in place. Place pocket piece against gusset piece, with Velcro lined up, and stitch a 1/4″ seam around three edges. Repeat for other side pocket.

c) Front pockets: Pin the two front pocket pieces (G) together along long edge, right sides together. Stitch a 1/2″ seam; trim. Turn, press, and topstitch 1/4″ around all four edges. Attach other halves of metallic snaps to right side of pocket, through both layers. Measure up 5″ from bottom and in 1″ from each side to place snaps. Fold pocket in half width-wise and press, creating a crease down the center. Place the pocket piece against the remaining front fabric piece (B), matching bottom and side edges; pin in place. Topstitch along center crease, to create two front pocket halves. Cut two pieces of Velcro, each 4″ long. Stitch two fuzzy halves to the interior of the pocket, 1/4″ down from top edge, and centering each piece on each side of the center crease. Mark placement for other halves of Velcro on piece B, then stitch in place. Line up Velcro halves and topstitch 1/4″ seam around edges.

6. Assemble bag exterior.

a) Pin interfaced bottom gusset piece (D) to one side gusset piece (C) along short edges, encompassing bottom of side pocket, right sides together. Stitch a 1/2″ seam, beginning and ending 1/2″ from ends. Press open. Repeat for other side gusset piece.

b) Pin back zippered pocket piece to gussets along sides and bottom, through all thicknesses, right sides together, having zipper near the top. Stitch a 1/2″ seam, pinning corners like this:

Repeat for front pocket piece. Turn right side out. You should now have a bag exterior that can stand up on its own. Set exterior aside.

7. Make interior pockets.

a) Turn under 5/8″ on top edge of one interior pocket piece (I) and stitch in place using a 1/2″ seam allowance, forming a casing. Cut a piece of elastic 10″ long, insert it into the casing, and secure at both ends. Repeat for other interior pocket piece (I).

b) Pin wrong side of pocket piece against right side of one lining piece (B), matching bottom and side edges, easing in fullness at bottom by creating pleats or gathers. (It’s pretty much impossible to gather vinyl, so I used pleats across the bottom. If you’re using regular fabric for the lining, do a gathering stitch across the bottom and pull up the threads to fit). Stitch a 1/4″ seam around each side. Repeat for other pocket piece.

c) To create two interior pockets on one piece, fold the whole piece in half width-wise and mark the center line. Topstitch down that center line through all thicknesses.

d) To create three interior pockets on the other piece, measure in 5″ from each side and mark lines. Topstitch down those lines through all thicknesses.

8. Make bag interior.

Follow step 6 to attach side and bottom gussets and assemble the interior of your bag, with one exception: leave a long opening on one of the bottom seams for turning the bag. Do not turn right side out.

9. Finishing the bag.

a) Pin unfinished edge of flap to top edge of back zippered exterior piece, right sides together (lining side facing out). Stitch 1/4″ seam to attach.

b) Slip exterior of bag into lining, right sides together. Pin top edges together through all thicknesses. Stitch a 1/2″ seam. Trim seam.

c) Turn bag right side out by pulling exterior through the opening in lining. Sew up opening in lining. Push lining down into bag. Topstitch 1/4″ seam around top opening edges of bag.

d) Lap each end of strap 1.5″ over sides of bag. Topstitch strap ends to bag in an X pattern to secure.

You’re now ready to rock your new bag!

Рубрики:  сумки & гаманці/сумки

сумка-торбинка фото мк

Воскресенье, 06 Декабря 2015 г. 18:17 + в цитатник
https://foofanagle.wordpres...-tutorial/

At long last, the promised Bagsket Tutorial.
none none

First off, thank you Claudine for posting her inspirational bag.
Full credit must also go to Diana. She and I worked through the first bag together and her guidance was invaluable. If you’re a knitter, make sure to check out her amazing FREE knitting patterns.
And finally, thanks susankg53 for the name…it’s perfect!

This is a great project for your scraps and I hope you have fun with it. As I’ve stated before, I am NOT an expert seamstress by any means, so I’m sure I’m doing things bass ackwards all over the place.

I would love love LOVE to see what you come up with.

This is a long tutorial with a fair number of pics. If anything is unclear, please email me (foofanagle at gmail dot com) and I’ll be happy to clarify. For those of you who are quick and crafty, here’s a summary of the steps…it may be all you need.

SUMMARY
Cut and assemble pieces
Sew basket (bottom, side, together)
Sew handles and add to basket
Add trim to pocket, sew pocket to inside lining, sew pockets
Iron drawstring flap and sew down top ends for neat drawstring opening
Sew down drawstring flap
Sew drawstring bottom to interior lining top
Sew lining to basket
Trim top of Bagsket and thread drawstring
Ta da!

Read on for the full tutorial in all of it’s badly photographed glory. (you can click on the photos to see a larger version)

Did I mention I’d love to see any bags you make using this tutorial?


::Bagsket – The Tutorial::

PIECES (for a bag that approx. 8 inches in diameter and 8.5 inches tall – for 12in diameter bag, see bottom of post)

Basket
9 inch circle of interfacing
9 inch circle of exterior fabric
29.3in x 9in interfacing
29.3in x 9in exterior fabric (top pieced strip = 29.3in x 4.5 in and bottom exterior strip = 29.3in x 5.5 in sewn together lengthwise with a ½ inch seam allowance.)
none

Bag
9 inch circle of interior fabric
29.3in x 9in interior fabric
29.3in x 4.5in interior fabric (pocket)
30.3in x 7in interior fabric (drawstring top)
none

Handles/Trim
2in x 15in (x4) of handle fabric
2in x 14in (x2) of interfacing
30 in of pocket lining double-fold trim
30 in of exterior top double-fold trim
30 in of rickrack, ribbon or trim
none

NOTES
Use a heavy interfacing like Timtex. I didn’t make it fusible, but that could potentially help when sewing the fabric to the interfacing.
Seam allowances for basting and seaming are different to ensure basting stitches don’t show

PUT IT ALL TOGETHER

Assemble your pieced strip. Have fun with this. It doesn’t really matter how many fabrics or angles etc that you use as long as you end up with the correct sized piece at the end. You can make the whole exterior pieced or use just two fabrics and on and on. If desired, sew decorative trim to exterior fabric. Play now (because the rest is a bit of work!)

Basket Construction:
Pin exterior bottom fabric to interfacing circle (wrong side of fabric to interfacing)
none

Baste together with a 1/3in seam allowance. We’re basically just holding the fabric to the interfacing. If you have fusible interfacing, you can skip the basting.

Pin exterior fabric to the interfacing rectangle
Baste together with a 1/3in seam allowance

none

With right sides facing, pin and sew the short ends of the side piece together with a ½ in seam allowance, forming a cylinder
Press seam to one side

Mark the 4 points on both the bottom and side piece.
(You can fold the circle/cylinder in half, mark the crease at each end, open and refold so the pins are together and mark the creases again.)
none

Line up a pin on the bottom with a pin on the side and pin together (making sure the interfacing side is on the outside on both the side and bottom)
none

Line up the remaining markers and pin the bottom to the side. Pin generously to ensure the pieces don’t slip apart as you sew.
none

Sew together the bottom and side piece with a 1/2in seam allowance. Make sure your seam “covers” the basting stitches (that’s why there’s a difference in the seam allowance when basting vs. seaming. Or you can do it haphazardly like I did and pick out the basting stitches later. That’s sooo much fun!
Here’s what the stitching should kinda look like…
none

This will take a bit of fiddling and manipulating. When you sew over the side seam, you may need to get a “running start” on your machine so that it powers through. If you have a walking foot…use it!

Turn the bucket right side out. I iron the sides of the bucket once more to smooth out the wrinkles that are inevitable when you turn the bucket.

Handle construction:
(I’m sure there’s a better way to do this…but this is how I made mine. And apparently I forgot to take pics of this step…but is pretty much exactly what I did for the headbands.)
With right sides of handle fabric facing, place the interfacing strip on top and pin all together
Sew down each side (length wise) wish a ¼ in seam allowance
Trim the seam allowance down to 1/8 in or pink the seam allowance making sure not to snip the stitches
Turn the tube right side out so that the interfacing is between the handle fabric now
Press
Sew down the side of the handle with a 1/8in seam allowance. When you reach an end, tuck the fabric ends in, making sure one side wraps around the raw end of the interfacing.
Turn the corner and sew the ends, turn and sew up the other length of the handle with the 1/8in seam allowance.
Repeat the end treatment on the other end of the handle, sew to your starting point and snip your thread.

Repeat for the second handle.

Attach handles to the side of the basket
Ends of handles should be about 3.5 inches from the top of the basket and about 4 inches apart from each other.
Pin handle ends in place
none

Sew handles down in a reinforcing square.
none

It takes a bit of mushing and smooshing to get this done, but you can do it! Iron the sides of the bucket one more time if you think they need it.

PHEW!

Bag Construction

Sew trim to the top of the pocket edge
none

Sew pocket to lining along the bottom seam and sew (trimmed edge is towards the top)
none

Sew pocket lines down at whatever intervals you’d like. I like some narrow and some wide pockets to help hold a variety of notions and tools.
Drawstring Top:
Fold in both sides 1/2” and iron (this is so you have a nice opening for your drawstring)
Fold down ¼” from the top of the fabric and iron. If you’re using a print, you should be folding so that the wrong side of the fabric is inside the fold.

Fold down another 1” from the top and iron. This creates the pocket for you to pull the drawstring through.
none

Sew down the length of the drawstring fold using a 1/8” seam allowance from the folded edge.
none

With “inside” sides facing, pin the drawstring fabric to the top edge of the side lining and sew together
none

Line up edges of the inside lining and sew together at the ends (make sure the pockets are in).

**NOTE** Do not sew together the drawstring opening and make sure to line up the drawstring seam line and the top of the pockets when you sew together

Now for a nice clean look, do a pseudo-French seam along the drawstring flap (you don’t need to go all the way down the lining since only the drawstring flap shows both sides of the fabric.)
Basically, fold/roll the seam of the flap back onto itself. Press it down, pin it and sew it down so that the seam and raw edge is enclosed.
none

none
(Yeah, I know my instructions on this part are particularly bad.)

As you did with the bottom of the bucket, mark the 4 points of the bottom round and the bottom of the inside lining.
none

Pin the bottom round to the lining and sew together with a ½” seam allowance

This is what it looks like with the INSIDE out (when you put it in the basket, you’ll want the pockets on the inside.)

none

Guess what! You’re ALMOST there! Let’s bring it all together now.

Tuck the lining into the bucket. Make sure the drawstring flap is tucked inside the lining.
Pin the lining to the bucket all the way around the top.
none

Sew along the top (you’re sewing through the bucket and the drawstring/lining side edges) to secure the lining to the bucket using a ¼” seam allowance. The key here is to sew close enough to the top of the bucket so that the stitches won’t show after you apply the binding.

Are you still hanging in there?!

FINALLY…line up the end of the wide trim with the bucket side seam. Sew the trim to the top of the bagsket. Make sure you catch both sides of the trim as you go. Take your time on this…I recommend pinning (I didn’t pin and I regret it since I didn’t catch a couple of spots of the inside trim.) When you reach the end, fold the end of the trim under so you have a nice neat end when you get back to the side seam.

Guess what! You’re all done! CONGRATS!
none

For a Larger Bag (12 in in diameter and 12 in tall)
Basket
12 inch diameter circle of interfacing
12 inch diameter circle of exterior fabric
38.7in x 12.5 in interfacing
38.7in x 12.5 in exterior fabric (top pieced strip = 38.7in x 5.5 in and bottom exterior strip = 38.7in x 7 in sewn together lengthwise with a ½ inch seam allowance.)

Bag
12 inch diameter circle of interior fabric
38.7in x 12.5 inch interior fabric
38.7in x 4.5 inch interior fabric (pocket)
39.7in x 9 inch interior fabric (drawstring top)

Handles/Trim
2in x 15in (x4) of handle fabric
2in x 14in (x2) of interfacing
38 in of pocket lining double-fold trim
38 in of exterior top double-fold trim
38 in of rickrack, ribbon or trim

I’m sure I made this more complicated than it has to be. If you have better ways of doing parts (or all) of this project, please let me know. I’d love to hear it!

Рубрики:  органайзери/органайзер торбинка
сумки & гаманці/сумки


Процитировано 1 раз

сумка з бічними кишеньками фото мк

Воскресенье, 06 Декабря 2015 г. 18:13 + в цитатник
Рубрики:  сумки & гаманці/сумки

сумка-торбинка для покупок фото мк

Воскресенье, 06 Декабря 2015 г. 18:05 + в цитатник
punkinpatterns.com/blog/201...g-bag.html


oilcloth mini shopper

oilcloth mini shopper

oilcloth mini shopper

Cut the following pieces from oilcloth.

(2) 8″ x 6.5″ front and back pieces
(2) 8″ x 4.5″ side pieces
(1) 4.25″ x 6.25″ bottom piece
(2) 16″ x 3.5″ handles

oilcloth mini shopper

oilcloth mini shopper

oilcloth mini shopper

oilcloth mini shopper

oilcloth mini shopper

oilcloth mini shopper

oilcloth mini shopper

oilcloth mini shopper

oilcloth mini shopper

oilcloth mini shopper

oilcloth mini shopper

oilcloth mini shopper

oilcloth mini shopper

oilcloth mini shopper

oilcloth mini shopper

oilcloth mini shopper

oilcloth mini shopper

oilcloth mini shopper

oilcloth mini shopper

oilcloth mini shopper

oilcloth mini shopper

oilcloth mini shopper

oilcloth mini shopper


Рубрики:  сумки & гаманці/сумки

сумка з светру мк

Воскресенье, 06 Декабря 2015 г. 17:53 + в цитатник
sweetgrace.typepad.com/the_...orial.html

Make Alpaca Wool Sweater into Felted handmade Bag tutorial

Wool sweater bag roses handmade craft felted 
Today's little craft project is turning this Goodwill purchased alpaca sweater into a lovely rose covered bag.  Since I spent the weekend cleaning out the camel house I figured I deserved something beautiful and not smelling like poo!

The sweater was a mens X-large that is felted (washed in hot and dried on hot twice until it shrunk to a large child's size sweater...you know it felted when you can no longer see the stitches and it will not unravel when cut) I paid $3.00 for the sweater...

Wool sweater bag alpaca

I found two sweaters with this tag...lucky me!

Wool sweater bag cut sleeves 
Start by cutting off the sleeves just inside the arm-hole seams  Next cut at the neck...

Wool sweater bad cut neck 
I lined up a straight edge across the bottom of the armpits to make sure my neck cut would be as deep as my arm cuts.

Try to make the arm curves and the neck curves match...I had to fool with it a little after these pics to get them even. These will be your handles After you cuts are made shift the sweater around till the handles line up. 

Wool sweater cut sleeve

Next is the bottom of the bag...you don't have to do this, you can just sew the bottom together straight away but I needed the extra room.

I used one of the sleeves I cut off for this.  I made mine about 4 inches wide by the same length as the bottom of my sweater. 

Wool sweater bag bottom cut 
Turn your sweater inside out and at the bottom edge of the sweater pin your bottom piece, right sides together.

Wool sweater bag pin bottom

Now how does one fit a square cornered bottom piece into a curved sweater hem?

Well I put a little tuck in the corners of the bottom piece...all pointing in...to make it match up better to the sweater.

Wool sweater bag tuck bottom

Stitch along the bottom where you pinned, feed the sweater into the machine.  Don't pull from the back it will stretch and warp the sweater.

Turn right side out. Now you have a perfectly useful wool bag. But... when I noticed all those scraps I knew I just could not let them go to waste.

Wool sweater bag scraps

So I played around with them a little...

Wool sweater bag scrap flowers

Hmmmm...maybe roses?

Wool sweater bag roses first

So I made a couple of roses by handstiching them as I wound them around

And if two were good...

 Wool sweater bag roses leaves

Nine were better, with leaves to boot! All made from the scraps and hand sewn on. And what am I going to do with my newly created bag?

Wool sweater bag knitting

It is my new knitting bag!

Wool sweater bag ribbing 

I love the ribbing on the bottom...no hiding what this used to be!    

Wool sweater bag alpaca knitting 

There you have it...a thrift store sweater turned new rose knitting bag!

Felted wool bag sweater handmade roses 
So everybody run...don't walk...to your nearest thrift store and grab a armful of wool sweaters.  Let loose your creative genius that I know is hiding in there! Have fun! Update...I have also made a ruffled laptop bag out of an old wool sweater.  The tutorial is here.

6a00e553deebaf883401310fa9d3fb970c-500wi 

Рубрики:  сумки & гаманці/сумки

сумка з квіткою мк

Воскресенье, 06 Декабря 2015 г. 17:49 + в цитатник
sewmamasew.com/2010/02/fun-...rl-basket/

Supplies:

  • 1 – 13″ x 3″ piece for the handle
  • 2 – 4 1/2″ x 12 1/4″ piece for the body and lining of the bag
  • 2 – 12 5/8″ x 1 1/2″ with frayed edge pieces for the ruffle and the handle**
  • 2 – 4 inch circles
  • 1 – just under 4 inch circle Peltex for lining
  • 1 – 4″ x 12″ Peltex for the lining
  • 1 – 2″ x 42″(or width of fabric) with frayed edges for the flower**

Handle: 
To make the handle, fold in half lengthwise, and press.

As if you are making bias tape, fold again so that the raw edges meet the center fold. Press. Topstitch from each side down the length of the handle.

Set aside for now.

Ruffles
**Now let’s work on the ruffles. To make the edges frayed, you are going to snip about 1/4″ and then rip, rip, rip away. I ripped my pieces so that both edges are frayed. Part of the fun of this fabric is it is fairly natural looking. This frays extremely easily and adds texture to the piece.

Fold one ruffle piece in half lengthwise and press. Open up and use the pressed line to stitch a long basting stitch. Gather loosely by pulling one thread while holding the other one still. Repeat with the other ruffle piece.

Take one ruffle piece, tuck the end under and pin to the handle, 2 inches from the end.

Pin the ruffle leaving 2″ from each side. You can fold pleats in the ruffle if your gather wasn’t tight enough. I pinned the ruffle in a wavy fashion to give it a little character. But if you would rather, you can pin it straight. Sew down the center of the handle to keep the ruffle on the handle.

On the outside body piece, use a water soluble pencil (or light pencil because it will be covered with the ruffle) to mark 1 1/2″ from the top down. Mark all the way across the body piece.

Use the line to line up the second ruffle piece. Again, I pinned the ruffle to the body piece in a sort of curvy wave. I also made some pleats as needed. Sew the ruffle to the body.

With right sides together, pin the inside of the basket to the ruffled outer piece. Sew along the top edge. Press.

Turn the right sides out and press again.

We have to do a little frogging here. I find the easiest way to put the handles in is just a bit of unpicking. But if you would rather, you can pin the handle in before you sew the top of the basket together. The handle is fairly short and I find that way I have a harder time getting the handle straight.
I measure from the center of the basket top about 2″ out and unstitch the top 1 inch. From the other side I do the same. This leaves two holes bigger than the handles. (The handles are just there to show you how they will go. Wait a minute to put them in.)

Add your Peltex body piece now. I did this by lifting the outside layer and placing down the Peltex piece, then lay the top down over it so the right side is up and you have a nice sandwich of fabric, Peltex, fabric.

Insert the handles in the holes making sure the ruffle is facing out each time. This does make a loop for the handle. Pin in place. Top stitch along the top of the entire basket.

Top stitch again over the center of the ruffle, about 2″ down from that and finally just up from the bottom. This is to hold the three pieces of the body together.

Now, let’s sew the basket together. Fold the basket in half with wrong sides together. Sew along the edge of the basket.

Turn the whole basket right sides together and sew a 1/4 inch seam. This is going to cover the other seam and leave you with a French seam.

Take your two fabric bottom circle pieces and your Peltex circle. Make a sandwich with the fabric pieces on the outsides and the Peltex inside the sandwich. Zig-zag around the circle to keep them all together. With the right sides of the basket still together, pin the bottom circle to the bottom of your basket. Stitch the two pieces together. Go around it twice if you must.

You can turn your basket right side out now.

For the Flower:
Take your long piece and press it in half lengthwise. I leave it folded.

Prepare a long thread and needle. Remember this is Sew,Mama,Sew! not Hot Glue, Mama, Hot Glue! Slowly roll the flower up, making stitches in the folded end every 1/4 inch or so. More stitches are better because you really want to hold it all together. Continue to roll and stitch until your flower is the size you want or you run out of fabric.

Tuck the end of the flower under and stitch the flower securely. I took more stitches through the bulk of the flower now too to make sure it was all going to stay together nicely. I also fluffed the frayed edge a bit and pulled out and left some exposed fibers to give it more texture.

Hand stitch the flower to your basket and you are good to go!

Рубрики:  сумки & гаманці/сумки

сумка мк

Воскресенье, 06 Декабря 2015 г. 17:22 + в цитатник

Цитата сообщения kasana55

Сумка от Журавлика Мастер-класс "Лоскутная сумочка".

1. Делаем выкройки по размерам как указано на рисунке.

Рис.1
Рис.1 Выкройка изделия.

2. Выбираем деталь "Узор", смотрим фото и переносим деталь на миллиметровку, попутно удивляемся как можно изрисовать всю мамину миллиметровку.
Рис.2

Рис.2 Перенос детали на миллеметровку.

3. Делим чертеж на четыре одинаковых фрагмента  7,5*7,5 см и рисуем в одном квадрате линии будущего блока.
Рис.3

Рис.3 Создаем чертеж будущего блока.

4. Выбираем ткани (8 видов), ширина необходимая на данном этапе 2,5 см.

Рис.4
Рис.4 Подбор ткани для деталей.

5. Соединяем, как указано на рисунке 5.

Рис.5
Рис.5 Соединяем отрезки.

6. Разрезаем полоски ширина 2,5 см, соединяем в такой рисунок, обрамляя шоколадными оттенками разных тканей.
 

Рис.6
Рис.6 Формируем светлые блоки.

Рис.7
Рис.7 Добавляем шоколадные детали.

Рис.8
Рис.8 Формируем будущий орнамент.


7. Полученный образец рядом с эскизом.

Рис.9
Рис.9 Готовый элемент декора изделия.

8. Подбираем основную ткань сумки, конечно, ее можно выбрать и заранее.
И выбираем то, что будет основным фоном лоскутной вставки.
Рис.10

Рис.10 Подбор ткани для основного изделия.

9. Ширина светлой полоски ткани 5 см, обрезаем как на фото, потом линейку поворачиваем, чтобы был угол 90 градусов и отрезаем. В итоге у нас получился треугольник.


Рис.11
Рис.11 Срезаем деталь, используя линейку.

Рис.12
Рис.12 Детали для декора изделия.

10. Ленточно сшиваем детали.

Рис.13
Рис.13 Сшиваем детали изделия.

Удобно использовать лапку для пэчворка, а чтобы такой крой не отразился на качестве работы, вершина треугольника совпадает с пересечением середины квадратиков.
Рис.14

Рис.14 Используем лапку для пэчворка.

11. Промежуточный этап работы.

Рис.15
Рис.15 Собираем детали орнамента.

12. Полученные мини блоки (может "мини квилтики" начать шить?), точность обрезки на данном этапе обязательна. Сшиваем, припуски на шов везде 6 мм.
 

Рис.16
Рис.16 Получаем "миниквилтики".

Рис.17

Рис.17 Готовые "миниквилты".

13. О-о-о! Теперь можно порадовать себя – стучим молотком по швам с изнанки.

Рис.18

Рис.18 Работа со швами с изнанки.

14. Вырезаем дополнительно детали 3,75*9,75 см или больше, но не меньше.

Рис.19

Рис.19 Вырезаем дополнительные детали.

15. Сшиваем детали с основным узором, как на фото, так  как с изнанки видно стыки края блока, т.е. не промажем с точностью.
 

Рис.20

Рис.20 Сшиваем детали.

16. Основные детали выкройки соединяем малярным скотчем как на фото.
 

Рис.21

Рис.21 Соединяем основные детали выкройки.

17. Подбираем изнанку. У меня был отрез  46*55 см, получается и на лицевую часть такого размера тоже хватит.
 

Рис.22

Рис.22 Выбираем ткань для изнанки.

18. Согласно выкройки лицевой (серый) верх разделяем на две части и вшиваем лоскутную вставку.


Рис.23

Рис.23 Вшиваем лоскутную вставку.
 

Рис.24

Рис.24 Выкройка изделия.


19. Делаем двойной запас на усадку после стежки, переносим контур выкройки на ткань.

Рис.25

Рис.25 Перенос выкройки на ткань.

20. Пять слоев:

  • изнанка,
  • двусторонняя клеевая,
  • наполнитель прессованный жаропрочный,
  • двусторонняя клеевая,
  • лоскутный верх.

Рис.26

Рис.26 Соединяем слои.

Проглаживаем утюгом с лица и с изнанки (я делаю с паром). Можно данный этап разбить, сначала соединить изнанку и наполнитель.
Внимание! Клеевая не должна выступать за края ни ткани, ни наполнителя.

21. Выбираем нитки, две мононити (леска) темная и светлая, светлые и шоколадные нитки. Желательно список всего необходимого для проекта составить заранее.
 

Рис.27

Рис.27 Подбор ниток для изделения.

22. Диагонально под прямым углом проводим линии на лицевой стороне.
 

Рис.28

Рис.28 Наносим линии разметки.

23. Сначала простегиваем шов в шов, нитки обычные. Уменьшаем давление лапки на ткань, в связи с увеличенной толщиной.

Рис.29

Рис.29 Простегиваем изделие.

24. Выбираем строчку 44 на Бернине 1404QE, на Pfaff exspression 4.0 это строчка 52. Верхняя нить темная мононить (нужна качественная нить иначе нагрузку она просто не выдержит), нижняя нить бежевая.

Внимание! В зависимости от толщины сэндвича ставим иглы или для квилтинга с зелёной меткой (они так и называются), или для кожи, также подойдут иглы для вышивки с красной меткой. Для того, чтобы вы занимались шитьем, а не перезаправляли постоянно нитки, и чтобы ваш проект не превратился  в столь популярное НЛО.
Давление лапки на ткань уже уменьшили на треть или на четверть от нормы.

Внимание! Натяжение верхней нити я ставила на Бернине 7-10 (норма 4), т.е. увеличиваем натяжение в 2 раза минимум. Эта техника использования квилтинговых строчек написана в любой инструкции к швейным машинам.
И потом, раз нижняя нить значительно толще, ее протащит толще игла, и эффект будет выразительней. А добиваемся мы эффекта ручной стежки, так как стегать вручную пока не умеем.

Рис.30

Рис.30 Прокладываем строчку.

25. По размеченным линиям последовательно застрачиваем основной фон (отступ 1 см), если остановка в центре сумки, делаем закрепку. Сдвигом иглы влево или вправо регулируем точность, и не путаемся.


Рис.31

Рис.31 Застрачиваем основной фон.
 

Рис.32

Рис.32 При остановке делаем закрепку.
 

Рис.33

Рис.33 Прокладываем строчку.


26. На шоколадных тканях делаем тоже самое – стежку как на серой основной ткани.
А на светлой ткани делаем верхняя нить – светлая мононить, нижняя нить – шоколадный оттенок нитки.
 

Рис.34

Рис.34 Прострочить декоративные детали.

27. Из серой ткани (основной) вырезаем две полосы 13*45 см
 

Рис.35

Рис.35 Раскраиваем дополнительные детали из основной ткани.

28. Для замка деталь выкройки на фото, складываем пополам вдоль, заутюживаем. Отступаем от сгиба 0,8 см и прокладываем строчку.


Рис.36

Рис.36 Выкраиваем детали для замка.
 

Рис.37

Рис.37 Прокладываем строчку на сгибе.


29. На руках приметываем замочек (замочек может быть больше необходимого размера) как на фото, значительный захлест.


Рис.38

Рис.38 Приметываем замок.
 

Рис.39

Рис.39 Приметываем замок со значительным захлестом.


30. С лицевой стороны, ориентируясь на предыдущий шов, делаем строчку, используя лапку для вшивания молнии. Профессионалы могут этот этап сократить.

Рис.40

Рис.40 Делаем строчку с лицевой стороны.

31. Раскрываем деталь, используя клеевую и наполнитель, создаем объем.
 

Рис.41

Рис.41 Создаем объем деталей застежки.

32. Застегиваем полосками (строчка прямая).
 

Рис.42

Рис.42 Простегиваем детали застежки.

33. Делаем разметку, используя выкройки (линия с подписью 40 см должна располагать в центре молнии вдоль).
 

Рис.43

Рис.43 Делаем разметку.

34. Обрезаем излишки, замочек обрезаем, собачка, закрывшись, находится в 7 мм от края заготовки. С другого края молнии разбираем лишние 6 мм молнии (разобралась, никуда не делась, или просим кого-нибудь из близлежащих на диване).
С изнанки заготовки вручную подшиваем края молнии вдоль, как на фото.


Рис.44 Пришиваем края молнии к изделию.

35. Делаем две детали 3,5*12 см.
 

Рис.45

Рис.45 Выкраиваем детали для верха изделия.

36. Кусочек синтепона (у меня ширина 2 см), вкладываем и вручную подшиваем.


Рис.46

Рис.46 Создаем объем деталей.
 

Рис.47

Рис.47 Сшиваем деталь вручную.


37. Используем такой предмет для выворачивания или используем железный крючок, но нужен длинный.
В заготовку, где замочек, в первые от замка полоски пропихиваем полоски синтепона (2-2,5 см) или пряжу скрученную нитями, или шнур.
От давления синтепон всё-таки уменьшается в размерах.


Рис.48

Рис.48 Заполняем синтепоном полоски над замочком.
 

Рис.49

Рис.49 Создаем объем деталей.
 

Рис.50

Рис.50 Создаем объем деталей верха для замочка.

38. Делаем следующую деталь, выкраиваем изнанку лицо.


Рис.51

Рис.51 Выкраиваем изнанку и лицо боковой части.

39. Полоски, подшитые с синтепоном вручную, разрезаем по 5 см и пришиваем или приметываем как на фото.
 

Рис.52

Рис.52 Пришиваем детали с синтепоном к заготовке с замком.

40. Последовательно пришиваем деталь к заготовке с замком.


Рис.53

Рис.53 Пришиваем детали боковой части к заготовке с замком.
 

Рис.54

Рис.54 Сшиваем детали.
 

Рис.55

Рис.55 Готовим боковую часть к простежке.
 

Рис.56

Рис.56 Простегиваем боковые части изделия.


41. Выкраиваем из основной ткани шириной 3,5-4,5 см ткань длиной 130 см (равняется периметру лоскутного верха, плюс запас), складываем изнанкой внутрь пополам вдоль, отступив от сгиба 0,9 см, прокладываем строчку как на рисунке.
 

Рис.57

Рис.57 Вырезаем заготовки, прокладываем строчку.

42. Заполняем деталь синтепоном или шнуром, или волокнами пряжи.


Рис.58

Рис.58 Заполняем деталь синтепоном.
 

Рис.59

Рис.59 Получаем объемную деталь.


43. Подрезаем заготовку лоскутного верха (я делала по линейке –  просто плавно поворачиваем линейку и используем острый нож), выкройку приклеила временно к ткани на малярный скотч.

Рис.60

Рис.60 Подрезаем заготовку по выкройке.

44. Переносим линии для ручек сумки.
 

Рис.61

Рис.61 Намечаем ручки сумки.

45. Укладываем полученную деталь по периметру, приметываем. Загибаем края как на фото, синтепон от края детали уходит внутрь на 2 см.


Рис.62

Рис.62 Приметываем деталь по периметру изделия.
 

Рис.63

Рис.63 Приметываем деталь.
 

Рис.64

Рис.64 Основное полотно изделия с окантовкой.


46. Прокладываем строчку от наметки влево на 1 мм.
 

Рис.65

Рис.65 Прокладываем строчку.

47. Делаем ручки. Детали вырезаем 9*27 см, складываем лицевой частью внутрь, стачиваем, выворачиваем и заутюживаем, как на фото.


Рис.66

Рис.66 Стачиваем детали ручек.
 

Рис.67

Рис.67 Заутюживаем детали.


48. Строчки друг от друга на 1 см, делаем объем ручек.


Рис.68

Рис.68 Прокладываем строчки.
 

Рис.69

Рис.69 Создаем объем ручек.


49. Прикалываем ручки или приметываем в отведенные места.
 

Рис.70

Рис.70 Приметываем ручки.

50. Выворачиваем сумку и сметываем.


Рис.71

Рис.71 Выворачиваем сумку.
 

Рис.72

Рис.72 Сметываем изделие.
 

Рис.73

Рис.73 Полученное изделие с изнаночной стороны.


51. Вырезаем полоски для окантовки шириной 4,5 см, подкладываем вниз, шьем как на фото. Ориентируемся по строчке, которая у нас видна с одной стороны от шва со шнуром, перекрываем на 1 мм. После проверяем, если с лицевой стороны видны стежки, прокладываем дополнительные строчки, но делаем это пропорционально с каждой стороны.


Рис.74

Рис.74 Пришиваем полоски для окантовки.
 

Рис.75

Рис.75 Прошиваем окантовку.


52. На данном этапе изделие выглядит так.
 

Рис.76

Рис.76 Изделие с окантовкой.

53. Срезаем излишки и на руках подшиваем окантовку.
 

Рис.77

Рис.77 Срезаем излишки.

54. И наш результат!


Рис.78

Рис.78 Фрагменты изнанки изделия.
 

Рис.79

Рис.79 Фрагменты изнанки изделия.
 

Рис.80

Рис.80 Фрагменты готового изделия с лицевой стороны.
 

Рис.81

Рис.81 Фрагменты изнанки готового изделия.
 

Рис.82

Рис.82 Детали готового изделия.
 

Рис.83

Рис.83 Л br / src=0http://myquilt.ru/upload_data/Muster-class_Bag/55.jpg/p /0 centerоскутная сумочка.
 

Рис.84

Рис.84 Детали готового лоскутного изделия.
 

Рис.85

Рис.85 Готовое лоскутное изделие.
 

Рис.86

Рис.86 Готовое изделие.
 

Рис.87

Рис.87 Готовое изделие с лицевой стороны.


Рубрики:  сумки & гаманці/сумки


Поиск сообщений в крапка_з_комою
Страницы: 99 ... 63 62 [61] 60 59 ..
.. 1 Календарь