динозаври робимо з усього |
відбитки слідів


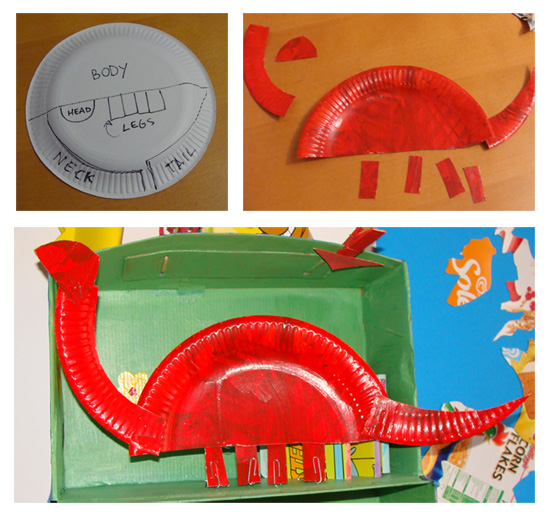
з паперових тарілок


з рулонів від туалетного паперу


з картону


маски


Printable Pterodactyl Mask Printable Styracosaurus Mask

 Printable Raptor Mask Printable Spinosaurus MaskSpino


Printable Brontosaurus Mask Printable Diplodocus MasksaPrintable Brontosaurus M

Printable Anklyosaurus Mask Printable Stegosaurus Mask
з мозаїки


/www.zujava.com/users/gonnafly:" target="_blank">http://www.zujava.com/users/gonnafly: " src="https://s-media-cache-ak0.pinimg.com/736x/64/35/d7/6435d754e7210659de75483e77303cce.jpg" style="height: 331px; width: 330px;" />
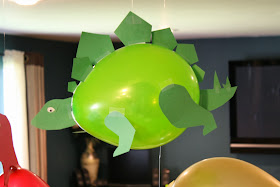
з кульок


з пластикових банок

відбитки динозаврів


льодяні яйця динозаврів


з макаронів


диноїжа


|
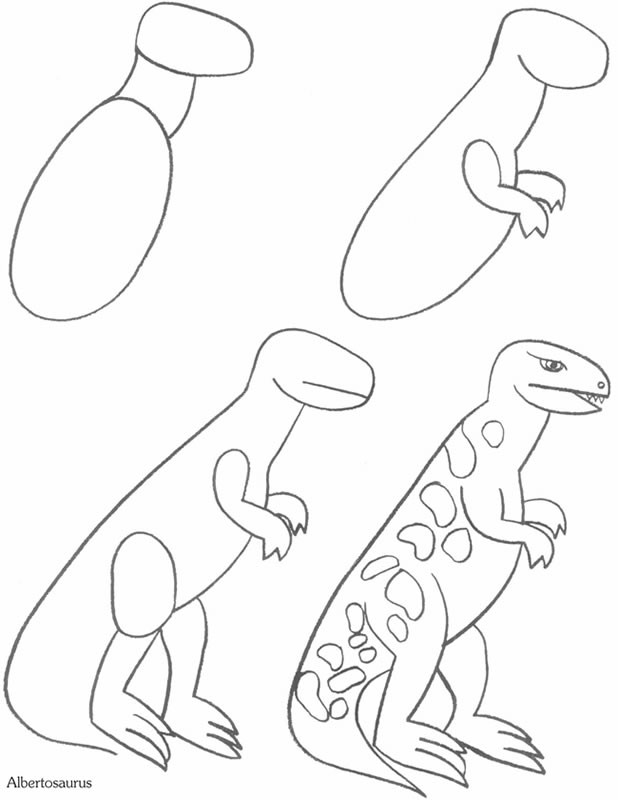
динозаври малюємо |


|
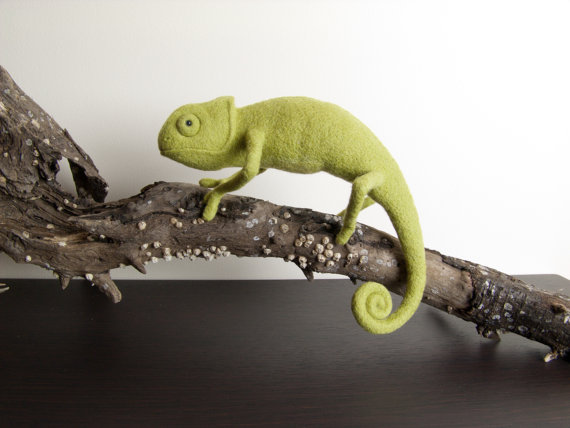
хамелеони |
шиємо


/www.etsy.com/listing/88260897/paintball-chameleon-stuffed-toy:" target="_blank">http://www.etsy.com/listing/88260897/paintball-chameleon-stuffed-toy: " src="https://s-media-cache-ak0.pinimg.com/736x/8e/7c/00/8e7c00bd450a8faf4b1beb02fcfe8506.jpg" style="height: 400px; width: 500px;" />


валяємо


/www.livemaster.ru/item/1229615-kukly-igrushki-kompozitsiya-iz-shersti-hello:" target="_blank">http://www.livemaster.ru/item/1229615-kukly-igrushki-kompozitsiya-iz-shersti-hello: " src="https://s-media-cache-ak0.pinimg.com/736x/bd/ca/b3/bdcab39335c1f0d8d1973c0ff17e9a2d.jpg" style="height: 305px; width: 500px;" />
в'яжемо


/www.lovecrafts.co.uk/projects/chameleon-free-bonus-pattern-from-knit-your-own-zoo/:" target="_blank">http://www.lovecrafts.co.uk/projects/chameleon-fre...ttern-from-knit-your-own-zoo/: " src="https://s-media-cache-ak0.pinimg.com/736x/99/74/d5/9974d5736da7b87c7519956e6209744e.jpg" style="height: 300px; width: 300px;" />

/hative.com/pipe-cleaner-animals-for-kids/,:" target="_blank">http://hative.com/pipe-cleaner-animals-for-kids/,: " src="https://s-media-cache-ak0.pinimg.com/736x/e0/16/45/e01645544d922455c1d120c94040d713.jpg" style="height: 375px; width: 300px;" />
/hative.com/pipe-cleaner-animals-for-kids/,:" target="_blank">http://hative.com/pipe-cleaner-animals-for-kids/,: " src="https://s-media-cache-ak0.pinimg.com/736x/00/35/de/0035de6216a34f4f75c49ea6aaba5397.jpg" style="height: 255px; width: 340px;" />

малюємо і робимо з паперу


/hartiatoys.com/:" target="_blank">http://hartiatoys.com/: " src="https://s-media-cache-ak0.pinimg.com/736x/f5/27/db/f527db37534afd53fc10d6fce24e7a25.jpg" style="height: 302px; width: 500px;" />


ліпимо


одяг та взуття


прикраси


/www.facebook.com/pages/Liz-Potter-Art/168895573220619:" target="_blank">https://www.facebook.com/pages/Liz-Potter-Art/168895573220619: " src="https://s-media-cache-ak0.pinimg.com/736x/95/8f/64/958f64997cff3a9b3c7117f1992d8383.jpg" style="height: 375px; width: 500px;" />


вишиваємо


/www.facebook.com/SilviaMan...:" target="_blank">https://www.facebook.com/SilviaMan...: " src="https://s-media-cache-ak0.pinimg.com/736x/e6/92/e6/e692e61358a7c066042f87842b0db086.jpg" style="height: 583px; width: 640px;" />


|
великодні курочки ідеї |
|
журнал з домашнім декором Hand-Stitched Home |
|
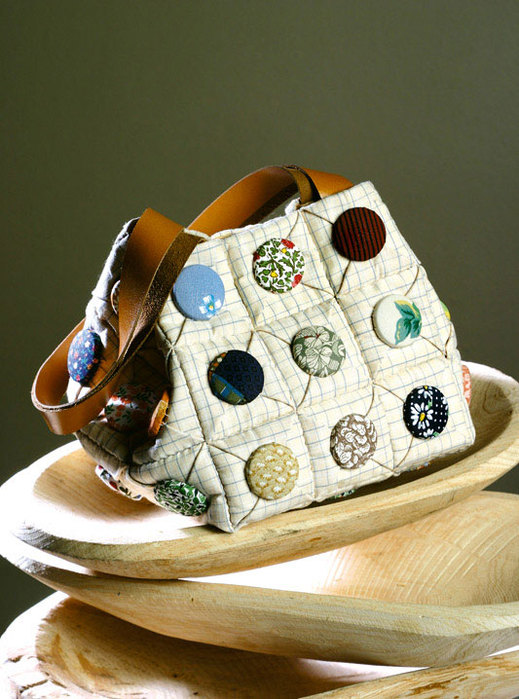
сумка мк |
| Для начала скажу, что идея сшить эту сумочку появилась у меня после увиденной на просторах интернета сумки, которая была сшита так же, как косметичка из «Дорожного набора», показанного тут на сайте. |
 |
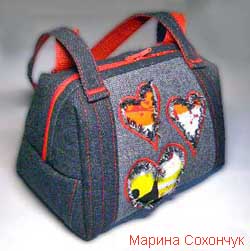 |
Моя новая сумка получилась после небольшого изменения технологии изготовления такой косметички. Каким образом? А все просто: у них общая выкройка - простой прямоугольник. И несложные преобразования дают возможность изменять внешний вид сумки по вашему желанию. Начну с описания своей сумки. А о вариантах превращения прямоугольника в другие сумки и сумочки вы прочитаете дальше. Марина СОХОНЧУК, Волгоград |
 |
|
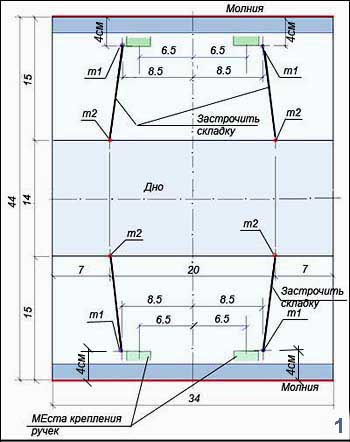 |
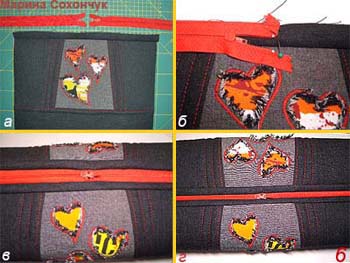
Не буду описывать подробно процесс сборки полотнища, потому что каждый выберет свой дизайн. Декоративным элементом для моей сумки стала вставка, выполненная в технике «обратной аппликации». А все необходимые для пошива точки и размеры нанесены на выкройке. Припуски на швы по длинным сторонам учтены в выкройке и равны 1 см. |
 |
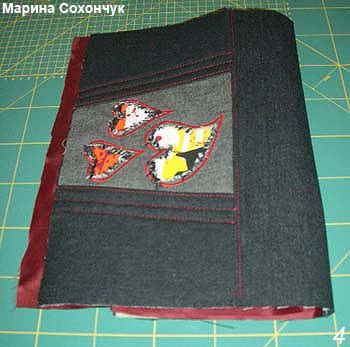
2. Сначала надо заготовить прямоугольник, из которого и должна получиться сумка. В качестве материала я взяла джинсовую ткань и яркую контрастную ткань для аппликации сердечек. Разный цвет джинсы – это лицо и изнанка одной и той же ткани. |
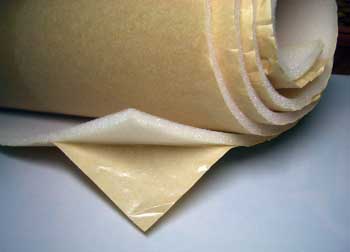 |
В качестве уплотнителя использовала клеящийся поролон. Этот материал я обнаружила недавно и пока экспериментирую с его использованием в разных лоскутных изделиях. |
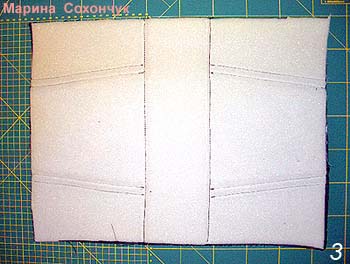 |
3. После приклейки поролона проложила несколько декоративных строчек, заодно и поролон дополнительно прикрепился к основному полотну. |
 |
4. В сумку я планировала поставить яркую красную подкладку. Для этого выкроила из подкладочной ткани прямоугольник размером с основную деталь (34х44 см). Чтобы определить излишек подкладки по длине, надо ее приколоть сметочными булавками (или приметать) по одной стороне и затем перегнуть пополам вместе с подготовленным верхом. У меня излишек составил 1,5 см. Отрезаем излишек подкладки. |
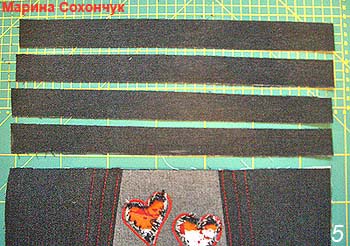 |
5. Выкраиваем 4 обтачки шириной 3 см для пришивания молнии. Длина обтачки – по ширине сумки. 2 обтачки – для верха сумки, 2 – для пришивания подкладки. |
 |
6. Переходим к вшиванию молнии. а. По обеим коротким сторонам прямоугольной заготовки пришиваем обтачки. Я выбрала для застежки две короткие «молнии», которые сходятся к середине. Но можно использовать и одну длинную. б. Совмещаем начало молнии с центром, кончик тесьмы подгибаем. Сначала прострачиваем с помощью обычной лапки по краю тесьмы, прихватывая обтачку. В этом случае ткань меньше припосаживается. в. Так выглядит застежка после того, как пришили обе молнии. г. Теперь меняем лапку на специальную для притачивания застежек-молний, и прострачиваем еще раз ближе к зубчикам. Вторую пару обтачек (для притачивания подкладки) пришиваем к тесьме молнии. |
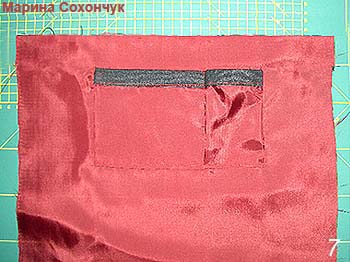 |
7. Подготовим и подкладку – пришьем карманы для мелочей. |
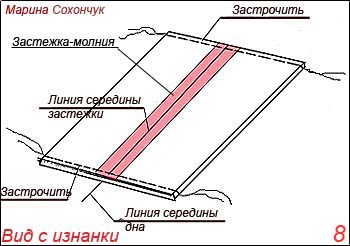 |
8. Застегнув застежку-молнию, совмещаем ее середину с линией середины дна (это линия сгиба нашей заготовки-прямоугольника), плоско складываем лицом вовнутрь и застрачиваем по боковым швам. Заодно закрепится в шве и «хвостик» молнии, а излишек длины можно срезать. Внимание! Перед тем, как застрочить боковые швы не забудьте чуть-чуть расстегнуть молнию, иначе потом трудно будет вывернуть изделие налицо. |
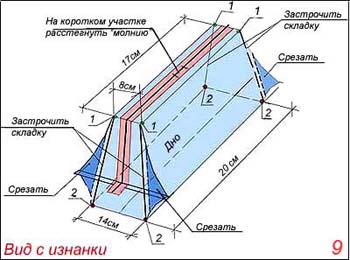 |
9. А сейчас начинаем формировать из заготовки будущую форму нашей сумки. Поскольку на фото плохо видно (сумка сшита из темного материала), я даю объемную схему, как это сделать. Для начала перенесем с выкройки нужные нам сейчас точки 1 и 2 (соответственно, по четыре точки на верхней и нижней стороне нашего сложенного «полуфабриката»). Плоскую деталь расправляем руками (молнию – вверх, дно – вниз), между точками 1 и 2 закладываем складки, закалываем их булавками и застрачиваем. Образующиеся при этом излишки (на схеме – темные треугольники) срезаем, оставляя припуск около 1 см. Расстегиваем застежку, выворачиваем, и это уже не полуфабрикат, а почти что сумка. Подкладку сошьем, проделав с ней все операции, описанные выше. Вложим ее в сумку и притачаем по открытым краям к внутренней обтачке застежки. Осталось только пришить ручки. |
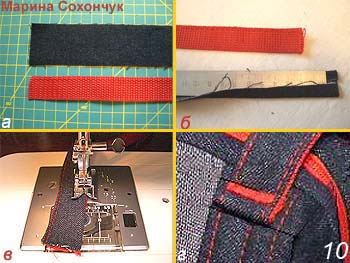 |
10. Опытным путем определяем длину ручек. У меня получилось 58 см (с учетом по 1 см на подгибку с каждого конца). а. Сумка не очень большая, поэтому я взяла корсажную ленту в тон молнии шириной 2 см ( для более объемной сумки ручки можно сделать пошире). б. С помощью утюга и металлической линейки (спасибо Насте Дорожкиной! - в курсе про японское плетение подсказалаудобный способ изготовления бейки) заутюживаем припуски так, чтоб получилась бейка, равная по ширине корсажной ленте. в. Осталось только красиво соединить бейку с корсажной лентой. Чтобы строчка выглядела более декоративной, выбрала режим "тройной стежок". Отстрочка выглядит рельефнее, когда длина стежка - максимальная. Накладываем бейку на корсажную ленту как можно ровнее и пристрачиваем их друг к другу декоративным «тройным» стежком. г. Ручки пришиваем так: сначала прикладываем изнаночной стороной вверх (место прикрепления ручек показано на выкройке), прикрепляем обычной прямой строчкой, затем отгибаем, прикрывая припуск. Окончательно прошиваем плотным «зиг-загом». |
|
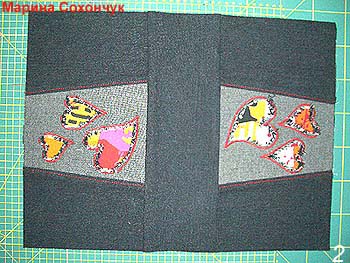
Вот и все, сумка готова! Если вы хотите поэкспериментировать – попробуйте смещать на выкройке точки 1 и 2, и вы увидите, как изменение положения этих точек трансформирует нашу прямоугольную заготовку в разные по форме и пропорциям сумки. А дальше мы покажем несколько примеров такой трансформации. |
|
|
Как меняется форма той сумки, которую сшила Марина Сохончук, можно наглядно увидеть на примере этих двух сумок (фото взяты из интернета). Сумка справа – сшита по такому же принципу, как и у Марины, и имеет с боковой стороны форму трапеции. Сумка слева – сшита по той же выкройке, однако имеет форму кирпичика. Рассмотрим, в чем разница в крое этих сумок. |
 |
|
Мы показали два положения складок, но как вы теперь поняли, вариантов может быть больше. Возьмите другой наклон складки – и у вас получится новая форма сумки. Так что пробуйте, моделируйте и подберите ту форму, которая вам понравится больше всего.
|
||||||
|
гаманець мк |
| Первый такой кошелек в нежно-розовую клеточку я сшила в подарок девочке. Потом повторила его для себя в джинсовом варианте, с «разрезалками». А новый кошелек по многочисленным просьбам моих подруг по рукоделию |
 |
шила специально, чтобы показать весь процесс его изготовления. Размер кошелька в готовом (разложенном) виде - 5х8,5 дюйма (примерно 12,5 x 21 см). Такой размер взят с учетом того, чтобы в него можно было положить бумажные купюры, мелочь и всевозможные карточки, которые становятся все более популярными. Ирина Мур Все размеры даны в дюймах. Для справки: 1 дюйм = 2,5 см. |
 |
|
|
||
 |
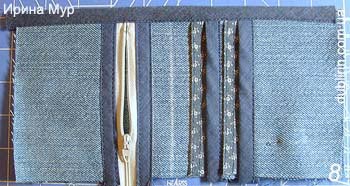
1. Выкраиваем с учетом припусков на швы из джинсовой ткани: * 2 детали А 5,5 х 9,0 дюйм. – основа кошелька, его обложка; * 1 деталь Б 5,0 х 9,0 дюйм. – отделение для бумажных купюр; * 1 деталь В 5,0 х 3,0 дюйм. – кармашек для мелочи; * 1 деталь Г 5,0 х 3,5 дюйм. – кармашек для карточек; * 1 деталь Д 5,0 х 2,5 дюйм. – кармашек для карточек. Для карточек я предусмотрела 4 кармана. Но, в связи с тем, что джинсовая ткань достаточно плотная, два из них я сделала из обычной х/б ткани, чтобы уменьшить толщину кошелька и избежать трудностей при сборке. Таким образом, еще два кармашка для карточек выкраиваем из х/б ткани: *1 деталь Е 5,0 х 8,0 дюйм. *1 деталь Ж 5,0 х 6,0 дюйм. |
 |
2. Начинаем работу с обложки. Для ее укрепления я использовала 808 Сraft Fuse фирмы PELLON. Этот материал хорош тем, что он тонкий, как бумага, но очень хорошо держит форму, не теряя при этом эластичности. Если же его нет, то обе детали нужно укрепить плотным клеевым односторонним флизелином или жестким дублирином. Укрепляем одну из деталей А (верхнюю), декорируем по своему усмотрению. Отступив 1,25 - 1,5 дюйма от короткого края, посередине устанавливаем на этой детали магнитную застежку. Отложим эти заготовки пока в сторону. |
 |
3. Обрабатываем бейкой все джинсовые детали кармашков и одну сторону застежки-молнии. При обработке молнии начинайте пришивать бейку выше ограничителя застежки-молнии приблизительно на ширину окантовки. Потом этот запас скроется под бейкой-окантовкой, которую будете пришивать с другой стороны. |
 |
4. Обе детали карманчиков из х/б ткани (детали Е и Ж) складываем пополам, прокладываем внутри "паутинкой" соответствующего размера, и проглаживаем. Отступив от сгиба, прокладываем одну или две параллельные декоративные строчки. Таким «двойным» кармашком удобнее пользоваться при доставании карточки. |
 |
5. Теперь окантованную деталь кармана для мелочи (деталь В) пристрачиваем ко второй стороне застежки-молнии так, чтобы припуски от верхнего ограничителя на обеих сторонах были одинаковыми. |
 |
6. Окантованную сторону тесьмы молнии накладываем сверху на короткую сторону детали Б и притачиваем ее по краю бейки. Закрепляем затежку-молнию по верху поперечной строчкой как можно ближе к краю, чтобы потом эта строчка не выглядывала из-под окантовки. На детали Б намечаем линию центра готового кошелька, мысленно разделив получившуюся заготовку пополам по вертикали. |
 |
7. На получившуюся заготовку накладываем окантованные заготовки для кармашков (слева направо детали Е, Г, Ж, Д, от большего к меньшему), как показано на фото. Выравниваем размеры всех сложеных деталей. |
 |
8. Окантовываем бейкой верхний срез заготовки для отделения для бумажных купюр. |
 |
9. Для обложки у нас было заготовлено две детали А – наружная (с застежкой) и внутренняя. Складываем их изнанкой к изнанке и выравниваем по размеру готового кошелька (5 х 8,5 дюйм.). Наружная деталь с застежкой – внизу! На внутренней детали разметим линию середины. |
 |
10. Накладываем сверху подготовленную заготовку кармана для бумажных купюр, совместив линию середины и нижние срезы деталей. Скрепляем все булавками. |
 |
11. Соединяем строчкой по краю все детали кошелька, чтобы они не сдвигались относительно друг друга. Уголки надо скруглить. Чтобы они были одинаковыми, удобно это делать по какому-нибудь шаблону. |
 |
12. Ну вот, сам кошелек практически уже готов… Пора приступать к застежке. Выкраиваем из джинсовой ткани 2 детали 4,0 х 1,5 дюйм. С одной стороны скругляем уголки на обеих заготовках (как на фото). Обратите внимание! Длина хлястика для застежки может меняться в зависимости от ширины окантовки и толщины получившегося изделия. Поэтому уточните его длину по вашему варианту. |
 |
13. Детали клапана застежки следует укрепить флизелином. На одной детальке поставьте вторую часть магнитного замочка. Сложите детали друг с другом изнаночными сторонами и соедините их (обшейте) плотным швом «зиг-заг» по краю, как бы обметывая. Я сделала это декоративными нитками, такими же, как декорировала лицевую сторону обложки. |
 |
14. Пристрочите клапан застежки, как показано на фото. Осталось совсем немного - и мы у цели! |
 |
15. И заключительный аккорд: окантовка почти готового изделия. Выкраиваем полоску ткани по косой и складываем ее по длине пополам. Заглаживаем, предварительно подвернув косой срез на внутреннюю сторону на 0,5 дюйма. Начинаем работу от точки сгиба кошелька. Стык бейки здесь будет наименее заметен. Обходим бейкой по всему периметру кошелька. |
 |
16. Чтобы замкнуть окантовку, настрачиваем конец бейки на ее начало до короткой стороны поперечного среза, зайдя за него приблизительно на 0,5 дюйма (см. фото!). Теперь излишек бейки можно отрезать. |
 |
17. Перегибаем бейку на внутреннюю сторону изделия и пришиваем ее внутренний край вручную потайными стежками. Стык бейки можно тоже прихватить несколькими потайными стежками, а можно этого и не делать. (Я не делаю, бейка лежит плотно и вывернуться никак не может). |
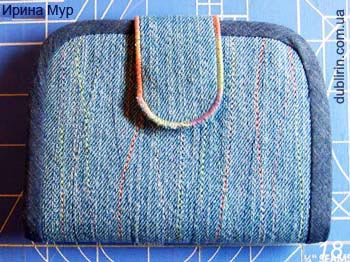 |
18. Теперь прогладьте швы, проверьте, надежно ли держит застежка и… кошелечек готов! |
|
Если вы шьете его кому-то в подарок (или даже в подарок себе, любимой!), не забудьте положить в него мелкую монетку! Говорят, так принято дарить кошельки, чтобы в них всегда водились денежки! Удачи вам! Пусть в новом кошелечке у вас всегда водятся… сами знаете что…! И не забудьте показать, что у вас получилось! |
 |
 |
 |
 |
 |
 |
 |
|
як пришити блискавку |
|
Такой способ вшивания застежки-молнии в сумку один из самых распространенных. Он пригоден для сумок разной формы: прямоугольных, круглых, косметичек и рюкзачков на молнии. Этот способ действительно универсален, но особенно хорош для сумок, в которых планка для молнии сшивается с боковыми стенками. Еще одно его преимущество в том, что внутренняя часть планки играет одновременно роль подкладки для боковин. А дело все в том, что планка, в которую вшивается молния, двойная. Итак, начнем... Ирина Лукашенко |
 |
 |
|
|
||
 |
1. Выкраиваем из ткани 4 полоски-обтачки: две для верхней (лицевой) и две для внутренней (я бы сказала подкладочной) стороны. Размеры полосок зависят от того, какой размер планки (вместе с вшитой молнией) необходимо получить в результате. Ширину рассчитываем так: нужная ширина этой планки в готовом виде делится пополам + 1 см на подворот + 1-1,5 см припуск. Предположим, ширина планки в выбранной модели сумки была 6 см. Отсюда ширина каждой полоски из ткани 6 : 2 = 3 + 1 + 1,5 = 5,5 см. Вообще-то обычно я делаю ширину немного шире. Лучше один раз потом все подровнять, чем сто раз делать вычисления или – еще хуже – окажется, что вы ошиблись с размером в меньшую сторону. Длина обтачки зависит от длины молнии. Для удобства в работе я стала часто пользоваться клеевыми флизелиновыми вставками для поясов. Их ширина известна, и можно не делать разметку по ткани, а просто наклеить полоски нужной длины и вырезать с необходимыми припусками по ширине. |
 |
2. Сначала обрабатываем нижнюю сторону застежки-молнии. Прикладываем обтачку лицевой стороной к нижней стороне тесьмы молнии, совмещаем края и стачиваем на расстоянии приблизительно 0,5 см от края тесьмы молнии. Отворачиваем обтачку и прокладываем строчку близко к сгибу. На фото видно ту сторону планки, которая смотрит как бы «внутрь» сумки. |
 |
3. Полоски ткани для верхней обтачки подгибаем на 1 см и заметываем. Если вы будете пользоваться клеевыми вставками для поясов, то это делается еще проще – заглаживаете по перфорации – и все! Заготовку с молнией выкладываете застежкой наверх, как показано на фото. |
 |
4. Заглаженной стороной накладываем обтачку на верхнюю сторону тесьмы молнии близко к зубчикам. Наложить нужно как можно ближе, но так, чтобы обтачка не мешала при застегивании. Зафиксируем обтачку булавками (или наметкой). |
 |
5. С помощью лапки для притачивания молнии пристрачиваем обтачку к тесьме молнии близко к краю. |
 |
6. Убираем все булавки, наметки, планку хорошо отглаживаем ивыравниваем в соответствии с нужными вам размерами. Я использовала молнию, купленную «на метраж». В этом случае внимательно следите, чтобы не слетел «бегунок» или предусмотрительно зашейте края застежки-молнии. Торчащий край молнии потом обрежется. |
 |
7. Переходим к боковым стенкам. Для того, чтобы пришить к готовой планке боковые стенки, необходимо выкроить 4 заготовки из ткани – по две на каждую боковую часть. Ширина их равна ширине планки с молнией, а длина – зависит от модели сумки. На фото показана обработка только одного края планки с молнией. Складываем заготовки для боковушек лицом к лицу, между ними «подсовываем» торцевой край планки с молнией. |
 |
8. Совмещаем все три открытых среза, фиксируем булавками. Стачиваем все три слоя. |
 |
9. Отворачиваем верхнюю и нижнюю боковушки в сторону от планки и отстрачиваем в край место перегиба. Это место часто самое «слабое» в застежке, поэтому лишние строчки тут не помешают. |
 |
10. Очень часто именно туда, где планка молнии сходится с боковыми стенками, вшивается ручка сумки (или лямки, или шлевка для карабина, или декоративная петелька). Тогда ручку нужно подсунуть ровно посередине и все хорошо застрочить, возможно даже несколькими строчками для крепости. |
 |
11. Вот так будет выглядеть соединение планки с застежкой с боковыми стенками и вшитой ручкой. Вот, собственно, и вся сложность. С противоположной стороны планки-застежки боковая часть пришивается аналогично п.9. Я знаю, что часто в пошиве сумок вы побаиваетесь именно вшивания молнии. Но вшив молнию таким образом хотя бы один раз, вы и в дальнейшем будете довольны своим результатом! Как говорится, глаза страшатся, а руки делают! |
|
сумочка з квадратиків мк |
|
сумка-клатч мк |

I’m excited to bring you this clutch pattern! It converts from a tote into a clutch, with beautiful circle handles. I wrote this pattern for Pellon Projects; it uses 3 different kinds of interfacing, which will give you a chance to get familiar with each. This pattern is appropriate for intermediate level sewing. It features inner pockets, a magnetic closure, and a metal buckle. You will also be required to make one buttonhole.
 ALL SEAM ALLOWANCES ARE 1/2″ UNLESS OTHERWISE NOTED. PLEASE READ ALL INSTRUCTIONS BEFORE BEGINNING. Printable Instructions and Pattern Pieces
SUPPLIES
– 1/4 yard (or a fat quarter) exterior fabric
– 2/3 yard interior fabric
– 1/2 yard side accent/handle fabric
– 2 yards Pellon SF-101 fusible woven interfacing
– 1/2 yard Pellon Fusible Fleece
– 1/2 yard Pellon Decor-Bond
– magnetic snap
– metal buckle with tongue (I used the Dritz 1-5/8″ fashion buckle)
– coordinating thread
– hand sewing needle
STEP 1 ~ CUT OUT YOUR FABRIC
From the Exterior Fabric
1a. Cut 2 pieces, each measuring 8″ x 11″. These will be your Exterior Main Panels.
From the Interior Fabric
1b. Cut 2 pieces, each measuring 11″ x 11″. These will be your Interior Main Panels.
1c. Cut 4 pieces, each measuring 11″ x 6″. These will be the Pockets.
From the Accent Fabric
1d. Cut 4 pieces, each measuring 2″ x 11″. These will be the Side Panels.
1e. Cut 2 pieces, each measuring 2″ x 3″. These will be the Bottom Strap pieces.
1f. Using the Top Strap piece that you printed out, cut 2 pieces from the Accent Fabric.
1g. Using the Handle pattern piece that you printed out, cut 4 pieces from the Accent Fabric.
From the Pellon SF-101 Fusible Woven Interfacing
1h. Repeat Step 1a. through Step 1g.
From the Pellon Fusible Fleece
1i. Repeat Step 1a. and Step 1b. Also cut two 2″ x 2″ squares from the fleece.
From the Pellon Decor-Bond
1j. Cut 8 pieces from the Handle pattern piece. Trim the Handle by approximately 1/4″ on all edges (except trim by 1/2″ in the inner circle) in order to reduce bulk in the seam allowance.
1k. Cut 8 pieces, each measuring 2″ x 11″.
STEP 2 ~ FUSE YOUR FABRICS
2a. Take 1 Exterior Main Panel and one of the corresponding fusible woven interfacing pieces. Fuse the woven interfacing to the wrong side of the Exterior Main Panel using manufacturer instructions. Then, fuse the fusible fleece to the interfaced side of the Exterior Main Panel. Repeat for the other Exterior Main Panel.
2b. Repeat Step 2a. for both Interior Main Panels.
2c. Take one Bottom Strap Piece and one of the corresponding fusible woven interfacing pieces. Fuse. Repeat for the remaining Bottom Strap Piece, both of the Top Strap Pieces, and each of the Pockets.
2d. Take one Handle Piece and one of the corresponding fusible woven interfacing pieces. Fuse. Then, fuse a Decor Bond Handle piece to the interfaced side of the Handle. Repeat so that you have fused a total of 2 pieces of Decor Bond to the Handle. Repeat this step for the remaining Handle pieces, and also for all of the Side Panels.
STEP 3 ~ ASSEMBLE THE INTERIOR

3a. Take 2 of the Pocket pieces and place them, right sides together. Sew along one 11″ edge. Press seam open.

3b. Turn the Pocket so it is wrong sides together. Press again along the sewn edge so that it lies flat. Topstitch 1/4″ from the edge.
3c. Repeat Step 3a. and Step 3b. for the 2 remaining Pocket pieces.

3d. Take one of the Interior Main Panels, right side facing you. Lay one Pocket with the raw edge even with the bottom of the Interior Main Panel. Pin, then baste along the raw edges of the Pocket (you will not baste the sewn edge of the Pocket). Repeat for the remaining Interior Main Panel and Pocket.

3e. Take one of the Handle Pieces. Sew along 1 long edge, pivoting through the curve, approximately 1/4″ from the raw edge of the fabric. Also sew 1/2″ along the inside circle of the Handle. Clip the ‘valley’ of the fabric with slits, and notch the ‘peak’ of the fabric with small v’s, approximately every 1/2″. Be sure not to cut in to your stitching.

3f. Turn your iron on. Using your fingers, turn the fabric to the wrong side at your stitches, then slowly ease along your fabric with your iron. It is especially important to press the inside circle very well.
3g. Repeat Step 3e. and Step 3f. for all 4 Handle pieces (set 2 of the Handles aside for the exterior).

3h. Take one Interior Main Panel and measure down 3/4″ from the top (the pocket will be at the bottom). Make a mark on the top left and top right corners. Align the bottom straight edges of the Handle along the marks that you made, and pin to the Interior Main Panel. Edgestitch on the Handle along the long pressed edge, 1/8″ from the edge. You will not stitch the inside circle of the Handle at this time.

3i. Trim inside the inner circle of the Handle where the Interior Main Panel is sticking out. You’ll want to flip it over to the wrong side and trim an additional 1/2″ away.
3j. Repeat Step 3h. and Step 3i. for the other Interior Main Panel and Handle.
STEP 4 ~ INSTALL THE MAGNETIC SNAP

4a. Take 1 Interior Main Panel piece and 1 of the fleece squares that you cut in Step 1i. Take the washer from one of the prongs and mark the prong placement with a fabric marker or chalk, approximately in the center of the Thermolam. Cut small slits at the marks. The reason that you are using the fleece is that it will help to reinforce your fabric against the pull from the magnetic snap every time you open and shut the clutch.

4d. Slide the prongs of the snap through the right side of the Interior Main Panel. Place the fleece square, then the washer, over the prongs. Close the prongs outward (use pliers with a piece of scrap fabric over the metal, if you need to), making sure they lie flat.

4e. Repeat Steps 4a. through 4d. to attach the other half of the snap to the other Interior Main Panel.
STEP 5 ~ ASSEMBLE THE EXTERIOR

5a. Take one of your Exterior Main Panels and one Side Panel. With right sides facing, place the Side Panel along the 11″ edge on the left-hand side of the Exterior Main Panel. Sew along the 11″ edge. Press seam toward the Side Panel. Repeat this step for another Side Panel and the right-hand side of the Exterior Main Panel.

5b. Edgestitch on the Side Panel 1/8″ from the seam on the left side of the Exterior. Then edgestitch 1/4″ from the stitches that you just made. Sew slowly, and make sure that the seam allowance is underneath your stitching; this will ensure that it gets tacked down securely. Now your Side Panel will have a nice finished look. Repeat for the right side of the Exterior.
5c. Repeat Step 3h. to attach each remaining Handle to each Exterior Main Panel.
STEP 6 ~ ASSEMBLE THE STRAPS/BUCKLE

6a. Take both of your Bottom Strap pieces. Place them right sides together, and stitch along each 3″ edge. Turn Bottom Strap right side out and press.

6b. Make a mark on the bottom of one Exterior Main Panel, over 4-7/8″ from the left hand edge.

6c. Place your Bottom Strap piece to the right of the mark that you made in Step 6b. One raw edge of the Bottom Strap should be even with the raw edge of the Exterior Main Panel. Slide the metal buckle over the Bottom Strap, then fold the Bottom Strap down so that now both of the raw edges of the Bottom Strap are even with the bottom of the Exterior Main Panel. Pin in place.
6d. Take both of the Top Strap pieces and place them, right sides together. Sew along 3 edges but do not sew the short straight edge.
6e. Trim the seam allowance to 1/4″, and clip the corner off, which will help it lie more flat. Turn the Top Strap right sides out and press.

6f. Edgestitch the Top Strap 1/8″ from the sewn edges (again, do not sew the straight short edge), being sure to pivot at the corners; then edgestitch the Top Strap 1/4″ from what you just sewed.

6g. On the Top Strap piece, make a buttonhole 1-1/2″ down from the pointed top corner.
6h. Remove the pin from under the Bottom Strap. Slide the Top Strap piece under the Bottom Strap piece, making sure to re-adjust the buckle. The raw edges of all Strap pieces should be even with the bottom edge of the Exterior Main Panel. Re-pin.

6i. Baste across the bottom of the Exterior Main Panel, attaching the Strap pieces. Sew horizontally right under the metal buckle, as close to the buckle as you are able to (you might want to pop your zipper foot on for this).
STEP 7 ~ ASSEMBLE THE CLUTCH

7a. Take both Interior Main Panels, and place right sides together. Pin along the 3 straight edges. Sew along those 3 straight edges only, with a 5/8″ seam. This will help the interior fit more snuggly inside your exterior. Trim the seam allowance to 1/4″. Clip the 2 bottom corners, being careful not to cut into your stitching. Leave the Interior wrong side out.
7b. Take both Exterior Main Panels, and place right sides together (you might want to buckle the strap so that it does not get caught in the stitching). Pin along the 3 straight edges. Sew along those 3 straight edges only, with a 1/2″ seam. When you get to the part where the straps are, sew slowly or hand crank your needle, and backstitch again (to give the strap added strength). Clip the 2 bottom corners. Press seams open, and turn the Exterior right side out.
7c. Place the Exterior inside of the Interior. Make sure the Handles and the side seams are aligned, then pin in place. Make sure you pin an exterior handle to an interior handle (otherwise you might be sewing the bag shut!).

7d. Sew the top of the Handles, all along the top of the clutch, with a 1/4″ seam allowance. Do not stitch the inside circles. Clip the ‘valley’ of the fabric with slits, and notch the ‘peak’ of the fabric with small v’s, approximately every 1/2″. Be sure not to cut in to your stitching.

7e. Turn the clutch right side out through one of the openings. Edgestitch the tops of the handles, 1/4″ from the edge, all the way around.
7f. Match the insides of the handles. You should have a nice pressed edge to work with from earlier. Pin the inside circles. Edgestitch the inside circles, 1/4″ from the edge. Note: Depending on your machine, you may not be able to sew around the entire inside circle of the handles. I was able to sew half by machine and half by hand. This is the trickiest (and last!) step of the pattern, so take your time…the results will be worth your patience!

CONGRATULATIONS! You’re finished!
Give your bag a good pressing for a professional-looking finish. Now you have a tote that collapses into a clutch, held in place with the metal buckle!
If you have any questions about this pattern, feel free to e-mail me directly at sara@sewsweetness.com, or check out my Flickr Group! I would love to see your completed project posted there!

|
сумка-портфель з вишивкою мк |

 Even if you are new to embroidery, you will have lots of fun with this beautiful design!
I was also able to use Cosmo embroidery floss for the first time. The threads look so much more smooth than either DMC or Iris flosses, and they are also glossier. Pink Castle Fabrics carries some nice Cosmo floss starter kits, if you are interested in taking a peek!

Embroidery Pattern and Printable Instructions
ALL SEAM ALLOWANCES ARE 1/2″ UNLESS OTHERWISE NOTED.
Finished size: 9.5″ long x 7″ high x 1.75 deep
SUPPLIES
– 1/2 yard exterior fabric
– 1/2 yard interior fabric
– 9″ x 7″ piece of fabric for the embroidery (we used Kona white)
– 1/3 yard Pellon Thermolam fusible interfacing
– 1 yard Pellon SF-101 fusible woven interfacing
– 1/3 yard Pellon Decor Bond fusible interfacing
– 28″ zipper (trim to 28″ including the tape)
– fabric marker or chalk
– ruler
– hand sewing needle
– zipper foot
– seam ripper
– turning tool

STEP 1 ~ CUT YOUR FABRICS
From the Exterior Fabric
1a. Cut 1 piece measuring 10.5″ long x 8″ high, for 1 of the Exterior Main Panels (the other Exterior Main Panel will be assembled using your embroidery).
1b. Cut 1 piece measuring 3.75″ x 30″ for your Exterior Zipper Panel.
1c. Cut 1 piece measuring 2.5″ x 5.5″ for the Exterior Top Panel.
1d. Cut 2 pieces, each measuring 10.5″ x 7″ for the Pocket.
1e. Cut 2 pieces, each measuring 2″ x 6.5″, for the Handles.
1f. Cut 2 strips, each measuring 1″ x 7″.
1g. Cut 2 strips, each measuring 7/8″ x 11.5″
From the Interior Fabric
1h. Repeat Steps 2a. through 2c. for the Interior pieces.
1i. Cut 5 pieces, each measuring 4″ x 18-1/2″ for the Dividers.
From the Pellon Thermolam
1j. Cut 4 pieces, each measuring 8″ x 10.5″
1k. Cut 2 pieces, each measuring 3.75″ x 30″.
1l. Cut 2 pieces, each measuring 2.5″ x 5.5″.
1m. Cut 1 piece measuring 1″ x 5.25″ for the Handle Insert.
From the Pellon SF-101
1n. Cut 2 pieces, each measuring 2″ x 6.5″.
1o. Cut 5 pieces, each measuring 4″ x 18-1/2″ (dividers)
1p. Cut 2 pieces, each measuring 10.5″ x 7″.
From the Pellon Decor Bond
1q. Cut 10 pieces, each measuring 1-1/4″ x 17″ (dividers)
STEP 2 ~ EMBROIDER THE DESIGN
2a. Using your 9″ x 7″ piece of fabric, embroider the design using the attached template and instructions.

2b. Take one of your 1″ x 7″ strips cut from the exterior fabric. The long edge of the strip should be even with the right-hand edge of your embroidered piece. Sew, right sides together, using a 1/4″ seam allowance. Repeat with the remaining 1″ x 7″ strip and the left-hand edge of the embroidery. Press seams open.

2c. Take one of your 7/8″ x 11.5″ strips cut from the exterior fabric. The long edge of the strip should be even with the top edge of your embroidered piece. Sew, right sides together, using a 1/4″ seam allowance. Repeat with the remaining 7/8″ x 11.5″ strip and the bottom edge of the embroidery. Press seams open. This assembled embroidered piece will now serve as one of your Exterior Main Panels.
STEP 3 ~ FUSE YOUR FABRICS
3a. Take 1 Exterior Main Panel and one of the corresponding pieces of Pellon Thermolam. Fuse the interfacing to the wrong side of the Exterior Main Panel according to manufacturer instructions. Repeat for the remaining Exterior Main Panel, the Exterior Zipper Panel, Exterior Top Panel, both Interior Main Panels, Interior Zipper Panel, and the Interior Top Panel.
3b. Take 1 Pocket piece and one of the corresponding pieces of Pellon SF-101. Fuse the interfacing to the wrong side of the Pocket according to manufacturer instructions. Repeat for the remaining Pocket and both of the Handle pieces.
STEP 4 ~ ATTACH THE ZIPPER
4a. Take your Exterior Zipper Panel and cut it in half, lengthwise.

4b. Place the resulting 2 pieces right sides together. With your fabric marker, measure and make a mark that is 1″ in from that left-hand edge. Do the same for the right-hand edge. Sew from the mark to the corresponding edge (each line of stitching will be only 1″ long), using a 5/8″ seam allowance.


5c. Turn both of the unfinished edges in by approximately 1/2″. Topstitch 1/4″ from both of the finished edges.

5d. Take your Exterior Top Panel. Make a mark that is in 1″ from both of the short edges.

5e. Place 1 short edge of the Handle to the inside of one of the marks that you just made, and centered. Pin in place. Do the same thing for the remaining short edge of the Handle. Sew on top of the Handle, 1/8″ from both short edges. Then sew another line of stitches that is 1/8″ from the previous stitching.
STEP 6 ~ ASSEMBLE THE BAG
6a. Place both Pocket pieces right sides together. Sew along 1 long edge. Press the seam open.

6b. Turn the fabrics so that they are wrong sides together, press again, and topstitch the straight edge, 1/8″ from the edge.

6c. Take the Exterior Main Panel without the embroidery, and place the Pocket that you just sewed, with the bottom raw edges of both even. Baste the Pocket to the Exterior Main Panel using a 1/4″ seam allowance.
6d. Take the Exterior Zipper Panel and the Exterior Top Panel and place them, right sides together, along one short edge. Sew. Press seam open.


6h. Notch small v’s into the seam allowance of the corners of both Exterior Main Panels, being careful not to cut into the seam allowance.
6i. Repeat Steps 4a. and 4b. for the Interior Zipper Panel. Press the center of the panel in by 5/8″ on each side.
6j. USING A 5/8″ SEAM ALLOWANCE (this will help the interior sit snuggly in the exterior), repeat Steps 6d. through 6h. to assemble the Interior.
6k. Turn your exterior right side out and your interior wrong side out. Place the interior inside of the exterior (so that wrong sides will be touching). Pin in place along the pressed edges of the Interior Zipper Panel against the wrong side of your zipper.
6m. Please give your bag a good pressing for a nice, professional look.
STEP 7 ~ ASSEMBLE THE DIVIDERS
7a. Take 1 of your Divider pieces and fold it in half, right sides together, along the long edge. Sew along that long edge.
7b. Turn your Divider right side out using the turning tool. Press. Turn 1 raw edge in by approximately 1/2″. Press.
7c. Slip 2 pieces of your Decor Bond inside of the assembled Divider. Again, using a safety pin to guide the Decor Bond through the tube will be helpful. Fuse according to manufacturer instructions.
7d. Measuring in from the raw edge of the Divider, make the following marks:
– 1/2″
– 2-1/4″
– 9-1/4″
– 11″

7e. Stitch on top of the marks that you just drew.
7f. Slide the raw edge of the Divider into the pressed edge on the opposite end, by 1/4″. Topstitch 1/4″ from the pressed edge (this will create a ‘ring’ with the fabric).

7g. Press along the 4 stitched lines. This will create a rectangle.
7h. Repeat Steps 7a. through 7g. to assemble all 5 Dividers.

7i. Place one Divider on top of another, along the long edges. Topstitch along both long edges, approximately 1/8″ from the edge. Continue adding another Divider until all 5 are connected.
7j. Place the assembled Divider inside of your bag.
Optional: You may wish to adhere the Divider to the bottom half of your interior with fabric glue.
Congratulations, you’ve finished!!

If you have any questions about this pattern, feel free to e-mail me directly at sara@sewsweetness.com, or check out my Flickr Group! I would love to see your completed project posted there!
|
сумка-сафарі мк |

Can't you picture Harrison Ford slinging this amazing duffle over his shoulder as Indiana Jones?! We blended heavy canvas and faux leather with webbing and brass zipper accents for the dashing exterior. Inside is a tough rip-stop nylon lining. Even if you're not a world-renowned archeologist and adventurer, this bag is is great way to pack your stuff, whether you're heading across town to the gym or getting away for the weekend. Father's Day is coming up, and this would make a very nice gift for your personal action hero. The combination of fabrics, colors and textures has the perfect feel – a little bit retro and a whole lot cool (just like Dad).

Our finished bag looks like you could have grabbed it off the shelf at Eddie Bauer®, but don't let the professional finish scare you off. Achieving a polished end result is often easier than you might think. Read through the project a few times before you start, then if a particular part has you stumped, try doing it with scraps to get the hang of it before moving on to your final fabric. And of course, we offer our trademark S4H details and photos to help you through each step.

We do strongly recommend the heavy canvas and faux leather combo to insure your duffle has the stability and durability you want for active, on-the-go (safari style) use.

The bag finishes at approximately 22" wide x 11" high.


NOTE: As mentioned above, we used the built-in AcuFeed Flex™ system on our Janome MC8900 QCP with the optional narrow foot VD throughout the entire project. If you don't have a built-in feeding system, attach a Walking foot or similar. It helps keep all the layers involved in this project feeding more smoothly.


|
сумка-торбинка з вишивкою та китичками мк |

Decorative stitching against a neutral canvas gives this slouchy bucket bag a great hipster style. We used the beautiful stitches available on the Janome Memory Craft 9900, which go up to 9mm in width. For a subtle boho flair, we then incorporated long, soft tassels at the sides and front. Read on to learn our unique steps for making these custom tassels: much less than buying, and in an exact color match!

There are decorative stitch accents along the top of the bag and the top of the exterior pocket, but the main feature is how we use them on the wide cross-body strap.
We added four lines of mirror-imaged decorative stiches down the length of the strap plus an embellished flat cord, which is stitched in place with a wide zig zag - a modern spin on a traditional heirloom technique.

Searching for innovative closures for our bag and tote designs is always fun. We've employed zippers, drawstrings, turn locks, and more. But, we hadn't yet used one of the best "cincher-upper" techniques: the belt! It does an amazing job holding up your pants, and works equally well as a functional, fashionable closure for this cute bag.

Our pretty custom tassels hang luxiously from the bag's side and sprout directly from the ends of twisted cord belt. If you've ever shopped for tassels, you know they can be hard to find in the color you want, and even if you do luck out and locate one to your liking, the price may surprise you. A single, small tassel can run $5.00 and up. Designer Alicia Thommas came up with an innovative way to unwrap twisted cording then sculpt it into perfectly-matched tassels.
This bag finishes at approximately 11" wide x 13½" high x 6" deep. The cross-body strap finishes at approximately 3" x 54½".


|
сумка-органайзер для пирогів мк |

One of the best things about the holidays is the chance to get together with family and friends around a beautiful table filled with traditional dishes. Maybe you'll be passing around Nana's famous baked ham, Aunt Sheila's warm apple-cranberry crisp, or your own delicious cornbread stuffing. If your culinary talents are on-the-go from gathering to gathering this season, you need a carrier that can keep your special dish toasty on the way there. Our wrap-it-up design includes a handy loop to clip a pot holder and an inside pocket for a serving utensil. This would make a wonderful present for the foodies on your gift list. Make the pretty carrier and matching mitt, then wrap up a new baking pan you've filled with yummy homemade treats!

Our carrier is made for a standard 9" x 13" covered baking pan. You'll want to measure your particular casserole dish and adjust the four "fabric wings" to fit. We noticed many newer dishes have large molded handles. This would definitely be something you'd need to account for, especially for the short bottom and long top wings.

We give you the basic sizing and all the steps; all you need to do is adjust to best fit your pan(s). As we often suggest, lay things out on paper first and/or make a prototype in muslin or another inexpensive fabric from your scrap bin. Sometimes, we even make mini-samples out of paper towels to ensure our dimensions are correct.

We originally used two fabrics (one print and one solid) from the Simple Marks collection by Malka Dudrawsky for Moda Fabrics. This is an older collection and can be hard to find. As an alternative, we found two options at Hawthorne Threads. The first includes a print from the Handcrafted collection by Alison Glass for Andover Fabrics paired with a FreeSpirit Designer Solid.


A second option has a festive holiday feel, but not so specific that it couldn't be used anytime of the year. Both prints are from the Dowry collection by Anna Maria Horner for FreeSpirit Fabrics.


To make a matching hotpad as we show in our sample photos, try our Quilted Oven Mitt or Appliquéd Oven Mitt. Both include a downloadable pattern.


 .
.


|
2 сумки прямокутні мк |

Today's casual bag features two generous pleated pockets bound with Fold Over Elastic by Dritz (FOE). One of the things we love about FOE is the ability to use it as a binding. You get three benefits in one: color, stretch and finish. There's a built-in crease line down the center that allows easy and accurate folding. The pockets not only look great, they're also super functional – with expandable tops that make dropping in items easy, even one-handed. In addition, the entire top of the bag is also finished with FOE, using it as a flat binding. Plus, the pretty patterns on the Drtiz FOE are woven in, not printed on, and they're fade resistant and colorfast. These good looks will last!

If you haven't experimented recently with elastics, you might still lump them into the "stiff and scratchy" category. Not the Dritz® Fashion Elastic. This stuff is soft and stretchy, yet substantial enough to add stability. Most solids are ⅝" (folding over to 5/16") x 1 yard and the patterns range from ½ (folding over to ¼") to 1" (folding over to ½") x 1 yard. Both are fully machine washable and dryable. We found a great selection of all the new patterns (from graphics to tie-dye to sports themes and more) at Jo-Ann Stores.

The bag finishes at approximately 15" tall x 12" wide with 2" sides and base.

We originally used two fabrics from the Organic Forest collection by Amy Butler. This great collection sold out quickly last Fall and can be hard to find. We were able to find our pretty picks still available at online retailer, Quilt Home, and list those links below. But because of the scarcity, we also selected a pretty new pair from the Cocoon collection by Valori Wells. Both fabrics as well as coordinating fold-over elastic (we like Animal Skin Blrown/Tan for this new combo) are available at Fabric.com.


Yesterday was the first day of Standard Time across most of North America. We got an extra hour of sleep, but in exchange for this bonus snooze time, we are now faced with several months of ever-encroaching darkness. It's the perfect time for a bag with built-in reflective capabilities, which kicks off our new "Did it with Dritz" week. This high-visibility mini-tote is great for kids who are often headed to school and back home in the dark. See how we used four different nifty notions from Dritz.

This cute little bag is made from easy-to-sew, pre-quilted material; no need for a lining or any extra batting or interfacing. We added Dritz Fold-Over Elastic to bind all the raw edges, and fashioned our cool clasp from a key fob and snap (see how easy it is below). Two widths of Dritz Fusible Reflective Ribbon make sure the wearer stands out in street lights and headlights.

Although designed with kids in mind, there's no reason it couldn't be used for adults as well. The cross body strap might need to be lengthened, but otherwise, it would be a great mini tote for anyone.

A big thanks to our friends at Dritz for sponsoring the entire week. Have you been over to see the new Dritz website? They've streamlined it, updated it, and completely revamped how you find their products. Dritz has so many different notions – literally thousands of them – you could fill a good size store with just their products. But on the new site, they've done a great job of figuring out how customers like to find things. And that's visually.

Let's say you want to look at all your different options in fabric pens. Once you've chosen your major category ("Sewing" in this case), you quickly see the Marking section you're looking for. In about three clicks you're looking at a dozen kinds of fabric markers, with the choice to click on each for more details. We've visited many, many notions sites with only a fraction of the selection of products, and the new Dritz.com really is much easier to navigate.

Of course, once you've found what you want, you need to know where to get it. They have a complete store locator, showing where you can buy their products from local stores, national chains, and online retailers.
Our bag finishes at approximately 10" high x 8" wide with a 2" base and sides and 33" cross-body strap.

|
велика проста сумка мк |

Quintessential: representing the most perfect or typical example of a quality or class. We may be blowin' our own horn a bit here, but we absolutely love this plaid tote, and we really believe it has all the traits needed to rocket to the top of the charts for cool and classic totes. We found our perfect plaid at Fabric.com. It's reminiscent of a vintage Pendleton® "49'er" jacket. We also show you its companion plaid in shades of pink. Precision cutting – both straight and on the bias, piping accents, and corded handles are just a few of the styling particulars that give our tote its iconic appeal.

We've pictured the tote relaxing in countryside locales as well as shopping in the urban hustle. It obviously has the fashion muscle to look great in any situation.
Thanks to our easy instructions, classic does not automatically mean complex. Though we recommend reading through the instructions carefully before beginning, and taking care with the stitching details, we still feel the project is appropriate for even newer sewers.

In additional to this beautiful blue and tan palette, this same plaid is available in a pink and camel combination.


The tote finishes at approximately 17" high x 18" wide x 5" deep with an approximate 8" handle loop.


|
кошик-сумка мк |

I think we can all agree little things tend to be pretty dang cute: babies, puppies, kittens, Barbie® shoes... but let's face it, sometimes you need BIG to take care of business. This fun storage bin lives up to its jumbo name. It's a large-and-in-charge fabric basket that's ready to take on your bigger storage tasks. From books to blankets to balls of yarn, if you have a lot to keep track of, this project is for you. We chose two bold fabrics in organic cotton. And what is that dynamite looking "rope" ringing the top and creating the handles? Piping cord! Inexpensive yet just the right soft and strong combo.
We originally used an organic cotton canvas for our exterior fabric, which provided enough natural heft that a single layer of heavy fusible interfacing was enough to allow the basket to easily stand up on its own. We recommend this type of medium-weight substrate for the best results.

The Birch Fabrics cotton canvas we originally used is currently on back order at Fabric.com. However, they carry a wide selection, and we found two new prints from the same Birch Fabrics' Charley Harper collection that would be a great alternative: Foxsimilies in Grey from the Organic Canvas collection by Charley Harper Nurture for Birch Fabrics for the exterior and Feathers in Mineral from the Organic Cotton collection by Charley Harper Nuture for Birch Fabrics for the lining.


In addition to the heavier-weight exterior, the top ring of piping cord adds to the stability and helps hold the round shape.

As with any large project, wrangling the big sections of this basket through your machine can sometimes be a bit of a challenge. Remember our top tips: 1) make sure you test your stitch length, needle type, and tension settings on scraps first to insure your machine is firing on all cylinders; 2) go slowly and stop as needed, with your needle in the down position, to adjust the fabric under the foot; and 3) if you're getting frustrated, take a break... even if you walk away with the project still in the machine.

The tote finishes at approximately 17" high x 16" in diameter.


Supplies shown are for ONE bin and yardage is figured to allow for a vertical motif. Should you choose a different fabric with a more random motif, you may be able to get away with a smaller cut. See the actual cut sizes in the Getting Started section below.


|
кругла сумочка мк |

There are many things that make fall fabulous: leaves on the trees exploding with color, the aroma of a rich stew simmering on stove, morning frost sketching delicate patterns on the window panes. If you're a lover of sewing and craft, it's also the time when we leave behind the distractions of summer and turn once again to our trusty sewing machines. We're taking a very fabulous look at fall this week and next with our friends from Fabric.com. We have two weeks of gorgeous fabrics and the perfect projects to welcome the art of autumn. Our series starts off with today's Canteen Bag, featuring two classic fall fabrics: wool suiting and corduroy.

If you've always been a bit hesitant about sewing circles... especially circles that become tubes, it's time to conquer your fears. Even with all its beautiful curves and professional finishing touches, our Canteen Bag is a project that is so much easier than it seems. We provide a pattern for the front and back exterior circles as well as the pretty front pocket. Even so, you might enjoy reading through our complete step-by-step tutorial: How To Make and Measure a Circle Without a Pattern.

The bag features a layered lining with the resulting interior seam allowances covered by fold-over elastic. This construction method is easier than a traditional two-part lining, and the elastic binding is much more forgiving than fabric bias binding.
Our thanks to Fabric.com for sponsoring the Fabulous Fall series. If you haven't visited Fabric.com before, make today the day you start – or should I say, the day your "addiction" begins?! Be prepared to lose yourself for a few hours. If you're already a Fabric.com shopper, you know there's always something new to see, like the Deal of the Day on their home page or Seasonal Specials.

Depending on the fabric weight you select as well as the weight of the front D-ring, you may wish to add a snap to the top of the exterior pocket or even simply hand tack it in place at the apex of the curve. The wool suiting we selected was interfaced and stood up nicely on its own during our photography session. However, given more weight, it could fall open. A snap or hand tack is a fast and easy addition that can be added during construction or even after the fact.

The bag finishes at approximately 9" in diameter and is 2½" deep. The shoulder strap is fully adjustable.

NOTE: Inventory shifts constantly, and some fabric may not be in-stock when you first visit. However, there are other color options as well as re-stock dates listed when appropriate for each fabric at the Fabric.com site.


|
наплічник-торбинка |

String style backpacks are everywhere for Fall, from ripstop athletic gear to high-end leather bags. They're compact and lightweight but can hold plenty. Ours is made in two bright fabrics from Ann Kelle's Beatbox collection for Robert Kaufman fabrics, which we found at Fabric.com. To give our design even more functionality, we added unique front crossover pockets, which create four individual sections to hold smaller items.

Our Beatbox backpack is modeled by an energetic seven-year-old, but the size and shape would work for any age. It's style that's ready to hit the road: a modern punch of color with a retro design. Tote it to the gym, fill it up with necessities for a day hike or picnic, slip it on for a bike ride to the farmer's market. Fusible fleece between the layers softens and stabilizes, and the adjustable cording shoulder straps, which thread through bottom eyelets, make going smaller or larger a snap.

Our thanks to Fabric.com for providing both the super cute fabric and the fun fold-over elastic in a vibrant chevron pattern that binds the front pockets. If you've never visited Fabric.com or haven't been back in awhile, there's always something new to discover; like the Deal of the Day on their home page; as well as the Just Arrived section for the latest bargains; and special featured items, like the super popular Cotton + Steel collections.

Our backpack finishes at approximately 15½" tall x 12½" wide.


Stitch across the loop ends to secure, running this short seam approximately ¼" from the raw edge. Trim away the taped ends so the cord lays flush against the fabric.


|
як зробити рівне коло при шитті |
Мастер-класс опубликован здесь: http://burdastyle.ru/master-klassy/master-klassy-b...m=email&utm_campaign=daily
Сделать идеально ровный круг не всегда просто. Знаю по себе. Когда шила пасхальные салфетки, то как раз больше всего времени уходило именно на выстрачивание ровного круга, т.к малейшая неточность и о красоте будущего изделия можно забыть.
А тут два идеально удобных способа!!!!
Информация будет полезна для любителей аппликации, при пошиве столового белья круглой формы, при изготовлении круглых шкатулок из ткани, пасхальных салфеток и много другого!!!! Идеально,просто и даже очень просто!!!!

Возьмите готовый шаблон круга или сделайте его самостоятельно, например, из плотного картона или пластика.

Обведите шаблон с изнаночной стороны ткани, оставьте припуски 1,5 см.
|