-Поиск по дневнику

Поиск сообщений в арчия

 -Подписка по e-mail


 -Интересы

всё новое-интересно!

 -Статистика

Статистика LiveInternet.ru: показано количество хитов и посетителей
Создан: 21.10.2010
Записей:
Комментариев:
Написано: 2705


Радуйся жизни! Пока ты ею недоволен, она проходит МИМО.

Поделки из глиняных горшочков

Пятница, 04 Марта 2011 г. 12:12 + в цитатник
Это цитата сообщения podborka [Прочитать целиком + В свой цитатник или сообщество!]

Поделки из глиняных горшочков - 4


Читать далее 

Рубрики:  дети/поделки

Метки:  

Нарциссы из яичной коробки!

Пятница, 04 Марта 2011 г. 11:58 + в цитатник
Это цитата сообщения M_A_G_D_A [Прочитать целиком + В свой цитатник или сообщество!]

Flowers from egg cartons

Narcissus , daffodils , narcissus and the snail Eveline

Beautiful narcissus, right? Are giving us so much joy

joyful explosion of yellow.

HOW TO
Рубрики:  дети/поделки

Метки:  

Сердца из папье-маше

Пятница, 04 Марта 2011 г. 11:54 + в цитатник
Это цитата сообщения mushroome [Прочитать целиком + В свой цитатник или сообщество!]

Сердца из папье-маше


Сердца из папье-маше


Добавлено: 13.03.2009 02:26   |   Просмотров: 6201 

 (700x375, 115Kb)
На девять моих сердец ушел один рулон самой дешевой туалетной бумаги.
1.Рвём в клочья рулон 
2.Заливаем водой,продолжаем кромсать бумагу 
3.Выжимаем из полученной массы воду с помощью х\б тряпки(полотенца)
4.Продолжаем кромсать кусочки бумаги 
 (400x361, 81Kb)
5.Готовим 1 стакан мучного клея - 2 ст.л.муки+вода,нагреваем,но не кипятим.Доводим до консистенции киселя 
6.Добавляем полученный мучной клей в бумагу.Хорошо перемешиваем.
7.Добавляем полстакана клея ПВА.
8.Хорошо перемешиваем до получения пастообразной массы, которая не должна клеится к рукам.
 (400x300, 65Kb)
9.Лепим всё что душе угодно 
 (400x283, 73Kb)
 (400x300, 38Kb)
Сушить лучше при комнатной температуре,чтобы изделие не потрескалось.Периодически переворачивать.

Высушенные сердечки расписываем темперой или акрилом 
 (500x375, 228Kb) 
 (500x375, 321Kb)

Рубрики:  дети/поделки

Метки:  

Подарочная упаковка своими руками

Пятница, 04 Марта 2011 г. 11:44 + в цитатник
Это цитата сообщения podborka [Прочитать целиком + В свой цитатник или сообщество!]

Подарочная упаковка своими руками - 4


Читать далее 

Рубрики:  дети/поделки

Метки:  

Понравилось: 1 пользователю

ТОРТ -"МОНАСТЫРСКАЯ ИЗБА"

Пятница, 04 Марта 2011 г. 11:40 + в цитатник
Это цитата сообщения Bronza53 [Прочитать целиком + В свой цитатник или сообщество!]

ТОРТ -"МОНАСТЫРСКАЯ ИЗБА"


торт в разрезе

Читать далее...
Рубрики:  Еда

Метки:  

Курник блинный

Пятница, 04 Марта 2011 г. 11:38 + в цитатник
Это цитата сообщения elenbar [Прочитать целиком + В свой цитатник или сообщество!]

Курник блинный

Хочу предложить вам курник который делается только из блинов. Я делаю всегда такой курник, он получается нежный и лёгкий.
Читать далее

Рубрики:  Еда

Метки:  

Шьём мочалку!

Пятница, 04 Марта 2011 г. 11:36 + в цитатник
Это цитата сообщения M_A_G_D_A [Прочитать целиком + В свой цитатник или сообщество!]

A Bath Pouf from an old towel.... I like it!!

Have you ever had an idea, and you thought "That's awesome! It'll be so fantastic!!" and then you make it, and you realize that it's really kind of kooky? That sort of happened here today. (well, a couple of days ago)
I was trying to think of something to do with these old towels I had. I think sometimes I try to hard to think of craft ideas. That's when projects like this are born:


Читать далее...
Рубрики:  Рукоделие

Метки:  

Великий и могучий.

Пятница, 04 Марта 2011 г. 11:31 + в цитатник
Это цитата сообщения Юлена- [Прочитать целиком + В свой цитатник или сообщество!]

Великий и могучий...

В преддверии Международного дня родного языка (отмечатеся 21 февраля).


И еще один фрагмент на языковую тему:


Рубрики:  дети

Метки:  

Платье вашей мечты!

Пятница, 04 Марта 2011 г. 10:53 + в цитатник
Это цитата сообщения M_A_G_D_A [Прочитать целиком + В свой цитатник или сообщество!]

evening gown

how to
Рубрики:  Рукоделие

Метки:  

Рамочки для поделок!!!

Пятница, 04 Марта 2011 г. 10:49 + в цитатник
Это цитата сообщения M_A_G_D_A [Прочитать целиком + В свой цитатник или сообщество!]

2 types paper frames

How to make a beveled picture frame out of paper

 
Quilled passionflower in a paper frame  

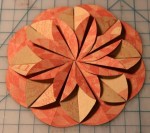
Long awaited instructions and templates for making a beveled paper frame I've used for my quilling projects "Poppies" and "Dandelions and raspberries". To additionally illustrate the use of a frame like this, I've created a quilled passionflower, which isn't a thoroughly designed work, so be indulgent, please.

We're going to make a frame that is 2.5 cm (1 inch) wide and 2 cm (6/16 inch) deep. I'm sorry, but you'll have to use a ruler with metric system units for this project.

Step 1: Preparing a paper rectangle

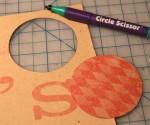
Measure the artwork to frame, add 10.5 cm at each side and cut out a rectangle of the dimensions you've calculated. Use heavyweight (240 gsm) cardstock paper.

Step 2: Drafting

Paper frame diagram

Use one of the following methods to draw the lines: print out the template, cut it out and transfer onto the piece of cardstock you've prepared; alternatively, you may just draw the lines with a pencil according to the diagram above.

Templates for download

Download one of the PDF templates for the right paper size and print it out. Make sure you don't resize or scale the page when printing.

Template for A4 size

Template for US Letter size

There's no need to download a template if you're not going to print it. Just draw the lines following the diagram above.

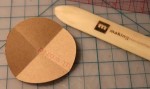
Notice that the corners are marked "top right", "bottom left" etc. Line up a cutout with a corresponding corner of the rectangle. Transfer the lines by pressing them into the paper, using a needle, or tracing the template around like shown in the photo. Using a pencil, mark with dots the points where the creases start.

After repeating the procedure for all the four corners, connect the dots with lines that go along the paper edges.

Tracing the template

Step 3: The cutout

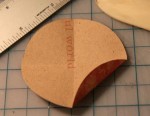
Carefully cut away the corners. Score the cardstock according to the crease lines and fold like shown below.

Paper frame cutout Corner ready for assembling

Step 3: Assembling

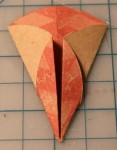
Start assembling the frame. If you don't use the back of the frame as a background, glue your picture down to the frame at this point. Then fold the border like shown in the pictures, simultaneously inserting the sides of a corner into each other.

Starting assembling the frame Assembling the frame Finishing assembling the frame Corner of the finished frame

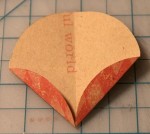
Repeat for the rest of the corners. When done, carefully glue the bottom of the border to the back of the frame.

Have you noticed that little square I'd left in the corner? It folds into a triangle, goes inside the border and gives the frame extra rigidness. I must credit Svetlana for this idea.

Quilled passionflower, closeup

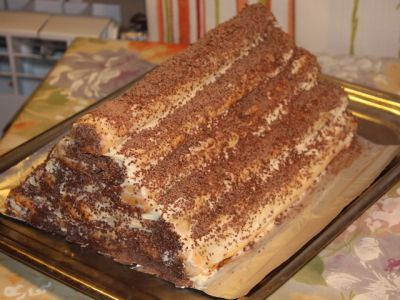
How to make a simple paper frame


This time I'd like to share with you a simple and easy way to make a paper picture frame, like the one shown in the photo above. Personally, I like using such paper frames for my quilling.

This is how the template for such a frame looks like. Please note, that not the absolute size but the ratios are important for this explanation. Using this template you can make a frame that has borders of equal width and height. The parts to be removed are marked in red, the inner bold rectangle shows the part of a picture that will be visible.

So, first measure a picture you'd like to frame. Add ten times the width of the frame border to both dimensions. For example, if your picture is 10x15cm with 1cm wide border, the resulting size would be 10+10*1 by 15+10*1 = 20x25cm. Draw a rectangle according to your calculations and cut it out. Then measure and mark the folding lines and corners as the template shows. Start measuring from the outer edges of the paper. Cut away the parts shaded with red.

To remind you, only the relative size of the parts is important. That is, if you want to make wider (and higher) borders, just multiply each number in the picture by the same factor.

Score the folding lines marked with blue dashes on the template. Use a special scoring tool, a thin embossing tool or simply a stick with rounded tip. Then fold as shown in the picture.

If you already have a picture to frame, glue it down now and then start assembling your paper frame.

Insert an end of each side border into its neighbor's end at the corners, one by one, like shown in the photos.

Generally, no adhesive is needed, but you may want to secure the frame with a small amount of glue.

If you want to make a frame with wide borders, the template will look like this (pay attention to the proportions):

And this one is for a deep frame, where the border's height is greater than its width.

The same principles apply for these templates as well: if you want another size, just multiply the numbers by a constant factor.


http://increations.blogspot


Рубрики:  дети/поделки

Метки:  

Понравилось: 2 пользователям

Шьём.

Пятница, 04 Марта 2011 г. 10:45 + в цитатник
Это цитата сообщения M_A_G_D_A [Прочитать целиком + В свой цитатник или сообщество!]

Без заголовка

M6165
line art & yardage
Рубрики:  Рукоделие

Метки:  

Кардиган - трансформер

Пятница, 04 Марта 2011 г. 10:23 + в цитатник
Это цитата сообщения Tanianico [Прочитать целиком + В свой цитатник или сообщество!]

Кардиган - трансформер

Кардиган - трансформер 


 (492x400, 25Kb)


далее...
Рубрики:  Рукоделие

Метки:  

Понравилось: 1 пользователю

Ажурная туника

Пятница, 04 Марта 2011 г. 10:16 + в цитатник
Это цитата сообщения dakka_-_L [Прочитать целиком + В свой цитатник или сообщество!]


Ажурная туника
 (510x699, 80Kb)

Читать далее...
Рубрики:  Рукоделие/Вязание крючком

Метки:  

ВЯЗАНИЕ КРЮЧКОМ ДЛЯ ДОМА

Пятница, 04 Марта 2011 г. 09:34 + в цитатник
Это цитата сообщения olga_zaedinova [Прочитать целиком + В свой цитатник или сообщество!]

ВЯЗАНИЕ КРЮЧКОМ ДЛЯ ДОМА

 (562x699, 139Kb)
Рубрики:  Рукоделие/Вязание крючком

Метки:  

ВЯЗАНИЕ КРЮЧКОМ - СУМКИ

Пятница, 04 Марта 2011 г. 09:32 + в цитатник
Это цитата сообщения olga_zaedinova [Прочитать целиком + В свой цитатник или сообщество!]

ВЯЗАНИЕ КРЮЧКОМ - СУМКИ

 (541x699, 103Kb)
Рубрики:  Рукоделие/сумки

Метки:  

пуговичные идеи

Четверг, 03 Марта 2011 г. 16:02 + в цитатник
Это цитата сообщения -Psiheya- [Прочитать целиком + В свой цитатник или сообщество!]

пуговичные идеи

Рубрики:  дети/поделки
Рукоделие

Метки:  

Рисуем пальчиками. Для занятий с детьми от 1 до 2 лет

Четверг, 03 Марта 2011 г. 15:58 + в цитатник
Это цитата сообщения Рыжая_котенок [Прочитать целиком + В свой цитатник или сообщество!]

Рисуем пальчиками. Для занятий с детьми от 1 до 2 лет


Рубрики:  дети/рисование

Метки:  

Летний жакетик крючком

Четверг, 03 Марта 2011 г. 15:26 + в цитатник
Это цитата сообщения Helam [Прочитать целиком + В свой цитатник или сообщество!]

Летний жакетик крючком из Lady Boutique Series no.3165!lad

 (316x400, 33Kb)
Летний жакетик крючком из Lady Boutique Series no.3165!
Очаровательный летний жакетик крючком!
Читать далее...
Рубрики:  Рукоделие/Вязание крючком

Метки:  

Журнал: Плетение полезных вещиц из газет.

Четверг, 03 Марта 2011 г. 14:53 + в цитатник
Это цитата сообщения Rukodelkino [Прочитать целиком + В свой цитатник или сообщество!]

Журнал: Плетение полезных вещиц из газет.

Читать далее...
Рубрики:  дети/поделки

Метки:  

МК! Бумажные цветочки, техника “Dahlia Fold”

Четверг, 03 Марта 2011 г. 13:50 + в цитатник
Это цитата сообщения Svetlana_Matskevich [Прочитать целиком + В свой цитатник или сообщество!]

МК! Бумажные цветочки, техника “Dahlia Fold”

Вырезаем восемь небольших кругов из двухсторонней декоративной бумаги для скрапа. Желательно выбрать не очень толстую бумагу - чем тоньше, тем легче будет складывать лепестки.И далее - по картинкам!!!!!! С сайта Craft Critique.

Размещено с помощью приложения Я - фотограф
Рубрики:  дети/поделки

Метки:  

Поиск сообщений в арчия
Страницы: 115 ... 72 71 [70] 69 68 ..
.. 1 Календарь