-Поиск по дневнику

Поиск сообщений в О_Дзюба

 -Подписка по e-mail


 -Сообщества

Участник сообществ (Всего в списке: 49) Материнство_с_умом УРОКИ_ФОТОШОПА Мы_и_Дети _вышивка_крестом_ Фото_и_фотошоп В_К_У_С_Н_Я_Т_И_Н_А Мамины_радости Учим_Английский Рецепты_домохозяек Стройные_и_красивые готовим_сами Наши_рецептики Вышивка_крестиком Фотошоп_и_творчество Вкусная_кухня_интернета О_детях Аудиокниги вязалочки Рукоделочки Всем_Вкусно Лучшие_рецепты_интернета УспешнаяДомохозяйка Кулинарная_книга Україна Я_мама Магия Рукодельница КлипАРТ Кисти_для_Фотошопа Рецепты До_и_после_фотошопа Вязание Мой_любимый_Малыш Best_Photoshoots FAQphotoshop Make_up Photoshop-art Photoshop_art Photoshop_Creation Photoshopia-ART Photoshopia World_of_the_Occult -HochuVseZnat- МОЙ_ЛИЧНЫЙ_ПОВАР Вяжем_вместе Моя_кулинарная_книга Вкусно_Быстро_Недорого Готовим_малышам Creative_Designs
Читатель сообществ (Всего в списке: 8) Наши_схемы Ссылочки_малятам Настоящая_женщина All-for-photoshop New_Photoshopinka Photoshopinka Релакс_и_вдохновение Школа_славянской_магии

 -Статистика

Статистика LiveInternet.ru: показано количество хитов и посетителей
Создан: 09.04.2009
Записей: 2744
Комментариев: 26
Написано: 2826


Выкройка леггинсы

Четверг, 13 Марта 2014 г. 03:07 + в цитатник
Это цитата сообщения adelaidaivi [Прочитать целиком + В свой цитатник или сообщество!]

Выкройка леггинсы

Выкройка леггинсы + видео мастер класс.

выкройка леггинсы

Представленная ниже выкройка леггинсов создана для биэластичных тканей (т.е. ткани растягиваются по долевым и поперечным нитям). Эластичность ткани для данной модели не должна быть меньше 20%. Рекомендуется до построения чертежа проверить эластичность ткани.

Начнем строить выкройку леггинсов.

Отмерить на вертикали отрезки:


  • 1—2 Высота сидения (здесь: 21,2 сантиметра).
  • 2—3 Высота колена (здесь: 31,8 см).
  • 2—4 Длина шага (здесь: 79,5 сантиметра).


выкройка леггинсов


Расстояние между точками 4—5 определяет величину уменьшения длины леггинсов (в данном случае — до щиколоток). Длина брюк может быть «три четверти», или выше колен для «велосипедных» брюк, или произвольная.

  • 3—6 Высота икры (здесь: 15,9 см).
  • Отрезок 2—7 на выкройке леггинсов = 1/10 от 1/2 Об + 3 см (здесь: 7 см). Через все точки, кроме 4, провести горизонтальные линии в обе стороны. Отрезок 2-8 равен 1/4 Обхвата бедер. 2—9 = 1/4 Об.
  • Через 8 и 9 провести перпендикуляры вверх до их пересечения с линией талии (см. рис.) — получены 11 и 10 соответственно. Расстояние между 8—12 = 1/10 от 1/2 Об +1—2 сантиметра.
  • Между 9-13 расстояние равно 1/10 Об. 6—14 на выкройке леггинсов равна 1/2 Обхвата икры. А 6—15 равна 1/2 Обхвата икры. Соединить 13 с точкой 14, а 12 с 15 прямыми вспомогательными.
  • Отрезок 5—16 = 1/2 Ширины низа (или Обхвата щиколотки).
  • 5—17 = 1/2 Ширины низа (или Обхвата щиколотки). От точек 16 и 17 отмерить по 1 см внутрь и начертить соединительные линии к 14 и 15.
  • Начертить линию шагового среза выкройки леггинсов(как на рис.) на передней половинке, соединяя 17, 15, 12. Отрезок 11 — 18 равен 1 сантиметр. Между 8 и 8а расстояние = половине отрезка между 8 и 12.
  • Начертить вспомогательную прямую 8а—12 и линию среза банта по лекалам, как на рис. Отрезок 10—19 = 3 см. Длину шагового среза передней половинки перенести на заднюю.


  •  Начертить средний срез задней половины. Эту линию продлить вверх. Отрезок 19—20 = 4—5 сантиметра. 1—21 равен 1,5—2 см. Начертить линию талии выкройки леггинсов. Для обработки верхнего среза брюк эластичной тесьмой запроектировать припуск на обработку шириной 2—3 см (заштрихованная область на рис.).
Рубрики:  Шитье

Леггинсы за 30 минут

Четверг, 13 Марта 2014 г. 03:07 + в цитатник
Это цитата сообщения adelaidaivi [Прочитать целиком + В свой цитатник или сообщество!]

Леггинсы за 30 минут


Доброго времени суток:)

Сегодня покажу как сшить леггинсы:) Все гениальное просто:)

Нам понадобиться ~1.2м трикотажа, резинка 3-4 см шириной, нитки, ножницы и швейная машинка:)

Раскрой. Я разрезала старые любимые джинсы по внутреннему шву. Складываем ткань лицом к лицу.

Припуски. По швам и по низу 1,5 см.

Взять одну штанину и сложить лицом внутрь. Выполнить шов.

Одну штанинину вывернуть наизнанку. Засунуть в нее вторую штанину и выполнить средний шов.

Пришить резинку с внутренней стороны.

Готово:)

P.S. лучше выбрать ткань поплотнее, чтобы не смотрелось как колготки:)

Рубрики:  Шитье

Сборка ниткой резинкой на платье, юбке

Четверг, 13 Марта 2014 г. 03:06 + в цитатник
Это цитата сообщения adelaidaivi [Прочитать целиком + В свой цитатник или сообщество!]

Сборка ниткой резинкой на платье, юбке

Опубликовала bro6shka в личном дневнике

Сборка ниткой резинкой на платье, юбке

Сборка резинкой или ниткой резинкой в несколько рядов на легком платье привлекательно выглядит и к тому же такое платье или юбку удобно носить. Сборку резинкой можно легко и просто настрочить с помощью строчки зигзаг. Нитку резинку можно шить прямой строчкой, если нитку резинку вставить в шпульку. Соберите на сборку резинку манжеты, пояс, корсаж или кокетку на юбке и вы получите красивое и удобное изделие. Такие сборки с помощью резинки можно использовать на платье или юбках в качестве декоративной отделки.
Резинки пришиваются строчкой "зигзаг" с изнаночной стороны платья или другой одежды.

1. Как сделать сборку резинкой для платья или юбки


Подберите резинку по ширине, цвету и упругости. Если рядов резинки будет немного, а ткань слишком плотная, то желательно выбирать резинку тугую. Слабая резинка будет плохо образовывать складки.
Оставьте один боковой шов открытым, не застроченным в том месте, где вы будете делать сборку резинкой. Его вы соедините на машинке, тогда когда настрочите резинку и сделаете сборку.
Наметьте мелом или смываемым карандашом линии рядов пришиваемой резинки на изнаночной стороне ткани рукава платья или низа юбки.
Расположите их, в зависимости от общего дизайна и размера самого платья на расстоянии от 1,3 до 2 см. друг от друга. Рядов резинки должно быть не меньше 3-х.

2. Сборка резинкой делается строчкой зигзаг


Сборка резинкой делается с помощью строчки зигзаг. Ширину и шаг строчки зигзаг подбирайте в зависимости от ширины резинки и качества, толщины ткани. Слишком частый зигзаг не нежной ткани может повредить ее.
Теперь следует по намеченным линиям пришить саму резинку на швейной машине. Для этого установите переключатель видов строчек на режим строчки "зигзаг" на ширину, достаточную для захвата резинки так, чтобы она проходила между иголками. Слишком широкий зигзаг будет стягиваться, а при слишком узком зигзаге, иголка будет попадать в резинку, что приведет к ее разрыву и не позволит стягивать резинку в складки.
Не растягивайте сильно резинку во время пришивания на машинке. Важно лишь, чтобы она находилась на отмеченной линии, не образуя изгибов. Если вы пришиваете широкую резинку зигзагом с фиксацией, то можно заранее сделать метки, разделив отрезанную резинку на ровные участки. Точно также нужно пометить мелом деталь, к которой будет пришиваться резинка. Совмещая метки резинки и метки нужной детали, вы равномерно рассредоточите растяжение всего отрезка резинки. Это способ можно использовать при пошиве простыни на резинке.
Но вернемся к платью. Вытяните длинные концы резинки с обеих сторон, так чтобы сборка распределилась одинаково по всей ширине рукава.

3. Как отрегулировать степень затяжки сборки резинкой


Чтобы сборка не была слишком тугой или слишком слабой, нужно отрегулировать ее натяжение. Лучше всего это сделать по фигуре или объему руки следующим образом.
Сколите булавками открытые срезы швов, и наденьте на себя платье или юбку изнанкой наверх. Так вам удобнее будет регулировать степень затяжки резинки на кисти. Подтяните эластичные концы резинки, равномерно распределяя складки по всей длине. Стягивайте резинку по два ряда сразу, чтобы сборка была ровной и равномерно уложенной между рядами.

4. Завяжите узлы на краях рядов и обрежьте концы резинки

Стачайте шов короткими прямыми стежками, следя за тем, чтобы узелки резинки не попадали под лапку. Не делайте в местах пересечения с резинкой закрепки. Слишком частые проколы иголкой могут повредить резинку. Закрепите только края общей строчки. Если требуется укрепить этот шов, то можно прострочить на машинке еще один дополнительный шов рядом.
Обработайте швы тем же способом, как и другие швы платья или блузки, например оверлоком.
Выверните изделие и проутюжьте шов с лицевой стороны если это необходимо.

5. Как шить ниткой резинкой


Нитка резинку можно также настрочить, как и широкую резинку по изнаночной стороне зигзагом, оставляя е между проколами иголки, а после подтянуть и сделать сборку. Но можно ниткой резинкой и шить на швейной машинке, только особым способом.
Нитка резинка заправляется в шпульный колпачок, а для верхней нитки используется обычная нитка, которой вы шили изделие.
Натяжение нижней нитки в шпульном колпачке нужно ослабить максимально. Только не выкручивайте винт более, чем на пол - оборота, чтобы он не выпал и не потерялся. Натяжение верхней нитки немного можно увеличить, но не сильно, иначе верхняя нитка будет рваться.
Шить ниткой резинкой это экстремальное занятие, поэтому попробуйте вначале это сделать на опытном образце.
Рубрики:  Шитье

Мясо по-французски с грибами

Среда, 12 Марта 2014 г. 22:50 + в цитатник
Это цитата сообщения adelaidaivi [Прочитать целиком + В свой цитатник или сообщество!]

Мясо по-французски с грибами


Мясо по-французски с грибами

Автор: Елена Бирюза 

  • Мясо по-французски с грибами
  • Мясо по-французски с грибами (Фото 2)

Мясо по-французски является достойным украшением праздничного стола. Плюсом этого вкусного и сытного блюда является простота его приготовления.

Изначально мясо по-французски (не имеющее отношения к французской кухне) готовилось из телятины, со временем же его рецепт стал более демократичным – сейчас для его приготовления используют, в основном, свинину. Хотя подойдёт также и говядина, курятина или индюшатина – кому что больше нравится.

Рецептов мяса по-французски существует очень много, с ингредиентами можно экспериментировать. Мы предлагаем вам рецепт мяса по-французски с грибами.

Рецепт: мясо по-французски с грибами

Ингредиенты:

  • Мясное филе – 300 г
  • Шампиньоны – 200 г
  • Твёрдый сыр («Российский») – 150 г
  • Лук репчатый – 1 шт.
  • Майонез, соль, перец.

Готовим мясо по-французски

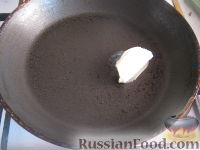
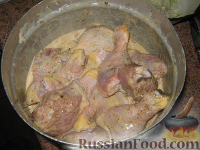
Вымытые и очищенные шампиньоны порежьте и залейте водой. После этого нарежьте мясо как на отбивные, толщиной примерно в 1 см, посолите и поперчите. Выложите мясо на большую сковороду или противень.

Смотрите также: Отбивные по-французски

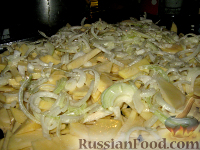
Слейте воду с грибов, слегка подсушите их и выложите на мясо, немножко посолите. Далее очистите и нарежьте полукольцами лук, который станет третьим слоем. Натёртым на тёрке сыром обильно посыпьте блюдо, сверху смажьте майонезом и выпекайте при температуре 200 градусов до появления корочки на сыре (около 25 минут)

Рубрики:  Кухня

Узкие брюки с поясом-корсажем

Среда, 12 Марта 2014 г. 22:49 + в цитатник
Это цитата сообщения adelaidaivi [Прочитать целиком + В свой цитатник или сообщество!]

Узкие брюки с поясом-корсажем

Узкие брюки с поясом-корсажем

Узкие брюки с поясом корсажемРазмер брюк: 34

Длина от талии: 108 см.

Ширина половинки брюк по нижнему краю: ок. 37 см.

Вам потребуется: эластичный поплин, растягивающийся в продольном направлении, 1,35 м шириной 145 см (раскрой по поперечной нити); флизелин G 785; 1 застежка-молния длиной 20 см; 1 плоская пуговица для внутренней застежки.

Рекомендуемые ткани: только эластичные брючные ткани.

Важно: узкие брюки должны растягиваться в ширину. Поэтому эластичные ткани, растягивающиеся в поперечном направлении, раскраиваются по долевой нити, а эластичные ткани, растягивающиеся в продольном направлении, раскраиваются по поперечной нити.

Припуски: На швы и по срезам — 1,5 см, на подгибку низа — 4 см.

План раскладки:

Ткань сложить вдвое, лицевой стороной вовнутрь.

Раскрой:

Брюки:

1 Передняя половинка 2х

2 Задняя половинка 2х

3 Средняя передняя часть пояса 4х

4 Боковая передняя часть пояса 4х

5 Средняя задняя часть пояса 4х

6 Боковая задняя часть пояса 4х

a) обтачка правого края разреза длиной 21 см и шириной 4 см;

b) 2 детали откоска длиной по 21 см и шириной по 4 см;

c) полоса для 4 шлевок длиной 30 см и шириной 4 см, включая припуски.

Прокладка: см. план раскладки.

Пошив брюк:

- На задних половинках стачать вытачки и заутюжить глубины вытачек к линии среднего шва.

- На дублированных прокладкой внешних частях пояса выполнить рельефные швы (контрольные метки). Припуски швов заутюжить на средние части. Части пояса отстрочить близко к швам и притачать к верхним срезам половинок брюк. Припуски швов заутюжить на части пояса.

- Выполнить боковые и шаговые швы. Припуски швов разутюжить.

- Половинку брюк вложить одна в другую, лицевой стороной к лицевой стороне. Единой строчкой выполнить передний и задний средние швы. Припуски шва разутюжить от верхнего среза до начала шагового скруглення. На самом участке шагового скруглення припуски шва плоско не утюжить.

- Выполнить швы на внутренних деталях пояса. Припуски швов разутюжить.

Рубрики:  Шитье

блузки

Среда, 12 Марта 2014 г. 22:48 + в цитатник
Это цитата сообщения adelaidaivi [Прочитать целиком + В свой цитатник или сообщество!]

блузки http://m-sewing.com/patterns-catalog/women

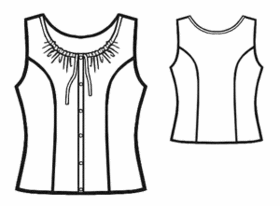
Home / Women / Tops / #5297 Chiffon draped top
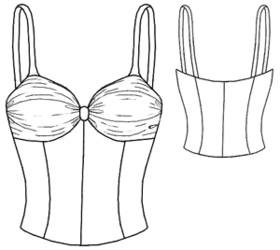
example - #5297 Chiffon draped top preview - #5297 Chiffon draped top

Difficulty: **

Recommended fabrics: soft draping silk

You will need: satin lining, separating zipper.

Attention! Fabric consumption varies depending on the size of garment. First of all, print out paper patterns and lay them out at the width of fabric/ knit you plan to use, to see how much fabric you will need.

When sewing the garment, pay attention to notches- they must coincide.

Cutting:

Fabric:

1. Front part center –2 details
2. Front part side - 2 details
3. Back part center - 1 detail
4. Back part side –2 details
5. Cup – 2 details
6. Draping detail of cups – 1 detail
7. Front facing – 1 detail
8. Back facing – 2 details
9. Strap – 2 details

Lining:

1. Front part center – 2 details
2. Front part side - 2 details
3. Back part center - 1 detail
4. Back part side –2 details
5. Cup – 2 details
6. Strap – 2 details

Recommendations on sewing sheer material. Do not draw contours via carbon paper on material, for they will be visible on the right side. The simplest way is to cut all details with equal allowances and sew edges on equal width.

Instructions:

1. Tack lining and fabric details and then sew them as usual (as fabric only).

2. Sew bust darts into cups.

3. Sew front part centers, front part princess seams.

4. Sew back part princess seams.

5. Sew right side of the top.

6. Tack lining and chiffon straps. Fold straps along the center and topstitch on 1 cm (3/8") width from the bend. Turn straps right side out, then press and sew to cups.

7. Make drapes into the detail to be draped. Make large machine stitches along both sides of front part center line and along side edges. Do not gather details on the string.

8. Tack draping detail to upper edge of front part, with draping detail edge opened between marks.

9. Sew cups to front parts.

10. Turn draping detail upward and gather it on lower strings to front center line up to 4 cm (1-5/8") height and along side edges up to cups side edges. Fold the stripe along the center and make a stitch 1 cm below the bend. Turn the stripe put and fold with it draping detail along front center lines. Sew stripe ends on the wrong side. Tack the detail. To avoid hanging drapes, you can invisibly sew them to cups by hand.

11. Press front/back part left sides into the wrong side and sew the zipper.

12. Sew front and back facing together and oversew facings outer edges.

13. Overstitch upper edge of the garment with facings. Turn the facings and topstitch seam allowance on 0.1 mm (very close) from the edge.

14. Turn the facing wrong side out and topstitch it to the zipper.

15. Fit the straps and sew their back ends under back upper edge.

16. Press the hem into wrong side and topstitch.


Free sewing patterns (PDF) available for download

Please review Our Sizing Charts

Size S   Size M   Size L   Fabrics Selection »  Sewing Supplies »


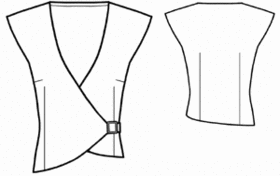
Home / Women / Tops / #5443 Wrapped top

example - #5443 Wrapped top preview - #5443 Wrapped top

Difficulty: *

You will need: sheer natural fabric.

Attention! Fabric consumption varies depending on the size of garment. First of all, print out paper patterns and lay them out at the width of fabric/ knit you plan to use, to see how much fabric you will need.

When sewing the garment, pay attention to notches- they must coincide.

Cutting :

Fabric:

1. Back part - 1 detail
2. Left front part - 1 detail
3. Right front part - 1 detail
4. Long waistband - 1 detail
5. Short waistband - 1 detai

Instructions:

1. Sew front/back darts. Press darts.

2. Sew shoulder seams, serge them. Press shoulder seams backwards.

3. Serge front/back neckline edges, sleeve hems. Turn front/back ready allowances under and topstitch them at 0.5 cm (3/16") from edge. Turn one-piece sleeve's hem ready allowances and topstitch at 0.5 cm from edge.

4. Serge side seams. Side seams leaving a slit into left side seam; press side seams apart. Serge the hem, then turn under and topstitch.

5. Fold the waistband along the center and overstitch along both edges. Turn waistband right side out and press it. Edgestitch waistband edge. Sew the waistband to left front part. Serge joining seam and topstitch it.

6. Serge side edge of short waistband. Apply the waistband to right front part and overstitch by three edges. Turn the waistband right side out and press it. Edgestitch waistband edge.

You can trim waistband end with buckle.


Free sewing patterns (PDF) available for download

Please review Our Sizing Charts

Size S   Size M   Size L   Size XL   Fabrics Selection »  Sewing Supplies »


Home / Women / Others / #5440 Denim corset

example - #5440 Denim corset preview - #5440 Denim corset

Difficulty: **

You will need: denim, a cord, fusing.

Attention! Fabric consumption varies depending on the size of garment. First of all, print out paper patterns and lay them out at the width of fabric/ knit you plan to use, to see how much fabric you will need.

When sewing the garment, pay attention to notches- they must coincide.

Cutting :

Fabric:

1. Center front part - 2 details
2. Placket - 2 details
3. Side front part - 2 details
4. Center back part - 2 details
5. Side back part - 2 details

Fusing: placket.

Instructions:

1. Apply the fusing to wrong side of placket.

2. Sew front and back princess seams. Press allowances towards the center front or center back. Topstitch princess seams at 0.5 cm (3/16").

3. Sew back middle seam, and serge it. Press back middle seam towards right back part. Make decorative seam at 0.5 cm (3/16") from joining seams.

4. Sew shoulder and side seams, then serge them. Press side/shoulder seams backwards. Topstitching at 0.5 (3/16”) cm from joining seams.

5. Serge front/back neckline edge, front part edge and garment hem edge. Topstitch ready edges on the garment at 0.5 cm from edge.

6. Press placket outer edge at 1 cm (3/8"). Fold the placket along the center, right side together, and press. Overstitch upper/lower corners of placket. Cut extra fabric at corners, and turn the placket right side out. Press the placket. Sew placket raw edge to middle edge of center front part.

7. Cut a stripe of fabric for button loops of 3 cm (1-1/8") width. Fold the stripe along the center and make a stitch at 0.5 cm from bend, overstitching one end. Turn the stripe right side out and press. Cut loops of 6 cm (2-3/8") length.

8. Tack loops to placket pressed edge. Topstitch the placket on center front part. Remove tacking. Turn loops towards center front part and topstitch them on the placket.


Free sewing patterns (PDF) available for download

Please review Our Sizing Charts

Size S   Size M   Size L   Size XL   Fabrics Selection »  Sewing Supplies »


Home / Women / Blouses / #5600 Blouse With Drapes

example - #5600 Blouse With Drapes preview - #5600 Blouse With Drapes

Difficulty: *

Recommended fabrics: lightweight fabrics of natural or artificial fibers.

You will need: shell fabric, lining, 1 button.

Attention! Fabric consumption varies depending on the size of garment. First of all, print out paper patterns and lay them out at the width of fabric/ knit you plan to use, to see how much fabric you will need.

When sewing the garment, pay attention to notches- they must coincide.

Cutting:

Shell Fabric:

1. Center Back– 2 pieces
2. Side Back – 2 pieces
3. Center Bottom Front – 2 pieces
4. Side Bottom Front – 2 pieces
5. Top Front – 2 pieces

Lining:

1. Center Back– 2 pieces
2. Side Back – 2 pieces
3. Center Bottom Front – 2 pieces
4. Side Bottom Front – 2 pieces
5. Top Front – 2 pieces

Instructions:

1. Sew Center Bottom Front to Side Bottom Front. Serge seam allowances and press them towards center front.

2. Sew Top Front to Center and Bottom Fronts. Clip allowances, serge and press upwards.

3. Sew princess seams of Back. Serge seam allowances; press them towards center back. Sew center back seam. Serge seam allowances; press them to one side.

4. Sew side seams. Serge the seams, press towards center back.

5. Sew pieces of lining similar to shell. Leave shoulder seams unsewn.

6. Line up shell and lining face-to-face, pin together at raw edges. Sew lining to shell at armholes, back neckline and top front. Clip allowances of neckline, armhole, mark a notch at Top Front as marked in pattern. Turn the garment to the face side, press.

7. Insert raw shoulder edges of Front between shoulder edges of Back. Turn under raw edges of Back, baste all the layers together, stitch shoulder seam.

8. Cut a stripe of shell fabric for loop 3 cm (1-3/16”) wide. Fold the loop lengthwise in half, stitch at 0,5 cm (3/16”) from the fold, as well at across one short end. Turn out and press the stripe. Cut a loop of needed length, baste it to the right Front.

9. Line up shell and lining face-to-face, pin and stitch all the way from horizontal seam of Top Front to the princess seam at Back. Clip allowances, turn the blouse out through the opening at Back (between two princess seams). Turn inside and press bottom allowances of Center Back. Edgestitch lining to shell at the opening at bottom of Center Back.

10. Make gathers at Top Front; you might want to use a decorative tape. Sew button for closure at waist, at the wrong side of left Front.


Free sewing patterns (PDF) available for download

Please review Our Sizing Charts

Size S   Size M   Size L   Size XL   Fabrics Selection »  Sewing Supplies »


Home / Women / Blouses / #5298 Gathered front blouse

example - #5298 Gathered front blouse preview - #5298 Gathered front blouse

Difficulty: *

Recommended fabrics: soft cotton or combined fabric.

You will need: fusible interfacing.

Attention! Fabric consumption varies depending on the size of garment. First of all, print out paper patterns and lay them out at the width of fabric/ knit you plan to use, to see how much fabric you will need.

When sewing the garment, pay attention to notches- they must coincide.

Cutting:

Fabric:

1. Front part - 2 details
2. Back part - 1 detail
3. Front facing - 2 details
4. Sleeve - 2 details
5. Cuff - 2 details
6. Collar – 2 details
7. Stand-up collar – 2 details

Fusible interfacing: front facing, outer collar, cuff, stand-up collar.

Instructions:

1. Strengthen the front facing, outer collar, cuffs and outer stand-up collar with fusible interfacing.

2. Sew waist darts into back part.

3. Oversew inner edge of the front facing. Overstitch the front part with front facings up to the notch, then turn faint bands into wrong side and press.

4. Make gathering along the front part center seam and sew.

5. Sew shoulder seams.

6. Sew side seams.

7. Overstitch inner collar with outer one. Turn the collar right side out.

8. Sew stand-ups, with collar between them.

9. Sew inner stand-up (with the collar) to the neckline, fold the outer stand-up open edge under and topstitch along the inner stand-up joining seam. Make decorative topstitch along the collar. Topstitch the edge. Sew front facings on shoulder seams with stitch of 1 cm (3/8") width.

10. Sew sleeve seams.

11. Sew sleeves into arm hole, fitting along caps.

12. Fold cuffs right sides together. Sew short ends into ring. Make a notch into allowance (near split), with slit in the seam center. Fold cuffs right sides together, stitch edges.

13. Sew cuffs to the sleeve hem and oversew cuff upper edge with the sleeve.

14. Topstitch the cuff-on-sleeve joining seam and make decorative seam along cuff bottom and slit sides.

15. Press the hem into wrong side and topstitch.


Free sewing patterns (PDF) available for download

Please review Our Sizing Charts

Size S   Size M   Size L   Fabrics Selection »  Sewing Supplies »

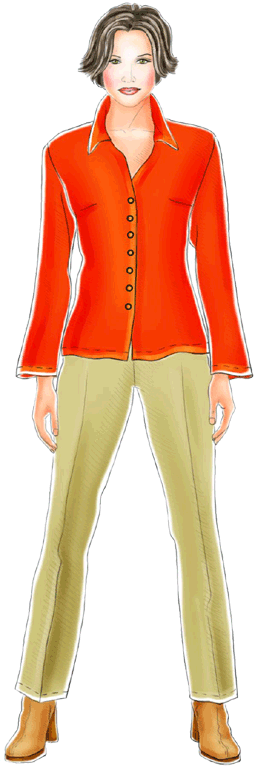
Home / Women / Blouses / #5167 Orange blouse

example - #5167 Orange blouse preview - #5167 Orange blouse

Difficulty: **

Recommendations: lightweight linen, cotton, silk or rayon fabrics and knits.

You will need: Lightweight linen fabric; fusible interfacing; 7 buttons.

Attention! Fabric consumption varies depending on the size of garment. First of all, print out paper patterns and lay them out at the width of fabric/ knit you plan to use, to see how much fabric you will need.

When sewing the garment, pay attention to notches- they must coincide.

Cutting:

Main Fabric:

1. Front one-piece-cut with Lower Collar – 2 pieces
2. Back -2 pieces
3. Front Facing, one-piece cut with Upper Collar – 2 piece
4. Front Sleeve – 2 pieces
5. Back Sleeve – 2 pieces

Fusible Interfacing: Front Facing one-piece cut with Upper Collar.

Instructions:

1. Reinforce with fusible interfacing the following pieces: Front Facing one-piece cut with Upper Collar.

2. Sew darts of Front and Back, sew center back seam.

3. Sew shoulder seams, clip allowances in the corners of collar.

4. Place Fronts face-to-face, stitch at raw edge of collar.

5. Sew Collar into neckline between corners.

6. Sew center back seam of Collar/Front Facings. Serge inside edge of each Front Facing up to the shoulder seam. Place Front Facings onto Front face-to-face, stitch together at center front.

7. Cut seam allowance in the corner of each Front Facing. Turn out the collar, turn Front Facings to the wrong side. Baste and press the edges. Turn under raw edge of Upper Collar and topstitch right into the seam of attaching the Lower Collar. Hand-sew Front Facings to Fronts at shoulder seams.

8. Sew side seams.

9. Sew Front and Back Sleeve pieces together (both front and elbow seam of each sleeve).

10. Sew sleeves into armholes, slightly gathering at sleeve head.

11. Turn under hem allowances of sleeves and blouse, topstitch.

12. Make buttonholes into the right front; sew buttons at the left front.


Free sewing patterns (PDF) available for download

Please review Our Sizing Charts

Size S   Size M   Size L   Size XL   Fabrics Selection »  Sewing Supplies »

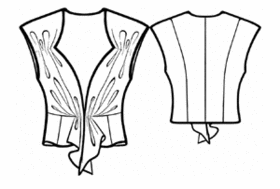
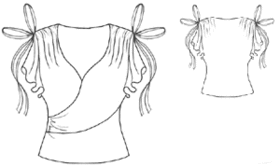
Home / Women / Tops / #5301 Draped top

example - #5301 Draped top preview - #5301 Draped top

Difficulty: *

Recommended fabrics: mixed knitted fabric.

Attention! Fabric consumption varies depending on the size of garment. First of all, print out paper patterns and lay them out at the width of fabric/ knit you plan to use, to see how much fabric you will need.

When sewing the garment, pay attention to notches- they must coincide.

Cutting:

Fabric:

1. Left front part - 1 detail
2. Right front part – 1 detail
3. Left drape – 1 detail
4. Right drape – 1 detail
5. Back part - 1 detail

Our advice: To make the fabric along stitched seams stretch, sew details with narrow zigzag or with special stretchable stitches. To make the hem stretch, oversew hem allowance with special oversew stitches (overlock), and then sew it using double needle. This is also attachable to other edges that should stay elastic.
These recommendations are not for industry.

Instructions:

1. Oversew outer edges of drapes, then fold under and topstitch.

2. Gather fabric on shoulder edges of drapes.

3. Overstitch left front part neckline with drape.

4. Overstitch right front part with drape coinciding left front part with notches.

5. Oversew front/back parts arm hole allowances, then fold under and topstitch.

6. Oversew back neckline allowance, then fold under and topstitch.

7. Sew shoulder seams.

8. Oversew drape shoulder allowances, then fold under and topstitch.

9. Make pleats into drape side edge. Sew side seams.

10. Oversew garment hem, then fold under and topstitch.

11. Tuck tie ends. Fold ties along the center and stitch on 0.7 cm (1/4") from the fold center. Turn tie into right side, then press. Sew ends. Sew ties to shoulder seams.


Free sewing patterns (PDF) available for download

Please review Our Sizing Charts

Size S   Size M   Size L   Size XL   Fabrics Selection »  Sewing Supplies »

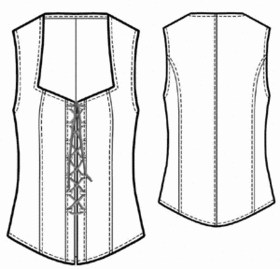
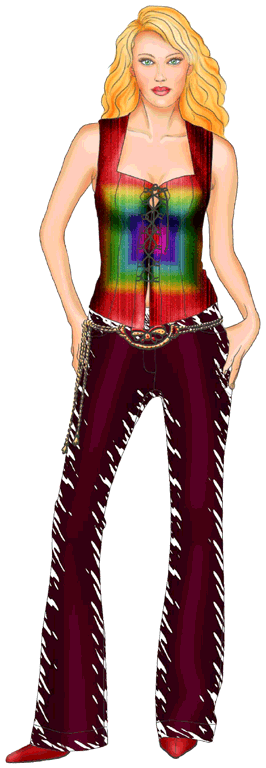
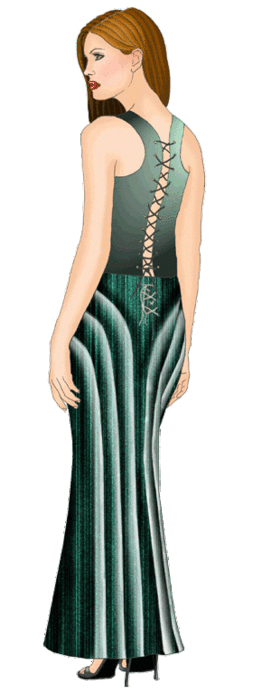
Home / Women / Others / #5359 Corset

example - #5359 Corset preview - #5359 Corset

Difficulty: **

You will need: denim, fusing, cotton lining, 6 buttons, a cord and 22 eyelets.

Attention! Fabric consumption varies depending on the size of garment. First of all, print out paper patterns and lay them out at the width of fabric/ knit you plan to use, to see how much fabric you will need.

When sewing the garment, pay attention to notches- they must coincide.

Cutting :

Fabric:

1. Center back part - 2 details
2. Side front part - 2 details
3. Center front part - 4 details
4. Side front part - 2 details

Lining:

1. Center back part - 2 details
2. Side back part - 2 details
3. Side front part - 2 details

Fusing: center front part.

Instructions:

1. Apply the fusing to wrong side of center front part.

2. Sew front and back princess seams and press them apart.

3. Sew side seams and press them apart.

4. Sew shoulder seams and press them apart.

5. Lay reinforced front central part on center front part, right sides together. Overstitch front facings and front neckline with front central part, stopping 5 cm (2") before shoulder edges.

6. Sew lining details. Press the lining.

7. Apply the lining to the garment right sides together, then sew to inner edges of front central part. Sew shoulder edges of lining and center front part shoulder edges. Overstitch back neckline and raw part of front neckline. Leave slits of 10 cm (4") length into lower part of armholes, and overstitch armhole upper parts. Cut seam allowances close to stitch. Pull front parts into right side through shoulder slits and turn the garment right side out through one of open side seams. Serge lower parts of armholes.

8. Press the hem to wrong side and sew by hand. Sew center front part to hem.

9. Make buttonholes into right front part, sew buttons on left one.

10. Male eyelets into center back part and pull the cord.


Free sewing patterns (PDF) available for download

Please review Our Sizing Charts

Size S   Size M   Size L   Size XL   Fabrics Selection »  Sewing Supplies »

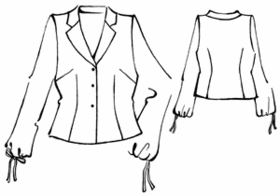
Home / Women / Blouses / #5305 Blouse with drawstring cuffs

example - #5305 Blouse with drawstring cuffs preview - #5305 Blouse with drawstring cuffs

Difficulty: **

Matrial: soft silk and viscose.

You will need: fusible interfacing; 3 buttons.

Attention! Fabric consumption varies depending on the size of garment. First of all, print out paper patterns and lay them out at the width of fabric/ knit you plan to use, to see how much fabric you will need.

When sewing the garment, pay attention to notches- they must coincide.

Cutting:

Fabric:

1. Front part - 2 details
2. Back part - 1 detail
3. Front facing - 2 details
4. Sleeve - 2 details
5. Collar - 2 details
6. Lapels – 2 details

Cut 2 fabric ties of 3 cm (1-3/16") width.

?usible interfacing: front facing, outer collar, lapel.

Instructions:

1. Strengthen the front facing, outer collar and the lapel with fusible interfacing.

2. Sew bust darts into front part and waist vertical ones into front/back parts.

3. Sew shoulder seams.

4. Sew side seams.

5. Sew inner lapel to inner collar.

6. Sew upper lapel to outer collar.

7. Overstitch inner collar and lapel with outer collar and lapel, then turn into right side and press.

8. Tack inner edge of front facings.

9. Overstitch right front part with front facing, inserting the lapel and collar. Make a notch into outer collar and bend it. Sew inner collar to back neckline, make one more notch into outer collar and overstitch left front part with front facing.

10. Turn front facings into wrong side. Oversew and press edges. Fold the outer collar open edge under and topstitch along the inner collar joining seam. Sew front facing into shoulder seams with 1 cm (3/8") width stitch.

11. Sew sleeve seams.

12. Press sleeve hem into wrong side and topstitch along drawstring marking.

13. Tuck tie ends. Fold ties along the center and stitch on 0.7 cm (1/4") from the fold center. Turn tie into right side, then press. Sew ends. Pull ties into drawstring loop.

14. Sew sleeves into armholes, fitting along caps.

15. Oversew garment hem, then fold under and topstitch along the edge.

16. Work button holes into right part. Sew buttons to left one.


Free sewing patterns (PDF) available for download

Please review Our Sizing Charts

Size S   Size M   Size L   Size XL   Fabrics Selection »  Sewing Supplies »

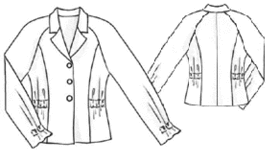
Home / Women / Blouses / #5154 Blouse with a Raglan Sleeve

example - #5154 Blouse with a Raglan Sleeve preview - #5154 Blouse with a Raglan Sleeve

Difficulty: **

You will need: Silk or other fabric for a blouse; fusible interfacing; 3 buttons; elastic 1/4” wide and about 50 cm (20”) long.

Attention! Fabric consumption varies depending on the size of garment. First of all, print out paper patterns and lay them out at the width of fabric/ knit you plan to use, to see how much fabric you will need.

When sewing the garment, pay attention to notches- they must coincide.

Cutting:

Silk:

1. Center Front- 2 pieces
2. Side Front - 2 pieces
3. Center Back - 2 pieces
4. Side Back - 2 pieces
5. Front Sleeve - 2 pieces
6. Back Sleeve – 2 pieces
7. Front Facing – 2 pieces
8. Collar – 2 pieces with folds
9. Facing for Elastic – 1 piece
10. Facing for Elastic at Sleeves - 2 pieces
11. Back Neck Facing – 1 piece with Fold

Fusible Interfacing: using hot iron, fuse interfacing to Front Facing, upper Collar piece, Back Neck Facing.

Instructions:

1. Cut elastic into 4 pieces: 2 pieces 10 cm (4") each – for sleeves and 2 pieces 15 cm (5-7/8") each for blouse sides.

2.Stitch center back seam and vertical seams of Back.

3. Stitch vertical seams of Fronts.

4. Sew Front Sleeves to Fronts, Back Sleeves to Back. Press seams.

5. Take each Facing for Elastic at Sleeve, fold under allowances and press. Place Fronts onto Back, face-to-face, and sew upper sleeve seam. At the wrong side of Sleeve, place Facing for Elastic, baste and topstitch along the long sides. Insert elastic into the tunnel, stitch to close the tunnel at one short side, picking up the elastic. Pull another end of elastic to get the right length and stitch the tunnel the same way.

6. Sew lower sleeve seams and side seam in one go. Press.

7. Prepare Facings for Elastic for blouse sides as you did in pt.5. Sew Facings to sides of blouse according to markings. Insert elastics and stitch tunnels at both sides as you did in pt.5.

8. Assemble the collar: place Collar pieces face-to-face, stitch along the outer edge, clip seam allowances, turn out and press. Take both raw edges of Collar together and baste the Collar into blouse neckline. Sew Back Neck Facing to Front Facings. Place Back Neck Facing/ Front Facings to blouse face-to-face, stitch along center front, lapels and neckline, attaching the collar at the same time.

9. Turn Front Facings/Back Neck Facing to the inside, baste along the seam and press. Hand-sew the Back Neck Facing to allowances of shoulder seams.

10. Serge bottom hem and sleeve hems. Turn under hem allowances and hand-sew to blouse bottom/ sleeve bottoms.

11. Make buttonholes into right Front, sew buttons to the left Front.


Free sewing patterns (PDF) available for download

Please review Our Sizing Charts

Size S   Size M   Size L   Size XL   Fabrics Selection »  Sewing Supplies »

Home / Women / Blouses / #5125 Blouse

example - #5125 Blouse

Difficulty: **

You will need: crepe, elastic braid, 5 buttons.

Attention! Fabric consumption varies depending on the size of garment. First of all, print out paper patterns and lay them out at the width of fabric/ knit you plan to use, to see how much fabric you will need.

When sewing the garment, pay attention to notches- they must coincide.

Cutting :

Fabric:

1. Center back part - 1 detail
2. Side back part - 2 details
3. Center front part - 2 details
4. Side front part - 2 details
5. Edge placket - 2 details
6. Neckline edging - 1 detail
7. Armhole edging - 2 pieces (3 cm (1-3/16") wide and about 50 cm (20") long -refer to your pattern for armhole length)
8. Tie - 2 details (2.5 cm (1") wide and 25 cm (10") long)

Instructions:

1. Sew front princess seam and back princess seam. Press seam allowances towards the center.

2. Sew shoulder seams, press allowances apart.

3. Overstitch armholes with edging. Sew edging ends together. Turn the edging to garment wrong side. Turn edging allowance in and topstitch along edge.

4. Overstitch neckline edge with edging, right sides together. Turn edging to garment wrong side. Turn edging allowance in and topstitch along edge. Cut elastic brain into two pieces and pull into neckline coulisse. Fix braid ends. Stitch ties neatly, to 0.5 cm (3/16"), and turn right side out.

5. Process placket upper corner, folding it along center wrong side out and overstitching along upper edge. Turn the placket right side out, press long edge allowances into. Insert tie end and front facing into placket and tack. Topstitch the placket at 0.2 cm (1/16"). Sew blouse side seams, press seam allowance apart.

6. Fold hem allowance under and topstitch at 0.7 cm (1/4").

7. Make 5 buttonholes into right placket and sew buttons on left one.


Free sewing patterns (PDF) available for download

Please review Our Sizing Charts

Size S   Size M   Size L   Size XL   Fabrics Selection »  Sewing Supplies »


Рубрики:  Шитье

платье-сарафан

Среда, 12 Марта 2014 г. 22:46 + в цитатник
Это цитата сообщения adelaidaivi [Прочитать целиком + В свой цитатник или сообщество!]

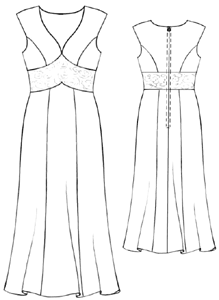
платье-сарафан


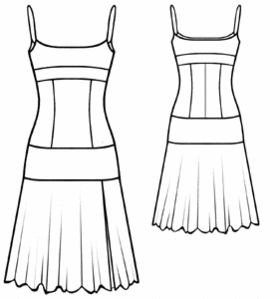
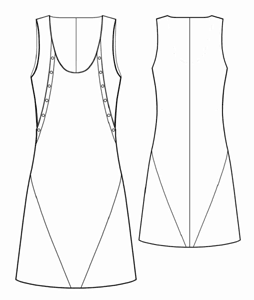
Home / Women / Dresses / #5595 Sleeveless Dress

example - #5595 Sleeveless Dress preview - #5595 Sleeveless Dress

Difficulty: **

Recommended fabrics: chiffon silk, lightweight transparent fabrics.

You will need: shell fabric; lining; invisible zipper.

Attention! Fabric consumption varies depending on the size of garment. First of all, print out paper patterns and lay them out at the width of fabric/ knit you plan to use, to see how much fabric you will need.

When sewing the garment, pay attention to notches- they must coincide.

Cutting:

Shell Fabric:

1. Top Back – 1 piece
2. Center Back – 2 pieces
3. Side Back – 2 pieces
4. Top Back Insert – 1 piece
5. Bottom Back Insert – 1 piece
6. Top Front – 1 piece
7. Center Front – 1 piece
8. Side Front – 2 pieces
9. Top Front Insert – 1 piece
10. Bottom Front Insert – 1 piece
11. Front Skirt Panel – 1 piece
12. Back Skirt Panel – 1 piece
13. Side Skirt Panel – 1 piece

Lining:

1. Top Back – 1 piece
2. Center Back – 2 pieces
3. Side Back – 2 pieces
4. Top Back Insert – 1 piece
5. Bottom Back Insert – 1 piece
6. Top Front – 1 piece
7. Center Front – 1 piece
8. Side Front – 2 pieces
9. Top Front Insert – 1 piece
10. Bottom Front Insert – 1 piece
11. Front Skirt Panel – 1 piece
12. Back Skirt Panel – 1 piece
13. Side Skirt Panel – 1 piece

Instructions:

Advice: horizontal seams can be trimmed with ruches.

Measure length of all horizontal seams, cut a stripe 5 cm (2”) wide and 2-3 times the length of all measured seams. Turn under twice and topstitch raw edges of the stripe at two short and one long sides. Machine-baste at raw edge of stripe, pull threads to make gathers. Measure your ruche to make sure its length corresponds (about 2” longer) length of measured seams. When sewing a horizontal seam, insert ruche into the seam, between the layers of shell, taking all raw edges together.

1. Sew Center Front and Side Fronts. Sew Center Backs and Side Backs. Serge seam allowances, press towards center. Sew right side seam. Serge the seam, press towards Back.

2. Sew together Top Front and Top Back at right side seam. Sew Top Front Insert and Top Back Insert at right side seam. Sew Bottom Front Insert and Bottom Back Insert at right side seam. Serge seam allowances, press towards Back.

3. Sew horizontal seams of assembled Front/Back units, inserting a ruche into each seam. Serge allowances, press upwards.

4. Sew left side seam from the bottom up to the top edge of Bottom Inserts, leaving an opening for zipper. Serge allowances, press them open. Press allowances at zipper opening as well. Baste and sew invisible zipper into the side seam opening.

5. Sew side seams of Skirt. Serge seam allowances, press towards Back. Turn under twice the vertical raw edges at front of skirt, topstitch. Baste and stitch the skirt to the top of dress, inserting a ruche.

6. Assemble lining pieces in a similar manner, leaving an opening for zipper in the left side seam.

7. Cut a stripe for Shoulder Strap. Fold the stripe lengthwise in half, face side inside, and stitch at 0,5 cm (3/16”) from the fold. Turn out Shoulder Strap, press. Cut the Strap in half. Sew each Shoulder Strap to the neckline of Front.

8. Put on the dress, adjust length of straps, sew ends to the Back neckline.

9. Line up Center Back piece with lining of Center Back face-to-face, pin or baste. Turn under lining around zipper closure, 0.5 cm off the zipper, pin to the neckline edge of dress. Sew top of dress to lining at top edge. Understitch the seam. Turn the lining to the wrong side, hand-sew to the zipper tape.

10. Finish bottom hem of dress, turning under and topstitching hem allowance. Trim lining at bottom if necessary and finish the lining hem similar to shell, but so that the lining is 2 cm (3/4”) shorter than dress.


Free sewing patterns (PDF) available for download

Please review Our Sizing Charts

Size S   Size M   Size L   Size XL   Fabrics Selection »  Sewing Supplies »


Рубрики:  Шитье

Сумка вкладыш – тинтамар

Среда, 12 Марта 2014 г. 22:46 + в цитатник
Это цитата сообщения adelaidaivi [Прочитать целиком + В свой цитатник или сообщество!]

Сумка вкладыш – тинтамар

Главная » Сумки » Сумка вкладыш – тинтамар


Сумка вкладыш тинтамари

В одном из сообществ рукодельниц, одна участница выложила статью про сумки вкладыши тинтамар, признаться я не знала что существует такая замечательная вещь. Я люблю большие сумки, а в больших сумках, даже при наличии специальных карманов я теряю всё что можно потерять. И такая вещь для меня спасение. Теперь телефон, ключи, ручки, дисконтные карты будут иметь своё почётное место и под рукой в нужный момент. И меняя сумки достаточно вынуть тинтамар и переложить в другую сумку.

Сумка вкладыш тинтамари

Высота сумки 17, 5 см, дно и боковые части 11 см, отсюда веду расчёт для кроя. Для сумки я взяла тафту 62 см на 27 см,  делала из остатков и потому основная часть сумки получилась из двух кусков со швом посередине. Для карманов кусок 64 см на 32 см. Отрез для кармана сложить вдоль заутюжить. Я поспешила и вырезала подкладку, в дальнейшем сумка получилась очень мягкой и заваливалась, вывод: ткань для сумки должна быть более жёсткой, либо  основную ткань укрепить уплотнителем, либо как сделала я сделала подкладку сумки из стёганной ткани с синтепоном. Подкладка для сумки 62 см на 23 см.

Сумка вкладыш тинтамари

Приложить карман соединяя центры. И двигаясь от центра влево и вправо отложить по 5.5 см. И от боковых срезов  отложите по 6.5 см (здесь учтён припуск на шов) проведите мелом вертикальные линии. Совместите боковые срезы основной части и кармана. Карман кроили с напуском для удобства в дальнейшем использовании. Дайте строчки по намеченным линиям, особо обратите внимание изготовлению закрепок.

Сумка вкладыш тинтамари

Теперь делите большой карман на нужное вам по размеру секции. Я поделила один большой карман пополам, второй на 3 равномерные части, один центральный разделила на три секции для ручек, отмелить вертикальные линии и дать строчки. Теперь соединить боковые швы сумки и дать строчку. Шов разложить на две стороны и разутюжить. Дать строчку по линии низа.

Сумка вкладыш тинтамари

Собрать подкладку. Соединить боковые швы и застрочить дно.

Сумка вкладыш тинтамари

Сложить углы по диагонали, отмелить линию 11 см на основной части и 10,5 на подкладке, застрочить формируя объёмное дно. “Ушки срезать”.

Сумка вкладыш тинтамари

От линии верха основной части вниз отложить ширину припуска 4 см, провести меловую линию. В боковом шве сделать дырочку ля шнурка. От верхнего среза отложить 1,5 см, и саму дырку 1,5 см. С двух сторон сделайте закрепки, что бы при дальнейшем использовании не расходился шов.

Сумка вкладыш тинтамари

Вложите подкладку, согните по меловой линии основную часть.

Сумка вкладыш тинтамари

Выступающую часть подкладки срежьте если она есть конечно.

Сумка вкладыш тинтамари

По линии припуска внутрь загните основную часть, заправляя под припуск подклад, подогните ещё раз на 1 см, приколите булавками, дайте строчку в край на 1 мм. Отпарьте.  В ранее сделанную дырку вставьте шнурок или резинку.  На конце шнурка установите “концевики” или ограничители.

Сумка вкладыш тинтамари

Сумка вкладыш тинтамари  - спасение девушки перед нами.

Сумка вкладыш тинтамари

Чувствую, уже любимая вещь.

Сумка вкладыш тинтамари

Порядка в ваших сумках, милые рукодельницы!

Рубрики:  Шитье

Украшаем

Среда, 12 Марта 2014 г. 22:45 + в цитатник
Это цитата сообщения adelaidaivi [Прочитать целиком + В свой цитатник или сообщество!]

Украшаем

Flower hair tie - Hand-MadeФутболка-волосы 
<a href=/pinterest.com" target="_blank">http://pinterest.com - Увлечения" id="sysPinImg_526fc109dd62fc880e3dcaf3" src="http://cdn-nus-4.pinme.ru/pin-upload-static/photos/b8cfa86f69b574e26202d827edb99c34_m1.jpg" style="height: 2051px" />ribbon rose pictorial how-to - канзаши

Рубрики:  Шитье

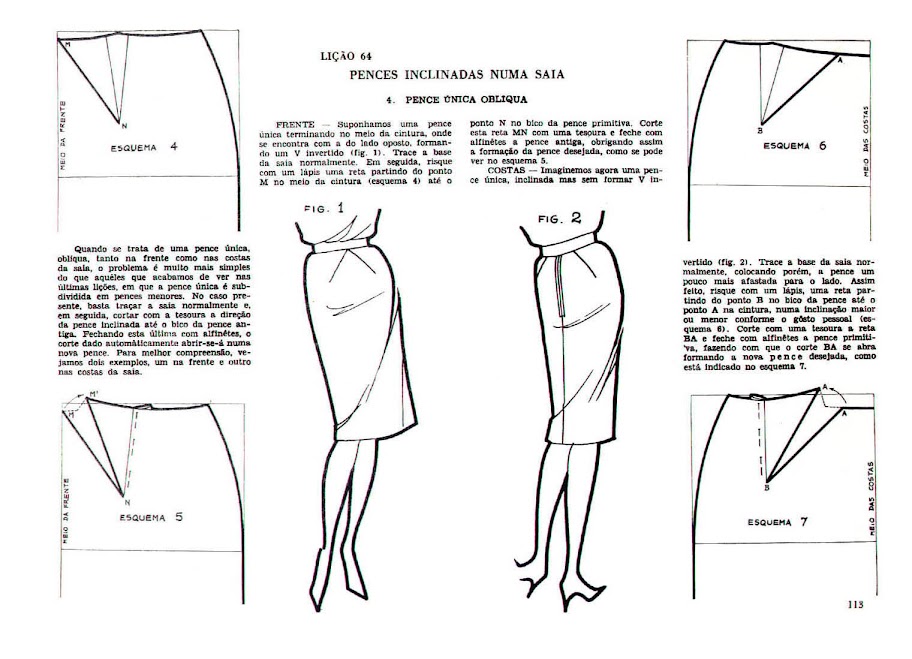
моделирование aprenda a coser gil brandao

Среда, 12 Марта 2014 г. 22:44 + в цитатник
Это цитата сообщения adelaidaivi [Прочитать целиком + В свой цитатник или сообщество!]

моделирование aprenda a coser gil brandao


Рубрики:  Шитье

Выкройка легинсов

Среда, 12 Марта 2014 г. 22:43 + в цитатник
Это цитата сообщения adelaidaivi [Прочитать целиком + В свой цитатник или сообщество!]

Выкройка легинсов (построение

vikrojka-leginsovДля построения выкройки легинсов нужно правильно снять мерки. Не забудьте, что эти мерки нужно редуцировать, т.е. уменьшить для того, чтобы легинсы обтягивали фигуру, т.к. шьём мы их из трикотажа.

Приступим к построению выкройки легинсов.

1. Построить перпендикуляр с вершиной в точке Т.

vikrojka-leginsov1

2. Определяем высоту сидения. Для этого от точки Т откладываем вниз ТШ=Вс. Через точку Ш  проводим горизонтальную линию. 

vikrojka-leginsov2

3. Определяем линию низа. Для этого от точки Т откладываем вниз ТН=Дпб. Через точку Н проводим горизонтальную линию. 

vikrojka-leginsov3

4. Определяем линию щиколотки. Для этого от точки Н откладываем вверх НЩ=6-8 см. (от пола!). Через точку Щ проводим горизонтальную линию. 

vikrojka-leginsov4

5. Определяем линию колена. Для этого от точки Т откладываем вниз ТК=Ддк. Через точку К проводим горизонтальную линию. 

vikrojka-leginsov5

6. Определяем линию бёдер. Для этого от точки Ш откладываем вверх ШБ=(0,1*Сб)+3. Через точку Б проводим горизонтальную линию.

vikrojka-leginsov6

7. Определяем линию икры. Для этого от точки Т откладываем вниз ТИ=Дди. Через точку И проводим горизонтальную линию. 

vikrojka-leginsov7

8. Определяем ширину по линии шага. Для этого от точки Ш откладываем влево и вправо ШШ1=ШШ2=0,5*Сб.

Из точки Ш1 проводим перпендикуляр вверх до линии талии и ставим точку Т1, а на пересечении с линией бёдер ставим точку Б1.

Из точки Ш2 проводим перпендикуляр вверх до линии талии и ставим точку Т2, а на пересечении с линией бёдер ставим точку Б2.

vikrojka-leginsov8 

9. Определяем расширение по линии колена. Для этого от точки Ш1 откладываем влево Ш1Ш3=0,2*Сб.

Далее от точки Ш2 откладываем вправо Ш2Ш4=(0,1*Сб)+( от 0,7 см. до 1 см.)

Примечание: если ткань сильно растяжимая, то Ш2Ш4=0,1*Сб. 

vikrojka-leginsov9

10. Определяем ширину по линии щиколотки. Для этого от точки Щ откладываем влево и вправо мерку Сщ. Т.е. Щ1Щ=ЩЩ2=Сщ 

vikrojka-leginsov10

11. Определяем ширину по линии икры. Для этого от точки И откладываем влево и вправо мерку Си. Т.е. И1И=ИИ2=Си. 

vikrojka-leginsov11

12. Соединяем точки Ш3, И1, Щ1 слева и Ш4, И2, Щ2 справа. 

vikrojka-leginsov12

Плавно оформить шаговые срезы с прогибом по линии колена на 2 см. внутрь. 

vikrojka-leginsov13

13. Определяем ширину по линии талии. Для этого от точки Т1 откладываем вправо Т1Т3=3 см. Соединяем точки Б1 и Т3 и на продолжении отрезка Б1Т3 откладываем от точки Т3 вверх 4-5 см.

Далее оформляем задний срез сидения, плавно соединив точки Б1 и Ш3.

vikrojka-leginsov14

От точки Т2 отложить влево 1 см. и полученную точку соединить с точкой Б2.

Далее оформляем задний срез сидения, плавно соединив точки Б2 и Ш4. 

vikrojka-leginsov15

14. Плавно оформить линию талии.

vikrojka-leginsov16

Мерки для трикотажных легинсов


ЛегинсыМерки для трикотажных легинсов снимаются по белью. Для того чтобы легинсы обтягивали фигуру, мерки редуцируют, т.е. уменьшают.


Редуцирование мерок:

Название мерки

Обозначение

Редуцирование (уменьшение), %

1

Полуобхват талии

Ст

15%

2

Полуобхват бёдер

Сб

15%

3

Полуобхват икры

Си

15%

4

Полуобхват щиколотки

Сщ

15%

5

Длина легинсов

Дпб

5%

6

Длина до колена

Ддк

5%

7

Длина до икры

Дди

5%

8

Высота сидения

Вс

5%

 Например, вы сняли с себя мерки, и у вас получился следующий список. От каждой мерки отнимите соответствующий процент (как показано в таблице выше). И у вас получится список редуцированных мерок, который нужно будет использовать для построения выкройки.

Ст = 31-15% = 26,4

Сб = 45-15% = 38,3

Си = 16,8-15% = 14,3

Сщ =10,5-15% = 8,9

Дпб = 98-5% = 93,1

Ддк = 54-5% = 51,3

Дди = 67-5% = 63,7

Вс = 27-5% = 25, 7

Как правильно снять мерки для трикотажных легинсов смотрите в таблице ниже. 

Название мерки

Обозначение

Техника снятия

1

Полуобхват талии

Ст

Сантиметровая лента проходит горизонтально по линии талии

2

Полуобхват бёдер

Сб

Сантиметровая лента проходит горизонтально через центр ягодиц и смыкается спереди с учётом выпуклости живота

3

Полуобхват икры

Си

Сантиметровая лента проходит горизонтально по самому полному месту икры

4

Полуобхват щиколотки

Сщ

Сантиметровая лента проходит горизонтально по щиколотке

5

Длина легинсов

Дпб

Сантиметровая лента проходит по правому боку от линии талии до пола (без обуви)

6

Длина до колена

Ддк

Сантиметровая лента проходит по правому боку от линии талии до середины коленной чашечки

7

Длина до икры

Дди

Сантиметровая лента проходит по правому боку от линии талии до икры

8

Высота сидения

Вс

Снимается только для женщин! Чтобы снять эту мерку необходимо сесть прямо на твёрдую поверхность и измерить сантиметровой лентой по правому боку от линии талии до плоскости сидения

 Важно!!! Мерки Ст, Сб, Си, Сщ записываются в половинном размере. Например, вы измерили обхват талии,который равняется 62 см. Вы записываете Ст=62/2=31 см. Если  обхват бёдер равен 90 см., тогда Сб=90/2=45 см. и т.д.

Остальные мерки Дпб, Ддк, Дди, Вс записываются целиком. Т.е. измерили длину легинсов, как сказано в таблице, получилось у вас 98 см., то вы и записываете Дпб=98 см.

Мерки для трикотажных легинсов        Мерки для трикотажных легинсов - высота сидения

Рубрики:  Шитье

Пирожки "Бомбочки"

Среда, 12 Марта 2014 г. 22:42 + в цитатник
Это цитата сообщения adelaidaivi [Прочитать целиком + В свой цитатник или сообщество!]

Пирожки "Бомбочки"

__________________________________________________________________________________________________________________________


Ингредиенты:


Тесто:

Мука — 3-3,5 ст.
Вода (кипяток) — 1 ст.
Раст. масло — 4 ст.л.
Сахар — 1 ч.л.

Соль — 1 ч.л


Начинка:

Помидоры — 5 шт.
Брынза (или творог) — 200 гр
Чеснок — 2 зуб.
Зелень
Соль


Приготовление:

Помидоры порезать кружочками. Брынзу размять вилочкой, если творог то посолить, выдавить через чеснокодавилку чеснок, добавить порезанную зелень и перемешать.

В воде (кипятке) размешать сахар и соль, добавить растительное масло. Добавить муку. Вымесить мягкое тесто.

Дать тесту отдохнуть 30 мин.

Раскатать половину теста в большой тонкий пласт.

Разложить на тесто кружочки помидор не ближе чем 3 см друг от друга.

На помидор выложить начинку.

Раскатать второй пласт теста, накрыть им первый с начинкой.

Cтаканом подходящего диаметра вырезать пирожки по контурам каждого кружочка помидора, так поступаем со всеми пирожками.

Жарить пирожки в большом количестве раскалённого растительного масла с обоих сторон.

Выложить на бумажное полотенце для устранения излишек масла.

Рубрики:  Кухня

Картофель “Фри” из духовки

Среда, 12 Марта 2014 г. 22:42 + в цитатник
Это цитата сообщения adelaidaivi [Прочитать целиком + В свой цитатник или сообщество!]

Картофель “Фри” из духовки

__________________________________________________________________________________________________________________________


Ингредиенты:

5-7 шт картофеля среднего размера
2 яичных белка
паприка

соль по-вкусу


Приготовление:

Многие из нас любят картофель “Фри”, но все прекрасно знают, что он не полезен для здоровья. Этот рецепт будет палочкой-выручалочкой для многих любителей картошечки “Фри”, и тем более такую картошку можно смело давать детям.
Для приготовления картошку нужно помыть, почистить и порезать брусочками толщиной 1 см.
Яичные белки взбить с солью до мягких пиков.
Выложить белки в порезанный картофель и хорошо перемешать, чтобы каждый брусочек был в белке.
Противень застелить пекарской бумагой и выложить на него картофель. Сверху картофель посыпать паприкой.
Поставить противень в духовку, разогретую до 180 градусов, и выпекать до румяной корочки.
Картофель “Фри” нужно есть сразу в горячем виде.

Рубрики:  Кухня

Пошаговое построение выкройки юбки

Среда, 12 Марта 2014 г. 22:41 + в цитатник
Это цитата сообщения adelaidaivi [Прочитать целиком + В свой цитатник или сообщество!]

Пошаговое построение выкройки юбки

Пошаговое построение выкройки юбки

13.11.2013 | Автор: Анастасия Корфиати

Пошаговое построение выкройки – строим юбку за 10 шагов!

Пошаговое построение выкройки юбки

Как показывает статистика, большинство женщин не начинают шить из-за необходимости построения выкроек-основ. Это тот самый камень преткновения, о который разбиваются намерения и который вызывает сложность. Некоторые думают, что построение выкройки требует большого количества времени, другие – что это вообще непостижимое знание, понять которое дано только избранным. Мы намерены развеять все ваши сомнения и дать вам пошаговое построение выкроек основ: юбки, платья, пиджака, пальто и брюк. Следуя нашим инструкциям, шаг за шагом, вы без труда построите любую выкройку.

Начнем с самого простого – пошагового построения выкройки прямой юбки. По этой выкройке можно очень легко смоделировать узкую юбку-карандаш, юбку с воланами, юбку-годе и бесчисленное множество любых других вариантов юбок.

Нажмите на ссылку и подпишитесь на нашу рассылку.Будьте в курсе всех новинок.

С уважением, ваша ШКОЛА ШИТЬЯ Анастасии Корфиати

Пошаговое построение выкройки юбки

Для построения выкройки юбки необходимо снять мерки:

Длина юбки………………………72 см

Обхват талии………..72 см

Обхват бедер……… 100 см

Пошаговое построение выкройки юбкиПошаговое построение выкройки юбки

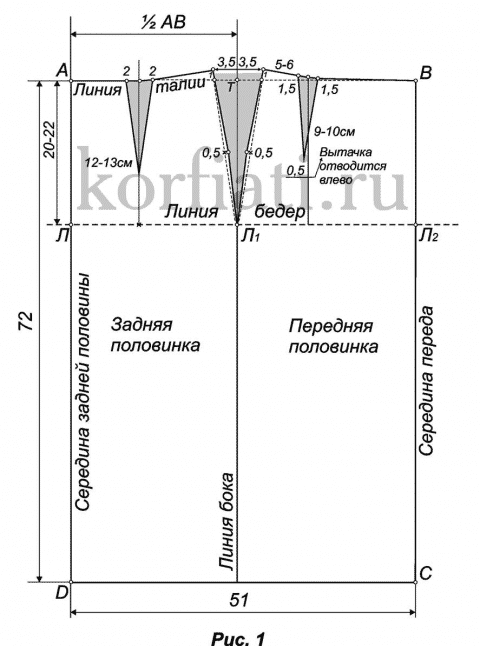
Пошаговое построение выкройки юбки шаг 1-2: 

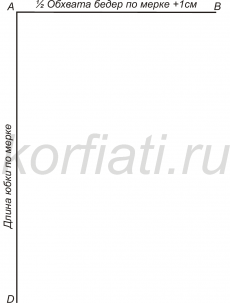
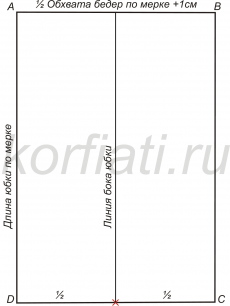
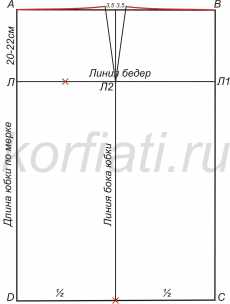
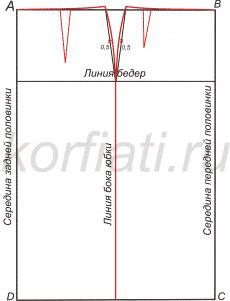
В левом верхнем углу на миллиметровой бумаге (отступив от верха 5см) поставьте точку А. Вниз по вертикальной линии отложите длину юбки по мерке – АD. Вправо – 1/2 обхвата бедер по мерке +1см=100/2+1=51см – точка В. Проведите отрезки DC и ВС.

Линия бока юбки. Отрезок DC разделите пополам, от точки деления поднимите вверх перпендикуляр до отрезка АВ.

Пошаговое построение выкройки юбкиПошаговое построение выкройки юбки

Пошаговое построение выкройки юбки шаг 3-4:

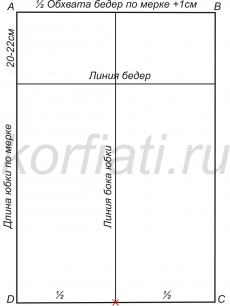
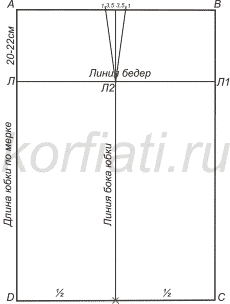
Линия бедер. От точки А отложите вниз 20-22см – АЛ = длине бедер по мерке. Из полученной точки проведите горизонтальную линию. Получили точки Л1 и Л2.

Расчет вытачек. Вытачки рассчитываем по формуле: (Обхват бедер минус обхват талии)/2 = (100- 72)/2=14см. Из этих 14 см половину убираем в боковые вытачки (14/2=7см) – по 3,5 см в каждую. От линии бока провести 2 прямых отрезка к точкам 3,5, удлинив на 1 см вверх каждый.

Пошаговое построение выкройки юбкиПошаговое построение выкройки юбки

Пошаговое построение выкройки юбки шаг 5-6: 

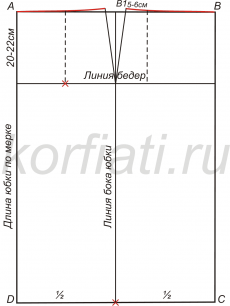
Соедините по лекалу точки 1 и точки А и В слегка выгнутой линией. ЛЛ2 разделите пополам и от точки деления поднимите перпендикуляр до отрезка АВ. От точки В1 отложите вправо по красной линии – 5-6см (для всех размеров), вниз опустите перпендикуляр до линии бедер.

Пошаговое построение выкройки юбкиПошаговое построение выкройки юбки

Пошаговое построение выкройки юбки шаг 7-8: 

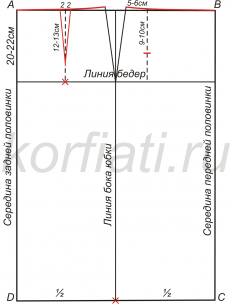
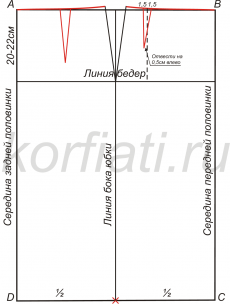
Окончательный расчет вытачек: оставшийся излишек ткани по талии (7см) распределить в вытачки задней и передней половинок юбки – чуть больше в заднюю половинку и чуть меньше в переднюю – соотвественно 4 и 3см.  Длина вытачки на задней половинке юбки – 12-13см. Длина вытачки на передней половинки юбки – 9-10см. Отведите вытачку влево на 0,5см (для красоты).

ВАЖНО! Между глубиной и длиной вытачки прямая зависимость – чем глубже вытачка, тем она длиннее.

Пошаговое построение выкройки юбкиПошаговое построение выкройки юбки

Пошаговое построение выкройки юбки шаг 9-10: 

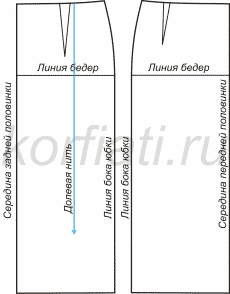
Линии бока разделите пополам и от точек деления отложите по 0,5см. По лекалу или от руки проведите линии боков юбки.

Выкройки передней и задней половинок юбки переснять на кальку отдельно и выкроить по долевой нити. Передняя половинка юбки кроится по сгибу ткани, задняя – со швом. По спинке юбки вшивается потайная молния, по линии талии – притачной пояс.

Смотрите также:

Выкройка юбки-колокол

Выкройка юбки солнце

Выкройка юбки с односторонними складками

Выкройки юбок для девочки

Как сшить юбку американку

Выкройка юбки-брюки

Выкройка длинной юбки на резинке

Выкройка юбки с оборками

Рубрики:  Шитье

Modern Sewing Patterns

Среда, 12 Марта 2014 г. 22:40 + в цитатник
Это цитата сообщения adelaidaivi [Прочитать целиком + В свой цитатник или сообщество!]

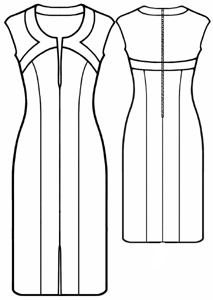
платья http://m-sewing.com/patterns-catalog/women


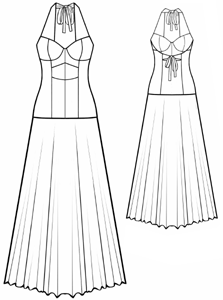
Home / Women / Dresses / #5594 Dress With Ties

example - #5594 Dress With Ties preview - #5594 Dress With Ties

Difficulty: **

Recommended fabrics: lightweight fabrics of natural or blended fibers.

You will need: shell fabric, lining (you can use shell fabric for lining pieces), invisible zipper tape, fusible interfacing.

Attention! Fabric consumption varies depending on the size of garment. First of all, print out paper patterns and lay them out at the width of fabric/ knit you plan to use, to see how much fabric you will need.

When sewing the garment, pay attention to notches- they must coincide.

Cutting:

Shell Fabric:

1. Center Back – 2 pieces
2. Side Back – 2 pieces
3. Back Tie – 4 pieces
4. Top Front Insert – 2 pieces
5. Middle Front Insert – 2 pieces
6. Bottom Front Insert – 2 pieces
7. Inside Cup – 2 pieces
8. Outside Cup – 2 pieces
9. Side Front – 2 pieces
10. Shoulder Strap – 4 pieces
11. Front Skirt – 1 piece
12. Back Skirt – 1 piece

Lining:

1. Center Back – 2 pieces
2. Side Back – 2 pieces
3. Top Front Insert – 2 pieces
4. Middle Front Insert – 2 pieces
5. Bottom Front Insert – 2 pieces
6. Inside Cup – 2 pieces
7. Outside Cup – 2 pieces
8. Side Front – 2 pieces

Instructions:

1. Reinforce all Cup parts with fusible interfacing.

2. Sew Outside and Inside Cup pieces together. Serge seam allowances, press towards center.

3. Sew Middle Front Insert to the Top and Bottom Front Inserts. Serge seam allowances, press towards Middle Insert.

4. Sew Front Inserts’ unit to the Side Front. Serge seam allowances; press towards center front.

5. Sew Side Back to Front. Serge seam allowances, press towards Back.

6. Sew Cup unit to the assembled top unit. Serge allowances, press towards Cup.

7. Sew center front seam. Serge seam allowances, press.

8. Assemble lining pieces in a similar manner.

9. Baste and sew invisible zipper into the center back seam.

10. Line up Center Back piece with lining of Center Back face-to-face, pin or baste. Turn under lining around zipper closure, 0.5 cm (3/16”) off the zipper, pin to the neckline edge of dress. Sew top of dress to lining at top edge. Understitch the seam. Turn the lining to the wrong side, hand-sew to the zipper tape.

11. Line up Back Tie pieces face-to-face and stitch together at three sides (two long, one short). Turn out the Ties, press.

12. Sew Back Ties and Center Back piece to the Side Back. Serge seam allowances, press towards side seam.

13. Line up Shoulder Strap pieces face-to-face, stitch around at three sides. Turn out and press Shoulder Strap. Sew Shoulder Strap to the Cup.

14. Turn Shoulder Straps, Back Ties and Center Back to the face side, pin to keep in place. Place lining over the top of shell, so that the tops and face-to-face. Stitch lining to shell at three sides: Center and Side Back, and along the top edge. Clip allowances; turn out lining to the wrong side, press the top edge.

15. Assemble pieces of skirt. Serge seam allowances, press towards Back.

16. Sew Top to Skirt. Serge seam allowance, press towards skirt.

17. Serge bottom edge of the dress, turn under hem allowance and topstitch at 0,5 cm (3/16”) from the bottom edge.


Free sewing patterns (PDF) available for download

Please review Our Sizing Charts

Size S   Size M   Fabrics Selection »  Sewing Supplies »

Home / Women / Dresses / #5523 Empire-style dress

example - #5523 Empire-style dress preview - #5523 Empire-style dress

Difficulty: **

You will need: natural or mixed fabric, invisible zipper, lining, elastic braid.

Attention! Fabric consumption varies depending on the size of garment. First of all, print out paper patterns and lay them out at the width of fabric/ knit you plan to use, to see how much fabric you will need.

When sewing the garment, pay attention to notches- they must coincide.

Cutting:

Fabric:

1. Center upper front part – 1 piece
2. Side upper front part – 2 pieces
3. Center lower front part – 2 pieces
4. Middle lower font part – 2 pieces
5. Side lower front part – 2 pieces
6. Gusset – 12 pieces
7. Side lower back part – 2 pieces
8. Center lower back part – 2 pieces
9. Side upper back part – 2 pieces
10. Center upper back part – 2 pieces
11. Middle lower back part – 2 pieces
12. Sleeve – 2 pieces

Lining:

1. Center back part – 2 pieces
2. Side back part – 2 pieces
3. Center upper front part – 1 piece
4. Center lower front part – 1 piece
5. Side front part – 2 pieces

Fusing: front/back armholes’ facing.

Instructions:

1. Apply the fusing to wrong side of front/back armholes’ facing.

2. Stitch bust darts and press them towards the center.

3. Stitch bust darts into upper front part lining. Press darts towards the center. Stitch front lining to back lining. Serge joining seams and press them backward. Serge lining hem, press it into wrong side and topstitch. Serge lining middle edge, stitch up to closure notch and press it apart.

4. Stitch the gusset to center lower front part, serge joining seam 4 cm (1-5/8") above the notch. Stitch middle seam of center lower front part to gusset side edge and serge it. Press middle seam pressing gusset’s side edge.

5. Stitch the gusset to middle lower front part; serge joining seam 4 cm above the notch. Stitch middle lower front part (with gusset) to center lower front part. Serge joining seam and press it pressing gusset side edge.

6. Stitch center upper front part to center lower part; serge joining seam and press it downwards. Stitch side upper front part to side lower part. Serge the seams joining side front parts and press it downwards. Stitch the gusset to side front part, serge joining seam 4 cm above the notch. Stitch relieve edges of front part and gusset side edge, serge relieve seams and press them pressing gusset side edges.

7. Stitch the gusset to center lower back part, serge joining seam 4 cm above the notch. Stitch middle lower back part to center lower back part. Serge joining seam and press it pressing gusset side edges.

8. Stitch center upper back part to center lower back part, serge joining seam and press it downwards. Stitch the gusset to side back part, serge joining seam 4 cm above the notch. Stitch the gusset to middle back part to gusset side edge, serge relieve seams and press them pressing gusset side edges.

9. Stitch the gusset to side front part, serge joining seam 4 cm above the notch. Stitch dress/gusset side seams. Serge side seams of gusset. Press side seams pressing gusset side edges.

10. Stitch the gusset to right center back part. Serge right middle back edge and gusset side edge. Serge left middle back edge and gusset side edge. Stitch middle back seam and gusset’s left side edge up to closure notch. Press middle back seam apart, press gusset side edges and closure slits. Stitch the zipper into middle back seam.

11. Stitch dress shoulder edges and press them apart.

12. Lay the lining on the garment right sides together, then overstitch neckline edge. Under stitchfront/back lining. Adjust lining middle edge and dress middle edge and fix them together near the zipper.

13. Make the stitch with easy loops along shoulder cap between notches, at 0.5 cm (3/16") from edge. Pull sleeve edge as wished. Serge sleeve hems, fold them under and topstitch at 1.2 cm (1/2") distance. Cut elastic braid according to size and pull pieces into sleeve lower allowance. Stitch sleeve edge and serge it. Press joining seam.

14. Stitch sleeves into armholes according to notches.

15. Serge dress hem, fold it under and topstitch at 1 cm (3/8") from lower edge.


Free sewing patterns (PDF) available for download

Please review Our Sizing Charts

Size S   Size M   Size L   Size XL   Fabrics Selection »  Sewing Supplies »

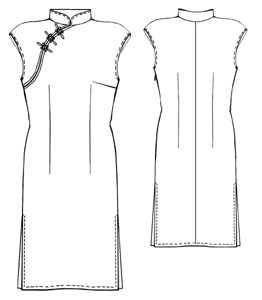
Home / Women / Dresses / #5331 Asian dress

example - #5331 Asian dress preview - #5331 Asian dress

Difficulty: **

You will need: silk, satin or brocade fabric; fusible interfacing; invisible zipper (refer to your pattern for zipper length); bias tape; 3 rayon braid frog closures.

Attention! Fabric consumption varies depending on the size of garment. First of all, print out paper patterns and lay them out at the width of fabric/ knit you plan to use, to see how much fabric you will need.

When sewing the garment, pay attention to notches- they must coincide.

Cutting :

Shell Fabric:

1. Stand-up Collar - 2 pieces
2. Back part - 2 pieces
3. Front part - 1 pieces
4. Upper Front part - 1 pieces

Fusible Interfacing: Stand-up Collar (1 pieces).

Instructions:

1. Apply fusible interfacing to wrong side of lower Stand-up collar.

2. Sew front bust dart and press it downwards. Sew front/back waist darts and press them towards the center front/ center back.

3. Finish curved (bottom) edge of Upper Front part and curved edge of Front part with bias tape – insert raw edge into folded ready-made bias tape, baste and topstitch at bias.

4. Serge side edges of Upper Front, Front and Back parts, as well armhole edges. Sew shoulder seams; serge allowances; press them backwards.

5. Sew right side seam of Upper Front part and press it open. Sew right side seam stopping at notch for side slit; press seam allowances open.

6. Sew left side seam between the notch for zipper closure and side slit. Press side seam allowances open; press under allowances of side slit. Baste zipper into opening in left side seam. Sew the zipper in. Sew right side seam leaving a slit unstitched.

7. Turn under armhole allowances and topstitch.

8. Sew center back seam. Serge allowances, press.

9. Line up pieces of Stand-up Collar face-to-face, baste and stitch at three outer sides. Slash allowances at rounded corners of Stand-up Collar; turn the Collar right side out and press. Sew outer (reinforced piece) Collar into neckline. Turn under neckline allowance of inner Collar, press. Baste inner Collar to the neckline. Stitch in the ditch of neckline seam to attach inner Collar. Edgestitch Stand-up Collar.

9. Measure length of slits to make sure they’re even. Cut the hem to even it out, if necessary. Serge bottom of dress. Finish slit corners - turn hem allowance to the face side, baste and stitch with a vertical seam at slit allowance fold. Turn out the corners to the right side, press. Fuse vertical allowances of side slits to the dress, inserting sheer double-sided fusible tape between layers of shell.

10. Turn under and press hem allowance. Topstitch the hem.

11. Sew frog closures to the garment as per pattern markings.


Free sewing patterns (PDF) available for download

Please review Our Sizing Charts

Size S   Size M   Size L   Size XL   Fabrics Selection »  Sewing Supplies »

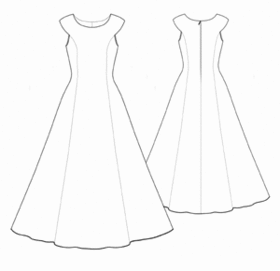
Home / Women / Dresses / #5529 Wedding dress

example - #5529 Wedding dress preview - #5529 Wedding dress

Difficulty: *

You will need: natural/mixed fabric, invisible zipper, lining.

Attention! Fabric consumption varies depending on the size of garment. First of all, print out paper patterns and lay them out at the width of fabric/ knit you plan to use, to see how much fabric you will need.

When sewing the garment, pay attention to notches- they must coincide.

Cutting:

Fabric:

1. Center back part - 2 pieces
2. Side back part - 2 pieces
3. Side front part - 2 pieces
4. Center front part - 1 piece

Lining:

1. Center back part - 2 pieces
2. Side back part - 2 pieces
3. Side front part - 2 pieces
4. Center front part - 1 piece

Instructions:

1. Serge front/back relieve seams, stitch them and press apart.

2. Serge shoulder/side seams and stitch them. Press side/shoulder seams backwards.

3. Serge lining middle edge, stitch it up to closure notch and press it apart, pressing zipper slits. Stitch lining details together and serge them. Press lining seams backwards. Serge lining's lower edge, fold it under and topstitch.

4. Stitch dress middle seam up to closure notch and press it apart. Stitch the zipper in.

5. Lay the dress and the lining together and overstitch neckline edge. Under stitch front/back lining. Overstitch armhole upper segment, them overstitch armhole lower segment. Topstitch allowances of armhole overstitching on lining at 0.2 cm from overstitching. Fold lining middle edge and stitch it to dress allowance at closure segment.

6. Serge dress hem, fold it under and topstitch at 0.5 cm (3/16") from lower edge. Make the petticoat of fishnet or buy ready one.


Free sewing patterns (PDF) available for download

Please review Our Sizing Charts

Size S   Size M   Size L   Size XL   Fabrics Selection »  Sewing Supplies »

Home / Women / Dresses / #5461 Sundress with shaped relieve

example - #5461 Sundress with shaped relieve preview - #5461 Sundress with shaped relieve

Difficulty: *

You will need: sheer flax; fusing; 12 buttons; bias tape.

Attention! Fabric consumption varies depending on the size of garment. First of all, print out paper patterns and lay them out at the width of fabric/ knit you plan to use, to see how much fabric you will need.

When sewing the garment, pay attention to notches- they must coincide.

Cutting:

Fabric:

1. Side front part - 2 details
2. Front part - 1 detail
3. Triangle gusset - 2 details
4. Back part - 2 details
5. Placket - 4 details

Fusing: packet.

Instructions:

1. Apply the fusing to wrong side of placket.

2. Lay placket details together and overstitch placket outer edge. Topstitch overstitching allowance on placket at 0.2 cm (1/16") from seam. Serge placket outer edge.

3. Sew the placket to front part. Topstitched placket sergeed edge along seam joining the placket. Press ready placket.

4. Sew triangle gusset to front part. Serge joining seam and press frontward.

5. Serge lower edge of front lower part. Press allowance and topstitch at 0.5 from (3/16") lower edge.

6. Make buttonholes into placket. Fix front part and side front part along side seam and along front neckline edge.

7. Serge back middle edge. Sew back middle seam and press it apart. Sew side edges of garment and serge them. Press side seam backwards.

8. Press the bias tape along the center and overstitch edges of: front/back neckline, front/back armholes.

9. Sew shoulder seams and press backwards. Serge the hem, press it under and topstitch. Sew buttons.


Free sewing patterns (PDF) available for download

Please review Our Sizing Charts

Size S   Size M   Size L   Fabrics Selection »  Sewing Supplies »

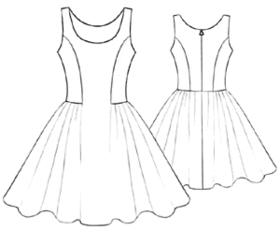
Home / Women / Dresses / #5196 Short dress

example - #5196 Short dress

Difficulty: *

You will need: crepe-de-chine; fusing; zipper.

Attention! Fabric consumption varies depending on the size of garment. First of all, print out paper patterns and lay them out at the width of fabric/ knit you plan to use, to see how much fabric you will need.

When sewing the garment, pay attention to notches- they must coincide.

Cutting:

Fabric:

1. Back panel - 2 details
2. Back central part - 2 details
3. Back side part - 2 details
4. Front side part - 2 details
5. Front central part - 1 folded detail
6. Front facing - 1 folded detail
7. Back facing - 2 details

Fusing: apply the fusing to wrong side of front neckline facing and back neckline facing.

Instructions:

1. Sew front and back princess seams. Slash a corner in front part when stitching. Sew side/shoulder seams.

2. Sew back panel to front one. Gather skirt upper edge and sew it to dress upper part, right sides together.

3. Sew back middle seam downwards from closure mark. Serge seam allowance and press them apart, press closure slit edges. Sew the zipper in with its teeth hidden.

4. Sew shoulder/side seams of facings. Fold facings to main detail, right sides together, and overstitch along edges of neckline and armholes. Pull facings right side out through shoulder alit, fold them out and topstitch them on seam allowances at 1-2 mm (1/16") from stitch. Fold facing free ends under near the closure, and sew them to zipper braid. Fix facings under armholes.
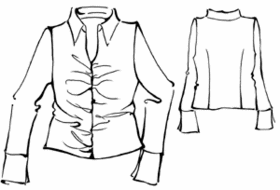
5. Fold the hem 1 cm (3/8") into wrong side and sew by hand.


Free sewing patterns (PDF) available for download

Please review Our Sizing Charts

Size S   Size M   Size L   Size XL   Fabrics Selection »  Sewing Supplies »

Home / Women / Dresses / #5211 Dress with lace insert

example - #5211 Dress with lace insert preview - #5211 Dress with lace insert

Difficulty: **

You will need: panne velvet; elastic lace, lining, fusing, zipper.

Attention! Fabric consumption varies depending on the size of garment. First of all, print out paper patterns and lay them out at the width of fabric/ knit you plan to use, to see how much fabric you will need.

When sewing the garment, pay attention to notches- they must coincide.

Cutting :

All panne velvet details must be cut out in same direction (along pile direction)!

Fabric:

1. Middle back part - 2 details
2. Side back part - 2 details
3. Middle front part - 2 details
4. Side front part - 2 details
5. Middle back panel - 2 details
6. Side back panel - 2 details
7. Side front panel - 2 details
8. Middle front panel - 1 folded detail
9. Back neckline facing - 2 details
10. Front neckline facing - 2 details
11. Back armhole facing - 2 details
12. Front armhole facing - 2 details

Lace:

1. Back insert - 2 details
2. Front insert - 1 folded detail

Lining:

1. Middle back part - 2 details
2. Side back part - 2 details
3. Middle front part - 2 details
4. Side front part - 2 details

Fusing: apply the fusing to wrong side of back neckline facing, front neckline facing, back armhole facing, front armhole facing.

Instructions:

1. Sew front and back princess seams (fabric and lining). Line up lining and fabric parts wrong sides together, baste at allowances and process as the single part. Sew side/shoulder seams.

2. Sew side edges of lace inserts. Sew insert upper edges to lower edges of dress upper part right sides together. Press allowances upwards and slash middle front insert allowance.

3. Sew princess and side seams of skirt (bottom part of dress). Sew middle back seam between hem and mark. Sew the skirt to lace insert's lower edge, press allowances towards the skirt.

4. Press closure slit allowance to wrong side, sew the zipper under slit edges.

5. Sew neckline facings together. Sew armhole facings together. Sew facings to garment right sides together. Fold facings out and topstitch on joining seam allowance at 1-2 mm (1/16") from the seam; then press. Fold free edges of back neckline facings under and sew them to zipper braid. Fold lower ends of front neckline facing under and sew them to seam joining the insert.

6. Press hem allowance to wrong side and sew with blind stitches.


Free sewing patterns (PDF) available for download

Please review Our Sizing Charts

Size S   Size M   Size L   Size XL   Fabrics Selection »  Sewing Supplies »

Home / Women / Dresses / #5589 Short Dress With Shaped Trim

example - #5589 Short Dress With Shaped Trim preview - #5589 Short Dress With Shaped Trim

Difficulty: **

Recommended fabrics: Fabrics of natural or blended fibers.

You will need: shell fabric; transparent shiffon silk for trim, invisible zipper, fusible interfacing, button.

Attention! Fabric consumption varies depending on the size of garment. First of all, print out paper patterns and lay them out at the width of fabric/ knit you plan to use, to see how much fabric you will need.

When sewing the garment, pay attention to notches- they must coincide.

Cutting:

Shell:

1. Center Back – 2 pieces
2. Side Back – 2 pieces
3. Center Front – 2 pieces
4. Side Front – 2 pieces
5. Front Facing – 4 pieces
6. Back Facing – 4 pieces
7. Shoulder Strap - 4 pieces

Chiffon Silk:

1. Top Back – 2 pieces
2. Top Front – 2 pieces

Instructions:

1.Reinforce Back Facings, Front Facings and Shoulder Straps (2 pcs only) with fusible interfacing.

2. Mark and sew darts at Back, press towards center. Sew shoulder seams. Sew side seams of Top Front and Top Back. Serge seams, press towards Back. Serge armhole raw edges, turn under and topstitch at 0.5 cm (3/16”). Serge raw edges at center back, turn under and topstitch at 0.5 cm (3/16”).

3. Line up two pieces (reinforced and non-reinforced) of Shoulder Straps, stitch at the inside raw edge and zipper edge. Clip allowances, turn out, press Shoulder Straps.

4. Sew outer side of Shoulder Strap to the Top Front and Top Back, matching the notches. Press seam allowances towards Shoulder Strap. Turn under allowance of Shoulder Strap at the wrong side of garment, baste to Top Front/Top Back. Stitch in the ditch of Shoulder Strap seam. Press Shoulder Straps.

5. Sew Front Facings and Back Facings together at side seam. Press seam open. Line up Facings face-to-face, insert Top Back and Top Front in between, so that reinforced half of Strap is applied to reinforced half of Facings. Stitch the Facings together at two sides: short edge of Front Facing and top edge of Facings. Turn out, press.

6. Sew princess seams of Front and Back. Serge allowances, press towards center.

7. Serge center front edges of Fronts. Sew center front edge between the notches. Press seam open, press slits’ allowances.

8. Sew side seams. Serge seam allowances, press towards Back.

9. Apply Facing to top edge of dress face-to-face, sew. Press allowances towards Facing. Sew center back seam up the notch for zipper. Press seam open, press down allowances of slit. Baste and sew zipper into the opening in center back seam. Zipper must reach top edge of Facing.

10. Turn under raw edge of Facing, sew to allowances around zipper. Press.

11. Serge bottom edge of dress, turn under hem allowance, topstitch at 1,5 cm (5/8”) from the bottom edge.

12. Work buttonhole into the shoulder strap, sew button.


Free sewing patterns (PDF) available for download

Please review Our Sizing Charts

Size S   Size M   Size L   Size XL   Fabrics Selection »  Sewing Supplies »

Home / Women / Dresses / #5463 Dress with a flounce

example - #5463 Dress with a flounce preview - #5463 Dress with a flounce

Difficulty: *

You will need: sheer natural fabric; invisible zipper; bias tape.

Attention! Fabric consumption varies depending on the size of garment. First of all, print out paper patterns and lay them out at the width of fabric/ knit you plan to use, to see how much fabric you will need.

When sewing the garment, pay attention to notches- they must coincide.

Cutting:

Fabric:

1. Center front part - 1 detail
2. Center front flounce - 1 detail
3. Side front part - 2 details
4. Side front flounce - 2 details
5. Side back part - 2 details
6. Side back flounce - 2 details
7. Middle back part - 2 details
8. Middle back flounce - 2 details

Instructions:

1. Sew center front flounce to front part. Serge joining seam and press it towards center front part. Sew the flounce to side front part. Serge joining seam and press it toward side front part.

2. Sew the flounce to middle back part. Serge joining seam and press it toward middle back part. Sew the flounce to side back part. Serge joining seam and press it toward side back part.

3.Sew relieve edges of center front part and side front parts together. Serge joining seam and press it toward center front part.

4. Sew relieve edges of center back part and side back part together. Serge joining seam and press it toward center back part.

5. Serge middle back edges. Sew back middle seam up to closure notch. Press joining seam apart, pressing closure slit. Sew the zipper in.

6. Sew dress side seams. Serge joining seams and press the backwards. Press the bias tape along the center. Overstitch front/back neckline edges and front/back armhole edges.

7. Sew dress shoulder seams and serge them. Press shoulder seams backwards. Serge flounce hem. Press it to wrong side and topstitch at 0.5 cm (3/16") from the hem.


Free sewing patterns (PDF) available for download

Please review Our Sizing Charts

Size S   Size M   Size L   Size XL   Fabrics Selection »  Sewing Supplies »

Home / Women / Dresses / #5144 Knitted dress with a raglan sleeve

example - #5144 Knitted dress with a raglan sleeve

Difficulty: *

You will need: knitwear; fusing; double needle.

Attention! Fabric consumption varies depending on the size of garment. First of all, print out paper patterns and lay them out at the width of fabric/ knit you plan to use, to see how much fabric you will need.

When sewing the garment, pay attention to notches- they must coincide.

Cutting :

Fabric:

1. Front part - 1 folded detail
2. Back part - 2 details
3. Sleeve - 2 details
4. Neckline decorative detail - 2 folded details

Fusing: outer side of neckline decorative detail.

Instructions:

Apply the fusing to wrong side of outer side of neckline decorative detail.

Sew back middle seam and side seams. Press allowances apart.

Sew sleeve seams. Press sleeve hem allowances into wrong side and topstitch at 2 cm (3/4") with double needle.

Sew sleeves into open armholes. Press allowances of front/back seams (in armhole upper parts).

Fold outer and inner decorative neckline detail along the center, right side together, then sew back edges. Press allowances. Apply both decorative details right sides together, and pin neckline edges. Sew. Cut seam allowances close to stitches; slash rounding and front middle line toward the stitch. Turn decorative detail right side out. Overcast the edge and press it, then tack open edges. To prevent front corner from peeling off, apply a small piece of fusing to wrong side on marking of decorative details' joining seam. Pin the decorative detail into neckline, from middle of neckline to back middle seam, coinciding marks of decorative detail's joining marks and crosswise marks. Decorative detail's outer part must be on garment right side. Sew decorative detail in, making fix stitches at the beginning and at the end of seam.
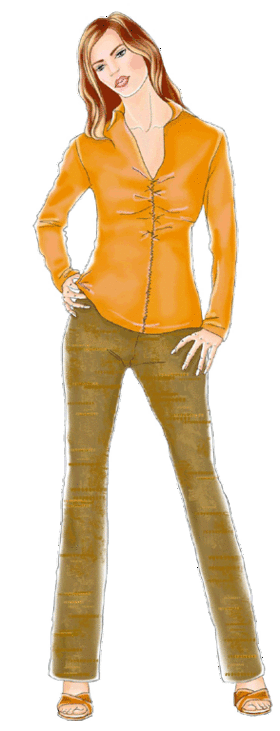
Slash front allowance at front middle line to last stitch. Sew the second half of decorative detail in, from front middle line to back middle seam. Make fixes at beginning and end of the seam. Overcast both allowances of decorative detail joining seam, press towards front part, back part and sleeves.
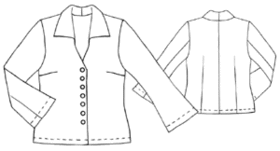
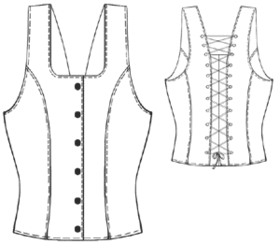
Press the hem into wrong side, then topstitch at 2 cm (3/4") with double needle.


Free sewing patterns (PDF) available for download

Please review Our Sizing Charts

Size S   Size L   Fabrics Selection »  Sewing Supplies »


Рубрики:  Шитье

моделирование Рattern

Среда, 12 Марта 2014 г. 22:39 + в цитатник
Это цитата сообщения adelaidaivi [Прочитать целиком + В свой цитатник или сообщество!]

моделирование Рattern

  draft sarong skirt sascade-1   sarong-cascade-23


Décolleté Garments-1Décolleté Garments-2


http://pattern-making.com/wp-content/uploads/2013/07/draft-halter-dress-1.jpg

http://pattern-making.com/wp-content/uploads/2013/07/draft-halter-dress-2.jpg

draft circular flounce-1http://pattern-making.com/wp-content/uploads/2013/07/draft-circular-flounce-2.jpg


Рубрики:  Шитье

Хлеб с гречневой кашей в хлебопечке

Среда, 12 Марта 2014 г. 15:40 + в цитатник
Это цитата сообщения adelaidaivi [Прочитать целиком + В свой цитатник или сообщество!]

Хлеб с гречневой кашей в хлебопечке

Хлеб с гречкой в хлебопечке

Хлеб с гречкой в хлебопечке

20.01.2013 | Автор: Наталья |
 

Мы все любим свежий, ароматный, вкусный хлеб. Но многие его продолжают покупать в магазинах и супермаркетах. А я хочу предложить вам дорогие друзья рецепт вкусного, пышного и именно домашнего хлеба, приготовленного в кухонной помощнице – хлебопечке. Такой хлеб вы не сможете найти ни на одном прилавке самого крупного супермаркета, в этом я просто уверена, потому, что хлеб наш – вы не поверите – с гречневой кашей! Ведь это не только вкусный хлеб, а ещё очень полезный. К тому же, если у вас осталось от ужина немного гречневой каши, выбрасывать её жалко, а для выпечки хлеба это самое нужное количество. Думаю, заинтриговала я многих хозяек своей красивой буханочкой домашнего ароматного хлеба. Пеките для своих домашних вкусный и полезный хлеб и каждый раз удивляйте их!

Ингредиенты:
  • дрожжи - 2 ч. л.
  • мука - 425 г
  • соль - 1,5 ч. л.
  • сахар - 2 ч. л.
  • яйцо - 1 шт
  • растительное масло - 2 ст. л.
  • гречневая каша - 150 г
  • вода - 240 мл

Рецепт хлеба с гречкой в хлебопечке:

Гречку перебрать, промыть и отварить до готовности. У меня гречка осталась с ужина.


Заложить все ингредиенты в ведерко согласно инструкции к вашей хлебопечке.


Я выкладываю в той последовательности, как написано в рецепте.

Пекла хлеб с гречкой в хлебопечке в режиме «Основной», размер XL, средняя корочка.


Готовый хлебушек вынуть после сигнала и остудить на решетке. Вес готового хлеба 800 г.


Приятного аппетита!!!

Рубрики:  Кухня

Бездрожжевое тесто для пиццы

Среда, 12 Марта 2014 г. 14:27 + в цитатник
Это цитата сообщения adelaidaivi [Прочитать целиком + В свой цитатник или сообщество!]

Бездрожжевое тесто для пиццы

Бездрожжевое тесто для пиццы

Фото к рецепту: Бездрожжевое тесто для пиццы
 15 мин (ваши 15 мин)
 Практика   05.02.13

Вы решили приготовить пиццу, а времени на дрожжевое тесто нет? Ничего, этот рецепт бездрожжевого теста для пиццы не потребует много времени и усилий.

Продукты
Мука - 2 стакана
Кефир - 1 стакан
Яйца куриные - 1 шт.
Маргарин - 5 ст. ложек
Соль - 1 щепотка


Пошаговый фото рецептБездрожжевое тесто для пиццы

 
Фото приготовления рецепта: Бездрожжевое тесто для пиццы - шаг №1 Приготовьте продукты для приготовления теста для пиццы бездрожжевого.
Фото приготовления рецепта: Бездрожжевое тесто для пиццы - шаг №2 Как приготовить вкусное тесто для пиццы:

Растопить маргарин в сковороде на самом маленьком огне.
Фото приготовления рецепта: Бездрожжевое тесто для пиццы - шаг №3 Налить в миску 1 стакан кефира.
Фото приготовления рецепта: Бездрожжевое тесто для пиццы - шаг №4 Яйцо вбить в кефир.Перемешать.
Фото приготовления рецепта: Бездрожжевое тесто для пиццы - шаг №5 Положить растопленный маргарин.
Фото приготовления рецепта: Бездрожжевое тесто для пиццы - шаг №6 Хорошо перемешать.
Фото приготовления рецепта: Бездрожжевое тесто для пиццы - шаг №7 Просеять муку. Всыпать муку, соль.
Фото приготовления рецепта: Бездрожжевое тесто для пиццы - шаг №8 Замесить тесто для пиццы.
Фото приготовления рецепта: Бездрожжевое тесто для пиццы - шаг №9 Бездрожжевое тесто для пиццы готово.
Рубрики:  Кухня

Слоеная картошка "На все случаи жизни"

Среда, 12 Марта 2014 г. 14:27 + в цитатник
Это цитата сообщения adelaidaivi [Прочитать целиком + В свой цитатник или сообщество!]

Слоеная картошка "На все случаи жизни"

Слоеная картошка "На все случаи жизни"

Фото к рецепту: Слоеная картошка "На все случаи жизни"
 Juss   11.11.08

Этот рецепт слоеной картошки мне подарила подруга. С тех пор он выручает меня на семейных ужинах. Сытно и вкусно! Мне очень нравится!

Продукты
Картофель - 20 шт.
Лук - 3-4 шт.
Мясо (курица или свинина, по вкусу) - у меня 15 куриных ножек
Сыр - 300-400 г
Майонез - 2 упаковки (примерно 500 г)
Соль
Специи
Зелень


Вместо курицы можно использовать свинину. Тогда порядок слоев немного меняется: картошка, мясо, лук.

 
Пошаговый фото рецептСлоеная картошка "На все случаи жизни"
 
Фото приготовления рецепта: Слоеная картошка "На все случаи жизни" - шаг №1 Нарезать лук полукольцами и замариновать его в майонезе.
Фото приготовления рецепта: Слоеная картошка "На все случаи жизни" - шаг №2 Нарезать картошку, посолить, замариновать в майонезе.
Фото приготовления рецепта: Слоеная картошка "На все случаи жизни" - шаг №3 Курицу (не поверите!) тоже замариновать в майонезе!:-)
Посолить, добавить специи по вкусу.
Фото приготовления рецепта: Слоеная картошка "На все случаи жизни" - шаг №4 Через час все выложить на противень слоями:
1. Картошка.
2. Лук.
3. Мясо.
Фото приготовления рецепта: Слоеная картошка "На все случаи жизни" - шаг №5 Поставить в духовку и готовить при температуре 220 градусов 40-50 минут.
Фото приготовления рецепта: Слоеная картошка "На все случаи жизни" - шаг №6 Затем посыпать тертым сыром и рубленой зеленью.
Когда сыр расплавится - слоеная картошка готова, можно подавать ее на стол.


Рубрики:  Кухня


Поиск сообщений в О_Дзюба
Страницы: 132 ... 84 83 [82] 81 80 ..
.. 1 Календарь