The Mozilla Blog: Firefox’s Test Pilot Program Returns with Firefox Private Network Beta |
Like a cat, the Test Pilot program has had many lives. It originally started as an Add-on before we relaunched it three years ago. Then in January, we announced that we were evolving our culture of experimentation, and as a result we closed the Test Pilot program to give us time to further explore what was next.
We learned a lot from the Test Pilot program. First, we had a loyal group of users who provided us feedback on projects that weren’t polished or ready for general consumption. Based on that input we refined and revamped various features and services, and in some cases shelved projects altogether because they didn’t meet the needs of our users. The feedback we received helped us evaluate a variety of potential Firefox features, some of which are in the Firefox browser today.
If you haven’t heard, third time’s the charm. We’re turning to our loyal and faithful users, specifically the ones who signed up for a Firefox account and opted-in to be in the know about new products testing, and are giving them a first crack to test-drive new, privacy-centric products as part of the relaunched Test Pilot program. The difference with the newly relaunched Test Pilot program is that these products and services may be outside the Firefox browser, and will be far more polished, and just one step shy of general public release.
We’ve already earmarked a couple of new products that we plan to fine-tune before their official release as part of the relaunched Test Pilot program. Because of how much we learned from our users through the Test Pilot program, and our ongoing commitment to build our products and services to meet people’s online needs, we’re kicking off our relaunch of the Test Pilot program by beta testing our project code named Firefox Private Network.
One of the key learnings from recent events is that there is growing demand for privacy features. The Firefox Private Network is an extension which provides a secure, encrypted path to the web to protect your connection and your personal information anywhere and everywhere you use your Firefox browser.
There are many ways that your personal information and data are exposed: online threats are everywhere, whether it’s through phishing emails or data breaches. You may often find yourself taking advantage of the free WiFi at the doctor’s office, airport or a cafe. There can be dozens of people using the same network — casually checking the web and getting social media updates. This leaves your personal information vulnerable to those who may be lurking, waiting to take advantage of this situation to gain access to your personal info. Using the Firefox Private Network helps protect you from hackers lurking in plain sight on public connections.
Start testing the Firefox Private Network today, it’s currently available in the US on the Firefox desktop browser. A Firefox account allows you to be one of the first to test potential new products and services, you can sign up directly from the extension.

Over the next several months you will see a number of variations on our testing of the Firefox Private Network. This iterative process will give us much-needed feedback to explore technical and possible pricing options for the different online needs that the Firefox Private Network meets.
Your feedback will be essential in making sure that we offer a full complement of services that address the problems you face online with the right-priced service solutions. We depend on your feedback and we will send a survey to follow up. We hope you can spend a few minutes to complete it and let us know what you think. Please note this first Firefox Private Network Beta test will only be available to start in the United States for Firefox account holders using desktop devices. We’ll keep you updated on our eventual beta test roll-outs in other locales and platforms.
Sign up now for a Firefox account and join the fight to keep the internet open and accessible to all.
The post Firefox’s Test Pilot Program Returns with Firefox Private Network Beta appeared first on The Mozilla Blog.
|
|
Hacks.Mozilla.Org: Caniuse and MDN compatibility data collaboration |
Web developers spend a good amount of time making web compatibility decisions. Deciding whether or not to use a web platform feature often depends on its availability in web browsers.
More than 10 years ago, @fyrd created the caniuse project, to help developers check feature availability across browsers. Over time, caniuse has evolved into the go-to resource to answer the question that comes up day to day: “Can I use this?”
About 2 years ago, the MDN team started re-doing its browser compatibility tables. The team was on a mission to take the guesswork out of web compatibility. Since then, the BCD project has become a large dataset with more than 10,000 data points. It stays up to date with the help of over 500 contributors on GitHub.
MDN compatibility data is available as open data on npm and has been integrated in a variety of projects including VS Code and webhint.io auditing.
Today we’re announcing the integration of MDN’s compat data into the caniuse website. Together, we’re bringing even more web compatibility information into the hands of web developers.
Before we began our collaboration, the caniuse website only displayed results for features available in the caniuse database. Now all search results can include support tables for MDN compat data. This includes data types already found on caniuse, specifically the HTML, CSS, JavaScript, Web API, SVG & and HTTP categories. By adding MDN data, the caniuse support table count expands from roughly 500 to 10,500 tables! Developers’ caniuse queries on what’s supported where will now have significantly more results.
The new feature tables will look a little different. Because the MDN compat data project and caniuse have compatible yet somewhat different goals, the implementation is a little different too. While the new MDN-based tables don’t have matching fields for all the available metadata (such as links to resources and a full feature description), support notes and details such as bug information, prefixes, feature flags, etc. will be included.
The MDN compatibility data itself is converted under the hood to the same format used in caniuse compat tables. Thus, users can filter and arrange MDN-based data tables in the same way as any other caniuse table. This includes access to browser usage information, either by region or imported through Google Analytics to help you decide when a feature has enough support for your users. And the different view modes available via both datasets help visualize support information.
We’ve been asked why the datasets are treated differently. Why didn’t we merge them in the first place? We discussed and considered this option. However, due to the intrinsic differences between our two projects, we decided not to. Here’s why:
MDN’s support data is very broad and covers feature support at a very granular level. This allows MDN to provide as much detailed information as possible across all web technologies, supplementing the reference information provided by MDN Web Docs.
Caniuse, on the other hand, often looks at larger features as a whole (e.g. CSS Grid, WebGL, specific file format support). The caniuse approach provides developers with higher level at-a-glance information on whether the feature’s supported. Sometimes detail is missing. Each individual feature is added manually to caniuse, with a primary focus on browser support coverage rather than on feature coverage overall.
Because of these and other differences in implementation, we don’t plan on merging the source data repositories or matching the data schema at this time. Instead, the integration works by matching the search query to the feature’s description on caniuse.com. Then, caniuse generates an appropriate feature table, and converts MDN support data to the caniuse format on the fly.
We encourage community members of both repos, caniuse and mdn-compat-data, to work together to improve the underlying data. By sharing information and collaborating wherever possible, we can help web developers find answers to compatibility questions.
The post Caniuse and MDN compatibility data collaboration appeared first on Mozilla Hacks - the Web developer blog.
https://hacks.mozilla.org/2019/09/caniuse-and-mdn-compat-data-collaboration/
|
|
Wladimir Palant: State of the art protection in Chrome Web Store |
All of you certainly know already that Google is guarding its Chrome Web Store vigilantly and making sure that no bad apples get in. So when you hit “Report abuse” your report will certainly be read carefully by another human being and acted upon ASAP. Well, eventually… maybe… when it hits the news. If it doesn’t, then it probably wasn’t important anyway and these extensions might stay up despite being taken down by Mozilla three months ago.

Image by Sheba_Also
As to your legitimate extensions, these will be occasionally taken down as collateral damage in this fierce fight. Like my extension which was taken down due to missing a screenshot because of not having any user interface whatsoever. It’s not possible to give an advance warning either, like asking the developer to upload a screenshot within a week. This kind of lax policies would only encourage the bad guys to upload more malicious extensions without screenshots of course.
And the short downtime of a few weeks and a few hours of developer time spent trying to find anybody capable of fixing the problem are surely a small price to pay for a legitimate extension in order to defend the privilege of staying in the exclusive club of Chrome extension developers. So I am actually proud that this time my other browser extension, PfP: Pain-free Passwords, was taken down by Google in its relentless fight against the bad actors.
Here is the email I’ve got:
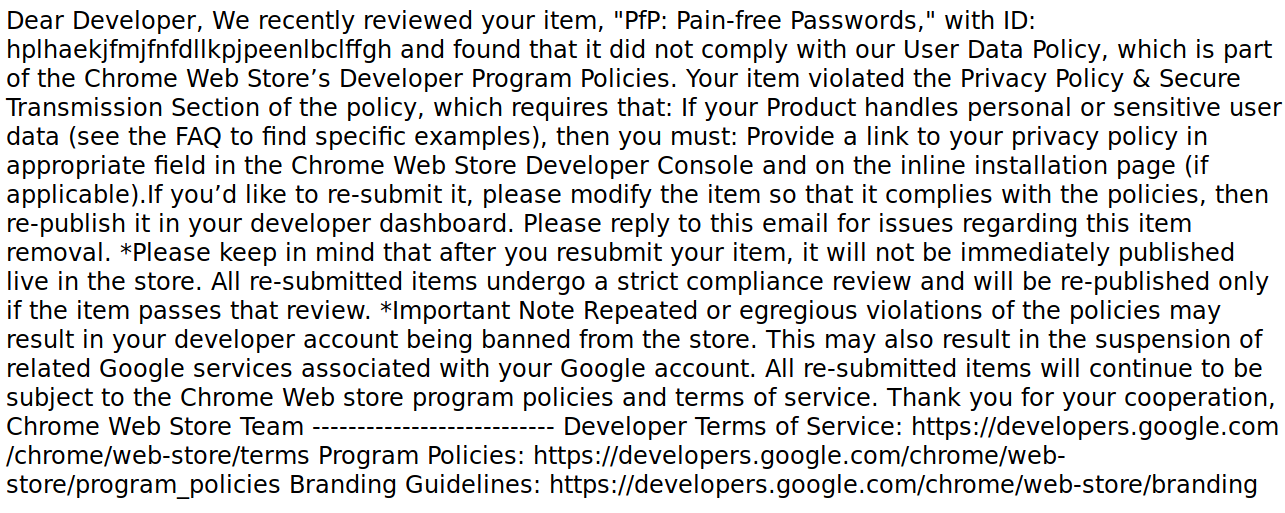
Hard to read? That might be due to the fact that this plain text email was sent as text/html. A completely understandable mistake given how busy all Google employees are. We only need to copy the link to the policy here and we’ll get this in a nicely formatted document.
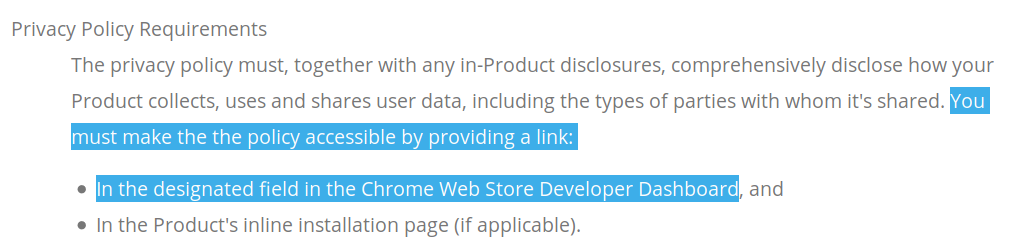
So there we go. All I need to do is to write a privacy policy document for the extension which isn’t collecting any data whatsoever, then link it from the appropriate field. Could it be so easy? Of course not, the bad guys would be able to figure it out as well otherwise. Very clever of Google not to specify which one the “designated field” is. I mean, if you publish extensions on Mozilla Add-ons, there is literally a field saying “Privacy Policy” there. But in Chrome Web Store you only get Title, Summary, Detailed Description, Category, Official Url, Homepage Url, Support Url, Google Analytics ID.
See what Google is doing here? There is really only one place where the bad guys could add their privacy policy, namely that crappy unformatted “Detailed Description” field. Since it’s so unreadable, users ignore it anyway, so they will just assume that the extension has no privacy policy and won’t trust it with any data. And as an additional bonus, “Detailed Description” isn’t the designated field for privacy policy, which gives Google a good reason to take bad guys’ extensions down at any time. Brilliant, isn’t it?
In the meantime, PfP takes a vacation from Chrome Web Store. I’ll let you know how this situation develops.
Update (2019-09-10): As commenter drawdrove points out, the field for the privacy policy actually exists. Instead of placing it under extension settings, Google put it in the overall developer settings. So all of the developer’s extensions share the same privacy policy, no matter how different. Genius!
PfP is now back in Chrome Web Store. But will the bad guys also manage to figure it out?
https://palant.de/2019/09/09/state-of-the-art-protection-in-chrome-web-store/
|
|
IRL (podcast): Privacy or Profit - Why Not Both? |
Every day, our data hits the market when we sign online. It’s for sale, and we’re left to wonder if tech companies will ever choose to protect our privacy rather than reap large profits with our information. But, is the choice — profit or privacy — a false dilemma? Meet the people who have built profitable tech businesses while also respecting your privacy. Fact check if Facebook and Google have really found religion in privacy. And, imagine a world where you could actually get paid to share your data.
In this episode, Oli Frost recalls what happened when he auctioned his personal data on eBay. Jeremy Tillman from Ghostery reveals the scope of how much ad-tracking is really taking place online. Patrick Jackson at Disconnect.me breaks down Big Tech’s privacy pivot. DuckDuckGo’s Gabriel Weinberg explains why his private search engine has been profitable. And Dana Budzyn walks us through how her company, UBDI, hopes to give consumers the ability to sell their data for cash.
IRL is an original podcast from Firefox. For more on the series, go to irlpodcast.org.
The IRL production team would love your feedback. Take this short 2-minute survey.
Read about Patrick Jackson and Geoffrey Fowler's privacy experiment.
Learn more about DuckDuckGo, an alternative to Google search, at duckduckgo.com.
And, we're pleased to add a little more about Firefox's business here as well — one that puts user privacy first and is also profitable. Mozilla was founded as a community open source project in 1998, and currently consists of two organizations: the 501(c)3 Mozilla Foundation, which backs emerging leaders and mobilizes citizens to create a global movement for the health of the internet; and its wholly owned subsidiary, the Mozilla Corporation, which creates Firefox products, advances public policy in support of internet user rights and explores new technologies that give people more control and privacy in their lives online. Firefox products have never — and never will never — buy or sell user data. Because of its unique structure, Mozilla stands apart from its peers in the technology field as one of the most impactful and successful social enterprises in the world. Learn more about Mozilla and Firefox at mozilla.org.
|
|
Без заголовка |
.length of a string containing an emoji resulting in a number greater than 1 (typically 2) and then proceeds to the conclusion that haha JavaScript is so broken. In this post, I will try to convince you that ridiculing JavaScript for this is less insightful than it first appears.
|
|
Mike Hoye: Forward Motion |

This has been a while coming; thank you for your patience. I’m very happy to be able to share the final four candidates for Mozilla’s new community-facing synchronous messaging system.
These candidates were assessed on a variety of axes, most importantly Community Participation Guideline enforcement and accessibility, but also including team requirements from engineering, organizational-values alignment, usability, utility and cost. To close out, I’ll talk about the options we haven’t chosen and why, but for the moment let’s lead with the punchline.
Our candidates are:
We’ve been spoiled for choice here – there were a bunch of good-looking options that didn’t make it to the final four – but these are the choices that generally seem to meet our current institutional needs and organizational goals.
We haven’t stood up a test instance for Slack, on the theory that Mozilla already has a surprising number of volunteer-focused Slack instances running already – Common Voice, Devtools and A-Frame, for example, among many others – but we’re standing up official test instances of each of the other candidates shortly, and they’ll be available for open testing soon.
The trial period for these will last about a month. Once they’re spun up, we’ll be taking feedback in dedicated channels on each of those servers, as well as in #synchronicity on IRC.mozilla.org, and we’ll be creating a forum on Mozilla’s community Discourse instance as well. We’ll have the specifics for you at the same time as those servers will be opened up and, of course you can always email me.
I hope that if you’re interested in this stuff you can find some time to try out each of these options and see how well they fit your needs. Our timeline for this transition is:
In implementation terms, there are a few practical things I’d like to mention:
… and a few words on some options we didn’t pick and why:
So here we are. It’s such a relief to be able to finally click send on this post. I’d like to thank everyone on Mozilla’s IT and Open Innovation teams for all the work they’ve done to get us this far, and everyone who’s expressed their support (and sympathy, we got lots of that too) for this process. We’re getting closer.
|
|
Mozilla Future Releases Blog: What’s next in making Encrypted DNS-over-HTTPS the Default |
In 2017, Mozilla began working on the DNS-over-HTTPS (DoH) protocol, and since June 2018 we’ve been running experiments in Firefox to ensure the performance and user experience are great. We’ve also been surprised and excited by the more than 70,000 users who have already chosen on their own to explicitly enable DoH in Firefox Release edition. We are close to releasing DoH in the USA, and we have a few updates to share.
After many experiments, we’ve demonstrated that we have a reliable service whose performance is good, that we can detect and mitigate key deployment problems, and that most of our users will benefit from the greater protections of encrypted DNS traffic. We feel confident that enabling DoH by default is the right next step. When DoH is enabled, users will be notified and given the opportunity to opt out.
This post includes results of our latest experiment, configuration recommendations for systems administrators and parental controls providers, and our plans for enabling DoH for some users in the USA.
Our latest DoH experiment was designed to help us determine how we could deploy DoH, honor enterprise configuration and respect user choice about parental controls.
We had a few key learnings from the experiment.
Now that we have these results, we want to tell you about the approach we have settled on to address managed networks and parental controls. At a high level, our plan is to:
We’re planning to deploy DoH in “fallback” mode; that is, if domain name lookups using DoH fail or if our heuristics are triggered, Firefox will fall back and use the default operating system DNS. This means that for the minority of users whose DNS lookups might fail because of split horizon configuration, Firefox will attempt to find the correct address through the operating system DNS.
In addition, Firefox already detects that parental controls are enabled in the operating system, and if they are in effect, Firefox will disable DoH. Similarly, Firefox will detect whether enterprise policies have been set on the device and will disable DoH in those circumstances. If an enterprise policy explicitly enables DoH, which we think would be awesome, we will also respect that. If you’re a system administrator interested in how to configure enterprise policies, please find documentation here. If you find any bugs, please report them here.
We’re also working with providers of parental controls, including ISPs, to add a canary domain to their blocklists. This helps us in situations where the parental controls operate on the network rather than an individual computer. If Firefox determines that our canary domain is blocked, this will indicate that opt-in parental controls are in effect on the network, and Firefox will disable DoH automatically. If you are a provider of parental controls, details are available here. Please reach out to us for more information at doh-canary-domain@mozilla.com. We’re also interested in connecting with commercial blocklist providers, in the US and internationally.
This canary domain is intended for use in cases where users have opted in to parental controls. We plan to revisit the use of this heuristic over time, and we will be paying close attention to how the canary domain is adopted. If we find that it is being abused to disable DoH in situations where users have not explicitly opted in, we will revisit our approach.
We plan to gradually roll out DoH in the USA starting in late September. Our plan is to start slowly enabling DoH for a small percentage of users while monitoring for any issues before enabling for a larger audience. If this goes well, we will let you know when we’re ready for 100% deployment. For the moment, we encourage enterprise administrators and parental control providers to check out our config documentation and get in touch with any questions.
The post What’s next in making Encrypted DNS-over-HTTPS the Default appeared first on Future Releases.
https://blog.mozilla.org/futurereleases/2019/09/06/whats-next-in-making-dns-over-https-the-default/
|
|
Honza Bambas: Visual Studio Code auto-complete displays MDN reference for CSS and HTML tags |
Mozilla Developer Network (now MDN Web Docs) is great, probably the best Web development reference site from them all. And therefor even Microsoft defaults to us now in Visual Studio Code.
Snippet from they Release Notes for 1.38.0:
VS Code now displays a URL pointing to the relevant MDN Reference in completion and hover of HTML & CSS entities:

We thank the MDN documentation team for their effort in curating mdn-data / mdn-browser-compat-data and making MDN resources easily accessible by VS Code.
The post Visual Studio Code auto-complete displays MDN reference for CSS and HTML tags appeared first on mayhemer's blog.
|
|
Mozilla VR Blog: Semantic Placement in Augmented Reality using MrEd |

In this article we’re going to take a brief look at how we may want to think about placement of objects in Augmented Reality. We're going to use our recently released lightweight AR editing tool MrEd to make this easy to demonstrate.
Designers often express ideas in a domain appropriate language. For example a designer may say “place that chair on the floor” or “hang that photo at eye level on the wall”.
However when we finalize a virtual scene in 3d we often keep only the literal or absolute XYZ position of elements and throw out the original intent - the deeper reason why an object ended up in a certain position.
It turns out that it’s worth keeping the intention - so that when AR scenes are re-created for new participants or in new physical locations that the scenes still “work” - that they still are satisfying experiences - even if some aspects change.
In a sense this recognizes the Japanese term 'Wabi-Sabi'; that aesthetic placement is always imperfect and contends between fickle forces. Describing placement in terms of semantic intent is also similar to responsive design on the web or the idea of design patterns as described by Christopher Alexander.
Let’s look at two simple examples of semantic placement in practice.
1. Relative to the Ground
When you’re placing objects in augmented reality you often want to specify that those objects should be relationally placed in a position relative to other objects. A typical, in fact ubiquitous, example of placement is that often you want an object to be positioned relative to “the ground”.
Sometimes the designer's intent is to select the highest relative surface underneath the object in question (such as placing a lamp on a table) or at other times to select the lowest relative surface underneath an object (such as say placing a kitten on the floor under a table). Often, as well, we may want to express a placement in the air - such as say a mailbox, or a bird.
In this very small example I’ve attached a ground detection script to a duck, and then sprinkled a few other passive objects around the scene. As the ground is detected the duck will pop down from a default position to be offset relative to the ground (although still in the air). See the GIF above for an example of the effect.
To try this scene out yourself you will need WebXR for iOS which is a preview of emerging WebXR standards using iOS ARKit to expose augmented reality features in a browser environment. This is the url for the scene above in play mode (on a WebXR capable device):
https://painted-traffic.glitch.me/.mred/build/?mode=play&doc=doc_103575453
Here is what it should look like in edit mode:
You can also clone the glitch and edit the scene yourself (you’ll want to remember to set a password in the .env file and then login from inside MrEd). See:
https://glitch.com/edit/#!/painted-traffic
Here’s my script itself:
/// #title grounded
/// #description Stick to Floor/Ground - dynamically and constantly searching for low areas nearby
({
    start: function(evt) {
        this.sgp.startWorldInfo()
    },
    tick: function(e) {
        let floor = this.sgp.getFloorNear({point:e.target.position})
        if(floor) {
            e.target.position.y = floor.y
        }
    }
})
This is relying on code baked into MrEd (specifically inside of findFloorNear() in XRWorldInfo.js if you really want to get detailed).
In the above example I begin by calling startWorldInfo() to start painting the ground planes (so that I can see them since it’s nice to have visual feedback). And, every tick, I call a floor finder subroutine which simply returns the best guess as to the floor in that area. The floor finder logic in this case is pre-defined but one could easily imagine other kinds of floor finding strategies that were more flexible.
2. Follow the player
Another common designer intent is to make sure that some content is always visible to the player. As designers in virtual or augmented reality it can be more challenging to direct a users attention to virtual objects. These are 3d immersive worlds, the player can be looking in any direction. Some kind of mechanic is needed to help make sure that the player sees what they need to see.
One common simple solution is to build an object that stays in front of the user. This can be itself a combination of multiple simpler behaviors. An object can be ordered to seek a position in front of the user, be at a certain height, and ideally billboarded so that any signage or message is always legible.
In this example a sign is decorated with two separate scripts, one to keep the sign in front of the player, and another to billboard the sign to face the player.
https://painted-traffic.glitch.me/.mred/build/?mode=edit&doc=doc_875751741&doctype=vr
Closing thoughts
We’ve only scratched the surface of the kinds of intent could be expressed or combined together. If you want to dive deeper there is a longer list in a separate article Laundry List of UX Patterns). I also invite you to help extend the industry; think both about what high level intentions you mean when you place objects and also how you'd communicate those intentions.
The key insight here is that preserving semantic intent means thinking of objects as intelligent, able to respond to simple high level goals. Virtual objects are more than just statues or art at a fixed position, but can be entities that can do your bidding, and follow high level rules.
Ultimately future 3d tools will almost certainly provide these kinds of services - much in the way CSS provides layout directives. We should also expect to see conventions emerge as more designers begin to work in this space. As a call to action, it's worth it to notice the high level intentions that you want, and to get the developers of the tools that you use to start to incorporate those intentions as primitives.
|
|
Hacks.Mozilla.Org: Debugging TypeScript in Firefox DevTools |
Firefox Debugger has evolved into a fast and reliable tool chain over the past several months and it’s now supporting many cool features. Though primarily used to debug JavaScript, did you know that you can also use Firefox to debug your TypeScript applications?
Before we jump into real world examples, note that today’s browsers can’t run TypeScript code directly. It’s important to understand that TypeScript needs to be compiled into Javascript before it’s included in an HTML page.
Also, debugging TypeScript is done through a source-map, and so we need to instruct the compiler to produce a source-map for us as well.
You’ll learn the following in this post:
Let’s get started with a simple TypeScript example.
The following code snippet shows a simple TypeScript hello world page.
// hello.ts

interface Person {
  firstName: string;
  lastName: string;
}

function hello(person: Person) {
  return "Hello, " + person.firstName + " " + person.lastName;
}

function sayHello() {
  let user = { firstName: "John", lastName: "Doe" };
  document.getElementById("output").innerText = hello(user);
}
TypeScript (TS) is very similar to JavaScript and the example should be understandable even for JS developers unfamiliar with TypeScript.
The corresponding HTML page looks like this:
// hello.html
Note that we are including the hello.js not the hello.ts file in the HTML file. Today’s browser can’t run TS directly, and so we need to compile our hello.ts file into regular JavaScript.
The rest of the HTML file should be clear. There is one button that executes the sayHello() function and
Next step is to compile our TypeScript into JavaScript.
To compile TypeScript into JavaScript you need to have a TypeScript compiler installed. This can be done through NPM (Node Package Manager).
npm install -g typescriptUsing the following command, we can compile our hello.ts file. It should produce a JavaScript version of the file with the *.js extension.
tsc hello.tsIn order to produce a source-map that describes the relationship between the original code (TypeScript) and the generated code (JavaScript), you need to use an additional --sourceMap argument. It generates a corresponding *.map file.
tsc hello.ts --sourceMapYes, it’s that simple.
You can read more about other compiler options if you are interested.
The generated JS file should look like this:
function greeter(person) {
  return "Hello, " + person.firstName + " " + person.lastName;
}
var user = {
  firstName: "John",
  lastName: "Doe"
};
function sayHello() {
  document.getElementById("output").innerText = greeter(user);
}
//# sourceMappingURL=hello.js.map
The most interesting thing is probably the comment at the end of the generated file. The syntax comes from old Firebug times and refers to a source map file containing all information about the original source.
Are you curious what the source map file looks like? Here it is.
{
   "version":3,
   "file":"hello.js",
   "sourceRoot":"",
   "sources":["hello.ts"],
   "names":[],
   "mappings":
"AAKA,SAAS,OAAO,CAAC,MAAc;IAC7B,OAAO,SAAS,GAAG,MAAM,CAAC,SAAS,GAAG,GAAG,GAAG,MAAM,CAAC,QAAQ,CAAC;AAC9D,CAAC;AAED,IAAI,IAAI,GAAG;IACT,SAAS,EAAE,MAAM;IACjB,QAAQ,EAAE,KAAK;CAChB,CAAC;AAEF,SAAS,QAAQ;IACf,QAAQ,CAAC,cAAc,CAAC,QAAQ,CAAC,CAAC,SAAS,GAAG,OAAO,CAAC,IAAI,CAAC,CAAC;AAC9D,CAAC"
}
It contains information (including location) about the generated file (hello.js), the original file (hello.ts), and, most importantly, mappings between those two. With this information, the debugger knows how to interpret the TypeScript code even if it doesn’t know anything about TypeScript.
The original language could be anything (RUST, C++, etc.) and with a proper source-map, the debugger knows what to do. Isn’t that magic?
We are all set now. The next step is loading our little app into the Debugger.
The debugging experience is no different from how you’d go about debugging standard JS. You’re actually debugging the generated JavaScript, but since source-map is available the debugger knows how to show you the original TypeScript instead.
This example is available online, so if you are running Firefox you can try it right now.
Let’s start with creating a breakpoint on line 9 in our original TypeScript file. To hit the breakpoint you just need to click on the Say Hello! button introduced earlier.

See, it’s TypeScript there!
Note the Call stack panel on the right side, it properly shows frames coming from hello.ts file.
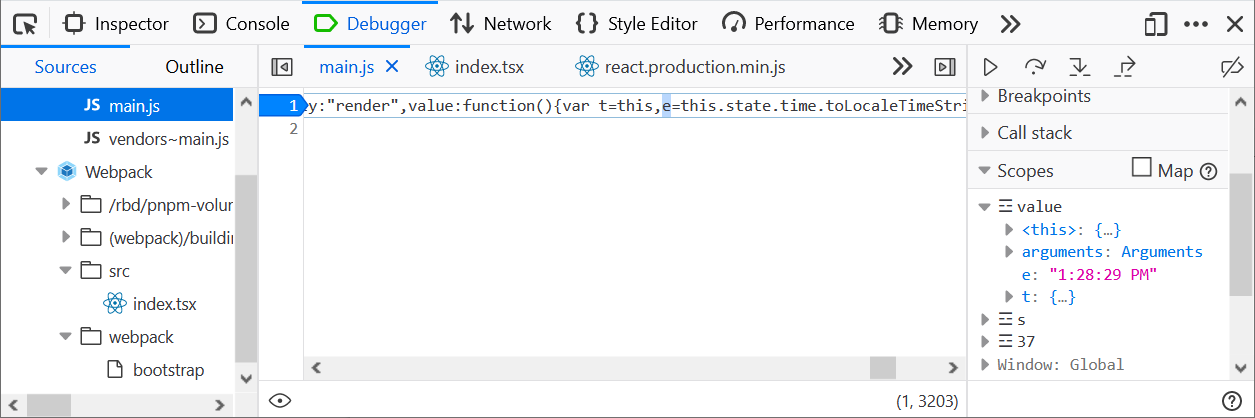
One more thing: If you are interested in seeing the generated JavaScript code you can use the context menu and jump right into it.
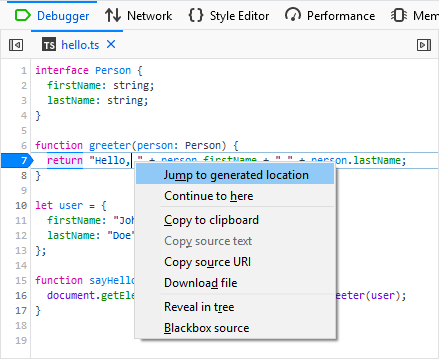
This action should navigate you to the hello.js file and you can continue debugging from the same location.

You can see that the Sources tree (on the left side) shows both these files at the same time.
Let’s take a look at another neat feature that allows inspection of variables in both original and generated scopes.
Here is a more complex glitch example.
Webpack/src/index.tsx file on line 45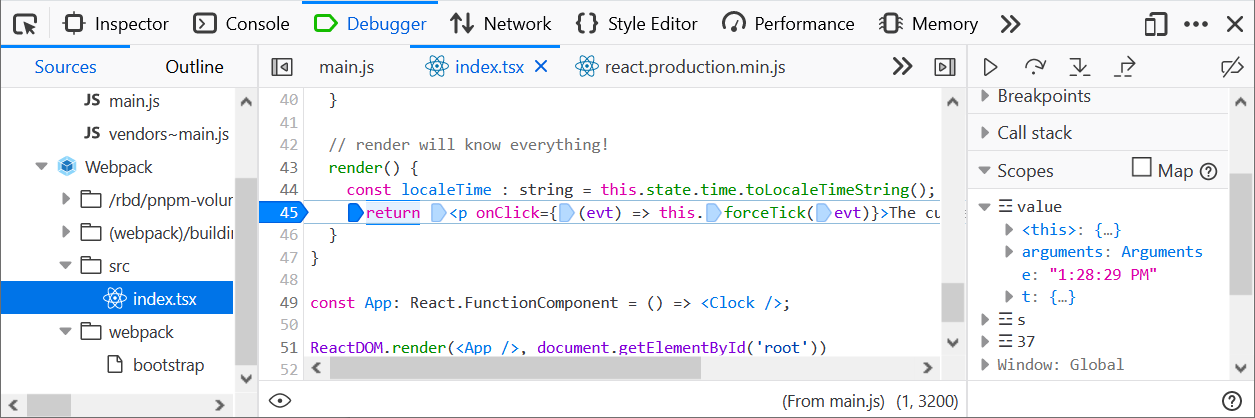
Notice the Scopes panel on the right side. It shows variables coming from generated (and also minified) code and it doesn’t correspond to the original TSX (TypeScript with JSX) code, which is what you see in the Debugger panel.
There is a weird e variable instead of localeTime, which is actually used in the source code.
This is where the Map scopes feature comes handy. In order to see the original variables (used in the original TypeScript code) just click the Map checkbox.
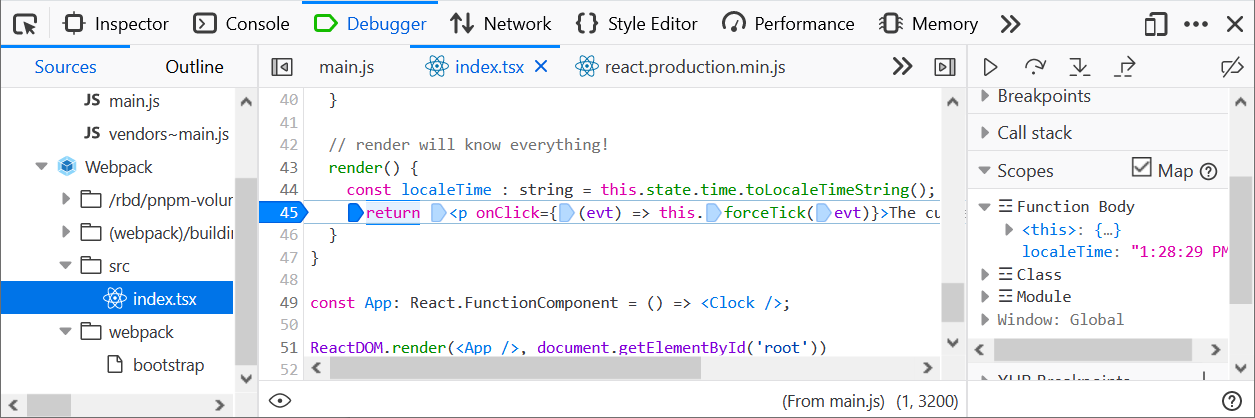
See, the Scopes panel shows the localeTime variable now (and yes, the magic comes from the source map).
Finally, if you are interested in where the e variable comes from, jump into the generated location using the context menu (like we just did in the previous example).
Stay tuned for more upcoming Debugger features!
Jan ‘Honza’ Odvarko
The post Debugging TypeScript in Firefox DevTools appeared first on Mozilla Hacks - the Web developer blog.
https://hacks.mozilla.org/2019/09/debugging-typescript-in-firefox-devtools/
|
|
Georg Fritzsche: Introducing Glean — Telemetry for humans |

When Firefox Preview shipped, it was also the official launch of Glean, our new mobile product analytics & telemetry solution true to Mozillas values. This post goes into how we got there and what it’s design principles are.
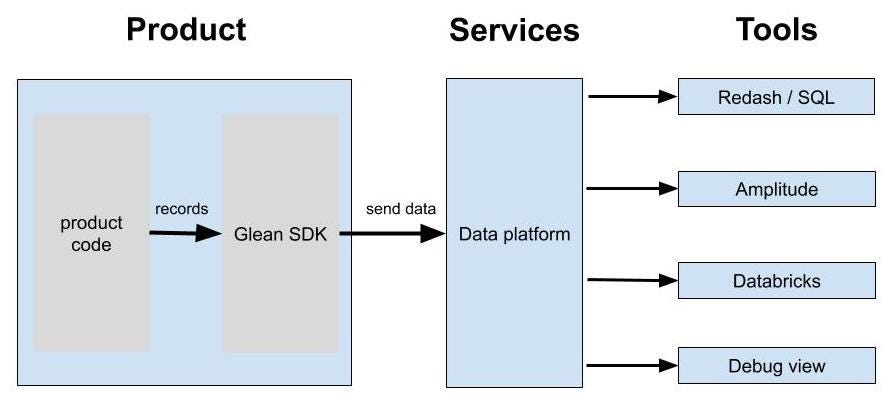
In the last few years, Firefox development has become increasingly data-driven. Mozilla’s larger data engineering team builds & maintains most of the technical infrastructure that makes this possible; from the Firefox telemetry code to the Firefox data platform and hosting analysis tools. While data about our products is crucial, Mozilla has a rare approach to data collection, following our privacy principles. This includes requiring data review for every new piece of data collection to ensure we are upholding our principles — even when it makes our jobs harder.
One great success story for us is having the Firefox telemetry data described in machine-readable and clearly structured form. This encourages best practices like mandatory documentation, steering towards lean data practices and enables automatic data processing — from generating tables to powering tools like our measurement dashboard or the Firefox probe dictionary.
However, we also learned lessons about what didn’t work so well. While the data types we used were flexible, they were hard to interpret. For example, we use plain numbers to store counts, generic histograms to store multiple timespan measures and allow for custom JSON submissions for uncovered use-cases. The flexibility of these data types means it takes work to understand how to use them for different use-cases & leaves room for accidental error on the instrumentation side. Furthermore, it requires manual effort in interpreting & analysing these data points. We noticed that we could benefit from introducing higher-level data types that are closer to what we want to measure — like data types for “counters” and “timing distributions”.
Another factor was that our mobile product infrastructure that was not ideally integrated yet with the Firefox telemetry infrastructure above. Different products used different analytics solutions & different versions of our own mobile telemetry code, across Android & iOS. Also, our own mobile telemetry code did not describe its metrics in machine-readable form. This meant analysis was potentially different for each product & new instrumentations were higher effort. Integrating new products into the Firefox telemetry infrastructure meant substantial manual effort.
From reviewing the situation, one main question came up: What if we could provide one consistent telemetry SDK for our mobile products, bringing the benefits of our Firefox telemetry infrastructure but without the above mentioned drawbacks?
In 2018, we looked at how we could integrate Mozilla’s mobile products better. Putting together what we learned from our existing Firefox Telemetry system, feedback from various user interviews and what we found mattered for our mobile teams, we decided to reboot our telemetry and product analytics solution for mobile. We took input from a cross-functional set of people, data science, engineering, product management, QA and others to form a complete picture of what was required.
From that, we set out to build an end-to-end solution called Glean, consisting of different pieces:
Our main goal was to support our typical mobile analytics & engineering use-cases efficiently, which came down to the following principles:
To make sure that what we build is true to Mozilla’s values, encourages best practices and is sustainable to work with, we added these principles:
One crucial design choice here was to use higher-level metric types for the collected metrics, while not supporting free-form submissions. This choice allows us to focus the Glean end-to-end solution on clearly structured, well-understood & automatable data and enables us to scale analytics capabilities more efficiently for the whole organization.
So how does this work out in practice? To have a more concrete example, let’s say we want to introduce a new metric to understand how many times new tabs are opened in a browser.
In Glean, this starts from declaring that metric in a YAML file. In this case we’ll add a new “counter” metric:
browser.usage:
  tab_opened:
    type: counter
    description: Count how often a new tab is opened. …
    …
Now from here, an API is automatically generated that the product code can use to record when something happens:
import org.mozilla.yourApplication.GleanMetrics.BrowserUsage
…
override fun tabOpened() {
  BrowserUsage.tabOpened.add()
  …
}
That’s it, everything else is handled internally by the SDK — from storing the data, packaging it up correctly and sending it out.
This new metric can then be unit-tested or verified in real-time, using a web interface to confirm the data is coming in. Once the product change is live, data starts coming in and shows up in standard data sets. From there it is available to query using SQL through Redash, our generic go-to data analysis tool. Other tools can also later integrate it, like the measurement dashboard or Amplitude.
Of course there is a set of other metric types available, including events, dates & times and other typical use cases.
Want to see how this looks in code? You can take a look at the Glean Android sample app, especially the metrics.yaml file and its main activity.
The first version of the Glean solution went live to support the launch of Firefox Preview, with an initial SDK support for Android applications & a priority set of data tools. iOS support for the SDK is already planned for 2019, as is improved & expanded integration with different analysis tools. We are also actively considering support for desktop platforms, to make Glean a true cross-platform analytics SDK.
If you’re interested in learning more, you can check out:
We’ll certainly expand on more technical details in future upcoming blog posts.
While this project took contributions from a lot of people, I especially want to call out Frank Bertsch (data engineering lead), Alessio Placitelli (Glean SDK lead) and Michael Droettboom (data engineer & SDK engineer). Without their substantial contributions to design & implementation, this project would not have been possible.
Introducing Glean — Telemetry for humans was originally published in Georg Fritzsche on Medium, where people are continuing the conversation by highlighting and responding to this story.
|
|
David Humphrey: Some Assembly Required |
In my open source courses, I spend a lot of time working with new developers who are trying to make sense of issues on GitHub and figure out how to begin. When it comes to how people write their issues, I see all kinds of styles. Some people write for themselves, using issues like a TODO list: "I need to fix X and Y." Other people log notes from a call or meeting, relying on the collective memory of those who attended: "We agreed that so-and-so is going to do such-and-such." Still others write issues that come from outside the project, recording a bug or some other problem: "Here is what is happening to me..."
Because I'm getting ready to take another cohort of students into the wilds of GitHub, I've been thinking once more about ways to make this process better. Recently I spent a number of days assembling furniture from IKEA with my wife. Spending that much time with Allen keys got me thinking about what we could learn from IKEA's work to enable contribution from customers.

I am not a furniture maker. Not even close. While I own some power tools, most were gifts from my father, who actually knows how to wield them. I'm fearless when it comes to altering bits in a computer; but anything that puts holes in wood, metal, or concrete terrifies me. And yet, like so many other people around the world, I've "built" all kinds of furniture in our house--at least I've assembled it.
In case you haven't bought furniture from IKEA, they are famous for designing not only the furniture itself, but also the materials, packaging, and saving cost by offloading most of the assmbly to the customer. Each piece comes with instructions, showing the parts manifest, tools you'll need (often simple ones are included), and pictorial, step-wise instructions for assembling the piece.
IKEA's model is amazing: amazing that people will do it, amazing that it's doable at all by the general public! You're asking people to do a task that they a) probably have never done before; b) probably won't do again. Sometimes you'll buy 4 of some piece, a chair, and through repeated trial and error, get to the point where you can assemble it intuitively. But this isn't the normal use case. For the most part, we buy something we don't have, assemble it, and then we have it. This means that the process has to work during the initial attempt, without training. IKEA is keen that it work because they don't want you to return it, or worse, never come back again.
Last week I assembled all kinds of things for a few rooms in our basement: chairs, a couch, tables, etc. I spent hours looking at, and working my way through IKEA instructions. Take another look at the Billy instructions I included above. Here's some of what I notice:
It got me thinking about lessons we could learn when filing issues in open source projects. I realize that there isn't a perfect analogy between assmbling furniture and fixing a bug. IKEA mass produces the same bookshelf, chairs, and tables, and these instructions work on all of them. Meanwhile, a bug (hopefully) vanishes as soon as it's fixed. We can't put the same effort into our instructions for a one-off experience as we can for a mass produced one. However, in both cases, I would stress that the experience is similar for the person working through the "assembly," it's often their first time following these steps.
When filing a GitHub issue, what could we learn from IKEA instructions?
These steps aren't always possible or practical. But it takes less work than you might think, and the quality of the contributions you get as a result is worth the upfront investment. In reality, you'll likely end up having to it in reviews after the fact, when people get it wrong. Try doing it at the beginning.
Here's a fantastic example of how to do it well. I've tweeted about this in the past, but Devon Abbott's issue in the Lona repo is fantastic: https://github.com/airbnb/Lona/issues/338. Here we see many of the things outlined above. As a result of this initial work, one of my students was able to jump in.
I want to be careful to not assume that everyone has time to do all this when filing bugs. Not all projects are meant for external contributors (GitHub actually needs some kind of signal so that people know when to engage and when to avoid certain repos), and not all developers on GitHub are looking to mentor or work with new contributors. Regardless, I think we could all improve our issues if we thought back to these IKEA instructions from time to time. A lot of code fixes and regular maintenance tasks should really feel more like assembling furniture vs. hand carving a table leg. There's so much to do to keep all this code working, we are going to have to find ways to engage and involve new generations of developers who need a hand getting started.
|
|
The Firefox Frontier: Stop video autoplay with Firefox |
You know that thing where you go to a website and a video starts playing automatically? Sometimes it’s a video created by the site, and sometimes it’s an ad. That … Read more
The post Stop video autoplay with Firefox appeared first on The Firefox Frontier.
|
|
Hacks.Mozilla.Org: Debugging WebAssembly Outside of the Browser |
WebAssembly has begun to establish itself outside of the browser via dedicated runtimes like Mozilla’s Wasmtime and Fastly’s Lucet. While the promise of a new, universal format for programs is appealing, it also comes with new challenges. For instance, how do you debug .wasm binaries?
At Mozilla, we’ve been prototyping ways to enable source-level debugging of .wasm files using traditional tools like GDB and LLDB.
The screencast below shows an example debugging session. Specifically, it demonstrates using Wasmtime and LLDB to inspect a program originally written in Rust, but compiled to WebAssembly.
This type of source-level debugging was previously impossible. And while the implementation details are subject to change, the developer experience—attaching a normal debugger to Wasmtime—will remain the same.
By allowing developers to examine programs in the same execution environment as a production WebAssembly program, Wasmtime’s debugging support makes it easier to catch and diagnose bugs that may not arise in a native build of the same code. For example, the WebAssembly System Interface (WASI) treats filesystem access more strictly than traditional Unix-style permissions. This could create issues that only manifest in WebAssembly runtimes.
Mozilla is proactively working to ensure that WebAssembly’s development tools are capable, complete, and ready to go as WebAssembly expands beyond the browser.
Please try it out and let us know what you think.
Note: Debugging using Wasmtime and LLDB should work out of the box on Linux with Rust programs, or with C/C++ projects built via the WASI SDK.
Debugging on macOS currently requires building and signing a more recent version of LLDB.
Unfortunately, LLDB for Windows does not yet support JIT debugging.
Thanks to Lin Clark, Till Schneidereit, and Yury Delendik for their assistance on this post, and for their work on WebAssembly debugging.
The post Debugging WebAssembly Outside of the Browser appeared first on Mozilla Hacks - the Web developer blog.
https://hacks.mozilla.org/2019/09/debugging-webassembly-outside-of-the-browser/
|
|
Daniel Stenberg: FIPS ready with curl |
Download wolfSSL fips ready (in my case I got wolfssl-4.1.0-gplv3-fips-ready.zip)
Unzip the source code somewhere suitable
$ cd $HOME/src
$ unzip wolfssl-4.1.0-gplv3-fips-ready.zip
$ cd wolfssl-4.1.0-gplv3-fips-ready
Build the fips-ready wolfSSL and install it somewhere suitable
$ ./configure --prefix=$HOME/wolfssl-fips --enable-harden --enable-all
$ make -sj
$ make install
Download curl, the normal curl package. (in my case I got curl 7.65.3)
Unzip the source code somewhere suitable
$ cd $HOME/src
$ unzip curl-7.65.3.zip
$ cd curl-7.65.3
Build curl with the just recently built and installed fips ready wolfSSL version.
$ LD_LIBRARY_PATH=$HOME/wolfssl-fips/lib ./configure --with-wolfssl=$HOME/wolfssl-fips --without-ssl
$ make -sj
Now, verify that your new build matches your expectations by:
$ ./src/curl -V
It should show that it uses wolfSSL and that all the protocols and features you want are enabled and present. If not, iterate until it does!
“FIPS Ready means that you have included the FIPS code into your build and that you are operating according to the FIPS enforced best practices of default entry point, and Power On Self Test (POST).”
https://daniel.haxx.se/blog/2019/09/04/fips-ready-with-curl/
|
|
Nick Fitzgerald: Combining Coverage-Guided and Generation-Based Fuzzing |
Coverage-guided fuzzing and generation-based fuzzing are two powerful approaches to fuzzing. It can be tempting to think that you must either use one approach or the other at a time, and that they can’t be combined. However, this is not the case. In this blog post I’ll describe a method for combining coverage-guided fuzzing with structure-aware generators that I’ve found to be both effective and practical.
Generation-based fuzzing leverages a generator to create random instances of
the fuzz target’s input type. The csmith program, which generates
random C source text, is one example generator. Another example is any
implementation of the Arbitrary trait from the quickcheck
property-testing framework. The fuzzing engine repeatedly uses the generator to
create new inputs and feeds them into the fuzz target.
// Generation-based fuzzing algorithm.

fn generate_input(rng: &mut impl Rng) -> MyInputType {
    // Generator provided by the user...
}

loop {
    let input = generate_input(rng);
    let result = run_fuzz_target(input);

    // If the fuzz target crashed/panicked/etc report
    // that.
    if result.is_interesting() {
        report_interesting(new_input);
    }
}
The generator can be made structure aware, leveraging knowledge about the fuzz target to generate inputs that are more likely to be interesting. They can generate valid C programs for fuzzing a C compiler. They can make inputs with the correct checksums and length prefixes. They can create instances of typed structures in memory, not just byte buffers or strings. But na"ive generation-based fuzzing can’t learn from the fuzz target’s execution to evolve its inputs. The generator starts from square one each time it is invoked.
Rather than throwing purely random inputs at the fuzz target, coverage-guided fuzzers instrument the fuzz target to collect code coverage. The fuzzer then leverages this coverage information as feedback to mutate existing inputs into new ones, and tries to maximize the amount of code covered by the total input corpus. Two popular coverage-guided fuzzers are libFuzzer and AFL.
// Coverage-guided fuzzing algorithm.

let corpus = initial_set_of_inputs();
loop {
    let old_input = choose_one(&corpus);
    let new_input = mutate(old_input);
    let result = run_fuzz_target(new_input);

    // If the fuzz target crashed/panicked/etc report
    // that.
    if result.is_interesting() {
        report_interesting(new_input);
    }

    // If executing the input hit new code paths, add
    // it to our corpus.
    if result.executed_new_code_paths() {
        corpus.insert(new_input);
    }
}
The coverage-guided approach is great at improving a fuzzer’s efficiency at creating new inputs that poke at new parts of the program, rather than testing the same code paths repeatedly. However, in its na"ive form, it is easily tripped up by the presence of things like checksums in the input format: mutating a byte here means that a checksum elsewhere must be updated as well, or else execution will never proceed beyond validating the checksum to reach more interesting parts of the program.
Coverage-based fuzzing lacks a generator’s understanding of which inputs are well-formed, while generation-based fuzzing lacks coverage-guided fuzzing’s ability to mutate inputs strategically. We would like to combine coverage-guided and generation-based fuzzing to get the benefits of both without the weaknesses of either.
So how do we implement a fuzz target?
When writing a fuzz target for use with coverage-guided fuzzers, you’re typically given some byte buffer, and you feed that into your parser or process it in whatever way is relevant.
// Implementation of a fuzz target for a coverage
// -guided fuzzer.
fn my_coverage_guided_fuzz_target(input: &[u8]) {
    // Do stuff with `input`...
}
However, when writing a fuzz target for use with a generation-based fuzzer, instead of getting a byte buffer, you’re given a structure-aware input that was created by your generator.
// Implementation of a fuzz target for a generation-
// based fuzzer using `csmith`.
fn my_c_smith_fuzz_target(input: MyCsmithOutput) {
    // Compile the C source text that was created
    // by `csmith`...
}

// Implementation of a generator and fuzz target for
// a generation-based fuzzer using the `quickcheck`
// property-testing framework.
impl quickcheck::Arbitrary for MyType {
    fn arbitrary(g: &mut impl quickcheck::Gen) -> MyType {
        // Generate a random instance of `MyType`...
    }
}
fn my_quickcheck_fuzz_target(input: MyType) {
    // Do stuff with the `MyType` instance that was
    // created by `MyType::arbitrary`...
}
The signatures for coverage-guided and generation-based fuzz targets have different input types, and it isn’t obvious how we can reuse a single fuzz target with each approach to fuzzing separately, let alone combine both approaches at the same time.
As a running example, let’s imagine we are authoring a crate that converts back and forth between RGB and HSL colors.
/// A color represented with RGB.
#[derive(Clone, Copy, Debug, PartialEq, Eq)]
pub struct Rgb {
    pub r: u8,
    pub g: u8,
    pub b: u8,
}

impl Rgb {
    pub fn to_hsl(&self) -> Hsl {
        // ...
    }
}

/// A color represented with HSL.
#[derive(Clone, Copy, Debug, PartialEq)]
pub struct Hsl {
    pub h: f64,
    pub s: f64,
    pub l: f64,
}

impl Hsl {
    pub fn to_rgb(&self) -> Rgb {
        // ...
    }
}
Now, let’s start by writing a couple structure-aware test case generators by
implementing quickcheck::Arbitrary for our color types, and then using
quickcheck’s default test runner to get generation-based fuzzing up and
running.
Here are our Arbitrary implementations:
use rand::prelude::*;
use quickcheck::{Arbitrary, Gen};

impl Arbitrary for Rgb {
    fn arbitrary<G: Gen>(g: &mut G) -> Self {
        Rgb {
            r: g.gen(),
            g: g.gen(),
            b: g.gen(),
        }
    }
}

impl Arbitrary for Hsl {
    fn arbitrary<G: Gen>(g: &mut G) -> Self {
        Hsl {
            h: g.gen_range(0.0, 360.0),
            s: g.gen_range(0.0, 1.0),
            l: g.gen_range(0.0, 1.0),
        }
    }
}
Now we need to define what kinds of properties we want to check and what oracles we want to implement to check those properties for us. One of the simplest thigns we can assert is “doing operation X does not panic or crash”, but we might also assert that converting RGB into HSL and back into RGB again is the identity function.
pub fn rgb_to_hsl_doesnt_panic(rgb: Rgb) {
    let _ = rgb.to_hsl();
}

pub fn rgb_to_hsl_to_rgb_is_identity(rgb: Rgb) {
    assert_eq!(rgb, rgb.to_hsl().to_rgb());
}

#[cfg(test)]
mod tests {
    quickcheck::quickcheck! {
        fn rgb_to_hsl_doesnt_panic(rgb: Rgb) -> bool {
            super::rgb_to_hsl_doesnt_panic(rgb);
            true
        }
    }

    quickcheck::quickcheck! {
        fn rgb_to_hsl_to_rgb_is_identity(rgb: Rgb) -> bool {
            super::rgb_to_hsl_to_rgb_is_identity(rgb);
            true
        }
    }
}
Now we can run cargo test and quickcheck will do some generation-based
fuzzing for our RGB and HSL conversion crate — great!
However, so far we have just done plain old generation-based fuzzing. We also want to get the advantages of coverage-guided fuzzing without giving up our nice structure-aware generators.
An easy and practical — yet still effective — way to add coverage-guided fuzzing into the mix, is to treat the raw byte buffer input provided by the coverage-guided fuzzer as a sequence of random values and implement a “random” number generator around it. If our generators only use “random” values from this RNG, never from any other source, then the coverage-guided fuzzer can mutate and evolve its inputs to directly control the structure-aware fuzzer and its generated test cases!
The BufRng type from my bufrng crate is exactly this “random”
number generator implementation:
// Snippet from the `bufrng` crate.

use rand_core::{Error, RngCore};
use std::iter::{Chain, Repeat};
use std::slice;

/// A "random" number generator that yields values
/// from a given buffer (and then zeros after the
/// buffer is exhausted).
pub struct BufRng<'a> {
    iter: Chain<slice::Iter<'a, u8>, Repeat<&'a u8>>,
}

impl BufRng<'_> {
    /// Construct a new `BufRng` that yields values
    /// from the given `data` buffer.
    pub fn new(data: &[u8]) -> BufRng {
        BufRng {
            iter: data.iter().chain(iter::repeat(&0)),
        }
    }
}

impl RngCore for BufRng<'_> {
    fn next_u32(&mut self) -> u32 {
        let a = *self.iter.next().unwrap() as u32;
        let b = *self.iter.next().unwrap() as u32;
        let c = *self.iter.next().unwrap() as u32;
        let d = *self.iter.next().unwrap() as u32;
        (a << 24) | (b << 16) | (c << 8) | d
    }

    // ...
}
BufRng will generate “random” values, which are copied from its given
buffer. Once the buffer is exhausted, it will keep yielding zero.
let mut rng = BufRng::new(&[1, 2, 3, 4]);

assert_eq!(
    rng.gen::<u32>(),
    (1 << 24) | (2 << 16) | (3 << 8) | 4,
);

assert_eq!(rng.gen::<u32>(), 0);
assert_eq!(rng.gen::<u32>(), 0);
assert_eq!(rng.gen::<u32>(), 0);
Because there is a blanket implementation of quickcheck::Gen for all types
that implement rand_core::RngCore, we can use BufRng with any
quickcheck::Arbitrary implementation.
Finally, here is a fuzz target definition for a coverage-guided fuzzer that uses
BufRng to reinterpret the input into something that our Arbitrary
implementations can use:
fn my_fuzz_target(input: &[u8]) {
    // Create a `BufRng` from the raw input byte buffer
    // given to us by the fuzzer.
    let mut rng = BufRng::new(input);

    // Generate an `Rgb` instance with it.
    let rgb = Rgb::arbitrary(&mut rng);

    // Assert our properties!
    rgb_to_hsl_doesnt_panic(rgb);
    rgb_to_hsl_to_rgb_is_identity(rgb);
}
With BufRng, going from quickcheck property tests to combined
structure-aware test case generation and coverage-guided fuzzing only required
minimal changes!
We can get the benefits of both structure-aware test case generators and
coverage-guided fuzzing in an easy, practical way by interpreting the fuzzer’s
raw input as a sequence of random values that our generator uses. Because
BufRng can be used with quickcheck::Arbitrary implementations directly, it
is easy to make the leap from generation-based fuzzing with quickcheck
property tests to structure-aware, coverage-guided fuzzing with libFuzzer or
AFL. With this setup, the fuzzer can both learn from program execution feedback
to create new inputs that are more effective, and it can avoid checksum-style
pitfalls.
If you’d like to learn more, check out these resources:
Structure-Aware Fuzzing with libFuzzer. A great tutorial describing a few different ways to do exactly what it says on the tin.
Write Fuzzable Code by John Regehr. A nice collection of things you can do to make your code easier to fuzz and get the most out of your fuzzing.
cargo fuzz. A tool that makes using libFuzzer with Rust a
breeze.
quickcheck. A port of the popular property-testing framework
to Rust.
bufrng. A “random” number generator that yields pre-determined
values from a buffer (e.g. the raw input generated by libFuzzer or AFL).
Finally, thanks to Jim Blandy and Jason Orendorff for reading an early draft of this blog post. This text is better because of their feedback, and any errors that remain are my own.
http://fitzgeraldnick.com/2019/09/04/combining-coverage-guided-and-generation-based-fuzzing.html
|
|
The Firefox Frontier: Recommended Extensions program—where to find the safest, highest quality extensions for Firefox |
Extensions can add powerful customization features to Firefox—everything from ad blockers and tab organizers to enhanced privacy tools, password managers, and more. With thousands of extensions to choose from—either those … Read more
The post Recommended Extensions program—where to find the safest, highest quality extensions for Firefox appeared first on The Firefox Frontier.
https://blog.mozilla.org/firefox/firefox-recommended-extensions/
|
|
Mozilla Addons Blog: Mozilla’s Manifest v3 FAQ |
Chrome versions the APIs they provide to extensions, and the current format is version 2. The Firefox WebExtensions API is nearly 100% compatible with version 2, allowing extension developers to easily target both browsers.
In November 2018, Google proposed an update to their API, which they called Manifest v3. This update includes a number of changes that are not backwards-compatible and will require extension developers to take action to remain compatible.
A number of extension developers have reached out to ask how Mozilla plans to respond to the changes proposed in v3. Following are answers to some of the frequently asked questions.
One of the proposed changes in v3 is to deprecate a very powerful API called blocking webRequest. This API gives extensions the ability to intercept all inbound and outbound traffic from the browser, and then block, redirect or modify that traffic.
In its place, Google has proposed an API called declarativeNetRequest. This API impacts the capabilities of content blocking extensions by limiting the number of rules, as well as available filters and actions. These limitations negatively impact content blockers because modern content blockers are very sophisticated and employ layers of algorithms to not only detect and block ads, but to hide from the ad networks themselves. Extensions would still be able to use webRequest but only to observe requests, not to modify or block them.
As a result, some content blocking extension developers have stated they can no longer maintain their add-on if Google decides to follow through with their plans. Those who do continue development may not be able to provide the same level of capability for their users.
In the absence of a true standard for browser extensions, maintaining compatibility with Chrome is important for Firefox developers and users. Firefox is not, however, obligated to implement every part of v3, and our WebExtensions API already departs in several areas under v2 where we think it makes sense.
Content blocking: We have no immediate plans to remove blocking webRequest and are working with add-on developers to gain a better understanding of how they use the APIs in question to help determine how to best support them.
Background service workers: Manifest v3 proposes the implementation of service workers for background processes to improve performance. We are currently investigating the impact of this change, what it would mean for developers, and whether there is a benefit in continuing to maintain background pages.
Runtime host permissions: We are evaluating the proposal in Manifest v3 to give users more granular control over the sites they give permissions to, and investigating ways to do so without too much interruption and confusion.
Cross-origin communication: In Manifest v3, content scripts will have the same permissions as the page they are injected in. We are planning to implement this change.
Remotely hosted code: Firefox already does not allow remote code as a policy. Manifest v3 includes a proposal for additional technical enforcement measures, which we are currently evaluating and intend to also enforce.
Google’s proposed changes, such as the use of service workers in the background process, are not backwards-compatible. Developers will have to adapt their add-ons to accommodate these changes.
That said, the changes Google has proposed are not yet stabilized. Therefore, it is too early to provide specific guidance on what to change and how to do so. Mozilla is waiting for more clarity and has begun investigating the effort needed to adapt.
We will provide ongoing updates about changes necessary on the add-ons blog.
Given Manifest v3 is still in the draft and design phase, it is too early to provide a specific timeline. We are currently investigating what level of effort is required to make the changes Google is proposing, and identifying where we may depart from their plans.
Later this year we will begin experimenting with the changes we feel have a high chance of being part of the final version of Manifest v3, and that we think make sense for our users. Early adopters will have a chance to test our changes in the Firefox Nightly and Beta channels.
Once Google has finalized their v3 changes and Firefox has implemented the parts that make sense for our developers and users, we will provide ample time and documentation for extension developers to adapt. We do not intend to deprecate the v2 API before we are certain that developers have a viable path forward to migrate to v3.
Keep your eyes on the add-ons blog for updates regarding Manifest v3 and some of the other work our team is up to. We welcome your feedback on our community forum.
The post Mozilla’s Manifest v3 FAQ appeared first on Mozilla Add-ons Blog.
https://blog.mozilla.org/addons/2019/09/03/mozillas-manifest-v3-faq/
|
|
Hacks.Mozilla.Org: Firefox 69 — a tale of Resize Observer, microtasks, CSS, and DevTools |
For our latest excellent adventure, we’ve gone and cooked up a new Firefox release. Version 69 features a number of nice new additions including JavaScript public instance fields, the Resize Observer and Microtask APIs, CSS logical overflow properties (e.g. overflow-block), and @supports for selectors.
We will also look at highlights from the raft of new debugging features in the Firefox 69 DevTools, including console message grouping, event listener breakpoints, and text label checks.
This blog post provides merely a set of highlights; for all the details, check out the following:
Firefox 69 supports a number of new CSS features; the most interesting are as follows.
69 sees support for some new logical properties — overflow-block and overflow-inline — which control the overflow of an element’s content in the block or inline dimension respectively.
These properties map to overflow-x or overflow-y, depending on the content’s writing-mode. Using these new logical properties instead of overflow-x and overflow-y makes your content easier to localize, especially when adapting it to languages using a different writing direction. They can also take the same values — visible, hidden, scroll, auto, etc.
Note: Look at Handling different text directions if you want to read up on these concepts.
The @supports at-rule has long been very useful for selectively applying CSS only when a browser supports a particular property, or doesn’t support it.
Recently this functionality has been extended so that you can apply CSS only if a particular selector is or isn’t supported. The syntax looks like this:
@supports selector(selector-to-test) {
  /* insert rules here */
}
We are supporting this functionality by default in Firefox 69 onwards. Find some usage examples here.
The most interesting addition we’ve had to the JavaScript language in Firefox 69 is support for public instance fields in JavaScript classes. This allows you to specify properties you want the class to have up front, making the code more logical and self-documenting, and the constructor cleaner. For example:
class Product {
  name;
  tax = 0.2;
  basePrice = 0;
  price;

  constructor(name, basePrice) {
    this.name = name;
    this.basePrice = basePrice;
    this.price = (basePrice * (1 + this.tax)).toFixed(2);
  }
}
Notice that you can include default values if wished. The class can then be used as you’d expect:
let bakedBeans = new Product('Baked Beans', 0.59);
console.log(`${bakedBeans.name} cost $${bakedBeans.price}.`);
Private instance fields (which can’t be set or referenced outside the class definition) are very close to being supported in Firefox, and also look to be very useful. For example, we might want to hide the details of the tax and base price. Private fields are indicated by a hash symbol in front of the name:
#tax = 0.2;
#basePrice = 0;There are a couple of new WebAPIs enabled by default in Firefox 69. Let’s take a look.
Put simply, the Resize Observer API allows you to easily observe and respond to changes in the size of an element’s content or border box. It provides a JavaScript solution to the often-discussed lack of “element queries” in the web platform.
A simple trivial example might be something like the following (resize-observer-border-radius.html, see the source also), which adjusts the border-radius of a
const resizeObserver = new ResizeObserver(entries => {
  for (let entry of entries) {
    if(entry.contentBoxSize) {
      entry.target.style.borderRadius = Math.min(100, (entry.contentBoxSize.inlineSize/10) +
                                                      (entry.contentBoxSize.blockSize/10)) + 'px';
    } else {
      entry.target.style.borderRadius = Math.min(100, (entry.contentRect.width/10) +
                                                      (entry.contentRect.height/10)) + 'px';
    }
  }
});

resizeObserver.observe(document.querySelector('div'));
“But you can just use border-radius with a percentage”, I hear you cry. Well, sort of. But that quickly leads to ugly-looking elliptical corners, whereas the above solution gives you nice square corners that scale with the box size.
Another, slightly less trivial example is the following (resize-observer-text.html , see the source also):
if(window.ResizeObserver) {
  const h1Elem = document.querySelector('h1');
  const pElem = document.querySelector('p');
  const divElem = document.querySelector('body > div');
  const slider = document.querySelector('input');

  divElem.style.width = '600px';

  slider.addEventListener('input', () => {
    divElem.style.width = slider.value + 'px';
  })

  const resizeObserver = new ResizeObserver(entries => {
    for (let entry of entries) {
        if(entry.contentBoxSize) {
            h1Elem.style.fontSize = Math.max(1.5, entry.contentBoxSize.inlineSize/200) + 'rem';
            pElem.style.fontSize = Math.max(1, entry.contentBoxSize.inlineSize/600) + 'rem';
        } else {
            h1Elem.style.fontSize = Math.max(1.5, entry.contentRect.width/200) + 'rem';
            pElem.style.fontSize = Math.max(1, entry.contentRect.width/600) + 'rem';
        }
    }
  });

  resizeObserver.observe(divElem);
}
Here we use the resize observer to change the font-size of a header and paragraph as a slider’s value is changed, causing the containing
So to summarise, Resize Observer opens up a wealth of new responsive design work that was difficult with CSS features alone. We’re even using it to implement a new responsive version of our new DevTools JavaScript console!.
The Microtasks API provides a single method — queueMicrotask(). This is a low-level method that enables us to directly schedule a callback on the microtask queue. This schedules code to be run immediately before control returns to the event loop so you are assured a reliable running order (using setTimeout(() => {}, 0)) for example can give unreliable results).
The syntax is as simple to use as other timing functions:
self.queueMicrotask(() => {
  // function contents here
})
The use cases are subtle, but make sense when you read the explainer section in the spec. The biggest benefactors here are framework vendors, who like lower-level access to scheduling. Using this will reduce hacks and make frameworks more predictable cross-browser.
There are various interesting additions to the DevTools in 69, so be sure to go and check them out!
The JavaScript debugger has some cool new features for stepping through and examining code:
In the new shiny about:debugging page, you’ll find a grouping of options for remotely debugging devices, with more to follow in the future. In 69, we’ve enabled a new mechanism for allowing you to remotely debug other versions of Firefox, on the same machine or other machines on the same network (see Network Location).
In the console, we now group together similar error messages, with the aim of making the console tidier, spamming developers less, and making them more likely to pay attention to the messages. In turn, this can have a positive effect on security/privacy.
The new console message grouping looks like this, when in its initial closed state:
When you click the arrow to open the message list, it shows you all the individual messages that are grouped:

Initially the grouping occurs on CSP, CORS, and tracking protection errors, with more categories to follow in the future.
Next up, we’ll have a look at the Page inspector. When using the picker, or hovering over an element in the HTML pane, the infobar for the element now shows when it is a flex container, item, or both.

See this page for more details.
A final great feature to mention is the new text label checks feature of the Accessibility Inspector.
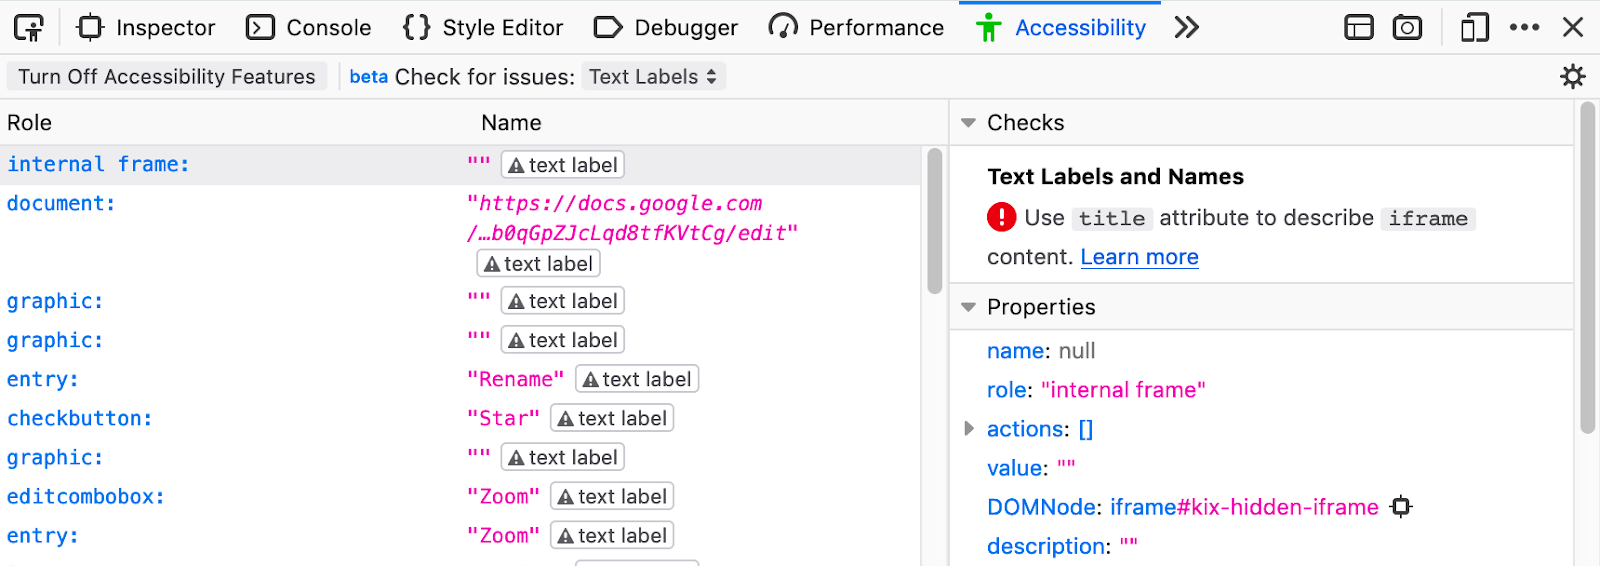
When you choose Check for issues > Text Labels from the dropdown box at the top of the accessibility inspector, it marks all the nodes in the accessibility tree with a warning sign if it is missing a descriptive text label. The Checks pane on the right hand side then gives a description of the problem, along with a Learn more link that takes you to more detailed information available on MDN.
Last but not least, Let’s give a mention to WebExtensions! The main feature to make it into Firefox 69 is User Scripts — these are a special kind of extension content script that, when registered, instruct the browser to insert the given scripts into pages that match the given URL patterns.
In this post we’ve reviewed the main web platform features added in Firefox 69. You can also read up on the main new features of the Firefox browser — see the Firefox 69 Release Notes.
The post Firefox 69 — a tale of Resize Observer, microtasks, CSS, and DevTools appeared first on Mozilla Hacks - the Web developer blog.
https://hacks.mozilla.org/2019/09/firefox-69-a-tale-of-resize-observer-microtasks-css-and-devtools/
|
|
Botond Ballo: A case study in analyzing C++ compiler errors: why is the compiler trying to copy my move-only object? |
Recently a coworker came across a C++ compiler error message that seemed baffling, as they sometimes tend to be.
We figured it out together, and in the hope of perhaps saving some others form being stuck on it too long, I thought I’d describe it.
The code pattern that triggers the error can be distilled down into the following:
#include// for std::move // A type that's move-only. struct MoveOnly { MoveOnly() = default; // copy constructor deleted MoveOnly(const MoveOnly&) = delete; // move constructor defaulted or defined MoveOnly(MoveOnly&&) = default; }; // A class with a MoveOnly field. struct S { MoveOnly field; }; // A function that tries to move objects of type S // in a few contexts. void foo() { S obj; // move it into a lambda [obj = std::move(obj)]() { // move it again inside the lambda S moved = std::move(obj); }(); }
The error is:
test.cpp: In lambda function:
test.cpp:19:28: error: use of deleted function ‘S::S(const S&)’
   19 |     S moved = std::move(obj);
      |                            ^
test.cpp:11:8: note: ‘S::S(const S&)’ is implicitly deleted because the default definition would be ill-formed:
   11 | struct S {
      |        ^
test.cpp:11:8: error: use of deleted function ‘MoveOnly::MoveOnly(const MoveOnly&)’
test.cpp:6:3: note: declared here
    6 |   MoveOnly(const MoveOnly&) = delete;
      |   ^~~~~~~~
The reason the error is baffling is that we’re trying to move an object, but getting an error about a copy constructor being deleted. The natural reaction is: “Silly compiler. Of course the copy constructor is deleted; that’s by design. Why aren’t you using the move constructor?”
The first thing to remember here is that deleting a function using = delete does not affect overload resolution. Deleted functions are candidates in overload resolution just like non-deleted functions, and if a deleted function is chosen by overload resolution, you get a hard error.
Any time you see an error of the form “use of deleted function F“, it means overload resolution has already determined that F is the best candidate.
In this case, the error suggests S’s copy constructor is a better candidate than S’s move constructor, for the initialization S moved = std::move(obj);. Why might that be?
To reason about the overload resolution process, we need to know the type of the argument, std::move(obj). In turn, to reason about that, we need to know the type of obj.
That’s easy, right? The type of obj is S. It’s right there: S obj;.
Not quite! There are actually two variables named obj here. S obj; declares one in the local scope of foo(), and the capture obj = std::move(obj) declares a second one, which becomes a field of the closure type the compiler generates for the lambda expression. Let’s rename this second variable to make things clearer and avoid the shadowing:
// A function that tries to move objects of type S in a few contexts.
void foo() {
  S obj;
  // move it into a lambda
  [capturedObj = std::move(obj)]() {
    // move it again inside the lambda
    S moved = std::move(capturedObj);
  }();
}
We can see more clearly now, that in std::move(capturedObj) we are referring to the captured variable, not the original.
So what is the type of capturedObj? Surely, it’s the same as the type of obj, i.e. S?
The type of the closure type’s field is indeed S, but there’s an important subtlety here: by default, the closure type’s call operator is const. The lambda’s body becomes the body of the closure’s call operator, so inside it, since we’re in a const method, the type of capturedObj is const S!
At this point, people usually ask, “If the type of capturedObj is const S, why didn’t I get a different compiler error about trying to std::move() a const object?”
The answer to this is that std::move() is somewhat unfortunately named. It doesn’t actually move the object, it just casts it to a type that will match the move constructor.
Indeed, if we look at the standard library’s implementation of std::move(), it’s something like this:
templatetypename std::remove_reference ::type&& move(T&& t) { return static_cast ::type&&>(t); }
As you can see, all it does is cast its argument to an rvalue reference type.
So what happens if we call std::move() on a const object? Let’s substitute T = const S into that return type to see what we get: const S&&. It works, we just get an rvalue reference to a const.
Thus, const S&& is the argument type that gets used as the input to choosing a constructor for S, and this is why the copy constructor is chosen (the move constructor is not a match at all, because binding a const S&& argument to an S&& parameter would violate const-correctness).
An interesting question to ask is, why is std::move() written in a way that it compiles when passed a const argument? The answer is that it’s meant to be usable in generic code, where you don’t know the type of the argument, and want it to behave on a best-effort basis: move if it can, otherwise copy. Perhaps there is room in the language for another utility function, std::must_move() or something like that, which only compiles if the argument is actually movable.
Finally, how do we solve our error? The root of our problem is that capturedObj is const because the lambda’s call operator is const. We can get around this by declaring the lambda as mutable:
void foo() {
  S obj;
  [capturedObj = std::move(obj)]() mutable {
    S moved = std::move(capturedObj);
  }();
}
which makes the lambda’s call operator not be const, and all is well.
|
|


