The Mozilla Blog: Welcome Chris Lin, our new Vice President of IT |
I’m excited to announce that Chris Lin is joining us today as our new Vice President of IT.
Chris will work closely with me to scale our impact and optimize operational efficiency. He will be responsible for the strategy, execution and operations of Mozilla’s business technology, information security, data management, network and infrastructure services.
“I am honored to join Mozilla at such an exciting juncture and work with the IT team to support the organization as we develop and grow our business and technical expertise,” said Chris Lin, Mozilla VP of IT. “Mozilla is a truly mission-driven organization with great products and technologies while also promoting internet health including privacy, security, openness, decentralization, digital inclusion, and web literacy. It’s wonderful to be part of Mozilla and contribute to our mission.”
Chris Lin joins Mozilla with a vast wealth of experience in IT, infrastructure, product management and cloud services. Chris was most recently at Facebook where he was Director of Enterprise Platform Infrastructure overseeing software-centric platform engineering, infrastructure services, applications operations, and data operations for Facebook business. Chris previously held other leadership roles in the industry including Vice President of Infrastructure AutoDesk, VP of Engineering & Infrastructure Operations at Symantec, and Principal of Architecture Services at VeriSign. Chris is also the founder and former President and CEO of iDini Corporation, a provider of scalable network computing for carrier-grade cloud services serving mobile devices.
Join me in welcoming Chris to Mozilla!
Denelle
The post Welcome Chris Lin, our new Vice President of IT appeared first on The Mozilla Blog.
https://blog.mozilla.org/blog/2018/05/07/welcome-chris-lin-our-new-vice-president-of-it/
|
|
The Mozilla Blog: Mozilla’s 48-Hour Hackathon for a Better Internet |
A decentralized alternative to today’s social media platforms. A community-built air quality monitor to thwart pollution in Buenos Aires. An open-source investigative tool for journalists in Hungary.
These are just three of nearly 150 projects from 24 countries participating in the 2018 Global Sprint, Mozilla’s fifth-annual distributed hackathon. Each year, coders, scientists, artists and activists gather online and in person for 48 hours to collaborate on open-source projects. This year’s Global Sprint is happening Thursday, May 10 and Friday, May 11.
“The Global Sprint is a way for the open-source community to swap code and ideas and energize their latest projects,” says Zannah Marsh, Mozilla’s Learning Strategist who helps lead the hackathon. “But the Sprint has a bigger mission, too. It introduces more people to the value of open-source approaches. And so many of the people and projects participating address the biggest issues online today — erosion of privacy, centralization of power, disenfranchisement. In the Sprint’s 48 hours, solutions to these issues take a big step forward.”
Here’s a snapshot of some of the projects, people, and places participating:

In Accra, Ghana, Yannick-No"el Aka is rallying coders from Nigeria, Kenya, South Africa and Cote d’Ivoire to participate. Learn more»

In Portland, OR, neuroscientists and civic hackers are working shoulder-to-shoulder on issues like disaster resilience and open protocols. Learn more»
Parliamentary Debates Open is seeking coders and designers to further expand the tool, a resource for investigative journalists in Hungary. Learn more»

The Commons Platform is seeking feedback on its model, a decentralized and cooperatively-owned social media destination. Learn more»
Want to participate in the Global Sprint? View all projects, and browse all sites. See you there!
The post Mozilla’s 48-Hour Hackathon for a Better Internet appeared first on The Mozilla Blog.
https://blog.mozilla.org/blog/2018/05/07/mozillas-48-hour-hackathon-for-a-better-internet/
|
|
Daniel Pocock: Powering a ham radio transmitter |
Last week I announced the crowdfunding campaign to help run a ham radio station at OSCAL. Thanks to all those people who already donated or expressed interest in volunteering.
Modern electronics are very compact and most of what I need to run the station can be transported in my hand luggage. The two big challenges are power supplies and antenna masts. In this blog post there are more details about the former.
Here is a picture of all the equipment I hope to use:
The laptop is able to detect incoming signals using the RTL-SDR dongle and up-converter. After finding a signal, we can then put the frequency into the radio transmitter (in the middle of the table), switch the antenna from the SDR to the radio and talk to the other station.
The RTL-SDR and up-converter run on USB power and a phone charger. The transmitter, however, needs about 22A at 12V DC. This typically means getting a large linear power supply or a large battery.
In the photo, I've got a Varta LA60 AGM battery, here is a close up:
There are many ways to connect to a large battery. For example, it is possible to use terminals like these with holes in them for the 8 awg wire or to crimp ring terminals onto a wire and screw the ring onto any regular battery terminal. The type of terminal with these extra holes in it is typically sold for car audio purposes. In the photo, the wire is 10 awg superflex. There is a blade fuse along the wire and the other end has a PowerPole 45 plug. You can easily make cables like this yourself with a PowerPole crimping tool, everything can be purchased online from sites like eBay.
The wire from the battery goes into a fused power distributor with six PowerPole outlets for connecting the transmitter and other small devices, for example, the lamp in the ATU or charging the handheld:
The AGM battery in the photo weighs about 18kg and is unlikely to be accepted in my luggage, hence the crowdfunding campaign to help buy one for the local community. For many of the young people and students in the Balkans, the price of one of the larger AGM batteries is equivalent to about one month of their income so nobody there is going to buy one on their own. Please consider making a small donation if you would like to help as it won't be possible to run demonstrations like this without power.
https://danielpocock.com/powering-a-ham-radio-demo-oscal-2018
|
|
Cameron Kaiser: TenFourFox FPR7 available |
http://tenfourfox.blogspot.com/2018/05/tenfourfox-fpr7-available.html
|
|
Mozilla VR Blog: Experimenting with Computer Vision in WebXR |

Over the past few months, we’ve been experimenting with what it would take to enable efficient, usable computer vision in WebXR. We’ve implemented a simple set of APIs in our iOS WebXR Viewer and the webxr-polyfill to test these ideas, and created some examples demonstrating how these APIs would work in practice, from simple color detection to tracking black and white markers in 3D using a WebAssembly version of the OpenCV computer vision library.
The simplest example we built computes two values: the average luminance of all pixels in the image, and the RGB color of the pixels in the center of the screen. (Interestingly, since most cameras have auto-gain turned on, the average luminance is usually close to 0.5 in our tests.)
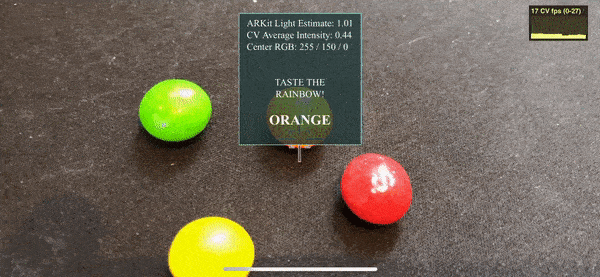
While seemingly trivial, even simple image analysis can be used in interesting ways, such detecting if a yellow post-it note is on the screen, or activating bombs to blow up zombies in an AR game students at Georgia Tech and the Savannah College of Art and Design made back in 2009.
Download the WebXR Viewer app and try a few samples, or use the sample code (available on github) as the starting point for your own explorations.
Many XR displays have cameras integrated into them, such the HTC Vive, Microsoft Hololens, and phones and tablets running ARKit and ARCore. WebXR can enable a wide range of cross platform applications that require non-standard tracking and sensing of the environment if it is possible to efficiently access video images from these cameras in Javascript, along with the properties of the camera such as it’s field of view and pose in the world.
Currently, XR platforms expose the pose (position and orientation) of the user’s display in the space around it. Some devices also track one or two controllers in the same space; others sense the structure of that space, either as full 3D meshes (on Windows MR and Hololens devices) or as planes (on ARKit and ARCore).
But AR applications, in particular, need to know more than just where they are in space; they also need to be able to sense and track “things” in the world. An AR application can only “augment” those things (people, images, or objects) that it knows about. Unfortunately, the various XR platforms will not be able to detect and track every possible thing an application might care about any time soon. Platforms like ARKit and ARCore are adding new sensing capabilities with each version, but those features are platform specific, preventing applications that rely on them from running everywhere.
Native applications can leverage SDKs like PTC’s Vuforia to detect and track images and objects. Lower level computer vision libraries like OpenCV let sophisticated developers create their own libraries for detecting and tracking things they care about. OpenCV can now be compiled into Web Assembly (a standard build target since December 2017) and run in a web page or Web Worker, opening the door to doing more sophisticated custom computer vision on the web.
Some of these algorithms will make it into the browsers over time, but a web standard like WebXR needs to expose a common subset of AR and VR capabilities that work on any platform, so that web apps written using the standard can reasonably expect to run everywhere. Each of the AR platforms supports a different set of sensing capabilities, and there is no reason to expect that every platform will support every possible form of sensing any time soon (if ever). There will continue to be new algorithms to sense and detect specific things in the environment, and being able to run them in every browser will let them be delivered to the widest audience.
It’s currently possible to do simple computer vision on the web, by grabbing video frames from a device obtained from mediaDevices.getUserMedia(), but the limitations of current Web APIs make it difficult to implement sophisticated algorithms comparable to what is possible in native applications.
Three things need to be added to Web APIs to make them amenable to sophisticated computer vision.
The first is the most well known to programmers who have tried to do web-based CV:
Efficient, real-time access to video from the cameras attached to devices
To use mediaDevices.getUserMedia(), a programmer attaches the media device to a DOM video element, and renders from the video element into a canvas element to retrieve a video frame. The MediaStream Image Capture draft proposal is designed to make this more efficient, allowing developers to directly retrieve an ImageBitmap from a video stream using the grabFrame() method (it is currently only implemented in Chrome).
The second issue is that web APIs do not give enough information about the cameras themselves. Many computer vision algorithms require knowledge about the optical characteristics of the camera, so we need:
Knowledge about the intrinsic properties (including focal length, skew and principal point) of the cameras.
Current web standards haven’t exposed this information because most cameras attached to computers today do not make their intrinsic details available to the platform. A proposal for a MediaStream Capture Depth Stream Extension explored how to extend the Media Capture and Streams specification to support depth-only or combined depth+color streams. As part of that draft specification, the MediaTrackSettings dictionary was extended to include the intrinsic properties of the camera, including focal length, principal point and distortion coefficients.
Like some depth cameras, it is reasonable to assume that the precise details of the cameras on a WebXR device are available via the platform. For example, Hololens’ camera includes this information in metadata attached to each captured frame, and ARKit and ARCore provide camera intrinsics to developers.
Finally, beyond efficient access to camera data and the camera properties, WebXR devices know the pose of the device in some world coordinate system, which means the systems knows the pose of the camera when a video frame is captured (the extrinsic properties of the camera). This information needs to be made available to the developer (as described, again, in the Hololens’ documentation).
Therefore, the third requirement for doing computer vision on the web (in WebXR) is:
Knowledge about the extrinsic properties (pose relative to the head and world coordinate systems) of the cameras
Together, these three pieces of information would allow developers to do custom computer vision on the web, in a way that leverages and integrates with the WebXR APIs and underlying platforms. To demonstrate how this might work, we added a simple API to obtain this information from our WebXR Viewer iOS app and webxr-polyfill.
The WebXR Viewer is based on ARKit, and runs by injecting information into Apple’s wkWebview, the same underlying iOS library that all web browsers on iOS use. (Apple restricts iOS web browsers from using any other web component in their applications, or from modifying the wkWebView.) Each time the app gets a video frame and the associated updates about real-world Anchors from ARKit, we inject all of this information into the wkWebview, which is then exposed to the programmer via the WebXR polyfill. This process is moderately expensive (the data needs to be converted into a Javascript command that is executed in the Webview, with the data being formatted as a JSON object).
To send in a large binary object like a frame of video into the wkWebView, it must first be encoded as a text string (using base64 encoding, in this case), and then decoded inside the Webview. As you can imagine, this is quite expensive to do every video frame, but it works surprisingly well as long as we downsample the video frame well below the full size provided by ARKit (e.g., on an iPhone X, the video frames are 1080p resolution, which is far too large). In each of the examples discussed here, you can see a graph of the “CV fps” (computer vision frames per second) in the upper right corner. In the WebXR Viewer, it’s often surprisingly low (less than 10 fps, or worse) even though the graphics are rendering at close to 60 frames per second. We suspect this is a combination of factors; partially the overhead of passing these huge strings into the Webview and then on into a Web Worker, and partially because ARKit is consuming a lot of the available processor cycles in the background.
The webxr-polyfill works in traditional browsers, and we implemented the computer vision extensions as well as we could in such browsers (using mediaDevices.getUserMedia() to retrieve low resolution video frames), mostly to simplify debugging. While the CV examples don’t work completely without the spatial tracking or camera intrinsics provided by ARKit, you can see from the two images below that they yield much higher CV frame rates than in the WebXR Viewer, typically running at the video frame rate of 60 frames per second (these images were captured in Mobile Safari on the same iPhone as the videos in this page). Efficient native implementations should yield even better results.
|

|
A second performance issue with the WebXR Viewer is that the video is being displayed in the native application and the web graphics are being rendered by a separate thread in the web view, without any synchronization between the Javascript thread and the native threads. The positive side of this is that the video is rendered very quickly; the negative side is that the two are not tightly aligned, so the graphics appear to swim relative to the video.
Neither of these problems will exist in a native implementation of this API, and while they distract a bit from the final result, we are able to experiment with how this might be presented to web programmers.
Any web API that accesses the camera will need to obtain explicit user permission, just as current camera, microphone and geolocation APIs do. Hopefully, as WebXR is added to new browsers, we won’t end up with a sequence of popups users click through without reading, but to keep things simple in our implementation, we are explicitly asking for permission each time a web app request video frames.

One interesting question we had to consider for this permissions dialog is the differentiation between the browser displaying the video, and the web page having access to the video frames. Phrasing this such that user’s understand what is being asked, and implementing the APIs such that users can toggle access on and off over time (for example) are challenges that will need to be addressed.
The color detection example above relied on just the first of the three requirements mentioned above: efficient video access. Because that example simply looks at the pixels and doesn’t use any spatial information (such as the pose or focal length of the camera), it doesn’t need to know those camera details. It’s easy to think of a variety of simple computer vision and image processing techniques that only need this limited information.
An collection of more complex examples can be found in the documentation for the Web Assembly version of OpenCV. We used one of their examples, face detection, as the basis for a second sample, one that is more complex than the simple color detector above, but still only relies on access to the video frames. Face detection algorithms typically use some form of template matching to find faces in an image, and return the bounding box (in 2D) of the detected faces.
You can run the example in the WebXR Viewer, or in any browser supporting WebRTC here.
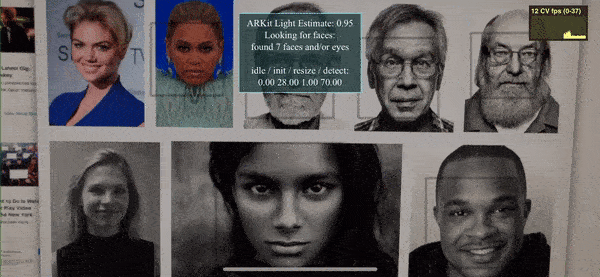
You will notice a few things if you run the sample. Clicking on the graph in the upper right, you will see that the graphics speed (FPS) is likely higher than the computer vision speed (CV fps), which is possible because the face detector is running asynchronously in a Web Worker. Because the vision processing is asynchronous and can be slower than the rendering, the bounding boxes around detected faces lag a little behind the video. However, because it is asynchronous, we are not constrained to use algorithms that can run in real time, once per frame: if you hold a picture with many faces in front of the camera, the speed will drop, but the graphics speed will hold steady.
An obvious problem with this approach is that in a moving scene, if the analysis takes too long, the bounding boxes we get will not correspond to what’s in the scene when the application receives them from the Web Worker. Correcting for this latency is difficult because the bounding boxes are 2D, not 3D: we don’t know where the faces are relative to the viewer, just where they appeared in 2D in the video image.
By leveraging the second and third properties listed above (intrinsic and extrinsic information about the camera), we can do better. Knowing the intrinsic properties of the camera (it’s field of view, and so on), computer vision algorithms can determine where something is in 3D relative to the camera. Knowing the extrinsic properties of the camera (where it is in the world), allows us to then know where those things are in 3D world coordinates.
To leverage this information when not running the computer vision synchronously with the rendering, we need one more thing: a way to relate the pose camera when the video frame was captured to the pose of the WebXR device. In general, the renderer and camera many not run at the same speeds (for example, the HTC Vive displays at 90Hz, but its front-facing camera runs at 60Hz), and even when they do (such as in ARKit), by the time the asynchronous computer vision processing is finished, the camera will have moved. XR systems (like Hololens, ARCore and ARKit) do not guarantee that world coordinates are stable over time. In practice, this means that from one rendering frame to the next, the coordinate system in which the positions of the device and any Anchors in the world are reported may change, so the extrinsic camera parameters from one frame may not be valid the next frame.
We solve this problem by expressing the camera’s extrinsic pose relative to an Anchor in the scene, not in world coordinates: by knowing the pose of the camera relative to some Anchor when a video frame is captured, at some point in the future we can find the Anchor in world coordinates, and compute where things relative to that camera are in the current world coordinates.
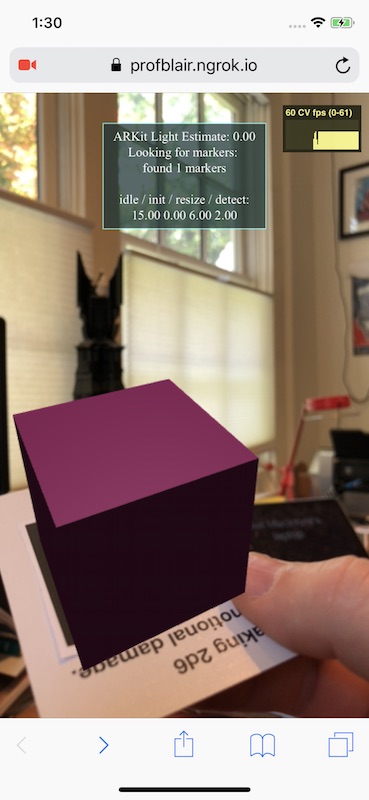
To explore this idea we used another OpenCV example, the Aruco marker tracker for small black and white markers. Each computer vision frame, we use OpenCV to detect the pose of any visible markers relative to the camera. When we receive this information back from the Web Worker, we can determine the pose of each marker relative to the Anchor used for the extrinsic pose of the camera, and in turn compute the location of each marker in the current world coordinates.
Given a marker pose in world coordinates, the first time we see a specific Aruco marker we create an new Anchor for it. When we get an updated pose for the marker in subsequent frames, we compute a offset from the maker’s Anchor, and use that to position the content correctly near the Anchor each time the scene is rendered.
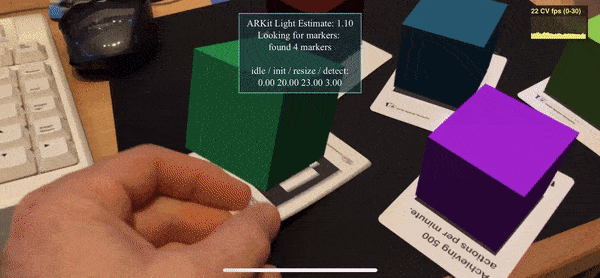
As you can see in the video, this has some nice properties. When the markers are not visible (either because they are occluded or because the camera is moving fast and the video is blurry), the boxes drawn on the markers are still tracked in the world, because they are attached to Anchors which are updated each frame by the platform. Since we have the accurate camera properties, the real-world pose of each cube is relatively accurate, so the cubes appear to be stable in the world. Even when the marker tracker is running very slowly, the results acceptable.
The specific API and approach we have taken is by no means a firm proposal for how this might be implemented in practice, but rather a feasibility demonstration. While the cameras attached to WebXR displays could be exposed directly through the WebXR APIs, as we have done here, there are existing web APIs that it could be extended to support much of what is needed.
Two components will probably need to be exposed through the WebXR APIs: the physical configuration of the display, and a way of relating the pose of the camera frames to the device pose. The pose of each camera attached to a WebXR display (part of the extrinsic parameters mentioned above) are particular to WebXR; AR and VR displays will have this information precisely calibrated and available to the browser, but other computing devices may not. And to determine where the camera was looking when a frame was captured (in the coordinate system of the device) will require knowing the precise relationship between the timestamps of the video frame and the WebXR API poses, something not currently possible inside the web page.
A minimal approach might only require the WebXR Device API to expose the spatial configuration of the cameras on the device, some way to synchronize camera and devices poses, and pointers to instances of the camera devices implemented via an extended version of the MediaStream Image Capture API mentioned above.
Some additional functionality may be required to ensure the camera implementations are efficient enough. For example, video frames are large, and each additional copy or format conversion of a frame adds latency and wastes battery and processing time, precious commodities when doing high performance 3D graphics on mobile devices. Extensions to the MediaStream APIs could support returning video in its native format, and to fire events when new frames are ready to reduce latency and unnecessary polling. These ideas were explored in a proposed Media Capture Stream with Worker extension to the MediaStream API. While work on that proposal was discontinued last year, it may be worth revisiting. Similarly, the extentions to the MediaTrackSettings dictionary proposed as part of the MediaStream Capture Depth Stream Extensions included the intrinsic properties of the camera, including focal length, principal point and distortion coefficients.
Regardless of the approach used, it seems clear that supporting high performance, custom computer vision in web pages as part of WebXR is possible. Such support would open the door to a wide variety of cross-platform AR applications that would otherwise be difficult or impossible to create.
We welcome your thoughts on these ideas, and encourage you to try them yourself with the WebXR Viewer and webxr-polyfill, or to join the Immersive Web Community and help define these (and other) aspects of the future of AR and VR on the web.
I want to thank the people who have contributed to this project, especially Roberto Garrido who implemented these capabilities in the WebXR Viewer and worked on the modifications to the webxr-polyfill with me. Anssi Kostiainen and Ningxin Hu (Intel), Chia-hung Tai (formerly at Mozilla) and Rob Manson have all pointed me at the draft extensions to the MediaStream APIs at different times over the past few years; Ningxin has be very generous with ideas on how to fully integrate these with WebXR, and in helping me getting OpenCV working (including modifying the opencv.js build scripts to include the Aruco marker tracker). Iker Jamardo at Google demonstrated that it was feasible to inject video frames into the wkWebView, and provided other implementation feedback. I had a number of conversations with him about these ideas, as well as with Josh Marinacci, Trevor F. Smith, Kip Gilbert, Lars Bergstrom and Anselm Hook at Mozilla, all of whom provided input and inspiration. Members of the Immersive Web Community also provided early feedback to these ideas, and it was during discussions last year that the idea of using timestamps and anchors to deal with fully asynchronous video originated.
https://blog.mozvr.com/experimenting-with-computer-vision-in-webxr/
|
|
Chris H-C: TIL: C++ character constants aren’t created equal |

When reviewing a patchset involving files, strings, timers, and multiple threads (essentially all the “tough to review” checkboxes right there), a comment from :froydnj caught my eye:
> +const char* kPersistenceFileName = "gv_measurements.json";
> +const char* kPersistenceFileNameNoExt = "gv_measurements";

Please make these `const char kPersistence...[] = "..."`, which is slightly smaller on all of our usual systems.
Why? Aren’t C arrays just pointers to the first element? Don’t we treat char[] and char* identically when logging or appending them to higher-order string objects?
Influenced by :Dexter and :jan-erik, I tried this out myself. I made two small C programs arr.c and ptr.c where the only difference was that one had a const char* and the other a const char[].
I compiled them both with gcc and then checked their sizes in bytes.
Sure enough, though ptr.c was smaller by one byte (* is one character and [] is two), after being compiled ptr was larger by a whole 8 bytes!
This is because C arrays aren’t identical to pointers to the first element. Instead they are identifiers that are (most of the time) implicitly converted to be pointers to the first element. For instance, if you’re calling a function void foo(char c[]), inside the function `c` is implicitly a char* and its size is that of a pointer, but outside of the function c could be an array with its size being the length of the array. As an example:
void foo(char c[]) {
  printf("sizeof(c): %d\n", sizeof c);
}
int main(void) {
  char arr[] = "a";
  printf("sizeof(arr): %d\n", sizeof arr);
  return 0;
}
Prints:
sizeof(arr): 2
sizeof(c): 8
Another way to think about this is that the char* form allocates two things: the actual string of four (“abc” plus “\0”) characters, and a pointer called ptr that contains the address of the place the ‘a’ character is stored.
This is in contrast to the char[] form which allocates just the four-character string and allows you to use the name arr to refer to the place the ‘a’ character is stored.
So, in conclusion, if you want to save yourself a pointer’s width on your constant strings, you may wish to declare them as char[] instead of char*.
:chutten
https://chuttenblog.wordpress.com/2018/05/04/til-c-character-constants-arent-created-equal/
|
|
Mozilla VR Blog: This week in Mixed Reality: Issue 5 |

As we continue to add the building blocks, we’re really seeing Firefox Reality, Hubs and the content related projects coming together.
This week we continue to sprint towards delivering a MVP:
Since the announcement of our Hubs by Mozilla preview release, we are focusing on bug fixes and polishing up the bits and pieces:
In addition to making Hubs the best social experience, we are tying up all the loose ends on self hosting.
Join our public WebVR Slack #social channel to participate in on the discussion!
We’re focusing on quality, bug fixes and mobile support on the WebVR exporter tool in Unity.
The WebXR Viewer on iOS now supports computer vision directly in the browser! Face detection, marker detection, etc. in WASM, alongside ARKit & WebXR. Article with more details coming soon...
Stay tuned next week for more developments across our three broad areas!
|
|
Hacks.Mozilla.Org: CDN, BCD, and SVG: MDN Changelog for April 2018 |
|
|
Daniel Pocock: GoFundMe: errors and bait-and-switch |
Yesterday I set up a crowdfunding campaign to purchase some equipment for the ham radio demo at OSCAL.
It was the first time I tried crowdfunding and the financial goal didn't seem very big (a good quality AGM battery might only need EUR 250) so I only spent a little time looking at some of the common crowdfunding sites and decided to try GoFundMe.
While the campaign setup process initially appeared quite easy, it quickly ran into trouble after the first donation came in. As I started setting up bank account details to receive the money, errors started appearing:

I tried to contact support and filled in the form, typing a message about the problem. Instead of sending my message to support, it started trying to show me long lists of useless documents. Finally, after clicking through several screens of unrelated nonsense, another contact form appeared and the message I had originally typed had been lost in their broken help system and I had to type another one. It makes you wonder, if you can't even rely on a message you type in the contact form being transmitted accurately, how can you rely on them to forward the money accurately?
When I finally got a reply from their support department, it smelled more like a phishing attack, asking me to give them more personal information and email them a high resolution image of my passport.
If that was really necessary, why didn't they ask for it before the campaign went live? I felt like they were sucking people in to get money from their friends and then, after the campaign gains momentum, holding those beneficiaries to ransom and expecting them to grovel for the money.
When a business plays bait-and-switch like this and when their web site appears to be broken in more ways than one (both the errors and the broken contact form), I want nothing to do with them. I removed the GoFundMe links from my blog post and replaced them with direct links to Paypal. Not only does this mean I avoid the absurdity of emailing copies of my passport, but it also cuts out the five percent fee charged by GoFundMe, so more money reaches the intended purpose.
Another observation about this experience is the way GoFundMe encourages people to share the link to their own page about the campaign and not the link to the blog post. Fortunately in most communication I had with people about the campaign I gave them a direct link to my blog post and this makes it easier for me to change the provider handling the money by simply removing links from my blog to GoFundMe.
While the funding goal hasn't been reached yet, my other goal, learning a little bit about the workings of crowdfunding sites, has been helped along by this experience. Before trying to run something like this again I'll look a little harder for a self-hosted solution that I can fully run through my blog.
I've told GoFundMe to immediately refund all money collected through their site so donors can send money directly through the Paypal donate link on my blog. If you would like to see the ham radio station go ahead at OSCAL, please donate, I can't take my own batteries with me by air.

|
|
Daniel Pocock: Turning a dictator's pyramid into a ham radio station |
(Update: due to concerns about GoFundMe, I changed the links in this blog post so people can donate directly through PayPal. Anybody who tried to donate through GoFundMe should be receiving a refund.)
I've launched a crowdfunding campaign to help get more equipment for a bigger and better ham radio demo at OSCAL (19-20 May, Tirana). Please donate if you would like to see this go ahead. Just EUR 250 would help buy a nice AGM battery - if 25 people donate EUR 10 each, we can buy one of those.
You can help turn the pyramid of Albania's former communist dictator into a ham radio station for OSCAL 2018 on 19-20 May 2018. This will be a prominent demonstration of ham radio in the city center of Tirana, Albania.
Under the rule of Enver Hoxha, Albanians were isolated from the outside world and used secret antennas to receive banned television transmissions from Italy. Now we have the opportunity to run a ham station and communicate with the whole world from the very pyramid where Hoxha intended to be buried after his death.
Donations will help buy ham and SDR equipment for communities in Albania and Kosovo and assist hams from neighbouring countries to visit the conference. We would like to purchase deep-cycle batteries, 3-stage chargers, 50 ohm coaxial cable, QSL cards, PowerPole connectors, RTL-SDR dongles, up-convertors (Ham-it-up), baluns, egg insulators and portable masts for mounting antennas at OSCAL and future events.
The station is co-ordinated by Daniel Pocock VK3TQR from the Debian Project's ham radio team.
Donations of equipment and volunteers are also very welcome. Please contact Daniel directly if you would like to participate.
Any donations in excess of requirements will be transferred to one or more of the hackerspaces, radio clubs and non-profit organizations supporting education and leadership opportunities for young people in the Balkans. Any equipment purchased will also remain in the region for community use.
Please click here to donate if you would like to help this project go ahead. Without your contribution we are not sure that we will have essential items like the deep-cycle batteries we need to run ham radio transmitters.
https://danielpocock.com/turning-a-dictators-pyramid-into-a-ham-radio-station
|
|
Mozilla Addons Blog: Winners of the Firefox Quantum Extensions Challenge to be announced May 8! |
The winners of the Firefox Quantum Extensions Challenge will be announced on Tuesday, May 8.
Tune in to the live awards ceremony on Air Mozilla at 17:00 UTC (what time is that in my region?) to discover which extensions were named Best Dynamic Theme, Best Tab Manager / Tab Organizer, and Best Extension for Games & Entertainment.
The post Winners of the Firefox Quantum Extensions Challenge to be announced May 8! appeared first on Mozilla Add-ons Blog.
|
|
Air Mozilla: Reps Weekly Meeting, 03 May 2018 |
 This is a weekly call with some of the Reps to discuss all matters about/affecting Reps and invite Reps to share their work with everyone.
|
|
Hacks.Mozilla.Org: Creating Web Things with Python, Node.js, and Java |
The Mozilla IoT team recently released the Things Framework, which allows you to build IoT devices that speak the Web Thing API. Last week, James built an ESP8266 web thing. This time, I’m going to show you how to build web things with Python, Node.js, or Java. These languages are definitely not optimal for small embedded devices; this tutorial is intended for higher-end devices that can run these languages with ease, or even your own desktop computer.
To demonstrate, we’ll be turning the Music Player Daemon (MPD) into a web thing. The libraries we’ll be using here are webthing-python, webthing-node, and webthing-java.
The Music Player Daemon is an open-source music player that has been around since 2003. MPD operates in a client/server model, and is controllable over TCP with a simple text-based protocol. I won’t cover installation here, but MPD can be installed via your package manager on Linux, Homebrew on Mac OS X, or with binaries on Windows.
Although this example is written for MPD, it would be easily portable to other music players with an API, or you could build your own player using this example as a base. More importantly, this example is primarily meant to demonstrate the Things Framework, which can be used to create an endless variety of web things.
The Python, Node.js, and Java web thing libraries all have essentially the same API. While they may not be entirely idiomatic for their respective languages, doing this allows us to maintain all the libraries more easily, which is incredibly valuable while the Web Thing API is still a living draft.
To start, initialize an empty project for your language of choice. For example, you might create a new project in IntelliJ IDEA for Java, or run npm init to start a new Node.js project. You’ll then want to add the webthing library as a dependency. Instructions for doing so can be found on the respective Github project page, or you can look here.
Now we’re ready to write some code. Essentially we’ll do the following:
Thing.
Thing to a WebThingServer.First off, let’s import our library of choice.
from webthing import Action, Event, Property, Thing, Value, WebThingServerconst {
Action,
Event,
Property,
Thing,
Value,
WebThingServer,
} = require('webthing');import org.mozilla.iot.webthing.Action;
import org.mozilla.iot.webthing.Event;
import org.mozilla.iot.webthing.Property;
import org.mozilla.iot.webthing.Thing;
import org.mozilla.iot.webthing.Value;
import org.mozilla.iot.webthing.WebThingServer;Now, we’ll create a basic subclass of Thing.
class MPDThing(Thing):
    def __init__(self):
Thing.__init__(self, 'MPD', 'musicPlayer', 'Music Player Daemon')class MPDThing extends Thing {
constructor() {
super('MPD', 'musicPlayer', 'Music Player Daemon');
}
}public class MPDThing extends Thing {
public MPDThing() {
super("MPD", "musicPlayer", "Music Player Daemon");
}
}Now that we have our MPDThing, we’ll need to add some properties to it. Obviously, a music player will have quite a few properties. To demonstrate, I will show you how to add one, and I’ll link to the rest of the code at the end of this post.
To add a property, you can do the following inside the MPDThing constructor.
status = self.get_status()
self.add_property(
    Property(self,
             'volume',
             Value(self.get_volume(status), self.set_volume),
             metadata={
                 'type': 'number',
                 'description': 'Playback volume',
                 'minimum': 0,
                 'maximum': 100,
}))this.getStatus().then((status) => {
this.getVolume(status).then((v) => {
this.addProperty(
new Property(this,
'volume',
new Value(v, this.setVolume.bind(this)),
{
type: 'number',
description: 'Playback volume',
minimum: 0,
maximum: 100,
}));
});
});ServerStatus status = this.client.getServerStatus();
Map volumeMetadata = new HashMap<>();
volumeMetadata.put("type", "number");
volumeMetadata.put("description", "Playback volume");
volumeMetadata.put("minimum", 0);
volumeMetadata.put("maximum", 100);
this.volumeValue =
new Value(status.getVolume(), v -> this.setVolume((int)v));
this.addProperty(new Property(this,
"volume",
this.volumeValue,
volumeMetadata));We’ve now created a Property that allows us to GET and PUT the playback volume. The Value piece is an object that essentially stores a cached value and a “value forwarder” callback. When the volume is set via a PUT request, the value forwarder is used to forward the new value to the actual device, which in this case is the MPD server. We’ve also set up some metadata for the property, including a description, value type, and a minimum and maximum value.
A music player can also have a lot of actions. While the MPD web thing has several basic actions like play, pause, and skip, I’ve added one that takes some additional input, which will queue a series of random songs. Action inputs are verified with a JSON Schema validator.
First, let’s create an Action subclass.
class QueueRandomAction(Action):
    def __init__(self, thing, input_):
        Action.__init__(
            self, uuid.uuid4().hex, thing, 'queueRandom', input_=input_)

    def perform_action(self):
        songs = self.thing.list()
        if songs:
            for _ in range(0, int(self.input['count'])):
                self.thing.add(random.choice(songs))

            playlist = self.thing.get_playlist()
            if playlist is not None:
                self.thing.add_event(
PlaylistUpdatedEvent(self.thing, playlist))class QueueRandomAction extends Action {
constructor(thing, input) {
super(uuidv4(), thing, 'queueRandom', input);
}
performAction() {
return this.thing.list().then((songs) => {
const promises = [];
if (songs) {
for (let i = 0; i < this.input.count; ++i) {
const uri = songs[Math.floor(Math.random() * songs.length)].file;
promises.push(this.thing.add(uri));
}
promises.push(this.thing.getPlaylist().then((playlist) => {
if (playlist) {
this.thing.addEvent(new PlaylistUpdatedEvent(this.thing, playlist));
}
}));
}
return Promise.all(promises);
});
}
}public static class QueueRandomAction extends Action {
public QueueRandomAction(Thing thing, JSONObject input) {
super(UUID.randomUUID().toString(), thing, "queueRandom", input);
}
@Override
public void performAction() {
MPDThing thing = (MPDThing)this.getThing();
Random random = new Random();
List songs = thing.list();
for (int i = 0; i < this.getInput().getInt("count"); ++i) {
MPDFile file = songs.get(random.nextInt(songs.size()));
thing.add(file);
}
String playlist = thing.getPlaylist();
thing.addEvent(new PlaylistUpdatedEvent(thing, playlist));
}
} QueueRandomAction takes an input, count, queues that number of random songs to the current playlist, and then emits a PlaylistUpdatedEvent (to be defined shortly). To add this new action to our MPDThing, do the following inside the MPDThing constructor:
self.add_available_action(
    'queueRandom',
    {'description': 'Queue a series of random songs',
     'input': {
         'type': 'object',
         'required': [
             'count',
         ],
         'properties': {
             'count': {
                 'type': 'number',
                 'minimum': 1,
             },
         },
     }},
QueueRandomAction)this.addAvailableAction(
'queueRandom',
{
description: 'Queue a series of random songs',
input: {
type: 'object',
required: [
'count',
],
properties: {
count: {
type: 'number',
minimum: 1,
},
},
},
},
QueueRandomAction);Map queueRandomMetadata = new HashMap<>();
queueRandomMetadata.put("description",
"Queue a series of random songs");
Map queueRandomInputMetadata = new HashMap<<>();
queueRandomInputMetadata.put("type", "object");
queueRandomInputMetadata.put("required", new String[]{"count"});
Map queueRandomInputPropertiesMetadata =
new HashMap<>();
Map queueRandomInputPropertiesCountMetadata =
new HashedMap();
queueRandomInputPropertiesCountMetadata.put("type", "number");
queueRandomInputPropertiesCountMetadata.put("minimum", 1);
queueRandomInputPropertiesMetadata.put("count",
queueRandomInputPropertiesCountMetadata);
queueRandomInputMetadata.put("properties",
queueRandomInputPropertiesMetadata);
queueRandomMetadata.put("input", queueRandomInputMetadata);
this.addAvailableAction("queueRandom",
queueRandomMetadata,
QueueRandomAction.class);The final piece of our Thing is its events. Since MPD is a client/server model, it can be updated externally by any number of other clients. As such, I created an event that will fire when the current playlist is updated.
As with Thing and Action, we’ll create an Event subclass.
class PlaylistUpdatedEvent(Event):
    def __init__(self, thing, data):
Event.__init__(self, thing, 'playlistUpdated', data=data)class PlaylistUpdatedEvent extends Event {
constructor(thing, data) {
super(thing, 'playlistUpdated', data);
}
}public static class PlaylistUpdatedEvent extends Event {
public PlaylistUpdatedEvent(Thing thing, String data) {
super(thing, "playlistUpdated", data);
}
}This is a basic Event. The data member will be filled in with a string representation of the current playlist.
To add this Event to our thing, we’ll do the following in the MPDThing constructor:
self.add_available_event(
    'playlistUpdated',
    {'description': 'The current playlist has been updated',
'type': 'string'})this.addAvailableEvent(
'playlistUpdated',
{
description: 'The current playlist has been updated',
type: 'string',
});Map playlistUpdatedMetadata = new HashMap<>();
playlistUpdatedMetadata.put("description",
"The current playlist has been updated");
playlistUpdatedMetadata.put("type", "string");
this.addAvailableEvent("playlistUpdated", playlistUpdatedMetadata);Now that we have a thing with properties, actions, and events, we’ll create a WebThingServer and attach the MPDThing to it.
thing = MPDThing()

server = WebThingServer([thing], port=8888)

try:
    server.start()
except KeyboardInterrupt:
server.stop()const thing = new MPDThing();
const server = new WebThingServer([thing], null, 8888);
process.on('SIGINT', () => {
server.stop();
process.exit();
});
server.start();MPDThing thing = new MPDThing();
List things = new ArrayList<>();
things.add(thing);
try {
WebThingServer server = new WebThingServer(things, null, 8888);
Runtime.getRuntime()
.addShutdownHook(new Thread(() -> server.stop()));
server.start(false);
} catch (IOException e) {
System.out.println(e);
System.exit(1);
} Our web thing is complete and it’s now controllable via the Web Thing API. Here’s how to add it to the Things Gateway:


The Things Gateway doesn’t currently provide a way to use actions or display events, but those are in the works.
Alternatively, you can control the web thing via cURL or any other HTTP library you choose:
$ curl \
    -X POST http://127.0.0.1:8888/actions \
    -H 'Content-Type: application/json' \
-d '{"play":{}}'Your imagination is really your only limit as to what you can turn into a web thing. If you’d like to see the rest of this example and how the actual MPD controls are implemented, all of the code is available on Github.
If you have any questions or suggestions, you can head over to Discourse or find us in #iot on irc.mozilla.org. Additionally, feel free to create issues, or even better, submit pull requests, to the webthing library repositories!
https://hacks.mozilla.org/2018/05/creating-web-things-with-python-node-js-and-java/
|
|
Mozilla Addons Blog: May’s Featured Extensions |

by Lusito
Make Firefox forget website data like cookies, local storage, and more—while retaining data for only the websites you place on your whitelist.
“This extension is absolutely excellent, it works seamlessly and intuitively.”
by Xamayon
Utilize a suite of customizable reverse image search options in a convenient context menu.
“Somebody listens! The ability to fine tune a context add-on. This one lets you open in a new tab OR window, choose which search engines or another program to search in, as well as save your preferences. Good Show!”
by David L.
See at a glance what third party domains are tracking you. Or take a deeper look through a detailed statistics and analysis dashboard.
“Awesome extension to track those who are tracking you.”
by Geoffrey De Belie
Select text on any web page and right-click to open a new tab to display your translated word or phrase.
“Best translation (extension), as it’s the only one that works with DeepL — the only translator that’s worth it.”
Featured extensions are selected by a community board made up of developers, users, and fans. Board members change every six months. Here’s further information on AMO’s featured content policies.
If you’d like to nominate an add-on for featuring, please send it to amo-featured [at] mozilla [dot] org for the board’s consideration. We welcome you to submit your own add-on!
The post May’s Featured Extensions appeared first on Mozilla Add-ons Blog.
https://blog.mozilla.org/addons/2018/05/02/mays-featured-extensions/
|
|
Air Mozilla: Bugzilla Project Meeting, 02 May 2018 |
 The Bugzilla Project Developers meeting.
|
|
About:Community: Firefox 60 new contributors |
With the upcoming release of Firefox 60, we are pleased to welcome the 63 developers who contributed their first code change to Firefox in this release, 59 of whom were brand new volunteers! Please join us in thanking each of these diligent and enthusiastic individuals, and take a look at their contributions:
https://blog.mozilla.org/community/2018/05/02/firefox-60-new-contributors/
|
|
Hacks.Mozilla.Org: Progressive Web Apps core guides on MDN Web Docs |
Progressive web apps (PWAs) are a new way of building websites, but are they really all that new? The basic principles of PWAs came out of older strategies for app design such as progressive enhancement, responsive design, mobile-first, etc. Progressive web apps bring together proven techniques such as these with a new set of APIs and other features under one umbrella term; 2018 could be the year of PWA.
On MDN Web Docs you’ll find a set of Core PWA Guides published for everyone who’s interested in checking them out. As a game developer I couldn’t stop myself from including a gamedev-related example in the series. js13kPWA is my website listing all the entries from the A-Frame category in the js13kGames 2017 competition.
When the user visits the PWA with a supporting mobile browser, it should display a banner indicating that it’s possible to install the app as a PWA:

It is still just a website like any other, so you can try it yourself with no extra steps needed. The source code is available on GitHub, and you can also view it live.
There are currently five Core PWA Guide articles:
The first article of the series introduces progressive web apps: defining what is a PWA, what makes an app progressive, whether it’s worth building, and the advantages it brings over regular web apps.
You can see the browser support, and check the js13k PWA example — the implementation of its contents is explained in subsequent articles.
Now that you’ve learned the theory behind PWAs, you can look at the recommended structure of an actual app. This article goes through the differences between server-side rendering and client-side rendering, shows how you can mix them both, and explains how PWAs can be built using any approach you like.
The app shell concept is the most popular approach for building the structure of an app. It’s important to follow the rules of being linkable, progressive, and responsive by design. We also discuss briefly how the Streams API will be able to help with faster progressive loading in the near future.
This article goes into details of implementing offline capabilities with service workers, explains the offline first approach, and looks at why the “progressive” in PWA is important.
We then inspect the js13kPWA source code to learn how to register a service worker, and what its lifecycle looks like, with installation, activation and updates explained in detail, and how to clear the cache if needed.
The fourth article describes how to install PWAs on your mobile device with supporting mobile browsers, so the app can be used as if it were native.
If the user clicks the button, there will be an extra step showing what the app will look like. When confirmed, the app will be installed on the home screen:

This section reviews basic requirements, the contents of the manifest file, the add-to-home-screen feature, and splash screen configuration.
The last article in the Core Guide offers a way to stay engaged with users. Both the Push API and the Notifications API help achieve this goal – the first one can deliver new content whenever it is available while the other is used to show its details to the user.
Up until now, we’ve use js13kPWA, which is served from backend-less GitHub Pages, to illustrate key PWA concepts, but the Push API requires the server side to work. That’s why I’ve taken the Push Payload Demo example from the Service Workers Cookbook and explained it in detail: subscribing, getting VAPID keys, and posting and receiving content.
I hope these excerpts have sparked your interest. Dive into the content right away to learn about implementing PWA features in your apps. The benefits greatly exceed the effort it will take to make your apps more engaging.
It’s possible that in the next few years we may forget the term PWA, as it becomes the primary technique used to build interactive websites. Be sure to learn how to do it effectively now. Just as responsive web design approach is now the standard for building mobile optimized websites, PWA techniques are on track to become the standard of the future.
https://hacks.mozilla.org/2018/05/progressive-web-apps-core-guides-on-mdn-web-docs/
|
|
Air Mozilla: Weekly SUMO Community Meeting, 02 May 2018 |
 This is the SUMO weekly call
https://air.mozilla.org/weekly-sumo-community-meeting-20180502/
|
|
Cameron Kaiser: A semi-review of the Raptor Talos II |

I'll call this a "semi-review" because, well, the system is a work in progress and getting the most from it will take time. Relatively little is optimized for PowerPC these days, and even less still for little-endian PowerPC or POWER9 in particular. If you want performance benchmarks, you can read Phoronix's performance tests which are substantially more thorough than anything I could gin up. This is about my experiences with the unit now that I've been using it most of today with my early firmware issues now largely corrected.
For what's in it, see my unboxing photographs from a few days ago. This system is best described as a middle-road configuration now that the 22-core chips are becoming available. It contains two four-core Sforza POWER9 processors on a 14nm process at 3.2/3.8GHz with 512K of L2 and 10MB of L3 per core; there is a discrepancy with the wiki which says 3.1/3.7 but you can read Raptor's spec sheet. SMT is available. By having both processors installed, all of the PCIe slots in this machine are unlocked (this was a deliberate design decision for efficiency, not to make you buy hardware you didn't need). All of the options in this unit are factory-installed: 32GB of ECC DDR4 RAM (maximum 2TB), an AMD Radeon Pro WX 7100 workstation video card (roughly a hopped-up RX 480), a Samsung 960 EVO 500GB NVMe SSD on a PCIe card and a Microsemi PM8068 SAS 3.0 controller. The machine comes stock in a Supermicro CSE-747 EATX case with two redundant 1400W power supplies, a SATA controller, onboard VGA, onboard USB 3.0, onboard 2xGigE network ports (Broadcom BCM95719), onboard RS-232 serial and an LG Blu-ray drive. A recovery disc with the factory firmware and manual is included. Sticker price was approximately US$7200.
No operating system is installed except for Petitboot (more in a moment). This machine should eventually run anything that supports it (of course it will run NetBSD, at least someday), but your sole option right now is Linux, and bleeding edge Linux at that: Raptor's excellent tech support team tells me that kernel 4.13 is minimally required and 4.16 is strongly recommended. This greatly limits your choices out of the box especially if you don't already have another Linux system to support bringing this one up. I didn't, so I selected Fedora 28, which supports ppc64le and has kernel 4.16. As of this writing, the final release of 28 has just hit the streets, so that's very timely. Officially Fedora only supports the Server flavour on ppc64le, but we can convert that to a Workstation version after it's installed.
The system boot sequence has several stages. You can read about them in a bit more detail on the RCS Wiki, but the breakdown is not unlike that of a modern POWER server, since this is mostly a modified OpenPOWER design. Immediately when power is applied, the system boots the "BMC" Baseboard Management Controller, which runs on an ARM6L service processor. This sits idle when the main processors are powered down. When the power button is pressed, the BMC starts the Initial Program Load (IPL) process on the main POWER9 CPUs from PNOR flash. Through a complex six-stage process the IPL terminates with loading Petitboot, a simple loader inside a tiny Linux environment called Skiroot. Since Petitboot is running in a tiny Linux, its presence simplifies driver support for the main operating system by handling platform functionality directly via the OpenPOWER Abstraction Layer. Petitboot, in turn, kexec()s into the OS kernel and, at least in theory, away you go.
Initially the fans came on at IPL at a terrific volume such that my wife and I could not reliably hold a conversation in the same room (no exaggeration). In addition, while I could get Petitboot to display on the Radeon card, the operating system wouldn't appear -- I had to use the onboard VGA to boot, which was inconvenient for my KVM and meant my expensive workstation card was doing nothing. Raptor's tech guys listened to my frustrated pleas and notified me immediately when the most current firmware was available. When I loaded this firmware on the system, it worked beautifully for about 10 or 15 minutes and then started freaking out, failing to see the NVMe, kernel panicking on the Fedora disc that it used to boot from, etc. Raptor got me another command to blank the GUARD partition on the PNOR flash to try to reset it, and the machine started working! In fact, I've been using it since about 11am today non-stop, so I consider that to be an excellent burn-in period. Oddly, I can't get Petitboot to appear on the WX 7100 output now, but the OS does, so it's not a big deal (I can just switch to VGA if I need to get into the bootloader until that gets fixed). This all happened literally within the space of a few days. The fans rev up and down periodically, which can be a bit disconcerting next to my usually quiet Quad G5, but they are no longer anywhere near as shrill or constant and I only notice them if the room is warm.
Power usage, incredibly, is quite modest for a machine of this specification. When you connect the power, the BMC sits idle at around 13W with a very quiet fan running. Starting IPL, the fans do still come on full blast at least initially and power usage jumps immediately to 143W. This climbs slowly to 212W by the time you hear the beep from the system indicating Petitboot has started. Petitboot then starts Fedora and once Fedora has booted and we are at the login screen, power usage drops back to around 150W and the fans automatically throttle down. I got out my infrared thermometer and checked the heat coming out the back, and found it was a very reasonable 91 to 99 degrees Fahrenheit. (The cat likes the G5 better for heat.) Most tasks barely moved the needle after that. I did some installations with dnf and the power usage barely rose to 160W. Compiling OpenSSL got it up to 177W. This is all less than the Quad G5 next to it, which right now is reading 238W on the UPS while sitting largely idle in Reduced power mode. On the other hand, I'm not using the video card very heavily, so this output could jump quite a bit once I get some games running on it. There are also no drives connected to the RAID yet, just the NVMe SSD.
You can expect an upgrade path with this hardware as well. Besides accepting any hardware accessories that are compatible with Linux (though see below), Raptor is planning to make additional processor options available if you have the thermal headspace and the power capacity, even this 22 core monster. Unlike the Quad G5, this system shouldn't be a dead end.
So that's the hardware. Let's talk about the software. This isn't under Raptor's control necessarily, but it will play into your decision-making process should you make an investment in one.
There are really two kinds of customers for the Talos II: people like me who dislike x86 on technical grounds and Intel's continued hegemony and wish to support alternative architectures of comparable performance, and people who are paranoid and want a system that is far less of an opaque closed system that they can audit and trust than what passes for commodity hardware these days. There is naturally some overlap between these two groups. The second group will probably put up with a little more inconvenience for the sake of ultimate privacy than the first group, which is more concerned about functionality. You should think long and hard about where you fall here, because it will affect how you perceive the system.
The major selling point to the second group is that the firmware is fully open-source and auditable even down to the FPGA level. Schematics are included! You can download and build your own FPGA flash image, your own BMC flash image and your own PNOR flash image. In fact, you are expected to, though Raptor provides pre-built versions assuming you trust them and their warrant canary. As long as you don't brick the BMC -- though this is doable if you are incautious -- you can play around with Petitboot and Skiboot pretty much at will and just reflash if you screw it up. Programming the FPGA means you'll need your own SPI programmer, but there's a JTAG port on the board and you can plug right in. Note that this scheme isn't perfect because you still have to trust a certain amount of the other firmware in the system, mostly in the various peripheral devices, but it's clearly better than what you'd get from any other system and it's a strong start towards reclaiming control of our own machines. Although I haven't tried writing my own custom firmware yet, it's very easy to build and flash the prefab releases, and the process is well documented. To upgrade to the current firmware from the v1.02 my machine came with did not require flashing the FPGA, so I could do it all from my G5 by talking to the BMC over SSH.
For the first group, however, that alone won't be satisfactory, because we actually want to use this thing as a computer. Frankly, my plan is to make this the Power Mac G5 successor that never was. It certainly has the specs for it. Unfortunately, this part is the bit that's not yet complete. I haven't tried other operating systems other than Fedora 28 yet, but I can't imagine the experience is much different, so take these observations at face value.
Because Fedora doesn't offer a direct download for Workstation on little-endian 64-bit PowerPC, you have to install Server first, and then switch to the Workstation environment. This will download the remaining missing pieces; I selected the default Workstation environment, which is based on GNOME. Hopefully future distros supporting this machine will do better than this process. While in use the system is perfectly responsive but seems slower than it ought to be at times, particularly compared to the Quad G5, though this is probably an unfair comparison. The G5 is running Mac OS X 10.4.11, an OS written by its manufacturer and highly optimized for it. The Talos II has to contend with an OS for which it is not the primary target, nor one that is particularly tuned for any PowerPC system.
There are various glitches and many things don't work yet. The first and most important deficiency is that I still can't get amdgpu working in Xorg, so I'm using framebuffer support (fbdev). This means the video card is still going largely underutilized. I expect this to improve as Polaris support improves, but it's not there yet. For this reason I haven't even bothered trying to load any games on it so far.
Multimedia is also limited because I don't have a sound device. lspci alleges the WX 7100 has some sort of audio support, but the open source drivers don't currently support it. I'll likely solve this problem with some sort of USB audio out in the meantime, but that's suboptimal. I haven't tried playing DVD or BD movies on it yet either for that reason.
Fedora didn't like the GBU-421 Bluetooth USB dongle I use with the G5. The G5 needed no drivers and it just "works," but GNOME doesn't see it. I had to transfer the picture above from my phone to the G5, and then to the Talos.
A few of the included applications either misbehave or don't work at all, though most fortunately do. The GNOME Software application kept complaining about incorrect checksums, but dnf was fine from the command line. Firefox 59 crashes with a segmentation fault on start-up (like I say, I guess I've got a project now). GNOME Web (formerly Epiphany) does work, but it's WebKit and I don't like that, and it too is not very well optimized. It does pretty well, though, considering; it got 2455ms on SunSpider, which would seem like a dismal number given that the Quad G5 managed 2255ms in TenFourFox, except that TenFourFox has a JIT and GNOME Web here is running interpreted, and TenFourFox is compiled with CPU optimizations specifically for the G5 while GNOME Web and the system WebKit have no specific optimizations. I'm also unhappy there's no Gopher support. On the other hand, you would expect YouTube videos to be a slideshow (no JIT, little or no SIMD), and yet they play at a surprisingly good framerate, just muted. This post is being written in GNOME Web.
However, much of the rest of it does work. Since I intend this to be a successor to my G5, I spent most of the afternoon making GNOME more Mac-like. Using Fondu, I copied the Lucida Grande font from Tiger and converted it back to TTF (to compile Fondu on the Talos, configure it with ./configure x86_64-unknown-linux-gnu, since it doesn't know what the heck a little-endian PowerPC is) and installed it. I then installed the GNOME Tweaks tool with dnf and a Mac GNOME theme and Dock extension. (Some other ideas are on this how-to.) I switched the system font to Lucida Grande in the Tweaks tool, disabled hinting entirely and left it with greyscale antialiasing, turned on User shell themes in Tweaks, and wrote a minimal shell theme to make the top bar more like a Mac menu bar. It's not perfect, but it's a good start. I'll provide it later if people are interested.

To get my Mac shortcut keys back, I installed AutoKey (autokey-gtk), and started making equivalents. A few clashed with GNOME, which I changed from Settings, and I altered a couple others in Terminal, but they mostly just worked with everything else including GNOME Web.
Let's bottom line it. As far as value for money, the machine is well-assembled, solidly built (if in an unexciting enclosure) and consists of quality components. I think the above paragraphs also demonstrate that the level of support from Raptor is absolutely commensurate with what you would expect for a $7000+ computer. Frankly, it's one of the best technical support experiences I've ever had with any system. Part of that is undoubtedly the low production numbers and highly technical engineering audience, but I have never felt like the machine was an unrecoverable doorstop even when it wasn't suitable for use yet.
Software, however, is still a work in progress. You should not expect a 100% functional system at the end and you don't even get a functional system out of the box. Not only will you have to install an OS and go through that process, you're also pretty much guaranteed that something won't work when that part is done. And even when everything you need actually is working, nothing is optimized for it; many things will run abnormally slowly until "someone" (tm) does this work. It's been a long time since PowerPC was a common desktop platform, so many of the optimizations Intel systems take for granted just don't exist, and some desktop apps aren't even tested.
But all of these things are correctable. The hardware is solid. The firmware rudiments are coming together; look at how quickly this machine evolved in just a few short days. Software is likely to be an easier nut to crack on the little-endian Talos than on previous big-endian PowerPC systems, too. Assuming there aren't dependencies on complex assembly code blocks, more code is likely to "just" work with fewer or no modifications because the assumptions made for mainstream x86 will now largely apply here as well. This depresses me personally since I think in big-endian, and have used big-endian systems for decades, but that's the way things are now.
I'm looking forward to this system becoming my daily driver and it might even happen in just a few months. I need to get Firefox working, and I need to get QEMU optimized to run my old Power Mac software. That's all doable. Once the video card and sound options are fixed, I can even start using it for multimedia and games, and the G5 can then become a well-cherished part of my collection.
This is a fully free system you can live with. This is a fully free system that can kick ass. The promise was kept and the dream is real. It's time to get busy.
http://tenfourfox.blogspot.com/2018/05/a-semi-review-of-raptor-talos-ii.html
|
|
Mozilla Open Innovation Team: WebVR Experience Challenge, Winners Announced! |
Mozilla seeks to continually grow a robust community around A-Frame and WebVR and to support developers who build content for this ecosystem. This is why we partnered with Sketchfab to create hundreds of medieval fantasy assets for the WebVR community to use. Today we are proudly announcing the Winners of the WebVR Experience Challenge!
Building on the rich pool of assets from our Real Time Design Challenge we received many entries that used the glTF models and A-frame and turned them into really fun games and experiences! Each of the creators really put their own personal take on these assets. The entries of this contest allow us to see what VR can do in the Web, and that it is ready for an open community to experiment and innovate with it.
We would like to thank our Judges who spent their time thoroughly reviewing each entry, Ada Rose Cannon, Developer Advocate for the Samsung Internet VR browser, Joshua Marinacci,
Senior Developer Evangelist at Mozilla, working on Mixed Reality and Fernando Serrano Garc'ia, Engineering Manager at the Mozilla Mixed Reality team.
Without further ado,
1st place goes to Jorge Fuentes for Puppetrilla!

Stunning work Jorge! We’re sending you the complete VR Set — including a VR-Ready Laptop and an Oculus Rift.
2nd place goes to Andrew Fraticelli for Witches Brew.
Congratulations Andrew! You won a Pixel Phone and Daydream View and the Lenovo — Star Wars™: Jedi Challenges.
3rd place goes to Danilo Pasquariello for Epic Medieval Battle.
Nice work Danilo! Have fun with your new Pixel Phone and Daydream View.
There are also 4 honorable mentions who will also be receiving a prize for their great work.
Good job to the honorable mentions! The Lenovo — Star Wars™: Jedi Challenges are on their way to you.
*Though this challenge was initially focused on A-Frame and WebVR development, two of the entries used our Unity WebVR Exporter and were just too good not to give an honorable mention.
We know creating VR content is hard and WebVR can be even more challenging. That’s why we wanted to create this contest to encourage people to give it a try so we could get feedback on how to improve the existing workflow, tools and frameworks and on the other side to have a nice set of experiences that people could enjoy and developer could learn from. We could not be happier with the results of this challenge and look forward to hearing what the players think about these games!
Check out Mozilla’s Mixed Reality blog, connect with us through the WebVR slack and keep up to date with Virtual Reality for the Open Web!
WebVR Experience Challenge, Winners Announced! was originally published in Mozilla Open Innovation on Medium, where people are continuing the conversation by highlighting and responding to this story.
|
|


