-Цитатник

Ажурный жилет крючком. - (0)

Ажурный жилет крючком.   1. 2. 3. 4. 5. ...

Элегантный жилет крючком. - (0)

Элегантный жилет крючком.   1. 2. 3. 4.

Жилет с накладными карманами. - (0)

Жилет с накладными карманами.   1. 2. 3. 4.

Стильный жилет из круглых двуцветных мотивов. - (0)

Стильный жилет из круглых двуцветных мотивов. 1. 2. 3. 4. ...

Ажурный жилет красивым узором. - (0)

Ажурный жилет красивым узором. 1. 2. 3.

 -Рубрики

 -Метки

casaco manga reta de retalhos casaqueto tipo chanel pull by brigitte appel vestido chamise decote v e babados na cava e barra vestido ou blusa camisão com pate ажурная блуза из цветочных мотивов. ажурная кофточка ажурная кофточка спицами. ажурный джемпер долина бабочек. ажурный топ крючком ажурный узор спицами блок блоки блуза блуза и платье по одной схеме вязания. блуза крючком из шестиугольных мотивов блуза цветочная симфония. болеро крючком вязание-крючок блузки геометрия погона детский джемпер clover детский джемпер крючком джемпер джемпер arbus by bristol ivy джемпер крючком джемпер роджерсия джемпер с круглой кокеткой джемпер. спицы. жакет жакет из разноцветных "бабушкиных" квадратов жилет жилет где прекрасно сочетаются мотивы и узор. жилет крючком жилет с короткими рукавами жилет спицами жилетка крючком кофта кофта от валентины дьяченко. мода + кофточка кофточка hasina от лизы ричардсон кофточка крючком кофточка с круглой кокеткой кофточка спицами кофточка цвета чайной розы круглая кокетка летний ажурный пуловер летний джемпер летний джемпер оверсайз. летний жакетик летний топ лоскутное одеяло лоскутный блок льняная кофта крючком льняное платье крючком мастер-класс топ & джемпер «вояж» мерки и выкройки-основы для 50-58 размеров мир рукоделушек (рукоделушки) мотивы крючком нежный джемпер связанный поперек одеяло платье платье отрезное . размеры 44 - 70 покрывало пуловер пуловер с круглой кокеткой пуловер. спицы. пэчворк пэчворк и квилт расклешённая юбка сиреневая туника топ топ крючком топ. туника узор узор «листики» для круглой кокетки уютное футболка шаль крючком из alize angora simli шапка шапка спицами шапка узором «коса до пояса» спицами шитье шляпка юбка яркое лоскутное покрывало

 -Всегда под рукой

http://www.liveinternet.ru/users/tatmel/post334232109/

 -Поиск по дневнику

Поиск сообщений в tatMel

 -Подписка по e-mail


 -Интересы

шитье интернет

 -Статистика

Статистика LiveInternet.ru: показано количество хитов и посетителей
Создан: 02.09.2010
Записей:
Комментариев:
Написано: 52346


Блок "Звезда"

Среда, 26 Декабря 2012 г. 21:19 + в цитатник
Цитата сообщения 06Leka

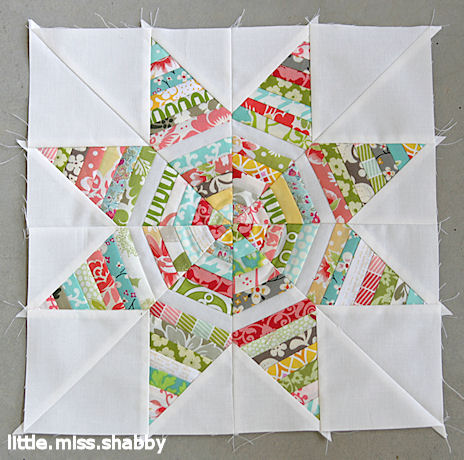
Шьем из тазиков. Блок "Звезда"

http://www.littlemissshabby.com/2012/08/string-star-tutorial/

String Star Tutorial

Posted in Fabric Stash, Quilt Blocks on Aug 16, 2012

September is my month in the Stash Trad Bee & I have totally been struggling with what block to have my group members make for me.  I have finally decided to go with a scrappy String Star.  Now, I know that I have seen a tutorial for this block somewhere (I can find the 6 pointed string star–but, I really wanted the 8 pointed one) but I’ve looked high and low to no avail.  So, here’s a tutorial of my own–it includes templates which I think makes things pretty easy–the one I had originally spotted did not.  If anyone stumbles across the one I had originally seen–please let me know, I’d love to give credit!

*Thanks to Ellen the block I had originally seen has been tracked down.  Thanks so much Ellen!–You can see the block I originally saw here.

Let’s get started:

You will need:

  • a bunch of 1″ strings–for my block I am using a combo of Aqua, Coral, Yellow, Green & Grey/Taupe.
  • a bunch of 2″ strings in the same colors(you’ll use these at the very tips of each diamond)
  • a 1″ x WOF string from a solid of your choice (Kona Snow in my block)
  • (4) 4 3/8″ squares cut diagaonlly once from solid of your choice (Kona Snow in my block)
  • (4) 3 3/8″ squares cut diagonally once from solid of your choice (Kona Snow in my block)
  • 4 copies of The Templates (make sure to set your page scaling to “none” when printing these out)

Begin by placing one of the solid strings aligned so the top edge runs thru the points on the right and left–you can see the placement in the picture above.  Use a little bit of temp. fabric spray adhesive to hold it into place & work from the non printed side.

After placing the solid string properly work the strings just as you would with any other string block until the diamond shape is covered with strings.  Make sure to shorten up your stitch length  You’ll notice that I used all 1″ strings for my block–in hindsight, I should have used (1) 2″ string at the points on each end.

Flip the block over and trim on the 1/4″ seam allowance line(the lighter line around the edge).  Remove paper.

Continue to make a total of 8 diamonds.

You will probably want to lay out the block before sewing the triangles in place as the triangle orientation varies.  Sew a small triangle and a right triangle onto each diamond unit like so(4 units will be made with this orientation & 4 with the opposite orientation–you’ll make a total of 8 units).

Sew together the units made above into 4 quarter units(here you can see the two different orientations).

Sew the quarters together to complete the block.

Рубрики:  пэчворк
Метки:  


Добавить комментарий:
Текст комментария: смайлики

Проверка орфографии: (найти ошибки)

Прикрепить картинку:

 Переводить URL в ссылку
 Подписаться на комментарии
 Подписать картинку