Без заголовка |
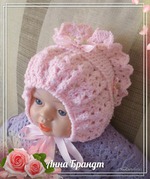 Чепчик " Розовые облака" связан из мягкой пряжи нако " Бамбино", на р-р от 35 до 40 за счёт ленточек затягивается на личике. Очень хотелось связать пинеточки в этом цвете, но в магазинах не нашла этот цвет, буду ждать, чтобы завершить комплектик для малышки.
|
Без заголовка |
<div style="margin:5px 0;font-family:Arial;font-size:13px;"><a href="http://www.stranamam.ru/" style="color:#ff0000;text-decoration:underline;font-size:19px;border:0;">Страна Мам</a> <span style="color:#0E8BDF;font-size:19px;border:0;">→</span> <a href="http://www.stranamam.ru/post/10291578/" style="color:#0E8BDF;text-decoration:underline;font-size:19px;border:0;">Привет от лета - винтажный комплект для красавицы малышки + комплект аксессуаров Феечка</a><div style="padding-top:4px;font-size:12px;">Тэги: <a style="text-decoration:underline;color:black;border:0;" href="http://www.stranamam.ru/tags/18065/">авторская работа</a>, <a style="text-decoration:underline;color:black;border:0;" href="http://www.stranamam.ru/tags/2439/">ажур</a>, <a style="text-decoration:underline;color:black;border:0;" href="http://www.stranamam.ru/tags/3307/">для девочек</a></div><div style="padding:7px 0;"><a href="http://www.stranamam.ru/post/10291578/"><img border=0 src="http://st1.stranamam.ru/data/cache/2015sep/08/40/17210186_36104-150x0.jpg" align="left" style="border:0;margin:0 10px 14px 0;"></a>Доброго времени суток! <br>Хочу поделиться радостью, как говорила ранее: вышла первая наша работа с Настюшей в журнале Ксюша за август, это первая моя публикация, чему очень рада! Спасибо Ирише Хорт и Тамаре Марочкиной за это! <br>Это пост по комплекту: http://www.stranamam.ru/ <a href="http://www.stranamam.ru/post/10291578/" style="color:#0E8BDF;text-decoration:underline;border:0;">Читать полностью</a></div><br style="clear:both"></div>
|
Без заголовка |
Posted on 29 Comments
We love our water colour paint sets. I mean, we really love them.
I don’t think a week ever goes by when someone doesn’t get out the water colours for a little painting. One of the big kids got them out on the weekend, and before long all four kids were busy filling the paper with colour.
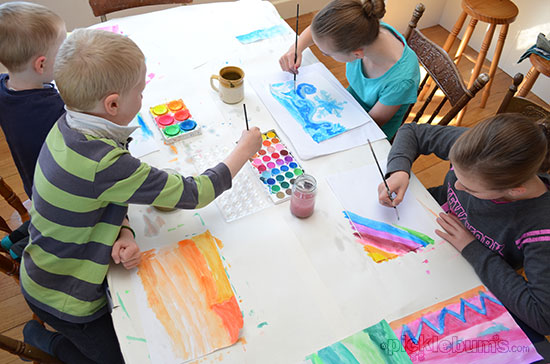
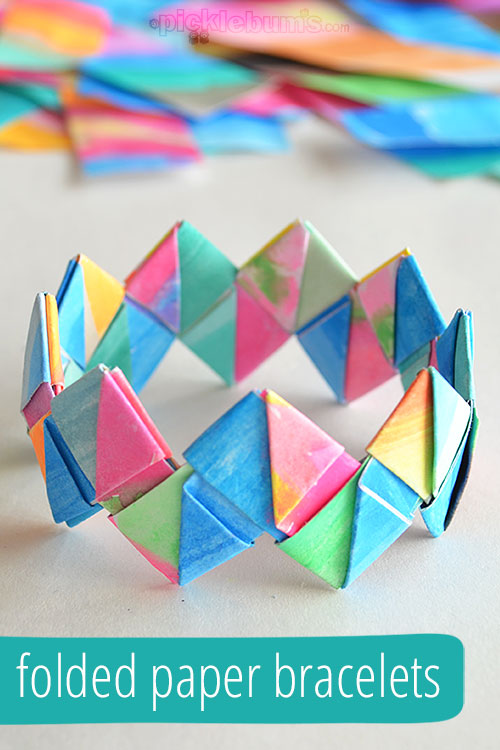
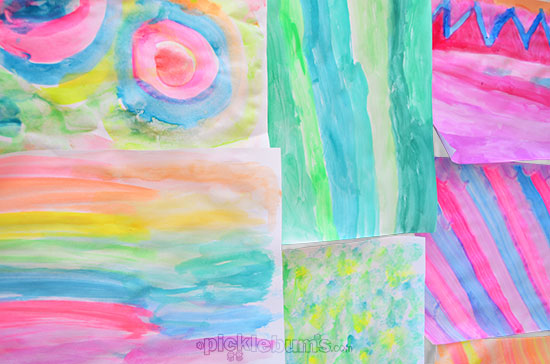
With so much painting, there is always a pile of artwork in my study and recently I remembered a fun way to use it. Cleaning out some paperwork I came across an ancient photocopied sheet of instructions for making folded paper bracelets. I remember making these as a teenager, and I knew my kids would love to transform their paintings into wearable art so we got out the pile of paintings got to work!
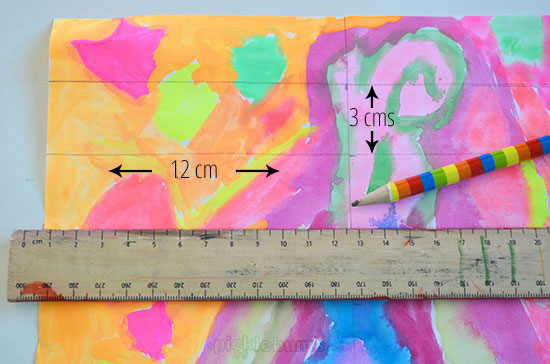
To make a folded paper bracelet you need to begin by cutting lots of strips of paper. The strips need to be 12cms x 3cms (bigger or smaller as long as the size ratio is 1:4). We worked on our math skills counting by threes to rule up the paper and then I cut the strips with a paper cutter to make quick because you need a lot of strips! For each bracelet you’ll need between 16 and 22 strips, depending on how big a braclet you want to make. We used 18 strips to make one big enough to fit over my ten year old’s hands.
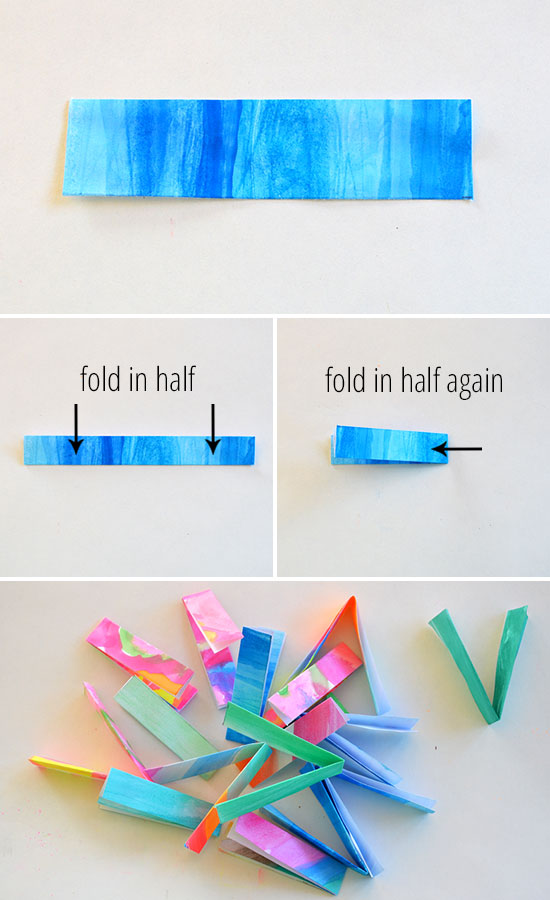
Begin by folding your strips into the basic shape, my six year old was good at this process.
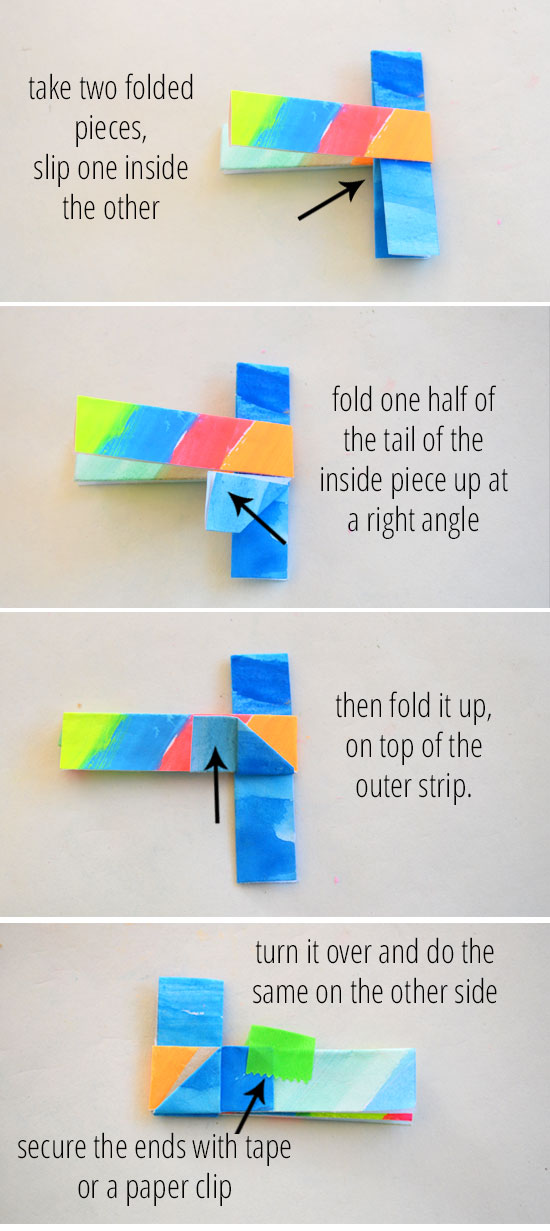
Then you need to learn the basic construction technique. This is a little tricky but with help and supervision my girls (aged ten) were able to master the process after some learning time.
Once you’ve got the hang of it, keep adding strips. I suggest making the loop part of each strip a little on the large size when working with kids, it will look a little less neat and symmetrical when finished but it makes it much easier for kids to insert the next strip.
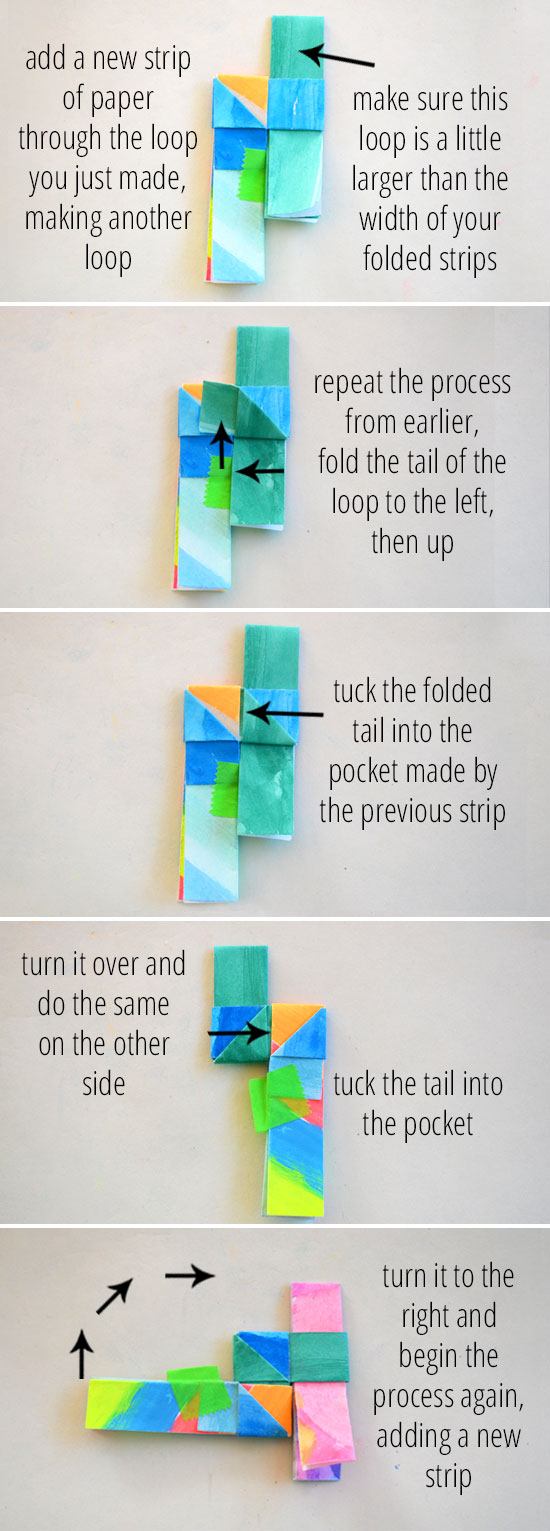
Keep adding strips…
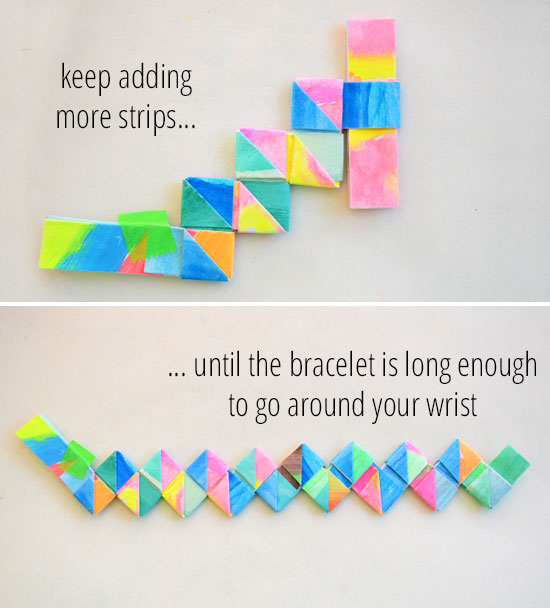
And eventually you will have enough to make a bracelet, remember it needs to fit over your hand when it is done, so don’t make it too small!
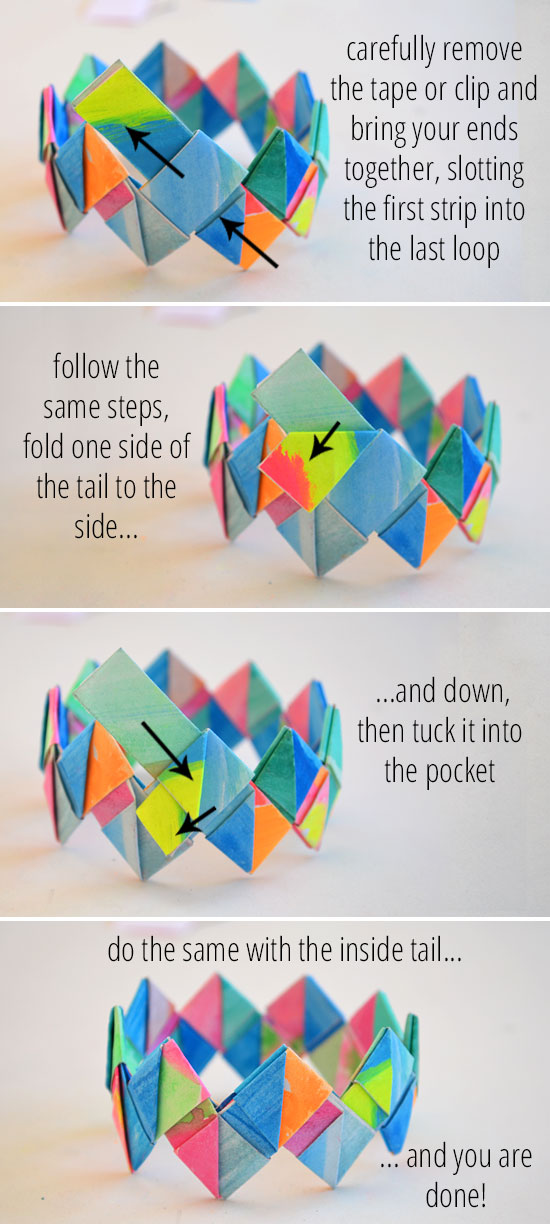
Our folded paper bracelets turned out even better than I remembered! The colours of the kid’s paintings looked fabulous all folded together.
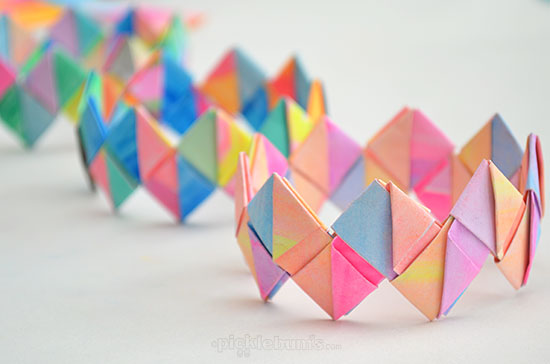
They would make an unusual and one of a kind gift don’t you think!? We are working on folding a really big one to make a crown!

|
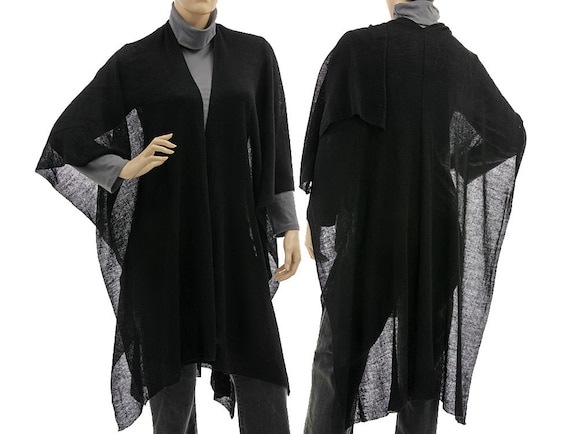
Без заголовка |
 Доброго времени суток, уважаемые Страномамочки! Лето не за горами, вот такое очаровательное платье у меня связалось для племянницы. Похожие платья и схемы уже есть на просторах интернета. НО! Я снова столкнулась с проблемой (это уже закономерность ), как расширить полотно по этой всем известной схеме. Читать полностью
|
Без заголовка |
|
Без заголовка |


I’ve seen many headbands lately which use a loop of cord elastic that is cinched at the center, usually by a metal crimp, to form a figure eight (like Anthropologie’s Oxford headband, Anthropologie’s Fairytale Theater headband, Banana Republic’s double ribbon headband, and Santi’s metallic headband). This inspired me to use two ponytail holders to achieve a similar effect–because I do not have any metal crimps and neither do you, I presume, and, while we’re at it, maybe you don’t even have cord elastic. So here it is, an easy headband using minimal supplies that you probably already have at home.

Tip: If your ribbon is wider than 0.75" (19 mm), you may want to fold or pleat the ribbon at the ends so that it is narrow enough to attach easily to the ponytail holders.

|
Без заголовка |
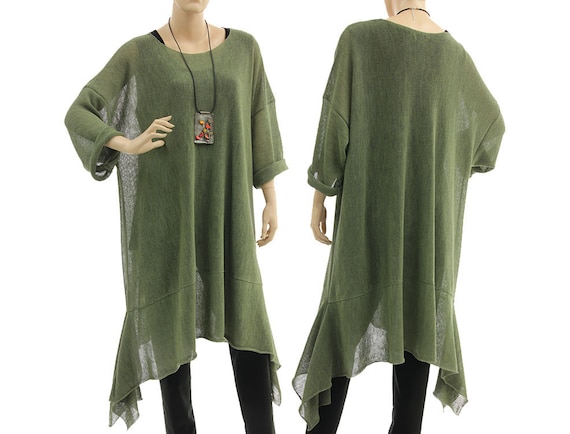
 Это платье было найдено на просторах интернета
|
Без заголовка |
 Картофель фри (без масла)
|
Majoneze 5 minutees |
|
Без заголовка |
 Ой не обижайтесь на меня, дорогие, что пропадаю я. Не виноватая яяяя
|
Krāsu saskaņa |
 Сочетаем цвета правильно
|
|
Kleitas meitenēm |
|
Без заголовка |


|
Raksts ar arajiem stabiniem |


|
Kurpītes |


|


 - 瑜伽猫 - 瑜伽猫的博客")


: 如何快速劈开粗毛线(大师班) - maomao - 我随心动")
: 如何快速劈开粗毛线(大师班) - maomao - 我随心动")
: 如何快速劈开粗毛线(大师班) - maomao - 我随心动")
: 如何快速劈开粗毛线(大师班) - maomao - 我随心动")
: 如何快速劈开粗毛线(大师班) - maomao - 我随心动")
: 如何快速劈开粗毛线(大师班) - maomao - 我随心动")