
НЕ НАДО ПОДРЕЗАТЬ ЖЕНЩИНЕ КРЫЛЬЯ,
ИНАЧЕ ОНА БУДЕТ ВЫНУЖДЕНА
ЛЕТАТЬ НА МЕТЛЕ!
Бежевое платье |


Метки: вязание платье туника крючок |
Платье цвета пудры |


Метки: вязание крючок платье туника |
Короткий пуловер с узором из шишичек |


Метки: вязание крючок пуловер |
Укороченый жакет и сумочка |


Метки: вязание спицы крючок жакет сумка |
Пуловер с косами связаными поперек |


Метки: вязание косы спицы пуловер |
Два ажурных шарфика-платочка |
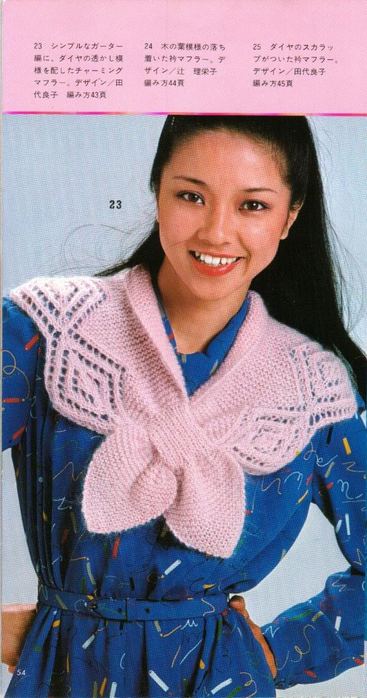
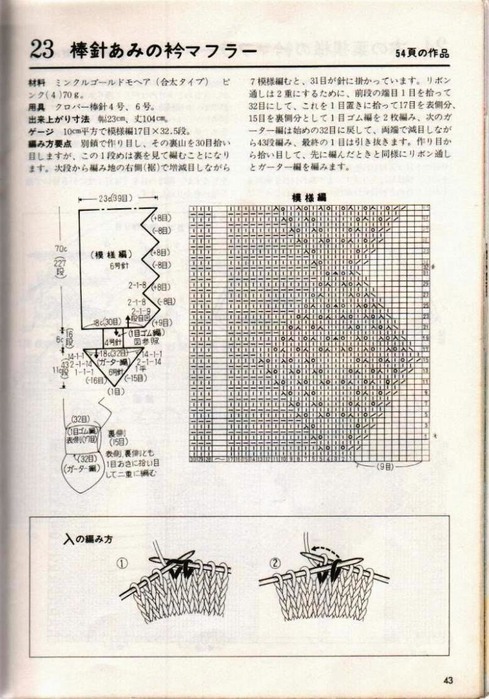
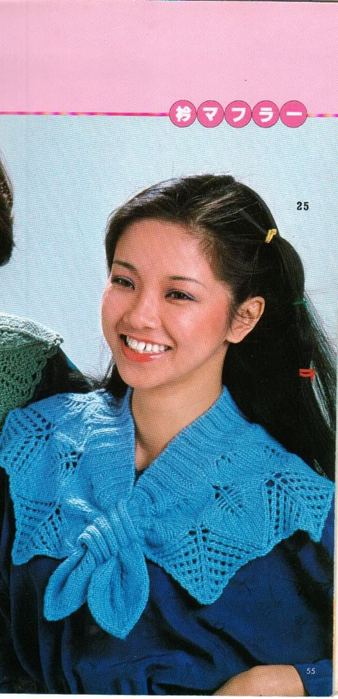
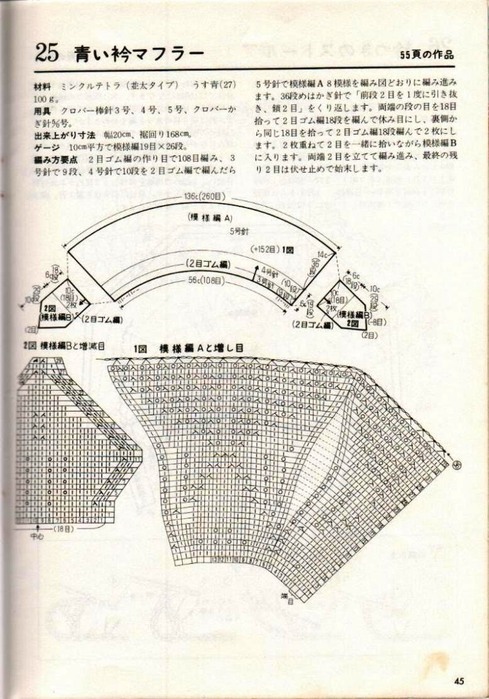
Метки: шарфик вязание ажур спицы |
Шапочка-тюрбан |

This chemo turban was inspired by my mother Maureen Cannon, who fought breast cancer with dignity, courage, and grace. The French word "esprit" means liveliness of mind or spirit my mother was the embodiment of this word. She was a beautiful and fashionable woman, and through no fewer than four different courses of chemo which left her without her hair, she kept her spirits high by wearing colorful scarves, tied turban style around her head. At night, she would wear a soft, stretchy cotton cap for comfort.
This turban marries the comfort of a soft, stretchy cotton cap with the fashion and beauty of a turban scarf. It is knit in lively, hugging Esprit cotton/elastic yarn in a reversible 4 x 4 rib pattern, and is as quick and easy to knit as it is uplifting to wear.
Size:
Width: Rib stretches from approx. 4" to 10".
Length: 20" after folding and grafting.
Materials:
- 2 balls of elann.com Esprit.
- 5.5 mm (US 9) needles.
- Scrap yarn for provisional cast on
- 6 mm (US K) crochet hook for provisional cast on.
Gauge:
Measured over 4 x 4 rib, off needles and completely relaxed, 24 sts and 15 rows = 2" x 2".
Method:
Using scrap yarn and 6 mm (US K) crochet hook, begin with a Provisional Cast On for 50 sts as follows:
Crochet a chain of 60 stitches (i.e. 10 stitches more than your knitted piece will be). Tie a knot near the tail end of the crocheted chain, so youll be able to easily unzip it later. Turn the chain over so the bump is on top. Insert the tip of your 5.5mm (US 9) knitting needle through the bump and knit first stitch using Esprit. Continue this knitting on cast-on until you have 50 Esprit stitches on your needle.
Begin 4 x 4 rib pattern as follows:
Row 1(WS): K1 tbl (selvedge st), k2, *p4, k4* 5 times, p4, k2, sl 1 wyif (selvedge st).
Row 2(RS): K1 tbl (selvedge st), p2, *k4, p4* 5 times, k4, p2, sl 1 wyif (selvedge st).
Repeat these two rows until piece measures approximately 40" in length. Do not BO instead, leave live stitches on one needle in preparation for grafting 2 ends together to form piece into a loop, as described below.
Finishing:
Unzip crocheted chain at beg of piece, one stitch at a time, and PU 50 stitches with your second needle. You are now ready to make the piece into a loop by grafting the 2 ends together using Kitchener Stitch. Maintain rib pattern in grafting by treating each set of knit and purl stitches in the ribbing as a separate unit. i.e. purl stitches should always face purl stitches on inside, with knit stitches facing outward, toward you on the front needle and facing away from you on the back needle, ready to graft. After each set of knit stitches is grafted, and you reach purl stitches, turn the work inside out, so that purl stitches are now on the inside with knit stitches facing toward you on the front needle and facing away from you on the back needle, ready to graft (as pictured, steps 1-4). Repeat to end of row and fasten off.
Fold loop as in diagram below, with right sides together, and sew an 8" seam, as shown below. Be sure that 2 knit sts on either end of RS are facing each other, so that after seam is opened, the seamed RS will show as a unit of 4 knit sts between 2 sets of purled sts see photo below.

To wear, place Fold A at forehead, 8" seam at center back of head, and Fold B at back of head.

Next, twist loop at back of neck.

Then, simply pull loop over head to front, and adjust twists and folds as you wish.
Standard Abbreviations:
Approx - approximately, beg - begin(ning), BO - bind off, CC - contrast color, cm - centimeter, cn - cable needle, CO - cast on, cont - continue(ing), dec - decrease, EOR - every other row, ER - every row, es - edge stitch, f&b - front and back, inc - increase, k - knit, L - left, MC - main color, meas - measures, mm - millimeters, P - purl, patt - pattern, pm - place marker, psso - pass slip st over, PU - pick up, rem - remain, rep - repeat, Rev - reverse, R - right, rnd - round, RS^ - right side (row), sc - single crochet, SKP - slip 1, knit 1, psso, s - slip, SSK - slip, slip, knit - slip next two stitches knitwise, one at a time, to right-hand needle. Insert tip of left-hand needle into fronts of these stitches, from left to right. Knit them together. One stitch has been decreased, st st - stocking stitch, st(s) - stitch(es), tbl - through back loop, tog - together, WS^ - wrong side (row), wyib - with yarn in back, wyif - with yarn in front, yb - yarn back, yf - yarn forward, yo - yarn over.

|
Носочки от Дорпс |

When Christie fell in love with the Drooping Elm stitch pattern after knitting a scarf and hat in it, she knew that she just had to try the pattern on socks. The result was this delightful sock pattern with easy toe-up construction, simple short-row heels, and a delicate ruffle around the cuff.
They are pictured above knit in elann.com Peruvian Baby Cashmere by Lorill Anderson.
Experience:
Intermediate
Size:
To fit average woman (sample socks fit US 9.5-10)
Materials:
- 4 balls of elann.com Peruvian Baby Cashmere (shown in 3317, Morning Mist)
- Two 2.50mm (US 1) Circular Knitting Needles (24 or 30" length), or size needed to obtain gauge
- Tapestry Needle
Gauge:
8 sts = 1 inch
Notes:
The Drooping Elm Leaf pattern is from Barbara G. Walker, A Treasury of Knitting Patterns. Note that in Rows 3 and 4, there is one less stitch for each pattern repeat. In Row 5, the original number of stitches is restored.
These socks are knit from the toe up using two circular needles, it is easy to adjust both the length of the foot and leg while knitting.
Chart:


INSTRUCTIONS:
Toe Cast On
Using a provisional cast on method (Knitty has an excellent tutorial here) and 1 circular needle, cast on 8 sts.
Purl one row.
Knit one row.
Remove the provisional cast-on, placing the 8 stitches onto the 2nd circular needle.
Hold the two needles parallel to each other so that the needle with the picked up loops is in the front and the needle with the 8 sts you cast on is in the back. Knit across the stitches on the front needle, (if necessary, untwist stitches by ktbl).
Start working in rounds and increase for the toe as follows:
Round 1: (Increase Round): *K1, inc1, k to last 3 sts of circular needle, inc1, k2*, rep between **s on second circular needle (4 sts increased).
Round 2: Knit.
Repeat rounds 1 and 2 until you have 30 sts on each needle (60 sts total).
Foot patterning:
Round 1: Work Row 1 of the Drooping Elm Leaf chart twice, k30.
Round 2 and all subsequent rounds : Continue working the Drooping Elm Leaf chart twice, k30.
If you prefer to work from written instructions :
Round 1 : *K1, yo, k1, ssk, p1, k2tog, k1, yo, p1, ssk, p1, k2tog, yo, k1, yo*, rep between **s once more, k30.
Round 2 : *K4, p1, k3, p1, k1, p1, k4*, rep between **s once more, k30.
Round 3 : *K1, yo, k1, ssk, p1, k2tog, k1, p1, sk2p, yo, k3, yo*, rep between **s once more, k30.
Round 4 : *K4, p1, k2, p1, K6*, rep between **s once more, k30.
Round 5 : *K1, yo, k1, yo, ssk, p1, k2tog, k2tog, yo, k5, yo*, rep between **s once more, k30.
Round 6 : *K5, p1, K9*, rep between **s once more, k30.
Round 7 : *K1, yo, k3, yo, sk2p, p1, yo, k1, ssk, p1, k2tog, k1, yo*, rep between **s once more, k30.
Round 8 : *K7, p1, k3, p1, k3*, rep between **s once more, k30.
Round 9 : *K1, yo, k5, yo, ssk, k1, k2tog, p1, k2tog, k1, yo*, rep between **s once more, k30.
Round 10 : *K11, p1, k3*, rep between **s once more, k30.
Work as set, repeating Drooping Elm Leaf pattern on instep sts and Stst on foot sts until the sock measures roughly 2 inches less than the desired length. Try on the sock, if the knitting reaches the spot where your heel begins, or touches the front part of the ankle, you are ready to start the heel shaping.
Work across instep sts only in Drooping Elm Leaf pattern, mark next pattern row on chart or instructions.
Short Row Heel :
Notes :
Heel is worked back and forth in rows over 1 circular needle only (foot sts).
How to W&T (wrap and turn):
On the Knit Side: Knit to last st, slip sl from LH to RH needle purlwise, bring yarn to front, slip st back to LH needle. Turn, bringing the yarn to the purl side between the needles.
On the Purl Side: Purl to last st, slip st from LH to RH needle purlwise, take yarn to back, slip st back to LH needle. Turn.
How to work wrapped sts:
On the Knit Side : Knit to wrapped st (single or double), PU wrap(s) with RH needle tip, lift over st and place on RH needle, k2tog (k3tog for double wrapped sts).
On the Purl Side : Purl to wrapped st (single or double), sl next st onto RH needle, PU wrap(s) with LH needle tip, lift over st and place on RH needle, slip sts one at a time pwise to LH needle, P2tog tbl (P3tog tbl for double wrapped sts).
Beg short row shaping :
Row 1 : K29, W&T.
Row 2 : P28, W&T.
Row 3 : K to stitch before first wrapped st, W&T.
Row 4 : P to stitch before first wrapped st, W&T.
Repeat rows 3 and 4, working 1 less st before each W&T, until you have 8 "live" (unwrapped) stitches on the needle, and 11 wrapped stitches on each side (ending with a WS row).
Reverse short row shaping :
Row 1 : K8, wws, W&T
Row 2 : P9, wws, W&T
Row 3 : K10, wws, W&T
Row 4 : P11, wws, W&T
Repeat rows 3 and 4, working 1 more st before each W&T, until all 30 stitches are live again.
Last row 4 will be : P29, wws.
Turn work RS facing.
Work Drooping Elm Leaf pattern from marked row over all sts (4 repeats).
Continue as set, working Drooping Elm Leaf pattern over all sts for about 3 inches, or desired height, ending with round/row 10.
Ruffle:
Set-up round : Knit.
Round 1 : *K1, yo*, rep between **s around.
Rounds 2 & 4 : Knit.
Round 3 : *K2, yo*, rep betweeen **s around.
Cast off loosely, using a larger needle size if necessary.
Weave in loose ends and block.
Abbreviations : inc1 - knit into front and back of stitch, K - knit, k2tog - knit 2 sts together, k3tog - knit 3 sts together, Ktbl - knit through back of loop, LH - Left Hand, P - purl, P2tog - purl 2 sts together, P3tog - purl 3 sts together, PU - pick up, rep - repeat, RH - Right Hand, sk2p - sl1, k2tog, pass sl stitch over the k2tog stitch, sl - Slip, ssk - Slip 2 stitches separately to right needle as if to knit, 2. Insert tip of left needle into fronts of these stitches, from left to right. Knit them together, st - stitch, Stst - Stockinette Stitch, knit every round, tbl - through back loop(s), WWS- work wrapped stitch (see Short Row Heel Notes), yo - yarn over.

|
KATIA CARIBE LACY PULLOVER |


ABBREVIATIONS:
beg - beginning, ch - chain, cm - centimeters, cont continue, dec - decrease/s/ing, foll(s) - follow(s)(ing), g - grams, inc - increase/s/ing, K knit, m - meters, mm - millimeters, P purl, pat pattern, rem - remain/der/ing, rev St st - reversed stockinette stitch, RS - right side, sc - single crochet, sep separately, st(s) - stitch(es), st-sr - stockinette stitch, tbl - through back of loop(s), tog together, WS - wrong side.

|
Голубое болеро |


Метки: вязание спицы болеро |


