«Какое умение самое редкое? — Умение отдавать.Какое умение самое лучшее? — Умение прощать.Какое умение самое трудное? — Умение молчать.Какое умение самое важное? — Умение спрашивать.Какое умение самое нужное? — Умение слушать.Какая привычка самая неприятная? — Склочность.Какая привычка самая вредная? — Болтливость.Какой человек быстрее приходят к Богу? — Милосердный.Какой человек самый сильный? — Который способен постичь Истину.Какой человек самый слабый? — Который надеется на свою силу.Какой человек самый разумный? — Который следит за своим сердцем.Какая привязанность самая опасная? — Привязанность к своему телу.Какой человек самый бедный? — Который больше всего любит деньги.Чем противостоять беде? — Смирением.Чем противостоять страданию? — Терпением.Каков признак здоровой души? — Вера.Каков признак больной души? — Безнадежность.Каков признак неправильных действий? — Раздражение.Каков признак добрых поступков? — Мир души.Какой человек заживо умер? — Равнодушный.Какой человек никогда не умрет? — Любящий Бога и ближних».Симеон Афонский
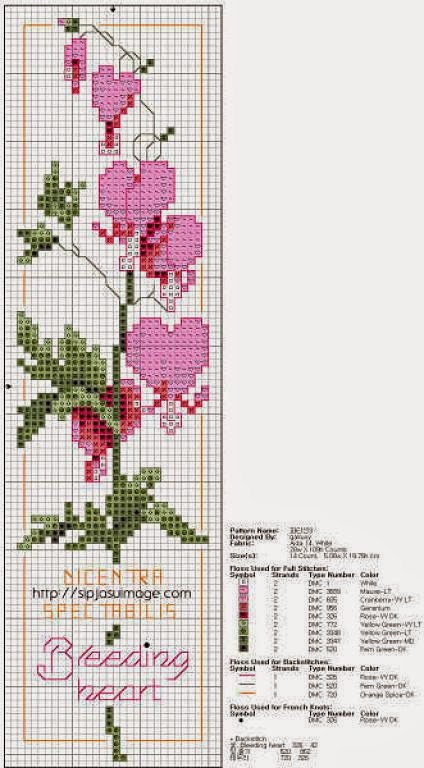
Красивая схема, вышивка. Тюльпаны |
Метки: вышивка |
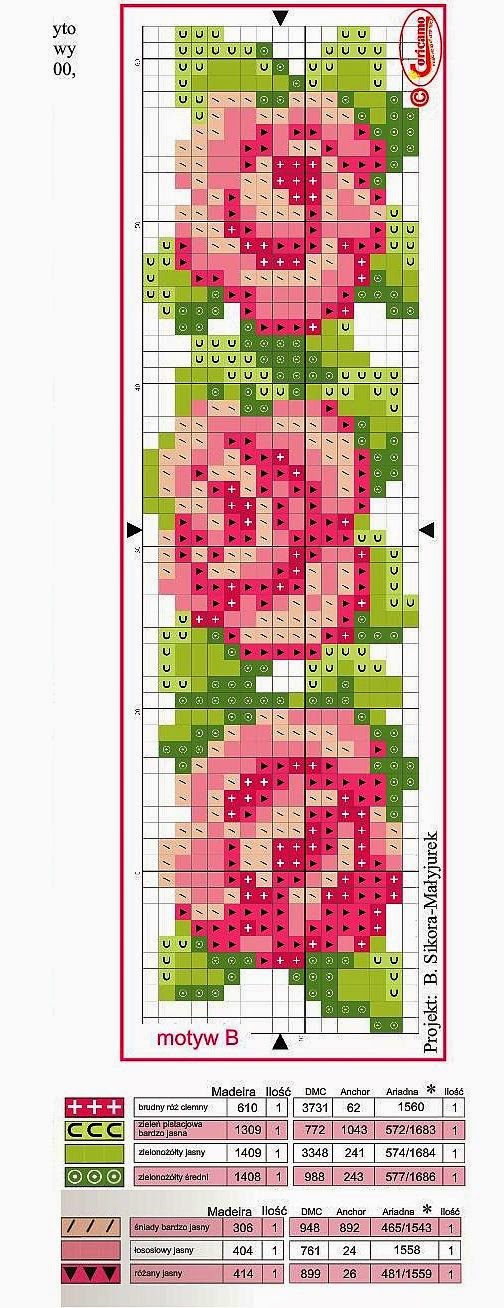
Вышивка. Бабочки |
Метки: вышивка бабочки |
Браслет |
Метки: украшения своими руками браслеты |
Сова из бисера |
|
Дорсетские пуговицы |

|
Браслет |
Summary: This article is about a red glass bead bracelet. Follow me to see how to make the red glass bead bracelet with white pearl beads and seed beads.

Are you attracted by the stunning red glass bead bracelet above? The supplies are minimal: just some red glass beads, white pearl beads, coffee seed beads, etc. The simple instructions below will show you how to make the red glass bead bracelet with white pearl beads and coffee seed beads.
Red Bicone Glass Beads
4mm White Round Pearl Beads
2mm Coffee Seed Beads
Platinum Slide Lock Clasps
Silver Jump Rings
0.2mm White Fishing Wire
Needle
Needle Nose Plier
Stainless-Steel Scissor

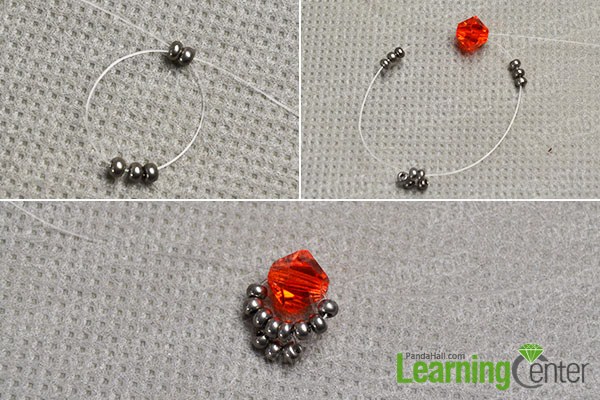
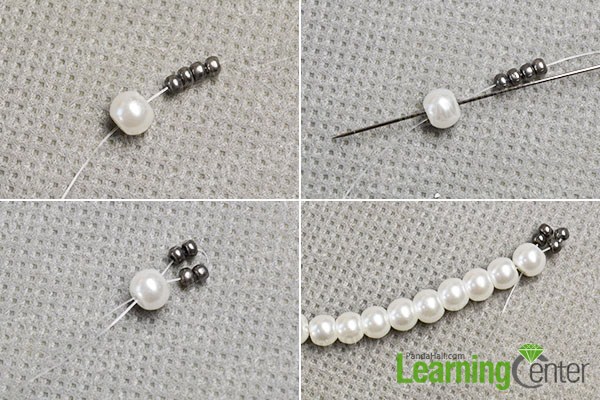
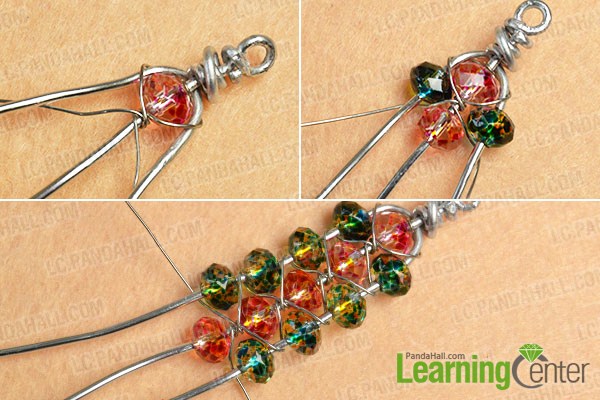
1st, cut a part of 0.2mm white fishing wire and add 3 2mm coffee seed beads to the middle. Then, cross the wires through 2 2mm coffee seed beads (as shown in the picture);
2nd, add 3 2mm coffee seed beads to the left wire and the right wire respectively. Then, cross the wires through a red bicone glass bead (as shown in the picture);
3rd, tighten the wires (as shown in the picture).
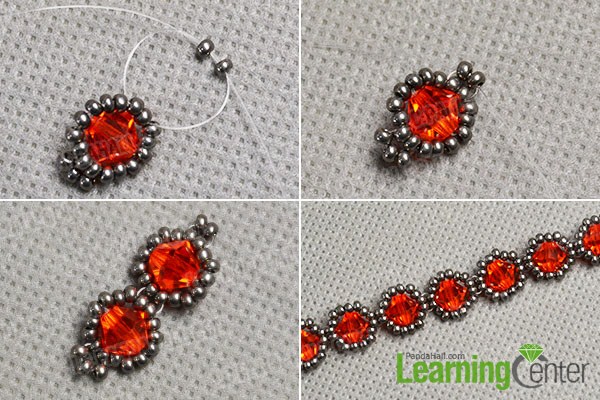
1st, add 3 2mm coffee seed beads to the left wire and the right wire respectively. Then, cross the wires through 2 2mm coffee seed beads and tighten (as shown in the picture);
2nd, cross the wire through the 5 2mm coffee seed beads and tighten (as shown in the picture);

3rd, cross the two wires through 2 2mm coffee seed beads and tighten (as shown in the picture);
4th, refer to the above steps to make another such red glass bead and seed bead pattern (as shown in the picture);
5th, refer to the above steps to make more such red glass bead and seed bead patterns (as shown in the picture).
1st, cut another piece of 02mm white fishing wire. Then, thread a 4mm white round pearl bead and 4 2mm coffee seed beads to it (as shown in the picture);
2nd, cross the right wire through the 4mm white round pearl bead and tighten (as shown in the picture);
3rd, add some 4mm white round pearl beads to one wire (as shown in the picture).
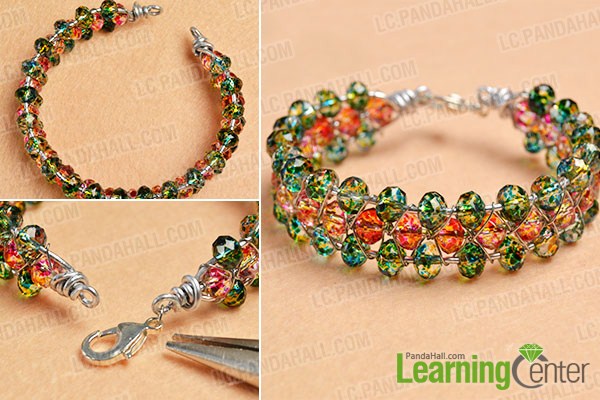
1st, refer to Step 3 to make a corresponding end on the other end of the white pearl strand. Then, refer to Step 1 and Step 2 to make another red glass bead strand (as shown in the picture);
2nd, add the two red glass bead strands and the white pearl bead strand to the three holes of a platinum slide lock clasp (as shown in the picture);
3rd, split the platinum slide lock clasp apart and combine it with the other end of the two red glass bead strands and the white pearl bead strand (as shown in the picture).

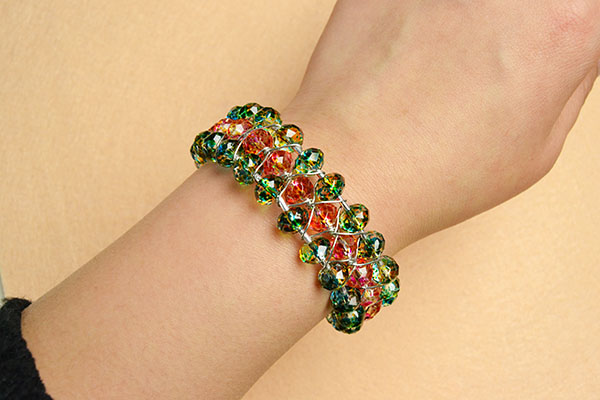
Here is the final look of the red glass bead bracelet.
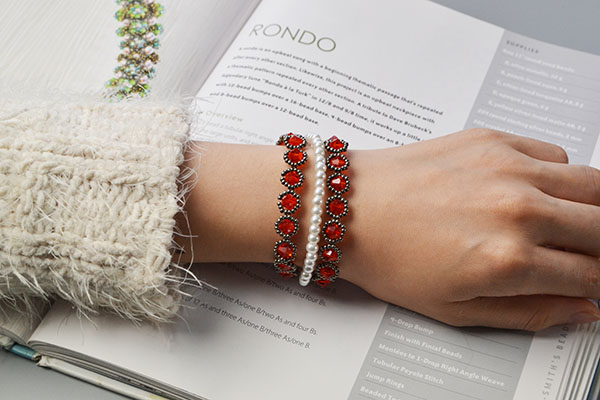
From the above picture, it looks like that I wear two red glass bead bracelets and one white pearl bracelet. In fact, it's one bracelet. The making steps are not very difficult to follow. Have a nice try if you like this red glass bead bracelet.
Метки: украшения своими руками браслеты |
Браслет |
Summary: Looking for easy bracelet patterns? In this article, you can learn how to make a green and red glass bead bracelet within two steps.

If you want to make some easy bracelets, the above green and red glass bead bracelet will be a good choice for you. Just with some glass beads, wires and lobster clasps, you can also make one. Now, let's see how to make the green and red glass bead bracelet within two steps.
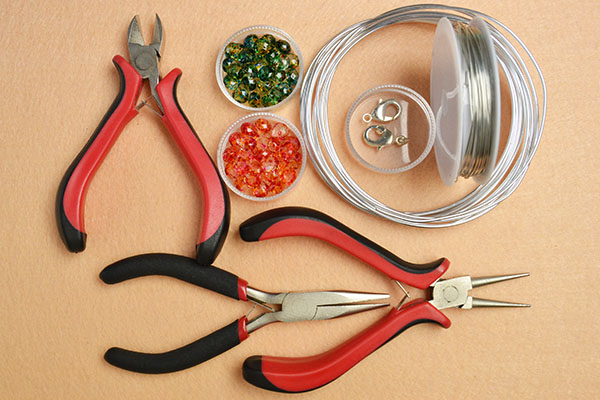
8x6mm Abacus Glass Beads
1.5mm Silver Aluminum Wire
0.5mm Silver Copper Wire
Silver Lobster Clasp
Needle Nose Plier
Round Nose Plier
Diagonal Plier
1st, cut three equal parts of 1.5mm silver aluminum wire. Then, make a hoop on one end of one silver aluminum wire (as shown in the picture);
2nd, add the other two aluminum wires (as shown in the picture);
3rd, cut a part of 0.5mm silver copper wire and wrap it around the aluminum wire (as shown in the picture).
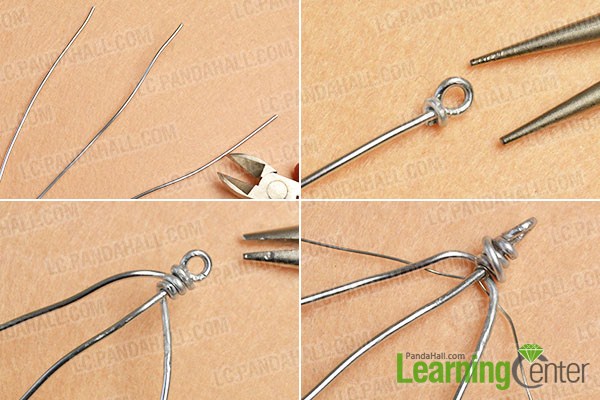
1st, add a red 8x6mm abacus glass bead to the middle aluminum wire. Then, wrap the copper wire around the aluminum wire and red glass bead (as shown in the picture);
2nd, add a green 8x6mm abacus glass bead to the left aluminum wire and the right aluminum wire respectively (as shown in the picture);
3rd, wrap the copper wire and add more red glass beads and green glass beads to the aluminum wires (as shown in the picture);
4th, add more red glass beads and green glass beads and wrap the copper wires. Then, cut off the excess wires and twist the ends (as shown in the picture);
5th, add a silver lobster clasp to the right end through a silver jump ring. Then, connect the two ends of the green and red glass bead bracelet together.
Here is the final look of the green and red glass bead bracelet.
|
Кулон |
Summary: Wanna send her a DIY heart pendant this Valentine's Day? This Pandahall tutorial will show you how to make a purple pearl bead heart pendant necklace with golden chain.

Do you love the above purple pearl bead heart pendant necklace? Just with some pearl beads, chains and other link clasps, you can also make one you're your lovers. Follow me to see how to make this purple pearl bead heart pendant necklace with golden chain.
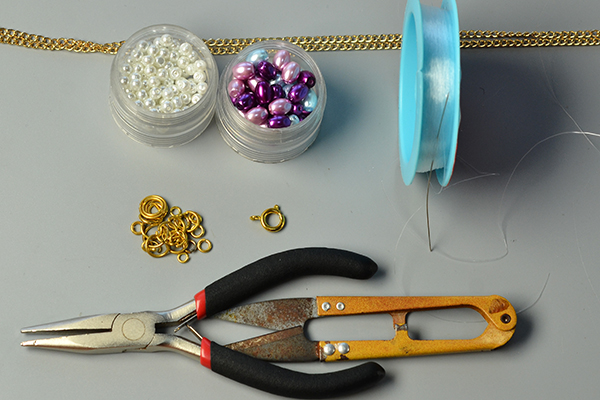
4mm White Round Pearl Beads
Purple Oval Pearl Beads
Golden Twisted Chain
Golden Spring Clasps
Golden Jump Rings
0.2mm White Fishing Wire
Needle Nose Plier
Stainless-Steel Scissor
1st, cut a part of 0.2mm white fishing wire and thread 4 purple oval pearl beads to it (as shown in the picture);
2nd, make some knots with the two wires and cut off the left wire (as shown in the picture);
3rd, add a 4mm white round pearl bead and cross the wire through the adjacent purple oval pearl bead (as shown in the picture);
4th, refer to the above steps to add 3 more 4mm white round pearl beads (as shown in the picture).

1st, thread 2 purple oval pearl beads to the wire (as shown in the picture);
2nd, cross the wire through the 4mm white round pearl bead (as shown in the picture);
3rd, thread 2 purple oval pearl beads to the wire (as shown in the picture);
4th, cross the wire through the 4mm white round pearl bead (as shown in the picture);
5th, cross the wire through the purple oval pearl beads and the white round pearl beads. Then, add a 4mm white round pearl bead and cross the wire through the pearl beads (as shown in the picture);
6th, add a 4mm white round pearl bead and cross the wire through the adjacent purple oval pearl bead (as shown in the picture).
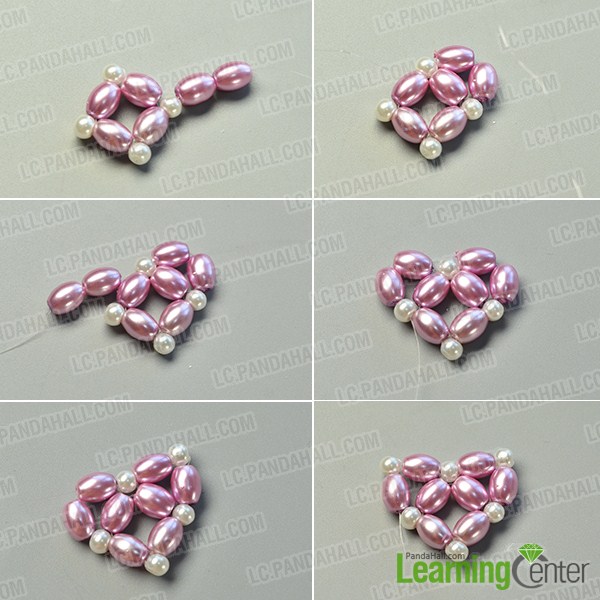
1st, cross the wire through the pearl beads and add 4 purple oval pearl beads (as shown in the picture);
2nd, cross the wire through the purple oval pearl bead (as shown in the picture);
3rd, cross the wire through the white round pearl bead and the purple oval pearl bead. Then, put the 4 purple oval pearl bead pattern above the pearl heart (as shown in the picture);
4th, cross the wire through the 4mm white round pearl bead (as shown in the picture);
5th, add 2 purple oval pearl beads (as shown in the picture);
6th, cross the wire through the pearl beads (as shown in the picture).

1st, add 2 purple oval pearl beads and cross the wire through the pearl beads (as shown in the picture);
2nd, cross the wire through the pearl beads (as shown in the picture);
3rd, add a golden jump ring (as shown in the picture);
4th, cross the wire through the pearl beads. Then, cut off the excess wires (as shown in the picture);
5th, cut a part of golden twisted chain and add the heart purple pearl heart pendant to the middle of the chain (as shown in the picture);
6th, connect the two ends of the chain through a golden spring clasp and golden jump rings (as shown in the picture).

Here is the final look of the purple pearl heart pendant necklace.

Метки: украшения своими руками |
ВЫШИВКА. ВЕНОЧКИ |
https://www.tresorsdeboitesacouture.fr/8-decembre/


Метки: вышивка |