-Музыка
- Нат Кинг Коул-Эль Чокло - аргентинское танго
- Слушали: 6327 Комментарии: 0
- Brian Adams "Have you ever really loved a woman.."
- Слушали: 18710 Комментарии: 0
- Bruno Lorenzoni - Melodie d`amour. Аккордеон- мировая бессмертная мелодия из песни "Любовь"
- Слушали: 73788 Комментарии: 0
- саунд-трек из ролика- Интерью с Богом-
- Слушали: 143773 Комментарии: 0
- Эра-"Амено"
- Слушали: 5699 Комментарии: 0
-Рубрики
- Вышивка (604)
- Украшения своими руками (378)
- Книги и журналы по рукоделию (284)
- Живопись (132)
- Кулинария (126)
- Десерт (44)
- Закуски (28)
- Горячие блюда (18)
- Салаты (17)
- Хлеб (11)
- Напитки (4)
- Заготовки (2)
- Соусы (1)
- Музыка (123)
- Шарфики (87)
- Психология (72)
- Аудиокниги (58)
- Как быть красивой (52)
- Уход за лицом (22)
- Диеты (12)
- Уход за телом (10)
- Красивые волосы (1)
- Красивые картинки (41)
- Для дневника (37)
- Медитация и молитва (31)
- Размышления о жизни (28)
- Поддержим своё здоровье (24)
- Развитие детей (23)
- Декупаж (23)
- Ревелюр (22)
- Из лоскутков ткани (22)
- Букеты из конфет (21)
- Флористика (16)
- Видео (15)
- Шляпки (13)
- Фотография (13)
- Кинотеатр (11)
- Йога (11)
- Арт-терапия (10)
- Юмор (10)
- Папье-маше (7)
- Роспись камней (7)
- Овечки (7)
- Загородная жизнь (7)
- Русский язык (7)
- Мультфильмы (6)
- Хозяйке на заметку (5)
- Канзаши (5)
- Любимые фильмы (4)
- Компьютерные программы (4)
- Цветы (4)
- Образование (3)
- Пилатес (3)
- Искусство красиво одеваться (3)
- Фриволите (2)
- Точечная роспись (2)
- Мозаика (2)
- Полимерная глина (2)
- Батик (2)
- СМИ (2)
- Хобби- бизнес (2)
- Энкаустика (2)
- Природа. Страны. Континенты (2)
- Английский язык (2)
- Вязаные картины (1)
- История (1)
- Из пластиковых бутылок (0)
- Юридическая консультация (0)
- Адреса сайтов по декору (11)
- Валяние (234)
- Вязание (662)
- Для мужчин (76)
- Схемы узоров крючком (33)
- Варежки и перчатки (33)
- Вязание детям (25)
- Схемы узоров спицами (18)
- Носки (18)
- Пледы (12)
- Вязание для животных (6)
- Жилеты (42)
- Вязание в стиле Коко Шанель (20)
- Вязаные игрушки (156)
- Вязаные цветы (48)
- Дизайн (354)
- Декор (333)
- Декор мебели (4)
- Игрушки из ткани (107)
- Изделия из фетра (78)
- Картины из шерсти (37)
- Нуновойлок (12)
- Открытки (23)
- Подушки-игрушки (51)
- Покрывала в стиле пэчворк (6)
- Поэзия (29)
- Салфетки и скатерти (48)
- Светильники своими руками (44)
- Сумки (73)
- Тапочки из шерсти (46)
- Текстильная кукла (154)
- Цитаты (8)
- Часы (16)
- Шапки, береты (242)
- Шитьё (17)
-Новости
-Всегда под рукой
-Фотоальбом

- На занятиях по изучению корейской флористики
- 02:25 17.09.2012
- Фотографий: 3
-
Добавить плеер в свой журнал
© Накукрыскин
-Поиск по дневнику
-Подписка по e-mail
-Друзья
-Постоянные читатели
-Сообщества
-Статистика
Записей: 4505
Комментариев: 102
Написано: 4795
«Какое умение самое редкое? — Умение отдавать.Какое умение самое лучшее? — Умение прощать.Какое умение самое трудное? — Умение молчать.Какое умение самое важное? — Умение спрашивать.Какое умение самое нужное? — Умение слушать.Какая привычка самая неприятная? — Склочность.Какая привычка самая вредная? — Болтливость.Какой человек быстрее приходят к Богу? — Милосердный.Какой человек самый сильный? — Который способен постичь Истину.Какой человек самый слабый? — Который надеется на свою силу.Какой человек самый разумный? — Который следит за своим сердцем.Какая привязанность самая опасная? — Привязанность к своему телу.Какой человек самый бедный? — Который больше всего любит деньги.Чем противостоять беде? — Смирением.Чем противостоять страданию? — Терпением.Каков признак здоровой души? — Вера.Каков признак больной души? — Безнадежность.Каков признак неправильных действий? — Раздражение.Каков признак добрых поступков? — Мир души.Какой человек заживо умер? — Равнодушный.Какой человек никогда не умрет? — Любящий Бога и ближних».Симеон Афонский
Ткачество. |
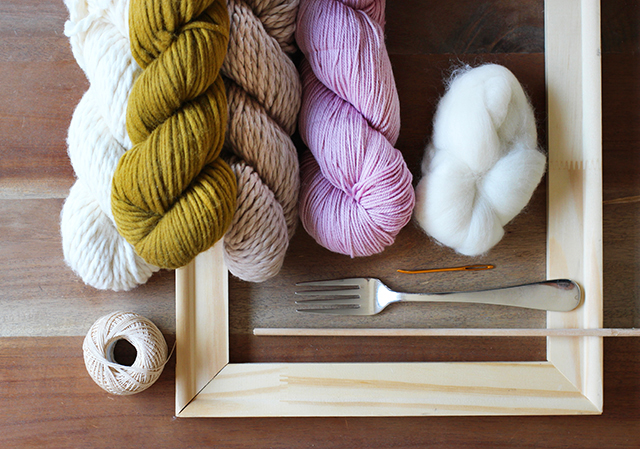
You’ll need:
- an assortment of yarn
- cotton warp twine or yarn
- wool roving (optional)
- a tapestry needle
- an open back frame or a canvas stretcher frame (for a custom size frame. tutorial found here)
- a thin wooden dowel (measuring at least the length of the width of the frame)
- a metal tube or wooden stick
- scissors
- a fork
 /honestlywtf.com/wp-content/uploads/2014/06/weaving2-300x210.jpg" target="_blank">http://honestlywtf.com/wp-content/uploads/2014/06/weaving2-300x210.jpg 300w" width="640" />
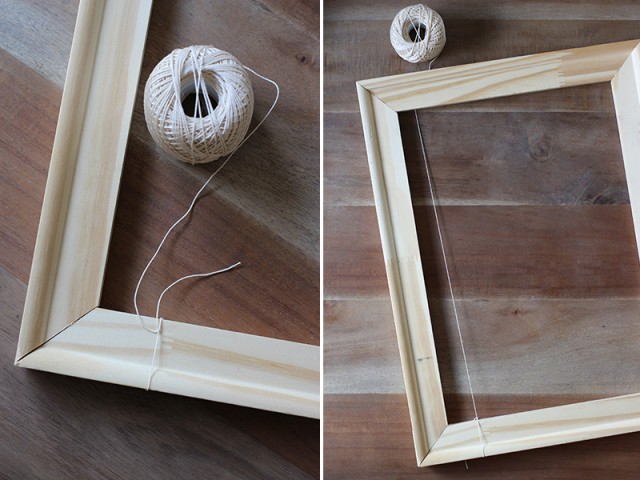
To make your loom, start by adding the warp to the wooden frame. The warp is a set of lengthwise strings that are held, in tension, on a frame. This is what you’ll be weaving onto. Because the warp is wound tightly around the frame, the yarn or string should be strong and not too thick or too thin. Cotton or nylon string is fine. Tie the end of your string into a double knot onto the bottom left of the frame. Loop the string under and over the top of the frame . . .
 /honestlywtf.com/wp-content/uploads/2014/05/weaving3-300x225.jpg" target="_blank">http://honestlywtf.com/wp-content/uploads/2014/05/weaving3-300x225.jpg 300w, http://honestlywtf.com/wp-content/uploads/2014/05/weaving3.jpg 800w" width="640" />
and back down under and over the bottom of the frame. Continue doing that, making a figure eight pattern each time.
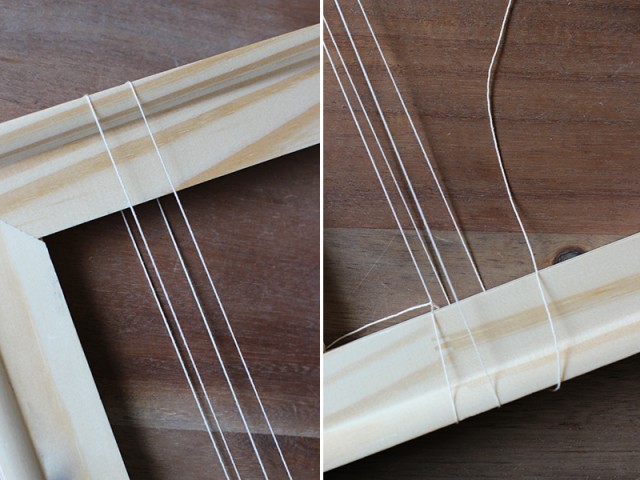 /honestlywtf.com/wp-content/uploads/2014/05/weaving4-300x225.jpg" target="_blank">http://honestlywtf.com/wp-content/uploads/2014/05/weaving4-300x225.jpg 300w, http://honestlywtf.com/wp-content/uploads/2014/05/weaving4.jpg 800w" width="640" />
Depending on how wide you want your piece to be and how big your frame is, you can make as few as 10 loops and as much as 25. Separate the strings about a 1/4″ apart from each other and make sure the tension is even and tight, but not too tight, before tying a knot at the top of the frame.
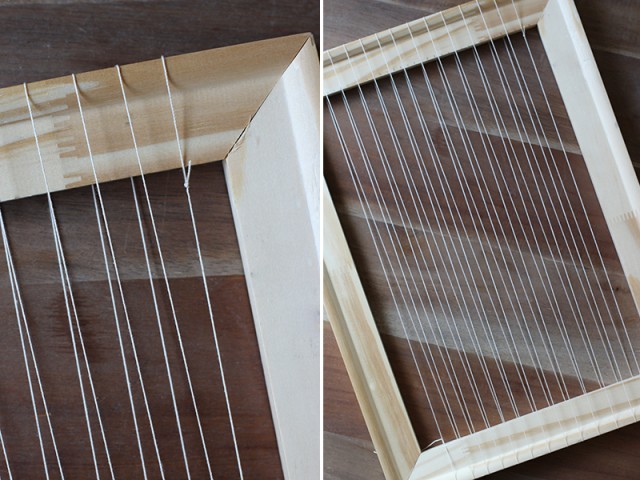 /honestlywtf.com/wp-content/uploads/2014/05/weaving5-300x225.jpg" target="_blank">http://honestlywtf.com/wp-content/uploads/2014/05/weaving5-300x225.jpg 300w, http://honestlywtf.com/wp-content/uploads/2014/05/weaving5.jpg 800w" width="640" />
Double check your loom from the side. The strings should be criss crossed around the middle of the loom. Take the thin wooden dowel, which will serve as your shed rod, and slide it through the strings – under where the strings are crossed. Then push it to the top of the frame. You’ll immediately notice that the tension is tighter. The shed rod helps separate the upper and lower warp strings, making it easier to weave!
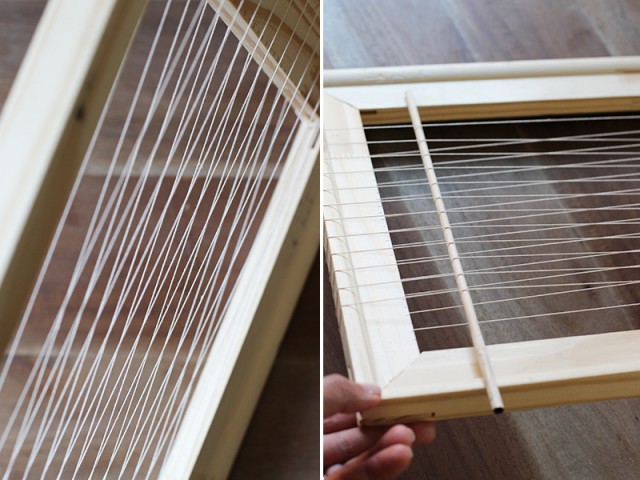 /honestlywtf.com/wp-content/uploads/2014/05/weaving6-300x225.jpg" target="_blank">http://honestlywtf.com/wp-content/uploads/2014/05/weaving6-300x225.jpg 300w, http://honestlywtf.com/wp-content/uploads/2014/05/weaving6.jpg 800w" width="640" />
This is what your loom should look like. Notice how the warps criss cross above the shed rod. The strings are evenly separated. And there is clear separation of a top layer of strings (top warp) and a bottom layer of strings (bottom warp). You are ready to weave!
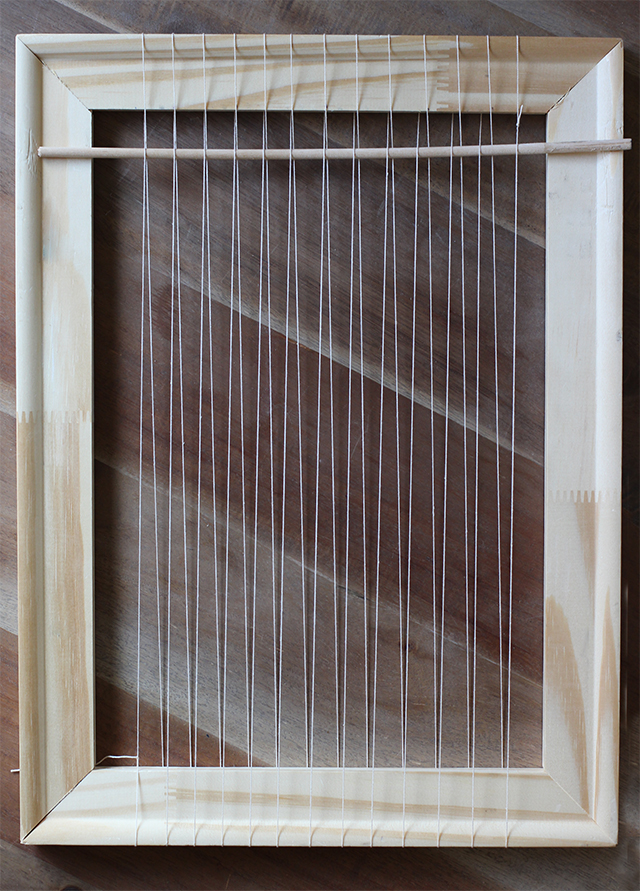 /honestlywtf.com/wp-content/uploads/2014/05/weaving7-300x417.jpg" target="_blank">http://honestlywtf.com/wp-content/uploads/2014/05/weaving7-300x417.jpg 300w" width="640" />
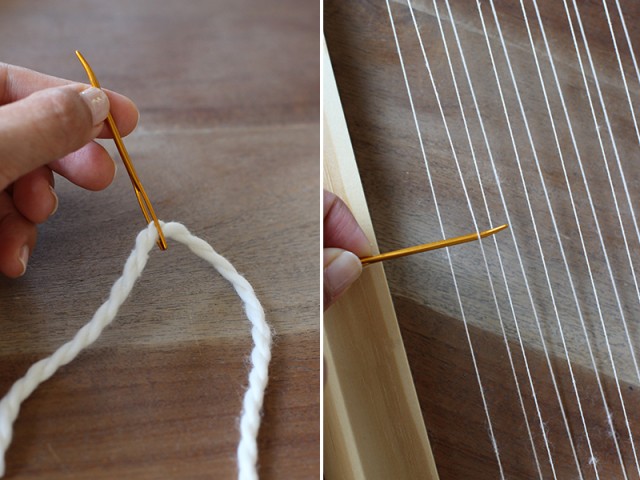
The weft is the term for the yarn which is drawn horizontally through the warp to create a weaving. For this, I like to use a variety of natural fiber yarns – some thick, some thin, some with interesting textures. It’s all about mixing it up! Cut the yarn to about 20-24 feet. Thread the end of the yarn through needle. Starting a few inches from the bottom of the loom, pass the needle under the bottom warps. That means under every other warp: over the first warp, under the second warp, over the third warp, under the fourth warp and so on.
 /honestlywtf.com/wp-content/uploads/2014/05/weaving8-300x225.jpg" target="_blank">http://honestlywtf.com/wp-content/uploads/2014/05/weaving8-300x225.jpg 300w, http://honestlywtf.com/wp-content/uploads/2014/05/weaving8.jpg 800w" width="640" />
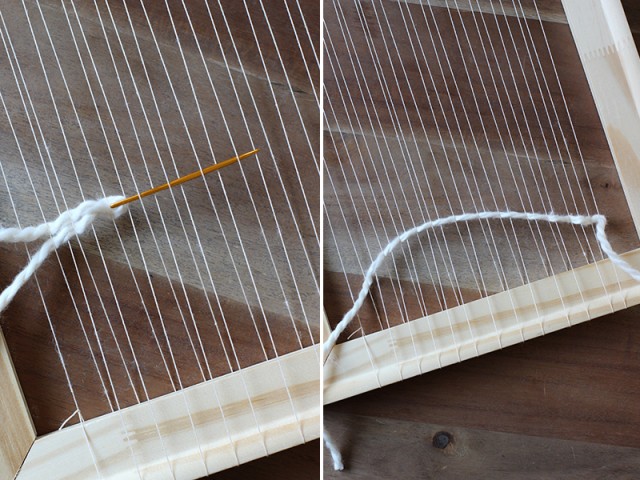
Pull the yarn straight through, leaving a 4-5 inch tail. Pull the right side of yarn down towards the bottom of the loom, creating a small arc in the yarn.
 /honestlywtf.com/wp-content/uploads/2014/05/weaving9-300x225.jpg" target="_blank">http://honestlywtf.com/wp-content/uploads/2014/05/weaving9-300x225.jpg 300w, http://honestlywtf.com/wp-content/uploads/2014/05/weaving9.jpg 800w" width="640" />
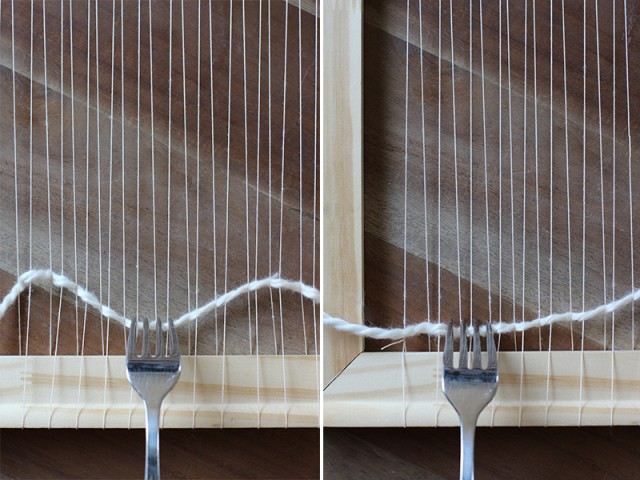
Use a fork to comb down the middle of the arc. Then the left and ride sides, pressing the rest of the weft into a straight line.
 /honestlywtf.com/wp-content/uploads/2014/05/weaving10-300x225.jpg" target="_blank">http://honestlywtf.com/wp-content/uploads/2014/05/weaving10-300x225.jpg 300w, http://honestlywtf.com/wp-content/uploads/2014/05/weaving10.jpg 800w" width="640" />
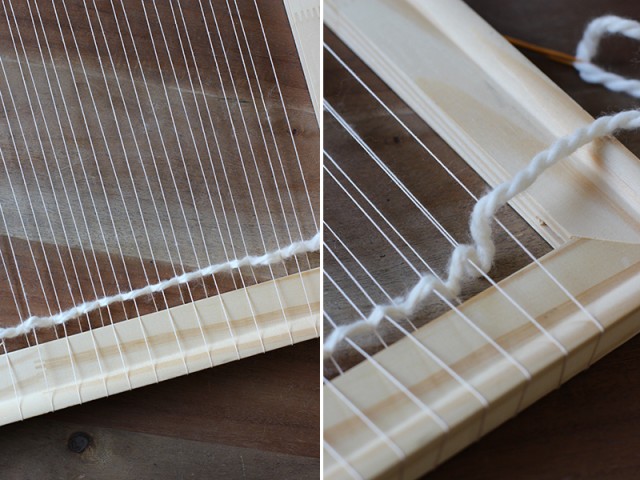
Giving the weft extra slack with an arc allows it to be packed into place with even tension. Doing this will give your piece an overall consistency to it. It’s an important step and shouldn’t be skipped after each weft is passed through! Now wrap the yarn around and under the last string.
 /honestlywtf.com/wp-content/uploads/2014/05/weaving11-300x225.jpg" target="_blank">http://honestlywtf.com/wp-content/uploads/2014/05/weaving11-300x225.jpg 300w, http://honestlywtf.com/wp-content/uploads/2014/05/weaving11.jpg 800w" width="640" />
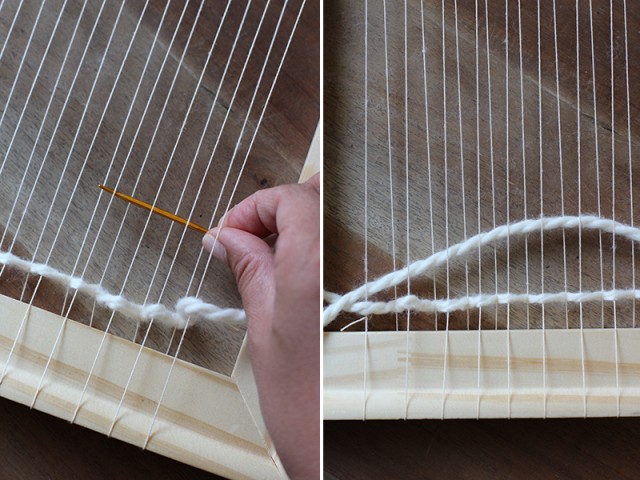
And bring it back through – this time through the top warps. Under the first, over the second, under the third and so on. Passing the yarn through the top warps should be easier than passing it through the bottom. This is because you’re not working with tension when weaving through the top warps.
 /honestlywtf.com/wp-content/uploads/2014/05/weaving12-300x225.jpg" target="_blank">http://honestlywtf.com/wp-content/uploads/2014/05/weaving12-300x225.jpg 300w, http://honestlywtf.com/wp-content/uploads/2014/05/weaving12.jpg 800w" width="640" />
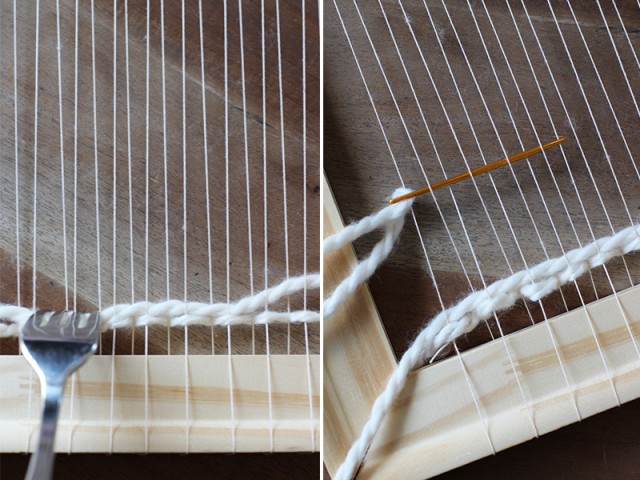
Use the fork to press down the second row to that it is snug against the first. Repeat by going back through the bottom warps.
 /honestlywtf.com/wp-content/uploads/2014/05/weaving13-300x225.jpg" target="_blank">http://honestlywtf.com/wp-content/uploads/2014/05/weaving13-300x225.jpg 300w, http://honestlywtf.com/wp-content/uploads/2014/05/weaving13.jpg 800w" width="640" />
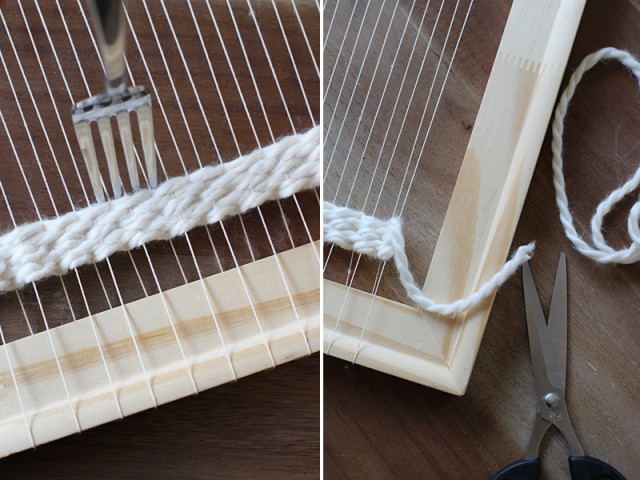
After a few rows, you can cut the yarn to leave a 4-5 inch tail. Or just continue weaving. If you run out of yarn, I’ll explain how to add more yarn later in the tutorial. I’ll also be showing you how to finish those loose tails at the very end.
 /honestlywtf.com/wp-content/uploads/2014/05/weaving14-300x225.jpg" target="_blank">http://honestlywtf.com/wp-content/uploads/2014/05/weaving14-300x225.jpg 300w, http://honestlywtf.com/wp-content/uploads/2014/05/weaving14.jpg 800w" width="640" />
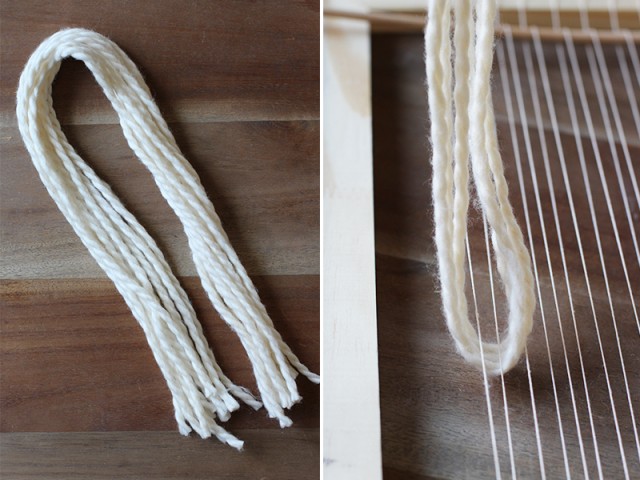
To add tassels, cut a bunch of yarn double the length of the desired tassel length. Take a group of 3-5 strands, depending on the thickness of the yarn, and center it under the first set of top and bottom warps.
 /honestlywtf.com/wp-content/uploads/2014/05/weaving15-300x225.jpg" target="_blank">http://honestlywtf.com/wp-content/uploads/2014/05/weaving15-300x225.jpg 300w, http://honestlywtf.com/wp-content/uploads/2014/05/weaving15.jpg 800w" width="640" />
Slide a finger under the middle of the yarns, between the two wefts. Pull the center up, creating a loop.
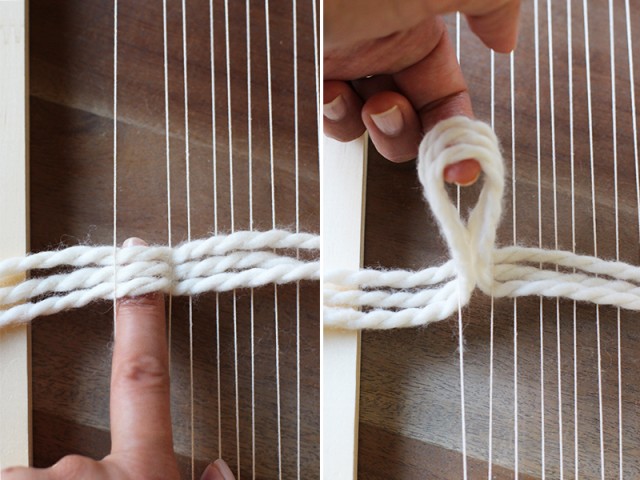 /honestlywtf.com/wp-content/uploads/2014/05/weaving16-300x225.jpg" target="_blank">http://honestlywtf.com/wp-content/uploads/2014/05/weaving16-300x225.jpg 300w, http://honestlywtf.com/wp-content/uploads/2014/05/weaving16.jpg 800w" width="640" />
Grab the ends from under the loop and pull tight.
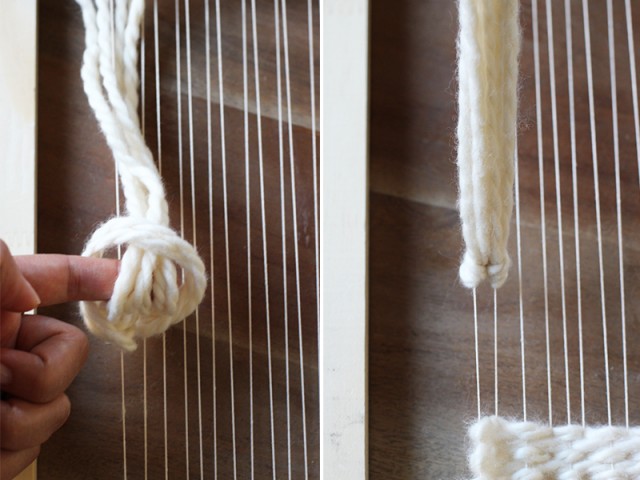 /honestlywtf.com/wp-content/uploads/2014/05/weaving17-300x225.jpg" target="_blank">http://honestlywtf.com/wp-content/uploads/2014/05/weaving17-300x225.jpg 300w, http://honestlywtf.com/wp-content/uploads/2014/05/weaving17.jpg 800w" width="640" />
Slide the tassel down and repeat.
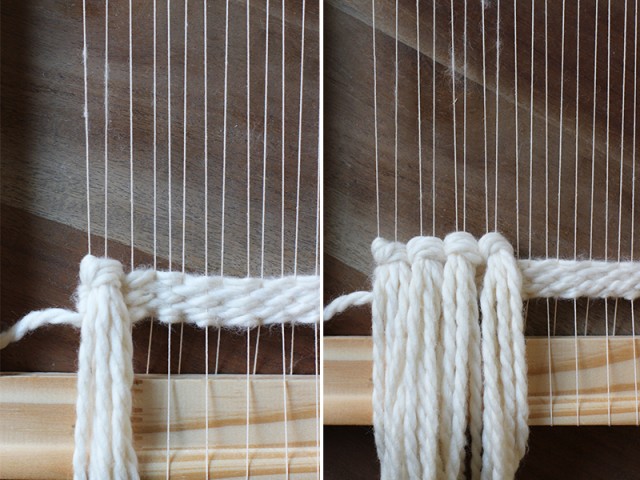 /honestlywtf.com/wp-content/uploads/2014/05/weaving18-300x225.jpg" target="_blank">http://honestlywtf.com/wp-content/uploads/2014/05/weaving18-300x225.jpg 300w, http://honestlywtf.com/wp-content/uploads/2014/05/weaving18.jpg 800w" width="640" />
If the yarn runs out while plain weaving, just drop the yarn behind the loom. Be sure to drop it with at least a few of inches of slack. Bring up a new piece of yarn, as if to continue the weft.
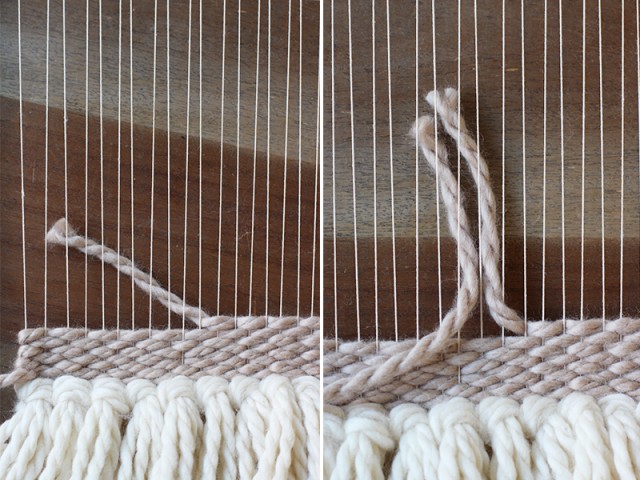 /honestlywtf.com/wp-content/uploads/2014/05/weaving19-300x225.jpg" target="_blank">http://honestlywtf.com/wp-content/uploads/2014/05/weaving19-300x225.jpg 300w, http://honestlywtf.com/wp-content/uploads/2014/05/weaving19.jpg 800w" width="640" />
Create the arc as normal and press down with your fork. I’ll show you how to take care of the loose ends on the backside towards the end of the tutorial.
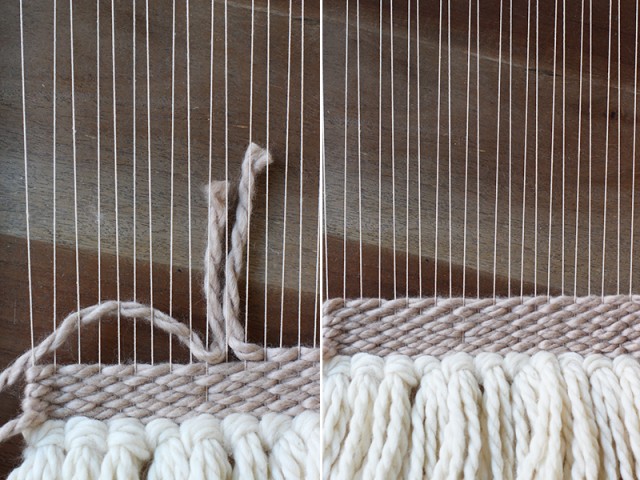 /honestlywtf.com/wp-content/uploads/2014/05/weaving20-300x225.jpg" target="_blank">http://honestlywtf.com/wp-content/uploads/2014/05/weaving20-300x225.jpg 300w, http://honestlywtf.com/wp-content/uploads/2014/05/weaving20.jpg 800w" width="640" />
There might be a place where you decide to break up your weaving with tassels or sections of varying yarns. To plain weave just a small section, simply continue to weave as normal.
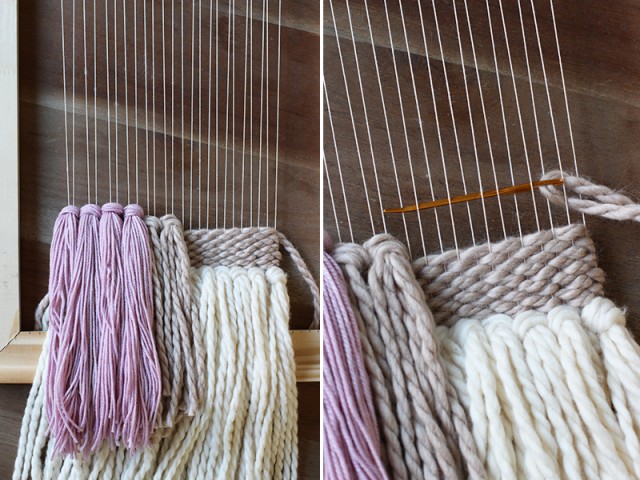 /honestlywtf.com/wp-content/uploads/2014/05/weaving21-300x225.jpg" target="_blank">http://honestlywtf.com/wp-content/uploads/2014/05/weaving21-300x225.jpg 300w, http://honestlywtf.com/wp-content/uploads/2014/05/weaving21.jpg 800w" width="640" />
When you want to turn back simply wrap the yarn around the last warp and weave through the opposite set of warps. It doesn’t matter if it wraps around a bottom or top warp – as long as you return the yarn back the other direction through the opposite set of warps.Create a small arc.
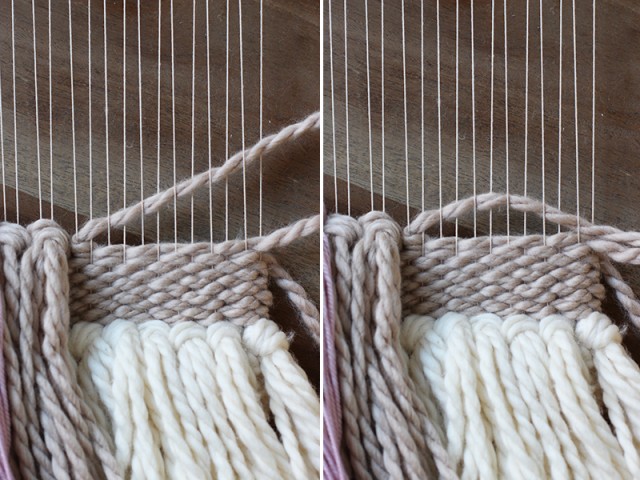 /honestlywtf.com/wp-content/uploads/2014/05/weaving22-300x225.jpg" target="_blank">http://honestlywtf.com/wp-content/uploads/2014/05/weaving22-300x225.jpg 300w, http://honestlywtf.com/wp-content/uploads/2014/05/weaving22.jpg 800w" width="640" />
And press down with the fork. Go back through and take it a few warps further if need be.
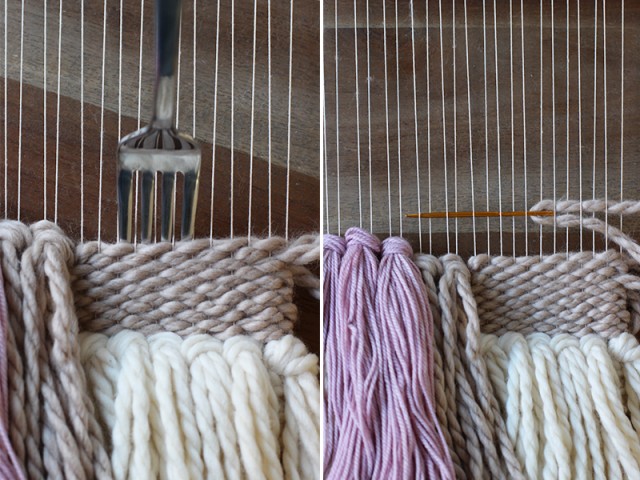 /honestlywtf.com/wp-content/uploads/2014/05/weaving23-300x225.jpg" target="_blank">http://honestlywtf.com/wp-content/uploads/2014/05/weaving23-300x225.jpg 300w, http://honestlywtf.com/wp-content/uploads/2014/05/weaving23.jpg 800w" width="640" />
Make an arc and press down. Easy peasy. Continue weaving!
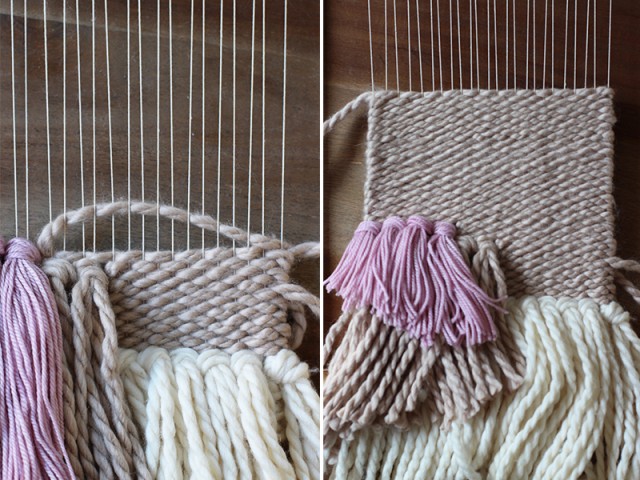 /honestlywtf.com/wp-content/uploads/2014/05/weaving24-300x225.jpg" target="_blank">http://honestlywtf.com/wp-content/uploads/2014/05/weaving24-300x225.jpg 300w, http://honestlywtf.com/wp-content/uploads/2014/05/weaving24.jpg 800w" width="640" />
One weaving technique I love is the soumak, which looks similar to a fishtail braid. To do this, you wrap the yarn around each warp from the right side. And then back through around the left side of each warp. Place the needle under the first warp from the right side of the warp. Wrap the yarn around it and pull until you have a few inches of slack.
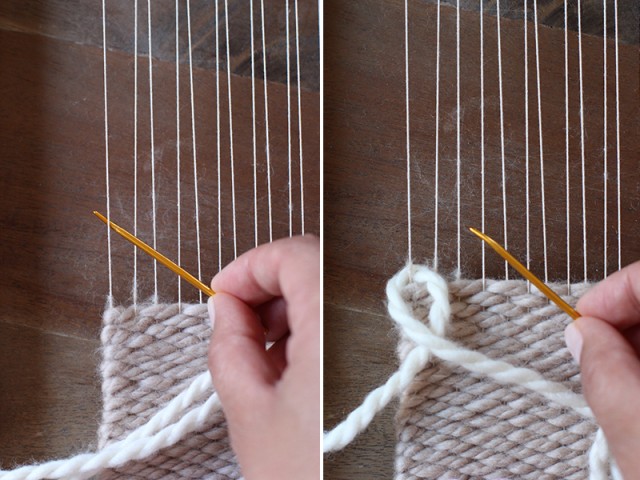 /honestlywtf.com/wp-content/uploads/2014/05/weaving25-300x225.jpg" target="_blank">http://honestlywtf.com/wp-content/uploads/2014/05/weaving25-300x225.jpg 300w, http://honestlywtf.com/wp-content/uploads/2014/05/weaving25.jpg 800w" width="640" />
Then wrap the yarn around the second warp – again, from the right side. Pull. Then wrap around the third warp and so on . . .
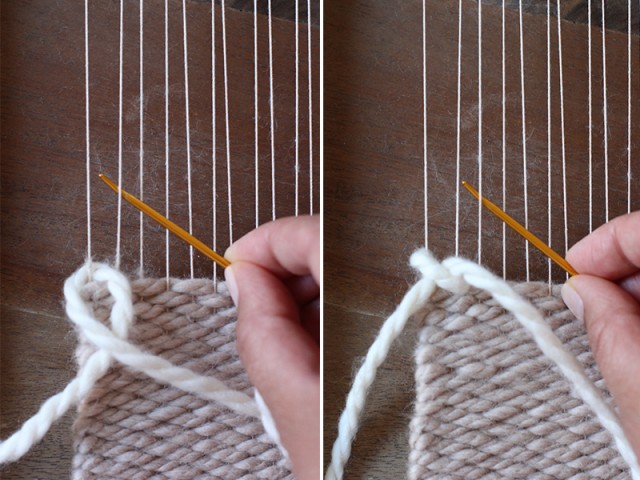 /honestlywtf.com/wp-content/uploads/2014/05/weaving26-300x225.jpg" target="_blank">http://honestlywtf.com/wp-content/uploads/2014/05/weaving26-300x225.jpg 300w, http://honestlywtf.com/wp-content/uploads/2014/05/weaving26.jpg 800w" width="640" />
Once you reach the end, mirror the technique – this time, wrapping yarn around each warp from the left side. Cut the yarn, leaving slack.
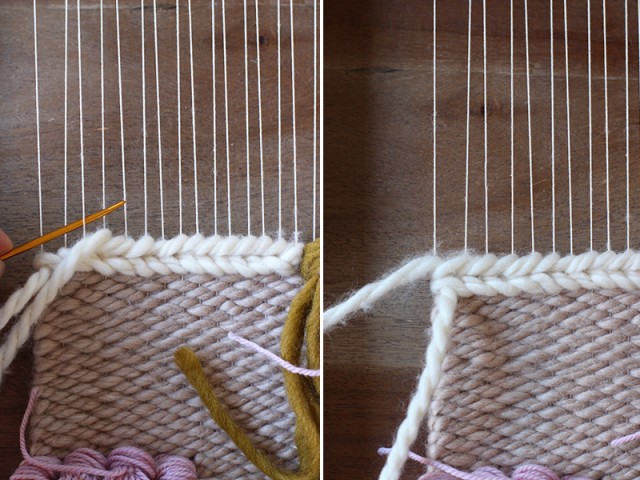 /honestlywtf.com/wp-content/uploads/2014/05/weaving27-300x225.jpg" target="_blank">http://honestlywtf.com/wp-content/uploads/2014/05/weaving27-300x225.jpg 300w, http://honestlywtf.com/wp-content/uploads/2014/05/weaving27.jpg 800w" width="640" />
Wool roving is super soft wool that has not yet been spun into yarn. It usually comes in long, thick bundles that easy to pull apart and manipulate. Incorporating roving into your weaving is super easy – just treat it as yarn and pass it through like a plain weave. Under the top warps first.
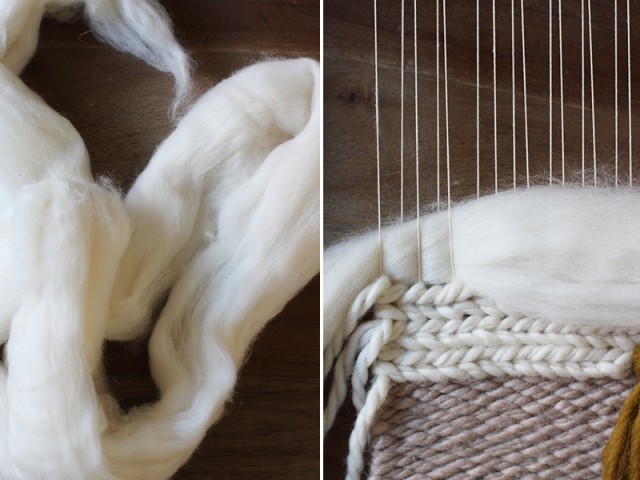 /honestlywtf.com/wp-content/uploads/2014/05/weaving28-300x225.jpg" target="_blank">http://honestlywtf.com/wp-content/uploads/2014/05/weaving28-300x225.jpg 300w, http://honestlywtf.com/wp-content/uploads/2014/05/weaving28.jpg 800w" width="640" />
And back under through the bottom warps. When you’re finished, simply give the roving a hard pull on each side and it will naturally separate. Again, be sure to leave some slack!
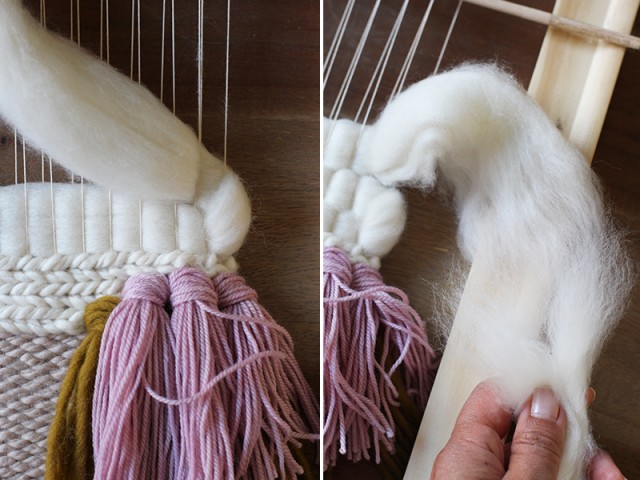 /honestlywtf.com/wp-content/uploads/2014/05/weaving29-300x225.jpg" target="_blank">http://honestlywtf.com/wp-content/uploads/2014/05/weaving29-300x225.jpg 300w, http://honestlywtf.com/wp-content/uploads/2014/05/weaving29.jpg 800w" width="640" />
Continue weaving until you’ve reached the top.
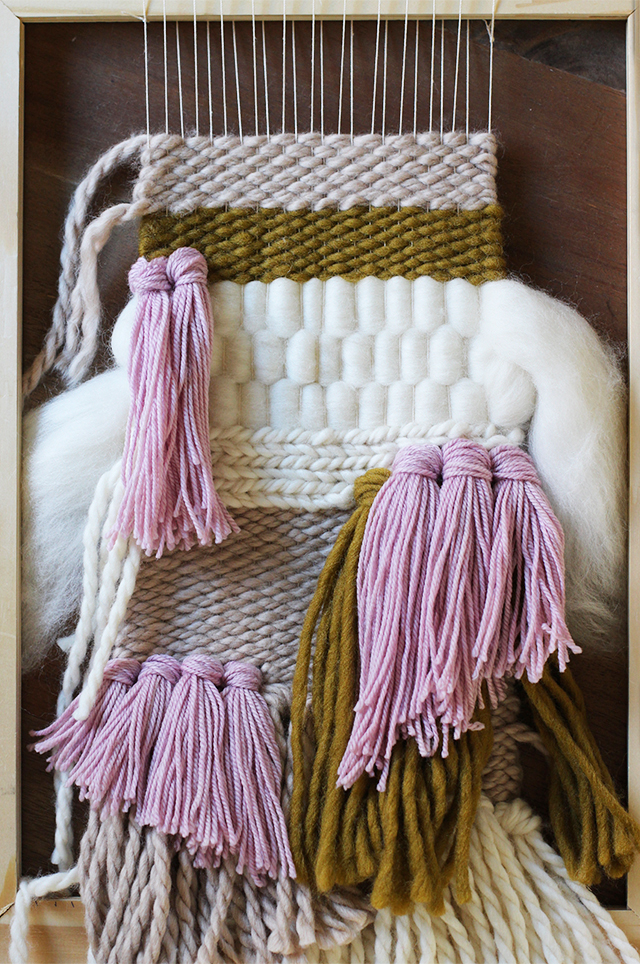 /honestlywtf.com/wp-content/uploads/2014/06/weaving30-300x451.jpg" target="_blank">http://honestlywtf.com/wp-content/uploads/2014/06/weaving30-300x451.jpg 300w" width="640" />
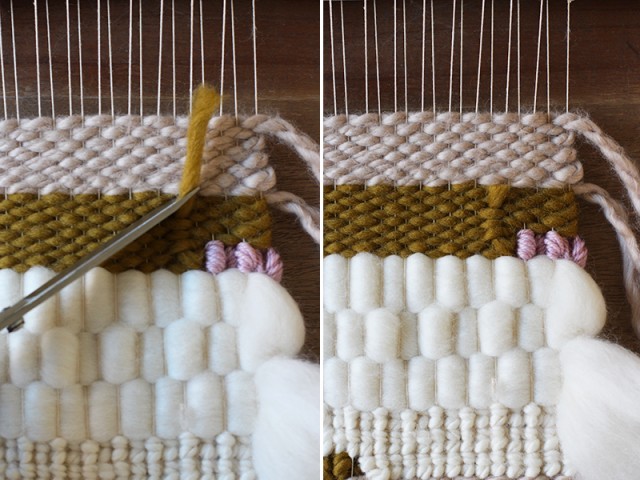
To finish all the yarns dropped off the back and the ends, turn the loom around. Thread the extra slack through the needle and tuck it under a series of 3 wefts, lengthwise.
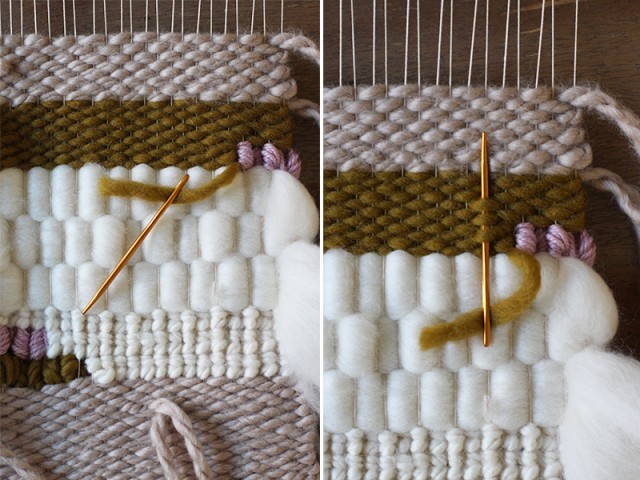 /honestlywtf.com/wp-content/uploads/2014/05/weaving31-300x225.jpg" target="_blank">http://honestlywtf.com/wp-content/uploads/2014/05/weaving31-300x225.jpg 300w, http://honestlywtf.com/wp-content/uploads/2014/05/weaving31.jpg 800w" width="640" />
Trim with a pair scissors.
 /honestlywtf.com/wp-content/uploads/2014/05/weaving32-300x225.jpg" target="_blank">http://honestlywtf.com/wp-content/uploads/2014/05/weaving32-300x225.jpg 300w, http://honestlywtf.com/wp-content/uploads/2014/05/weaving32.jpg 800w" style="margin: 0px auto; padding: 0px; border: 0px; outline: 0px; vertical-align:" />
|
Красивая схема, вышивка. Тюльпаны |
Метки: вышивка |
Вышивка. Бабочки |
Метки: вышивка бабочки |
Браслет |
Метки: украшения своими руками браслеты |
Сова из бисера |
|
Процитировано 1 раз
Понравилось: 1 пользователю
Браслет |
http://lc.pandahall.com
How to Make Red Glass Bead Bracelets with White Pearl Beads and Seed Beads
Summary: This article is about a red glass bead bracelet. Follow me to see how to make the red glass bead bracelet with white pearl beads and seed beads.
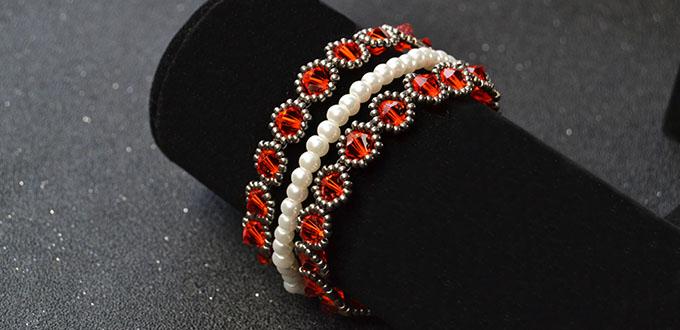
Are you attracted by the stunning red glass bead bracelet above? The supplies are minimal: just some red glass beads, white pearl beads, coffee seed beads, etc. The simple instructions below will show you how to make the red glass bead bracelet with white pearl beads and coffee seed beads.
Materials and tools needed in DIY the red glass bead bracelets:
Red Bicone Glass Beads
4mm White Round Pearl Beads
2mm Coffee Seed Beads
Platinum Slide Lock Clasps
Silver Jump Rings
0.2mm White Fishing Wire
Needle
Needle Nose Plier
Stainless-Steel Scissor

Instructions on how to make the red glass bead bracelet:
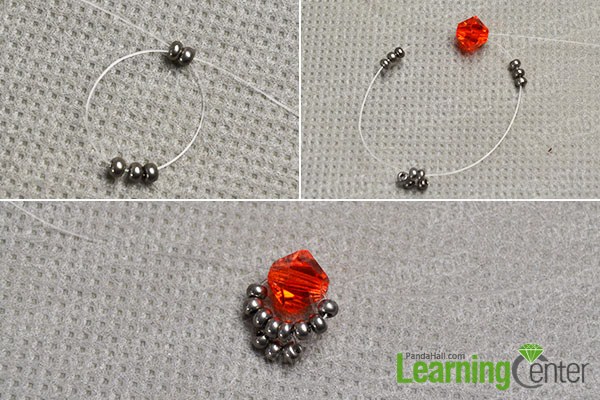
Step 1: Make the first part of the red glass bead bracelet
1st, cut a part of 0.2mm white fishing wire and add 3 2mm coffee seed beads to the middle. Then, cross the wires through 2 2mm coffee seed beads (as shown in the picture);
2nd, add 3 2mm coffee seed beads to the left wire and the right wire respectively. Then, cross the wires through a red bicone glass bead (as shown in the picture);
3rd, tighten the wires (as shown in the picture).
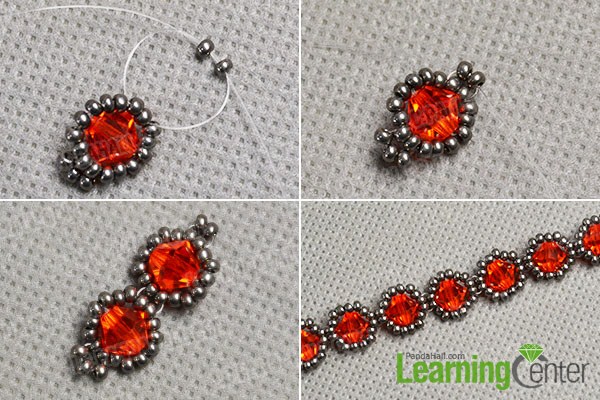
Step 2: Make the second part of the red glass bead bracelet
1st, add 3 2mm coffee seed beads to the left wire and the right wire respectively. Then, cross the wires through 2 2mm coffee seed beads and tighten (as shown in the picture);
2nd, cross the wire through the 5 2mm coffee seed beads and tighten (as shown in the picture);

3rd, cross the two wires through 2 2mm coffee seed beads and tighten (as shown in the picture);
4th, refer to the above steps to make another such red glass bead and seed bead pattern (as shown in the picture);
5th, refer to the above steps to make more such red glass bead and seed bead patterns (as shown in the picture).
Step 3: Make the third part of the red glass bead bracelet
1st, cut another piece of 02mm white fishing wire. Then, thread a 4mm white round pearl bead and 4 2mm coffee seed beads to it (as shown in the picture);
2nd, cross the right wire through the 4mm white round pearl bead and tighten (as shown in the picture);
3rd, add some 4mm white round pearl beads to one wire (as shown in the picture).
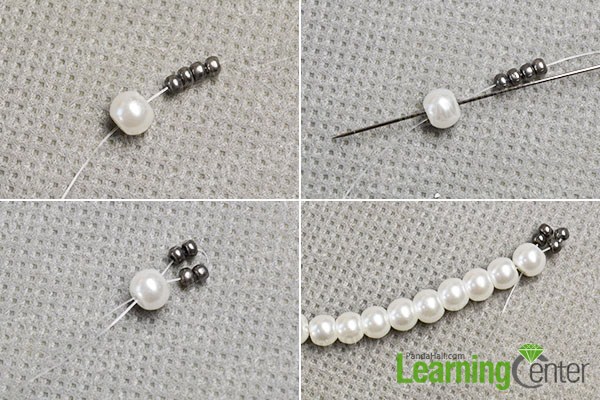
Step 4: Make the rest part of the red glass bead bracelet
1st, refer to Step 3 to make a corresponding end on the other end of the white pearl strand. Then, refer to Step 1 and Step 2 to make another red glass bead strand (as shown in the picture);
2nd, add the two red glass bead strands and the white pearl bead strand to the three holes of a platinum slide lock clasp (as shown in the picture);
3rd, split the platinum slide lock clasp apart and combine it with the other end of the two red glass bead strands and the white pearl bead strand (as shown in the picture).

Here is the final look of the red glass bead bracelet.
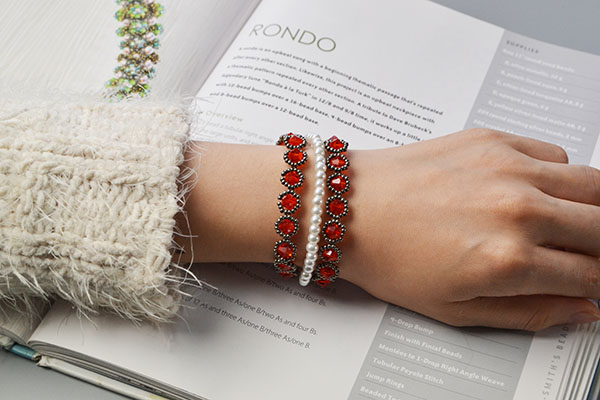
From the above picture, it looks like that I wear two red glass bead bracelets and one white pearl bracelet. In fact, it's one bracelet. The making steps are not very difficult to follow. Have a nice try if you like this red glass bead bracelet.
Метки: украшения своими руками браслеты |
Браслет |
http://lc.pandahall.com/
Beginners' DIY Project - How to Make a Green and Red Glass Bead Bracelet within 2 Steps
Summary: Looking for easy bracelet patterns? In this article, you can learn how to make a green and red glass bead bracelet within two steps.
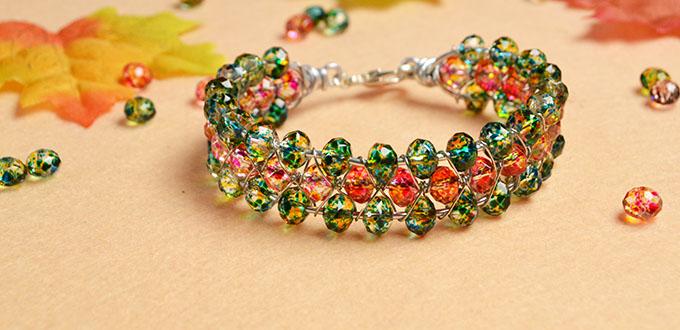
If you want to make some easy bracelets, the above green and red glass bead bracelet will be a good choice for you. Just with some glass beads, wires and lobster clasps, you can also make one. Now, let's see how to make the green and red glass bead bracelet within two steps.
Supplies needed in DIY the green and red glass bead bracelets:
8x6mm Abacus Glass Beads
1.5mm Silver Aluminum Wire
0.5mm Silver Copper Wire
Silver Lobster Clasp
Needle Nose Plier
Round Nose Plier
Diagonal Plier
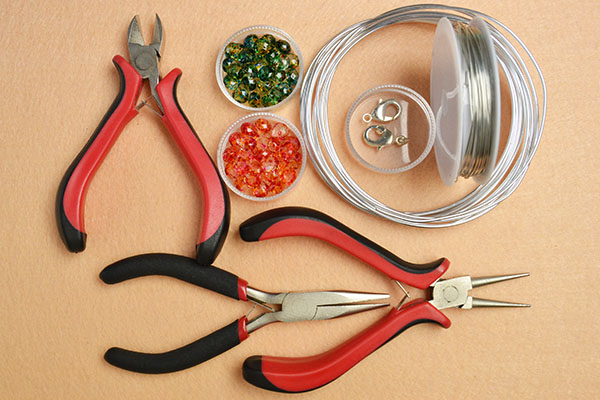
Instructions on how to make the green and red glass bead bracelets:
Step 1: Make the first part of the green and red glass bead bracelet
1st, cut three equal parts of 1.5mm silver aluminum wire. Then, make a hoop on one end of one silver aluminum wire (as shown in the picture);
2nd, add the other two aluminum wires (as shown in the picture);
3rd, cut a part of 0.5mm silver copper wire and wrap it around the aluminum wire (as shown in the picture).
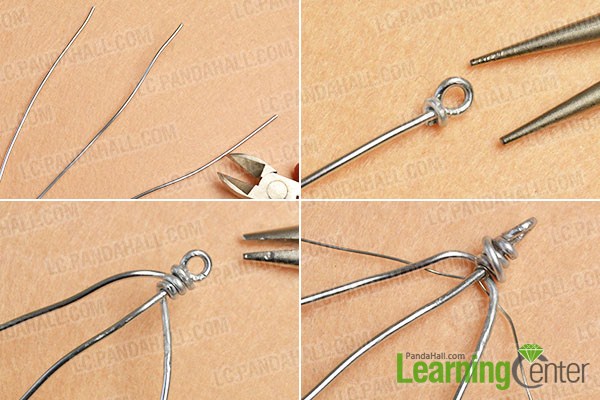
Step 2: Make the rest part of the green and red glass bead bracelet
1st, add a red 8x6mm abacus glass bead to the middle aluminum wire. Then, wrap the copper wire around the aluminum wire and red glass bead (as shown in the picture);
2nd, add a green 8x6mm abacus glass bead to the left aluminum wire and the right aluminum wire respectively (as shown in the picture);
3rd, wrap the copper wire and add more red glass beads and green glass beads to the aluminum wires (as shown in the picture);
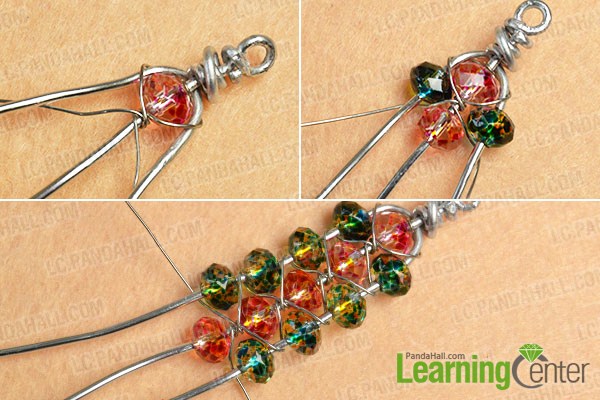
4th, add more red glass beads and green glass beads and wrap the copper wires. Then, cut off the excess wires and twist the ends (as shown in the picture);
5th, add a silver lobster clasp to the right end through a silver jump ring. Then, connect the two ends of the green and red glass bead bracelet together.
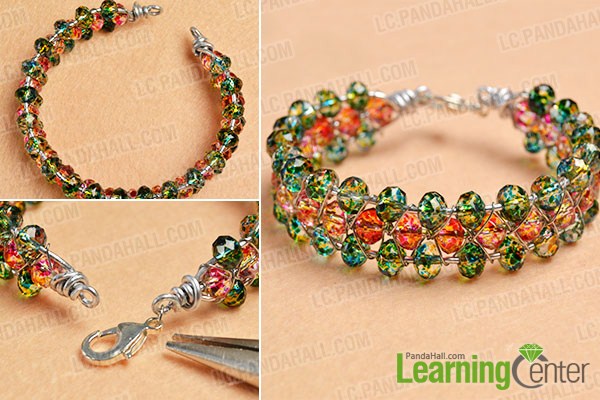
Here is the final look of the green and red glass bead bracelet.

|


