Платице эксклюзив |

Скачать выкройку
depositfiles.com/ru/files/jwcq77g07
Архив содержит 6 листов выкройки, которые следует склеить в фотошопе, а затем нарезать на формат А4, - в нем же (если печататься будет на обычном принтере)
источник www.adorn-yourself.at.ua
|
бисерная брошь |
 Нежная брошь сплетена из бисера и жемчуга
. Основой композиции броши являются 2 крупные розетки, составленные из сплетенных листочков разных размеров.
Вам потребуется: белый бисер, розовый бисер, жемчуг.
Начните работу с самых крупных – их два. Для этого сплетите цепочку-основу «в крестик» на 17 ключевых бисерин. По
схеме 1доплетите листочек от центра сначала влево, а затем – симметрично вправо. Теперь по этому же принципу изготовьте 4 средних листочка (в цепочке-основе 13 ключевых бисерин), затем – 4 маленьких листочка (в цепочке-основе – 9 ключевых бисерин). Соедините листочки между собой в розетки, начиная от центра
(схема 2). Вышейте серединки розеток и пришейте «гроздья»
(схема 3 и фото). Теперь в свою очередь соедините розетки протяжками «жемчужные нити» и прикрепите фурнитуру. Первая жемчужная нить набирается так: 12 см розового бисера и жемчуга; 14 см белого бисера и жемчуга. Вторая «жемчужная нить» длиннее на 1,5 см, третья – еще на 1,5 см и т.д. Подробнее узнать о способах плетения (низания) из бисера можно
здесь.


|
снуд |
|
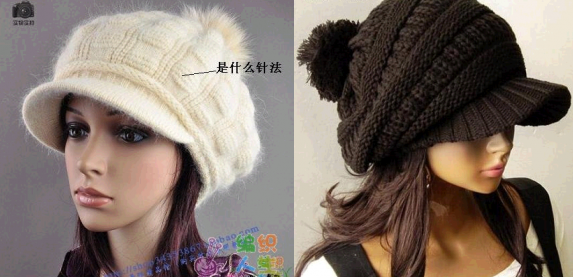
кепка вязанная |
Смотрится отлично в разном цвете - практичная и стильная. Она достаточно глубокая, так что для зимы будет актуальна, а козырек защитит глаза от летящего в лицо снега. Если Вы ещё без шапки, то пора задуматься утеплить свою головушку. Но помните, такую кепку не стоит одевать с длинной шубой, она не подходит к одежде из меха.
Полезные заметки
Если у Вас возник вопрос , какой подарок подобрать любимому мужчине, то тут возможно Вы и найдёте своё решение. Редко когда мужчины не носят часы, а такие , как эти, уж им точно понравятся и Вы сможете подобрать отличную модель. У каждого бренда свой неповторимый стиль. И поверьте, интернет магазин ХОТ-РЕПЛИКА – это точно магазин для тех, кто понимает толк в наручных часах.

|
шторы на кухню |
Шторы на кухню
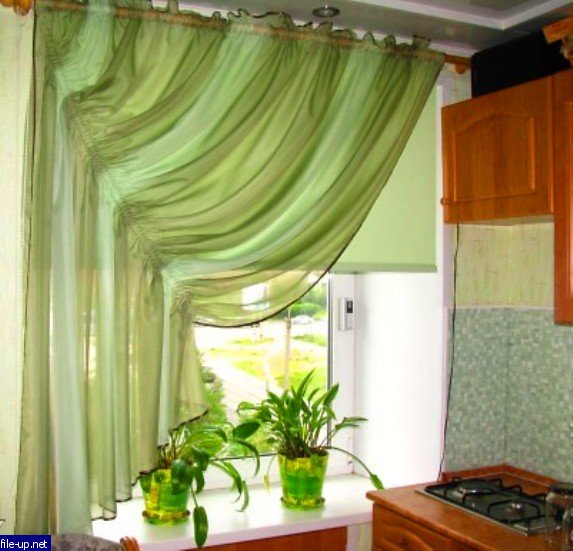
Отрез ткани по периметру обрабатывается косой бейкой, наверху отступив 5см пристрачивается полоска ткани (кулиска), чтоб штору одеть прям на трубу карниза. и по линии (см. схему) пристрачивается шторная лента. Шторку одела на карниз, повесила и уже на месте регулировала сборку шторной ленты.
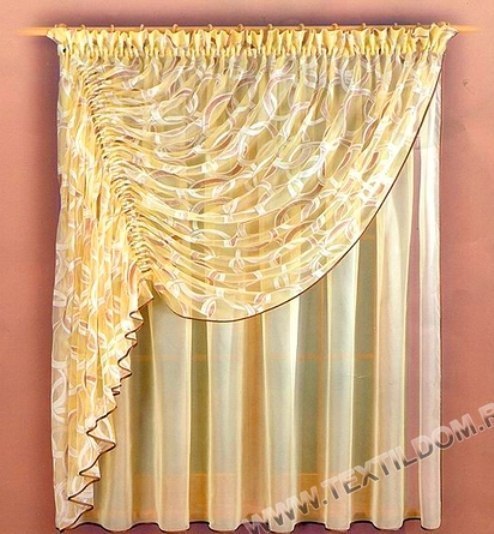
Схема пошива

http://vk.com/feed
|
цветы самоделки |
|
вязание шапка |
|
Сумки лоскутные. |

|
Крошки от Cheri Hiers |
|
Альбом для хранения ленточек и кружева. Мастерская "Оранжевый Енот" |
http://www.livemaster.ru/topic/116601-albom-dlya-h...ya-lentochek-i-kruzheva?msec=7
Как-то раз передо мной стал вопрос, где же хранить огромное количество лент и кружев, которых скопилось у меня немало... Порыскав по сайтам и опросив всех знакомых рукодельниц, я наткнулась на очень занятный альбом, но к сожалению, там не было сказано как его делать... Пришлось думать самой. Теперь хочу поделиться этой идеей с вами
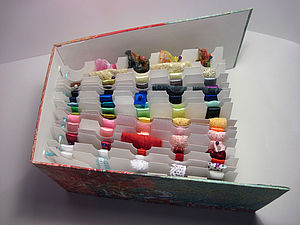
Пример Альбома - http://irchik0308.blogspot.ru/2011/07/blog-post.html:


|
Очень подробный МК по кукольной ножке! |
Стащила отсюда http://members.home.nl/asrai/cursus-en.htm
|
The foot in this tutorial is from heel to big toe about 1.8 inch long. Always use the head as a comparison for the size of the feet. The length of the feet is equal to the size of the head. |
 |
 |
|
In this tutorial I will only make the right foot. Try to work simultaneously on both feet because it is hard to make an equal looking foot afterwards. You start off by making a 2.5 inch long cylinder shaped roll of clay, about 0.8 inch thick (pict. 1). Bend the roll of clay in an angle like in pict. 2. The top will become a part leg and the other part the foot. |
|
 |
 |
| Flatten the clay by pressing it together between thumb and point finger towards the 'toes'. Be careful not to make it too flat. (pict. 3 + 4). | |
 |
 |
|
Now it is time to form the heel. Push/smear some clay from under the foot backwards (towards the heel) and push/smear some clay from the lower leg down (towards the heel) (pict. 5). This way you'll get more clay on the heel and a better shape at the sole of the foot. Press the clay with your thumb on the inside of the foot to make it more hollow (pict. 6). |
|
 |
 |
|
Before you can make incisions for the toes, the front of the foot needs to be reshaped a bit. Cut off a piece of clay slantwise starting at the 'big toe' (pict. 7). After this smooth the edge with your fingers (pict. 8). |
|
 |
 |
|
Look at the foot to see if it's not too thick, if it is you can make it thinner by smearing the clay from the instep to the leg. You can also smear clay upwards just above the heel towards the leg, this way the foot will become slimmer (pict. 9). Sculpt as smooth as possible, use a damp finger to rub the clay for a smooth finish. Now you can make incisions for the toes with the help of a sharp tool. Don't forget the big toe needs to be bigger than the other toes (pict. 10). |
|
 |
 |
|
Spread out the toes gently so you have more working space (pict. 11). Hold the toes one by one between your point finger and thumb. While warming the clay by the warmth of your hands, very gently roll the toes slightly back and forth, so the inside of the toes will also become round. This will probably make the toes become too long but that doesn't matter (pict. 12). When the toes have the right thickness and are nice and round, you can cut them off at the right size. Smooth the edges of the toes with your fingers. |
|
 |
 |
|
You can use a sculpting tool for the areas that are difficult to reach, like between the toes (pict. 13). If everything is nice and smooth, we are ready to make the nails (pict. 14). |
|
 |
 |
|
You could use the small hollow chisel again as I used in the hands lesson, but this time I will sculpt the lines by hand. For this I used a sharp sculpting tool, the one in pict. 10. You could also use a small knife (not too sharp). Press left and right from the 'nail' a straight line in the clay (pict. 15). Now you have to connect those two lines, this is a very precise work. You could also use a sharp wooden toothpick for this (pict. 16). They start to look more and more like real nails. |
|
 |
 |
|
Some polymer clay brands can become overworked, it can become too soft. So at this time I gave the nails some rest and focused on the sole of the foot. Halfway each toe I draw a line on the inside, except the small and the great toe (pict. 17) The nails weren't finished yet. We also have to connect the lines at the front of the toe with a sharp tool, as you can see in pict. 18. |
|
 |
 |
|
Draw lines on the 'knuckle' area of the toes with a small sculpting tool or toothpick , the same way as I did in the hands tutorial. This makes it look more natural (pict. 19). The sole of the foot needs some more modeling. Place 3 slices of clay on the heel, ball and big toe, like in pict. 20, carefully blend the seams with your sculpting tool or fingers until the seams are blended in with the sole. |
|
 |
 |
|
Moisten your finger and polish everything smooth.This also works for removing unwanted fingerprints. At pict. 21 you can see a sideview of the foot, it looks much better now because of the modeling we did at the sole of the foot. Use a sculpting tool or rubbertip brush to add lines to accentuate the tendons/bones of the foot (pict. 22). |
|
 |
 |
|
Rub the lines with a wet finger to blur and make it look more natural (pict. 23). Now it's time to make the knuckles on the ankles. Before you start check out the foot from all sides to see if it still looks okay (pict. 24). |
|
 |
 |
|
Pay attention to the ankle area that it is not too fat. If it is you still have the chance now to sculpt it slimmer (pict. 25). Place a small slice of clay on both sides of the ankle where the knuckle should be. Study your own foot to see how this looks (pict. 26). |
|
 |
 |
|
Blend the seams with a sculpting tool (pict. 27), don't blend it too wide because it wouldn't look like bone anymore. Just blend only the edges. Gently rub over the knuckles with a slightly wet finger to make it smooth (pict. 28). |
|
 |
 |
|
The foot is almost ready now. Before curing check the feet from all sides and correct any mistakes, don't forget the sole of the feet (pict. 29 + 30). |
|
 |
 |
|
Cut off the leg at about 1.40 inch. Use a wooden toothpick to make a hole in the leg, make sure it's deep enough, about 0.80 inch. Twist the stick a little to make the holes wider so it will fit the armature. I use a small wooden board with big nails through it, as a stand to place the feet on (pict. 31). I pre-heat the oven at 220-266 Fahrenheit and bake the feet for about 30 minutes. Always use an oven thermometer to make sure the oven is at the right temperature, because if it gets too hot the polymer clay may turn yellow/brown. Leave the feet to cool in the oven before you take them out (pict. 32). |
|
 |
 |
|
After cooling down I made it a little smoother by sanding the clay with a polishing sponge. Sometimes rubbing it with a soft cloth is enough. If there are any small scratches visible, you can gently touch them with some acetone on a brush and usually they disappear. Use very little acetone because too much can give white spots on the clay! Next step is painting and coloring the foot. This can be done by either acrylics, watercolor paint or water- or oil based patina. For this foot I use watercolor paint and acrylic paint (pict. 33). First I rub the clay in with some skin powder make-up to give it a warmer tone. The color of the nails was created by blending different shades of watercolor paint. I use a thin paintbrush to apply the paint, I paint the nails several times, letting it dry in between coats. This paint is transparent and doesn't really stick to the clay. So you need to do this a few times, some of the paint's pigment will be absorbed by the clay, just enough for a natural color (pict. 34). |
|
 |
 |
|
I mix white acrylic paint with a bit black or yellow to get an off-white shade. With a very thin painting brush I paint the 'half moons' and the 'nail borders' (pict. 35). After the paint is dry I add some Fimo gloss varnish (not the water-based one) to finish the nails (pict. 36). I like this varnish a lot, it will not turn yellow and even after several years it will still look glossy. Now the foot is finished...! (pict. 37) |
|
 |
|
|
You can now attach the feet to the armature. If the hole in the leg is too wide you can add some papertape to the wire for a better fit. Later on you can use some glue (for instance hot glue gun) to attach them permanently.
|
|
 |
|
| The best moment for this depends on the kind of clothes he or she will be wearing. Sometimes it is easier dressing the doll, if the feet can still be detached from the legs. | |
 |
|
|
Спящая малышка (лепка головы) - из журнала Pretty Toys №1(6) 2012 |
|
Сказочный гномик |
http://urokilepki.ru/2012/08/skazochnyj-gnomik/
Сегодня на уроке мы с вами сделаем милого, доброго гнома, который будет прекрасным украшением письменного стола, декоративной полочки или станет отличным подарочным сувениром.

|
Приготовление и окрашивание холодного фарфора. Мастер-класс от Ledivseti |
Дорогие мои рукодельницы! Приветствую всех, кто очень интересуется холодным фарфором, хотел бы его приготовить, но никак не может начать его варить из-за неимения кукурузного крахмала. Как оказалось, можно использовать и картофельный крахмал, не смотря на отрицание многих мастериц в сети. Моя огромная благодарность автору со Страны Мастеров Ольге Молчановой за вдохновение на творчество, за подробный мастер-класс, за то, что раскрыла все секреты холодного фарфора, за ее прекрасные работы! Спасибо! Поближе познакомиться с автором вы сможете по ссылке http://stranamasterov.ru/user/248586. Далее размещаю текст автора.
Хочу заметить, что эти цветы, белые, что ниже, автор сначала покрывает белой грунт-эмалью из баллончика (автомобильной), а сверху тоже из баллончика автомобильным лаком. Именно поэтому они такие белоснежные и блестящие)


|
Маленькие феи |
|
платье-трансформер |
Сегодня хотелось бы вам показать мастер класс по пошиву платья-трансформер из предыдущего поста.
На самом деле, оно не особо трансформер. Просто можно придумать множество вариантов носки.
Итак, нам понадобиться 1,5 метра (на любой размер и рост примерно 162) простого трикотажа. Я выбрала черный цвет. Вдохновением послужили эти фотографии.

|
Фантазии |
|
Кукольная галерея Ларисы Кукурика |
|
Сказочные |
|
Феи-мамы и феи-дочки |
|