���������� �������.
�����-������� - (0)������� ������� "�������" ("�������"). ������
����� ���������� �������� - (0)���� ������� �� MyPicot �������� https://mypicot.com/0085.html ������� � ��...
������ �������. ������-�����. - (0)������ �������. ������-�����. ������ ���� ������� ������ �������, �� ����� ����� ���� ������ �� �...
�������� ALCHEM. �� ����� - (0)��������� ALCHEM. �� ����� �������� Alchemy ������ ������� � ����� Lion Brand Va...
������� �� SARAH |
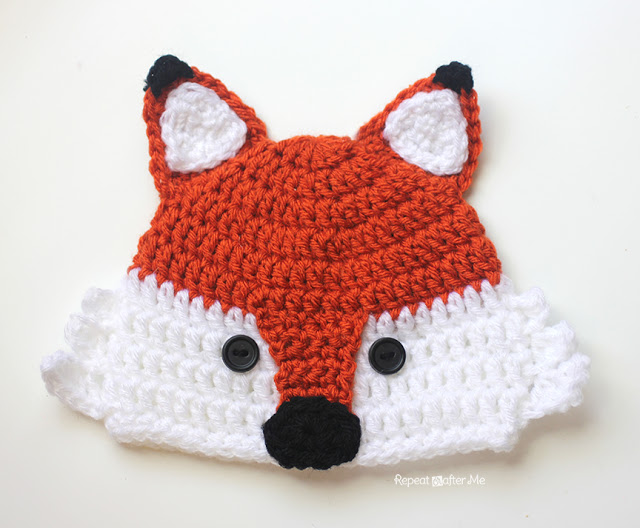
This crochet fox hat has been much requested and on my to-do list for a long time! After some inspiration from my Repeat Crafter Me Crochet FB Group, I finally put yarn to hook and came up with this cutie! I used my basic hat pattern and added embellishments. Full FREE pattern is below!
Materials:
– Worsted weight yarn. I used Lion Brand Vanna’s Choice in Terracotta (orange), White, and Black.
– Size H Crochet Hook
– Two black buttons (about 1/2 inch round)
– Tapestry needle
Abbreviations:
Magic Ring Tutorial
SC = Single Crochet
SC Decrease = Single Crochet Decrease
HDC = Half Double Crochet
HDC Decrease = Half Double Crochet Decrease
DC = Double Crochet

Size: 0-3 Months
Starting with orange yarn
Round 5: 2 DC in first, DC in next 10, repeat around, join, chain 2 (48 DC)
Change color to white after round 7
Round 6-11: DC in each around, join, chain 2 (48 DC)
Round 12: SC in each around, join, fasten off, weave in ends (48 SC)
Magic ring, chain 2 and make 11 DC in magic ring, join to first DC, chain 2
Round 5: 2 DC in first, DC in next 10, repeat around, join, chain 2 (48 DC)
Round 5: 2 DC in first, DC in next 10, repeat around, join, chain 2 (48 DC)
Round 7: 2 DC in first, DC in next 12, join, chain 2 (56 DC)
Size: Toddler/Preschooler
Magic ring, chain 2 and make 11 DC in magic ring, join to first DC, chain 2
Round 2: 2 DC in each around, join, chain 2 (22 DC)
Round 3: 2 DC in first, DC in next, repeat around, join, chain 2 (33 DC)
Round 4: 2 DC in first, DC in next 2, repeat around, join, chain 2 (44 DC)
Size: Teen/Adult
Magic ring, chain 2 and make 11 DC in magic ring, join to first DC, chain 2
Round 2: 2 DC in each around, join, chain 2 (22 DC)
Round 3: 2 DC in first, DC in next, repeat around, join, chain 2 (33 DC)
Round 4: 2 DC in first, DC in next 2, repeat around, join, chain 2 (44 DC)


Nose Bridge:
Turn hat upside down. You are going to want to locate the 6 stitches in the middle of the hat. Doesn’t need to be perfect because ANY spot could be the middle since we haven’t attached any other features yet.
Attach orange yarn along the last row of orange stitches. chain and make 6 SC in the next 6 spots, chain 1, turn
Row 2: SC decrease, SC in next 2, SC decrease, chain 1, turn
Row 3: SC in each stitch across, chain 1, turn (4 SC)
Continue repeating row 3 until nose bridge is long enough to reach the base of hat.
Fasten off leaving long tail.
Sew all side of the nose bridge to the hat.
Nose:
With black yarn…
Magic Ring, chain 2 and make 2 DC, HDC, 2 SC, HDC, 2 DC, HDC, 2 SC, HDC, and join to first DC. Pull tight and leave long tail to sew onto base of the nose bridge.

Cheek Fluff:
Right Side: Attach yarn over the DC on the edge of the last row of hat.
Chain 6, SC in second chain from hook, HDC decrease over next two, DC decrease over next last two, join with a SC to next DC on edge of hat, chain 5, HDC decrease over first two, DC decrease over last two, join with a SC to next DC row on hat, chain 3, HDC decrease and join to next DC on edge of hat. Fasten off, weave in ends.
Left Side: Starting on the 4th DC row of white from bottom of the hat, attach yarn and chain 3, SC in second chain from hook, HDC in last, join to next DC space on edge, chain 4, SC in second chain from hook, HDC in next, DC in last, join to next DC space on edge, chain 5, SC in second chain from hook, DC in next two, 2 DC in last, join and fasten off, weave in ends.
Feel free to add more fluff “spikes” if you want it to fill more of the white area on large hats. The pattern above works perfectly for a 0-3 month size hat.
NOTE: After making the cheek fluff, I realized that maybe it should be pointing downwards? If you feel this way, just reverse the right and left side patterns!


Small Ears (0-12 month size hats) Make 2:
Starting with orange yarn…
Chain 9, SC in second chain from hook and the rest of the way down chain, chain 1, turn (8 SC)
Row 2: SC decrease, SC in next 4, SC decrease over last two, chain 1, turn
Row 3: SC in each stitch across, chain 1, turn (6 SC)
Row 4: SC decrease, SC in next 2, SC decrease over last two, chain 1, turn
Row 5: SC in each stitch across, chain 1, turn (4 SC)
Row 6: SC decrease two times, continue to SC around edge of ear…When you get back to the top, attach black yarn, SC + Chain 1 + SC along top to make black tip of ear!
Small Inner Ear (Make 2):
White white yarn…
Chain 7, SC in second chain from hook and rest of the way down chain, ch 1, turn
Row 2: SC decrease, SC in next 2, SC decrease, chain 1, turn
Row 3: SC across (4 SC)
Row 4: SC decrease over next two, chain 1, turn
Row 5: SC decrease, and continue to SC around edges of ear.
Fasten off leaving long tail to sew inner ear onto outer ear.
Large Ears (Make 2):
Starting with orange yarn…
Chain 11, SC in second chain from hook and rest of the way down chain, chain 1, turn
Row 2: SC decrease, SC in next 6, SC decrease, chain 1, turn
Row 3: SC in each stitch across, chain 1, turn (8 SC)
Row 4: SC decrease, SC in next 4, SC decrease, chain 1, turn
Row 5: SC in each stitch across, chain 1, turn (6 SC)
Row 6: SC decrease, SC in next 2, SC decrease, chain 1, turn
Row 7: SC in each stitch across, chain 1, turn (4 SC)
Change to black yarn…
Row 8: SC in each stitch across, chain 1, turn (4 SC)
Row 9: SC decrease two times, chain 1, turn
Row 10: SC decrease and continue to SC around edges of ear making sure to change yarn color at the appropriate spots.
Large Inner Ear (Make 2):
White white yarn…
Chain 9, SC in second chain from hook and rest of the way down chain, ch 1, turn
Row 2: SC decrease, SC in next 4, SC decrease, chain 1, turn


Who lives in a pineapple under the sea?! Yep, it’s your favorite square sponge named Bob! My son has been begging me for this hat and since I mastered the technique of crocheting a square hat (thanks to my Robot pattern), I had to get Mr. Squarepants on my hook immediately 

Materials:
– Worsted Weight Yarn. I used Lion Brand Vanna’s Choice in Duckie (yellow), White, and Honey (brown) with a bit of red, black, and turquoise for the eyes, cheeks, mouth, and tie.
– Size H crochet hook
– Tapestry needle
Abbreviations:
Magic Ring Tutorial
SC = Single Crochet
SC Decrease = Single Crochet Decrease
DC = Double Crochet
Before you get started I recommend watching this video on how to stitch on eyelashes. Apply this technique when stitching on other face embellishments like the mouth and cheeks. And be kind to yourself! Even I had a couple do-overs
Square Hat Pattern:
fasten off and begin on earflap as written below
Round 2-11: DC in each around, join, chain 2 (60 DC)
Size: Child
Round 2-12: DC in each around, join, chain 2 (64 DC)
Round 2-13: DC in each around, join, chain 2 (68 DC)
Earflap 2:
Chain 1, SC in next 10, chain 1, turn
Row 2: SC decrease, SC in next 6, SC decrease, chain 1, turn
Row 3: SC across (8 SC)
Row 4: SC decrease, SC in next 4, SC decrease, chain 1, turn
Row 5: SC across ( 6 SC)
Row 6: SC decrease, SC in next 2, SC decrease, chain 1, turn
Row 7: SC across (4 SC)
Row 8: Make 2 SC decreases, chain 1, turn
Row 9: SC decrease and continue to SC around the entire bottom edge of the hat (including earflaps). Fasten off and weave in ends. Cut 6 long strands of the same color brown, pull yarn halfway through last loop of the earflaps (you now have 12 strands). Knot, braid and knot again at the end of your braid. Trim ends of braided tails so yarn is even. Do this for both earflaps.
Earflap 2:
Chain 1, SC in next 12, chain 1, turn
Row 2: SC decrease, SC in next 8, SC decrease, chain 1, turn
Row 3: SC across (10 SC)
Row 4: SC decrease, SC in next 6, SC decrease, chain 1, turn
Row 5: SC across ( 8 SC)
Row 6: SC decrease, SC in next 4, SC decrease, chain 1, turn
Row 7: SC across ( 6 SC)
Row 8: SC decrease, SC in next 2, SC decrease, chain 1, turn
Row 9: SC across (4 SC)
Row 10: Make 2 SC decreases, chain 1, turn
Row 11: SC decrease and continue to SC around the entire bottom edge of the hat (including earflaps). Fasten off and weave in ends. Cut 6 long strands of the same color brown, pull yarn halfway through last loop of the earflaps (you now have 12 strands). Knot, braid and knot again at the end of your braid. Trim ends of braided tails so yarn is even. Do this for both earflaps.


Now you can begin to stitch on the other elements using your tapestry needle. Stitch on the belt, mouth, cheeks, and eyelashes. I also stitched a border of black around each eye as I was making the eyelashes. Remember to watch the video above or you can watch my video on how to sew on a puppy nose and mouth (below) for more help.


Spring is around the corner and so is Easter which makes it a perfect time to make this chunky baby chick hat! The super bulky yarn and large crochet hook makes it a quick crochet project.

Materials:
– Chunky or Bulky yarn. I used Loops & Threads Zoomba Super Bulky yarn in Lightening yellow.
– Size I/9. I actually used a size K hook in the one pictured because that is all I could find at the moment the inspiration for this hat hit  But I recommend using an I/9 for a tighter stitch and more exact sizes.
– Worsted weight yarn in orange and white.
– Size G hook for the eyes/beak.
– 2 small black buttons
– Tapestry needle
Abbreviations:
Magic Ring tutorial
SC = Single Crochet
HDC = Half Double Crochet
DC = Double Crochet
TC = Triple Crochet
Note: When beginning your hat, try to leave a long strand hanging from your magic ring. You will use this to create the little looped “feathers” on the top of the hat later on in the tutorial.
Chunky Hat Pattern:
Size: 0-3 Months
Magic ring, chain 2, DC 10 in magic ring, join to first DC, ch 2
Round 2: 2 DC in each around, join, ch 2 (20 DC)
Round 3: 2 DC in first stitch, DC in next, around, join, ch 2. (30 DC)
Round 4: 2 DC in first stitch, DC in next four, join, ch 1 (36 DC)
Round 5-8: DC in each stitch around (36 DC)
optional: SC or loosely slip stitch around the bottom to create a finished edge.
Size: 6-12 Months
Magic ring, chain 2, DC 10 in magic ring, join to first DC, ch 2
Round 2: 2 DC in each around, join, ch 2 (20 DC)
Round 3: 2 DC in first stitch, DC in next, around, join, ch 2. (30 DC)
Round 4: 2 DC in first stitch, DC in next two, join, ch 2 (40 DC)
Round 5: 2 DC in first stitch, DC in next seven, join, ch 2 (45 DC)
Round 6-10: DC around, join, ch 2 (45 DC)
optional: SC or loosely slip stitch around the bottom to create a finished edge.
Size: Child
Magic ring, chain 2, DC 10 in magic ring, join to first DC, ch 2
Round 2: 2 DC in each around, join, ch 2 (20 DC)
Round 3: 2 DC in first stitch, DC in next, around, join, ch 2. (30 DC)
Round 4: 2 DC in first stitch, DC in next two, join, ch 2 (40 DC)
Round 5: 2 DC in first stitch, DC in next three, join, ch 2 (50 DC)
Round 6: 2 DC in first stitch, DC in next 9, join, ch 2 (55 DC)
Round 7-12: DC around (55 DC)
optional: SC or loosely slip stitch around the bottom to create a finished edge.
Size: Teen/Adult
Magic ring, chain 2, DC 10 in magic ring, join to first DC, ch 2
Round 2: 2 DC in each around, join, ch 2 (20 DC)
Round 3: 2 DC in first stitch, DC in next, around, join, ch 2. (30 DC)
Round 4: 2 DC in first stitch, DC in next two, join, ch 2 (40 DC)
Round 5: 2 DC in first stitch, DC in next three, join, ch 2 (50 DC)
Round 6: 2 DC in first stitch, DC in next four, join, ch 2 (60 DC)
Round 7-13: DC around (60 DC)
optional: SC or loosely slip stitch around the bottom to create a finished edge.


Row 2: SC in first 2, HDC in next, DC, 2 DC in next two, DC, HDC, SC, SC + chain 1 + SC in last, continue to SC along sides and bottom and join with slip stitch in to first SC.
Small part of beak:
With orange yarn…
Chain 5, SC in second chain from hook, HDC Decrease over next two, SC in last.
Fasten off leaving long tail to sew on to hat (under larger part of beak)

I love when one crochet pattern suddenly morphs into something else and that is exactly what has happened with my last couple hat patterns! It all started with my Crochet Fox Hat which then turned into a Raccoon Hat and then the Raccoon hat inspired me to make this Panda Bear Hat! I love being able to borrow elements from one pattern and creating something else. What will this hat become next?!
Materials:
– Worsted weight yarn in Black and White. I used Lion Brand Vanna’s Choice.
– Size H Crochet Hook
– Two White buttons (about 1 inch wide)
– Tapestry needle
Abbreviations:
Magic Ring Tutorial
SC = Single Crochet
HDC = Half Double Crochet
DC = Double Crochet
Basic Hat is worked in all white yarn.
Round 5: 2 DC in first, DC in next 10, repeat around, join, chain 2 (48 DC)
Round 6-11: DC in each around, join, chain 2 (48 DC)
Round 12: SC in each around, join, fasten off, weave in ends (48 SC)
Magic ring, 11 DC in magic ring, join to first DC, chain 2
Round 5: 2 DC in first, DC in next 10, repeat around, join, chain 2 (48 DC)
| �������: | ������� �������/����� ������ ������� �������/�������� ����� - �����/���� |
| �������������� | « ����. ������ — � �������� — ����. ������ » | ��������: [1] [�����] |


