
Без заголовка |

Рецепт дальневосточного пянсе, более перченый, чем его сибирский вариант.
Готовить его нетрудно, немного придется повозиться, но результат того стоит. Кушать его стоит теплым, т.к. холодное блюдо не вкусное. Еще замечу, что назвать его острым не могу, т.к красного перца там нет, но есть черный.
Примите так же к сведению, что блюдо достаточно сытное, так, что одного пирожка вполне достаточно, чтоб хорошо перекусить даже мужчине.
|
Без заголовка |
|
Без заголовка |
|
Без заголовка |
http://www.craftstylish.com/item/945/how-to-make-pretty-pincushions
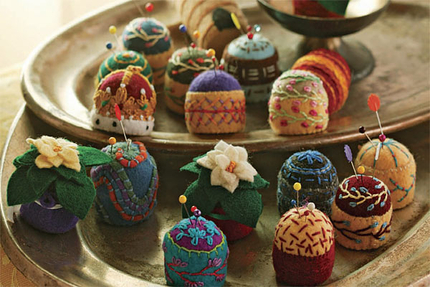
Are you ready for “oohs” and “ahs” all around? At just 1-1/2 inches tall, these minute pincushions will be the darlings of any party and the apple of any craftster’s eye. They fit neatly into a sewing box and are extremely handy perched on a sewing machine (just add a Velcro dot).
And did I mention that these cushions use recycled materials? The base is a soda-bottle cap wrapped with craft felt. As you can see in the photo, the sky’s the limit in terms of design. Besides simple shapes reminiscent of cupcakes or candy, you can fashion a mini poinsettia, a crown, or even a beehive or cactus—cute, cuter, cutest!
What you'll need:
Plastic cap from a liter-size soda bottle
Chalk
Sharp scissors
Craft felt
Large-eye embroidery needle
Multicolored skeins of embroidery floss
Poly fiberfill
Step 1: Prepare the base
Lay the bottle cap on a small square of felt. Trace the shape with chalk. Then cut along the chalk line with sharp scissors.
 |
Trace a bottle cap on felt. Cut along chalk line with scissors to create the base of the pincushion. |
Step 2: Sew outer sleeve to the base
Cut a felt strip a bit wider than your cap’s height and long enough to wrap around the cap with some overlap. Wrap it around the cap. Then slipstitch along the overlap. Pop in the base circle, and slipstitch around it as shown. Don’t cut the floss!
 |
Wrap outer sleeve around cap. Slipstitch along the overlap. |
 |
Slipstitch around the base circle. Leave a tail of floss to complete the bottom of the pincushion. |
Step 3: Create the top
Cut a 3-inch square, and then round the corners. Baste around the circle’s outer edge. Pull the floss ends to gather. Stuff the pouch with polyfiberfill (until the ball is hard), and knot the floss ends. Press the ball into the base.
 |
Cut a 3-inch square. Round the corners with scissors to create a circle. |
 |
Baste around circle's outer edge. Pull the floss to gather. |
 |
Fill the gathered circle with fiberfill to create a firm ball. Stuff the pouch into the bottlecap. |
Step 4: Sew the ball to the base
Hand-stitch in place using a blanket stitch or whipstitch. Working from right to left, bring the needle from back to front 1/8 inch from the edge. Keep the thread from the previous stitch under the needle point.
 |
Blanket stitch. This stitch secures the top to the base. |
Step 5: Embellish with embroidery
Pincushions are the perfect canvas for hand embroidery. Thread your needle with a single strand of embroidery floss. Combine the stitches shown below to make flowers, vines, or geometric designs. If at first you don’t succeed, try again. Felt is very forgiving.
 |
Decorate your pincushion. Try different patterns to get a unique look. |
Feather Stitch
Working from right to left, bring the needle out at point A. Insert it at point B, holding a loop of thread to the left. Bring the needle up at point C inside the loop. Pull the stitch to tighten. Point C then becomes point A. Repeat.
 |
Feather stitch. Vary the length and angle of your stitches for different effects. |
Lazy Daisy
Bring the needle out at point A. Reinsert it into the same hole or close to it, leaving a loop. Exit at point B, holding the loop under the needle. Pull the needle through. Insert the needle on other side of the thread loop to secure.
 |
Lazy Daisy. Use one of more petals to create floral designs. |
French Knot
Bring the needle and thread out at point A. Hold the thread taut with your left hand, and wrap it around the needle two or three times. Insert the wrapped needle close to point A.
 |
French knot. Scatter or cluster the knots to add texture. |
Photos: Sloan Howard and Scott Phillips
|
Без заголовка |
|
Без заголовка |
|
Без заголовка |
|
Без заголовка |
Мастер-класс по шитью Овечки тильды
Мне очень нравится такая тильда Овечка. Спасибо за МК ИСТОЧНИКУ
Сайт автора мастер класса http://www.katjushik.ru/categories/toys/tilda
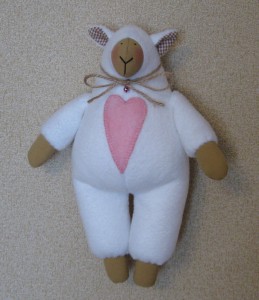
Шила по меньшей выкройке, которую увеличивала до размеров А4. Поэтому овечка получилась небольшой: ок. 27 см. Посмотреть выкройку овечки.
Как обычно покажу основные этапы изготовления игрушки (так, как я их вижу, конечно).
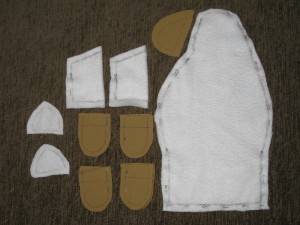
Кроим:
|
"200 схем для вышивки на пластиковой канве - магниты". Книга по вышивке крестом. |
"200 схем для вышивки на пластиковой канве - магниты". Книга по вышивке крестом.
Отличный вариант для сувенира - это вышитый на пластиковой канве, магнит на холодильник. В этой книге по вышивке, Вы найдете 200 схем с самыми разными мотивами.
1.
|
Без заголовка |
1.

2.

Идея такова - если нужно много пуговиц похожих оттенков, а купить дорого, то можно сделать их из пластики!!!
Для формочек подойдут любые подручные средства.
|
Без заголовка |
|
Без заголовка |
Вышивка крестом по пластиковой канве - овощи и фрукты.Схема для вышивки.
Отличным украшением для кухни, могут стать магниты на холодильник, вышитые крестом , на пластиковой канве, симпатичные мордашки - лука и редиски, вызовут улыбку, каждый раз, когда Вы будете открывать холодильник.
1.

|
Без заголовка |
цитирую автора

|
Без заголовка |
использовались материалы сайтов: http://www.tilda-mania.ru/ http://www.livemaster.ru/ http://thegardencat-inst.blogspot.com/ http://www.diets.ru/album/499003/


|
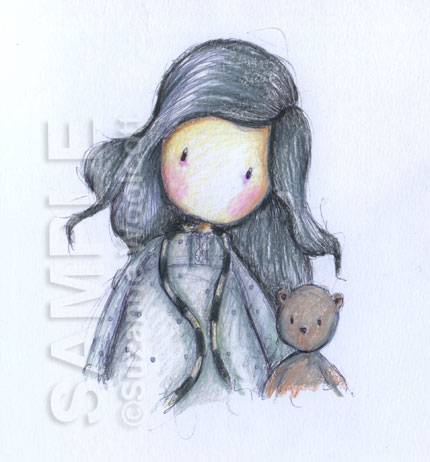
Выкройка текстильной шарнирной куклы с пропорциями ребёнка 5-8 лет. |
Блог моей любимой кукольницы Марыси.
[url=http://withlovemarysia.blogspot.com/2012/08/5-8.html?utm_source=feedburner&utm_medium=feed&utm_campaign=Feed%3A+blogspot%2FsDkXb+%28%D0%91%D0%BB%D0%BE%D0%B3+%D0%BE+%D1%82%D0%B5%D0%BA%D1%81%D1%82%D0%B8%D0%BB%D1%8C%D0%BD%D1%8B%D1%85++%D0%BA%D1%83%D0%BA%D0%BB%D0%B0%D1%85+%D0%B8+%D0%B8%D0%B3%D1%80%D1%83%D1%88%D0%BA%D0%B0%D1%85+%D1%80%D1%83%D1%87%D0%BD%D0%BE%D0%B9+%D1%80%D0%B0%D0%B1%D0%BE%D1%82%D1%8B.++++++++C+%D0%BB%D1%8E%D0%B1%D0%BE%D0%B2%D1%8C%D1%8E%2C+%D
|
Без заголовка |
|
Без заголовка |
|
Без заголовка |
|
Без заголовка |
Котенок Мандаринчик своими руками
(валяние)

Нам понадобится непряденая шерсть оранжевого цвета. Иголки для валяния: грубая №36, для основных работ; тонкая №38 star, для обработки поверхности; иголка с обратным зубом, для придания котику пушистости.
Серия сообщений "валяшки":
Часть 1 - Вязано-валяный мишка
Часть 2 - Без заголовка
Часть 3 - Магнит Кот-летяга
Часть 4 - Без заголовка
Часть 5 - МК мишка тедди в вязано-валяной технике
Часть 6 - Мышонок Фенечка. Мастер класс по сухому валянию
Часть 7 - Декор трикотажных изделий методом сухого валяния. Чудесная идея!
Часть 8 - Мастер-класс по сухому валянию: Солнечные кролики
Часть 9 - "Лена креатив 1\2014".Журнал по рукоделию.
|
Миниатюрная коробочка из бумаги |
Миниатюрная коробочка из бумаги
Что нам понадобится:
4 листа бумаги А4;
руки;
вдохновение (обязательно);
|


