-Поиск по дневнику

Поиск сообщений в ольга_жагунь

 -Подписка по e-mail


 -Постоянные читатели

 -Сообщества

Читатель сообществ (Всего в списке: 1) Как_похудеть_лентяйке

 -Статистика

Статистика LiveInternet.ru: показано количество хитов и посетителей
Создан: 11.01.2012
Записей: 181
Комментариев: 1
Написано: 199


Переделочки

Воскресенье, 08 Апреля 2012 г. 13:08 + в цитатник
Цитата сообщения Аринуш 
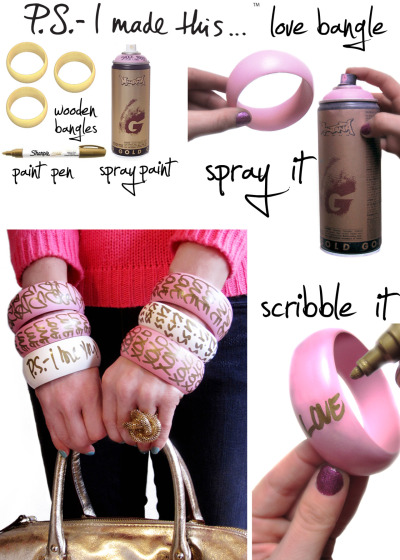
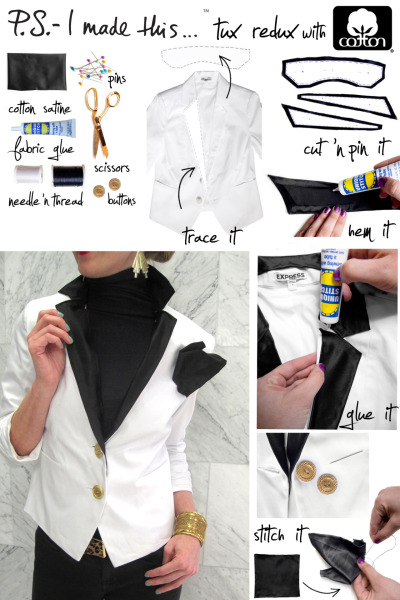
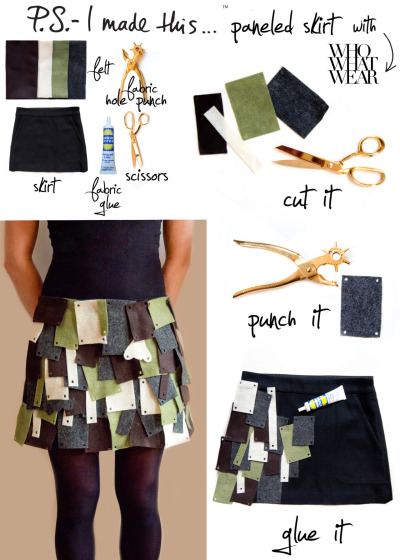
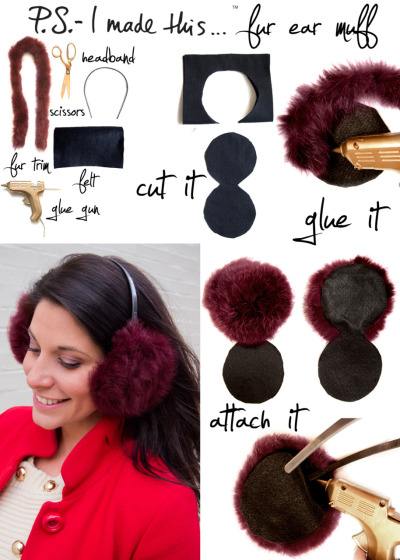
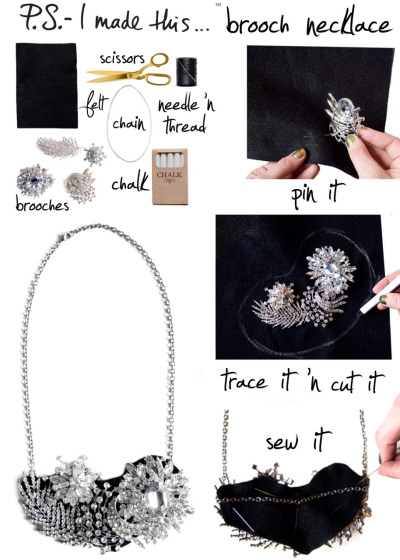
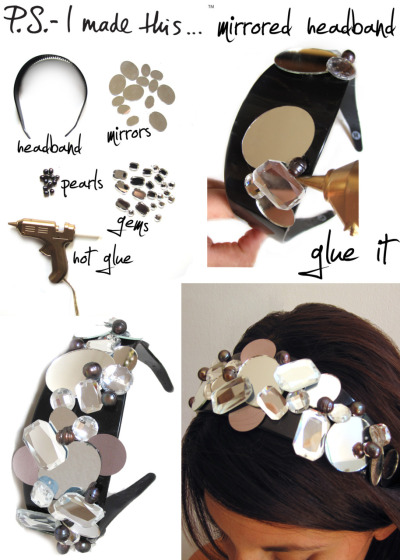
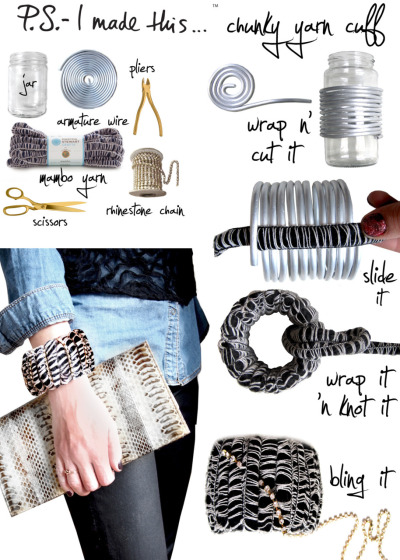
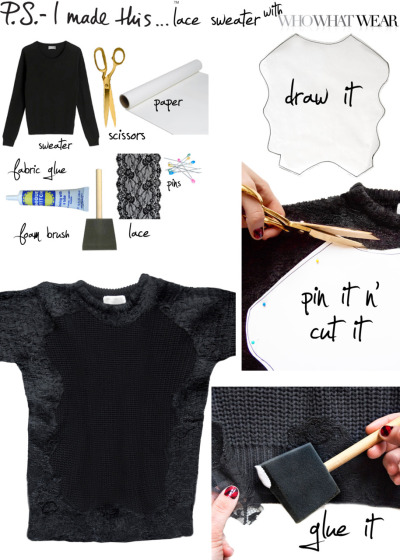
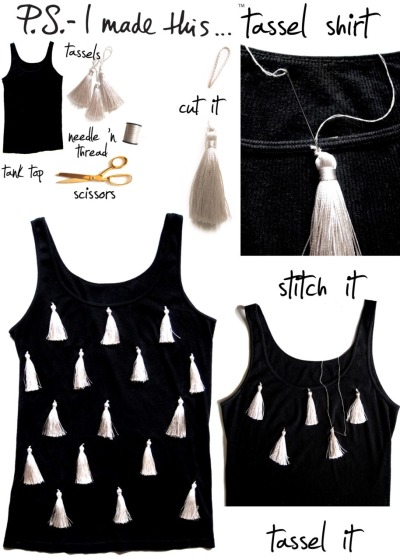
Декорируем и переделываем модные вещицы. Мастер-класс. Часть #1.

All hail McQueen!  Keep your manicure   out and about, while your palm stays calm and carries on.   Alexander  McQueen’s fingerless gloves inspired these delicious DIY glovettes, created with our friends at Who What Wear.  To create your  own pair, cut the feet off of a pair of socks,  which leaves you with a  “tube”.  Cut all of the fingers off minus the  thumb then snip  off approximately 1/2” of thumb’s fingertip. Make a  1”-vertical  slit on the outside of the tube to create the thumb  hole.  Slide gloves inside the tube, pulling the thumb through the hole.  Find two sparkly  brooches or buttons and glue thin tube shaped beads with a hot glue gun  or super glue.  Once dry, pin or sew to the top of the glove.  


Stand out as an Icon of Style.  Get inspired by the epitome of innovation, sleekness, technology and sportiness. Follow the Mercedes-Benz iconic road map for luxury and celebrate style with this DIY fashion project.  Inspired by iconic essentials and unique modern design , we created a j’amazing braided headband using Mercedes-Benz leather and layered in texture,  to top it off.  After all, it is Mercedes-Benz Fashion Week and we want to cruise around in style.
To create, cut a piece of leather approximately 1/2” wide and 2.5-3 ft long.  Add a bright cord (or ribbon) and ball chain.  Knot all three materials together onto a hair elastic and braid.  Once you have a braid long enough to wrap around your head, knot off on the other end of the  hair elastic.  Be sure to pull tight to make sure it’s secure. Snip the ends and you’re ready to brave a bold braided accessory!


Unleash your inner Cat Power.  From  Charlotte Olympia’s cat heels and flats to Jason Wu’s Target collab mascot, we decided to jump on the bandwagon and pay homage to  our  feline friends with a delicious DIY.  Be fierce and show your  feminine  feline side with a DIY that’s purrrrrrrfect!


To   create:  cut out 2 triangles in black, that are slightly rounded, for  the  ears. Measure and cut out a smaller and contrasting shape for the  inner  ear.  Use the same fabric to create a nose shape.  Use either  leather, suede, or  any faux fabric you have.  Create a “face” with puffy paint drawing eyes  onto a plain loafer. Be sure to use a different color puffy paint for the inside of eyes.  Glue ears onto the inside of the loafer with  a  glue gun.  Attach the nose and finish drawing the face by adding   whiskers and a mouth.  Wait until puffy paint is completely dry before  kicking up your heels and exercising your cat like reflects!


Holler for a lady like collar.  As we gear up for spring,  join the top-notch collar clan a la Louis Vuitton.   Feel ultra femme and fancy free and get inspired with a super sweet DIY.


To create, download the pattern we created for Who What Wear and trace onto eyelet fabric.  Cut out collar silhouette.  Use scissors to create a scalloped edge.  Attach a small piece of Velcro as a closure.  Style with high neck blouses, dresses, or jackets. Get creative with fabrics and colors!


“The  greatest love of all is easy to achieve.  Learning to love yourself is  the greatest love of all”.  Whitney said it best… but so did Oscar!   Mr. de la Renta’s go-to quotes were etched into resin bangles that boasted his words and beliefs. 


This Valentine’s Day, DIY your  heart out, literally.  It’s time to stop wearing your heart on your  sleeve and start sporting it ‘round your wrist… with a touch of  repetition.  Mark my words, by marking yours with a graffiti style love  note accessory.  P.S. - Remember more is more, so scribble ‘em, stack ‘em  and love ‘em lots!


To create: Apply two smooth coats of spray paint to wooden bangles.  Be sure to wait until paint is completely dry before picking up.  Use Sharpie Paint pens to  scribble your love notes and quotes all around the bracelet. For an  extra detail, inscribe the inside as well.  Get creative with your color  combinations and messages.  Create a bevy of bangles for yourself and  friends.  What better way to say “I will always love you”, than with a  wristed development that’s to DIY for! 


Turn evening wear into everyday flair with a tux redux.  Reinventions of YSL’s famed Le Smoking jacket and dapper black-tie duds are having a major moment.  A classic blazer is forever in style and always evolving.  Since we’re all about staying on-trend by creating them, we dipped into our DIY drawers for our favorite fabric, cotton.  This soft substance plants itself into the best textile fibers and threads known to man, and breathes new life into our wardrobe. This season, look to deliciously chic cotton to kick it up a notch.  P.S. - The Fabric of Our Lives® makes so many DIY’s come to life!
Lay your blazer open on a flat surface. Trace the silhouette of the inside of the collar as well as inside lapel using a piece of tracing or parchment paper. Cut out the collar pattern and lapel.  Be sure to factor in an extra 1/4 inch border around each piece for hemming purposes.  Pin pattern directly onto a piece of black cotton sateen fabric and cut out two lapels and two collar pieces with fabric scissors.  To create a clean and finished look, fold edges over using fabric glue to hem.  Use fabric glue to adhere each piece in its appropriate place.  Use your hands to smooth down and help set.  Cut a piece of fabric that is approximately a 5 inch square. Size will depend on your preference of pocket square and size of area you have to work with.  Fold back and glue the outside edge for a clean look.  Gather by pinching and folding and stitch directly onto the blazer for a faux handkerchief look.  Use corresponding color thread so thread is not noticeable.  Lastly, swap original buttons for a metallic gold or your favorite luxe option and stitch on.
 Get creative with your cotton color combinations and experiment by mixing patterns.  It’s the perfect opportunity to re purpose, re-create and re-invent. P.S. - The Fabric of Our Lives® makes us come alive with DIY.


Lose yourself in layers! My friends at Who What Wear and I did just that when we fell for Charles Anastase’s Fall/Winter 2012 stunners.   The melting pot of military hues infused into feminine silhouettes is  to DIY for!  Get creative with your own color story and start  “swatching” skirts, shirts, dresses…anything your heart desires.
To create, find a basic mini skirt to use as a base.  Incorporate several complimentary shades of felt material  and cut rectangles in an array of different sizes.  Get creative and  cut shapes with scalloped edges to add dimension and movement.  Use a  fabric hole punch to add extra detail to the felt pieces.  Place  swatches in a random pattern, starting with the bottom of the skirt, and  overlap as you move towards the top…making sure to completely cover  the surface.  P.S. — Lay your complete pattern out before you start to glue.   Adhere the swatches directly onto the skirt and hold in place for a  few seconds to secure.  Before you get decked in your DIY, make sure to  let the skirt dry completely on a flat surface….and then, swatch out! 


Burgundy, merlot and cabernet wine…their rich and mighty hues add great flavor to design.  Lanvin recently created yummy earmuffs in this of-the-moment shade.  Get inspired, stay warm, and feel good with a fuzzy fix!
To  create your own: fold a piece of felt in half, which will be the base  of the earmuff.  Trace and cut a circle leaving approximately 3 inches  flat on the bottom fold.  The size of the circle can vary per person.   You will need two of these felt rounds.  When open flat, circles should  be connected in the middle.  Apply small amounts of glue onto the  outside of the felt, and begin wrapping around a fur or faux fur strand,  gently holding it in place until set.  Continue to glue and coil inward  until you reach the center. When completely covered, trim excess fur.   Attach each muff by sandwiching them outside of a headband, gluing insides of felt together.  
P.S.  We’re also over-the-moon for these fox fur headphones from Beats by Oscar de la Renta…check them out! 


New year = new you!  Sparkle and shine for a fete that’s finer then fine this New Year’s Eve.  Expect jaws to drop (along with the ball) while you ring in 2012.  Get inspired by over-the-top glitz and glam for a decadent DIY stunner. Re-purpose brooches in your jewelry box, or pick up a few at flea markets or on eBay.
To create, pin several brooches, arranged in a bib-like formation onto a piece of felt. Outline the bib shape with chalk and cut out around the brooches.  You may need to sew a few stitches on the backside of the felt if brooches are weighing down the fabric, as you want them to lay flat.  Flip over necklace base and sew a chain onto the back. Use a new chain or opt for one from an old necklace for an extra special touch.
P.S.- Here’s to a happy, healthy & crafty 2012!


Bring Joy to the World this Holiday season! Use your fashion sense to give your home a festive twist!  We were inspired by Tory Burch’s bold and classic color palate for our Fashion Garland- the ultimate accent for chic and cheerful décor.  
To create: Cut pieces of ribbon and/or fabric that are approx. 9 inches long by 2 inches wide.  Both ends should be cut on an angle to prevent fraying.  Knot each piece of ribbon & fabric onto a strand of lights.  P.S.- get creative with your pattern and colors!  Continue to knot all the way down the strand of lights.  The amount of materials needed will depend on how long your strand is.  Hang your beautiful fashion garland over a mantle, fireplace, banister, railing, or mistletoe-topped entrance!
Plug in and let your holiday DIY garland shine bright and beautifully.  P.S.- Pair garland with live green garland for an extra decadent look. 


Twinkle twinkle little star, make a headband and raise the bar!  Stepping up your hair accessory is a must.  Get inspired by Nina Ricci’s sparkling stunner and DIY a version of your own.  Bling out a tousle topper which is a perfect partner for any holiday fete!
To create: Grab a thick headband, assorted gems, pearls and mirrored details.  Use hot glue to secure and embellish.  Create a random and sporadic look, and remember that haphazard= a happy DIY!  Have fun piling onto the headband until you are satisfied with your mirrored creation.


Tiz’ the season for DIY and who says only trees are for  decorating!?  Keep calm and get your craft on with a bold accessory that  boasts this season’s chunky knit trend. Make a statement with a sweet  and soft style essential that’s perfect to cozy up to. 


To create:  Make a bracelet base using armature wire, which is  extremely easy to form.  Find a cylinder-shaped item that fits your  wrist- jars work great.  Continue to wrap around until you achieve the  desired width.  Use wire cutters to snip the end.  Wrap Martha Stewart Crafts Lion Brand Mambo Yarn  (P.S.- it’s available in several other colors including hot pink!).  Slide under one coil, and  wrap around until the entire bracelet is covered.  Secure the end with a  knot and snip on the inside of the cuff. Lastly, add a bit of bling  and wrap rhinestone chain on top for a sassy touch.


Baby, it may not be cold outside- so be sure to look cool!


Brace yourself with lace!  Valentino’s F/W 2011 Collection displayed smokey hues of lace mixed with chunky knits, which our friends at WhoWhatWear and I thought needed to be DIY’ed ASAP.   Loose yourself in a lovely-cozy-cool- creation that’s perfect for the cold weather and any winter wonderland.

To create: sketch and cut out a pattern onto plain paper, which will be used to block out the center area of the sweater.  Remember to get creative with the shape of your pattern.  The pattern should be placed approximately 2-3 inches below the neckline and approximately 5 inches from the bottom of the sweater.  Cover the center portion surface of your sweater with the lace, pin the pattern over top the lace.  Follow the pattern, and trim lace.  Use a foam brush to apply a thin layer of fabric glue on the sweater where you want the lace to adhere.  Pat the lace down on the sweater and wait till completely dry to trim any excess lace. 


Don’t you wish every day could be a FRYE-day?  Known for their high-quality materials and hand-craftsmanship, The Frye Company has been around since the mid 1800’s (holy heritage!)  Frye crafts what are quite possibly the world’s most iconic boots, along with a bevy of luxe leather must-haves.  Fun fact: It takes more than 190 steps to make one pair of bench boots.  P.S.- CLICK HERE to see how Frye boots are made, and check out pics from our live DIY EVENT at their NYC Flagship store.  We DIY’ed our hearts and soles out this week.  Now read on to learn how to make your own luxe leather necklace!
To create: Use scissors to cut a piece of leather or leather-like material in a rectangle that’s approx. 12” x 4”.  Cut the bottom, giving it a wave-like shape. Punch holes spaced 1-inch apart using a leather hole punch.  Get creative and weave in cord, metallic beads, or other hardware accents.  P.S - we used actual eyelets from the Frye warehouse. To finish off, knot the cord and you are ready to sport this must have fall accessory. 


Declare  your love for cool tools and be a cut above the rest!  Girls on-the-go  with modern, multifaceted style need to be prepared for anything that  comes their way.  Enter life’s must-have accessory; the Swiss Army knife.  For centuries, these legendary tools have battled rogue threads  on our cocktail dresses, smoothed chips in perfectly manicured nails  and so much more.  Our pocketknife pal stays put in our purse and is as  essential as lipgloss!  Aside from the obvious “fix-it” functions, we’re  big fans of using this handheld toolbox to DIY. Read on to learn how  you can create a coveted “kiltie” embellishment for heels in need of an  overhaul.  
 To create, trace  and cut a template (almost like a stretched trapezoid) on paper.  P.S.-  The size will depend on your shoe size.  Be sure to measure the  template to the shoe before cutting and also leave a few extra inches  toward the upper portion to tuck into the shoe.  Use your Swiss Army knife (on  a cutting board with a flat surface) and cut two pieces of fabric.  Any  type of suede or leather-like material works.  Use mini snips to cut  two-inch slits. Continue to use snips to create an inverted “V” fringe.   Pierce two tiny slits with your knife half-way down.  Feed cord through  the holes, leaving space for your ankle to fit in. Lastly, add a bead  detail to the ends and tie a cute bow.   Get creative with your colors  of materials, cords, and shoes-  mix and match your heart away…
Your  Swiss Army pocket knife pal is super sharp… your DIY style should be too!


Don’t let superheros have all the fun.  It’s time you made yourself into a caped crusader.  I recently took my own advice when I spent the day with Elizabeth Holmes, who is quite the DIY queen herself, of The Wall Street Journal.  I dreamt up a must-have DIY cape which infused my favorite tartan plaid and the signature silhouette i love.  More behind the scenes snaPS with WSJ here!
To create, reach for your favorite cotton flannel or wool material.  You will need approx. 2 yards, depending on the size you desire.  First, fold material in half, horizontally.  Place a hat at the top of the fold (half way down).  This will serve as a neck-hole guide.  Continue to cut out a 4”inch panel.  Don’t throw away the scraps! Use the fabric scraps to create a strip which you can use as your belt.  P.S.- add fun brooches, and group in a  cluster, for a stunning finishing touch.  P.S.- Watch the DIY Video HERE.


Delicately over-sized and deliciously refined, sums up the wonderful world of Lanvin.  For Fall ‘11 Alber Ebaz dreamt up stunning crystal and sequin embellishments on everything from jewelry to gloves, to shoes, belts and more! Loose the diamonds, and loose yourself in some Lanvin inspiration for this sequin belt DIY.  
To create, measure and cut a piece of double satin ribbon (length will depend on waist size).  Be sure to leave approx. 6 inches on both ends so you have room to tie around your waist.  Arrange sequin patches onto the ribbon. P.S.- it’s okay if they overlap.  Once you are happy with the placement, use fabric glue to apply to the back of the patch and adhere onto felt.  Hold in place for a few seconds to set. Trim around the felt for a clean and finished edge.  Be sure to allow the embellishment to completely dry before attaching onto the ribbon, use a generous amount of the fabric glue. P.S.- A glue gun also works well.  Let belt dry completely before sporting.
P.S.- Check out more images of this project over at Who What Wear!


Department store cosmetic countertops should be called the land of decadent organization.  Perfectly placed products look colorful and clean, which make us crave them even more.  It’s time to roll out the red carpet for the new beauty starlet that’s on everyone’s lips, Maybelline New York’s Baby Lips Lip Balm.  Never have we ever found a pout pleaser that has color, moisture, the cute-factor, and j’amazing packaging all in one.  Baby Lips Lip Balm has inspired our DIY Beauty box!  Due to it’s fun and fresh look, we want to display it, at eye level- everyday!  The purple (aka “Peach Kiss”) case inspired the base for the beauty box of the same hue.
To create, use a block of floral foam (avail in lots of fun colors), and stud it up! Use a marker to plan out your beauty box placement.  Use desired products to pierce the foam directly by applying a bit of pressure, and created a spot carved out specially for it.  Make sure your Lip balms, mascaras, and other products have just enough depth to stand up straight and stay put.  Push test tubes, all the way down, into foam so the top lip is flush with the foam’s surface. Insert makeup brushes.  For a finished look, place grommets on top of the tubes opening.  Turn a tube into a bud vase for that final touch!
You now have yourself the perfect lip pleaser and a countertop cosmetic solution.  P.S.- Long live the Maybelline New York Beauty Box!


Designer. Icon. Legend.  Just a few labels for Oscar de la Renta, the man behind the label.  Mr. de la Renta, a staple in the fashion industry, has always taken a sophisticated, graceful and extraordinarily daring approach to designing.  OdlR believes, “What’s most important to these women is individuality.  I have to create things she’ll want to wear, no matter who she is.”  And the man does just that.  Recently, Oscar’s SS12 show made waves in the digital world as well as on the runway.  Social Society’s leading lady aka Oscar PR Girl introduced #OdlrLive on Tumblr, proving that innovation oozes from his runway world, into the digital world, for the world.  Take a note from Oscar and embrace your own individuality, creativity and style.  What better way to do that, than to get inspired by a recent piece from his SS12 collection. P.S.- it’s tassel time!
To create, round up a black tank top, tassels, needle and thread, and a pair of scissors.  Snip of the string loop at the top of your tassels and place onto the shirt to lay out your pattern.  P.S.- use a piece of chalk to mark if you need a guide.  Pierce the needle and thread through the top of the tassel head, and stitch onto the top layer of your shirt.  Stitch 3 or 4 times to secure, double knot and trim on the inside.  Continue to space out and sew onto shirt.
You can’t and shouldn’t escape the magical world of Oscar PR Girl.  Follow her, Friend her, tweet her, adore her, P.S.- I do!Аринуш


Рубрики:  Поделки из разных материалов


Добавить комментарий:
Текст комментария: смайлики

Проверка орфографии: (найти ошибки)

Прикрепить картинку:

 Переводить URL в ссылку
 Подписаться на комментарии
 Подписать картинку