-Метки
ажур аксессуары ананас араны блузка болеро веерочки вертикальный ажур воланы волны выпуклый узор декор десерт детское джемпер жакет жаккард жилет журналы зигзаг кардиган книги комплект костюм косы кофточка кошки круглая кокетка ленточное кружево летнее листья мотивы новорожденным павлиний хвост платье полоски пуловер резинка ромбы сарафан свитер сетка спицами сеточка топ туника цветочный мотив цветы шапочка шарф юбка
-Рубрики
- HAND-MADE (49)
- АТЕЛЬЕ (100)
- БЕРЕМЕННЫМ (2)
- БИБЛИОТЕКА (9)
- ДАЧА (91)
- ОГОРОД (10)
- ПОМОЩЬ РАСТЕНИЯМ (6)
- РАССАДА (3)
- САД (3)
- ЦВЕТНИК (18)
- ДЕТИ (35)
- ДОСУГ (6)
- ИГРЫ (6)
- ПИТАНИЕ (1)
- РАЗВИТИЕ (6)
- ДОМ (128)
- ДОМАШНЕЕ ХОЗЯЙСТВО (6)
- ЗДОРОВЬЕ (141)
- ИНОСТРАННЫЕ ЯЗЫКИ (50)
- ИНТЕРЕСНО ОБО ВСЕМ (19)
- ИНТЕРЕСНЫЕ ЛЮДИ (2)
- КОМПЬЮТЕР (16)
- ПОЛЕЗНЫЕ СОВЕТЫ (114)
- ПРАЗДНИКИ (19)
- ПРИЯТНОГО АППЕТИТА (146)
- ВЫПЕЧКА (8)
- ДЕСЕРТ (8)
- Заготовки (4)
- ИЗ МЯСА (3)
- ОВОЩИ (8)
- РЫБА (1)
- САЛАТЫ (1)
- ФРУКТЫ, ЯГОДЫ (1)
- РЕМОНТ (9)
- Рукоделие (2184)
- ВЫШИВКА (27)
- ВЯЗАНИЕ КРЮЧКОМ (427)
- ВЯЗАНИЕ НА ВИЛКЕ (7)
- ВЯЗАНИЕ СПИЦАМИ (1424)
- ПРЯЖА (2)
- УЗОРЫ КРЮЧКОМ (58)
- УЗОРЫ СПИЦАМИ (191)
- Свет мой, зеркальце, скажи... (80)
- УЛЫБНЕМСЯ (28)
- ФИНАНСЫ (5)
- ШКОЛА (1)
-Ссылки
-Видео

- MY BIRTHDAY CONGRATULATION
- Смотрели: 12 (0)
-Фотоальбом
Фотоальбом закрыт всем, кроме списка избранных и списка друзей. Зарегистрироваться!
-Поиск по дневнику
-Друзья
Друзья оффлайнКого давно нет? Кого добавить?
Anik1971A
BorisovnaA
DJONA63
Dushka_li
ga_lina
Gim56
Irina_L
iriska_d
kassir-lera
kudryashechka
len-OK65
Levkoj
liveinternetru
lyiolik
Marjory
nadinrom
Natalica_JA
rimirk
sakura1608
selwas
super59
Svetlana_Karablina
TATYSIY
TVORYU
Und-Ina
v_i_t_u_s_y_a
VERA-L
Vse_Sama
WAQ
ZheZhe
zzmeya
Алисия555-Светлана
Аля-М
Блог_Настика
Герасименко_Татьяна
Дина312
Золотая_лилия
Лёля_Полосатая
Лариса_Павловна
Леночка_77
Лесенка
Люмлия
малиновка76
РИМИДАЛ
Рошен
Т_Осень
Танечка777
Трииночка
Шрек_Лесной
-Постоянные читатели
Cwetok Galina2015lipetsk Galyko KOROLEVA_8 Lap_ka13 Lena_174 Mar-Tinka MikHEI Olana05 Svet_Vega Svet_lana2109 Wivanna XORCIKO buksiha elduhan gollubval jetta2009 mar2ina maralaska marista312 natusihka olgapilkatkacheva svetlana-sh tatka_fel tumas zmejka77 Алёнушшка Валерия67 Василюшкино_рукоделие Виолетта_Савченко Елена_КЕН ИРИНА_Кошеварова Кукушка26 Лёля_Полосатая Ленчик40 Линнинелль МАРГАРИТА_И_НАСТЕНА Мастер1965 Натали_И Наталья_1975_ Оля_Георгиновна Парус_11 Полтавчаночка СОВА_днём Тамара_Шевердина Танечки_2 Таня_Красильникова Фатима_63 ираиринка маша_сирень
Jolly Waves Cowl - Симпатичный снуд частичным вязанием |
http://knitting-and-so-on.blogspot.ru/2015/11/jolly-waves-cowl.html
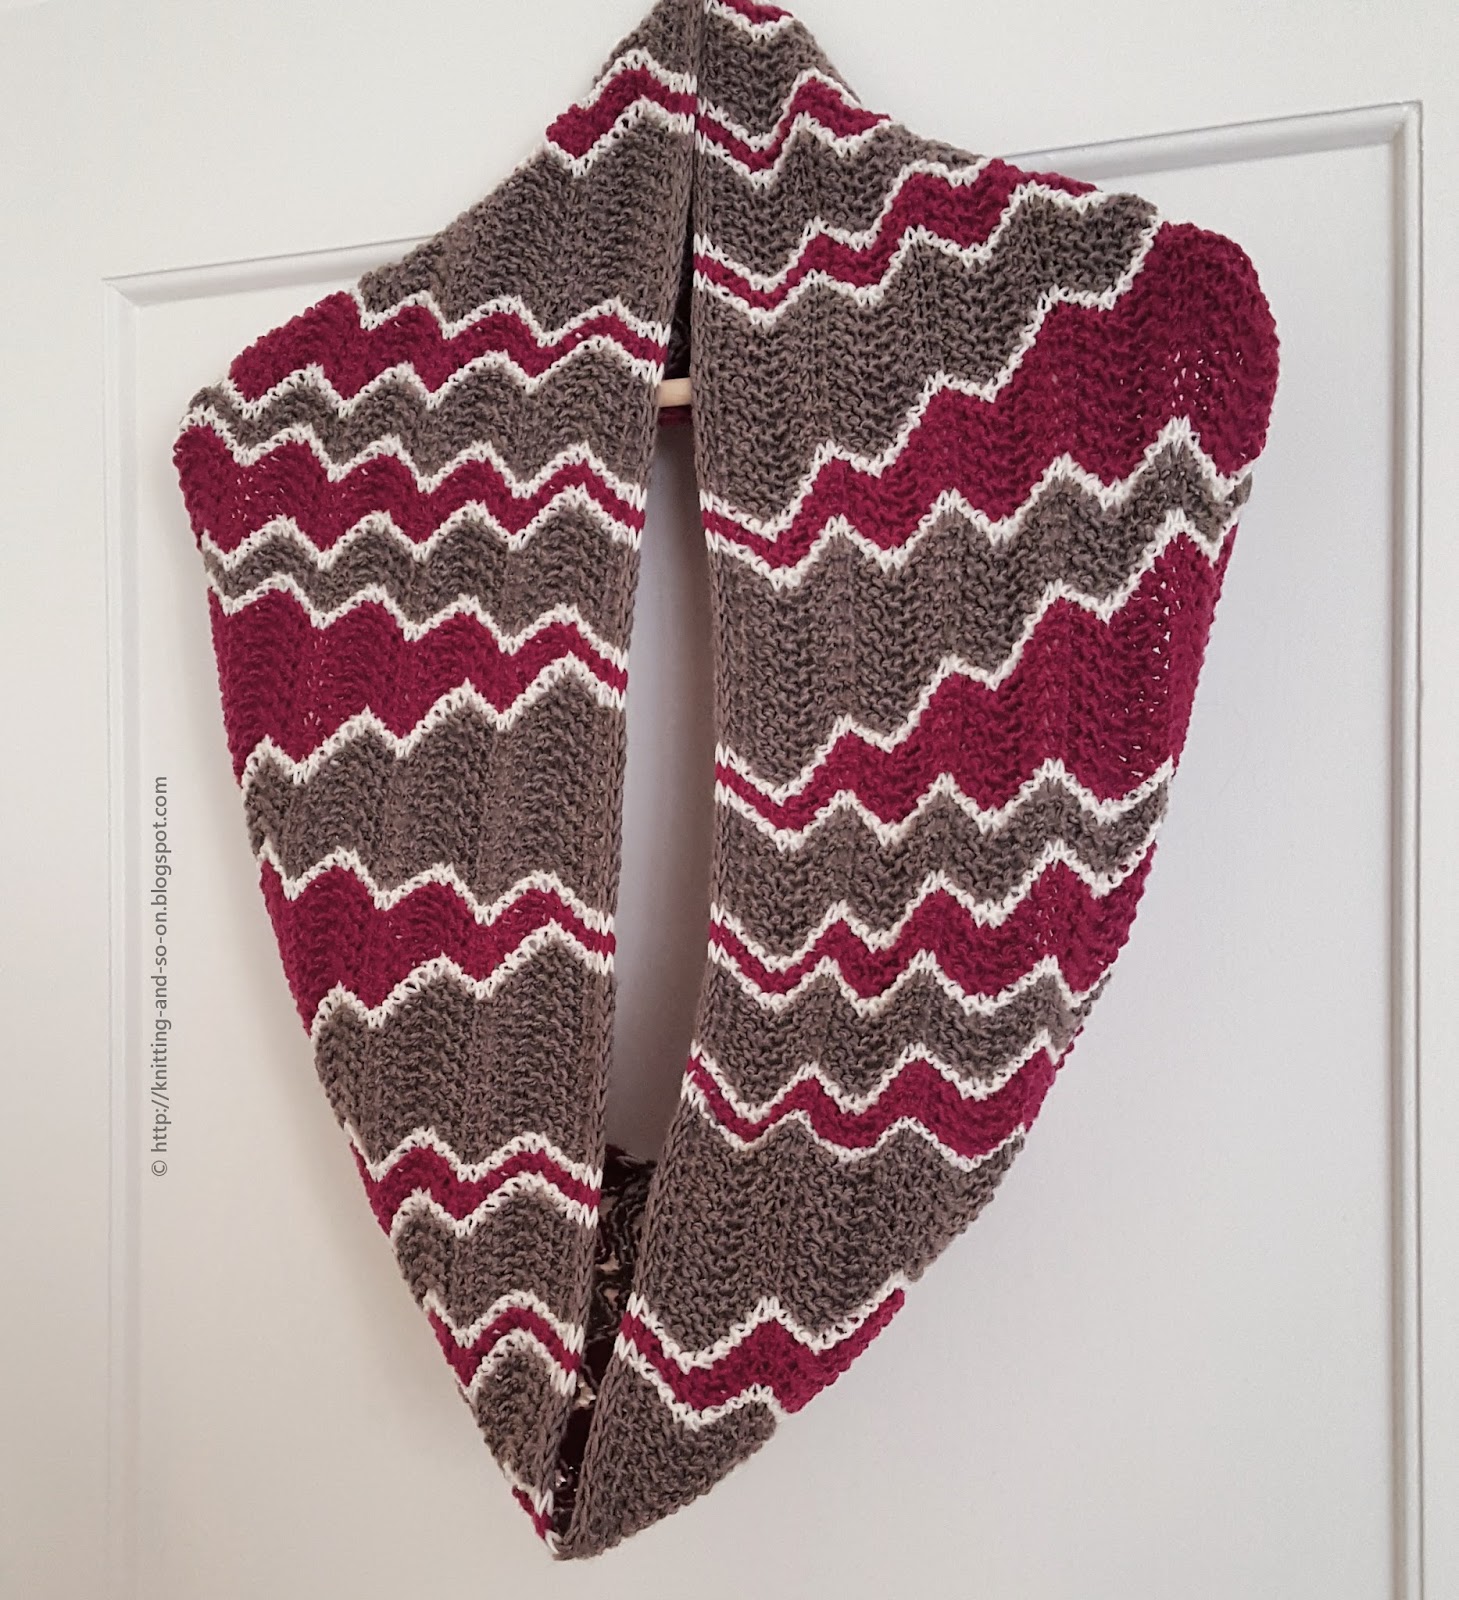
Jolly Waves Cowl
With an eye-catching design and beautiful colors this cowl will keep your spirits up this winter. The gorgeous graphical effect is achieved by the combination of short rows with a feather and fan pattern.

Materials
- about 220 grams of DK weight yarn in 3 colors, 100 grams of the main colors each (beige and maroon in the photos - called MC1 and MC2) and 20 grams of the contrast color (off-white in the photos - called CC) - this will yield a double length cowl, i.e. about 125 cm in circumference.
- 3.75 mm knitting needles (straight or circular)
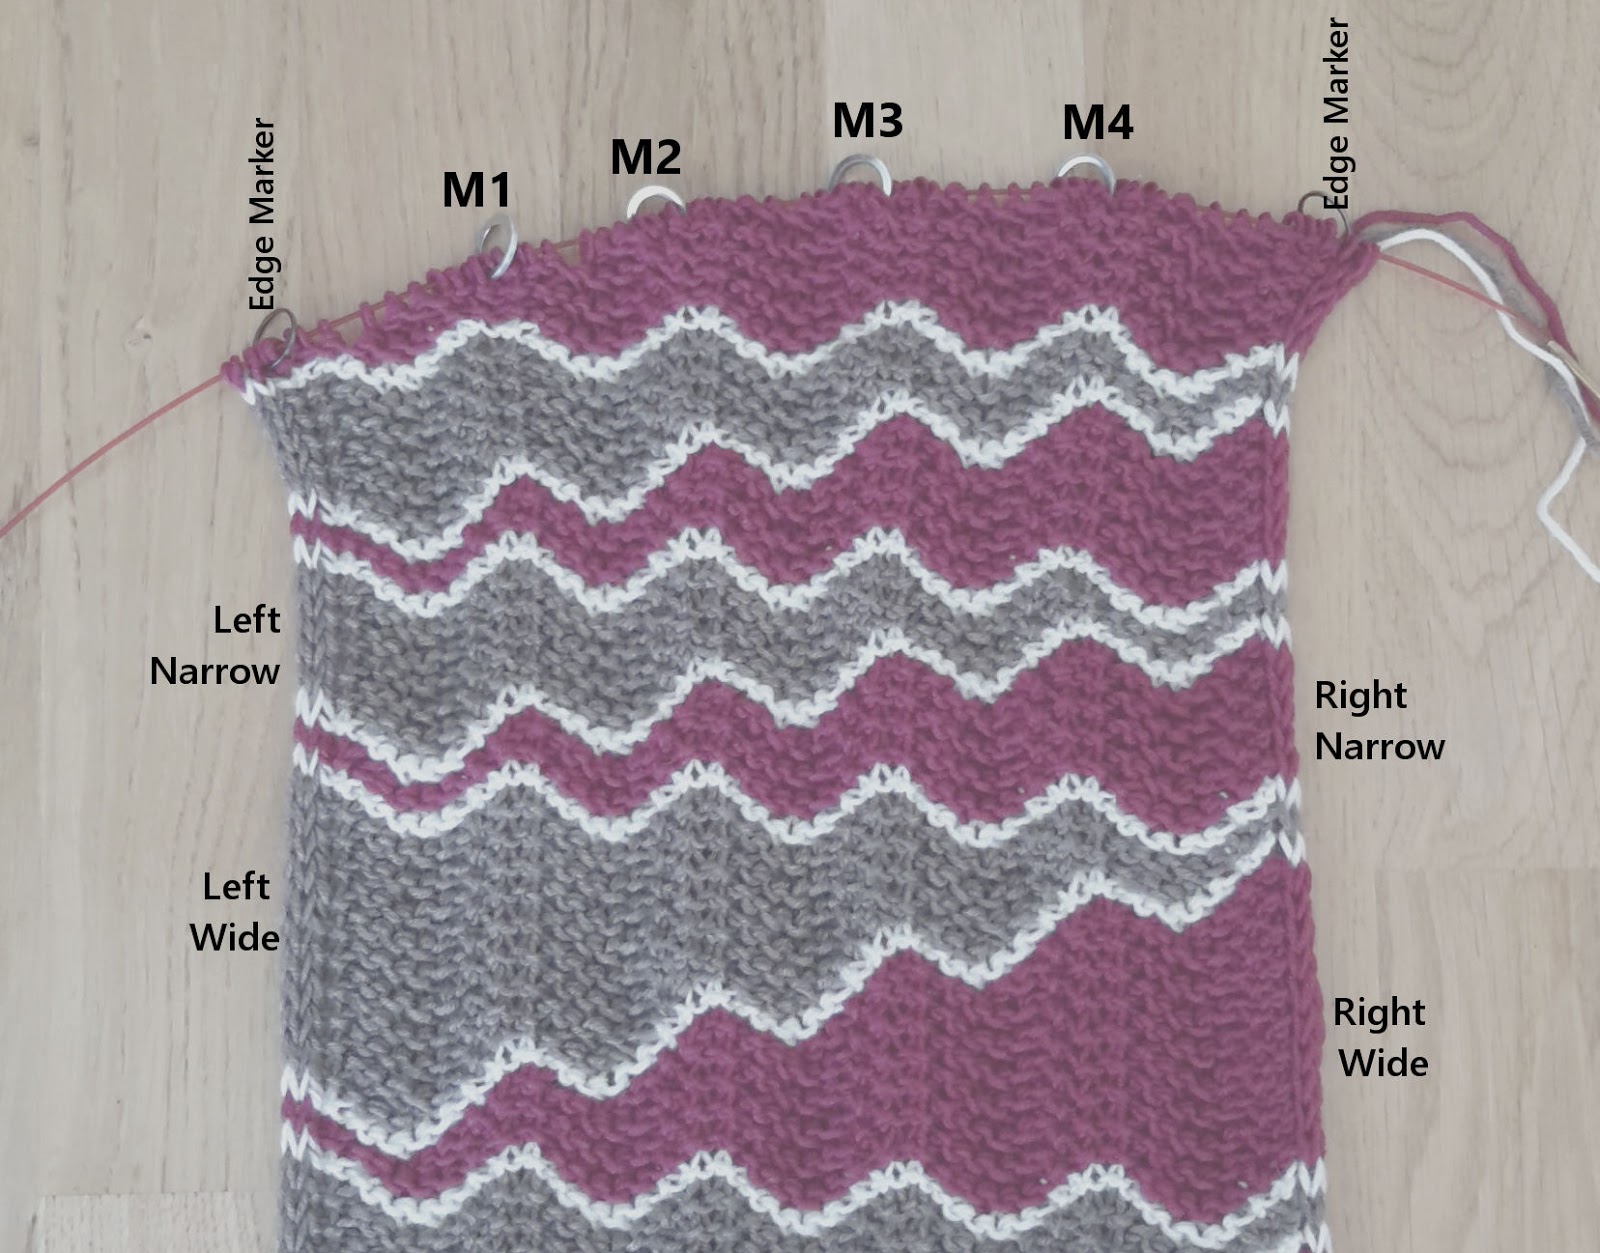
- 6 stitch markers (2 stitch markers to mark the edges and 4 markers to mark the ends of the short rows - these 4 markers will be called M1 to M4)
-
Techniques - Provisional CO: My favorite method for a provision CO is the crochet provisional CO - it is shown in this Youtube video by New Stitch a Day.
- Short Rows with Wrap and Turn (w+t): The technique is shown in this YouTube video by Very Pink Knits. For this cowl, I didn't pick up the wraps because with garter stitch the wraps hardly show.
- Grafting Garter Stitch: Shown in this YouTube video by New Stitch a Day. If you want to know all about grafting, please read the brilliant "Grafting Myths" series on Joni Coniglio's blog on knittingdaily.com.
- Carrying yarn up: If you want to avoid cutting your yarn with every color change (and subsequently to have to weave in too many ends), you will carry up the yarn on the side of your work - this technique is shown in this YouTube video by Knit Purl Hunter.
Short Row Sections
The pattern consists of different short row sections that are divided by a garter stitch ridge in the neutral color.
There are four types of section - as shown in the picture above.- Right Narrow Section
- Left Narrow Section
- Right Wide Section and
- Left Wide Section.
-
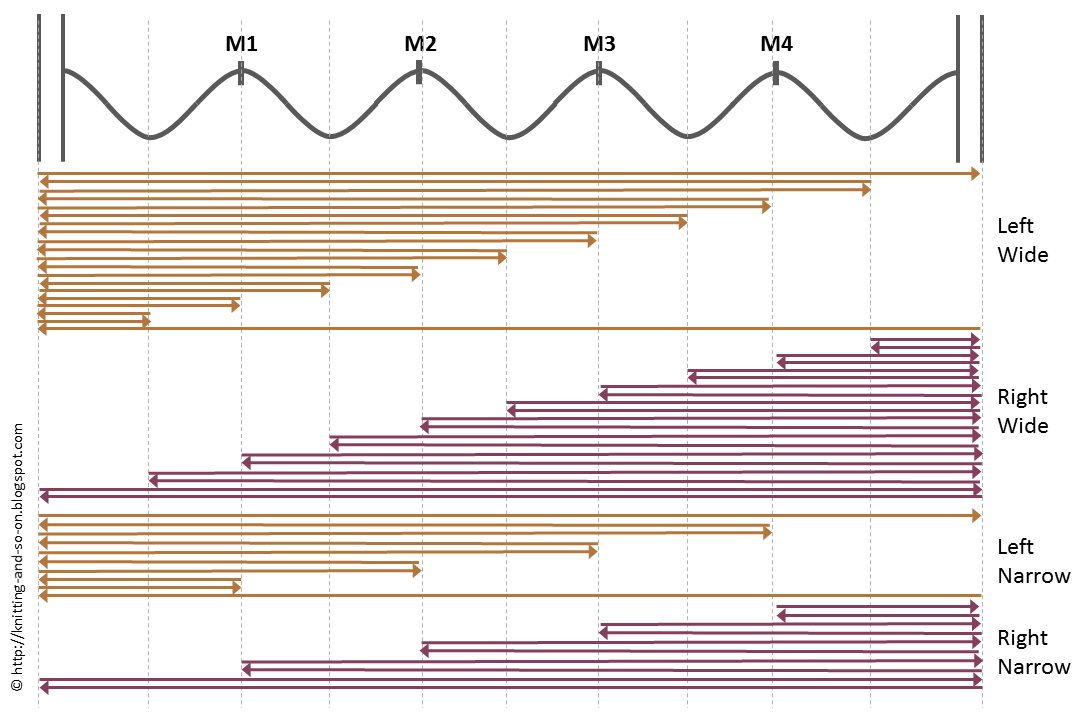
The diagram below shows how the short rows stack up for each section type. Both the photo and the diagram show the RS of the cowl.
Basically, you knit 4 narrow sections (right-left-right-left) and 4 wide sections (also right-left-right-left) with a rigde in a neutral color inbetween. All "right"-sections (i.e. right narrow and right wide section) are knitted in color 1 (MC1), all "left"-sections (i.e. left narrow and left wide section) are knitted in color 2 (MC2) - and all contrast ridges are knitted with the contrast color CC.
Instructions
Provisionally CO 66 stitches and knit one row with CC - leaving a tail long enough to graft these 66 stitches in the end and placing the markers as follows: k3 pm (edge marker) k12 pm (=M1) k12 pm (=M2) k12 pm (=M3) k12 pm (=M4) k12 pm (edge marker) k3
Knit a right narrow section as follows:
With MC1
R1 (RS): k all stitches
R2 (WS): sl3wyif, * kfb kfb ssk ssk ssk ssk kfb kfb repeat from * until there are only 3 sts left, sl3wyif
R3, R4 (RS, WS): k up to M1, w+t, * kfb kfb ssk ssk ssk ssk kfb kfb repeat from * until there are only 3 sts left, sl3wyif
R5, R6 (RS, WS): k up to M2, w+t, * kfb kfb ssk ssk ssk ssk kfb kfb repeat from * until there are only 3 sts left, sl3wyif
R7, R8 (RS, WS): k up to M3, w+t, * kfb kfb ssk ssk ssk ssk kfb kfb repeat from * until there are only 3 sts left, sl3wyif
R9, R10 (RS, WS): k up to M4, w+t, * kfb kfb ssk ssk ssk ssk kfb kfb repeat from * until there are only 3 sts left, sl3wyif
 Knit a contrast ridge as follows
With CC
R1 (RS): k all stitches
R2 (WS): sl3wyif, * kfb kfb ssk ssk ssk ssk kfb kfb repeat from * until there are only 3 sts left, sl3wyif
Knit a left narow section as follows
With MC2
R1 (RS): k all stitches
R2, R3 (WS, RS): sl3wyif, kfb kfb ssk ssk ssk ssk kfb kfb (you're now at M1), w+t, k all stitches
R4, R5 (WS, RS): sl3wyif, * kfb kfb ssk ssk ssk ssk kfb kfb repeat from * until you are at M2, w+t, k all stitches
R6, R7 (WS, RS): sl3wyif, * kfb kfb ssk ssk ssk ssk kfb kfb repeat from * until you are at M3, w+t, k all stitches
R8, R9 (WS, RS): sl3wyif, * kfb kfb ssk ssk ssk ssk kfb kfb repeat from * until you are at M4, w+t, k all stitches
R10 (WS): sl3wyif, * kfb kfb ssk ssk ssk ssk kfb kfb repeat from * until there are only 3 sts left, sl3wyif
Knit a contrast ridge.
Knit a right narrow section.
Knit a contrast ridge.
Knit a left narrow section.
Knit a contrast ridge.
Knit a right wide section as follows
With MC1
R1 (RS): k all stitches
R2 (WS): sl3wyif, * kfb kfb ssk ssk ssk ssk kfb kfb repeat from * until there are only 3 sts left, sl3wyif
R3, R4 (RS, WS): k up to M1, k6, w+t, ssk ssk kfb kfb, * kfb kfb ssk ssk ssk ssk kfb kfb repeat from * until there are only 3 sts left, sl3wyif
R5, R6 (RS, WS): k up to M1, w+t, * kfb kfb ssk ssk ssk ssk kfb kfb repeat from * until there are only 3 sts left, sl3wyif
R7, R8 (RS, WS): k up to M2, k6, w+t, ssk ssk kfb kfb, * kfb kfb ssk ssk ssk ssk kfb kfb repeat from * until there are only 3 sts left, sl3wyif
R9, R10 (RS, WS): k up to M2, w+t, * kfb kfb ssk ssk ssk ssk kfb kfb repeat from * until there are only 3 sts left, sl3wyif
R11, R12 (RS, WS): k up to M3, k6, w+t, ssk ssk kfb kfb,* kfb kfb ssk ssk ssk ssk kfb kfb repeat from * until there are only 3 sts left, sl3wyif
R13, R14 (RS, WS): k up to M3, w+t, * kfb kfb ssk ssk ssk ssk kfb kfb repeat from * until there are only 3 sts left, sl3wyif
R15, R16 (RS, WS): k up to M4, k6, w+t, ssk ssk kfb kfb, * kfb kfb ssk ssk ssk ssk kfb kfb repeat from * until there are only 3 sts left, sl3wyif
R17, R18 (RS, WS): k up to M4, w+t, * kfb kfb ssk ssk ssk ssk kfb kfb repeat from * until there are only 3 sts left, sl3wyif
R19, R20 (RS, WS), k3, k6, w+t, ssk ssk kfb kfb, sl3wyif
Knit a contrast ridge.
Knit a left wide section as follows
With MC2
R1 (RS): k all stitches
R2, R3 (WS, RS): sl3wyif, kfb kfb ssk ssk, w+t, k all stitches
R4, R5 (WS, RS): sl3wyif, kfb kfb ssk ssk ssk ssk kfb kfb (you're now at M1), w+t, k all stitches
R6, R7 (WS, RS): sl3wyif, kfb kfb ssk ssk ssk ssk kfb kfb (you're now at M1), kfb kfb ssk ssk, w+t, k all stitches
R8, R9 (WS, RS): sl3wyif, * kfb kfb ssk ssk ssk ssk kfb kfb repeat from * until you are at M2, w+t, k all stitches
R10, R11 (WS, RS): sl3wyif, * kfb kfb ssk ssk ssk ssk kfb kfb repeat from * until you are at M2, kfb kfb ssk ssk. w+t, k all stitches
R12, R13 (WS, RS): sl3wyif, * kfb kfb ssk ssk ssk ssk kfb kfb repeat from * until you are at M3, w+t, k all stitches
R14, R15 (WS, RS): sl3wyif, * kfb kfb ssk ssk ssk ssk kfb kfb repeat from * until you are at M3, kfb kfb ssk ssk. w+t, k all stitches
R16, R17 (WS, RS): sl3wyif, * kfb kfb ssk ssk ssk ssk kfb kfb repeat from * until you are at M4, w+t, k all stitches
R18, R19 (WS, RS): sl3wyif, * kfb kfb ssk ssk ssk ssk kfb kfb repeat from * until you are at M4, kfb kfb ssk ssk. w+t, k all stitches
R20 (WS): sl3wyif, * kfb kfb ssk ssk ssk ssk kfb kfb repeat from * until there are only 3 sts left, sl3wyif
Knit a contrast ridge.
Knit a right wide section.
Knit a contrast ridge
Knit a left wide section.
Repeat this series of sections (right narrow, left narrow, right narrow, left narrow and right wide, left wide, right wide, left wide) - always divided by a ridge in the neutral color - until the cowl is long enough for you. End with a left wide section.
Put the stitches from your provisional cast-on on a needle and graft both ends together - 3 sts in stockinette, then 60 sts in garter stitch and the last 3 again in stockinette stitch. (If you need more detailed instructions for the grafting part, it's the same that has been used for the Mixed Wave Cowl on this blog. Follow the link and you'll find detailed instructions written by Joni Coniglio.
Weave in ends and block.
This pattern was featured at the Hookin' up on Humpday #111 Link Party, the Knitting Love Link Party #5 and at the Link and Share Wednesday Link Party No. 122 by Oombawka Design - thank you!
| Рубрики: | Рукоделие/ВЯЗАНИЕ СПИЦАМИ |
Процитировано 5 раз
Понравилось: 3 пользователям
| Комментировать | « Пред. запись — К дневнику — След. запись » | Страницы: [1] [Новые] |


