-

 -

  •     , , , 24 . !
  •     - - . : Internet Explorer 6, Fire Fox 1.5, Opera 9.5, Safari 3.1.1 JavaScript.
  • , . , , , , , , -, ,

 - -

 -

   M_A_G_D_A

 - e-mail


 -

 LiveInternet.ru:
: 13.01.2010
:
:
: 4255

:

"Kitchen Items":
1 - spoon shade
2 - Cool lampshade
3 - Hanging baskets chandelier
4 - Cute tray re-style
5 - Make a Beaded Chandelier
6 - Jute-Wrapped Lampshade
7 - The greatest idea ever!!
8 - frames with seeds
9 - how to make frame with seeds
10 - toy plane
11 - candles
12 - out of foil
13 - coffee bean trea
14 - whisk into jewelry holder
15 - cinnamon sticks miniatures
16 - DIY Zip Tie Chandelier
17 - jumbo button wall decore
18 - silverware wall art
19 - uses for recycled pizza tool
20 - coffee frames
21 - frames for the kitchen
22 - foil rose
23 - covered with coffee filters
24 - ribbon organizer
25 - crafts with medical spatulas
26 - decorate with coffee
27 - easiest recipe of cold porcelain
28 - crackle with kitchen items
29 - molding with silicone and kitchen soap
30 - making your own cutters
31 - lamp from paper plates
32 - recycled lamp
33 - coffee bean decoration
34 - candles
35 - frames & clocks
36 - coffeeeeeeeee
37 - with coffee bean
38 - kitchen ware

Kitchen Items.


: Wooden Spoon(4), Towels(5), Tires(8), Tins & Cans(22), Thread, Rope & Wire(55), Socks(14), Sea Shell(14), Plastic Spoons(5), Plastic Bottles(86), Pipes & Tubes(30), Pasta(9), Paper & newspaper(97), Molding(27), Light Bulbs(4), light bulb(1), IceCeam Sticks(2), Hangers(3), glass bottles(2), Feather(8), Egg Shells(11), Egg Carton(14), Drinking Straw(4), Dried Flowers(3), Decorative Bottles(79), Corn Husk(1), Coat Hangers(5), Cloth Pin(14), China & Kitchen ware(3), CDs(19), Carton(54), Branches(32), Books(4), Blankets, jeans,leather....etc(55)

: WEDDING(44), VICTORIAN(35), USEFUL (103), RECYCLE(694), PRIVATE(3), LINKS To Crafts(22), LIGHT(148), in minutes(17), health & beauty(67), GARDEN(63), Games(7), Flower Making(115), FASHION(818), DECOR(1018), COOKING(310), Computer & internet(12), Cats(29), Beautiful Places(32), Backgrounds(42), Alphabet(5)
(0)

spoon shade

, 05 2010 . 21:11 +
Pappus [ + !]


  " "  .   . .

: , , , 6 , , , .


LIGHT/Lamps

:  
(0)

Cool lampshade

, 05 2010 . 21:14 +
Fire_Work [ + !]

« »


Fields forever. , : , , , , — !


LIGHT/Lamps

:  
(0)

Hanging baskets chandelier

, 29 2010 . 20:35 +

DIY Chandelier........tutorial


Glamour, bling, sparkle....those are a few words that come to mind when I look at this chandelier. And that is exactly the look I was going for. I needed to add a bit of glamour and sparkle to a corner of my daughter's bedroom.....

 
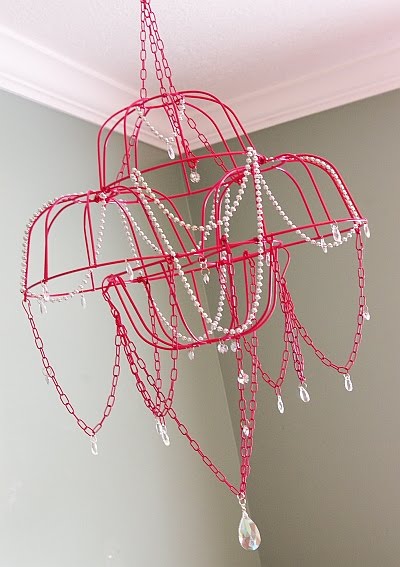
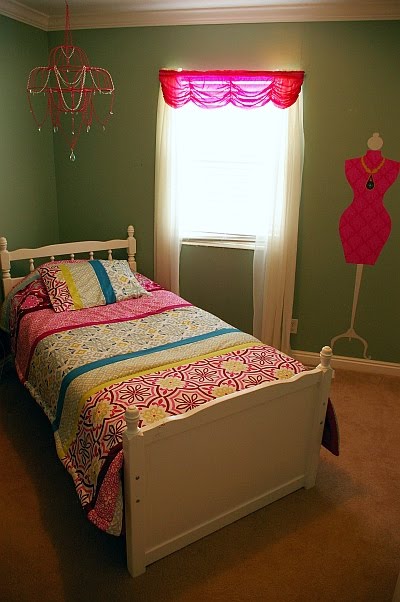
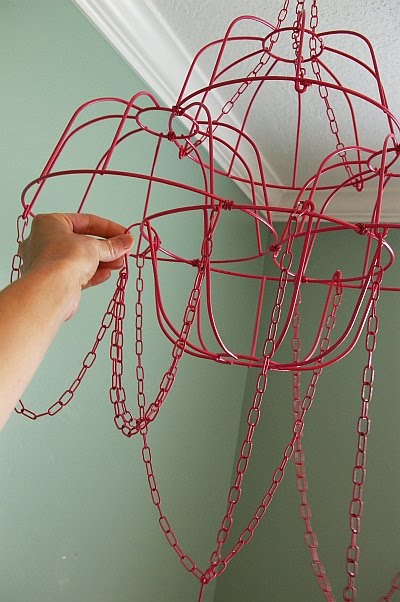
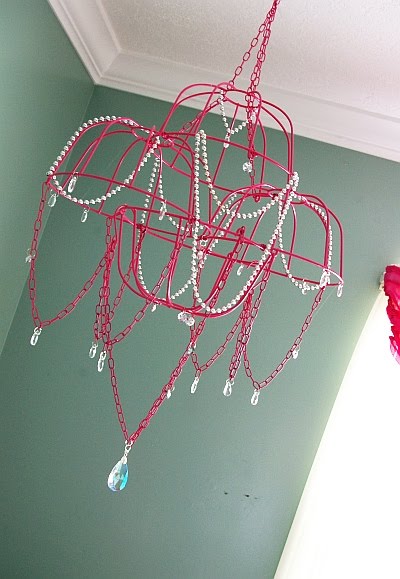
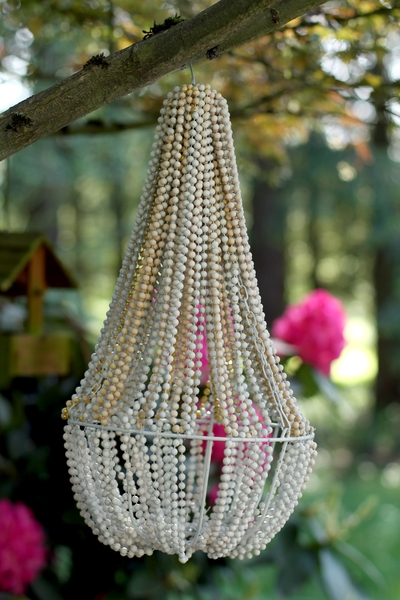
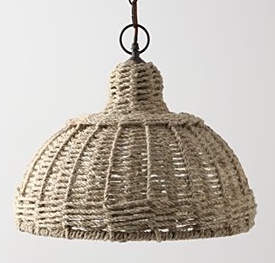
And when you can't thrift one to makeover, why not make one yourself! Can you guess what I used?........Hanging flower baskets!!!! You can make one too!

 
DIY Chandelier
Materials:
4 - 10" wire hanging baskets - (got mine at the $1 store!)
Wire (I used 19 gauge I had on hand)
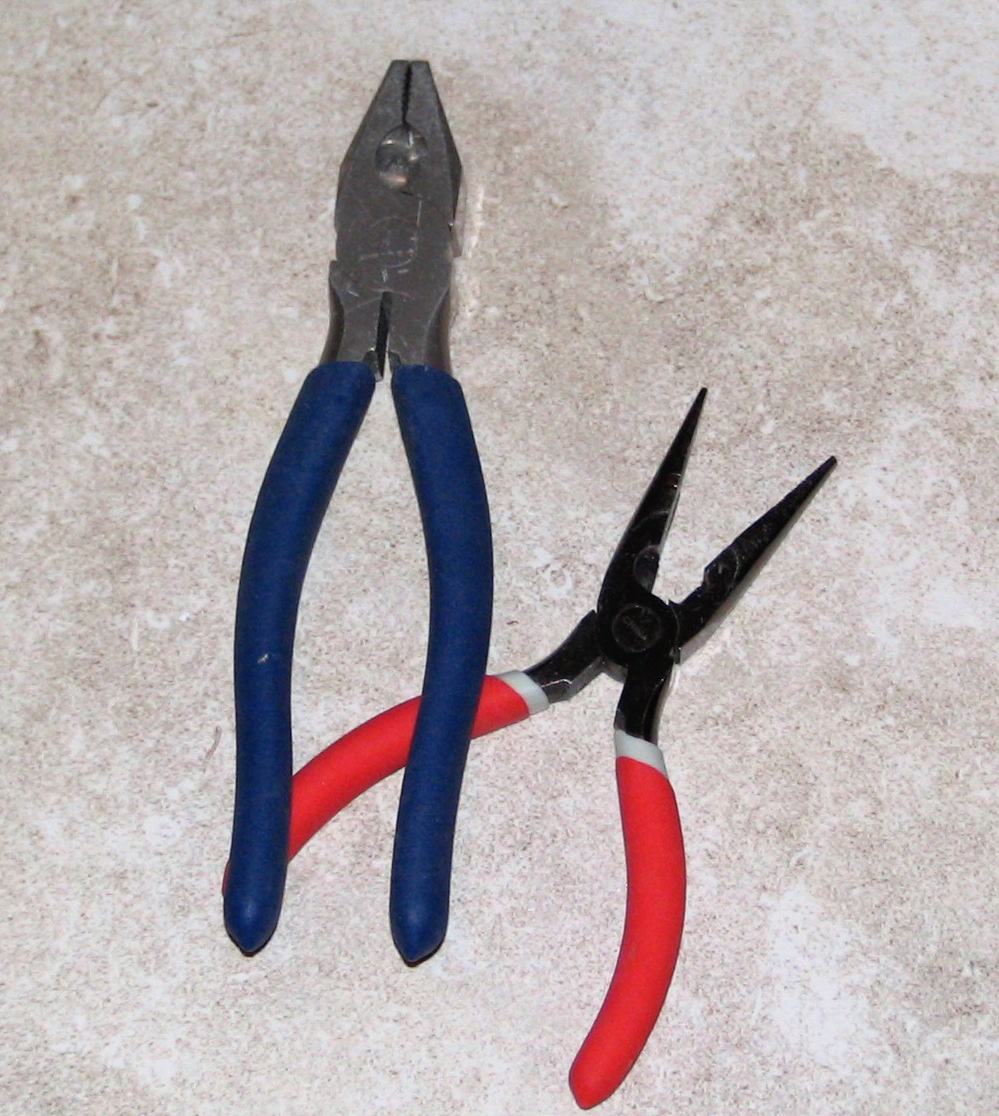
Needle nose pliers/wire cutters
Hot Glue Gun
Spray Paint
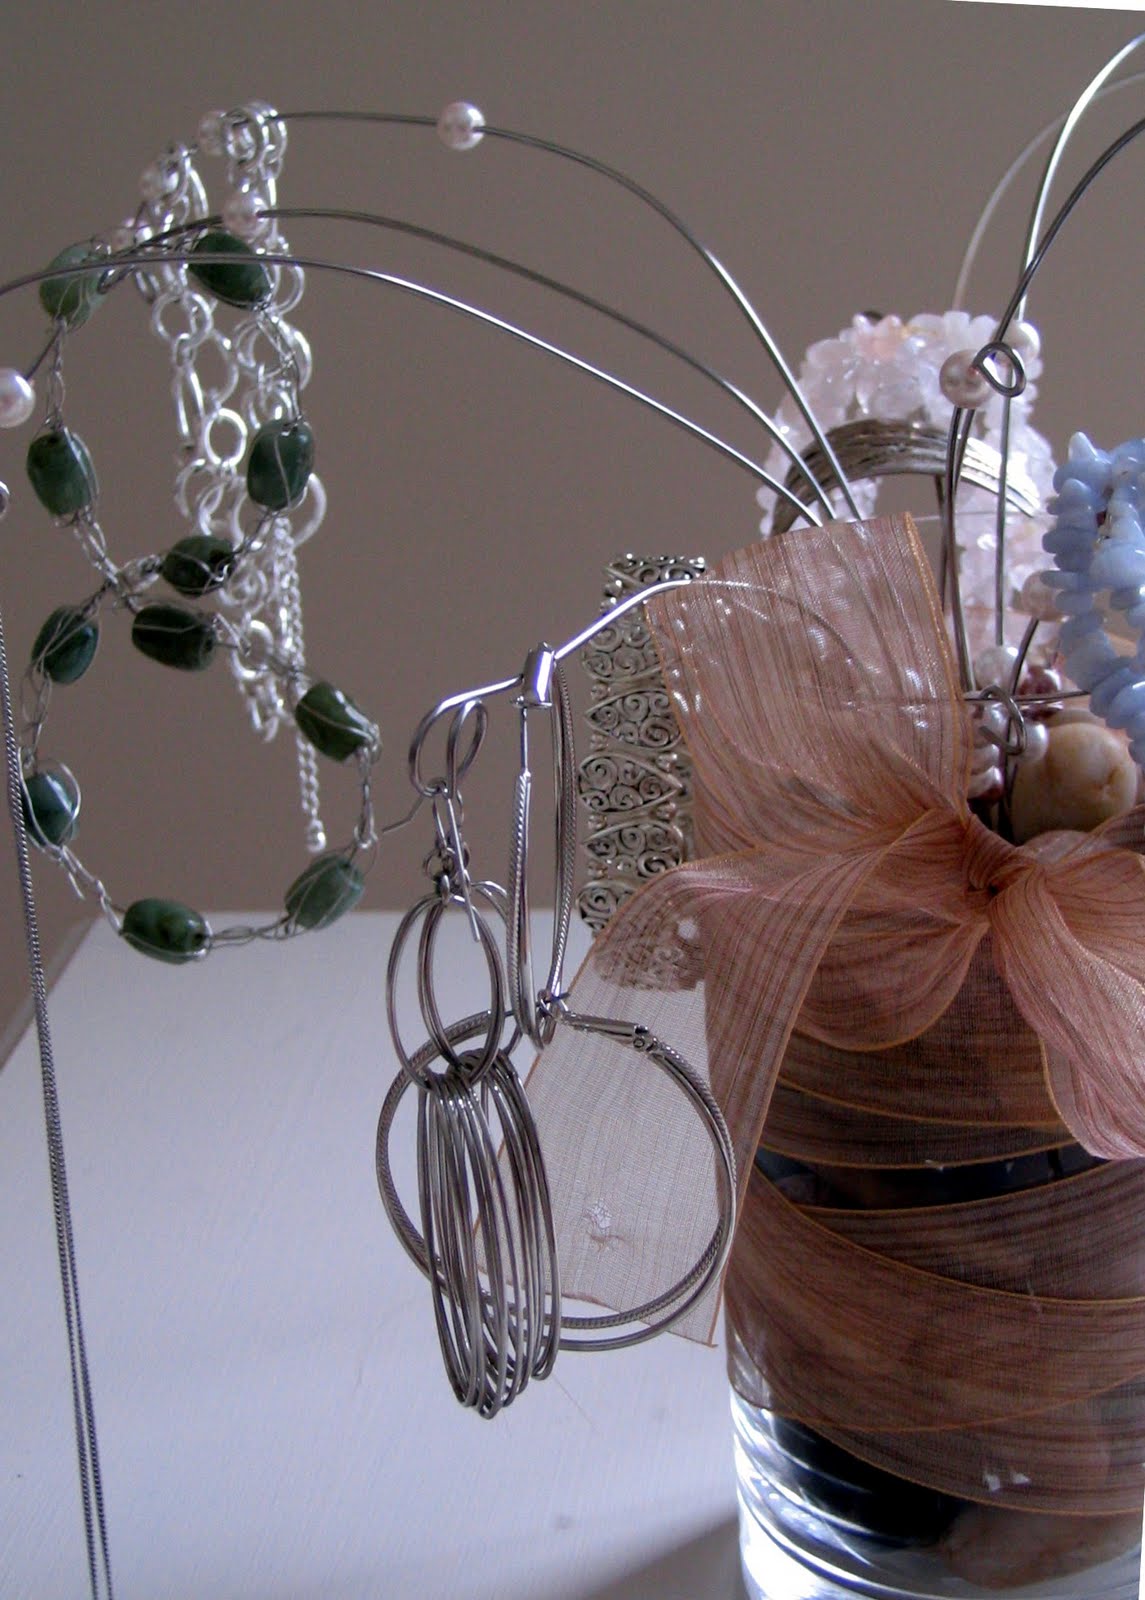
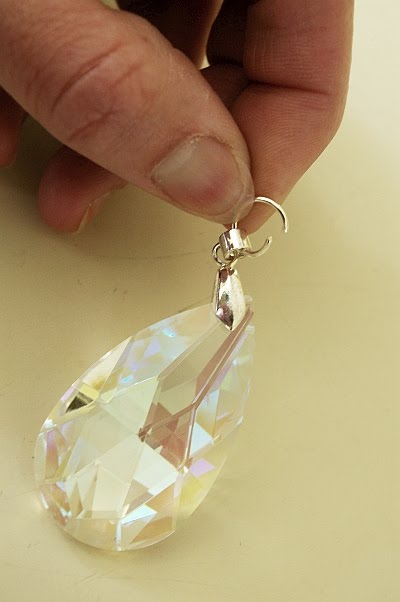
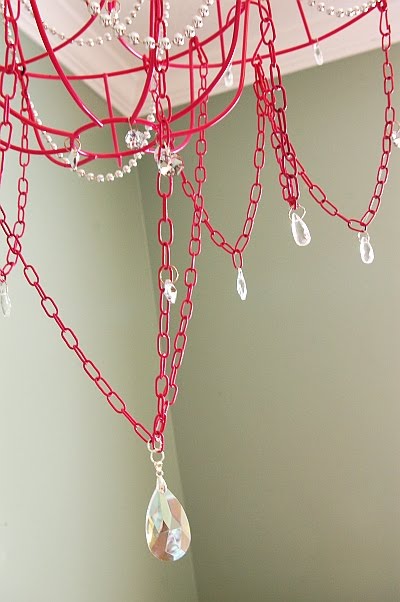
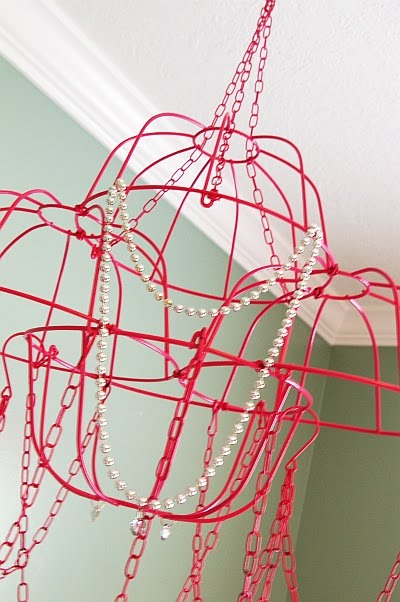
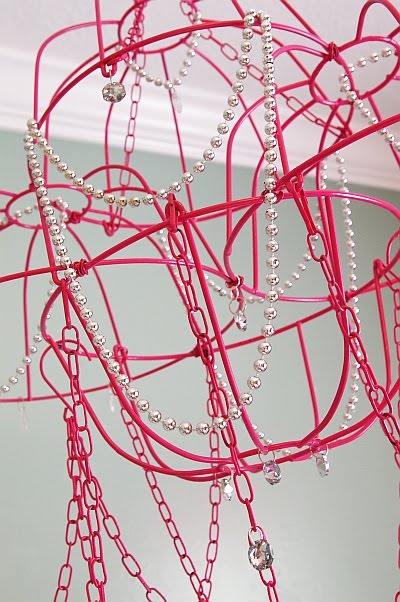
Embellishments - crystals, beaded necklaces (I bought a pack of silver ones at the $1 store), round mirror pieces, colored beads, jump rings, etc - whatever you like!

 
**Share your finished project in the Brassy Apple Flickr Group!**
download the full tutorial to keep/print HERE

Let's go!

 
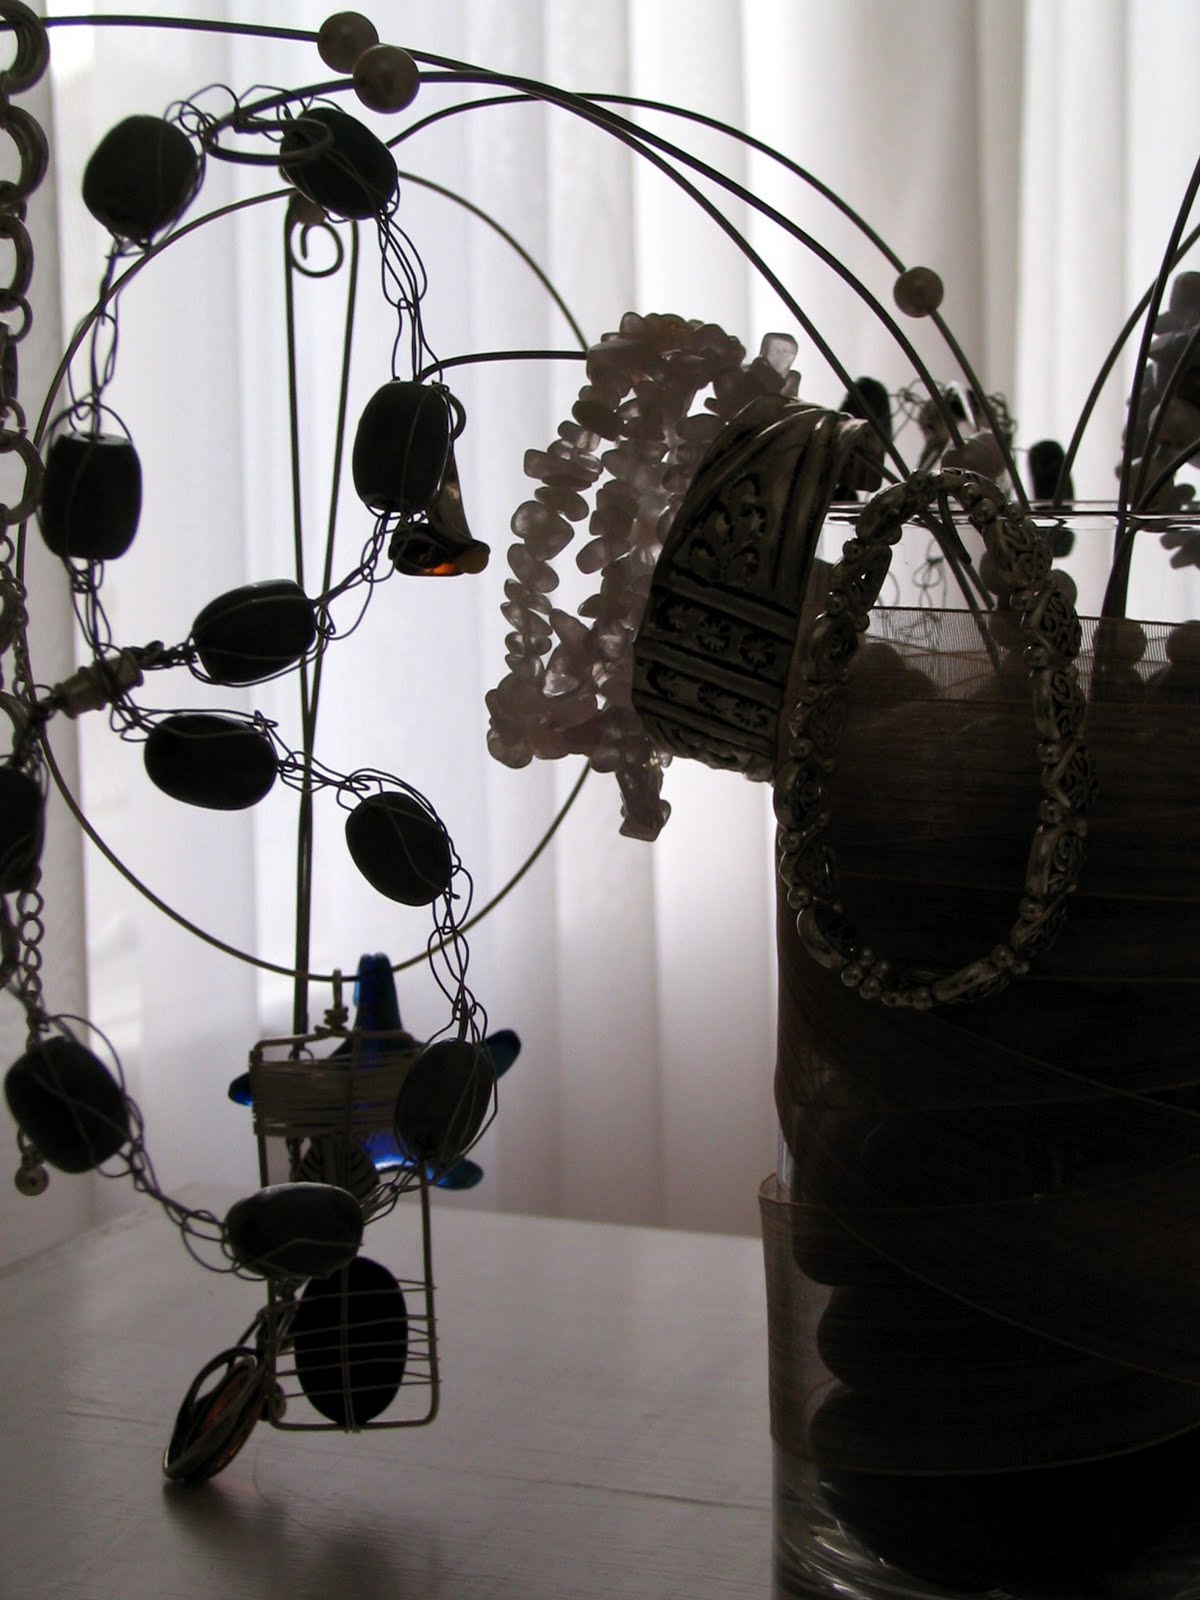
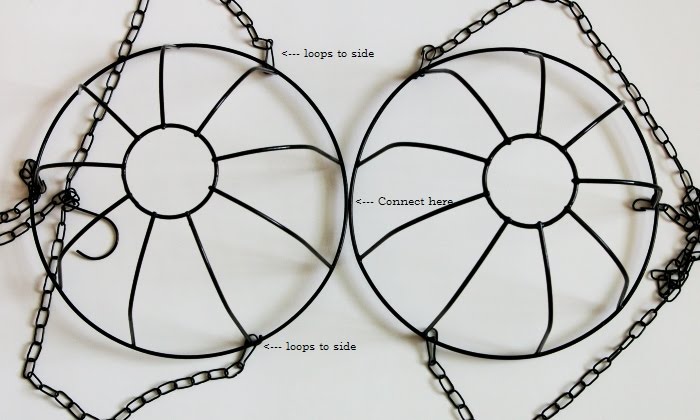
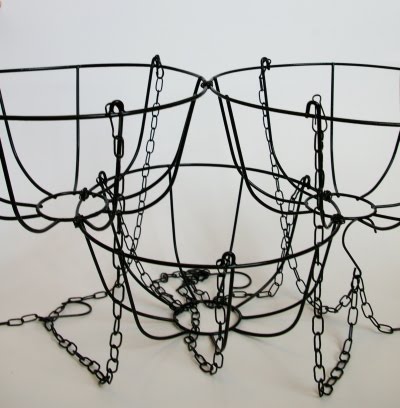
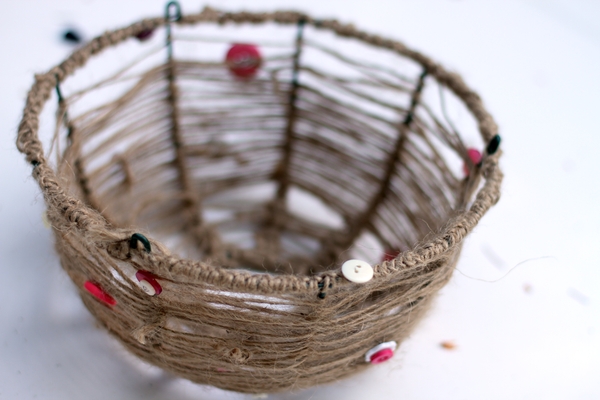
Step1: Place 2 baskets together - rounded side up/flat side down. Connect them in the middle using wire. Wind tightly. Be sure to space the "loops" to the sides as shown in the photos below.


Step 2:  Take your 3rd basket and thread the hook and chains up through the middle hole and lay off to one side.

 
(threading up...)
(laying off to one side....)

 
Step 3: Place this 3rd basket in the middle of the other 2 that you connected - rounded up side/flat side down.


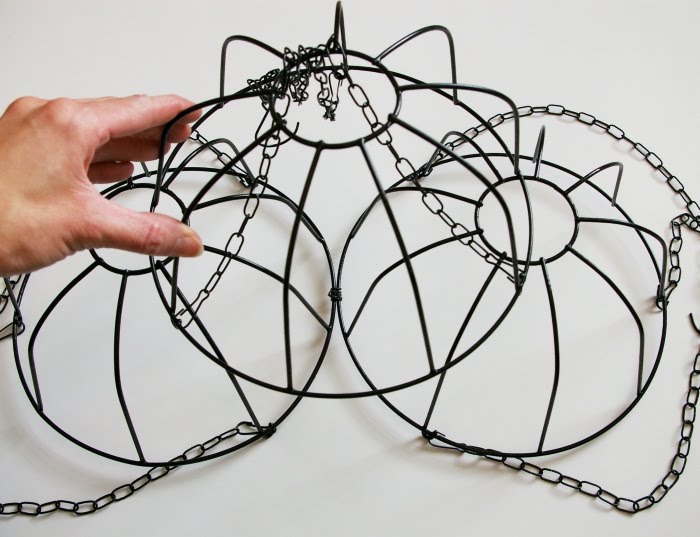
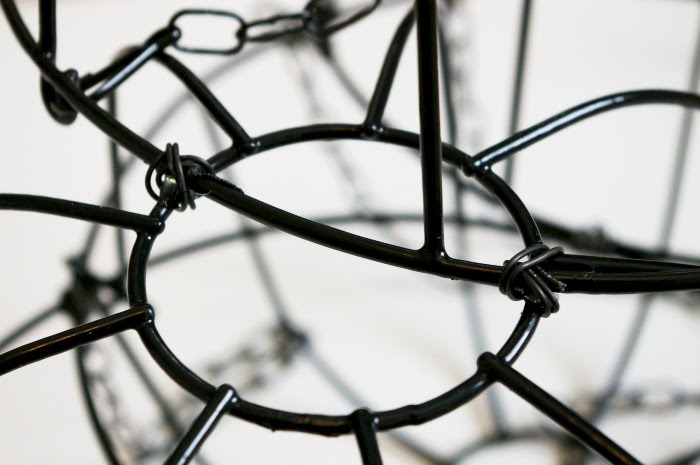
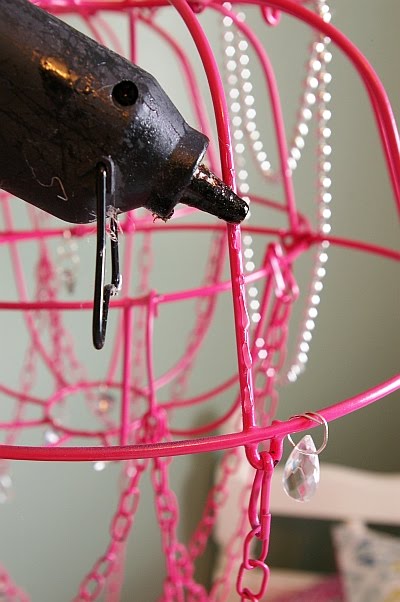
Connect the 4 points that touch (2 on each side. See photo below) with wire. To wrap these with wire easily, apply a small dot of hot glue and then wind the wire around.


Step 4: Turn the entire piece over.....


and place the 4th basket in the middle -flat side down (see photo below). Attached it with wire at the 4 points that are touching as before.


(a close up of how I connected the pieces together with wire)


Flip it back over. Using the top basket that you threaded the hook and chain through the center, the entire connected "chandelier" should now look like this:


Step 5: PAINT! (optional) Hang, spray paint and let dry. We used "berry pink" ultra cover by Rustoleum.


and came out with this beauty! (squeal! White would have been pretty too! just think of all the fun colors you could do!)


Step 6: Give your chandelier a bit of "shape" (this step is easiest to do if it is hanging). Take the 2 outside hooks and place on the inner rings on each side (see photos below). Secure the hook in place with a small dot of hot glue.

 
Now the chains that hang have some curves, shape and loop to them.

Step 7: EMBELLISH! now the fun really begins! If you have a supplies stash, you may have some gems you can use. If not, this step can be the "spendy" part. Be sure to look for sales or use coupons at your local craft stores if you can when shopping for crystal embellishments. Don't forget - we picked up a pack of silver "mardi gras" style necklaces at the $1 store. 6 came in a pack too!


 There are soooo many hoops, ledges, chains and other surfaces to attach beads and jewels to on your new chandelier - so have fun! Here are a few ideas of places we attached our embellishments....

Detach the center bottom hanging hook and replaced it with a large crystal and jump ring.


I hung teardrop style crystals from the bottoms of each of the loops on the outside chains (pictured above) and also hung smaller round crystals on the chains above the teardrop crystals.
Dress up the center and outside rings....


Draped beaded necklaces on the center front and back. Just a dot of hot glue on each side....


  I also glued some beading to the frame on the sides and draped it into the middle....repeated on the opposite side......


Just have fun where and how your embellish, drape and dress up your chandelier!


http://brassyapple.blogspot.com/

LIGHT/Chandelier
DECOR
RECYCLE

(0)

Cute tray re-style

, 01 2010 . 19:15 +
It's cute but not my style. I wanted to keep the red edges so I thought I should cover up the middle somehow.
ROPE!

I twirled and glued for a while. I think it turned out really nice
 
DECOR/Kitchen
RECYCLE

(0)

Make a Beaded Chandelier

, 01 2010 . 19:32 +
LIGHT/Chandelier
RECYCLE

:  
(0)

Jute-Wrapped Lampshade

, 01 2010 . 19:40 +
LIGHT/Lamps
DECOR
GARDEN
RECYCLE

:  
(0)

The greatest idea ever!!

, 01 2010 . 20:06 +


...
LIGHT/Chandelier
RECYCLE

:  
(2)

frames with seeds

, 01 2010 . 23:36 +
Tawa_Saenko [ + !]

***


 (640x631, 115Kb)
 (640x627, 93Kb)

...
DECOR/Frames, wall art, mirror
RECYCLE

:  
(0)

how to make frame with seeds

, 01 2010 . 23:42 +
[ + !]


DECOR/Frames, wall art, mirror
RECYCLE

:  
(0)

toy plane

, 09 2010 . 00:52 +
Ernata [ + !]

.

  : , , , , .

:  http://www.looledo.com/index.php

DECOR/Kids Rooms
RECYCLE/Carton
RECYCLE/Paper & newspaper
DECOR/Baby Stuff

:  
(1)

candles

, 25 2011 . 23:51 +
Ledidans [ + !]


  . : , , (, , , , ) ( ).


:

:  
(0)

out of foil

, 19 2011 . 23:39 +
˸ [ + !]

.


...

Flower Making

:  
(0)

coffee bean trea

, 12 2011 . 00:33 +
Oreana106 [ + !]

: -

, . 34- ; , , . , :)

, , , , - ;)
RECYCLE/Thread, Rope & Wire

:  
(0)

whisk into jewelry holder

, 02 2012 . 04:00 +


You will need:
 
A whisk (the largest one you can get. I got mine from the dollar store)
A vase (deep enough to hide the whisk's handle, I had this on hand)
Rocks, stones (dollar store purchase)
Beads, pearls...etc (on hand)
Ribbon (on hand, optional)
 
Tools:
Wire cutter and pliers
 
 
Here's the whisk (oops, sorry, pictured 2 there, but you only need one) and rocks I used.
You will need these.... wire cutter and pliers:
1) Using your wire cutter, cut the wire loops on the whisk. Try to cut the lengths as randomly as you can, meaning try not to cut them all at the same length:
2) With the help of your pliers, start to shape the wires so that they fan out and look more tree-like:
3) It is time to decorate. I had glass pearls on hand, so I threaded some of those on the wires:
4) Use your pliers to roll the wire ends so that the beads won't fall off, and so that you won't poke out your eyes when sleepily selecting necklaces. I rolled the wire downwards, but if I were to redo, I'd roll them the other way around so that they hold my jewelery better:
5) 6) and 7) When done all the "stems", stick the whisk into a vase, fill the jar up with rocks or pretty stones, or even marbles. This will add weight for stability and hide the handle of the whisk. Decorate said vase with ribbons if desired. Hang up jewelery and admire the prettiness:


vivelyonline.com
 
FASHION/Accessories

:  
(0)

cinnamon sticks miniatures

, 30 2012 . 02:12 +
_ [ + !]


, ,

DECOR/Miniatures

:  
(0)

DIY Zip Tie Chandelier

, 01 2012 . 01:40 +


DIY Zip Tie Chandelier

The Event Stylists HEYLOOK are back with another DIY Project perfect for any occasion, really: a chandelier made from zip ties! These are ridiculously low-cost with a huge design payoff, and can be easily customized to fit the theme of your event. I’d love to see these as a giant art installation for a ceremony!
From HEYLOOKTo give a little industrial edge to this sweet valentine’s table setting, we made a zip tie chandelier inspired by Anthropologie displays.

valentine's day chandelier diy project from heylookPin It
For this project, you’ll need:
- Spraypaint in the colors of your choice
- Zip-ties (we used 200 small ties for this chandelier)
- Clippers and metal wire
Start by making a circle of metal wire. Depending on the thickness of your wire, you’ll need to make it a double or triple round. It needs to be relatively stable so it won’t bend too much when the weight of the zip-ties is added.
Then add some lines of wire to the inside of the circle to give your chandelier some layers. Depending on how full you want your chandelier to look, you will need to add more wire lines. Now, if you’re not going for the industrial edgy look, you can replace the wire circle frame with anything more sleek and pretty. You could use any ready-made wooden, plastic or metal hoops. Spraypaint them if you like. Use a large hoop for the outside and smaller ones for the inside. Then either tie them together with thin metal wiring or make the entire chandelier separately (you’ll end up with different sized, single line chandeliers that you can use either apart or hang them layered into one another).
Now make the zip-tie chains. Tie one loop (just until you hear the first click, so you get a very open loop), then tie the next one into it. Continue in this way. Now again, if you’re going for a symmetrical look, you can make all the outside chains one length and all the inside ones another one (the inside ones should be longer). We variated the chain lengths throughout the entire chandelier.

valentine's day chandelier diy project from heylookPin Itvalentine's day chandelier diy project from heylookPin It
Tie the chains to the frame, then grab a bunch from one side, lay them out flat on a covered surface and spraypaint them in one color. You can spraypaint the chains entirely or go for a white to color gradient look as we did. Hang them up to dry (make sure the painted chains don’t touch the unpainted ones – just tape the unpainted ones together), then repeat with another color.
When you’re done, arrange the chains on the wire frame to get the look you want. Then add a dap of hot glue to each chain to fix it into position on the metal frame. We bent them wire frame a little bit at this point, because the perfect circle frame was well, too “perfect” for the look we wanted. Hang the chandelier with nylon string.
Now, imagine a whole venue full of these. Awesome! You can make rainbow colored chandeliers or keep them all in one color or different shades of one tone.
 
 
LIGHT/Chandelier

:  
(0)

jumbo button wall decore

, 10 2012 . 23:49 +

My mom loved teak wood...anything teak wood. She would buy it all in yard sales and thrift stores. Well, I think she cringed a little from up above when I took a drill and a paint brush to one of her pieces. I had one of her cheese boards tucked away in a closet...within minutes, look how darn cute it turned out. I think she's ok with it, because she was the best seamstress ever and would love this button!


If this was the only cheese board she had, I would have thought twice about it, but it is one of many teak trays...many!


Look...don't you see a button in there?


This is when I think she shed a tear...LOL


If you don't want to drill your cheese board or tray, you can use those office stickers and then paint over them as stencils. Peel away the stickers to reveal the button look.


Just one quick coat of paint, add a little hanger on the back when it dries and you're done.


Cute!


Even cuter when it's threaded.


Wish I could replace the "O" in office with this button...hmmm where's my saw?


Here it is threaded on top of my calendar.


My push pin buttons match the big sister.


Just hot glue buttons on thumb tacks...easy, easy!


Remember my motto...always look twice at something before you pass it up. There are a lot of cheese boards out there waiting to become jumbo buttons.
space
 
DECOR/Frames, wall art, mirror

:  
(0)

silverware wall art

, 10 2012 . 23:54 +

Pottery Barn had these metal silverware silhouettes a while ago. Some of you might remember them? I've never stopped thinking about them - I'm a sucker for kitchen related art. When I realized we needed something to decorate the wall opposite our hutch, I knew I had to try and recreate these on the cheap.

We went to Lowe's and picked up an $8 piece of 1/4" thick 4x8 birch plywood. We had them cut it into four 1x2 boards.

I sketched out a fork, spoon, and knife on plain paper. Using some carbon paper Matt snagged from work, I transferred them onto the boards. If you don't have carbon paper, you could cut out the shapes and trace them like a stencil, or scribble with a pencil on the back of the sketch to make some makeshift carbon paper. Either way should work great!

IMG_0785

IMG_0787

We don't have a jigsaw, but we do have a multisaw attachment for the Dremel, so that's what we used. Matt cut out the shapes of the silverware, and then used a sanding attachment to smooth the edges. I also sanded by hand around the edges of the cut out and the edges of the board for a smooth finish.

IMG_0788

Dremel

I knew I wanted the silhouettes to be black, but I didn't want them to have even a hint of shine. I had some chalkboard paint on hand from another project, so I used that. I love the matte almost metallic finish. It only took one coat and some touch ups.

IMG_0792

And the finished product:

IMG_0802

IMG_0803

Don't mind how off the fork looks in the last picture - the patio door is right next to the table and is casting a weird shadow in the picture.


DECOR/Frames, wall art, mirror

:  
(2)

uses for recycled pizza tool

, 10 2012 . 23:59 +

How about drying supports for craft projects.


Paint something on both side and place it on this support, so it can dry all over at the same time.


Another drying support especially when using glue or Mod Podge. I made these balls with shredded old book pages. Can't let the glue dry right there on the table, because it would glue itself right to the surface. These supports are plastic, so nothing really sticks to the little spikes and the air circulates all around.


How about gluing these to some kind of sewing station and have all your hand sewing thread right there where you are working. You could some how fashion an area for a pincushion, thread and scissor holder, then glue this plastic thingy to that to hold the thread.


This one is a little crazy, but worked great with my iPhone.


Great for watching videos, or having the phone up so that I can see texts or emails coming in without having to tip the phone to see...especially if I'm working at my desk and the phone is flat on the table. This keeps it in plain view.


If you can think of other things to do with these crazy little things that I hate to throw away...let us know in the comments section. There must be something else we can do with them!!
 
Oh wait...I just thought of another one, but sorry no picture...just brain storming. A place card holder for the dinner table or when you are labeling food on a buffet!

USEFUL

:  
(0)

coffee frames

, 24 2012 . 00:39 +
[ + !]

"" .

panno (640x523, 149Kb)

 , , , -:
...
DECOR/Frames, wall art, mirror

:  

 : [2] 1