Learn To Make A Miniature Ladies 1920's Hat with Janine Crocker |
Materials Needed:
 Close-up images of materials needed
Enlarge picture of basic supply requirements
 Close-up images of materials needed
Enlarge picture of additional supply requirements
 1. Cut out a piece of card, approximately 3" x 3/8". If the hat is to fit a doll, you can test the fit by wrapping it loosely around the doll's head and leave an overlap of 3/8", then trim to fit.
Enlarge picture showing size of pattern
 2. Lightly apply tacky glue all over one side of cardstock and stick onto the "wrong" side of lining fabric.
Enlarge picture showing the gluing and binding of fabric to card
 3. Trim around the edges of the fabric.
Enlarge picture showing where to trim
 4. Smear the glue onto the other side and place onto the "wrong" side of the hat fabric, leaving a tiny edge 1/16" along the top and 3/8" to one side.
Enlarge picture to show where to apply glue on the wrong side of fabric
 5. Run a line of glue along the bottom edge to prevent fraying.
Enlarge picture showing where to apply glue
 6. Glue along the top edge and fold the fabric neatly over.
Enlarge picture of how to fold fabric
 7. Press down well.
Enlarge picture showing where to press firmly
 8. Test the size of the crown again and dab glue onto the extra fabric at the end. The other end can be trimmed, if the hat needs to be smaller.
Enlarge picture showing where to apply glue
 9. Gently bend the piece around into a circle holding together firmly for a couple of minutes.
Enlarge picture showing where to bind the two ends
 10. Clamp ends with the peg and set aside to dry.
Enlarge picture showing where to place clothes peg along the crown
 11. While the band is drying, take a piece of 1½" square piece of cardstock.
Enlarge picture to show size of cardstock needed
 12. Join the wrong sides of the lining fabric and the hat fabric onto each side of the card.
Enlarge picture showing the joining of the lining and fabric
 13. By this time the crown piece should be dry. Remove the clamp/peg and glue along the raw edge in a thin line.
Enlarge picture showing where to apply glue on the crown
 14. Now gently push the crown into an oval shape. The seam can be at the back, front or side in the place where you will be putting the most decoration to hide it so now is the time to decide where you want it.
Stick the crown down onto the lining - you can weigh it down with a small book. Allow to dry completely.
Enlarge picture showing how to make crown tip
 15. Once the hat is dry, cut carefully around the edge as closely as you can.
Enlarge picture showing how to trim
 16. You now have a basic hat shape and you can start the really fun bit - the decorating!
Enlarge picture to showing hat ready for decorating
 17. Inside view of basic hat shape.
Enlarge picture showing inside view of hat
 18. Use the narrow trim to cover the tiny join at the top of the crown. Rummage through your selection of bits and decide what you will use to decorate your hat. For a 1920's hat jewelry findings come in especially useful, as do feathers and unusual braids
Enlarge picture showing how to trim hat
 19. Choose trim for the lower part of the crown.
Enlarge picture showing option to trim hat
 20. Add beads, feathers, etc. to decorate; use your peg to clamp where needed. Allow all pieces to dry thoroughly.
Enlarge picture showing embellishment options
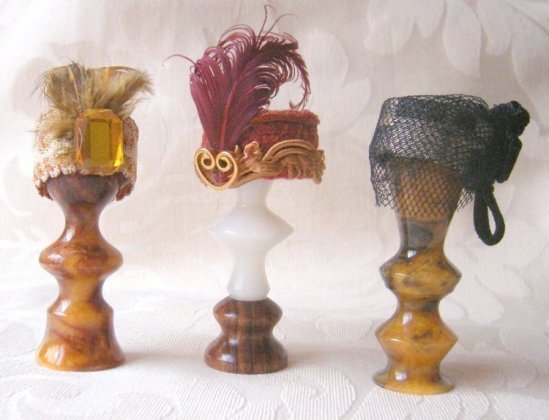
 21. Completed and decorated hat. With the techniques you have just learned, you can make any style hat you desire. Altering the shape just a little will greatly change the style to fit your next hat, so play and experiment.
Enlarge picture showing completed hat
| Рубрики: | КУКЛЫ - ОФОРМЛЕНИЕ/Одежда КУКОЛЬНЫЙ ДОМИК/Разное КУКЛЫ - ОФОРМЛЕНИЕ/Одежда вязаная |
| Комментировать | « Пред. запись — К дневнику — След. запись » | Страницы: [1] [Новые] |


