���������� ������ ��� ����� ����������� ������� �� �����. ��� ������ ����������� ��������� ����� ...
��� ��������� - (0)����� �� �����, ������. ����, �������� https://www.faceb...
��� ��������� - (0)�.�. ������ "���������� ����" ����� ������ �21 ���������� ����� �����...
��� ��������� - (0)��. �������� � ������� ������� �����-����. ��������� ��� ������� ��������� � ������� ����...
��� ��������� - (0)������� �� �����. ������� ��� ����������� ������� �� �������� ������ ���������� ���� ���������...
��� ��������� |

|
��������� �������� �� ������� ����� �� 50 ���, �������� ����� ������ |
|
��� ��������� |
|
��� ��������� |
|
��� ��������� |
|
��� ��������� |
|
��� ��������� |
|
��� ��������� |
|
��� ��������� |


|
��� ��������� |


|
��� ��������� |

��� ����� ������� � ������ ������ �������� ���� ����������� �����.
|
��� ��������� |
�� ����� ����� �� �������, ��� ������� ���� ���� ������� � �������, ��� � ������� �� �������� ��������� ��������.
��� ���� ������� �������, ������� ����� ����� ������� �� ������� �������. �� � ������ ������������ �� ���� �� ���� ����� �� ������.
������������, ��� ����� �� ������ - ��� �������.

|
��� ��������� |

|
��� ��������� |

������� �������� ��������, ������� ������ ������� ����� ����������.
|
��� ��������� |
|
��� ��������� |
|
��� ��������� |
(� ����������� �� �������)
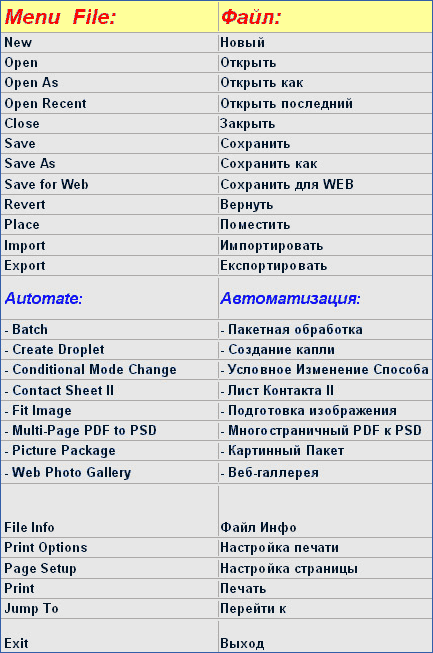
������� ���� ���������:
File/����
|
��� ��������� |
|
��� ��������� |
|
��� ��������� |

|


 ������


 �������� ������