(� ��� 849 ������� �� ����� ������������ ����� �����)
������ ����� ������������ ↓
��������� ����� �������� ����� �������� ���� �������������� ������ �������� ����� ����������� ���� ������� ������� ������� ������� ������� ������� ������� ������� �������� ������� �������� ������� �������� ������� ���� �������� ��������� ������� ������ ������� ������ ����� �� ������ ������� ��������� ������� ������������� ������ ���� ������-����� ������� ������ ������� �������� ���� �������� �� ������ ��������� �������� ���� ��������� ������ ��������� ������ ����� ����� ���������� ������� ����� ����� �������� �������� ��� ��������� ���� ������� ����������� ������� ���� ���� ������� �����
��������� �������� ���������� |
������� |

In this tutorial you will learn step by step how to make a pendant with a bezel made from wire. I recommend starting with a stone that is round or oval if you are just starting. I use 28 gauge wire in this tutorial, but if you are new to wire working you may want to use 26 gauge, as 28 gauge can break easily if too much tension is put on it.
Tools and Materials:
16 gauge copper wire – length depends on the size of the stone you are using The stone pictured is a little over an inch in height. Just make sure you have enough to make the bail later on.
28 or 26 gauge copper wire – for the stone I am wrapping I start with about 36″ of wire. Add more if you are using a larger cabochon.
Cabochon
Steel Bench Block
Planishing or Chasing Hammer
Wire Cutters
Round Nose Pliers
Chain Nose Pliers
A small jump ring mandrel or a 12 gauge piece of wire
Jeweler’s File
Liver of Sulfur (optional)

Step 1: Take your length of 16 gauge wire and begin to shape it around your cabochon. Using the back of your cabochon as a guide, make sure the wire frame is slightly smaller that the stone. This will keep the stone from coming out through the back once finished.

Step 2: Pick up your chain nose pliers and make a bend in the frame at the top on both sides. This will later be made into the bail of your pendant.

Step 3: Placing the pendant frame on your steel bench block, hammer it slightly all around and on the extensions that will become the bail. This is simply to harden the wire and give it a more finished look.

Step 4: Now take your length of 28 or 26 gauge wire and wrap it three times around the top of the frame to secure it. Now you want to grab your mandrel or 12 gauge piece of wire and wrap the wire over it to form a loop.

Step 5: Take the wire and weave it through the front of the frame. Once you have done this, take the end of the wire and and bring it back through your loop.

Step 6: Pull the wire all the way through the first loop, pulling it snug. Never put too much tension on the wire, as these smaller gauge wires will break quite easily. Remove the mandrel or pice of 12 gauge wire from the first loop and place it along side of it to start your next loop.

Step 7: Repeat the process of pulling the wire through the front of the frame to the back and weaving back through the loop.

Step 8: Finish weaving your loops around the entire frame. You should end up with something similar to the first photo. Now grab your cabochon and place it on your frame. You are going to use your thumb and index finger to hold it securely on place while you start the next step of your bezel.

Step 9: Now you’re ready to get started on the bezel that will hold your cabochon in place. Taking the tail end of your 26 or 28 gauge wire, weave it through the first loop you made on the frame from BACK to FRONT. Alway bring the wire that is being woven from the back on over the top of the wire that is being fed from the front.

Step 10: Pull as lightly as you can on the wire once it’s fed all the way through from the back to the left and then to the right.

Step 11: Continue the process of weaving the end of the wire through the neck loop on the frame from back to front, making sure the wire being fed from the back is over top of the wire being fed from the front.

Step 12: Continue this weave around the entire frame.

Step 13: Once you’ve made you second row of loops, you are going to repeat the process once more, but this time feed the wire through the second row of loops. You still want to bring the wire from the front to the back and keep the wire being fed from the back over top of the wire being fed from the front.

Step 14: When you have finished your third row of loops, it’s time to finish off the bezel. The way I do this is by taking the end of my wire and instead of feeding it through the back of the next loop, I go up one row and weave it through the first loop in the previous row. Then again through the first row of loops until it is back at the frame.

Step 15: Weave the wire three times around the frame of your pendant and trim off any excess wire with your wire cutters.

Step 16: Take your wire cutters and trim off the ends of your “bail” to about 2″ (I always have extra wire!). Use your jewelers file to smooth the ends of the wire.

Step 17: Using loops forming pliers or a jump ring mandrel (I use the 6 mm setting for this pendant), form the loops for your bail, making sure they go from front to back.

Step 18: Take your round nose pliers and make an upward facing loop on the ends of the wire.

Step 19: Use your fingers to pinch the ends of the bail against the back of the pendant.

Step 20: If you’d like your bail to be a “V” shape, simply shape it with your finger until you are happy with it. If you would like the copper to be a darker brown color, you may darken it using liver of sulfur like in the title photo. I hope this tutorial was helpful!
|
�����: ��������� �������� |
��������� �������� � ������� �������. |
������� |
����, ������� �� �������� �������� ������� � ������� �������. ��� ����� ��� �����������:
������� ������������ ��� ���������� ���� �������� 1 �� (�������).
�������� ��� ���������� ������� �������� �����.
�������
������� �������� ����.
��������� ���������� �������.
��� ��������� ��������.
���������.
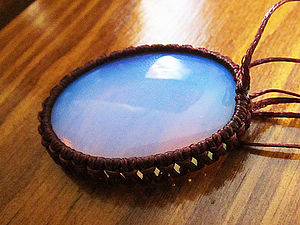
������ ����� ����� ������������ ������� �����. � ������ �� ������� ����� ����������� ����� ����������� �����, � ������� ��������� ������� ��� ����������� �����. ��������, ���� ������ �������, ��� ���, �������� ������� ����. ��, ��������� � ���� ������ ���� �����, �� � ��� � ��������.
���� ����� �� ���������� ����������� � ��� ���� ������� — ��� ������ �������. �� ���� ��������� ������� ����� ���������� � �����������, ���� ������������ �������, ���� ��� ��������� ���������� ������, �� ��������� � �� ������ �� ����� ������. � ��������� �� ���� ������ �������, � ����������� �������� ������ �������� �� ������ ������, � � ��������� �������� ��������� ������� �� ������� ����� � ������� �� ������. ����������� �� ���� ����� ��������. � ����� ������, �� ���� ������ ��������� �������� ������� � ���������� ��� ��� ������.
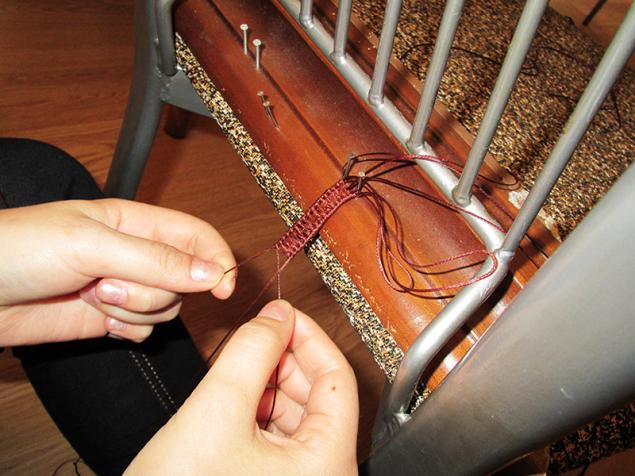
����, ����� �������, ��� ��������� � ����������� ������, ����������! �� ����� �������, �������� 1 �� �� ����, ������� �������� �� ���������� �������� �� 3-4 �� ����, ��� ������� ��������. ����� �������� ��� ���� ����� �������� ������ ������ � ����������� �� � ��������� ����� �������, ����� �� ��������� �������� ���� ����� �� ���������. ��� ����� ���� �������� ���� ������ ������, ����� ��������� ������� ����� (�� ����� 70 ��), ����� ������� ����� �� �������� ����� ���� � �������� ������� ���� ������ ������� (��������) �����.
����� �������� ����� ����� ������ ������, ���� ��� �� ������ ��������. ������ ���� ������ ��������� ������, �� �������������, ���� �� ��� ��������.
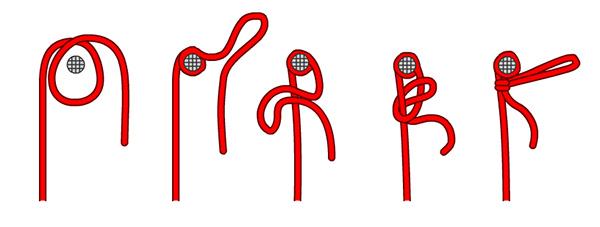
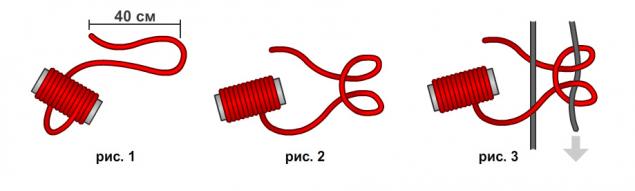
������� �� ������ �� ������ ������, �� ������� ��� ����������� ������� �����, ����� �������� �� ����� �������� ������. ���������� �� ������� ���������� ������� �����, ������� ��� ���, ���� ������� ��� ����� 40 �� (��� 1), ������� ����� ������� (��� 2) � ����� ���������� ������ ��� �������������� �������� ������ �����, ���, ��� �������� �� ������� (��� 3).
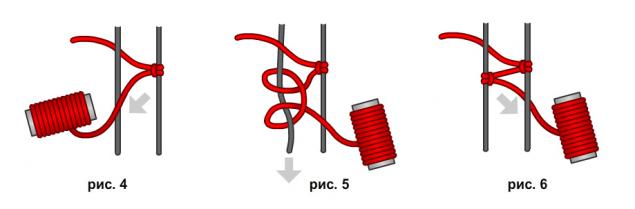
������ ������ ������������ ���� ������ �����, ���� ��� ���� ��������, � ����� ������� ���������� ������� ������� ��������, ����� — ������, ���� ��������� ���������� ������ (��� 4). �� ������ ���� ������ �������, ���� �� ������� � ����, �� �������� ���������, ���� ������ ��� �������� � ��������. ����� ��������� ����������� � ����� �����, �������� �������� � ���������� ������� (��� 5, 6).
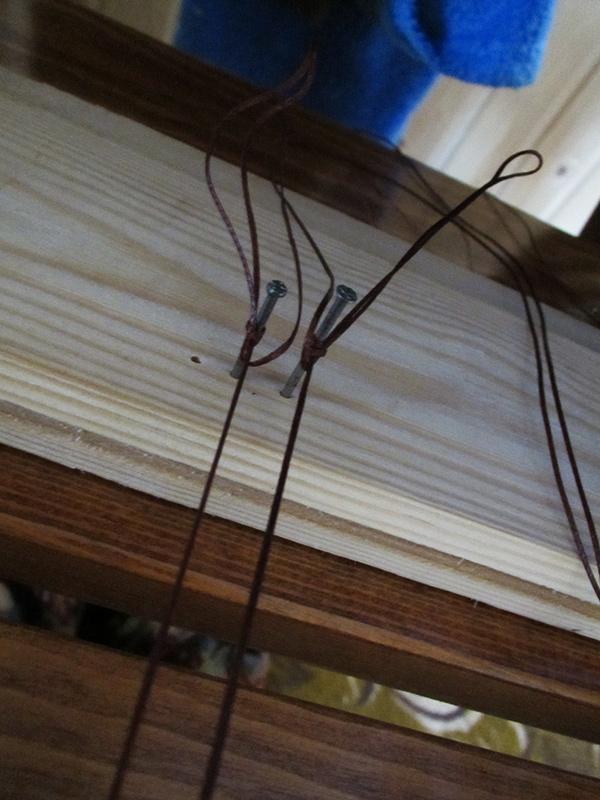
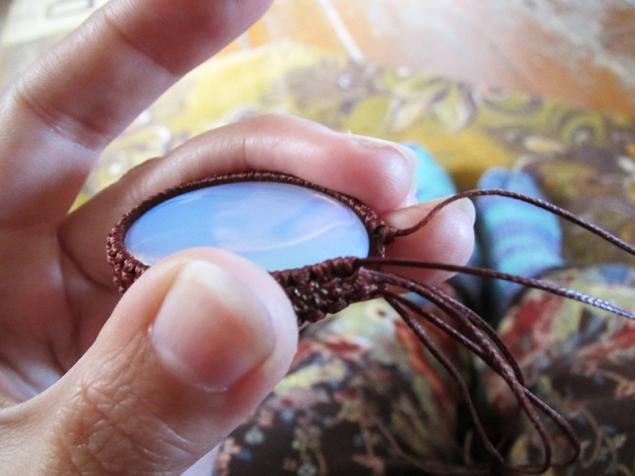
���� ����� ����� ������������� ������ ���� ���������� ���������, �� ���������, ������ �������� ������ ���� � �������, ����� ���� �� ������ ���� ������� ����������. ����� ������� ������ �������, ������ ����� ���������� ��������. ����� ������� �� ����� �������� — ��������� ���������� ���������� ����� ������������� ������ � ������ ���������� �����, �� �� �������� ��������� ����. � ���� ���� ���������� ��������� ��������. � ���� � ������ ��� ���������� ������� �����-����� ���������� ���� � ��������� � 4 �������.

����� ������� ������, ���������� �������� �� �������� ����� �����, ����������� � ��������� � ���� �����������. ���� �� ������� ��������, ������� ����� ����� 40 ��.

������ ����� ������������ ����: ����������� ������� ����� �������� ��������, ��������� ��, ���� ��� ��������� ������, ������ �������� ������� � ������� ������� ����� ���� ������� � ����� �����. ���� ���� ������� ���������� ������� �������, ����� ��������� ��������� ������� �����, ���� ����� ������� �� ����� � ������ ����������� � ��������� ���������. ��� �����.
|
�����: ��������� �������� ������� ������� ��������� �������� � ������� ������� |
| ��������: | [1] |


